
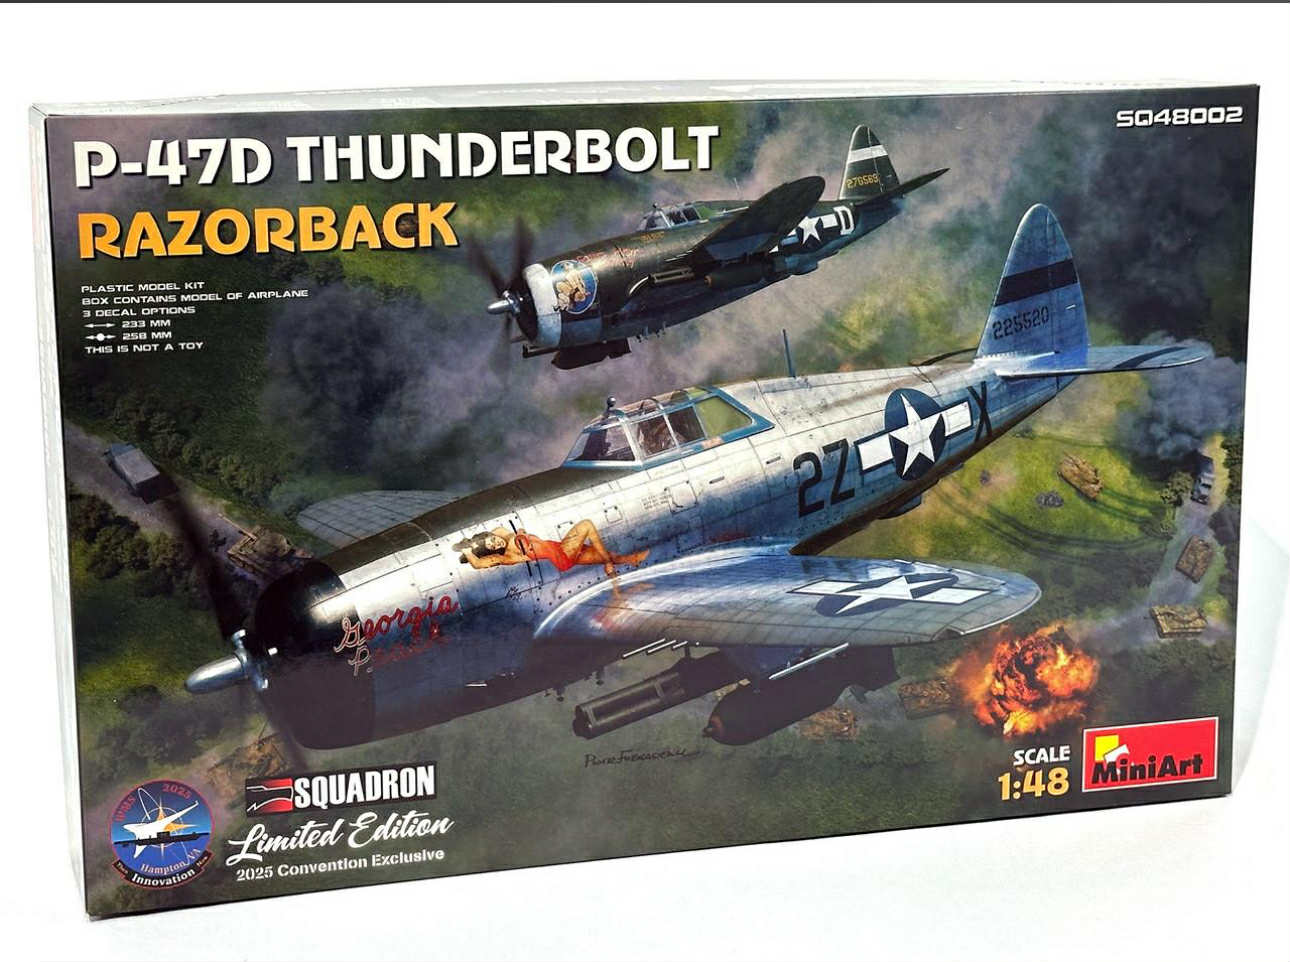
P-47D Thunderbolt Razorback
Squadron, in partnership with MiniArt, released this boxing as a Limited Edition at the IPMS/USA Nationals in Hampton, VA. Utilizing the newly released P-47D-11 Razorback kit with new decals, Squadron has created a rather unique model. Having just built a Tamiya P-47D Razorback I was looking forward to building this kit to see how it stacked up. Packaged in a sturdy cardboard box with a colorful box art with two unique 405 Fighter Group aircraft, one in NMF and the other in OD and Neutral Grey. Let’s see what is in the box because that is what really matters.
First off, the instructions are printed in an 8.5 x11 booklet with full color on the cover pages and black and white drawings for the constructions. The simple-to-understand instructions are on 14 pages in 34+ stages. The full color cover has full color callouts for the underwing items, including the decal placement. The inside of the back cover has the three aircraft marking options. Inside that are two pages are parts breakdown/inventory. One page is for stencil placement, which is quite easy to understand. One thing that is missing is any color callouts in the actual instructions, the armament, and the actual aircraft callout colors, but the build process itself does not, so you’ll have to do some research for colors.
There are 20 sprues of various sizes in light grey plastic. The plastic has recessed rivets and panel lines. The plastic is slightly soft, but the detail is phenomenal. Ten of the sprues are related to underwing accessories, including bombs, drop tanks, and bazooka tubes. There is a single sprue of clear plastic that is beautifully clear. There are two decal sheets, one sheet is complete stencils, and the other is the aircraft markings. Both sheets are printed by Cartograf, so you know they are the world’s best decals. They are thin and in perfect register. One thing that is unique about the decals is the breakdown of the stencils. They are separated on the sheet by placement, i.e. Upper Wing, Lower Wing, Right Fuselage, Left Fuselage, and Drop tanks/Bombs. This allows the modeler to just do one area at a time, should they decide but it aids in finding the correct decals quickly. I wish other model companies followed this example.
Now that we know what is included, let’s get building. As I mentioned earlier, the plastic is soft so be careful with the small and fragile parts.
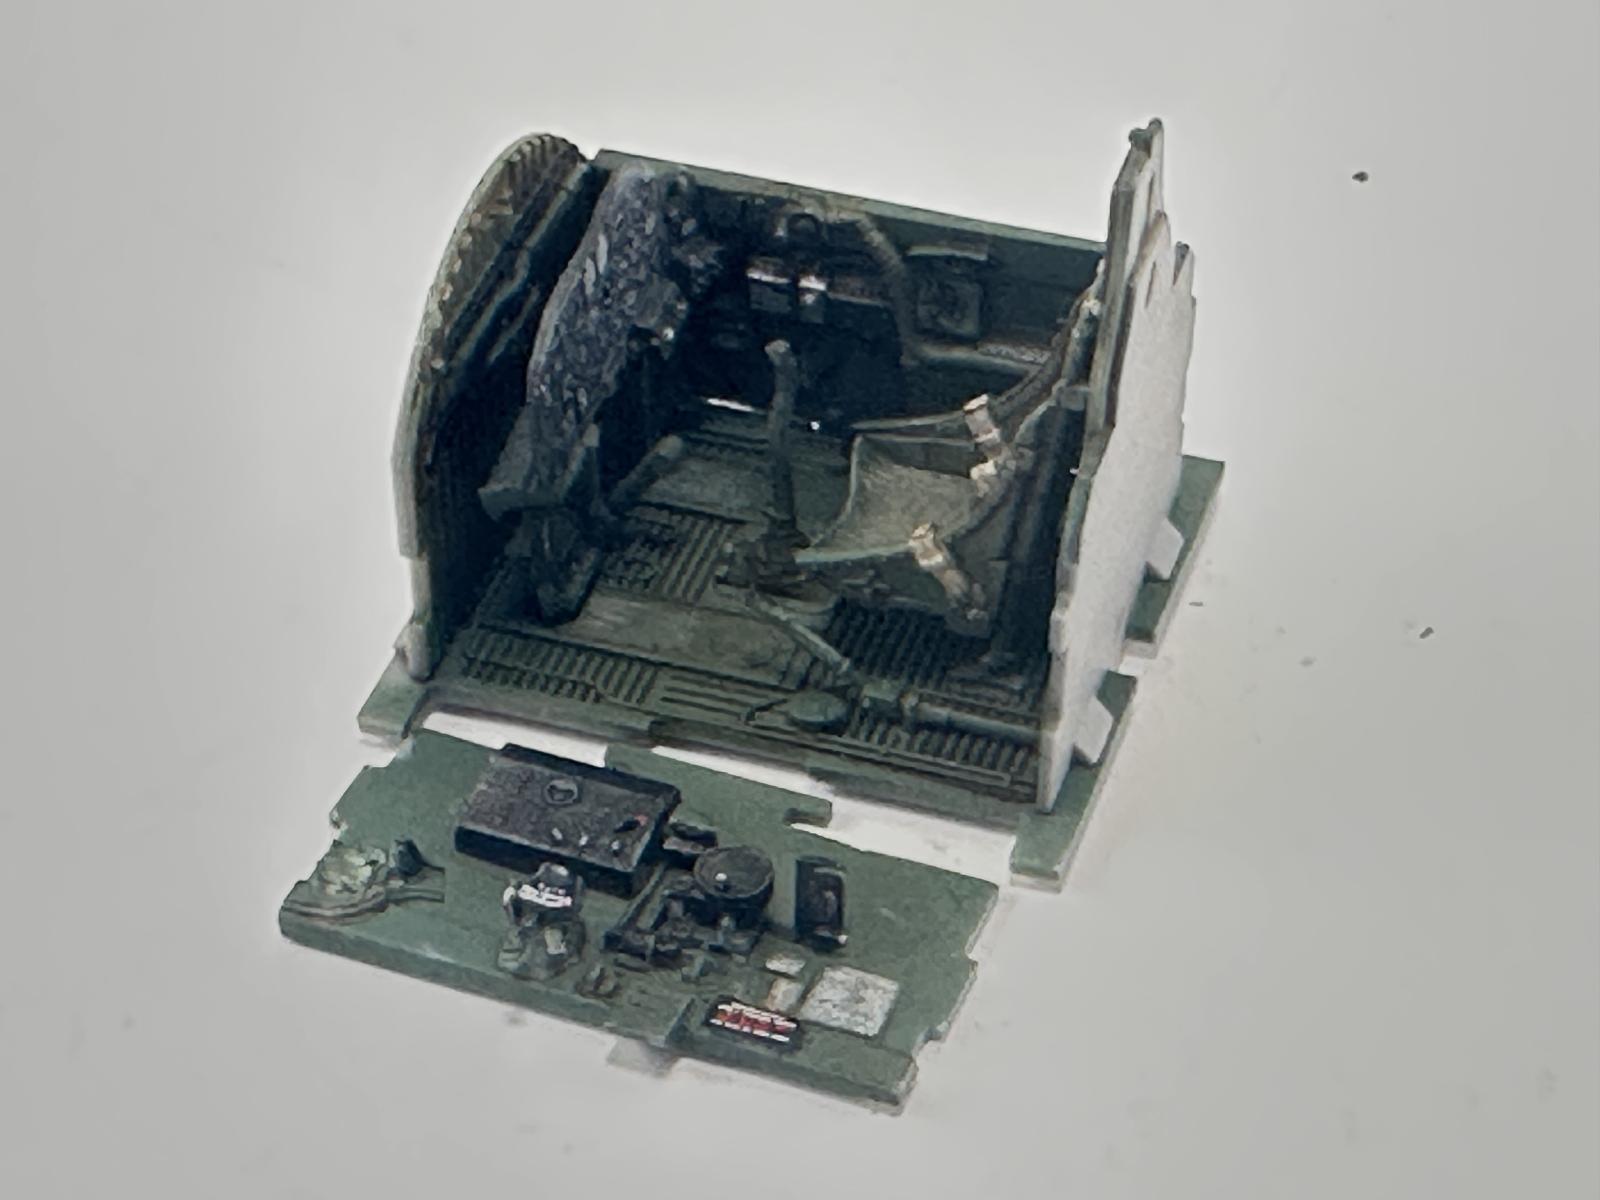
Building starts in the cockpit. This kit has the best out-of-the-box cockpit I’ve ever seen. Even the seatbelts are molded on with a separate piece for the lap belts. A RECOMMENDATION: the cockpit floors and sidewalls will fit perfectly if you use a knife and square off the female part of the keys. This made all the difference in the world. The tolerances are so close that it makes a huge difference. Everything fit perfectly when you do this. There are a few TINY pieces in the cockpit, which are beautifully rendered and just need care in removing them from the sprues and cleaning up. There are decals to add to the interior, so don’t forget them. The instrument panel has three different options on how to do it. I used the full instrument panel decal over the kit part, and it settled perfectly with Solvaset. A coat of flat blended it into the interior. A drop of Micro Krystal Kleer in the gauges restores the luster. You can paint the instrument panel and use just the pre-positioned decals to add to the panel or you can use individual instruments.
I painted my interior with MRP Dull Dark Green and details in black. Particular attention must be paid to the seat supports (Part Cd16). You may want to leave the seat out until much later. I broke mine at least twice.
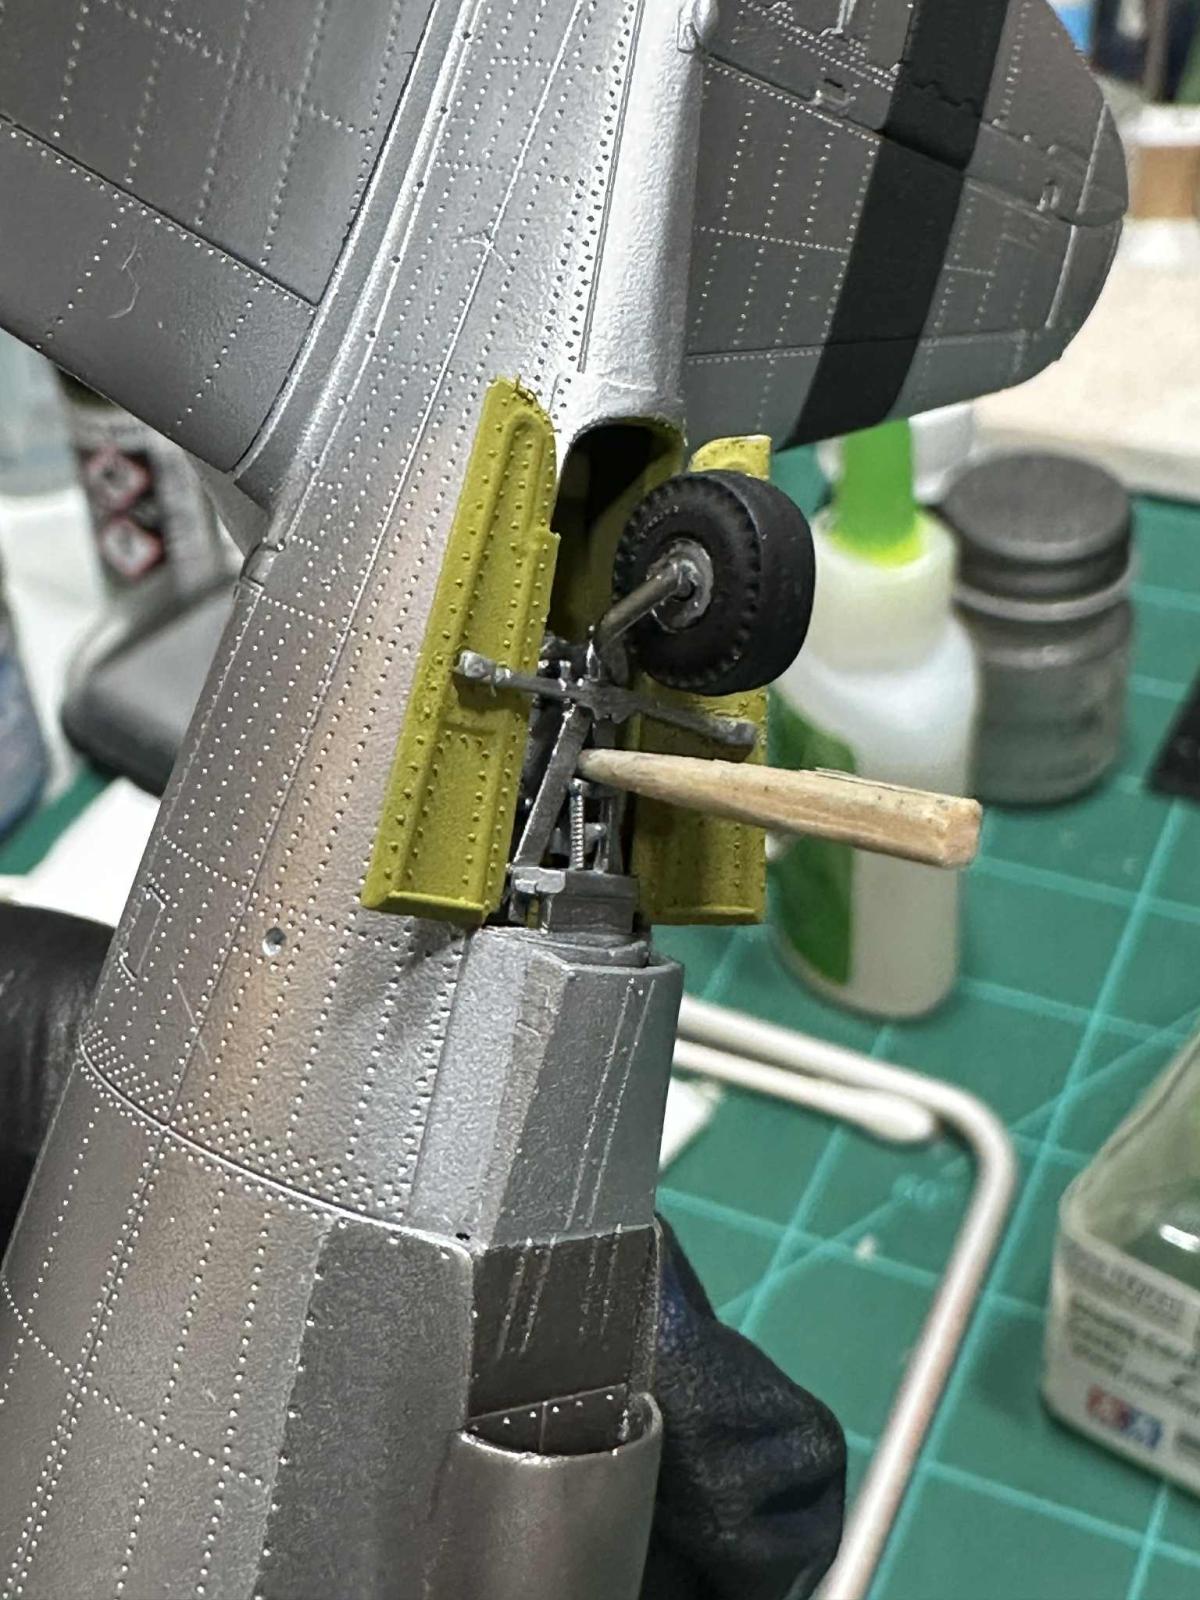
After that the instructions have you build up the tail wheel assembly. There are two options, one with the exposed mechanism and one with the cover on. The one with the cover allows you to position the tail wheel strut as you’d like. I liked the look of the exposed mechanism, so I went with that. Again, the gear door actuator arms and the strut are very fragile. You are also given the option of having a round or flattened/bulged tail wheel. I went with the bulged one because I wanted to have a heavy bomb load on my aircraft.
After finishing up the cockpit, it is time to add the centerline drop tank mount and waste gates, as well as the turbo supercharger exit and tail wheel well. Paint them now while you have access. Bringing the fuselage together showed something else that was a little annoying but easily rectified. The female part of the alignment holes benefits from being slightly drilled out to make them ever so slightly wider. I can’t remember the drill bit I used, but a quick turn and it was done. Once done, the fuselage fit together perfectly. I glued mine in sections. This allowed me to align everything. I used Tamiya Quick Setting Extra Thin Cement, the light green top one, not the dark green top. This glue sets up quickly and doesn’t overly ‘melt’ the plastic, plus it sets up in seconds. This is useful on a NMF airplane. I recommend leaving off the antenna mast on the spine. It just sticks out there begging to be broken. It can be added in the final sequence.
Step 8 is an important step. It adds the cockpit glare shield and the gunsight. Go slow. When adding the upper fuselage piece to the fuselage, DON’T add the firewall first. This is where the soft plastic is your friend. Align one side of the panel to the fuselage half and glue it in place with the Light Green Tamiya Cement. I’ll be using this from here on out on this model. Let it dry in place. Now lightly squeeze the fuselage side NOT glued and hold the part in place at the top until aligned, then glue it in place as before. If you do it properly, everything will fit perfectly with NO filler needed and a perfect panel lines. Once glued in place then you can add the firewall. It will fit perfectly as well if you attach that upper panel properly. I always add a small bead of super glue around the fuselage and wing leading edges and clean it up. That is just my technique, regardless, the fit is perfect. Any detail lost is restored then. Really, the fit was perfect out of the box.
Now onto the engine. Here is another recommendation. Part Gc4 is a support ring around the front of the engine for the cowling. There is a tab on the bottom that will aid in putting the engine in later in the assembly sequence. I recommend that you remove most of it but not all of it. There is also some detail around the outside of the part. Sand them off. It will look great with the engine cowlings removed, but closed up they will create issues. They are not seen on the finished model with the cowling panels closed up. The rest of the engine builds up beautifully. You will have to decide which gear case and magnetos you’ll need on the front. I went with the one designated for my subject. When you add it make sure it is tight against the mount (Part A20).
Building up the ductwork is interesting, so go slowly. Utilize Part A8 to make sure you have the proper alignment of the parts. Also, on part D24, make sure you minimize the mounting tab. I think you could leave that part out completely if you wanted, as it is hidden behind the engine and invisible. The exhaust gates on the fuselage sides are either opened or closed. On my aircraft the instructions seem to indicate that my subject aircraft was closed, but I opted to use the open style.
Now came adding the engine cowlings. I RECOMMEND you add the top part first, then the left and right panels, followed by the bottom. You may have to hold the parts together slightly until the glue sets up, but if you do it this way, there is no gaps anywhere. Don’t forget to paint the inside of the cowlings BEFORE assembly. You can choose either open or closed cowl flaps. I went with the open ones. The caution here is to be careful when cleaning up the part. There is a recessed area on the upper portions of Part B50 and B51 that needs to be there, so don’t remove them. The fit is precise.
Adding part Fc4 own the fuselage is heart-stopping. It is possible to lose the piece inside the fuselage if you’re not careful. The fit is perfect when done, but I held my breath while adding it. The instructions recommend adding the tail wheel assembly, but I recommend you don’t add it now, as it would just get in the way and probably break. Also, it would be a pain to paint.
Moving on to the wings, the assembly looks intimidating, but it really isn’t all that hard. Build it up as sh. and keep everything squared. If it fits in the upper wing, it will work just fine. RECOMMENDATION- leave part Cd10, the inner gear door actuator, until much later. I didn’t on one and immediately broke it. It can easily be added in a later sequence. One thing I didn’t like about the kit was having to add the guns prior to assembling the wings. I quickly broke off or bent some. I RECOMMEND you remove the plastic guns and then replace them with aluminum tubing, which is what I ended up having to do. Leave off the pitot tube as well. Same reason. If you can find the Master Model metal guns and pitot tube, that would be the best solution.
Adding the inserts into the lower wing panels was not a big deal. The fit was good with just a little bit of Mr. Surfacer 500 added around the edges and wiped off with MR. Leveling Thinner for a perfect fit and match to the surrounding detail. Don’t forget to open up the holes for the pylons and rocket tubes if you are going to use them. At least open up the pylon holes now. Paint the interior zinc chromate yellow, I used Tamiya, while you have access to the entire wheel well. When adding the upper wing, ensure that the front portion, which is very flexible is aligned with the wheel well supports before glueing into place. I did leave off the wingtip lights until final assembly. There did seem to be a slightly larger gap to the flaps and ailerons than I liked but I went with what I had and in the paint stage decided that it wasn’t too objectionable.
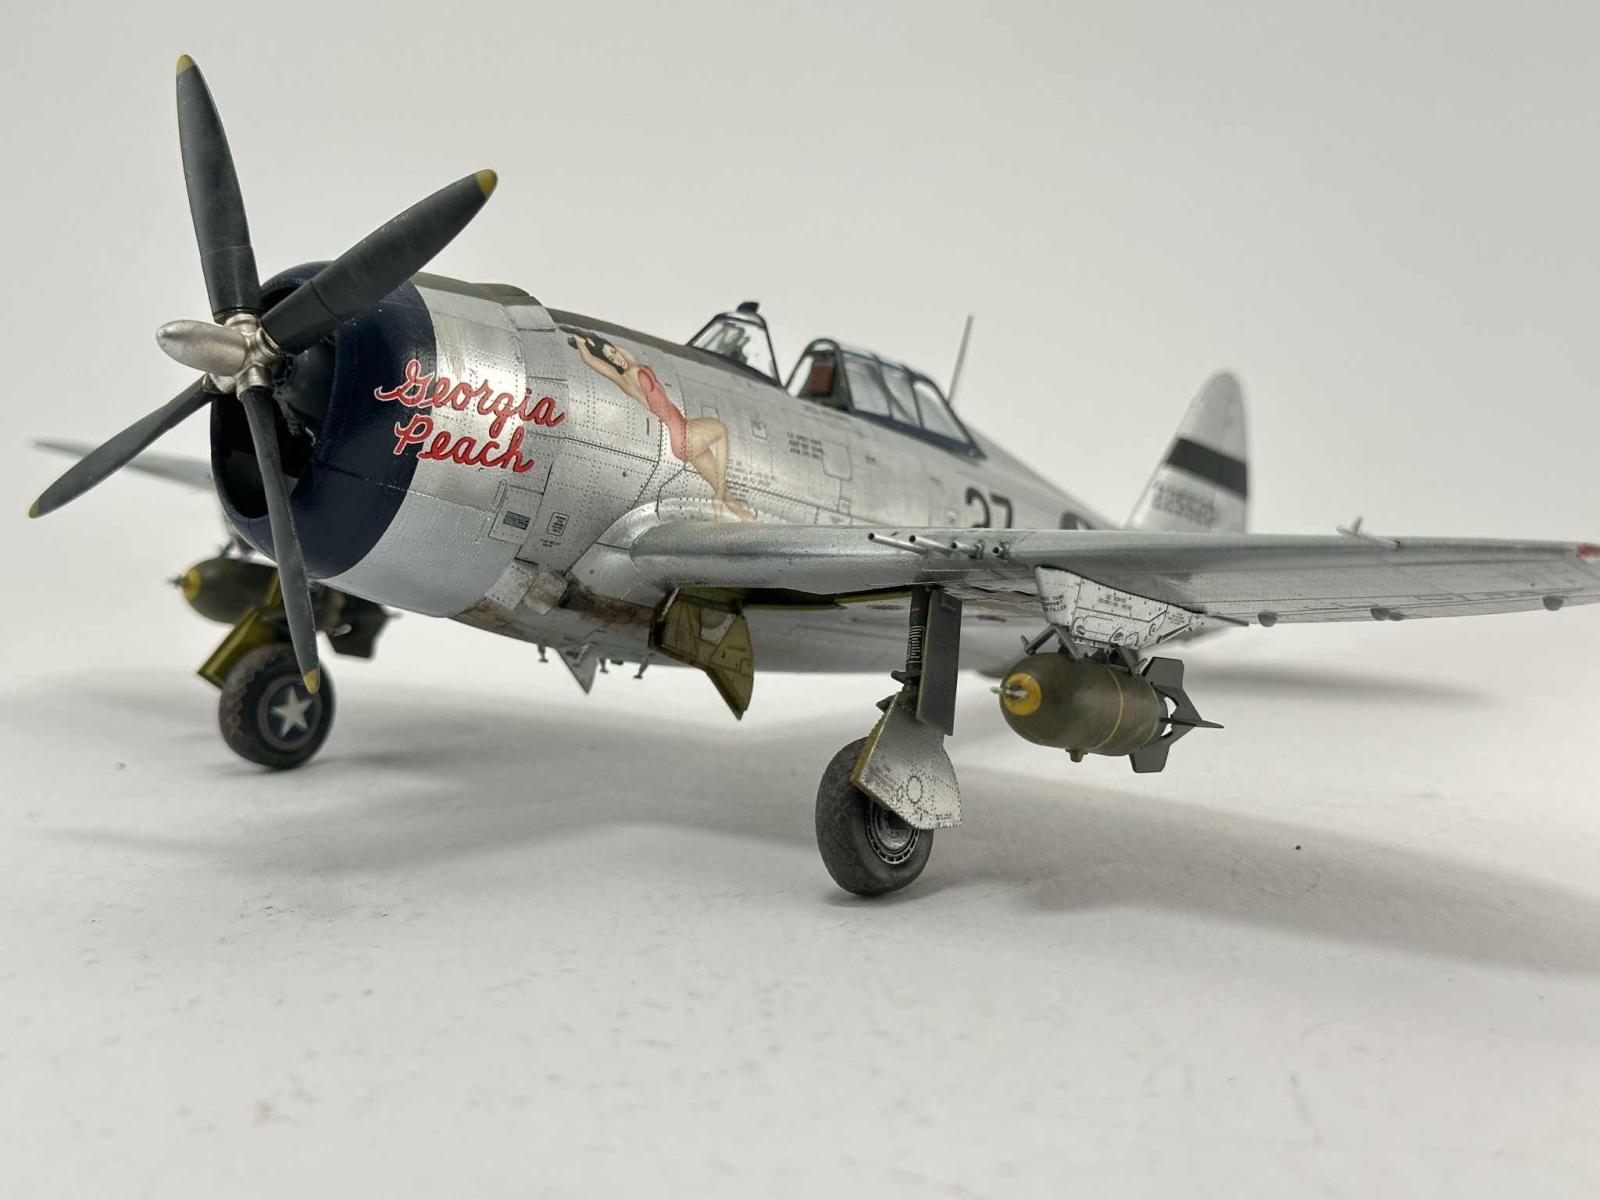
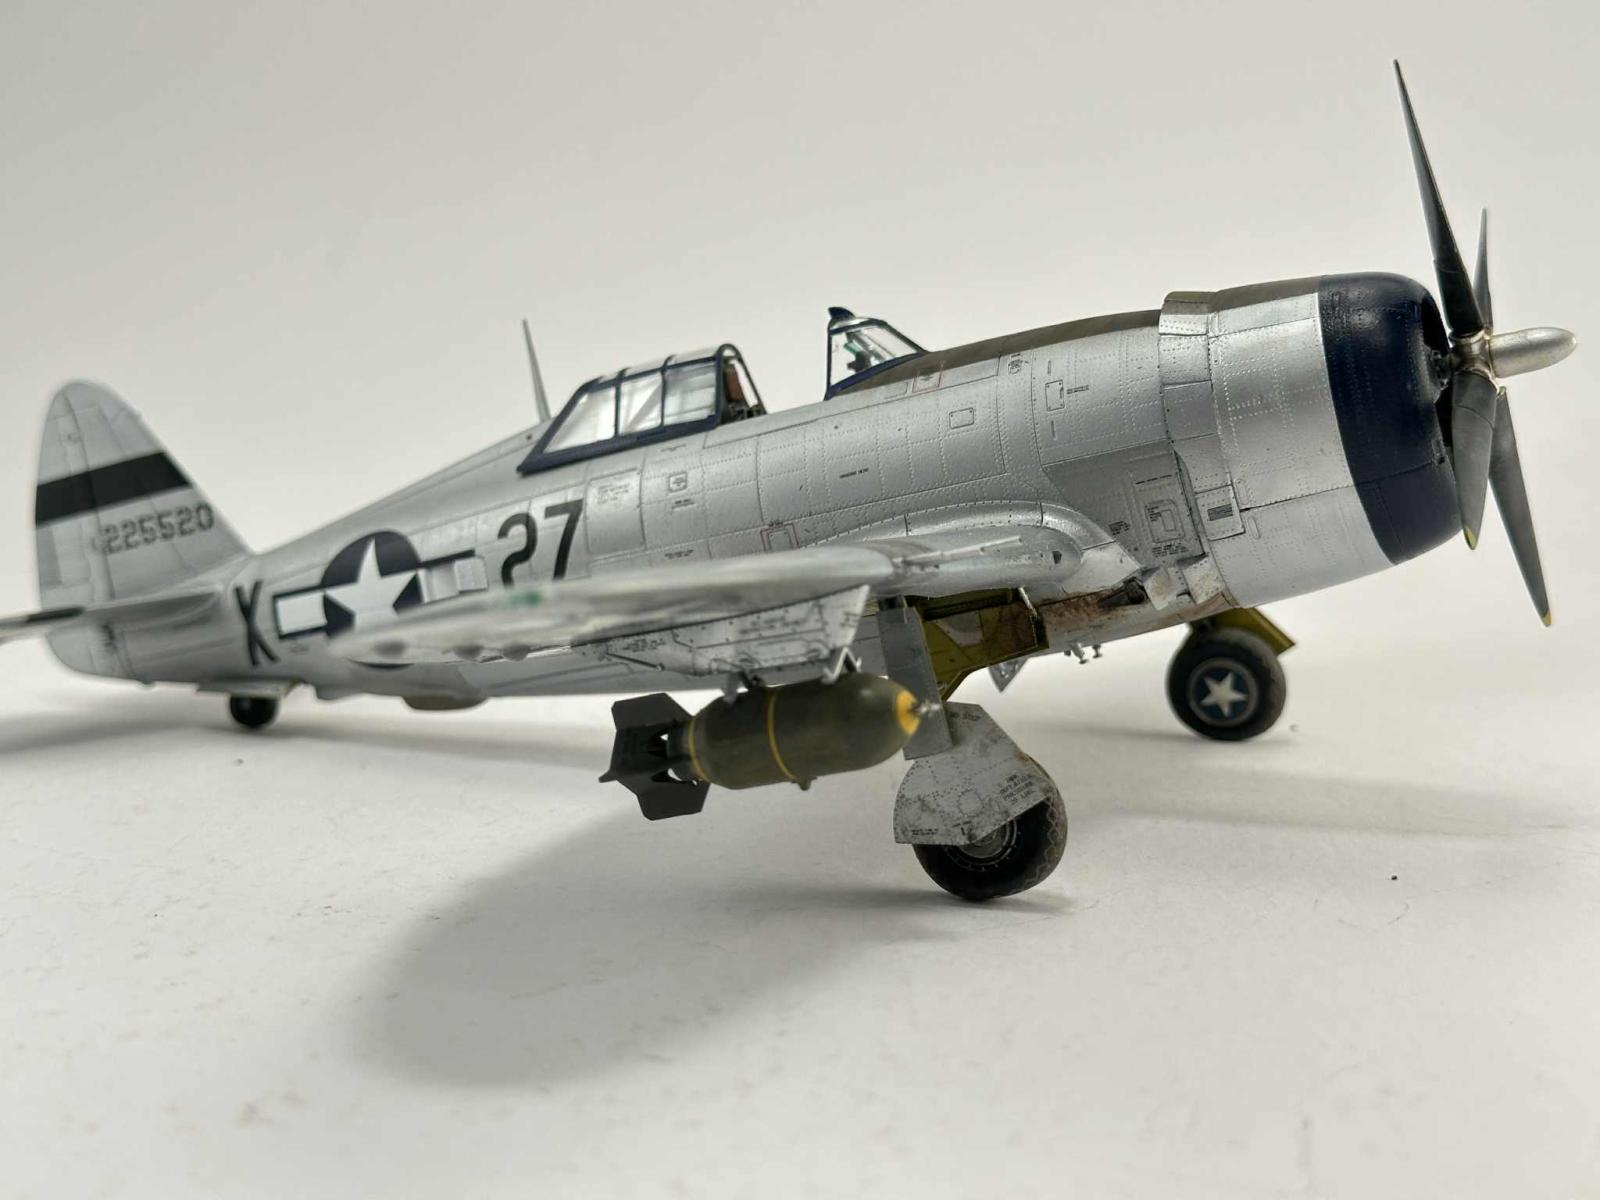
You get a choice of wheels, either bulged or perfectly round. I went with the bulge. They are bulged but not necessarily flat on the bottom. I could have flattened them with a file for a more weighted look, but decided against it. Like the wheels, there are two choices of struts, one fully extended and one fully compressed under a full load with minimal oleo showing. Since I was going to be adding two 1,000 lb. bombs to mine, I went for the compressed strut.
Adding the wings requires some work. First off clean up the parts that fit into the fuselage. One place where I did need to use some modeling skills was the recessed portion on the fuselage where the flaps sit. If you don’t make a slight recess there, the flap won’t fit. It was simple to do with a scraping tool/chisel. Once that was done, I attached the top of the wing to the fuselage and allowed it to dry. They did the same to the bottom and had no gap. I did use some Mr. Surfacer 500 to even out the seam, but it was easy.
The tail surfaces fit fine after some slight sanding of the hinges and openings in the rudder and elevators. Again, there was a little gap but nothing I couldn’t live with. I added the front windscreen now and added masking to it. The entire model was then primed with Alclad Grey Primer. Any areas that needed addressing were taken care of and reprimed. The rivets just cried out for a Natural Metal Finish. The entire model was given a coat of Alclad Aluminum. Then particular panels were masked off and painted Alclad White Aluminum, Dark Aluminum, Duraluminum, and AK Aluminum, and White Aluminum. The waste gate on the belly was painted Model Master Burnt Metal. Once dried, the black stripes were masked off and painted MRP NATO Black.
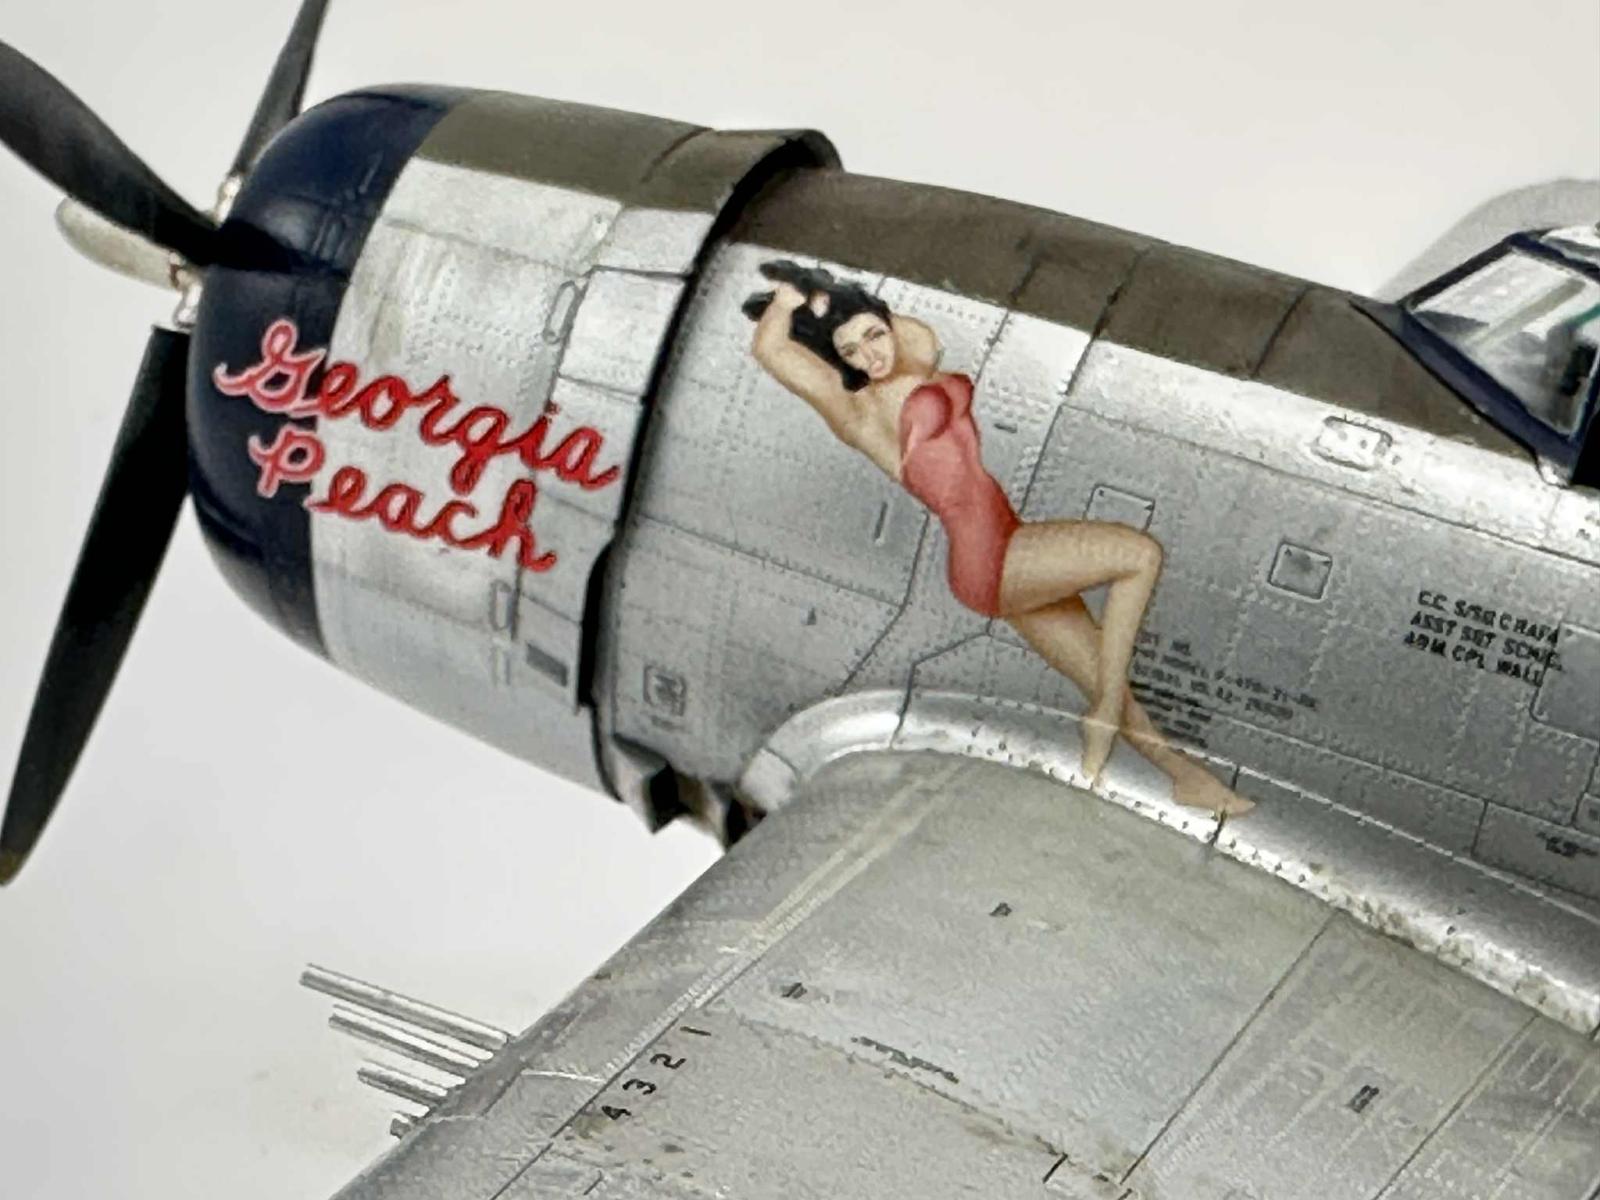
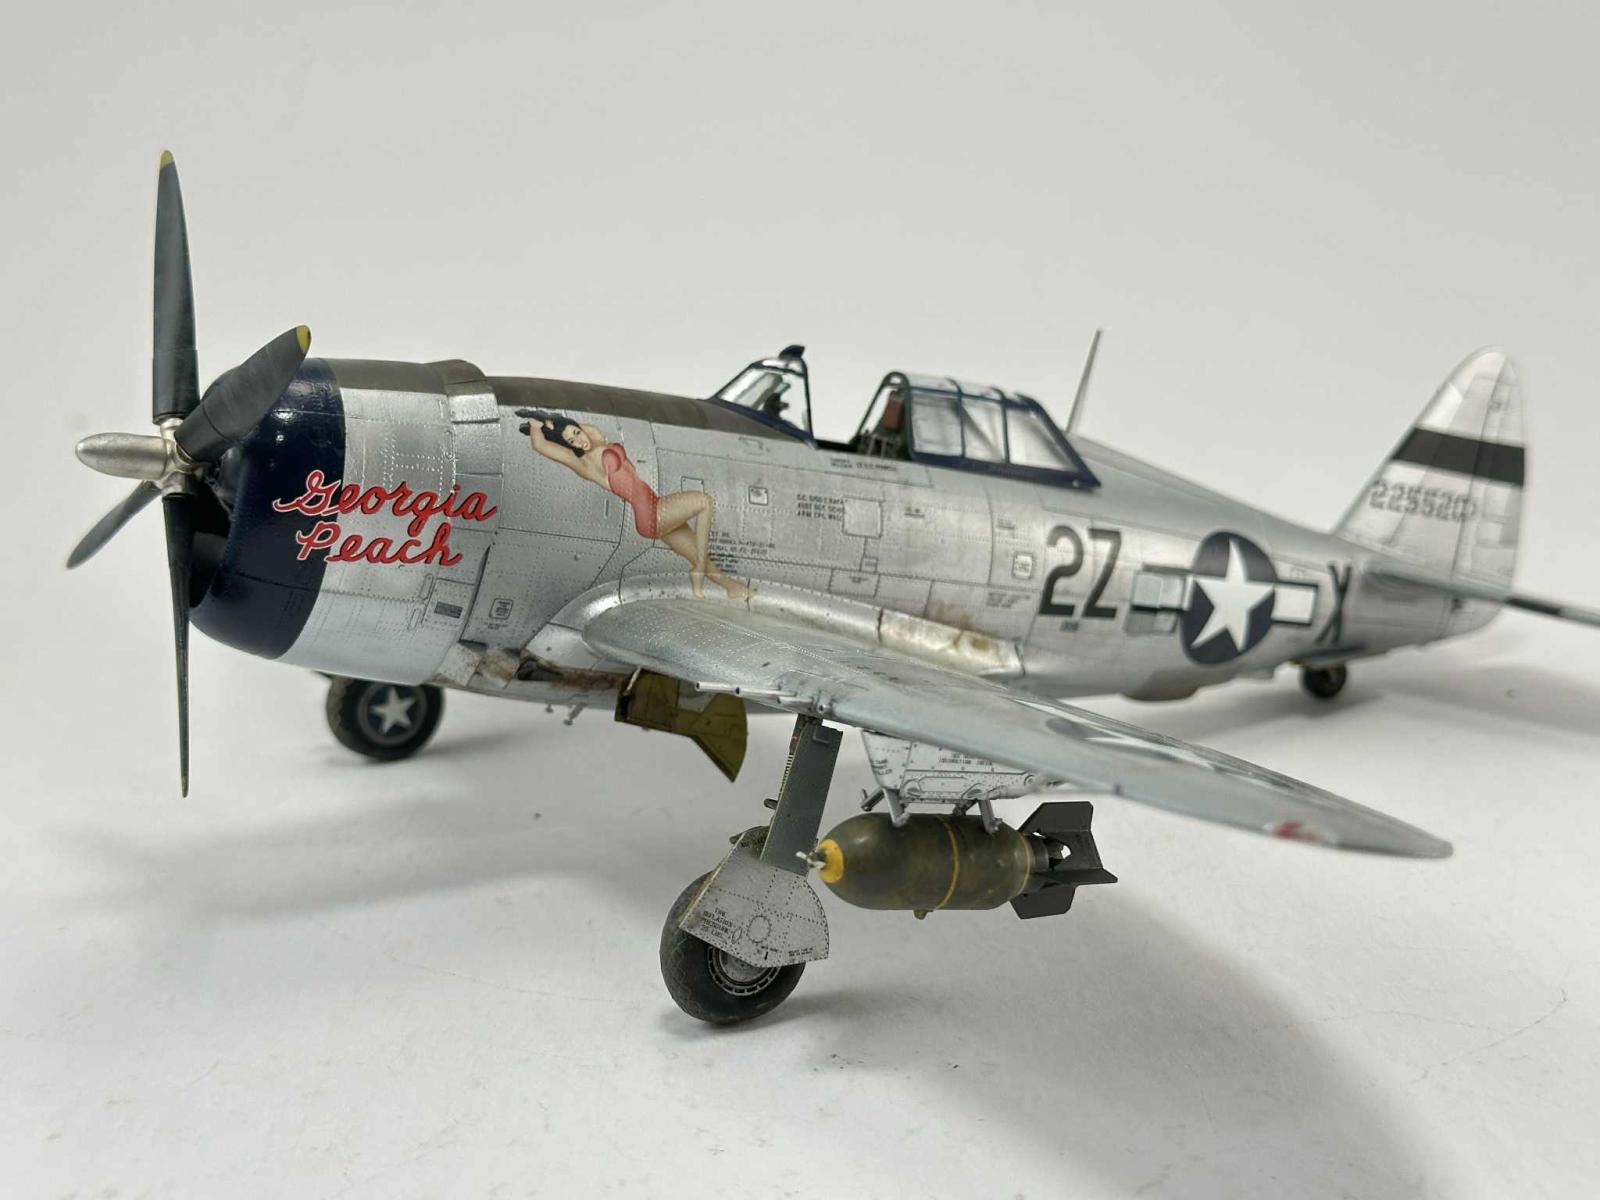
The nose from the only black and white picture I had seemed to show that the cowling was not black as the instructions suggested. I thought it was a dark insignia blue with a slightly lighter blue upper cowling. I was wrong, it should be black. Apparently there is a period color photo of the entire side of the aircraft that shows it. I got that information too late though so mine is a very dark Insignia Blue. The anti-glare panel was masked off and painted in MRP OD 41. A coat of Alclad Aqua Gloss prepped the model for decals. I added all the stencils, which worked marvelously. The carrier film just disappeared. You can read them even. Then came the first bit of self-induced drama.
I tried to add the Georgia Peach nose markings and realized that I had painted the nose band too big as the first two letters have a white background that aligned with the band. I quickly removed the decal and kept it moist while I did an emergency paint job on the nose. I finally got the proper position and added the nose markings, which aligned perfectly. I breathed a sigh of relief, and the rest of the decals were added. Everything fit perfectly and settled down perfectly. What I should have done was to measure the length of the decal from the end of the word to the white letters and then masked accordingly. Luckily, I was able to pull it off, but just barely.
I added the landing gear struts, belly sway braces, and the tail wheel assembly, along with the doors. I also stuck a cut-off toothpick into the tail wheel assembly to protect it while handling it. That is another benefit of having the open assembly tail strut. The tail wheel strut is very flexible and fragile. A metal strut here would have been nice. I’ll remove the toothpick for display but while dealing with the model, its safer this way. Now is a good time to add the main gear doors and the retraction struts that we left off. The belly sway braces were added now since the landing gear protects them. Another coat of Aqua Gloss was added and the model set aside while I worked on the armament.
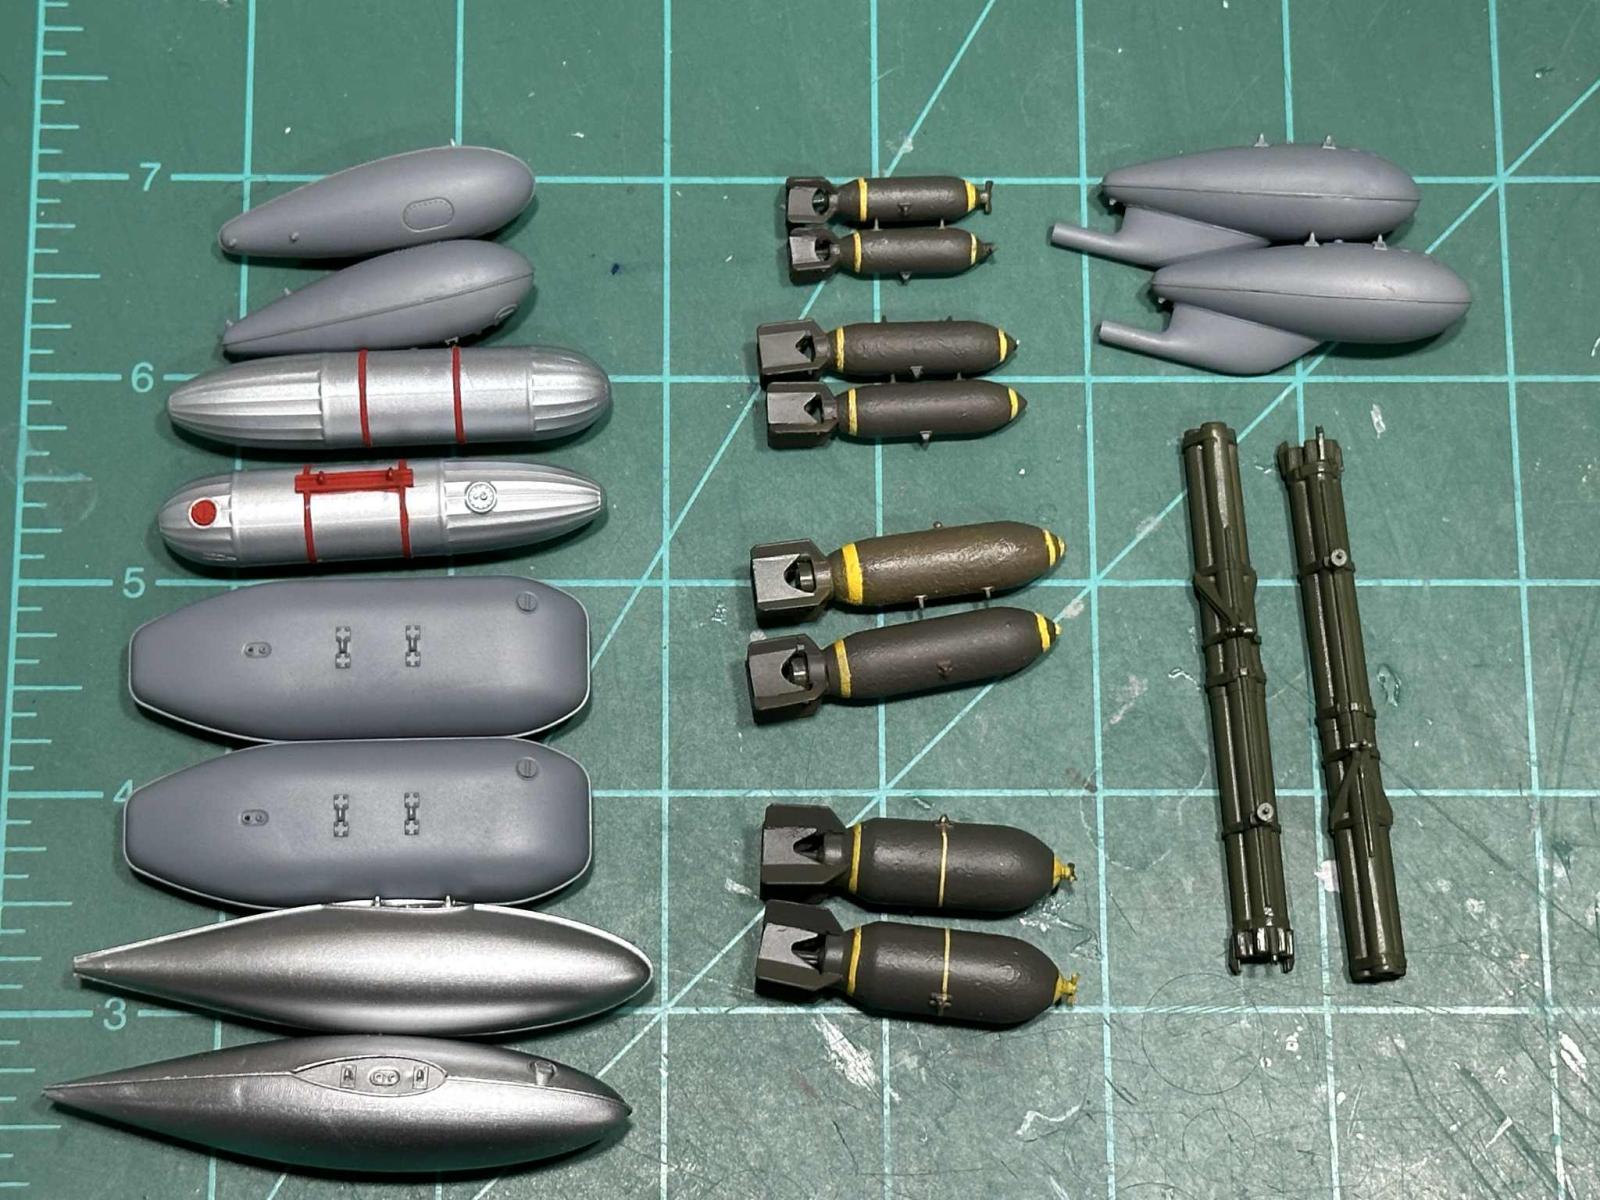
The kit comes with two types of 1,000 lb., one type of 500 lb., and 250 lb. bombs. It also has 75-gallon, 108-gallon paper, 150 gallon and 200 gallon drop tanks. In addition, the kit comes with smoke generator pods and M-10 bazooka launchers. They all fit together perfectly as long as you remember to drill out the mounting holes slightly. On my bombs I used Mr. Surfacer 500 dabbed on with an old brush and stippled a rough surface. Then I painted the bombs Tamiya Flat Yellow and masked off the nose and rear stripes. They were then painted in a splotchy pattern of Tamiya Khaki Drab and MRP OD 41. The drop tanks were either AK Extreme Aluminum or MRP Neutral Grey. The bazooka was painted British Dark Green. Like the model, the decals fit perfectly.
Before I went any further, I masked off the anti-glare panel, wheel wells, tires and anything else that needed to be flat and sprayed Alclad Matte Finish.
Now it came to weathering. I really liked the look of the model and didn’t want to go overboard on the weathering. Some AK Starship Filth and Buff Oil Brusher were added to the wing root area. AK Starship Filth was applied to certain areas and a thick wet brush with Odorless Thinner was used to stipple it in place. Some pastels were added aft of the wing gun exhaust ports. The wheel well areas were given a wash of burnt umber artist oils thinned with turpenoid. I also used a thicker wash on the exhausts and turbo exhaust shroud on the belly. Some mud splattering was added underneath, along with some on the wheels. Again, not too much as these were mostly used on airfields. Some chipping was added to the canopy frame and anti-glare panel, but not too much. Some Buff Oil Brusher was thinned down and blended with a large brush to dirty up the top of the wings, where the crew would walk, and to blend the decals.
About this time, disaster struck. I dropped the model and broke off a landing gear and wheel. After much swearing, I pinned everything back in place. It is not as good as the original position but it will have to do. Once happy, I added the 1,000 lb. M-65 bombs to the pylons and added them to the lower wings. The wingtip lights, antenna mast, pitot tube, and some other small parts were added, and the model was done. I should have added the wing lights when the instructions called for them to blend them in better but a quick swipe with a sanding stick set things right.
I thoroughly enjoyed this build and bought two more of this version, as well as some Advanced kits and other Basic MiniArt P-47s to do. The plastic is soft, but I didn’t mind that at all. Actually, it worked in my favor. I would have liked a slightly more robust tail wheel strut, though. The kit is slightly over-engineered for some, but I liked the results. You will find no better plastic cockpit, engine or wheel well in any kit out of the box. I loved the rivet detail, and it looks great under a NMF. The exterior detail and the level of accuracy of these kits make them THE best P-47 in this or any scale. There I said it. The inclusion of nearly every under-wing/fuselage ordnance and drop tank just adds to the value of this winner. The only downside is the weak tail wheel strut. You must handle the kit with care. Is it better than the Tamiya kit? Yes and no. Yes, in the amount of detail you get and, in my case, the fit. No, in the ease of assembly. So, depending on what you want to do with your model, it is up to you. For me, I will build these MiniArt kits over a Tamiya one. Bring on the D-5/6, P-47N, and P-47M.
Highly recommended
Thanks to Squadron and IPMS/USA for the review copy. You can obtain yours directly from Squadron . Let them know you read about it here.
Recommendations in One Place
- Square off the female part of the tabs in the cockpit for a tight fit.
- Drill out the female alignment holes on all the parts that have them i.e. Fuselage, wings and armament.
- Leave the firewall (Part A7) off until you’ve glued the upper fuselage panel (Fc1) on. Go slow and glue one side at a time.
- On the engine cowling support, part Gc4, cut down the bottom tab, but don’t remove it, and remove the outer detail on the same part if you are having the cowlings closed.
- Cut down tab on D24 or delete this part as it is invisible when assembled.
- Assemble the engine cowling in the sequence of top, sides, then bottom
- Leave the Inner Landing Gear Door, Cd10, off until later. Do not add it during assembly steps 19 and 23. Add them when you add the inner gear doors.
- Replace the guns with tubing or Master Model barrels, if capable. That goes for the pitot tube as well.
- Sand or cut a recessed area on the fuselage where the flaps sit for a perfect fit.
- Use a cutoff toothpick to support the tailwheel assembly, just as a precaution. Remove it for display at a show.

Reviewer Bio
Floyd S. Werner Jr.

Building models since the age of 7, I’ve become known for my Bf-109s and helicopters. I currently run Werner’s Wings. I was previously the ‘star’ of the Master Class Model Building Video series. I’ve been published numerous times on various website, including Hyperscale and ARC. My work has been in FSM and Great Scale Modeling 2001, as well as, numerous other model magazines. I’m a published author with my Squadron/Signal Walkaround book on the Kiowa Warrior. My models have continuously won many regional and national awards. My unique model photography gives my models instant recognition for their historical perspective.
I’m a retired from the Army after 21 years of flying Cobras and Kiowa Warriors, including tours in Iraq, Bosnia, Korea, and Germany. I’m also a retired Flight Officer for the Baltimore City Police and flew their helicopters chasing bad guys. I’m currently flying Cobras and Hueys with the Army Aviation Heritage Foundation.
I’ve been married to my high school sweetheart, Yvonne, for 42 years. Our daughters have blessed us with six grandchildren. My passions continue to be his family, friends, helicopters, models and airplanes, especially the Bf-109 and my beloved AH-1 Cobra. My motto has always been - MODELING IS FUN!
Comments
Add new comment
This site is protected by reCAPTCHA and the Google Privacy Policy and Terms of Service apply.
Similar Reviews