
Kosciuszko Albatros "Cooper"
History
The Albatros series of Biplane fighters, beginning with the D.I of 1916, became one of the standard German fighters of World War I. Initially powered by a 160 hp. Mercedes D.III engine, subsequent developments of the aircraft switched to a new wing arrangement, partially intended to improve pilot visibility, and partially to follow the example of the French Nieuport 17 series. The engines remained basically the same, although upgraded models produced 175 to 185 hp., improving performance somewhat. The D.IV reverted to the earlier wing, and was not produced, but the D.V had the “V-strut” wing and the 160/185 hp. Mercedes.
The Austrian firm of Oeffag redesigned the D-III, eliminating the structural problems faced by nearly all Albatros fighters, and equipping the aircraft with an Austro-Daimler engines of 225 HP enclosed in a new cowling. These were designated S.253, and were used successfully by Austria-Hungary’s air units until the end, and after the war, 30 additional aircraft were built for Poland’s newly created air arm. These were used against the Russians, who were attempting to destroy Poland’s newly won independence. The pilots were Polish, German, and some other nationalities. A few Americans flew for Poland, and the aircraft depicted in this kit honors the memory of one of these.
The kit provides a model of one of the aircraft flown by Merian Cooper, an American from Jacksonville, Florida, who was born in 1893. He spent 3 years at the U.S. Naval Academy before resigning to fight with a National Guard unit against Pancho Villa in the 1916 border war with Mexican bandits. In 1917, after the U.S. entered World War I on the side of the Allies, Cooper joined the Air Service and flew DH-4’s over the Western Front. He was eventually shot down, and spent the rest of the war as a POW.
After the war, Cooper participated in some of the activities of the U.S. government in its postwar relief efforts, but he came to the conclusion that his best efforts should be directed towards helping the Poles protect their newly-won independence against the Russians, who were trying to create a Polish Soviet Socialist Republic. Cooper’s ancestors had known the Polish Count Pulaski, who helped the Americans in the Revolution against England, and probably felt that he was returning the favor by helping Poland against the Communists. After joining a unit made up of former U.S. Army pilots, he flew missions against Russian ground targets, but was eventually shot down, spending some time as a POW before escaping back to Poland. Returning to the U.S., he pursued a number of careers, eventually becoming a Hollywood producer. His most famous film was King Kong, which he conceived, co-directed, and co-produced in 1933. He still has a star on the Hollywood Walk of Fame.
There are quite a few references to Cooper on line, including his role in helping to destroy a Russian communist cavalry unit that was closing in on Warsaw, and his actions were regarded as heroic by the Poles, who awarded him the Polish equivalent of the US Congressional Medal of Honor. Later, in World War II, he was commissioned a Colonel in the USAAF, and served in the Far East during the war. Try Google for further information. He was quite a guy. But Google unfortunately, shows no reference to his airplane, only the model.
Instructions
The 8 page instructions provided include a very detailed historical account of the aircraft and a brief biography of Merian Cooper, the pilot of the plane. A useful sprue diagram is included, along with excellent line drawings of the model during assembly. Black and white photos show the locations of some of the details and PE parts, but these are not as useful as the drawings. Rigging information is given, along with a top and side view color drawing showing decal placement. A color guide is at the bottom.
The Kit: Description and Assembly.
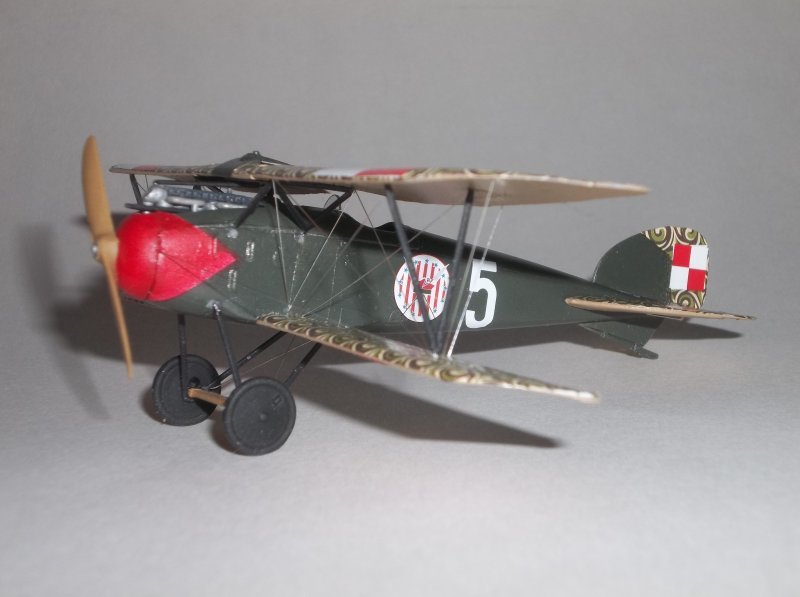
Quite a few kits of the Albatros series have appeared over the years. I have built the Revell D.III and the Airfix D.V, and also several years back did the Eduard D.V. This kit is totally different from that kit, but appears to have been issued before in a simplified form, probably by Roden. The kit is an attempt to do a super-detailed Austrian Oeffag D.III version with an exotic color scheme, and the makers have certainly achieved this goal. The kit consists of 54 styrene parts cast in grey, 14 resin parts, including one wheel-forming tool, 30 photo-etched parts, and one piece of clear film, which serves as a windshield. Not all of the parts are to be used, creating a few for the spares bin. There are some sink marks in the rear fuselage that are easily filled in, and since the Albatros was built of formed plywood, there are few panel lines to worry about. The fuselage halves were warped somewhat, but judicious use of clamps got them together OK. The wings had a fair amount of flash that needed to be trimmed. The ailerons are molded onto the wings, but this kit suggests replacement with additional units, requiring some pretty fancy trimming. The new ones were supposed to have scalloped rear edges (wire trailing edges) but the difference is so slight that it would certainly be easier just to trim the scalloping on the trailing edges with an X-Acto knife rather than removing ailerons and replacing them. The detail will be lost in the decal covering anyway, so why bother.
Most kits of this size and complexity use a one piece bottom wing, but this one has a two piece lower wing with attaches to the fuselage with very small tabs, hardly enough to withstand any kind of handling. The upper wing comes in three parts, with three different center sections provided. There are photo-etched parts for the radiator surfaces, and these are nicely done
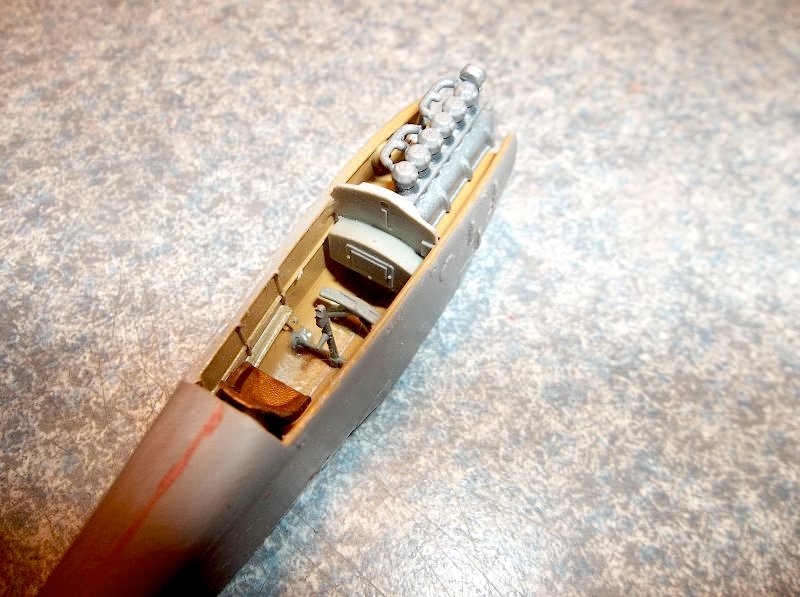
The interior is partially done in photo etch, but I found the instructions to be confusing, as the standard instructions consist of clear line drawings while the resin and PE parts are shown by rather dark photos which show where the parts go. The cockpit interior includes some sidewall detail as well as an injection molded seat, seat mount, and control stick. The machine gun mechanisms, which cannot be seen once installed, are resin, while the three instrument panels are PE, complete with several instruments. There is a PE floor and rear bulkhead in the cockpit, and the seat mounts on a short post that makes for a very weak structure. I would suggest mounting the seat belts before installing it, as you are sure to break it off during assembly.
The tail unit has indications of mounting holes, but the instructions are not very clear about exactly where these go. The horizontal tail unit has to be trimmed carefully to get it to fit. The rudder and lower vertical tail surfaces also have mounting tabs, but there are no holes in the rear fuselage, only hints at an indentation, and these need to be either drilled out or mounted without the tabs.
The engine is well detailed, and consists of two crankcase parts, rocker arm housings, a crankshaft, and individual exhaust stacks. These are nicely detailed, but the stacks don’t line up in the cowling. This is a case where the designers have attempted to put a lot of detail into the models, but a lot of it will not be seen once the kit is assembled. Then there is a cover over the engine, which makes most of it invisible if it is used. It would be useful if you were building an airplane with covers off for maintenance.
The wing and landing gear struts are very spindly, but they are probably accurate, as I determined from looking at photos of the airplane. They do require some trimming, however, and the structure is very delicate once installed. Be very careful handling the model while you are working on it, as repair could be very frustrating. I managed to build it without any kind of structural failure, but I was extremely careful, especially while installing the rigging.
The prop needs to be glued to the crankshaft. After installing the exhaust stacks, the cover can be placed over the whole thing, but this is described as being used only in extremely cold weather, so is apparently an optional item. I left it off. Be sure, however, that you drill the holes in the cover, as the machine guns fire through the holes. I have no idea how they line up with the machine gun parts in the cockpit. The cover doesn’t fit anyway, so this is one detail you can dispense with and still have an accurate model.
The wheels suggested are resin, and the insides need to be trimmed out before the PE spokes are installed on either side of each wheel and this is ignored in the instructions. The main problem here is that the PE metal is slightly heavier in thickness than any I’ve encountered before, and needs a little more than an X-Acto knife to cut the parts off of the sheet. When I tried to remove the wheel covers, they distorted to the point that they would not fit inside the resin wheels. After all that is done, and the outer portions are bent on the little forming tool, the spokes are somehow supposed to be glued to the wheel and then painted black. That could have been done in resin, or even injection molded plastic. The little spoke sections have holes in them big enough for the axles to go through, which surprised me somewhat. Fortunately, solid wheels were also included, so I used those.
Painting and Finishing
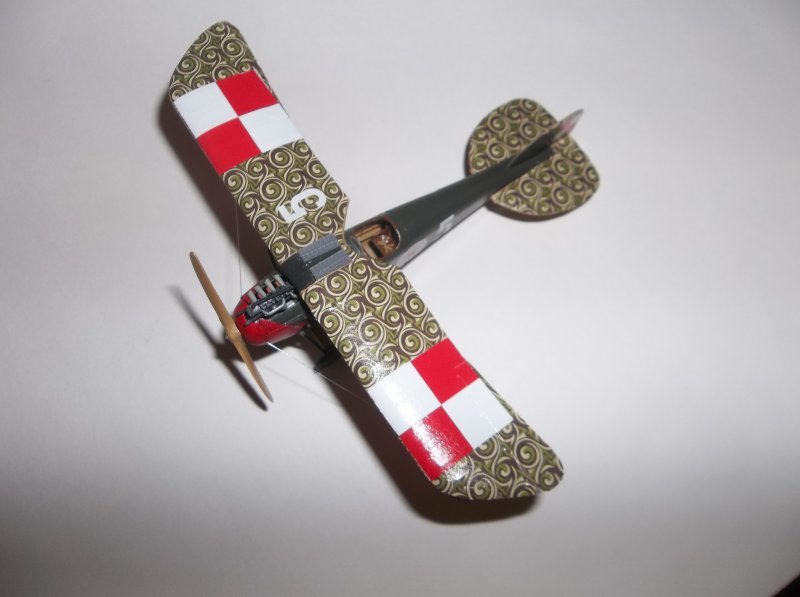
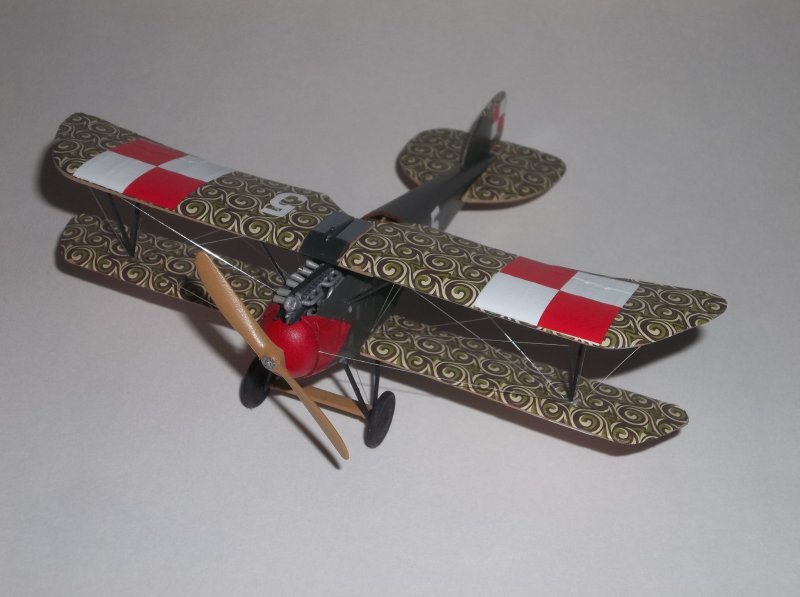
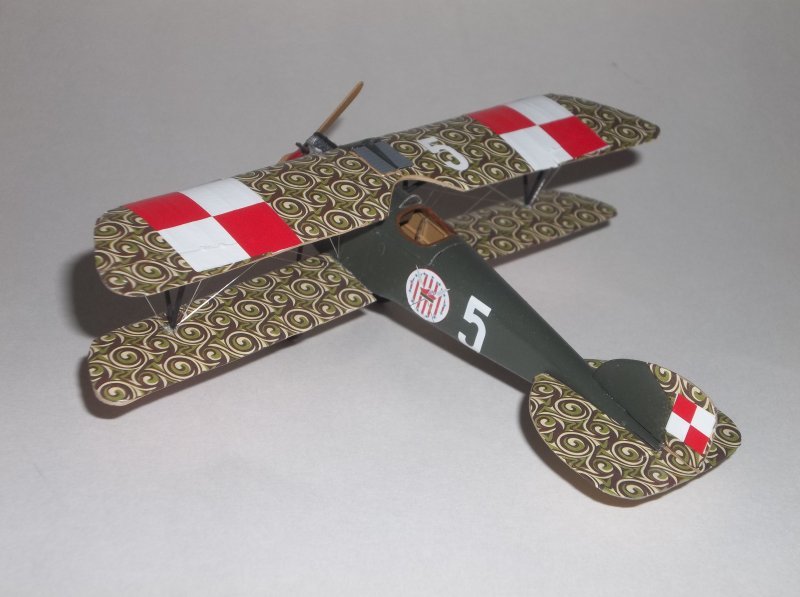
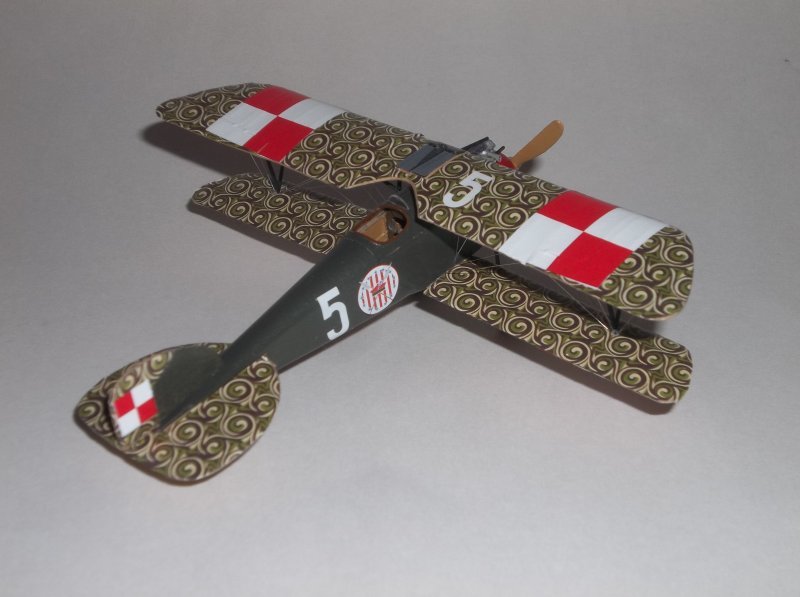
Most of the model needs to be painted before assembly. Once basic assembly is done, the decals need to be applied. This airplane had a strange printed fabric pattern on the wings and tail surfaces, but not the fuselage. It is a weird pattern, and looks like someone’s wallpaper that they applied after going to Colorado and buying up all of the surplus pot they have for sale there. Or maybe, someone purloined the draperies from a Polish castle and used the material to cover the airplane. I’m not sure of the accuracy of the paint scheme, but it does look colorful, and my wife thought it was “cute”, which I guess is a compliment. I’ve never seen any photos of the actual airplane, and don’t know where I would find them, but it would be interesting to see some documentation on this aircraft. There are quite a few photos online of models of the plane, but only one that looks like an actual photo, and it too looks like a model.
Once assembled and painted, with all decals in place, the model should be rigged. I used my electronic wire system, which resulted in very realistic rigging. There is some reference to rigging on the kit instructions, but the drawing on the Squadron In-Action book on the Albatros fighters was more useful. Rigging was a rather quick process, as there aren’t too many wires to install.
Recommendation
Although this kit is not for beginners, it does make into an accurate version of the Albatros, and depicts a version that has rarely appeared in kit form before, to my knowledge at least. It is very colorful, and the decals really make it stand out. If you have some modeling experience, and want to build a truly unique model, this is the one to get. It’s not an easy model to build, but you’ll get a feeling of accomplishment when you have it finished and on the shelf. Highly recommended for experienced modelers.
Thanks to Squadron/Encore and IPMS for the opportunity to build this interesting model.


Comments
Comments on Albatros D.III Cooper
Enjoyed your review. I completed this model today. It was a good opportunity to try a 1/72 model with PE and EZ line rigging. The “sworl” camo is what the Polish used on their planes from 1917 to about 2022. You did a good job digesting Merian C Cooper’s story. I can suggest the 1974 book Flight of Eagles, which has many quality photos and descriptions that might answer your questions.
Follow-up
I meant 1922 not 2022. Also I have learned that the sworl pattern was a product of the Austro-Hungarian Oeffeg shop.
Add new comment
This site is protected by reCAPTCHA and the Google Privacy Policy and Terms of Service apply.
Similar Reviews