
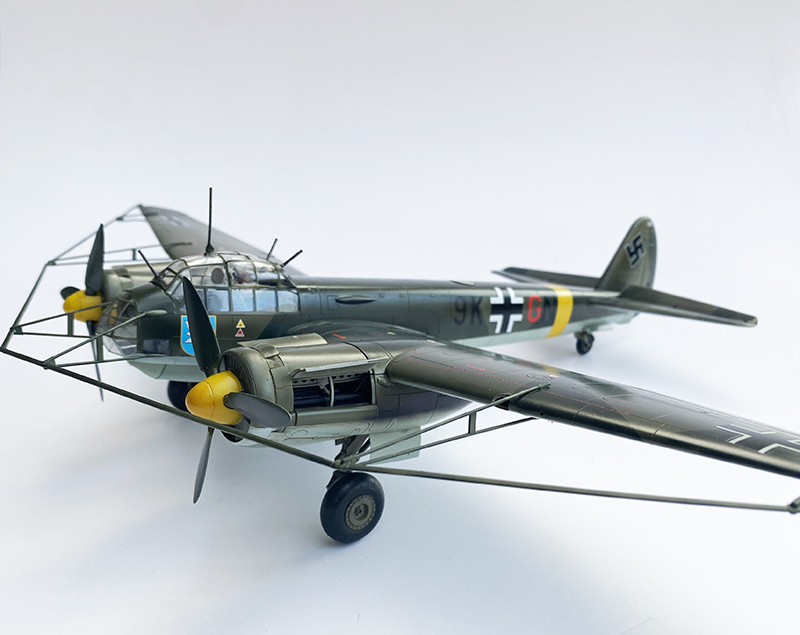
Ju-88A-8 Paravane
History
The Junkers Ju 88 is a German World War II Luftwaffe twin-engined multirole combat aircraft. Junkers Aircraft and Motor Works (JFM) designed the plane in the mid-1930s as a so-called Schnellbomber ("fast bomber") that would be too fast for fighters of its era to intercept. It suffered from technical problems during its development and early operational periods but became one of the most versatile combat aircraft of the war. Like a number of other Luftwaffe bombers, it served as a bomber, dive bomber, night fighter, torpedo bomber, reconnaissance aircraft, heavy fighter, and at the end of the war, as a flying bomb.
The Junkers Ju 88 is a German World War II Luftwaffe twin-engined multirole combat aircraft. Junkers Aircraft and Motor Works (JFM) designed the plane in the mid-1930s as a so-called Schnellbomber ("fast bomber") that would be too fast for fighters of its era to intercept. It suffered from technical problems during its development and early operational periods but became one of the most versatile combat aircraft of the war. Like a number of other Luftwaffe bombers, it served as a bomber, dive bomber, night fighter, torpedo bomber, reconnaissance aircraft, heavy fighter and at the end of the war, as a flying bomb.
Despite a protracted development, it became one of the Luftwaffe's most important aircraft. The assembly line ran constantly from 1936 to 1945 and more than 15,000 Ju 88s were built in dozens of variants, more than any other twin-engine German aircraft of the period. Throughout production the basic structure of the aircraft remained unchanged.
The Ju-88A-8 was fitted with a cutting blade across the front of the machine. During the Battle of Britain, the English stationed large helium “barrage” balloons in and around city centers, with the hopes they would create havoc amongst marauding German bombers and fighter. The “paravane” blade was fitted to the Ju-88s as a means for cutting the steel cables to which the balloons were attached. Due to the increased weight constraints introduced by the paravane, the crew was reduced to three, and the powerplants were upgraded to Jumo 211F-1 engines.
The Kit
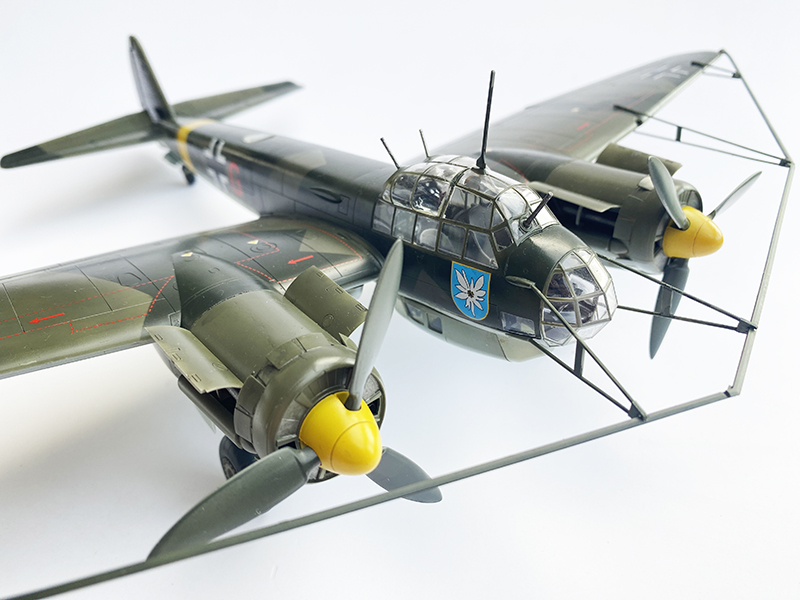
Molded in gray plastic, the 222 parts are presented on 9 sprues. This kit is essentially a re-release of ICMs’ Ju-88A-5 with parts for the paravane added on a single sprue. The detail is abundant, particularly in the landing gear and engines. The cockpit is also well-appointed. The transparencies are absolutely crystal clear, being some of the nicer canopy/window clear parts I’ve seen in awhile. The parts are molded crisply and cleanly, and the panel lines are nicely represented. The plastic consistency is what I refer to as “Goldilocks” plastic...not too soft, not too brittle. Juuuust right!
Instructions
The instruction booklet is 8.5” x 11”,printed on mixed media paper. The outside covers and first page are on glossy paper stock, and the rest of the booklet is on regular matte paper. Construction of the model is covered across 108 steps, which start in the cockpit. For the most part, they are clear and concise. During construction of the engines, however, close attention must be paid. I had to read, and re-read several of the steps here, as the drawings did not make immediate sense to me. And, that certainly could’ve just been me. Interestingly, the instructions have you construct and attach a full bomb load. Remember, the paravane added so much weight that the crew was reduced to three men, and the machine guns were limited as well. A full bomb load here doesn’t make sense. The drawings are in black & white. On the last page, canopy masking templates are provided. I suppose these are meant to be traced onto tape, then cut to fit. To me, that seems a lot like work, and I don’t find them useful at all. Color pictures serve as the paint guides and decal placement guides. The pictures are smallish, and the stencil placement guides are so tiny, you’ll need your Optivisor to make sense of them These are two areas that ICM could really step up their game- I’d happily pay a bit more for the kit if it includes pre-cut canopy masks ala’ Eduard, and a separate, fold-out painting guide with stencil and decal placements called out in normal-sized font. Having said all that, ICM provides a link on the product page to download a pdf. of the instructions, upon which the stencil placements are easier read, and can be enlarged/printed. I’ve included the link below.
https://icm.com.ua/wp-content/uploads/2022/09/48230_instr_web-3.pdf
Construction
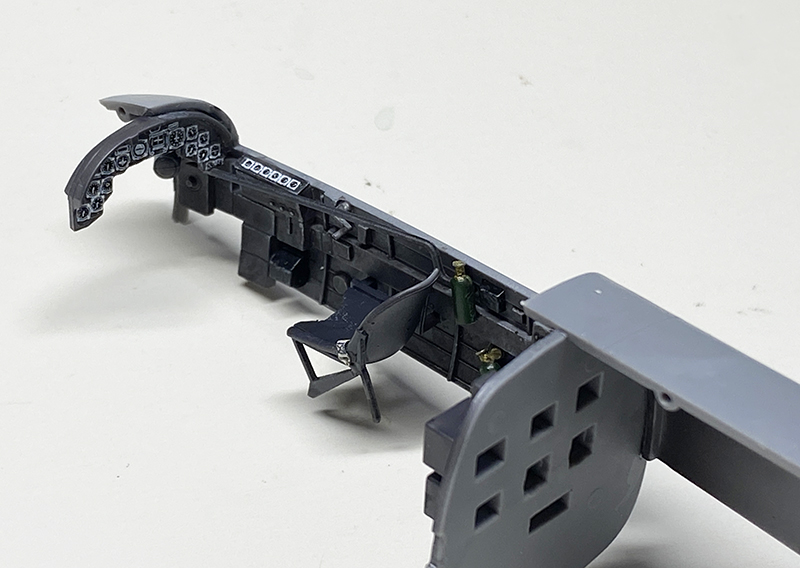
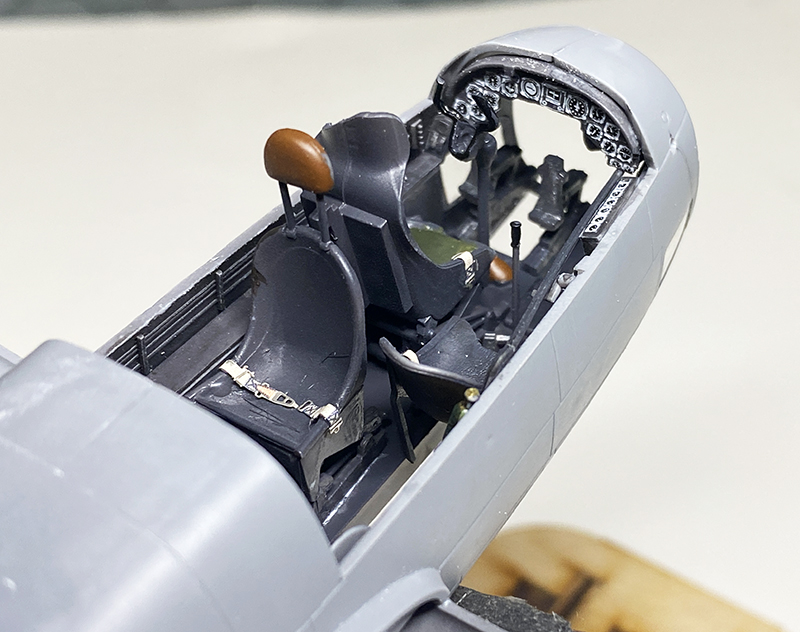
As with most aircraft, construction begins in the cockpit. Everything here is straightforward and drama free. The cockpit detail is very nice, indeed, particularly the bank of radio equipment. Before closing the fuselage halves together, the tailwheel assembly is installed. I painted and weathered mine first, then, once installed, I covered it with masking tape for when the model is painted later. The rest of the cockpit assembly, consisting of the pilot and crew seats, is attached to the center wing spar, and installed from below. The pilots’ chair is a left and right half, resulting in and obvious seam. I concealed the worst of it with a seat cushion made from Apoxy Sculpt. Eduard seat belts were added to the crew seats.
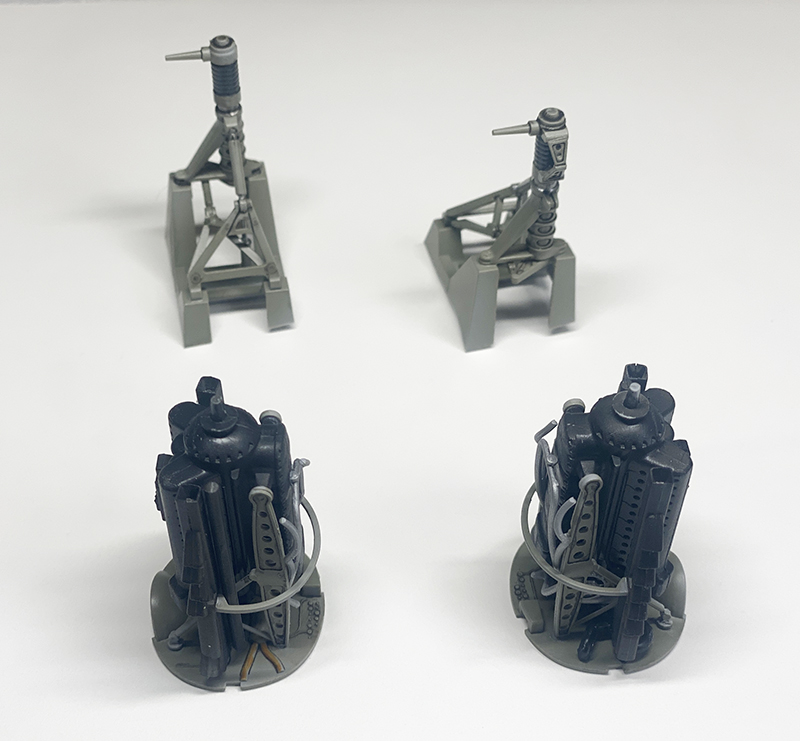
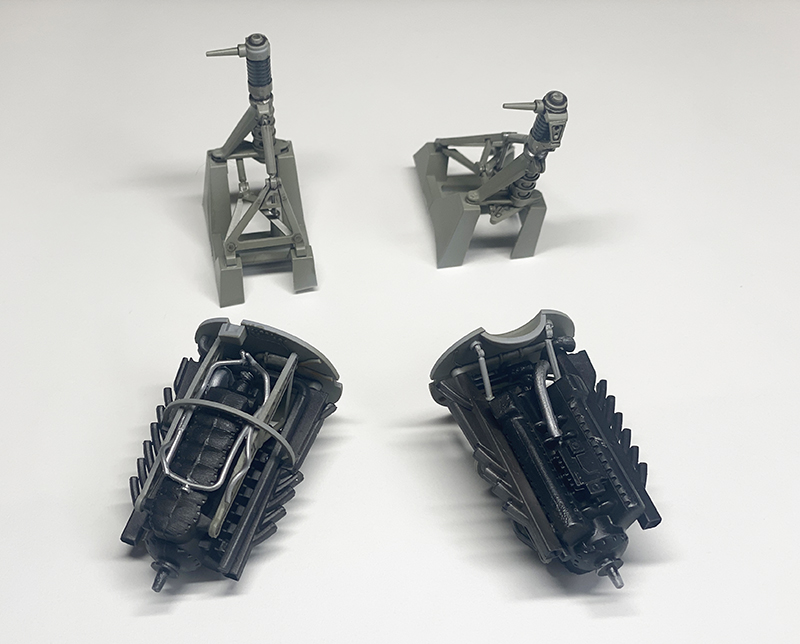
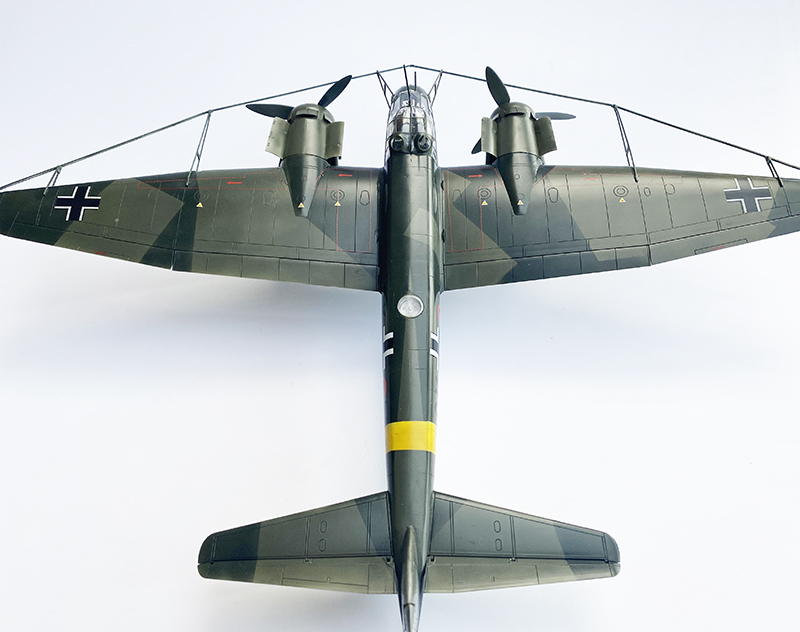
Next are the horizontal tail stabilizers, with articulating elevators. The main wings are a top and bottom cemented together. Once attached to the fuselage, there is virtually no gap. The vertical stabilizer and rudder are attached, and fit is excellent. Next, the flaps are attached and the ventral gondola is built. The beefy, well-detailed main landing is assembled next. This was an area where the instructions are confusing. Parts D35 attached directly to parts E5 on both legs, but the drawings in steps 47 & 52 indicate otherwise. The following 28(!) steps have you constructing the engine and nacelles, mating them together, and, finally, mating them over the main landing gear and onto the wings. I really see no way to install the main gear after the nacelles are installed, so, like the tailwheel, I taped up the gear legs in anticipation for painting.
Despite all of the detail and many, many parts in the engines, they fit into the nacelles relatively easily. Getting the nacelles attached to the wings took some finessing, and a little bit of Vallejo Acrylic Putty was wiped into the underwing joins.
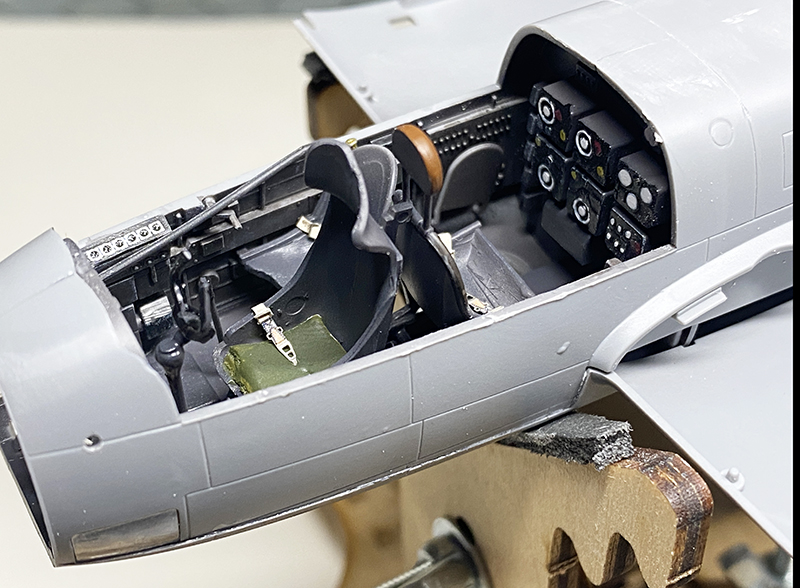
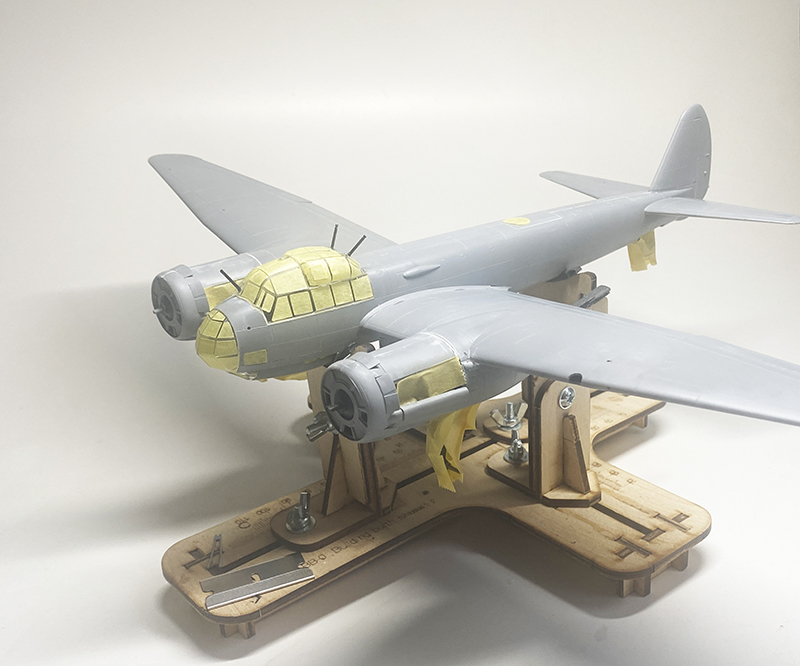
The clear parts that make up the massive greenhouse windscreen and canopy all fit together pretty well, with no gaps. I masked all of the window panes with an aftermarket masking set made specifically for this paravane variant (New Ware AM1029 Ju 88A-8 Paravane BASIC kabuki masks for ICM). I really don’t see this task being completed any other way. The machine guns attached from the inside of some glass parts were secured with white PVA glue. Once the canopies were attached, the engine compartments were masked off (I’ve modeled this plane with the engines exposed), and painting can now commence. After the main airframe was painted, decaled, and flat-coated, the fiddly bits were all attached. Assembly/attachment of the actual paravane was hilariously difficult. The brackets that hold it fit just fine to the wings, but each one of them has two mounting pins that prevent the blade from insertion. I cut the pins out, and sanded the inside of the “pincers” to open them up more. Also, I recommend sanding down the blades’ attachment points to thin them a bit. Once I had the entire paravane attached to the plane, I was relieved to know I’d only fractured it three times.
Another cool link ICM provides from their product page goes to Youtube, where you can watch a 3D CAD-styled demonstration of how the model is assembled. The link is included below.
https://www.youtube.com/watch?v=B46G8vgo3Vw
Decals
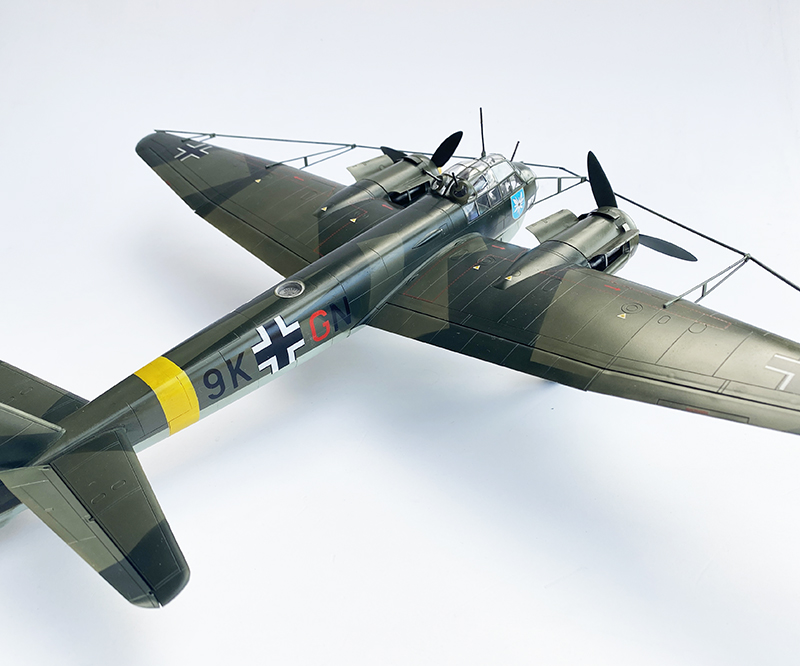
The decals, which appear to be printed in-house by ICM are in perfect register, and rich in color. However, they’re very thin and sometime difficult to work with. The yellow fuselage band is painted on, as the decal tore easily. The fuselage codes are not for this airframe, as the correct ones folded up on themselves and were unrecoverable. This isn’t said to criticize the decals, but to forewarn. The decals responded very well to Micro-Sol.
Paint & Finish
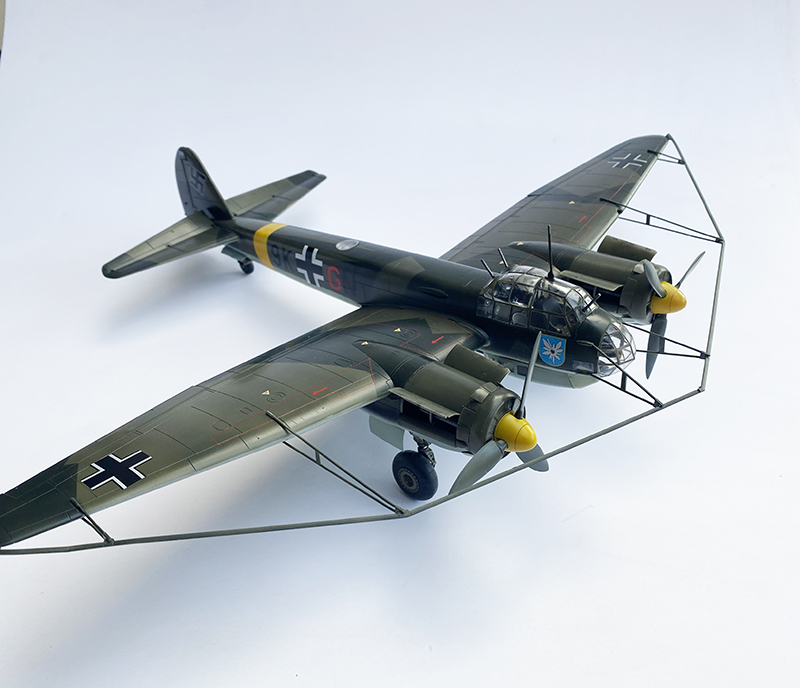
The model was painted RLM 65/70/71, which is correct for early-war daylight bomber schemes. I used Mr. Hobby Aqueous colors, shot through my trusty Iwata HP-C from the late 1960s/early 1970s. Gloss coat was applied in the form of Mr. Color GCX-100, and the matte coat is MRP Super Matte.
Conclusion
In my opinion, this is the most accurate and detailed Ju-88 kit on the market. ICM first released it in 2017, with several reiterations featuring new parts and versions up to, and including, the one here. It’s definitely a builders’ kit...a fair amount of work goes into filling/sanding seams. The engine nacelles are a fiddly affair, and will require filler to fare them in. I dislike the engineering of the greenhouse canopy, particularly the uppermost pair of parts. I like that the engines can be exposed, adding visual interest. A couple of the paravane support brackets were broken on the sprue, but were easily fixed. The panel lines/hatches/etc. are finely molded and hold a wash well.
In all, I spent 38 hours building and painting this kit.
My thanks and gratitude to ICM and IPMS/USA for this review sample.


Comments
Add new comment
This site is protected by reCAPTCHA and the Google Privacy Policy and Terms of Service apply.
Similar Reviews