
Gloster Sea Gladiator Mk.II With Royal Navy Pilots
ICM first issued a Gloster Gladiator in 2019 and a Sea Gladiator in 2020. For 2024 the Sea Gladiator has been issued again with a set of three Royal Navy figures included. Except for the figures and the box art, this new kit is the same as the 2020 Sea Gladiator kit. The kit includes six trees of grey plastic parts, one tree of clear parts, decals, and instructions.
The new figures in this kit are a standing pilot in flight gear, a pointing officer, and a sailor holding a paint can. The parts for the figures have some minor flash but are otherwise well-molded and detailed and have and well-sculpted faces. The instructions for the figures are a single sheet with a parts map and color key on one side, and an illustration of the completed figures on the other. The color key identifies paints from ICM’s own line of acrylic paints. The figures go together well and have natural looking poses. The chinstrap parts for the pilot’s helmet have the parts numbers reversed, install them opposite to where the instructions show. The pilot’s parachute is well detailed but doesn’t seem to drape over his shoulder in a natural way. I would expect the weight of the ‘chute to pull the fabric tight against his shoulder. This isn’t obvious from the front, so it isn’t a serious flaw if you can control the direction from which the figure is viewed.
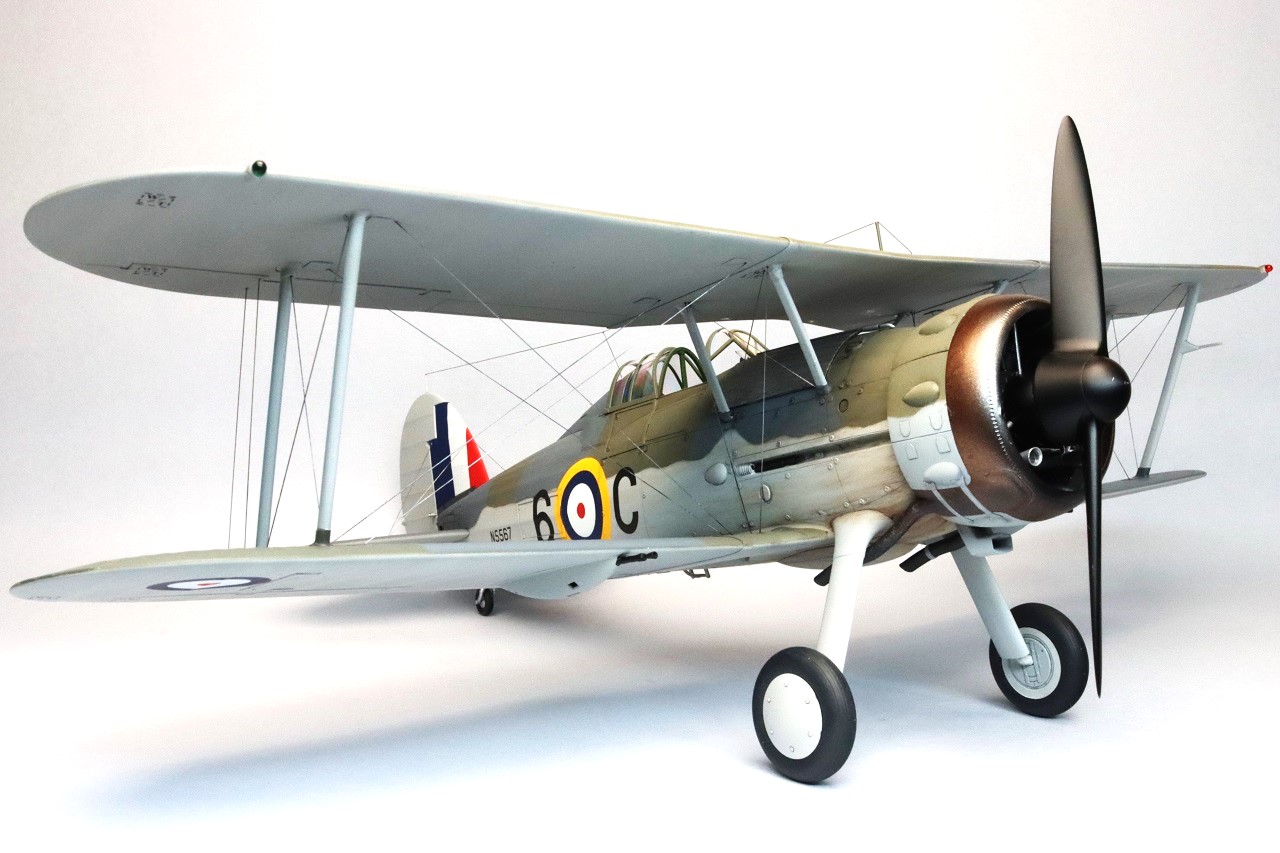
In typical ICM fashion, the kit comes in a sturdy cardboard box with the box-art printed on a thinner cardboard cover. The kit parts come in a re-sealable plastic bag with the clear parts separately bagged to avoid scratching. The plastic parts for the aircraft are well-molded with no flash. The fabric areas of the aircraft are molded slightly concave between the underlying structures. This effect is pronounced enough to illustrate the underlying structure but subtle enough to not look toy-like. The clear parts are reasonably thin and have good clarity. The 20-page instructions are well-illustrated and easy to follow. The first page has a short history of the aircraft and a list of recommended paints. Unlike the figure instructions, the color call outs for the aircraft are keyed to Tamiya and Revell paints. Page 17 of the instructions has a template for cutting out canopy masks. Since the canopy framing on the plastic parts is so well-defined, I found it easier to cut the canopy masking directly on the plastic parts. There are optional parts provided for two and three-bladed propellors. There are decals for four different marking options: No 804 sq RNAS Hatson, No 804 sq HMS Furious, No 813 sq HMS Eagle, and Gladiator 5519 on Malta. Only the Malta Gladiator has the fuselage illustrated from both sides.
Unsurprisingly, construction begins with the cockpit.The ICM instructions call for the cockpit to be painted with Tamiya XF-5 ‘flat green’. This wasn’t the color I expected, but I don’t have any evidence to say that it isn’t correct. If you have access to better references than me, you may want to choose a different color. Unfortunately, the pilot’s seat has an obvious ejector-pin mark that needs fixing. There are no parts provided to depict the pilot’s harness. I bought an Eduard photo-etch harness and installed that on the seat. The instructions seem to indicate that the instrument decals are grouped together on decals #1 and #2. There is no carrier film between the instrument decals, you will need to apply them individually. The gunsight is molded in gray plastic and is missing the clear reflector. I scratch-built the clear portion with some packaging material. The bottom of the gunsight (D12) has a round locating peg, but the mounting hole on the bottom of the gunsight bracket has a half-moon shaped mounting hole. The tailwheel strut is meant to be trapped between the fuselage sides early in construction. I was worried that I would break the strut in subsequent steps, so I mounted a plastic block in the tail to accept a wire that I inserted into the top of the strut. A beacon (E4) and radio antenna insulator (E3) need to be installed before closing the fuselage. I missed these parts and had to scratch-build substitutes to install from the outside.The instructions have you install the rudder mount (D56)
after the fuselage sides are glued together. However, the sides of the rudder mount are tapered to fit the inside contours of the fuselage, so it is easier to install it before gluing the sides together.
When test-fitting the lower wing parts, I found a slight gap in the trailing edge seam. I thinned the inner surfaces of these parts for a better fit. When gluing the top and bottom of the wings together, don’t force the gap in the aileron hinges closed. If you do, you will get a step between the aileron and wing.When I was installing my upper wing to the rest of the aircraft, I found that I had to press down on the center portion quite a bit to get the fuselage struts to meet the center of the wing. In retrospect, I think that when I glued the top and bottom of the upper wing together, I flattened the wing too much so that it didn’t have the same dihedral angle as the lower wing. The tops of the fuselage struts have very small pins that locate in shallow holes on the upper wing. If I were to build another Gladiator, I would add some metal pins here for more strength and positive fit. The outboard wing struts fit into sizable sockets on the wings and go together very easily.
I needed to use some filler on the seams where the lower wing meets the fuselage and around the edges of the plug (G2) for fitting the arrestor hook. The seam between the landing gear legs and the fuselage doesn’t fall in the same place as it does on the real aircraft and will need some careful clean-up. Some panel lines on the top of the nose fade-out and need to be re-scribed. The air intake under the nose (F6 and F7) has a shallow opening. For a better appearance, I removed the plastic that blanked off the opening. The locating pins for the horizontal stabilizers are very small and don’t provide a lot of strength or help alignment. If I were to build another Gladiator, I would replace the plastic pins with longer metal ones. The axles are a little too long for the main wheels to seat all the way. I drilled into the backs of the wheels for a better fit.
Pages 17 and 18 include diagrams for rigging the model. No rigging material is provided. I used thin elastic thread for my build. If you choose to rig your build, you will want to gather some reference material to show the locations of the wires. The instructions aren’t quite detailed enough to show exactly where to drill the holes and there are no marks on the model’s surface to show rigging points.
The engine parts are well detailed with finely molded cooling fins on the cylinders. The push-rod covers (D36) are not round in cross-section. This is correct, don’t “fix” it. I found the fit of the prop-shaft (D6) to be loose and wobbly.You may want to drill a hole through the crankcase so that you can use a wire prop-shaft that will stay centered.The engine can be built with the cowl closed or removed to display the detail. You must decide if you want the cowl open or closed before building the engine. If you want the cowling closed you have to leave off the valve covers (D14), the cowling will not fit over the valve covers. When installing the air intakes (D2, D4, and D7), the orientation of D7 isn’t clear from the instructions. Photos of the real aircraft show the long edge facing the inside.
The decals are printed in good register and worked very well. The carrier film is very thin and I found that the decals with only black ink were very easy to wrinkle or fold and require extra care if you try to slide them into location. There are stencils provided on the decal sheet but their locations are not shown on the instructions. I decided to apply the stencils using an Airfix instruction sheet. The underwing roundels (decal #5) seem smaller than what is shown on the instructions. I don’t know if the decals or the instructions are correct.
ICM’s Sea Gladiator builds into an attractive and impressive model. Overall, I enjoyed my build but it did frustrate me at times. This kit is generally good but not consistently good.I wouldn’t recommend this as someone’s first biplane or large-scale build, but experienced modelers should have no trouble. I am grateful to ICM and IPMS/USA for providing this kit for review.


Comments
Add new comment
This site is protected by reCAPTCHA and the Google Privacy Policy and Terms of Service apply.
Similar Reviews