
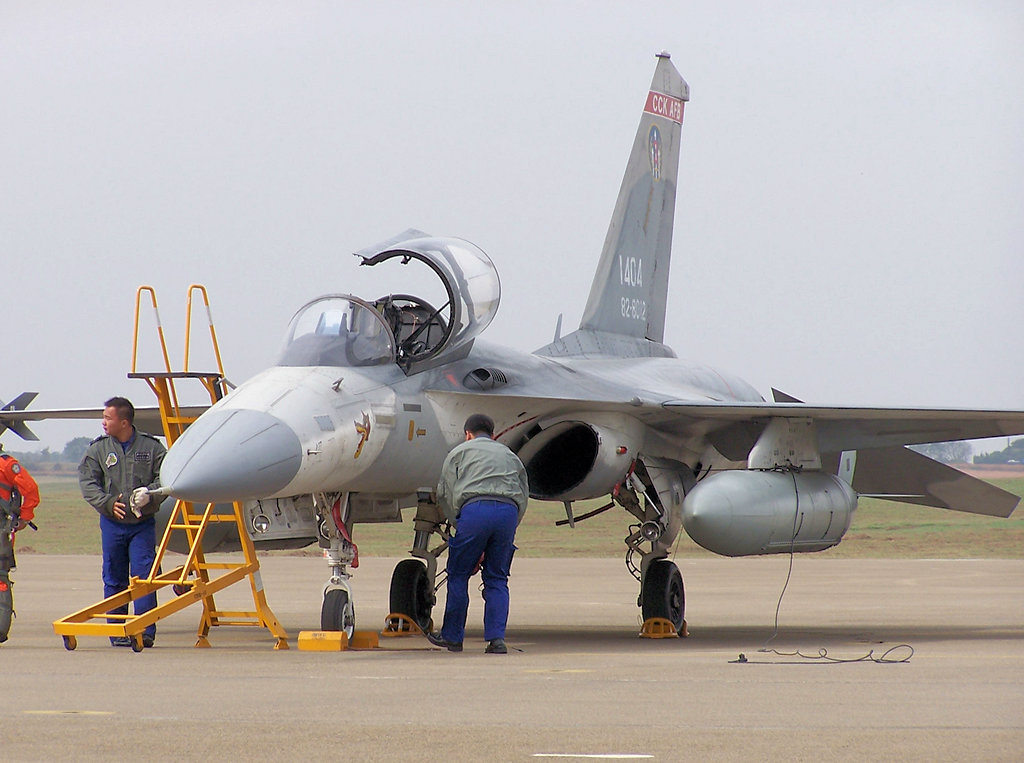
ADF F-CK-ID Ching-Kuo IDF - Indigenous Defense Fighter
Brief History
The AIDC F-CK-1 Ching-kuo, commonly known as the Indigenous Defense Fighter (IDF), is a multi-role combat aicraft named after Chiang Ching-kuo, the late President of the Republic of China (Taiwan). The aircraft made its first flight in 1989. It was delivered to Republic of China Air Force in January 1994 and entered service in 1997. All 130 production aircraft had been manufactured by 1999.
The IDF program was initiated when the United States refused to sell F-20 Tigershark and F-16 Fighting Falcon jet fighters to Taiwan following diplomatic pressure from China. Taiwan therefore decided to develop an advanced indigenous jet fighter. The IDF jet fighter project was designed and built by the Aerospace Industrial Development Corporation (AIDC) based in Taichung, Taiwan.
The ROCAF's initial order for 256 aircraft was cut to 130 in 1991, following deals for the purchase of 150 F-16 Block 20 A/B and 60 Mirage 2000-5Ei/Di with the US and France. The last IDF A/B rolled off the production line in 1999. Mid-life updates to the aircraft were initiated in 2011.
The Kit
(from the manufacturer's website)
New tooling nose section & canopy for 2-seat version (Note: AFV Club has previously issued a single seat verion on this aircraft).
- High precision engraving line.
- Landing-gear doors can be selected position in open or closed.
- Accurate cockpit details.
- Aeroengine tail pipes can be selected two different type set.
- Flaps, all-movable tailplane and vertical rudder can be chosen any angle.
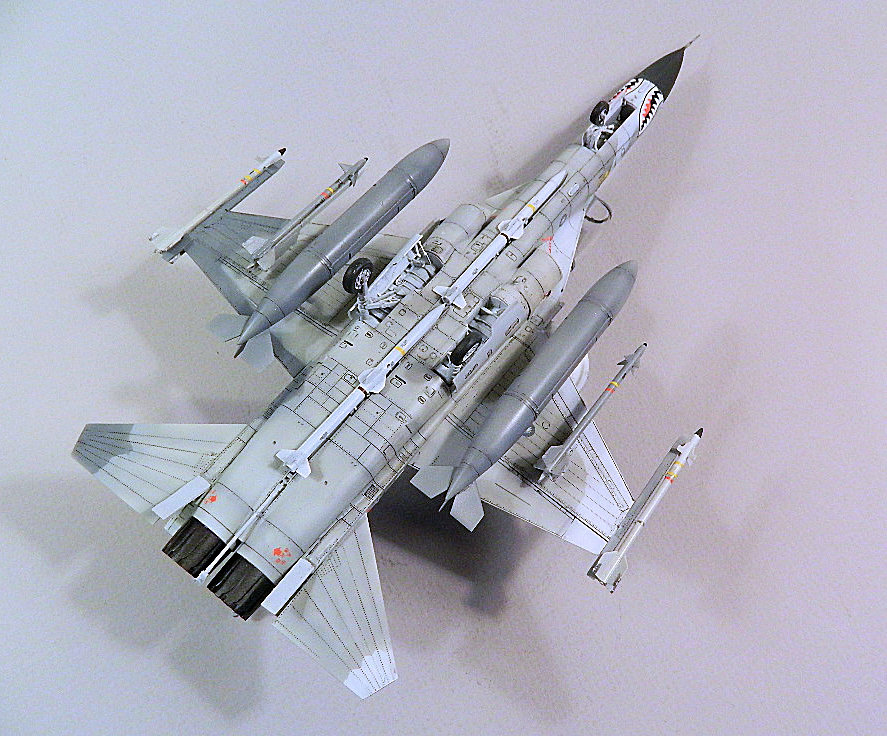
- Containing AIM-9P4 air-to-air missiles, TC-1 air-to-air missiles, TC-2 advanced medium-range air-to-air missile, 275 gal external fuel tank.
- Containing Tainan air base, Taichung cck air base unit painting and remove before flight tag decal.
- Cartograf decal included.
- Containing meticulous etched metal accessories.
The kit arrives in a sturdy and colorful box. Upon opening the lid I found all the sprues individually wrapped in sealed, clear plastic bags, The foreward fuselage halves are enclosed in a protective bubble wrap plus the clear, sealed bag. Before opening any of the bags I generally check the sprue count with the layout shown in the instructions. I was surprized to find an extra clear sprue with several underwing weapons. I did notice a "BONUS" sticker on the front of the box and realised the additional clear sprue was the bonus. The box lid inner side panels have images of the other aircraft models offered by the AFV Club.
The kit includes 10 sprues of grey plastic, one clear canopy sprue, a secondary clear sprue, plus the bonus clear sprue, one small PE fret, a decal sheet and a small sheet of red vinyl material to be used to make the Remove Before Flight streamers. The plastic parts are chrisply molded, with a bit of flash on a few of the parts. There are a few extra parts on sprues shared with the single seat kit. This looks to be an amazing kit.
The Kit Instructions
There are 28 pages included for the instructions, including a parts tree breakdown, a paint color chart including FS numbers for the camouflage colors, plus several four view, full color images of the various versions included on the decal sheet. The parts list does not indicate what parts are not to be used in this build. There are 26 steps to the construction with each step depicted as an exploded view with parts numbered and paint colors called out. These instructions are also available on the AFV Club website. This feature offers a potential buyer the opportunity to review the contents of the box and the assembly steps.
The bonus parts include a separate double-sided instruction sheet for the "Hsiung Feng" III anti-ship missile, the "Wan Chien" air-to-ground cruise missile, and the "Hsiung Feng" II anti-ship missile. Check out WikiPedia for additional technical information, colors and markings for these weapons.
My first impression of the kit while reviewing the instruction is the aircraft resembles the marraige of the F-16 and F-18, resulting in a slightly smaller and very aesthetic and appealing aircraft. An attractive offspring!
Construction
Cockpit
The instrument panels and side consoles are made up from several small parts. Each instrument panel has three parts with raised details. Assembling the two instruments panels is a bit challenging with the small size of the parts, but with care and patience it can be done. Each side console panel has a raised ejection pin stub on the back side that must be removed before the panel will fit properly. Rudder pedals and side-mounted control columns are also included. The control columns are very small and will require care to mount. Construction step 1 addresses the cockpit construction and also includes a decal placement layout and paint colors for the instrument panels and side consoles. This is a nice feature.
In Step 2 interior side panels are fit into shaped recesses in the two halves of the forward section of the fuselage. The two fuselage halves numbers need to be switched. The side panel inserts require some slight trimming to fit properly. Once the sprue attachmnet burrs has been eliminated the side panel will fit quite snuggly.
Fuselage
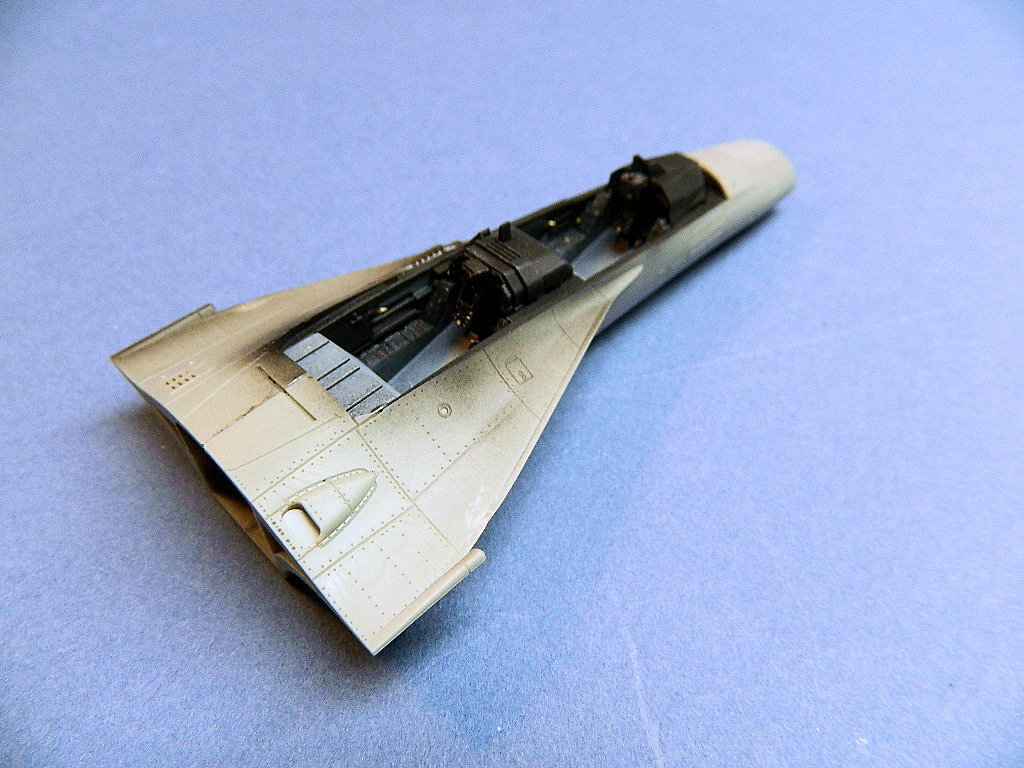
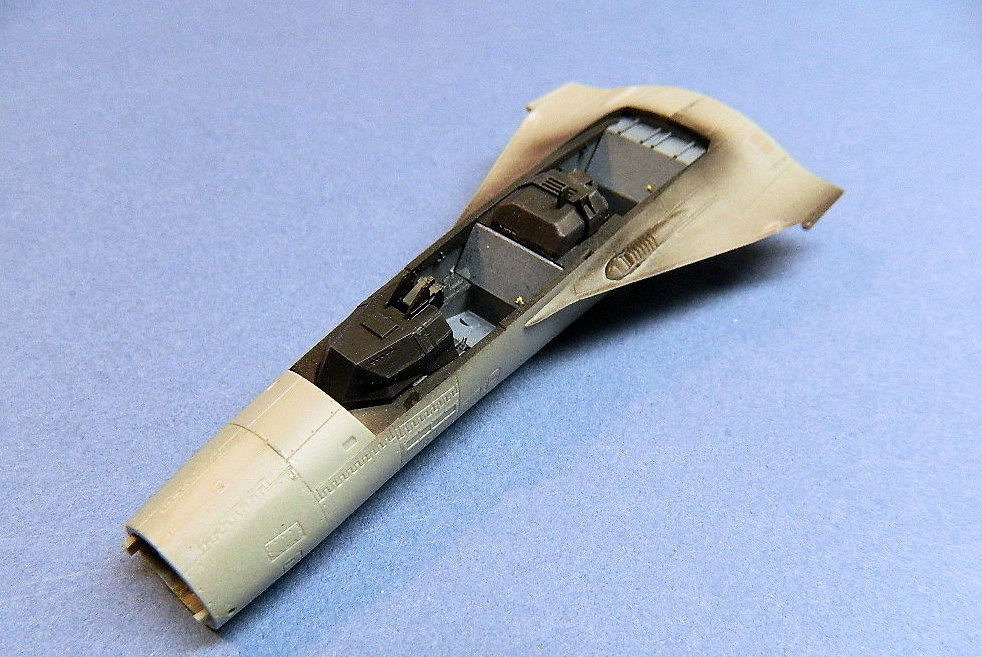
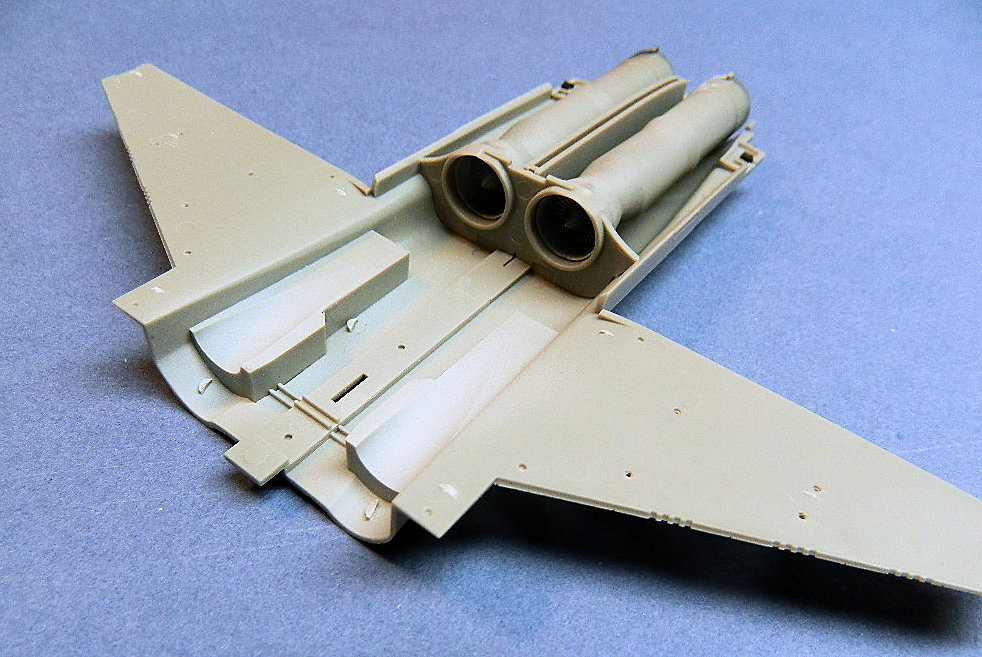
The forward fuselage in made from two halves with a vertical seam, while the main fuselage rear section consists of a top and bottom half, resulting in a horizontal seam, plus the twin intake ducts and exhausts. Each intake duct is comprised of two halves with a contoured opening on the bottom, which will align with a raised dished sections for the main gear wheel wells fitted to the bottom half of the fuselage earlier in the construction. The intake ducts are fixed in place by a mid-section bulkhead.
The engine intakes and exhaust ducts are a bit of tricky construction and installation and merits several test fittings of parts and subassemblies: First, I assembled the two intake ducts. There are no alignments tabs for the ducts, so a progressive application of the solvent to the seams is required while aligning the parts. I did make an effort to eliminate the interior seams and ejector pin marks with some fine white putty and later sanding once the solvent had cured. I test fit both ducts to check the alignment with the tops of the wheel wells and saw that care will be required to minimize the interior seams. The ducts and top of the wheel wells must be painted first before the ducts are fitted in place permanently. The rear of the ducts fit into openings in the mid-section bulkhead, but cannot be installed too deep to avoid a gap between the intake nacelle and duct. All in all it appears that once installed and glued in place vision into the intake will be quite limited.
At the other end we have the "engine" and afterburner sections. The "engine" sections consists of two halves and a turbine face. The turbine faces were left off until everything was painted. Each afterburner section consists of a one piece plastic tube that was cemented to the engine sections.The rear end of the afterburner has two tabs on opposite sides and the tabs must be aligned vertically to eventually fit into shallow recesses in the rear section of the fuselage top and bottom. Test fit, test fit and test fit again! The instructions show the exhaust nozzles (there is a choice of open or closed) glued to the burner cans before the assembly is glued in place in the fuselage. I left the nozzles off for painting separately, to avoid masking of those parts.
Speed brakes, similar to those used on the F-16, are located at the rear of the fuselage and may be posed open or closed. Since I was undecided on the postion of these items I left them off until later in the construction.
I fitted the cockpit assembly into the guides on the left side of the fuselage, then fitted the right side in place. The design is such that there is a minimal seam on the top and bottom of the fuselage assembly. However, the fit was quite tight and I need to push the cockpit tub into alignment and clamp the two sides together while the solvent cured.
The radome is a separate part and is provided with a kit-furnished, turned metal pitot. I first super-glued the pitot to the radome. I had decided to paint the radome with pitot in place before fixing this subassembly to the model at the end of the construction. I also added several lead fishing sinkers to the radome cavity. Leaving the radome off until later also afforded the opportunity to add more nose weight in the front fuselage section if required.
In steps 18 and 19 several very small parts are fitted in place on the underside of the fuselage.
Exhausts
As noted previously the exhaust nozzles have two options: open or closed. I chose the open configuration so that I could paint and weather the interiors for added interest. When it came time to fit the exhausts to the rear of the fuselage I found the exhausts were slightly smaller than the fuselage. There are two small tabs at the rear of the fuselage that are to align with small recesses in the mounting face of the exhausts.
Wings
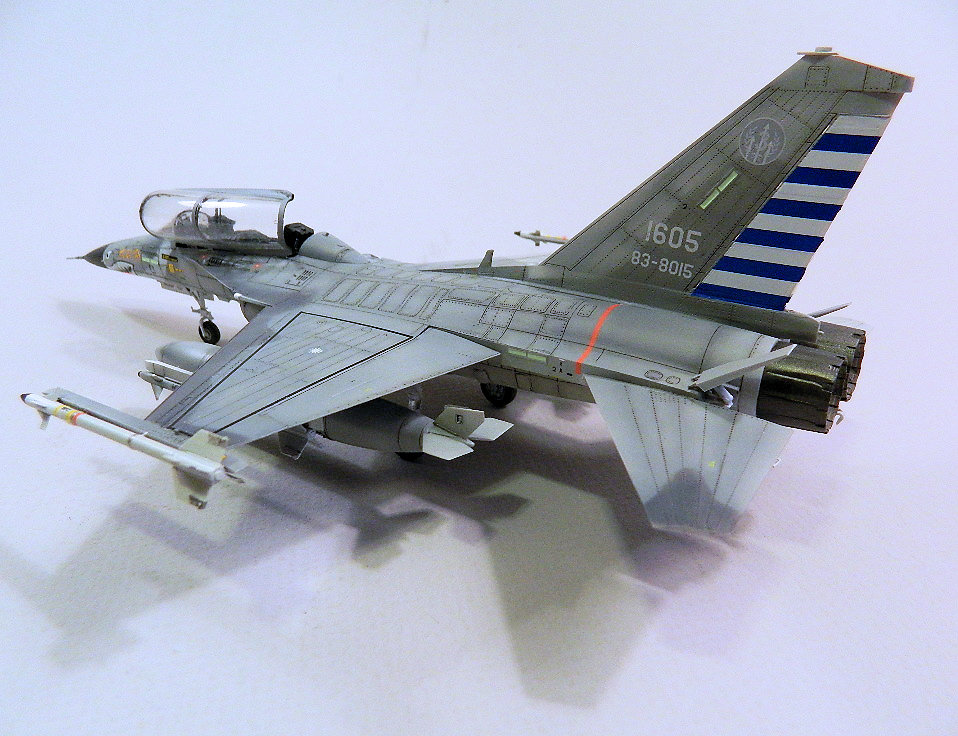
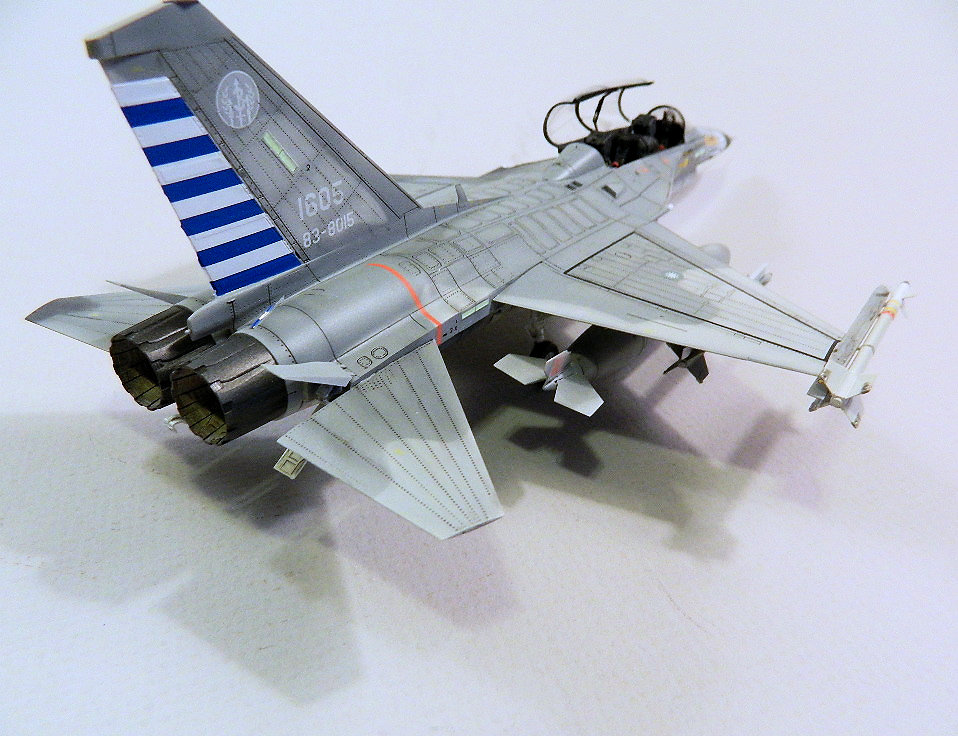
The wings are molded integral with the rear fuselage halves, with separate control surfaces. The horizontal stabilizers are molded a single parts and may be posed in other than a neutral position. The vertical stabilizer is also a single part with a poseable rudder. There is a "shark fin" antenna molded on the vertical stabilizer spline that will required care during the remaining assembly to avoid breakage.
The left wing leading and trailing flaps were a bit of a tight fit and required some sanding on the outboard ends. The missile launch rail tab on the same wing wold also not fit into the slot on the end of the wing. The tabs was trimmed a bit and everything fit.
Weapons Pylons
The pylons for the underwing drop tanks include separately molded anti-sway braces for additional realistic detail.
With steps 22 and 23 the weapons and fuel tanks are fitted in place. To missiles are fitted in the ventral location while two missiles per wing are fitted in place. These parts are all fitted in place once the model has been painted and decals placed.
Landing Gear
The nose gear is the first to be assembled, and is made up from 10 parts including the nose wheel. Some of the parts are very small and require care to remove from the sprue. The cuts were made with a pair of Tamiya side cutters after careful study for the best angle and location. Fortunately I did not beak any of the parts. Once assembled the joints were allowed to cure and the assembly was painted, but not installed until later.
The main gear is comprised of fewer parts and is more rubust. Wheels were left off until the model was painted, decaled and weathered.
The gear door are all fitted with quite delicate actuators, and therefore additional care is required during the assembly and painting to avoid loss or breakage of these small parts.
Canopy Clear Parts
The canopy consists of two clear parts, the windscren and the main canopy, plus several fine, grey plastic parts making up the rear view mirror mounts and the cross bracing. Both clear parts have raised mold lines down the top center line than must be removed. The main canopy has two tabs on the left side that fit into recesses in the cockpit ledge, allowing the canopy to be placed in an open position. This is a really neat idea that works!
Underwing Store and Weapons
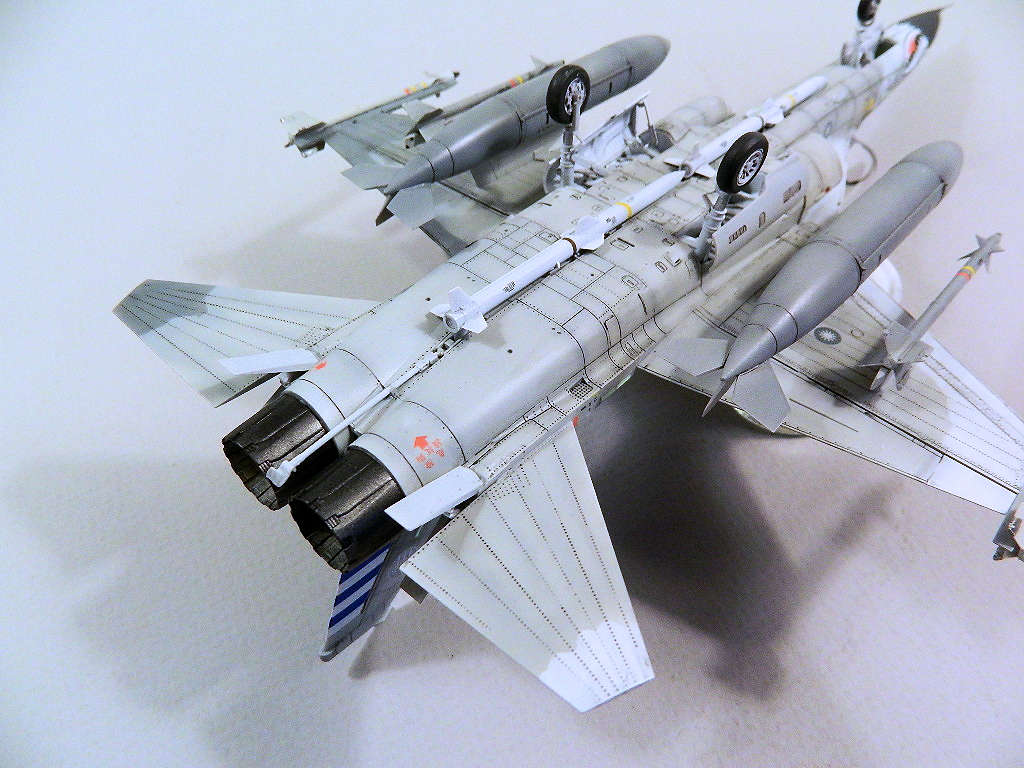
The kit includes two 275 gallon drop tanks, two AIM-9P4 sidewinders, two TC-1 Sky Swords I missiles, and two TC-2 Sky Sword II missiles, plus the missiles included with the bonus sprue. The fuselage centerline missile launcher may be displayed in a stored or launch configuration. Take your pick.
The missiles are assembled with separate fins, and the instructions include painting instructions with colors called out by name and FS numbers. Decal locations are also noted.
The inclusion of the remove before flight streamers is a big plus in my opinion. A small sheet of thin red vinyl material to be used in making “Remove Before Flight” (RBF) streamers is provided. The instructions show this material first be cut into scale-appropriate strips for streamers. The warnings for the RBF streamers are provided as decals. Instructions for the placement of the RBF streamers on the model is provided in the instructions, Step 26. This is a nice addition that will really dress up the completed kit. Another nice touch by the kit manufacturer.
Painting
Fifty shades of grey? Well almost. Several shades of grey are required to complete the camouflage scheme for this model. I used Tamiya acrylic paints with FS formula found on the internet. The paints were thinned with Mr Color Self-Leveling thinner. The camouflage scheme is a bit complicated, but with some planning is can be replicated and will result in a rather unique appearance.
First, the model was primed with Tamiya fine white primer decanted and thinned with Mr Color Self-Leveling lacquer thinner. This was allowed to dry for 24 hours. I preshaded the panels lines to add some additional depth and interest to the camouflage scheme. At this time I realized how pronounced some of the panel lines and rivets were. I was going to live with it. Each color was applied and allowed to dry 24 hours before the application of the next color. Once the painting was completed I applied three thin coats of Furture thinned 1:1 with alcohol. After the last coat the model was allowed to cure for 48 hours.
Decals
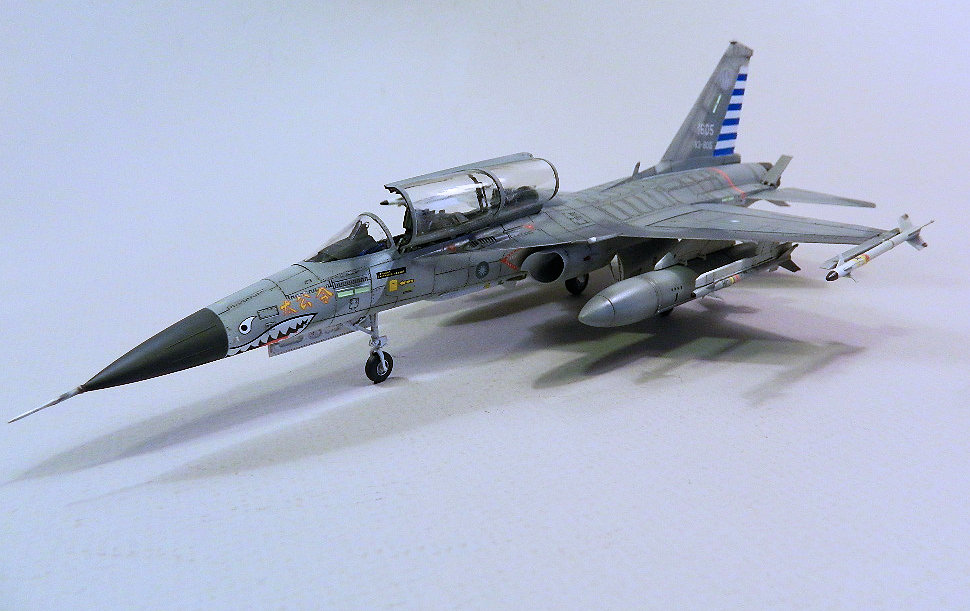
There are markings for six different aircraft, with a shark mouth version included. Deciding on which markings to use is a real challenge, however all are very appealing and should result in a spectacular model, so you cannot go wrong with any choice. I chose the sharkmouth from the 7th Tactical Fighter group, Ching Chuan Kang Air Base from July 2015. I previously felt that sharkmouths only belonged on P-40's, A-10's, F-4 and F-14's, but am now inclined to include the F-CK-1 Ching-Kuo.
A quick soak in water and the decals are ready to go. The wing walkway outlines will require special attention to get each part, and there are four of them on each side, to properly align. Go slow and plan the application and it will work. A light application of MicroSol and the decals settled down nice and proper.
Bonus Sprue
The bonus sprue was a nice and unexpected surprize, however I had mis-placed the assembly instructions. I went to the AFV Club website and was stopped dead by a language barrier. However, being the clever chap that I am I scrolled to the bottom and found a Facebook link, which I clicked on. I left a brief message and shortly thereafter received a reply with a pdf file containing the assembly instructions. Without the instructions there was no way that I would attempt to assemble the missiles.
The bonus sprue is molded in clear plastic with extraordinary fine scribing and detail. Four missiles can be made from this sprue. First there is the "Wan Chien" air-to-ground cruise missile; the "Hsiung Feng II" anti-ship missile; the "Hsiung Feng III" anti-ship missile; and a second variation of the "Hsiung Feng II" anti-ship missile.
In a follow-up communication with the AFV Club Facebook contact I learned that there is no decision yet on the availability of this sprue as a separate purchase item. I hope they do as this is a wonderful feature for the modeler.
Conclusion
When researching this kit I explored the company website. The product page listed the various features of the kit, plus they provide the instructions for the build, all 28 pages. I found this to be especially helpful if I were considering a purchase of the kit on my own. Seeing the various constructions steps gave me some idea of the parts makeup, steps involved, and the various options in the kit, such as underwing stores, weapons, markings and camouglage schemes. This also provide some insight into possible aftermarket accessories that I might "need' (if available) to satisfy my own personal building quirks. However, the only thing missing from the kit were seat harnesses. In addition the FS numbers for the various paint colors used on the aircraft are especially usefull. The information provided is a big plus in my opinion. A visit to the AFV Club website is time well spent. They offer a greater line of products than I had originally was aware.
This is the first AFV aircraft model that I attempted, and I must say this is a very nice kit, and the construction was quite enjoyable. Sure the ejector pin stubs were a bit annoying, but I took great pleasure in nipping each one off with side cutters.
Many thanks to WikiPedia for their help in the research for this aircraft and weapons.
My thanks to AFV Club and to IPMS/USA for the opportunity to build and review this fine plastic kit. With the many small parts involved in various steps this model is more suitable for the experienced modeler, but I would highly recommend this kit to anyone interested in modern jet aircraft. This is a real beauty.

IDF Pre-Production
Forward Fuselage 1
Forward Fuselage 2
Rear Fuselage with Exhausts
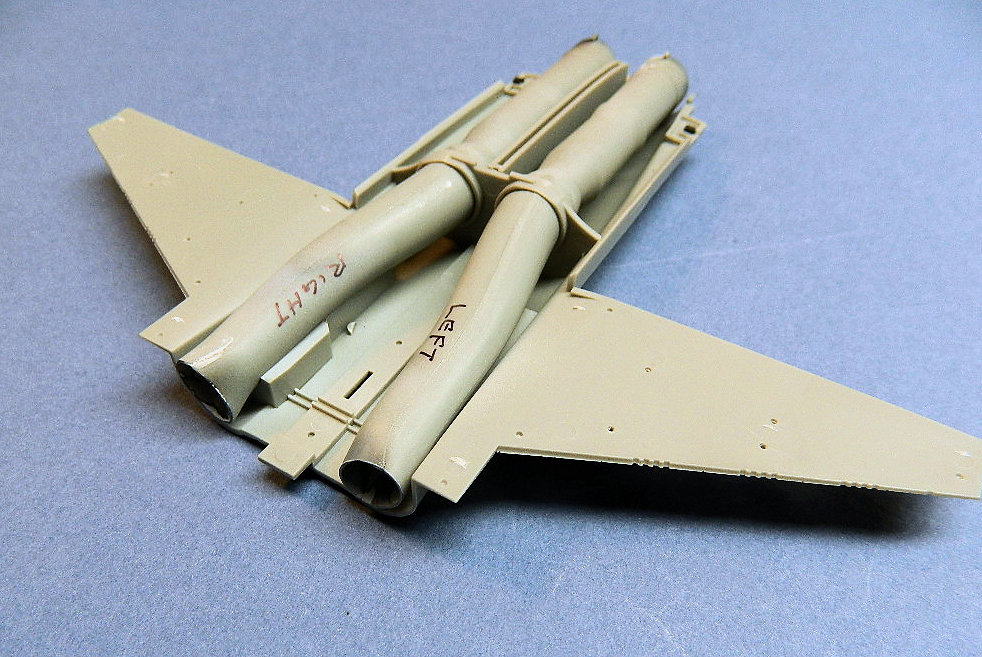
Rear Fuselage with Intake ducts and exhausts
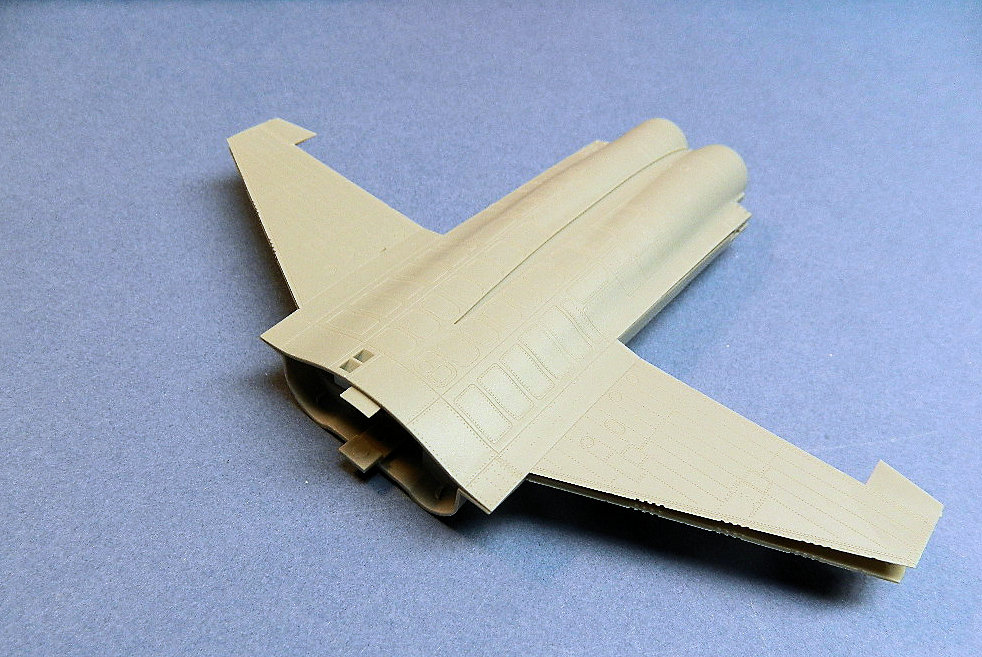
Top and Bottom Rear Fuselage Dry Fit
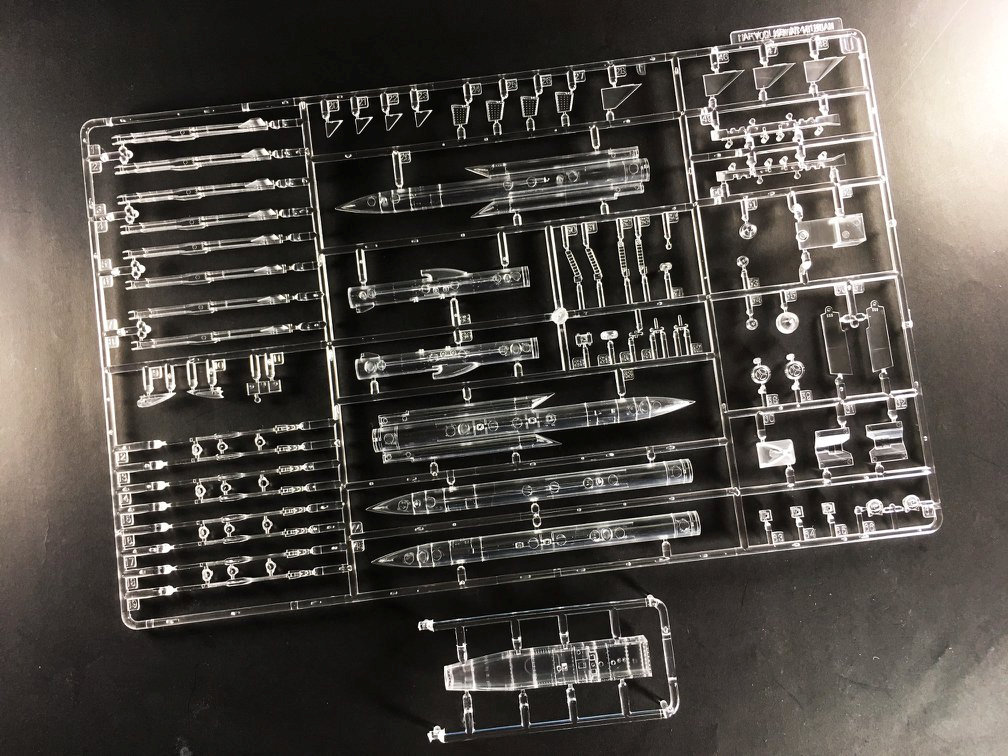
Bonus Sprue
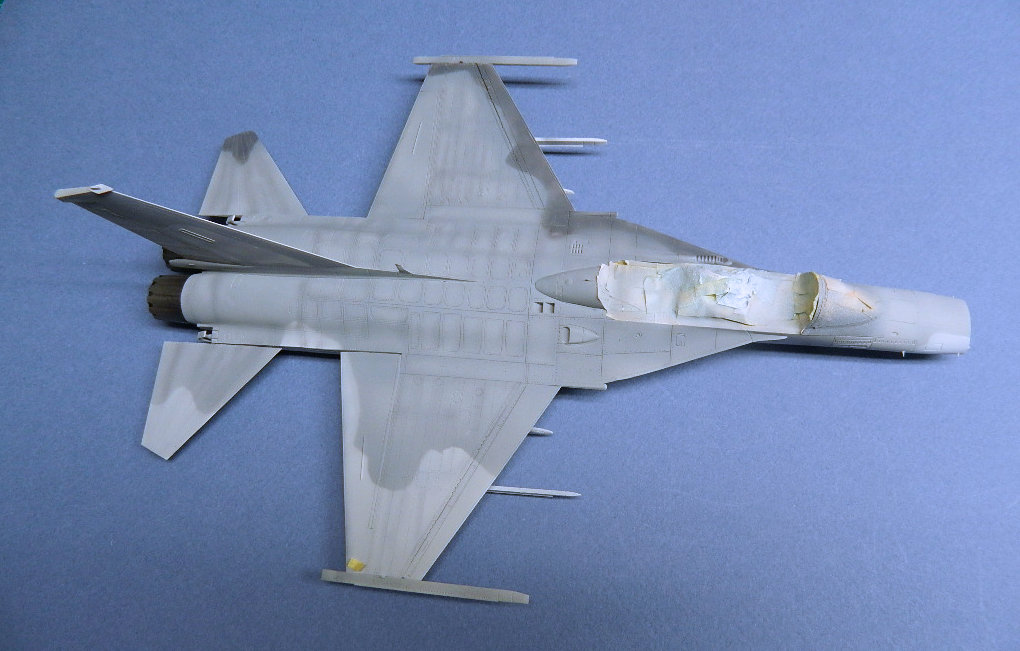
Underside painted
Top Side Painted
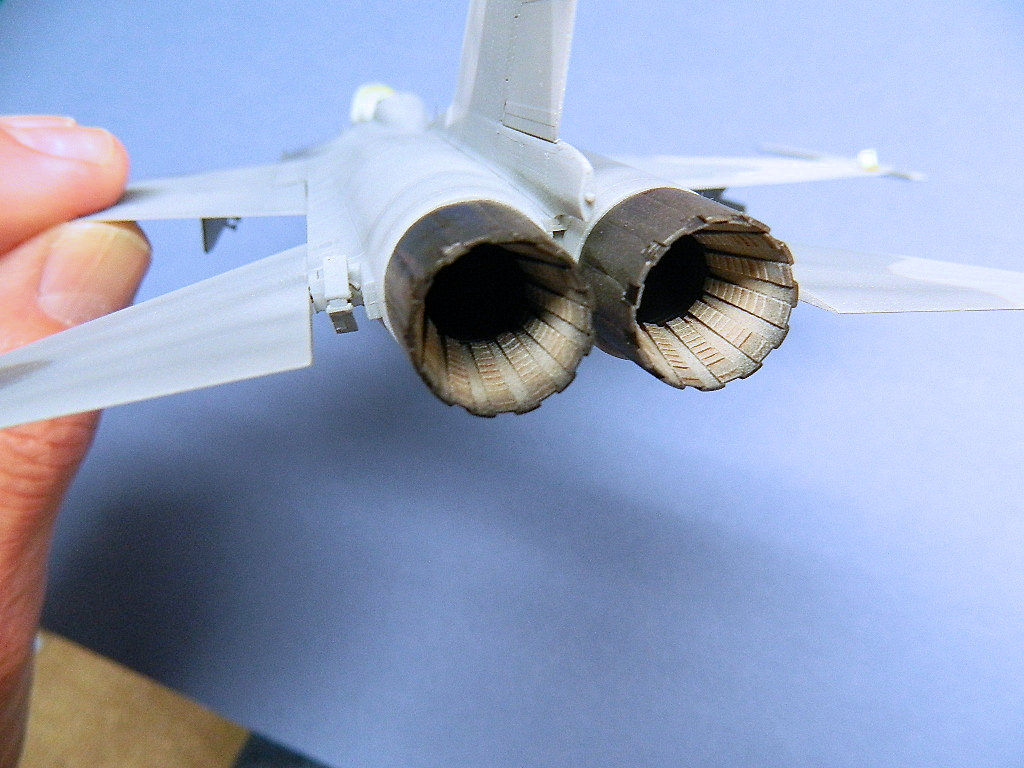
Exhausts painted and weathered
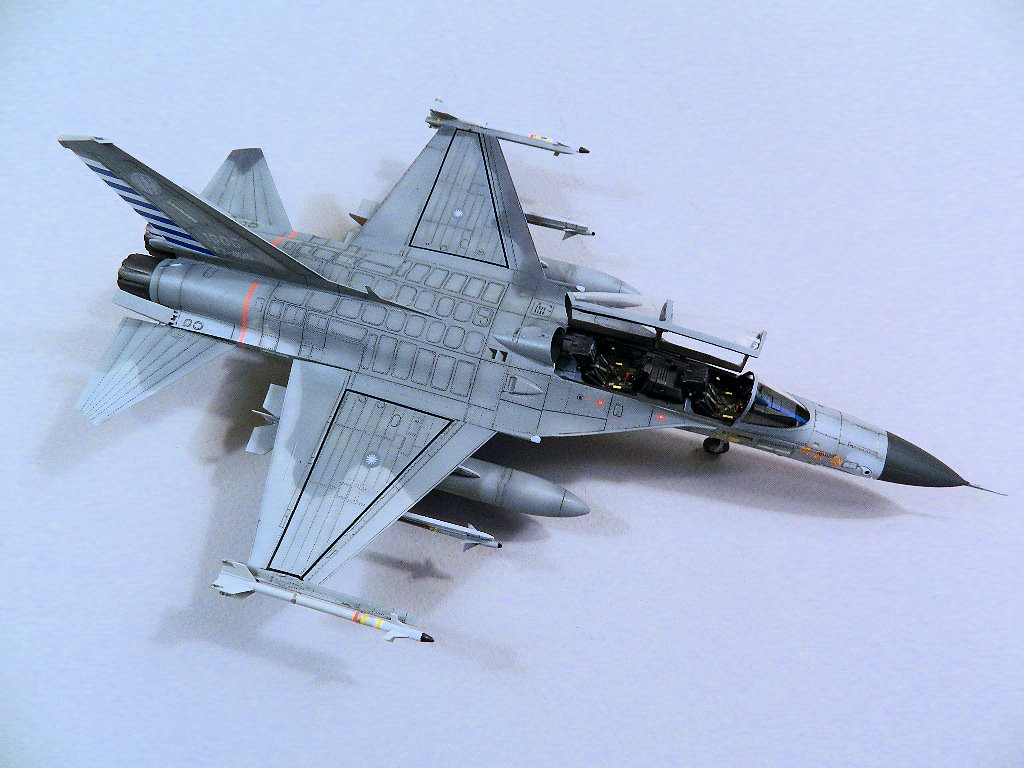
Top View
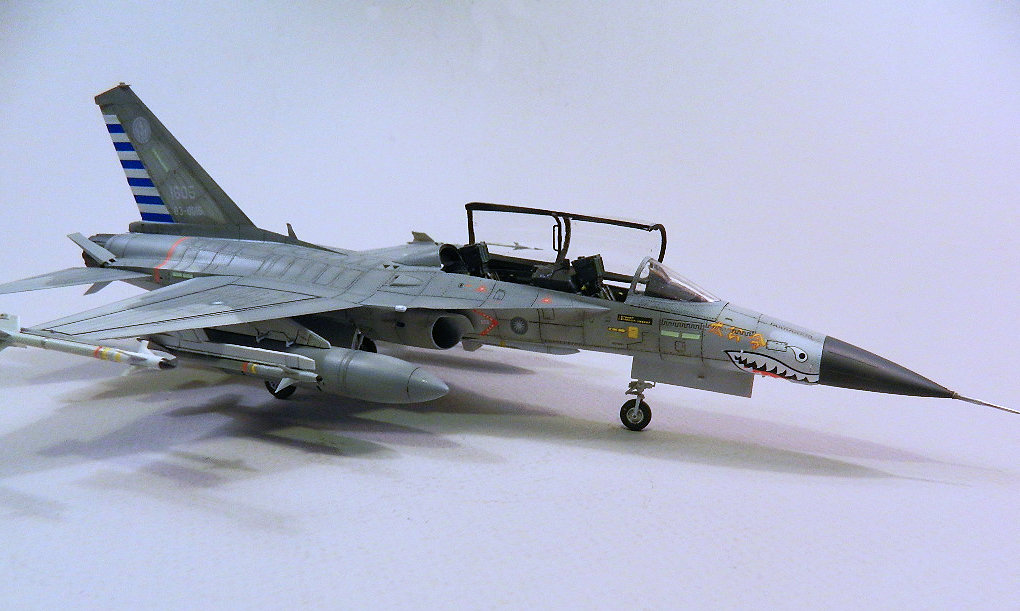
Right Front View
Left Front View
Left Rear View
Right Rear View
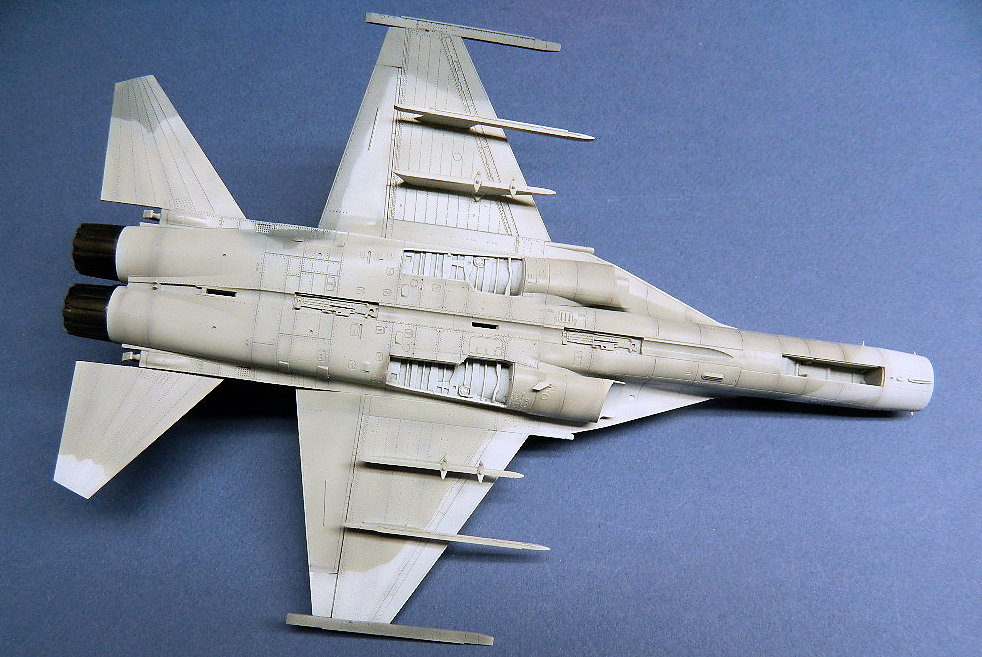
Undersides
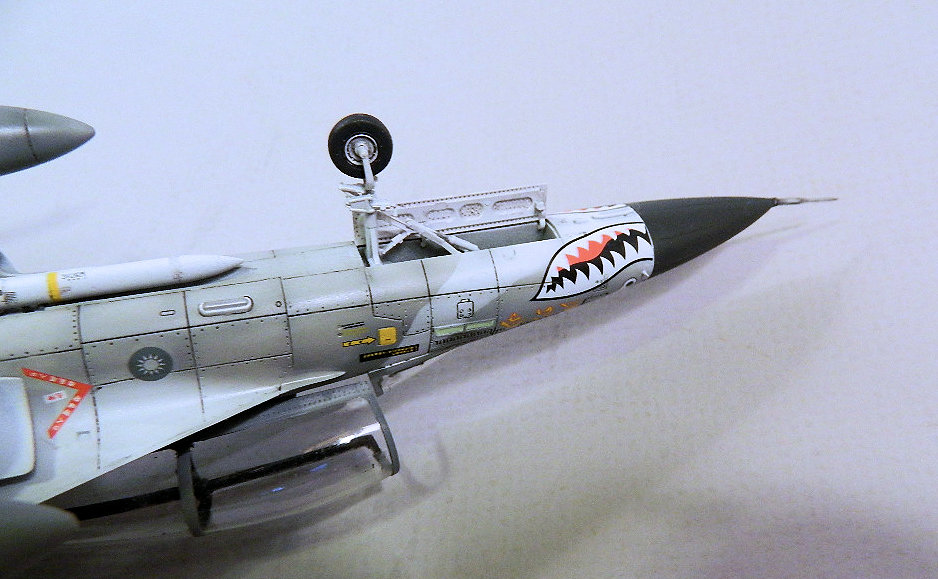
Upside Down Shark
Comments
Add new comment
This site is protected by reCAPTCHA and the Google Privacy Policy and Terms of Service apply.
Similar Reviews