
F4U1A/2 Corsair
Overall Evaluation
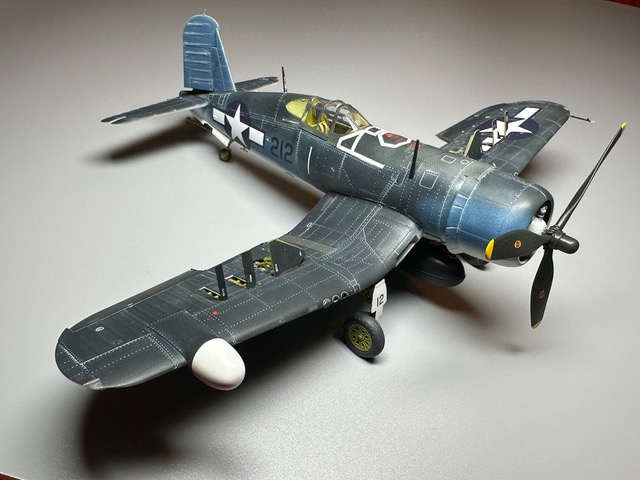
‘Move over, there’s a new sheriff in town’ – at least as quarter scale Corsairs are concerned. As I have built this F4U-2 kit, I am overjoyed with the kit’s attention to details and overall accuracy. As I previously said: Almost any way you slice it, this is a beautiful kit! And, for the price, you receive two beautiful Corsair kits. These kits are highly recommended both for newer builders interested in the Corsair as well as those who felt the best such kit was the other Japanese company. Now we have a higher bar and it’s a great set of Corsairs.
Now, as for the review itself-
A Very Brief History the Corsair [from manufacturer’s website]
F4U Corsair is a famous carrier-based fighter aircraft deployed by U.S. Navy in WWII. With the first prototype manufactured in 1940 and final variant produced in 1953, it has the longest production run of any U.S. piston-engine fighters.
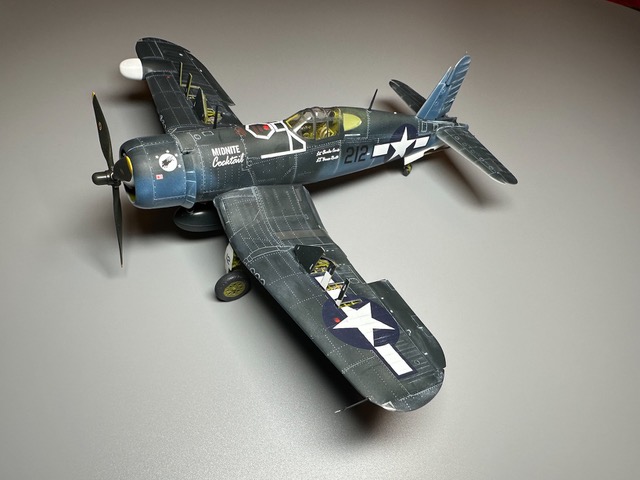
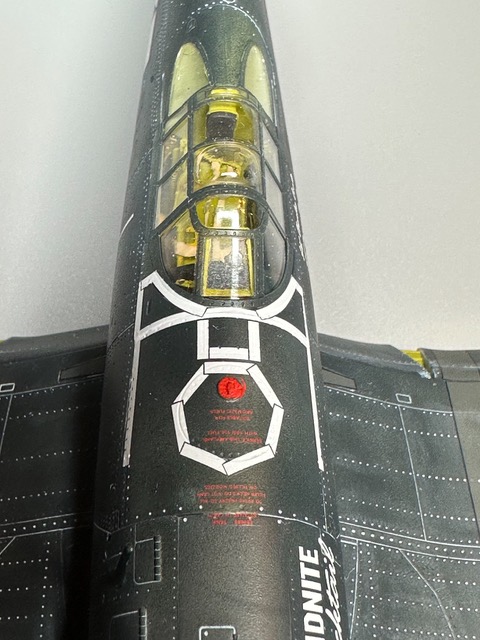
F4U is a single-seat, single-engine and inverted "gull wing" fighter who is renowned for its good performance, speed, ruggedness, and firepower. It is the first fighter in US with a speed over 640km/h and one of the fastest piston-engine fighters. Beside air warfare, it also could be used in tactical bombing. F4U-1A is an upgraded variant of F4U-1. The most notable distinction from F4U-1 includes lifting the pilot’s seat by 18cm, replacing the -1's "birdcage" framed canopy with a semi-bubble canopy, retaining only two frames on either side and a distinctive metal hood over the pilot's head. Thus the pilot’s overall visibility was greatly increased. Furthermore, based on actual experience of F4U-1, F4U-1A also removed top cowl flaps of cowling and replaced the open window in the floor of the cockpit with a mental plate.
The initial design of night-fighter Corsair was finished in Dec 7 1941, the date of Japanese’ surprise attack on Pearl Harbor. The first prototype, designated XF4U-2, was modified based on a F4U-1 of first mass production and took its first fly. There were total 32 F4U-2s were converted from F4U-1s at Naval Aircraft Factory at Philadelphia. The F4U-2 has an AIA radar antenna mounted in a radome, placed two thirds of the way along the starboard wing. The outermost machine gun was removed from that wing to help balance the additional weight. The AIA radar system is capable of searching enemy fighters within a range of 6km. Moreover, F4U-2 was also equipped with a flame hider, radio altimeter, radar beacon responder, and autopilot, improved the lighting system, and replaced the standard high-frequency radio with a very high frequency radio.
Caveat: There is also a small historical summary detailing a more complete history of the F4U aircraft with the kit’s instructions. I know my eyes are not good as they used to be, however, I had to hold this informative outline and almost every other part of instructions up closely to my OptiVisor just to read them. The details are all there, but they are very small and very finely printed.
The Kit
Almost anyway you slice it, these are two beautiful, entirely separate kits creating a great buy for your money! Especially when you consider the various competitor’s kits, e.g. Arii, Academy, Airfix, Bandi, Monogram, Hasegawa, Heller, Hobby Boss, Hobbycraft, Idea, Lindberg, Matchbox, Minicraft, Otaki, Revell, and Tamiya (which is not an exhaustive listing of the quarter scale kits of the venerable Corsair).
Of interest to many newcomers to the Corsair is why the ‘gull wing’ configuration looks the way it does. The answer is that the wide arc of the F4U’s propellor created the need to insure deck or ground clearance.
I suspect there is no aircraft better-known than the unique gull winged Chance Vaught Corsair, at least from this Navy centric modelers viewpoint. In my opinion, the F4U is the iconic naval aircraft of WWII and the Korean War.
You are greeted by a well-illustrated 26-page instruction booklet depicting the four aircraft (which have the beautiful Cartograf decals provided), and four full color illustrations with decaling notes for the four aircraft as well. From my count, there are a total 28 sprue sections, two cockpit masking sets, two small photo etch and a decal sheet in each kit.
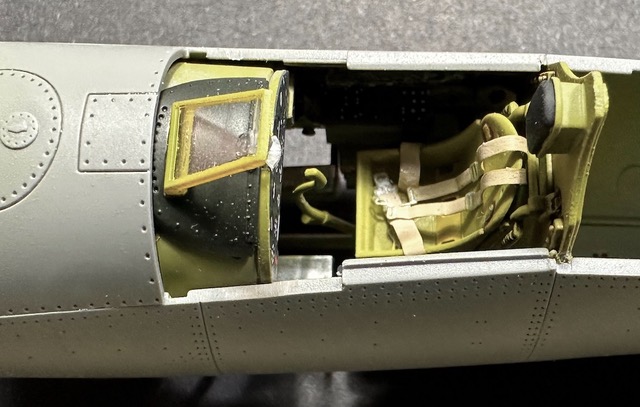
While the instruction drawings are all in black and white, they are three dimensional and provide guides for both unfolded and folded wings. The kit includes interior details where potentially visible. I don’t believe such fine details and highly detailed engineering has been aside from such kits as Arma and FineMolds.
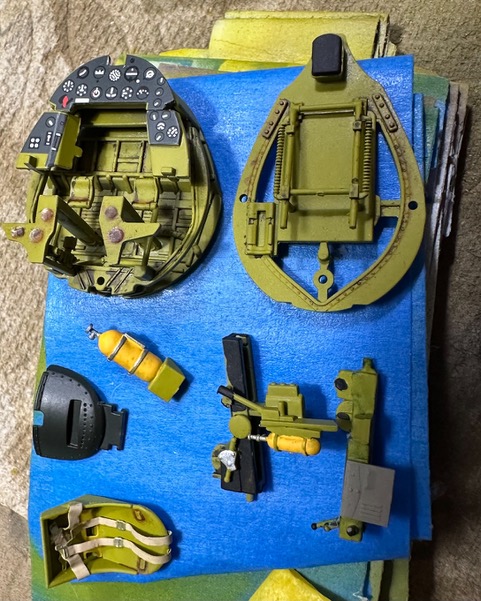
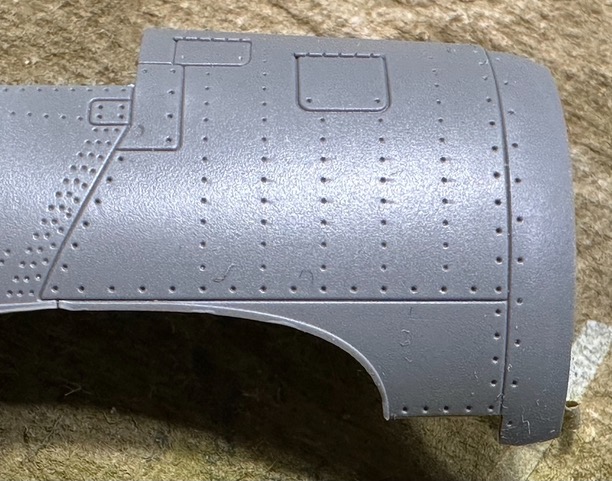
Using my Optivisor, I am very impressed with the small rivet details on the fuselage and wing surfaces. Even the flare pistol along the cockpit wall is a separate item.
As I have only started my construction, several noteworthy aspects of the Magic Factory are clearly evident: there is no flash evident and if you’re using a good pair of nippers, you’ll have little sanding to clean up any connection points. The fit is also great: There are a number of very tiny parts (almost all of tree #G), each of which fits precisely the intended hole or location.
I began by trying to build both kits simultaneously but quickly came to my limited senses and decided to tackle the ‘birdcage’ F4U 2 aircraft, as this is a subject I have yet to tackle in earlier builds.
The Build
The key detail features include the following:
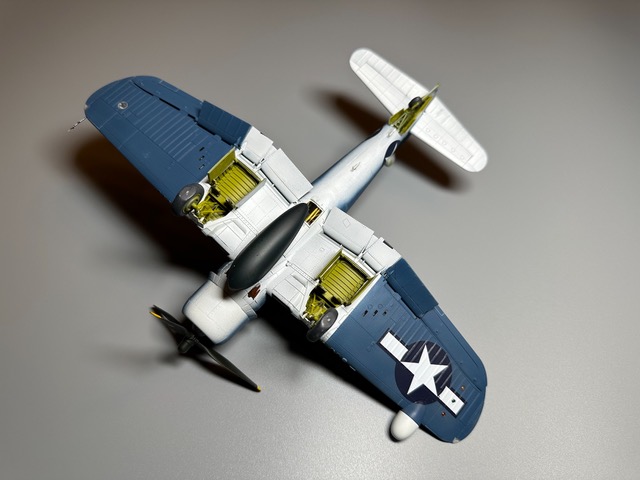
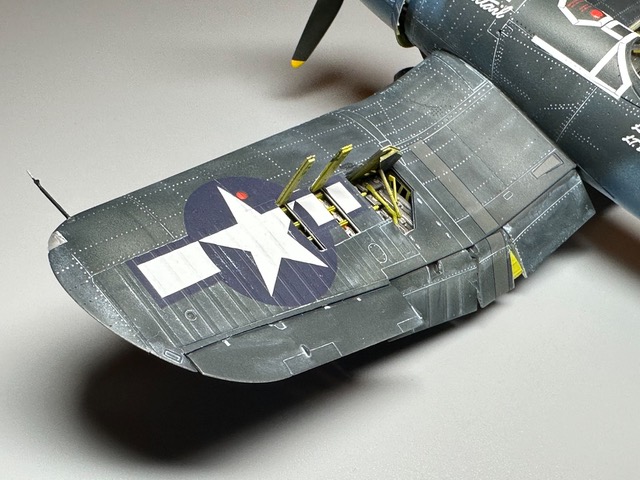
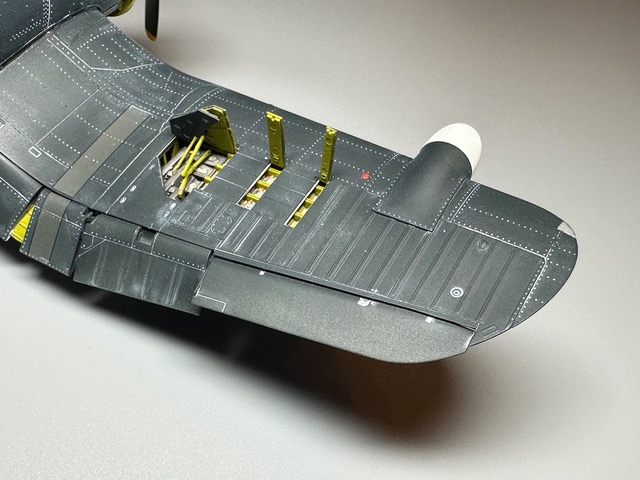
- Open gun bays
- Possible wings, elevators, and flaps
- Very accurate wheel wells
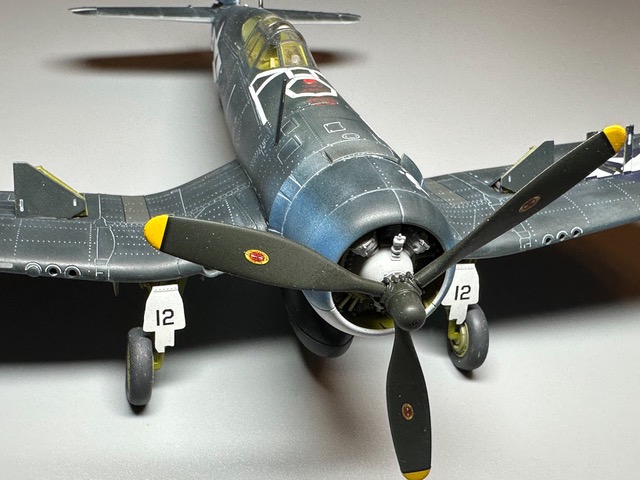
- Detailed engine
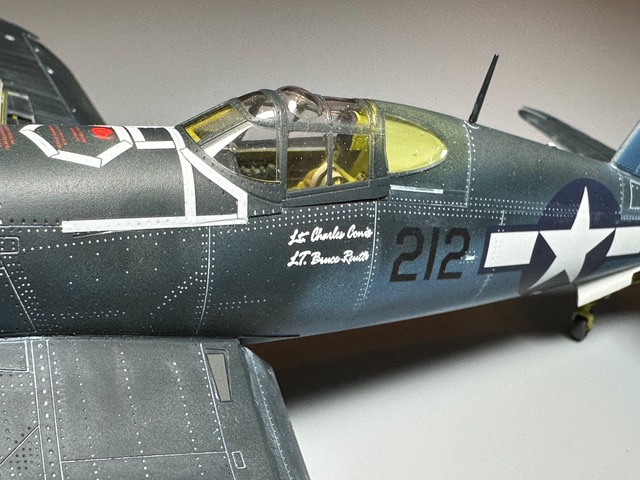
- Detailed cockpit
- Separate mask sets for both the F4U and -2 a/c
Small PE fret, which for the first time I’ve seen, no attachment points requiring filing or sanding—impressive in its own rights
An interesting feature of this kit is the minute engineering detail contained throughout the kit. I am hopeful that some of the detailed construction close-ups more clearly demonstrate the exceptional surface details and the forethought in the interior details shown.
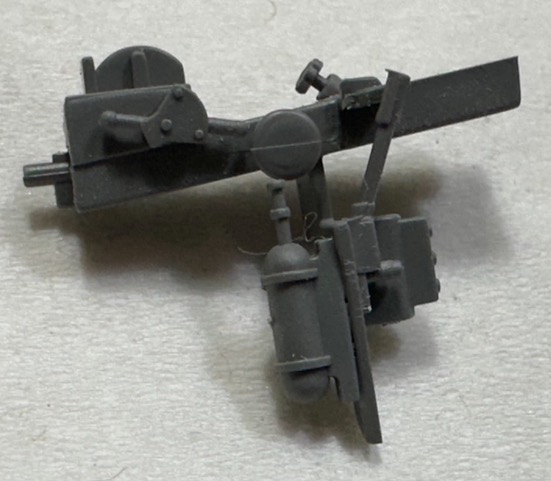
Assembly of the fuselage halves requires dexterity, some juggling of the halves and finagling to achieve the close fit that the engineers have sought to achieve. My first serious issue arose as I installed the bullet proof shield (part I-4) and then attempted to place the front wind screen (part I-1). I couldn’t make this combination fit and had to remove and modify the base of the bullet proof shield to insure what I believe is correct. The engine assembly is also mastery itself, with 14 parts combined to replicate the P&W R-2800-8 Double Wasp twin row 18-cynlinder engine with its distinctive top mounted twin distributors.
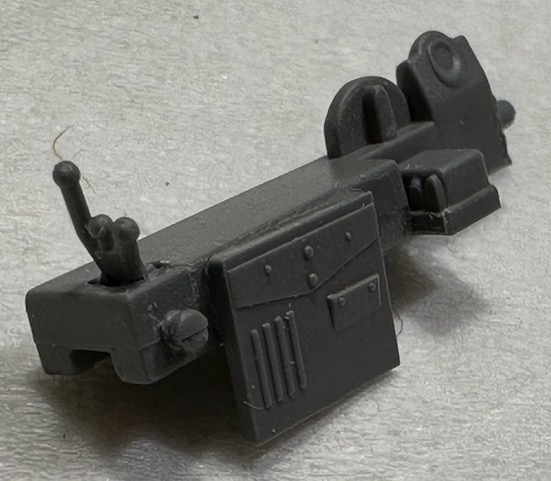
The next major component is constructing the wings, the a/c gun bays and the six .30 cal. machine guns. As you can see from my small images, the bays show a great amount of detail. Sadly, all of this shows little when the wings are assembled. Another problematic spot (at least with my rudimentary skills) were the wing tip lights—they are very small and positioning them was challenging to say the least. Another seemingly minor note: with the radar intercept antenna housing added to the starboard wing the outer .30 gun should be removed to offset the weight of the radar housing. A further note illustrating the high degree of engineering is shown in this kit’s inclusion of specific pieces such as the unique dash and the gun plug covering omitted the .30 machine gun.
I ran into my first major construction glitch when working to meld the wing structure to the fuselage. I am not certain where I ran off the tracks, but I couldn’t force the wing structure into the fuselage without performing some serious cutting to remove the protruding fuselage inner pieces, which in turn allowed for a fit….of sorts. This resulted in a sizeable gap around the wing roots. I know the interior components fit just right and were a perfect match for fuselage interior, leaving me wondering where I went wrong.
Another example of Magic Factory’s attention to detail is shown when building the propellor assembly, consisting of five parts. There is a very tiny tab at the end of each propellor blade which assures each blade is aligned perfectly.
I did encounter several hurdles when attempting to understand the kit’s instructions. For example: sequence #33 I found to be almost unintelligible. The drawings are not at all clear and left me to just guess where the parts #A1, A2, B21 and B11 should be placed.
You should also refer to several reviews available online, not all of which feel this is ultimate Corsair kit (due in large part to the surface of the kit and or the location and depth of the rivets).
Painting
Painting references are provided for AK, Mr. Color and Tamiya, though I expect most modelers will find the basic three-color navy colors across most paint lines.
I’ve began the transition to water-based paints, and once again am thoroughly impressed with the results using the Mr. Hobby Aqueous paints for all the exterior and most of the interior painting. It lays down beautifully, dries quickly and provides a hard surface. I used a small amounts of Walters Solvaset #904-470 and Microscales Micro Set #MI-1, both of which provided close fitting adhesion when dry and no problems with either product.
This includes White (H-1), Intermediate Blue (H-56), Navy Blue (H-54) and Interior Green (H-58). Additional small surface details were picked out using a variety of acrylics. Mr Metal Primer-R (MP-242) was used to provide a paintable base for subsequent PE surfaces. As I painted the white, I quickly realized that I may have over thinned it and found that several light coats would provide the complete coverage required. In the final painting I found each of the colors were dry to the touch within 15-20 minutes and when left overnight were hard as a rock.
I used Mr. Hobby’s Aqueous Hobby Color Thinner (T-111) to ensure the correct chemical mix (though I’ve also read about other thinners being used or attempted including such products ranging from rubbing alcohol to gin or vodka). I should admit that I have been trying some of these latter named products with some success (with gin winning hands down)--though not with the aqueous paints being thinned). I thinned using the T-111 about 20-30%.
Decals
The pre-cut stencils are and excellent fit to the windowpanes.
As for the decals, you are provided with a variety of markings on a single sheet produced by Cartograf in Italy. Of the four sets provided I choose to finish my F4U-2 in what I felt most appropriate, an aircraft flown in the combat over Kagman Airfield, Saipan in April 1944 (where I was a dependent from 1947-49 and had a great opportunity to see and climb around the many wrecked Japanese aircraft then stacked around the island’s airfields—what I wouldn’t give now to roam around with my adult eyes and interest in those aircraft).
The detailed printing on these sheets is all in register and complete down to the last detail for the four squadrons shown on the two large three-color fold-out prints. And as I type this, I am willing to bet there are many more decals for these two a/c headed our way.


Comments
Add new comment
This site is protected by reCAPTCHA and the Google Privacy Policy and Terms of Service apply.
Similar Reviews