
A-4E Skyhawk
Short History
The Douglas A-4 Skyhawk is a ground attack aircraft designed for the United States Navy and Marine Corps. The delta winged, single-engine A-4 was designed and produced by Douglas Aircraft Company’s chief designer Ed Heinemann. The aircraft was later produced by McDonnell Douglas. The A-4 was originally designated the A4D under the Navy’s pre-1962 designation system. The A-4 was in response to a call by the US Navy for a jet-powered attack aircraft to replace the older Douglas Skyraider. Ed Heinemann opted for a design that would minimize size, weight and systems complexity. The little Skyhawk quickly began to be called by other nicknames such as “Scooter”, “Kiddiecar”, “Bantam Bomber”, “Tinker Toy Bomber”, and one of its more famous of nicknames, “Heinemann’s Hot Rod”.
The Kit – What’s in the Box
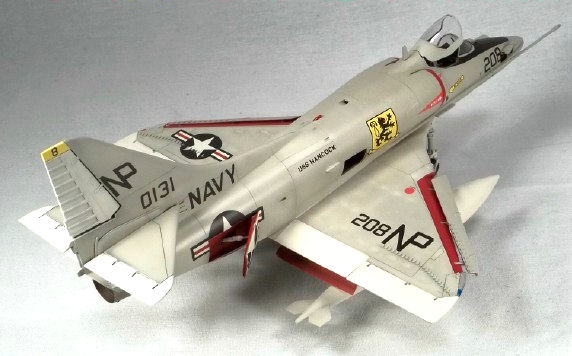
This kit is a brand new tooling from Trumpeter, featuring 16 grey sprues, and 3 clear sprues totaling 449 parts. Also included in the box is a set of metal main landing gear, a photo etch fret containing detailing parts for the ejection seat and air brake detail, as well as a set of rubber main tires that are to be installed on plastic wheel hubs (I am partial to just using plastic or resin wheels as I am not a big fan of these vinyl/rubber tires). The decals provided give you the option of three schemes: BuNo. 149993 of VA-72 flying off of the USS Independence during 1964, BuNo.150131 of VA-212 flying off of the USS Hancock during 1964, and an Aggressor bird of VF-43 BuNo. 151118, which is a beautiful paint scheme for this aircraft. One of the sprues also gives you the option of installing the avionics hump if you should desire to do so. Looking at the fuselage design, you can safely assume that a two-seat version will be coming soon.
Getting Started
When I was told that I would be getting this kit for review, I was quite excited since I am a BIG “Scooter” fan and rather enjoy building Trumpeter kits. This kit was no exception! Building this model was an ABSOLUTE JOY!! The model went together very smoothly and really reminded me of a “snap-together” type of construction.
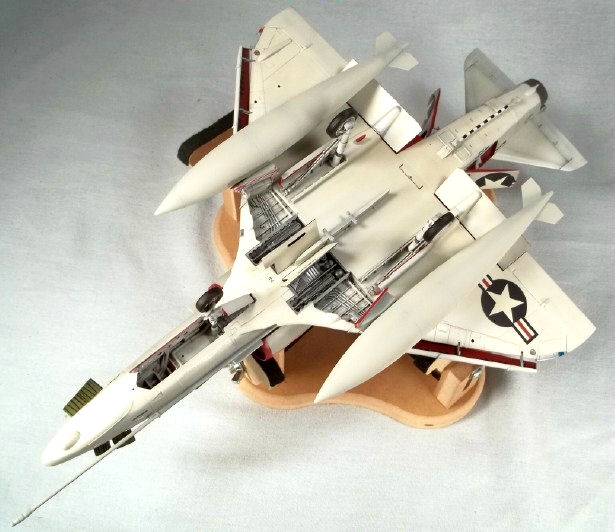
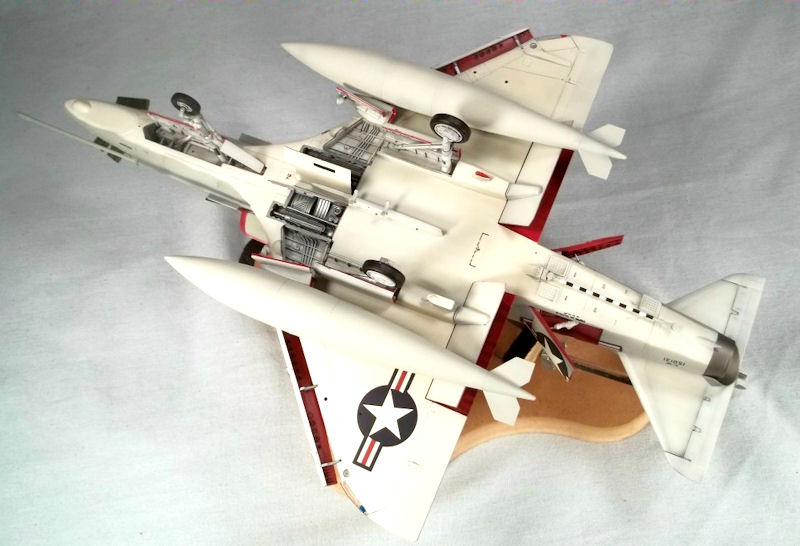
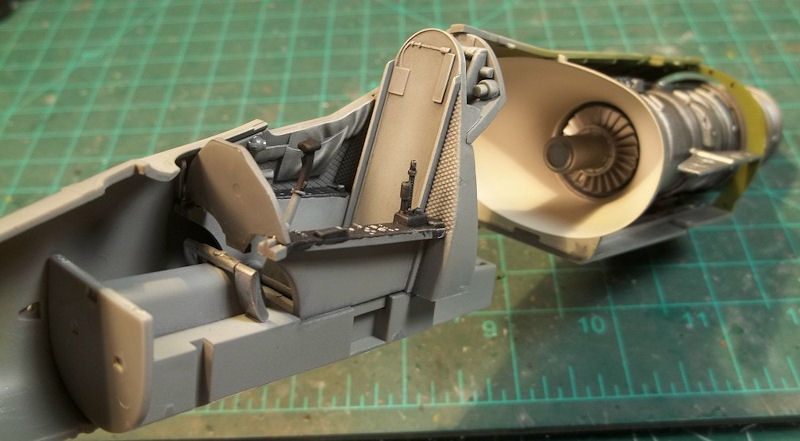
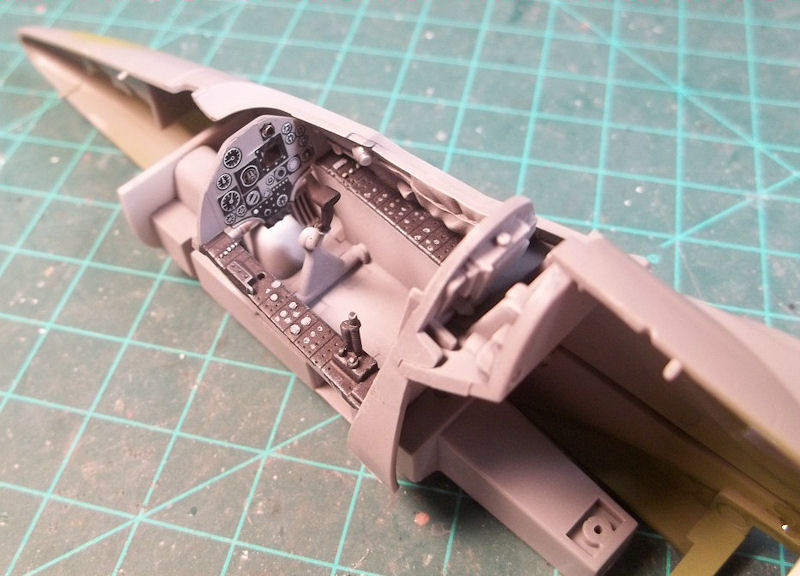
Now, as well as this girl went together and the overall design being quite nice, I was still dismayed by some of the detailing decisions (or lack thereof) made pertaining to this kit. In a 1/32 scale airplane kit, I fully expect to see a very nicely detailed and complete cockpit, but with this kit I was a little disappointed. The sidewalls of the fuselage were nicely done but the control panels on either side of the cockpit tub were very sparsely detailed and the instrument panel was simply a decal. (That, for some reason, seems to be more and more the trend these days with aircraft cockpits and I have to wonder if the model companies are just assuming that a resin cockpit will be made available via aftermarket and are cutting tooling costs to allow for the aftermarket products to take up the slack in those areas. I hope not.) I would prefer not to have to rely on aftermarket products to spruce up a model (especially in 1/32 scale), although I am the world’s worst about buying a detail set to throw into a build, so I can’t say much about the cockpit as it is in the cockpit. I guess the key word here is “rely”. Trumpeter did find a way to get around the sparse detail of the cockpit by designing the canopy to be glued in the closed position. Again, on a 1/32 scale aircraft, I want the canopy open and the cockpit in full view, so I glued my canopy open.
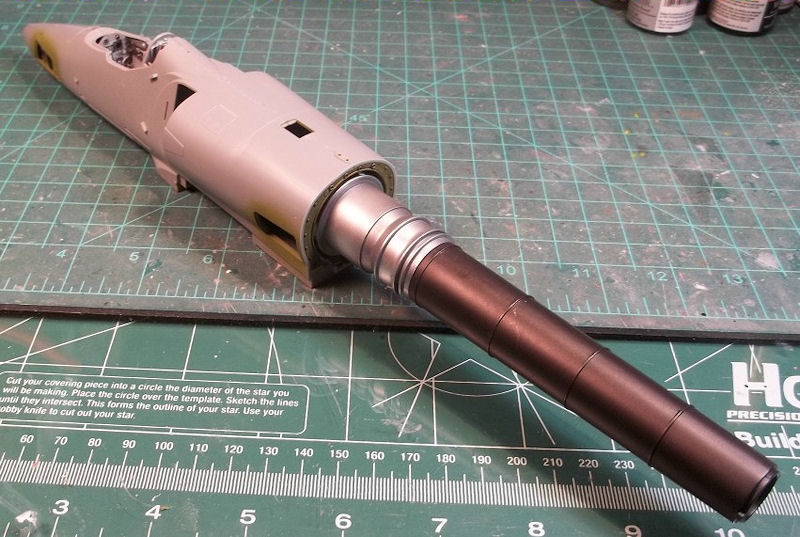
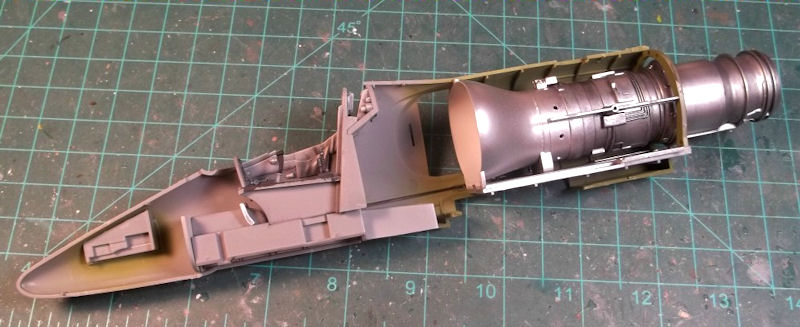
The engine that comes with this kit is very nice. It is not overly detailed but a good base to have fun with some scratch building and super detailing, if you so desire. I would not recommend going too overboard, since the engine is going to be completely hidden unless you leave the tail section off or you open the two access doors at the lower, mid fuselage area on either side to show that part of the engine (which is not much). The fuselage interior is complete with all ribbing and a couple of bulkheads that secure the engine in place at what would be the normal separation of the fuselage on the real aircraft when the tail is removed to service the engine. One drawback about the fuselage ribbing is that you run into some slight “sinking” of the plastic in those areas on the exterior of the fuselage. It does resemble skin fatigue on the aircraft somewhat, but I think I would like to do that myself versus the kit having this look out of the box, especially since this is probably due to the injection process and not something that is intended by the model manufacturer. Another nice feature is how well-detailed the main landing gear bays are, as well as the adjoining gun bays. The instructions indicate closing the gun bays but I elected to glue the doors open so all of that nice detail is not covered up. Again, it is amazing to me how certain areas like the gun bays got a lot of attention to detail but are shown closed up when areas that would normally be seen such as the cockpit result in very little detail. Also, it would be a good idea to add a little weight to the nose section of this bird in order for it to sit on the nose gear. The instructions did not call out for nose weight so I assumed it did not need any. Well folks….it did!
The other thing I loved about this kit is that all of the control surfaces are separate and give you the option of showing the model dirtied up or in a clean configuration. The included weapons package is nothing short of excellent! You can trick your A-4 out with any combination of fuel tanks, Mk 82’s, AGM45’s, AGM12’s, AGM65”s or M117’s. If you notice in the pictures, my outboard stations have not been installed yet because I have not decided on what to put there. Right now I am thinking Mk 82’s. What do you think?
Painting and Decals
I REALLY wanted to paint this bird up as an aggressor aircraft, but since I was running a little behind on getting this review finished (I know, John, don’t shoot me), I decided to just go with the two-tone scheme and the markings for the A-4E of VA-212, flying off of the USS Hancock circa 1964. Upper surfaces are painted in flat gull gray and the lower surfaces were painted with Model Master flat white and some very subtle post-shading for good measure.
Okay, boys and girls, this is where I have to say that the decals for this kit are both a blessing and a curse. These decals settle down and conform to the detail of the model without the need for any kind of setting solution, as the decals are so thin. But therein lies the problem, or “curse”, if you will. With the decals being so thin, if you leave them in the water to long they will curl up on themselves and it is next to impossible to get them straightened out again. The other disadvantage to these thin decals is that they are really easy to distort when moving them around on the surface once they start to adhere, which is pretty much immediately (lots of water here, folks!!). My best advice is to put the decals in water for just a few seconds, then set them on a paper towel to wick away the excess water for a few more seconds, then apply. Also, be sure to leave a little extra decal paper on one edge to make it easier to apply to the surface of the model. These decals will curl on you when you are transferring them to the model from the paper backing of the decal, so you have to be careful here. The other problem I had with these decals is the fact that the lighter colors such as the yellows and reds were too bright, the Stars and Bars were completely wrong in color, and the stars on a couple of the decals were rounded off and not pointed the way they should be. I had to use Stars and Bars decals from a different model in order to complete finishing my bird up.
Weathering and Detailing
I did spend some extra time on weathering this model through the use of oil washes, pastels, and a graphite pencil to enhance the panel lines and such to make this bird look like a typical front-line aircraft doing a hard job under very tough conditions. There was no detailing done to this kit since I wanted to build it “out of the box” to show what this kit was capable of with some TLC and without all of the aftermarket detailing and such. Thus, the extra time on the kit and my tardiness on completing this review. (Sorry again, John)
Conclusion
As stated earlier, I ABSOLUTELY loved building this model and I plan to purchase another one of these kits and spend the extra time detailing the engine and cockpit so I can really make this model jump out. Oh, yes, I will definitely be painting my next Skyhawk in the Aggressor scheme. I will use aftermarket wheels and decals for that build, though.
Now, I know that a few Trumpeter kits have exhibited some inaccuracies in the past, but looking through my reference books and drawings, I would say this kit represents the shape and lines of the Skyhawk quite well and very accurately. (I left my rivet counting days behind me long ago so I did not pull out the ol’ ruler to measure for length and width dimensions, but in my opinion I think our friends at Trumpeter did an outstanding job with this kit.)
I would like to thank Trumpeter and IPMS/USA for the opportunity to conduct this review.


Comments
Add new comment
This site is protected by reCAPTCHA and the Google Privacy Policy and Terms of Service apply.
Similar Reviews