
Lockheed F-35A Lightning II
Hobbico and Italeri USA once again earn appreciation from IPMS USA for providing a sample of a long-awaited product, the Italeri 1/32 F-35 Lightning II. Of course, the usual bow and thanks go to IPMS USA leadership for sending me this kit!
This kit is a medium sized box containing Italeri’s standard medium gray plastic, yellow-tinted clear canopy and other parts, a photoetch fret for some details, a small sheet of masking for only some/part of the Low-observable (LO) panels, and an excellenft Cartograf decal sheet with markings for US, Israeli, British, Australian, and Netherlands users.
Initial impression is good; the weapons bay will be the hard part, and this was proven out in construction. The detail is there and if you are not in a hurry will reward you with an excellent focus point for your efforts.
Announced about two years ago, this kit has been under development for a while and exhibits current details of an ”A” model. For all those clamoring for the other two versions, “Best git bizzy” with your own block of wood, knives, and sandpaper… because depending on how this kit sells, we may or may not see this one in the other guises anytime soon, and those don’t have as much in common with this kit as some think. Case in point are the two available 1/48 F-22 kits; both it appear to be short-sellers for some reason, given the wire-brushing from the perfection crowd, and the number I’ve seen on sale tables.
Before I begin MY review, my fellow modeling Junkie at work, Mahlon Smith provided me with a few trouble spots which I addressed along the way. Two stick out: the soft plastic landing gear, and some of the fit areas along the usual culprits, namely the intakes and along the chine. I did a lot of clamping, gluing, cementing, and filling in these areas.
I built this kit over a week’s total time; two days in a hotel outside of Barksdale AFB while I was TDY, where the basic interior work was started, three days over a weekend at home when the required home jobs allowed, and two evenings while up at Omaha after doing work up there. The last night started when I got back from work around 1800, and finished at 0245 the next morning. I delivered it to the reviewer’s table where it promptly lost a missile to a viewer. Applied Superglue and it was back on its feet. Such is the life of a model in the petting zoo.
Italeri went out on a limb with this kit; there are some details missing, which I tend to overlook because aftermarket takes up the slack. The cockpit in particular in this new F-35A is a great example. Some points:
- The cockpit is basic, with a decal instrument flat-panel in a “turned on” setting. Otherwise it’s like a Black TV screen after everyone has gone to bed. Lots of little side panels and small things like the landing gear retraction switch.
- The throttle and control handle are detailed, the kit photoetch set addresses the cockpit sills and other details, and the seat with PE harness appears to represent the basic item as we are able to discern from photography.
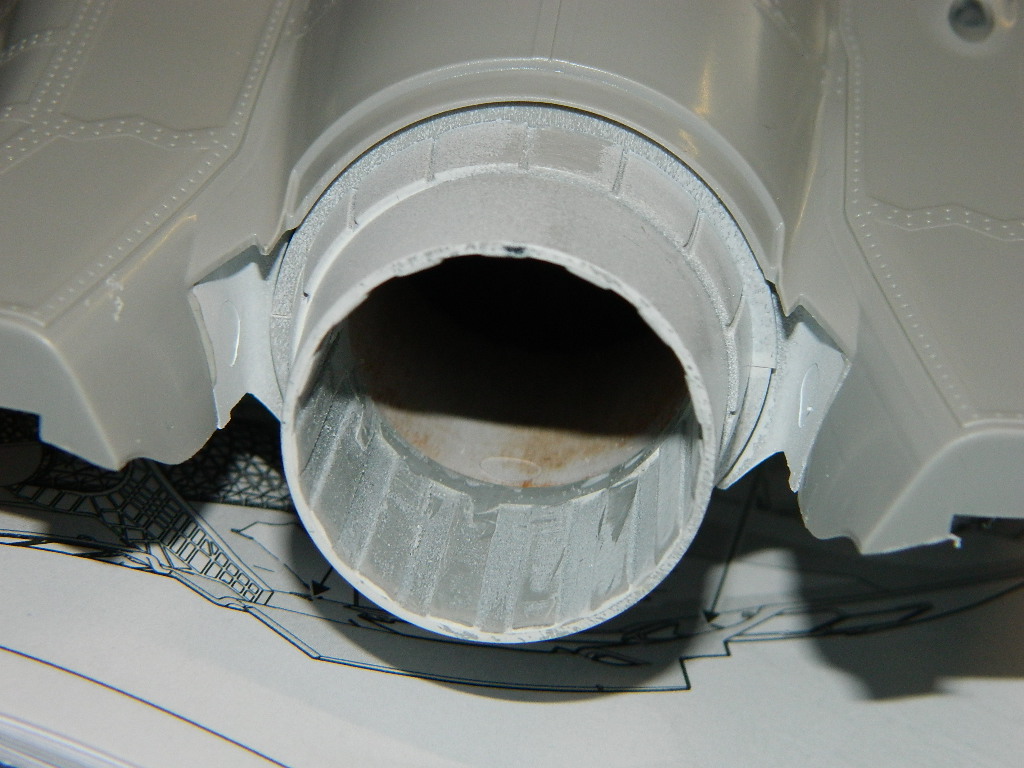
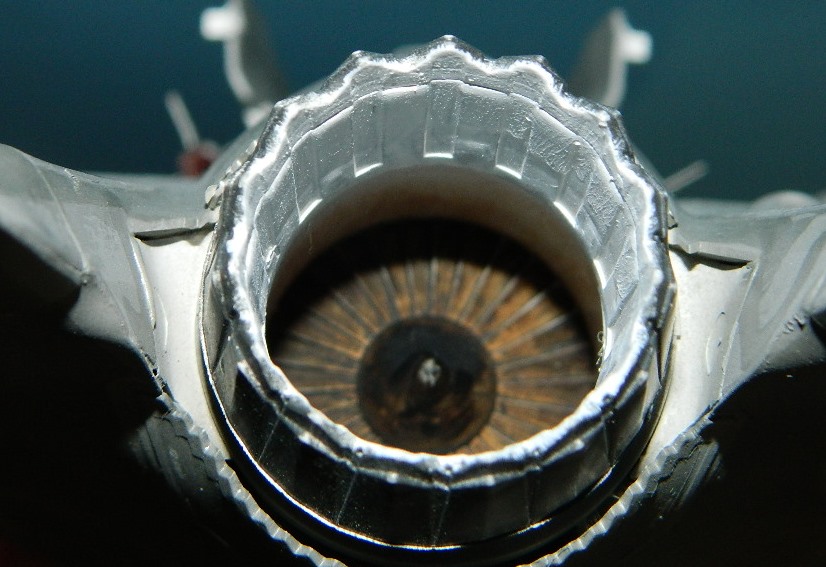
- The exhaust nozzle has a bit of an awkward seam around the circumference as it was molded in two parts, to provide detail on both sides. The pour bullets are located deep in the throat of the nozzle, so cleanup is a bit of a chore, but it puts the offending pour stubs out of direct view if you don’t have the tools to clean it up. There is no flameholder grid, and as decent photographs are not within my research reach, I must surmise the area is still pretty well classified.
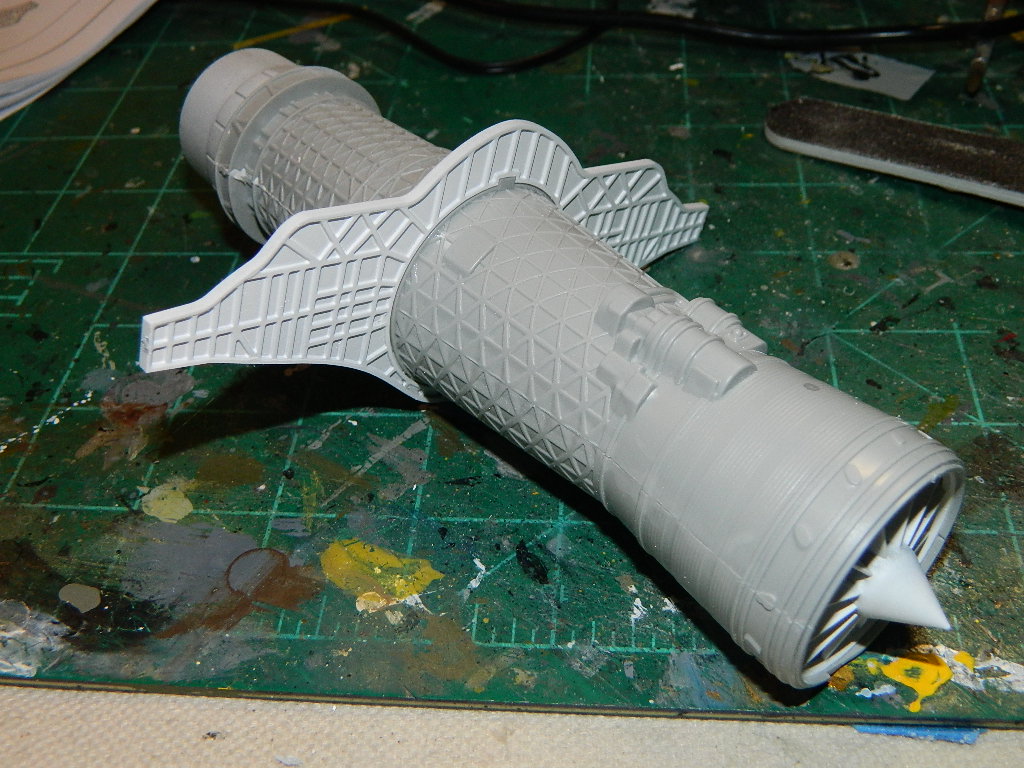
Notables in the Kit: Included is a complete Engine, representing the Pratt and Whitney F- . Although you cannot see the engine intake fan AT ALL (like a good stealth fighter should be) and there are no panels to take off/open, it’s there for the diorama crowd who want to show the engine.
The Air refueling slipway and door can be shown open. It adds visual effect… which I used.
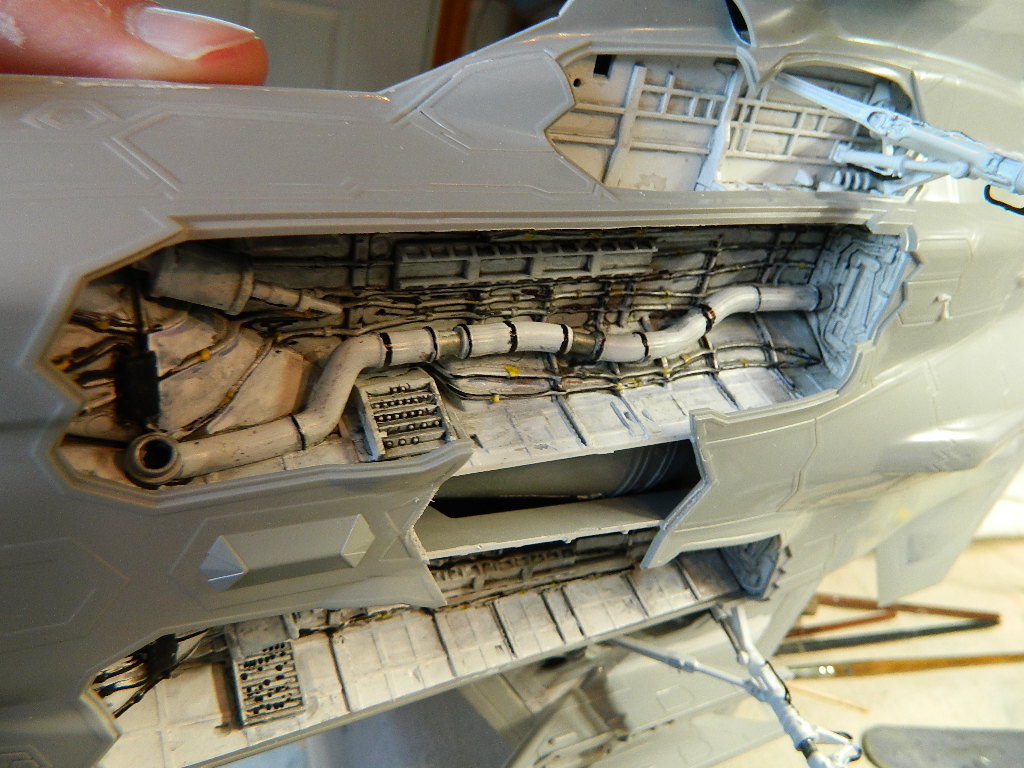
The WEAPONS BAY!
The star of the kit is the weapons bay; it appears to have everything there. I did mostly drybrush painting to get the job done; someone with good airbrush and “OOOOOO” brushes or elves will do it justice. I just built it and dirtied it up like all weapons bays I ever see. It was a two-night event to get together; I started with flat white on everything, then gloss white, a good two-day cure, then tackled it.
I noted the actuator arms and drive shaft parts were a bit fiddly, and clear directions on where some of the parts went in the bay appeared obscure. In the end I finished it up, but take your time is all I can advise.
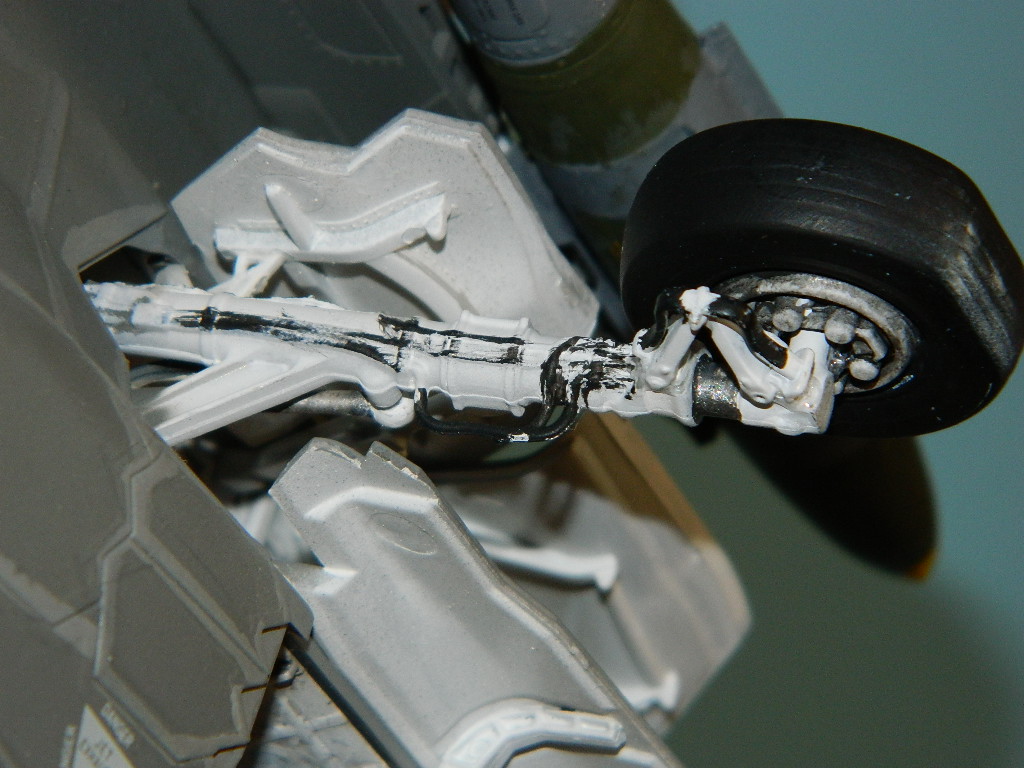
Landing Gear: As the advice of Mahlon Smith was to invest in metal gear, I knew full well the SAC metal gear would be a necessity. His observation was “After two days the kit gear started to splay out” The SAC gear has not had that problem to date on my build, even with all the sky-pilots in the office semi-dropping it back on the desk. Choice is all yours on your build. The SAC gear review says more.
This is the point where the modeler gets to decide how the model will be displayed; either fully “stealthy” with no external pylons, or with pylons. The current plan is to use the F-35 as a stealthy platform in the first part of a conflict, networking several F-35 and one F-22 as a silent package, with the noisy standard fighters to carry out the initial battle. After about a week when the air over the Forward edge of Battle is clear, then the F-35 will have pylons attached and carry out standard attack profiles.
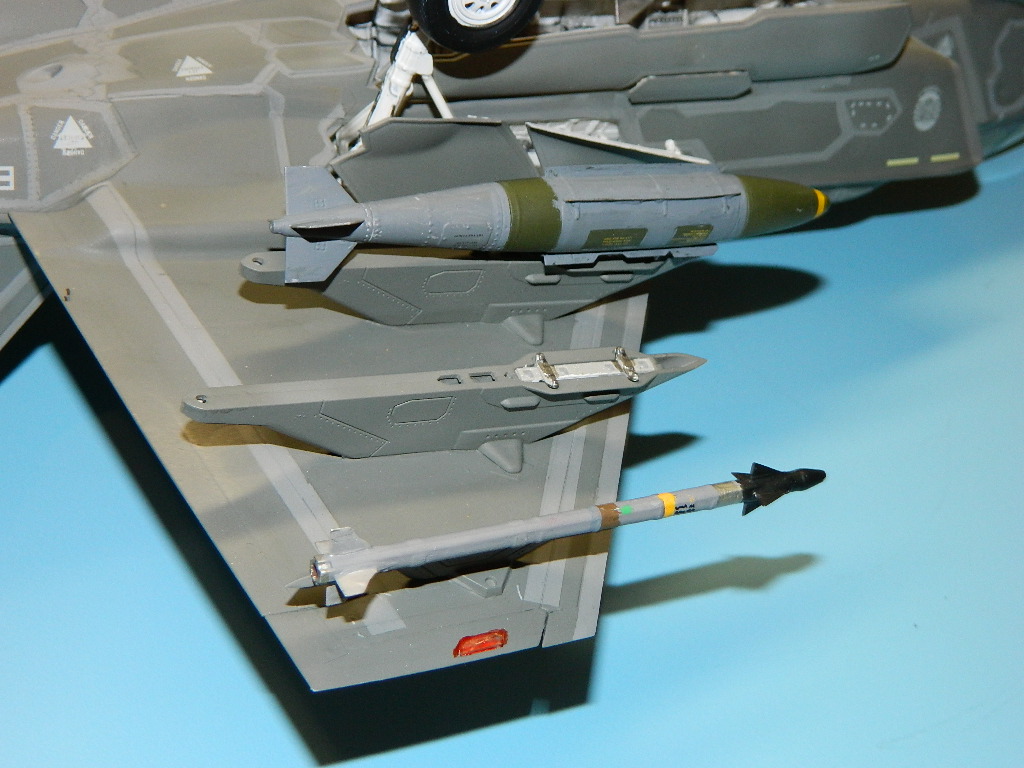
The pylons are all the same but numbered differently. They incorporate the shackles, racks, and sway braces, and add a feeling of purpose to the kit. Also, the racks for the bay are different and won’t take the place of external racks for the most part. I used the interior bay racks for the wing JDAM’s, and am not happy with myself because of it, they seem to hang too far out.
The wing tip sidewinder underwing mounts are correctly mounted at an angle with nose-down launching position. This is an airflow launch requirement and is accurate.
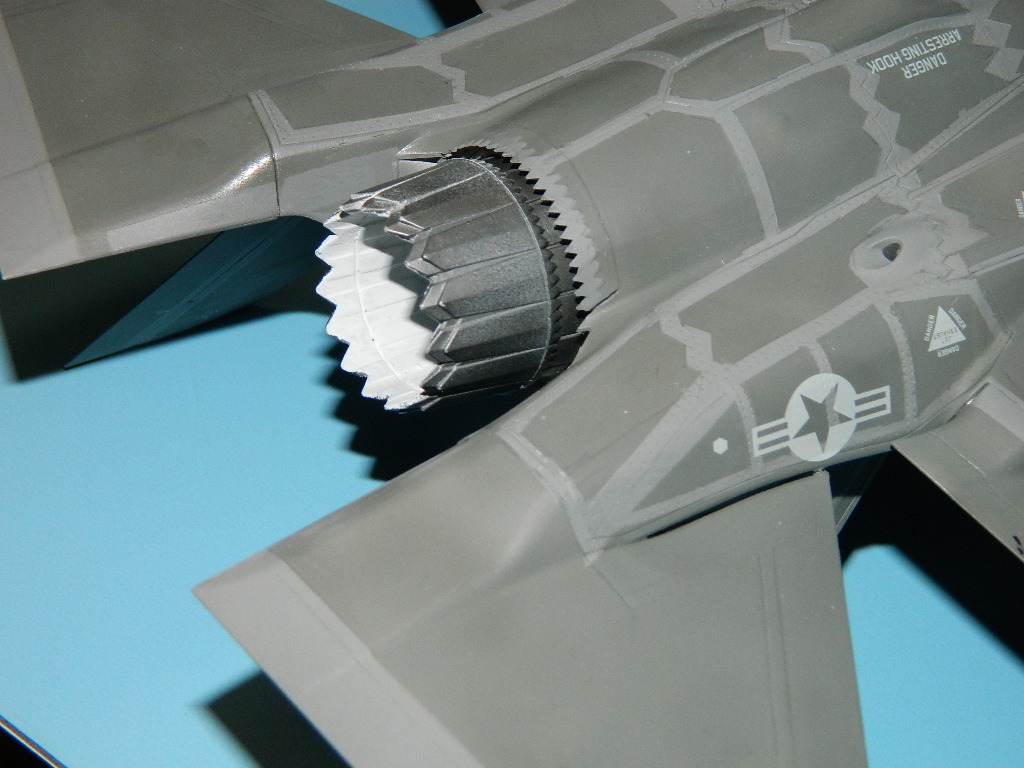
The exterior of the model is well done. Of course those who have never touched the aircraft are pretty good at saying the RAM is too thick; on this model, It looks good crisp, (Meaning it will guide my nice-sharp #11 blade over the masking tape) and I had no problem masking because it was there. I built the whole model to include all control surfaces and the landing gear in place. As I had used SAC gear, this was not a problem. Mask off the cockpit, wheel well,s and weapons bay without the doors on it, (that’s what Eduard’s’ packing foam is great for!) and get mentally prepared.
The whole model was given a coat of Tamiya Gray spray primer, any seam work fixed (a few on the wings and fins) and then one more coat to even out. Then I sprayed the whole model with Testors rattle can #1994, “Navy Aggressor Gray”, AKA Mod Eagle Light Gray, which is FS36251. This is close enough to what is listed as the correct RAM light ray on the Furball sheet, FS36170. It is definitely not Light Compass Ghost Gray, as seen in person it appears darker and closer in match on the current aircraft. Later versions may well have been Compass Ghost Gray Light, as they are definitely more defined and lighter on early deliveries.
The kit masking was used where called out, which leaves you to mask the flight and control surface leading and trailing edge areas, and the vast majority of the underside of the aircraft. In retrospect on the next one I’ll just do the whole thing without the Italeri masks, as they worked on flat areas but not on curved surfaces, having a tendency to lift up (and no, I didn’t’ handle them with my fingers). After all the “light” areas were masked, I used Vallejo’s Modelair 71.280, FS36170, “Camouflage Gray”. This shot great, and after letting it cure overnight I began to de-mask the model.
Only a few areas of touchup were required, and then I shot two gloss coats of Future over everything in preparation for the decals. These went on well, and I was surprised how close the colors came out for the few RAM not included as external relief detail. There are choices on the decal sheet for different Air refueling door outlines, and several decals which I was not able to find locations for on the instructions.
Once these had dried, I shot the entire model with two coats of Vallejo flat, which evened things out and gave the model a rather realistic look.
As to using the available “Have glass” coatings, I have not been able to acquire any, and frankly don’t plan on it. From the few photos I’ve seen I question the appearance, so we’ll just leave it for others to judge.
I installed the wing tip navigation lights, and the under nose seeker head with its housing. Other details include the use of some photoetch grilles, which I can’t confirm where they go.
Finishing involved building the ordnance and hanging them in place. The AMRAAM AIM-120’s appear to be A or B models, with larger tail fins, which I understand are not used on this aircraft or the F-22 as the “C” model of the weapon has smaller rear guide fins for bay clearance accommodation. All four missiles and the bombs are two-halves, with separate nose, mid-body and tail guidance fins. The GBU-32 JDAM (Joint Directed Attack Munition) utilizes two PE fins and a main mounting plate with two more side stabilizing chines to upgrade the plastic. This requires some metal expertise to form and attach, as the chines are cemented to a multiple-surface, round and sloping from one end to another. On the actual weapon this is a bolt-on addition for those inclined to work with such level of detail.
In any event, if you put the 2000 LB GBU-31 JDAM’s in the weapons bay, there would not be room to install the AIM’s as well, so I installed the JDAM on both inner pylons. The AIM-9X in the kit have a bit of heavy screw detail around the seeker head, but both look good on the outboard missile rack, so I used them as is.
Decals for the weapons are also included, and I actually was able to use them initially until I learned I had miss-painted the missile bodies in the wrong color gray, so the yellow “Live” weapon and brown propellant bands were hand painted due to time constraints.
The absolute final installation item was the canopy. I would normally install something like this open to display the cockpit, and all the requisite, strong bits are there to hold this large piece of plastic open. First, I’m not aesthetically inclined to the forward opening canopy. Second, I was concerned with transporting it in the “up” position. Third, the cockpit needs photoetch treatment to make it worthwhile. So, closed it was to be.
Or was it? I could not get it to seat in the closed position. I tried removing all the little bits in the way, made sure the sills were cut back, did not include the PE sill, etc. etc., and it still wouldn’t work. I know that clamping is an option, but clear plastic is notoriously brittle and would have had stress cracks when I finished. In the end I did the best I could, used Vallejo putty to semi-fill the seam, and touched up the canopy edges when complete.
Not happy was I; Others have said it fits like a glove, so I don’t know where MY problem was, but I’d plan on doing an open canopy in the future.
Although it seems like I was not happy with this kit, I had a great time with it, and will probably build another to correct the little spots ahead of time. I never dreamed we’d get a 1/32 F-35A. Another fine score for Italeri. Thanks to them for extending the lead, and again to my bosses in IPMS for trusting me to produce. I didn’t get too many critical remarks while sitting at the reviewer’s table on the kit.
Thanks to Hobbico for supplying the review kit to IPMS.


Comments
A different view of the Italeri F-35
It's hard to nail it precisely but the height and sculpt of the spine, the canopy being too high and blown rather than squat and more deeply integrated into the spine. The height of the cockpit sill from the chine line. The kit is just a tad off, in nearly every dimension, like it was taken directly from artist concepts of the CDR moldline without reference to the actual jet. The actual F-35 has a bunched, mean, look to it, well deserving of the 'Panther' service nickname it has received in preference to the 'Lightning' moniker (an elegant, if spindly, P-38 followon it is not) it so little deserves. And the Italeri kit just doesn't capture that look like it should.
Weapons bay doors, Landing gear doors. Flying surfaces. Canopy. Everything which is designed to articulate has lousy fit unless left opened. Also things like the vertical stabilizers which are made a inserts rather than straight halves. I do not care about poseable rudders. I do care about having to sand raised RAM detail to remove a visible seam that cuts across it. Also, you may forgive the nozzle for being funkily engineered but it is a major failing with that large internal seam.
Yeeeeesh. It looks steam punked which is SO WRONG when I can pull up a photo like this - https://www.cybermodeler.com/aircraft/f-35/pages/dayton_f-35a_30.shtml
And show you RAM strips which are so nearly flush as to be blended.
You can buy a full set from AM (30 bucks later...) but as is, you cannot do the lower fuselage.
So. You get four weapons pylons but only two JDAMs, AMRAAMs and AIM-9X. So you can either have wall to wall pylon loads but closed weapons bays. Or open weapons bays with AIM-120C and GBU-31 but no pylon ordnance. GBU-53/B on a BRU-61 would have been nice. AGM-158, AIM-132, GBU-12, Paveway IV, Brimstone, More AMRAAM, 465 gallon wing tanks. Almost anything would have been an improvement.
Inside weapons bays, buried among the raised detail. On the weapons bay doors. Speaking of the bays, too much of their detail is bas relief. If you look at the 1/48 resin equivalent from KASL hobby, the entire bay is heavily populated with wiring looms and hydraulic lines etc. In 1/32nd scale, the need is really there for these to be replicated as separately injected cable runs or with bendable wire and templates. Even when you install the GBU-31, too much of the weapons bay is just...blah.
Listen folks, the actual color is 36170. Available from Vallejo, Hataka, MRP and probably several others by now. But it's not a grey perse`, it's a semi translucent color which is sprayed over a metallic base coat so that it alternately looks like gunmetal, dark gull grey, dark ghost grey or even mirror-aluminum on occasion as it literally picks up the specular reflectance of the background. The RAM panels are 36251 Aggressor Grey or 36440 Lt. Gull Grey, depending on your preferences.
While this is not the only color callout error (AMRAAM and AIM-9X, I'm looking at YOU), what makes it important is that you need to understand that the way the masking is set up is wrong. You should be painting the top coat FIRST, for the RAM panel edging. Then put the masks over this. Then lay down a metallic grey or aluminum base coat. Then put down the Top Coat atop this, as a semi-transparent upper coat. Worthy of note: The paint used for the F-16 Have Glass V scheme is NOT the color used on the F-35. The Viper has a purple tint and is populated with rough flecks of imbedded RAM. The F-35 is mirror smooth and again, has a translucent effect so that the lower metallic coat shows through.
Since the unique color scheme is at least 30% of what makes the otherwise empty-wings Gen-5 stealth platforms cool _and it is universal for all operators_, Italeri really needed to concentrate on getting the color scheme correct and coming up with either a recessed (ala 1/72 Hasegawa) outline panel system into which strips of masking could be laid. Or a decal alternative. Instead, they try to surround the RAM strips which requires huge amounts of masking material and again, the raised panels look Frankenstinian in their awfulness. Full scale, those raised lips would be something like 4" tall and leave the resulting airframe about as aerodynamic as a feathered brick.
Honestly. The helmet is unique and nearly impossible to replicate with all those sensors. The glass EFIS cockpit is...vacant. And the powered-on main display (rather than a clear transparency which we could back shade with transparent green) makes the presence of a stick and rudder interface almost essential.
Add new comment
This site is protected by reCAPTCHA and the Google Privacy Policy and Terms of Service apply.
Similar Reviews