
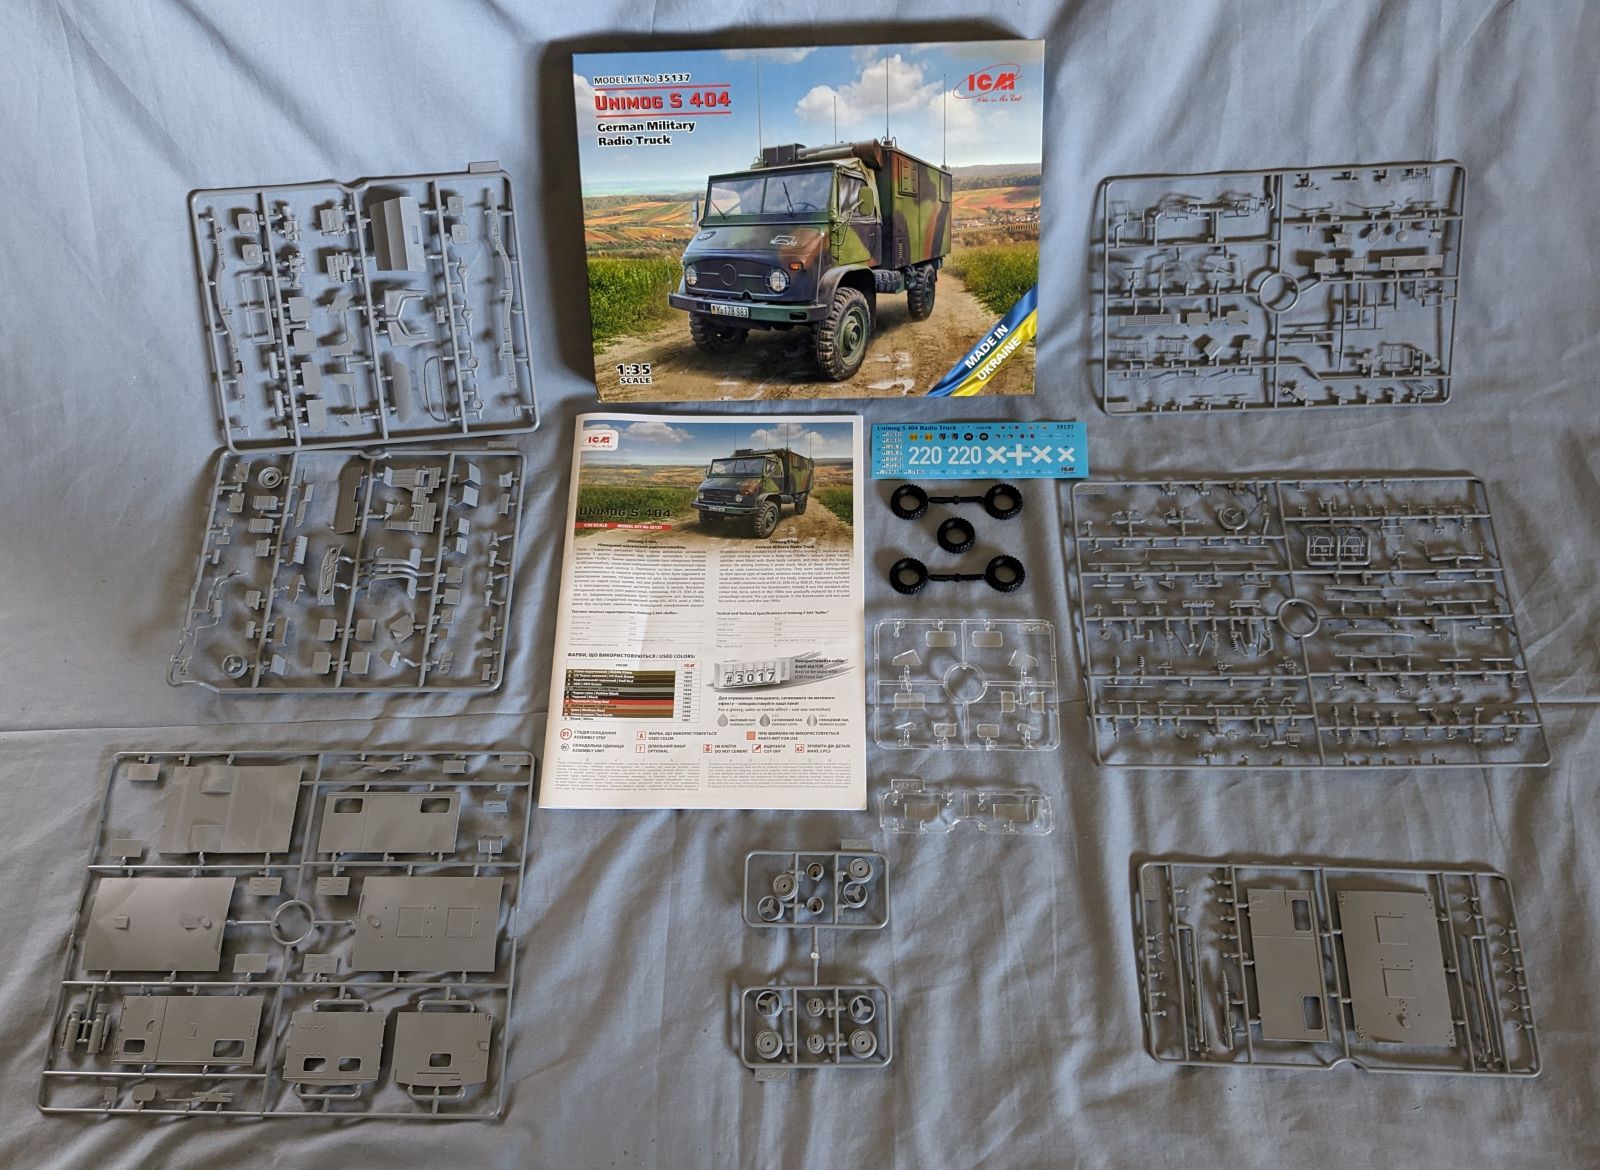
Unimog S 404 German Military Radio Truck
This is the third of four of ICM’s Unimog 404, Kit No, 35137 Military Radio Truck. Other variants in the series include the German Military Truck (Kit No. 35135 is the standard cargo version), the “Koffer” (Kit No. 35136) and Military Ambulance “Krankenwagen” (Kit No.35138). As I previously reviewed the standard, first kit, I was eager to review this third kit as a later version of this ubiquitous Unimog 404.
The Unimog 404, also called the Unimog S and Unimog 404S, was developed by Mercedes Benz from 1955 to 1980. Unimog (taken from UNIversal Motor Gerät, or universal power unit) is a small, capable, 1.5-ton offroad truck that reached a production number of 36,000 for the German military during the Cold War. The Unimog 404 could be driven in either 2x4 or 4x4 mode, being at home outdoors or cruising up to 60 km/hr on paved surfaces Despite its German origins, the first Unimog 404s were produced for the French Army who wanted the spare wheel moved from the cargo bed to an undercarriage location on a newly designed down swept frame to provide more space for troops and cargo. The versatile Unimog 404 has a folding canvas roof with a frame and comes with several cargo bed options: canvas cover (or not) for the cargo area and container boxes (radio, ambulance, etc) for different military functions.
ICM is the first company to bring the Unimog 404S (designated the Unimog S 404 by ICM) in any scale to market in injection molded plastic. This versatile and rugged vehicle was used by both the Bundeswehr and Luftwaffe.
Marking options in this kit include:
- 5th Signal Battalion, 5th Tank Division, Dietz, Early 1970s
- 74th Fighter Squadron, Germany, 1970s
- 77th Artillery Regiment, 7th Panzer Division, Trutzige Sachsen exercise, Northern Germany, 1985
- 12th Air Defence Regiment, Hardheim, 1991
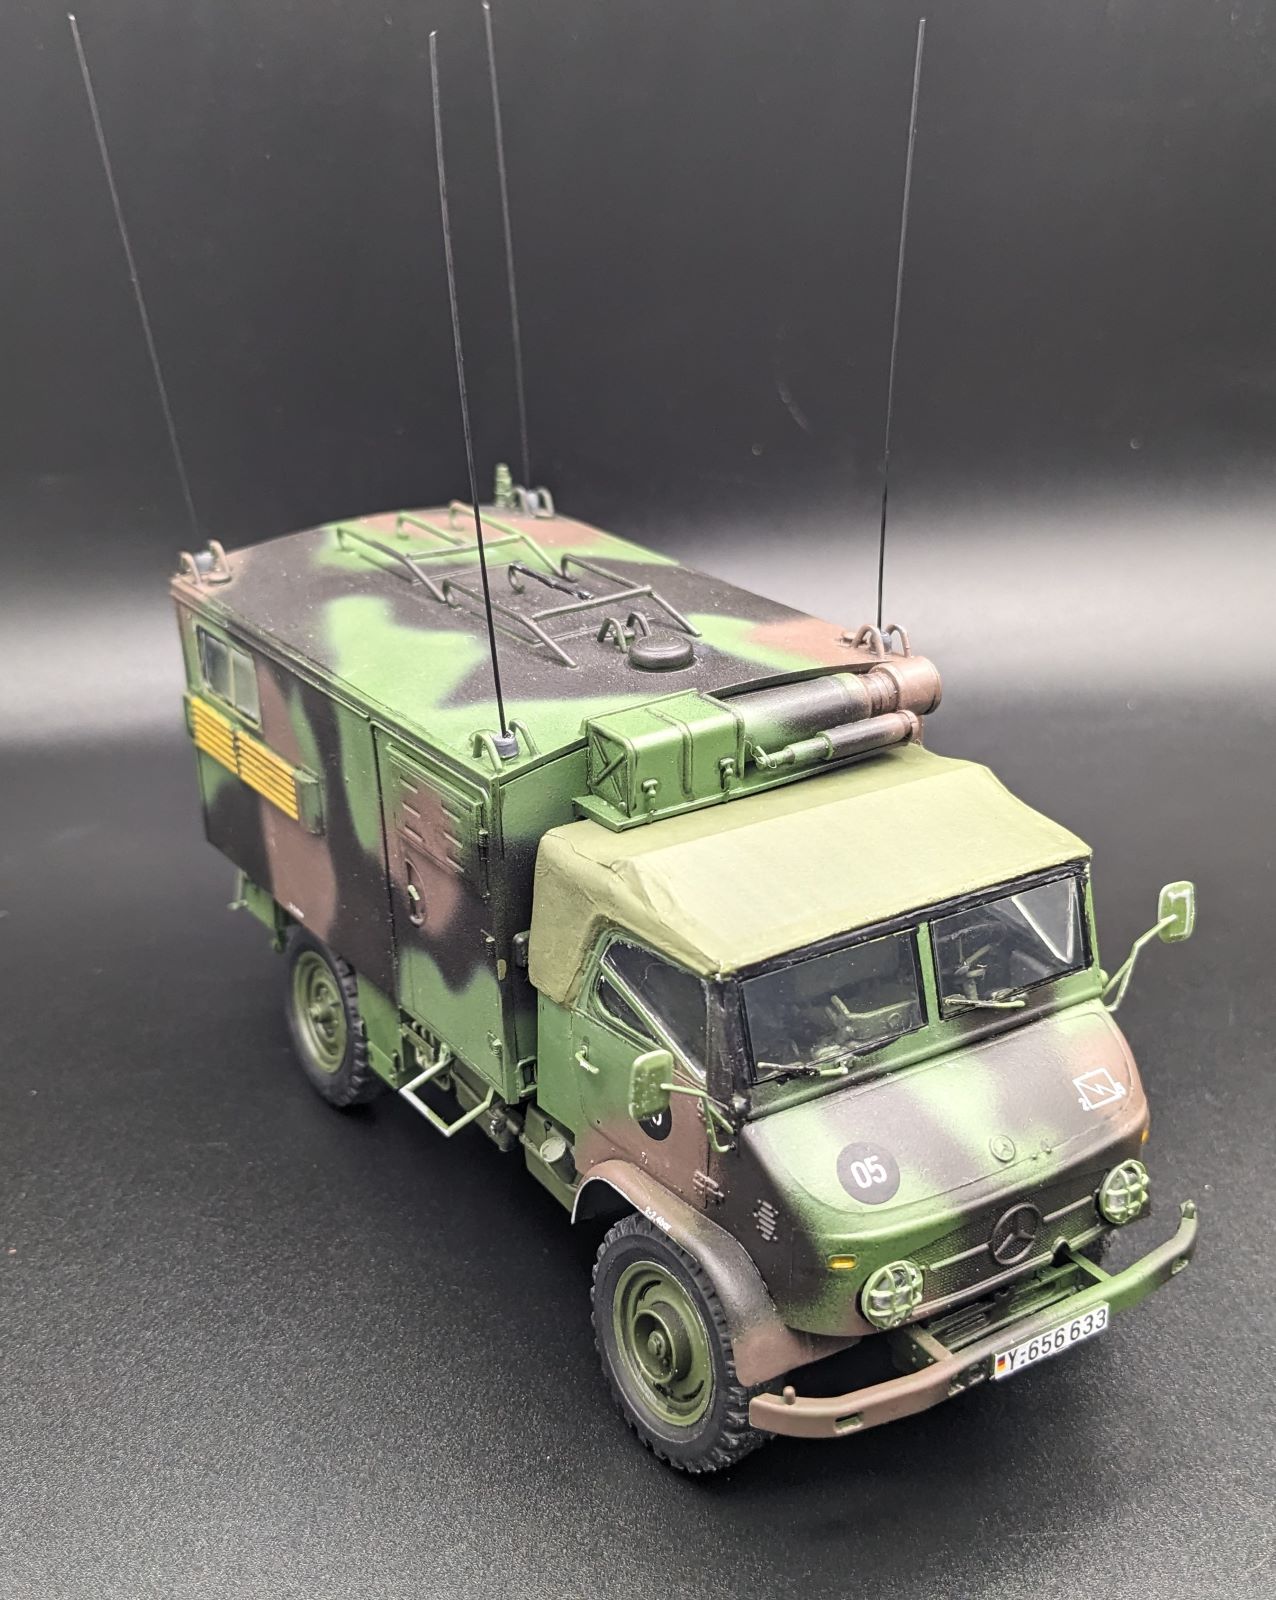
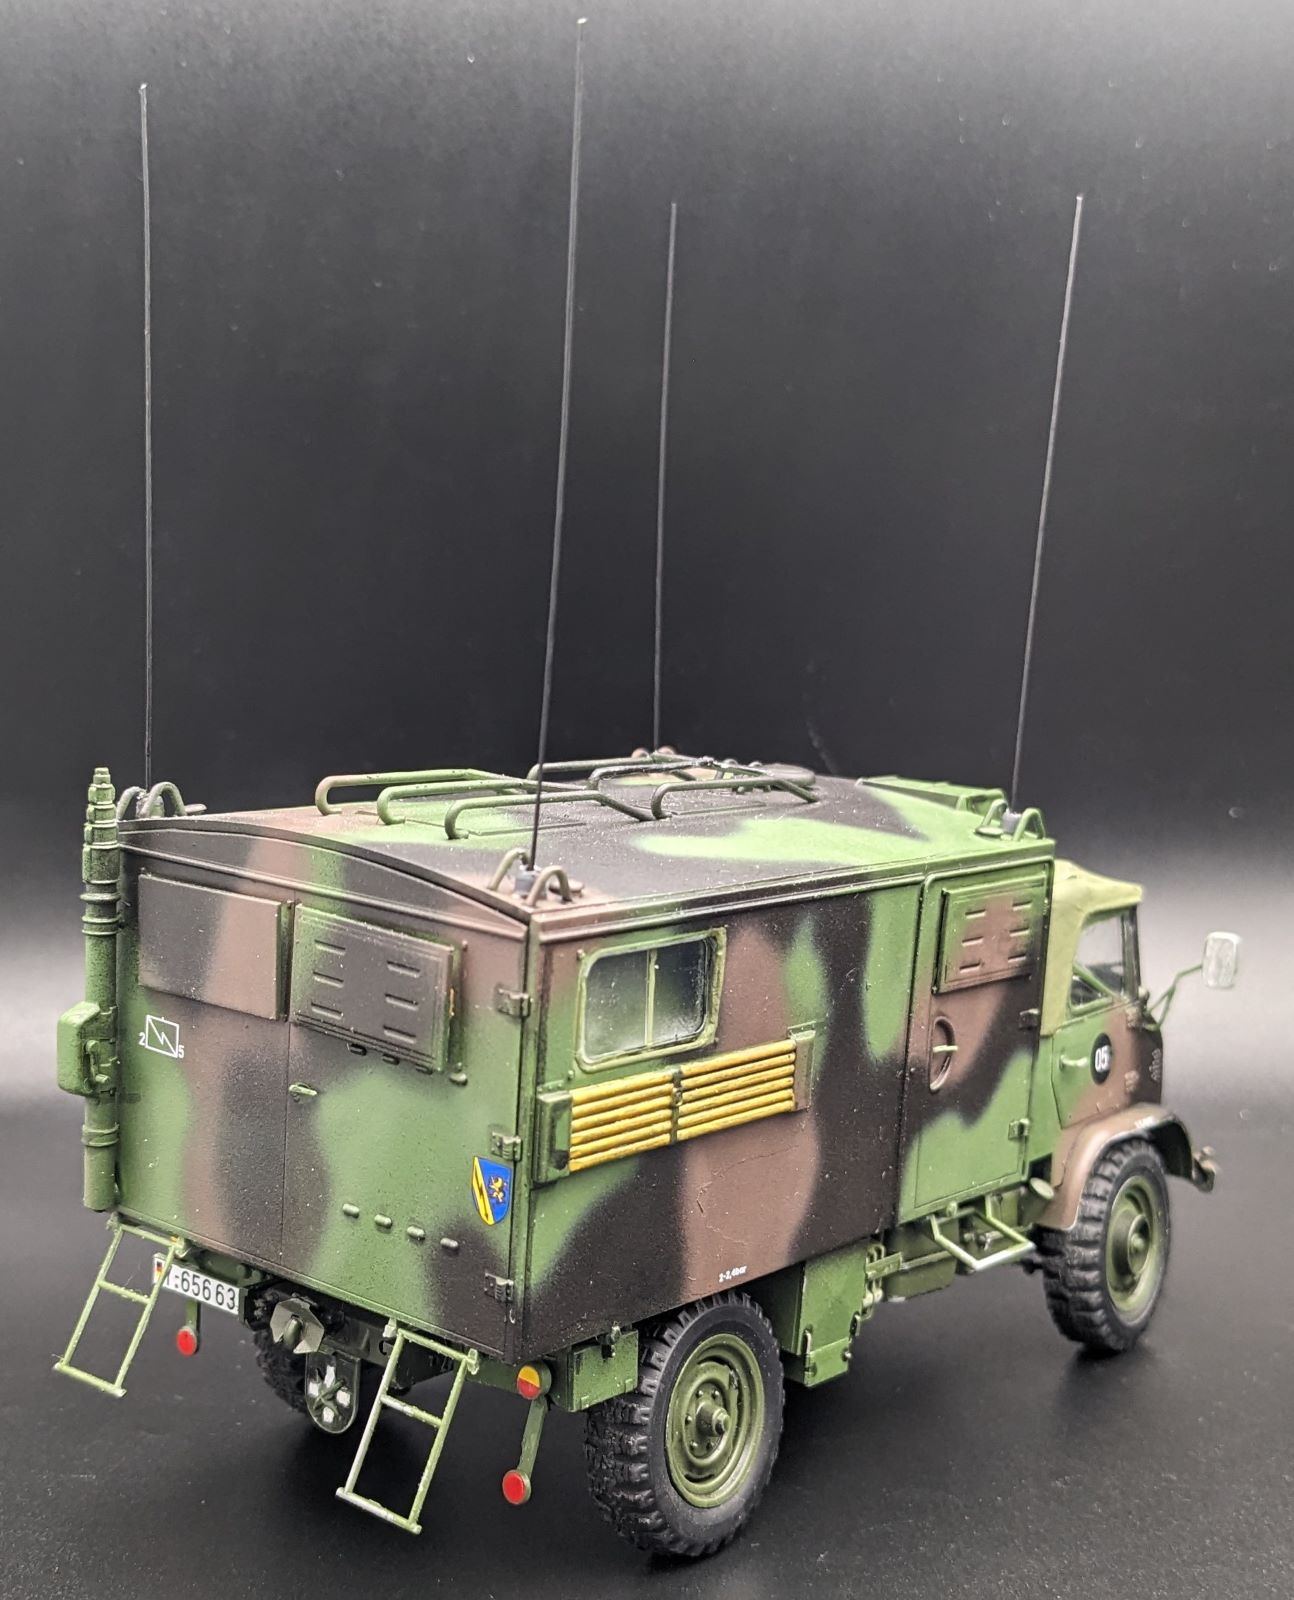
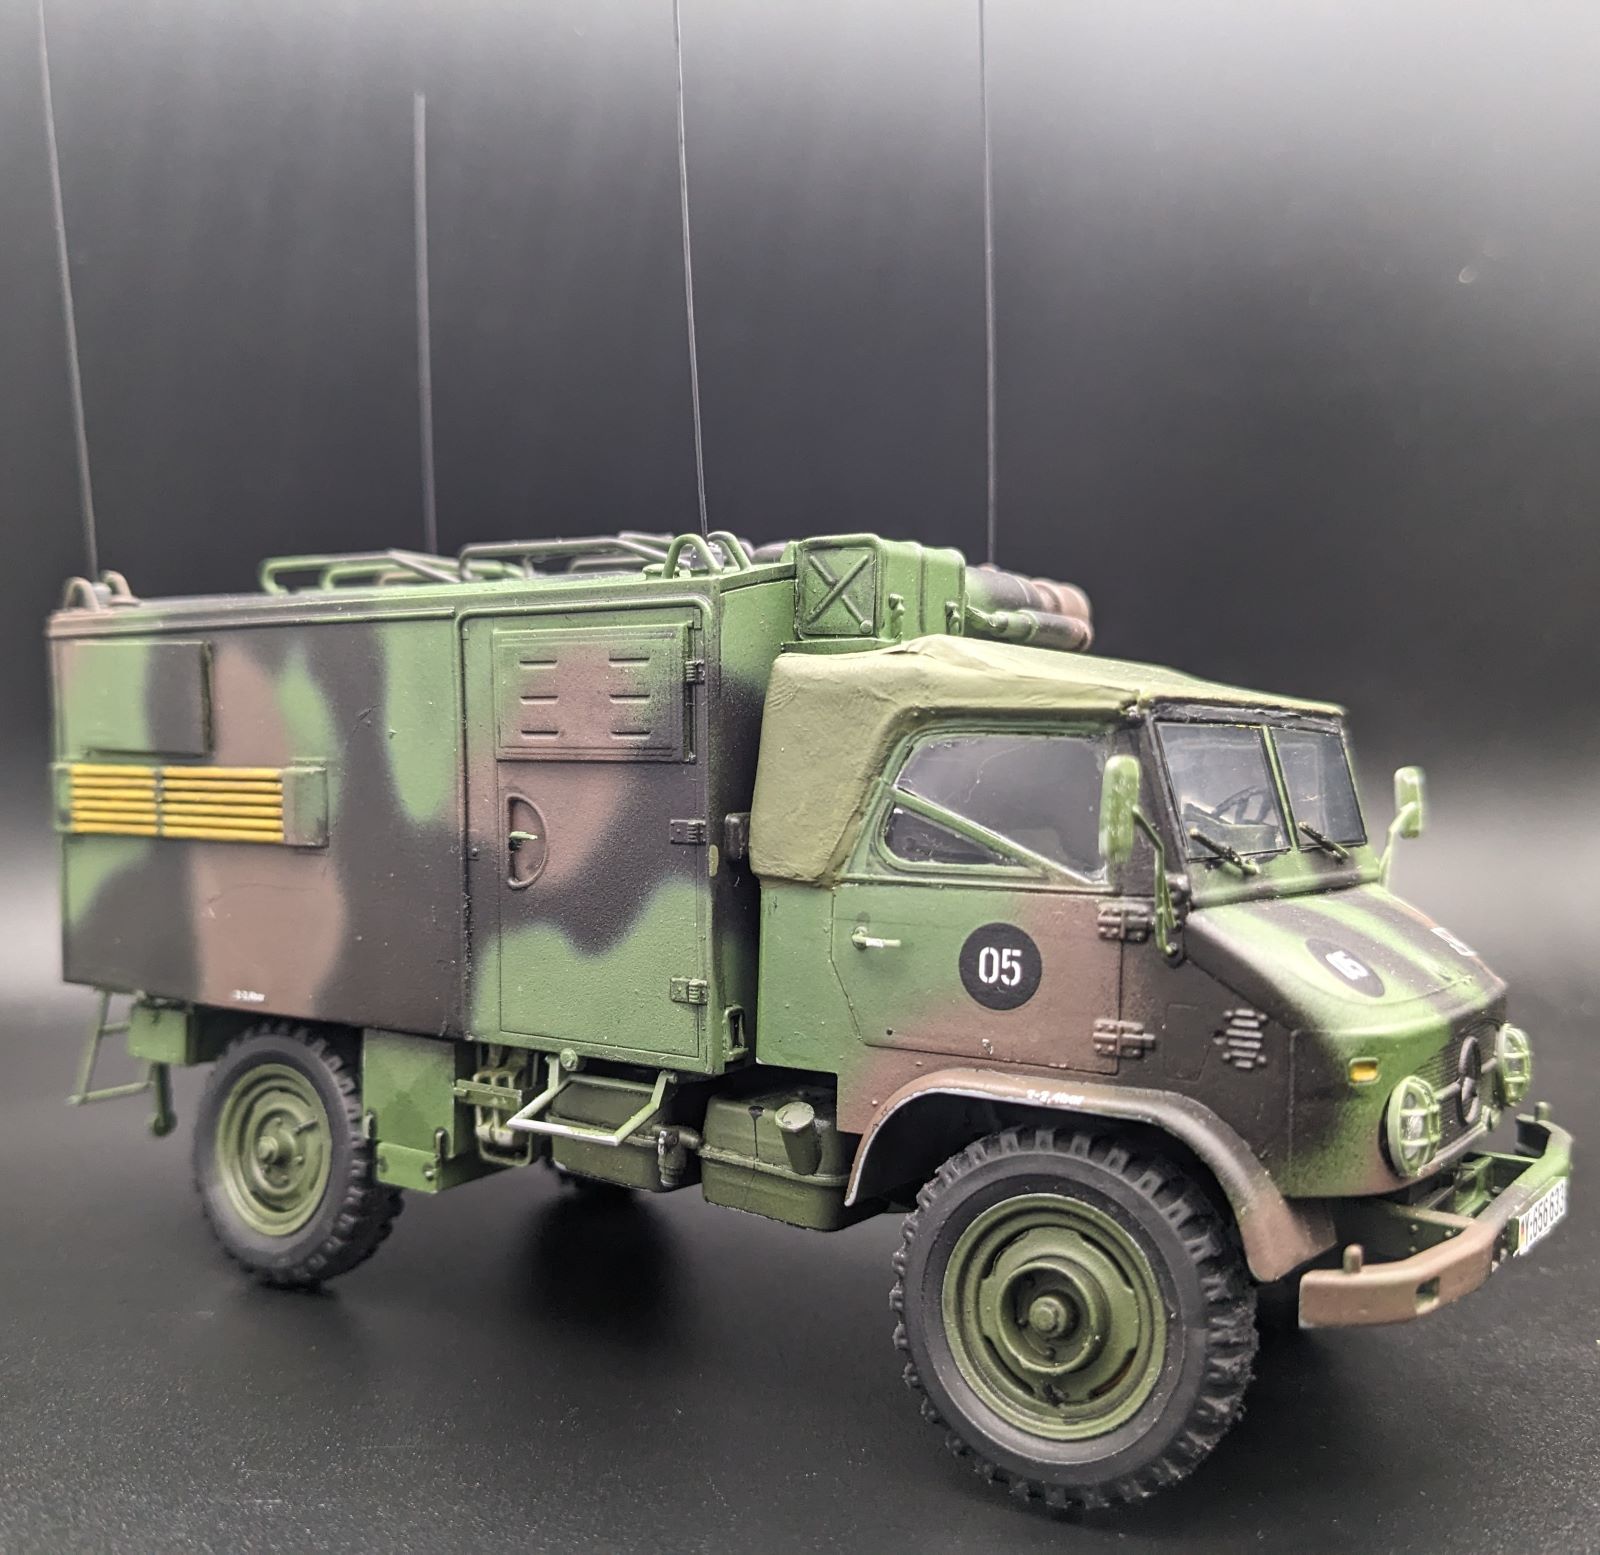
Two vehicles are in the earlier Bundeswehr Olivgrün, the other two in the NATO three-tone camo adopted in the 1980s.
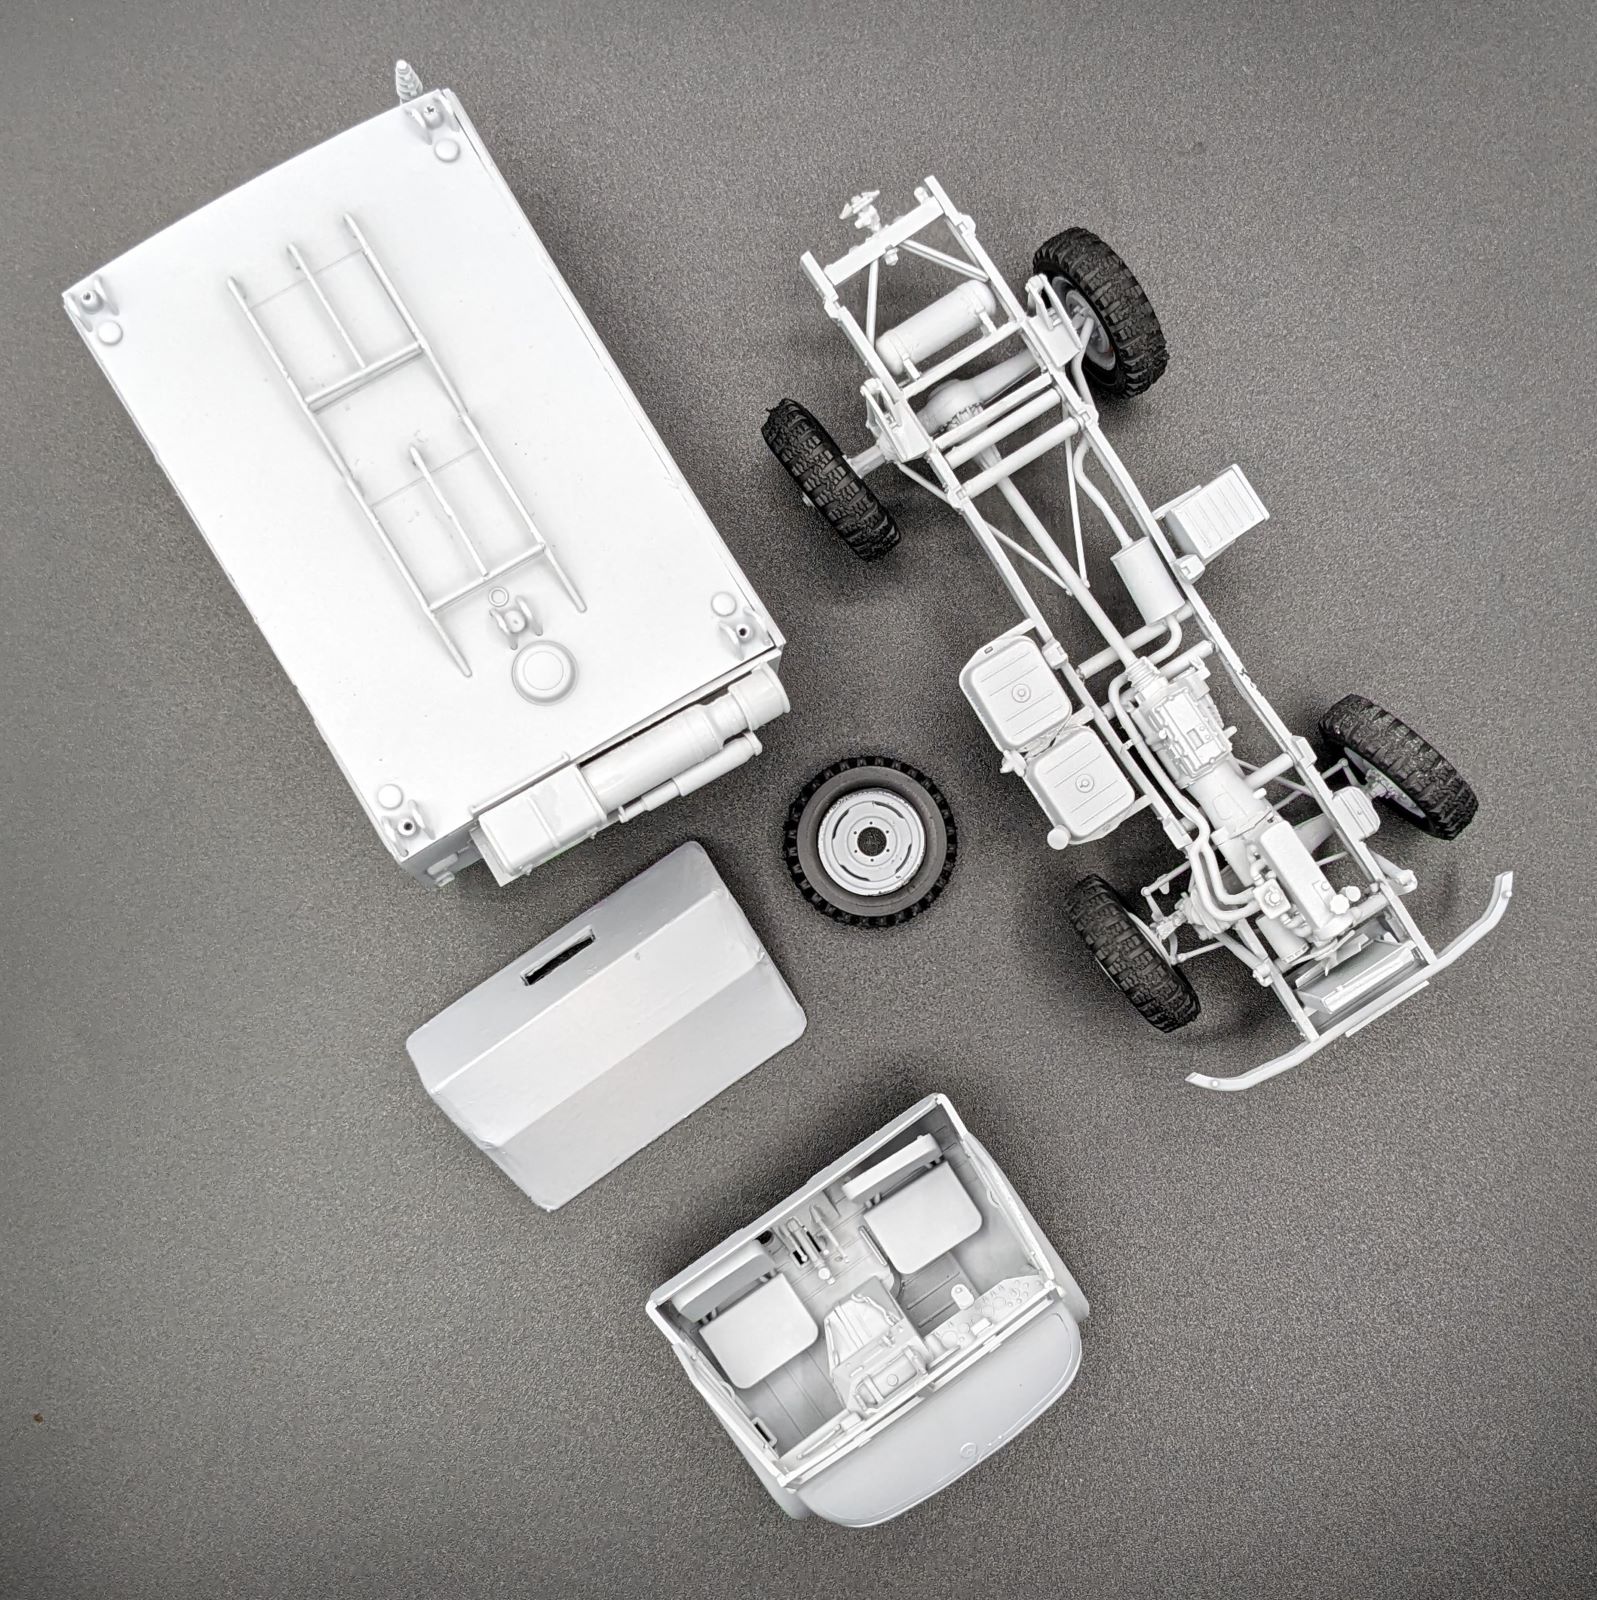
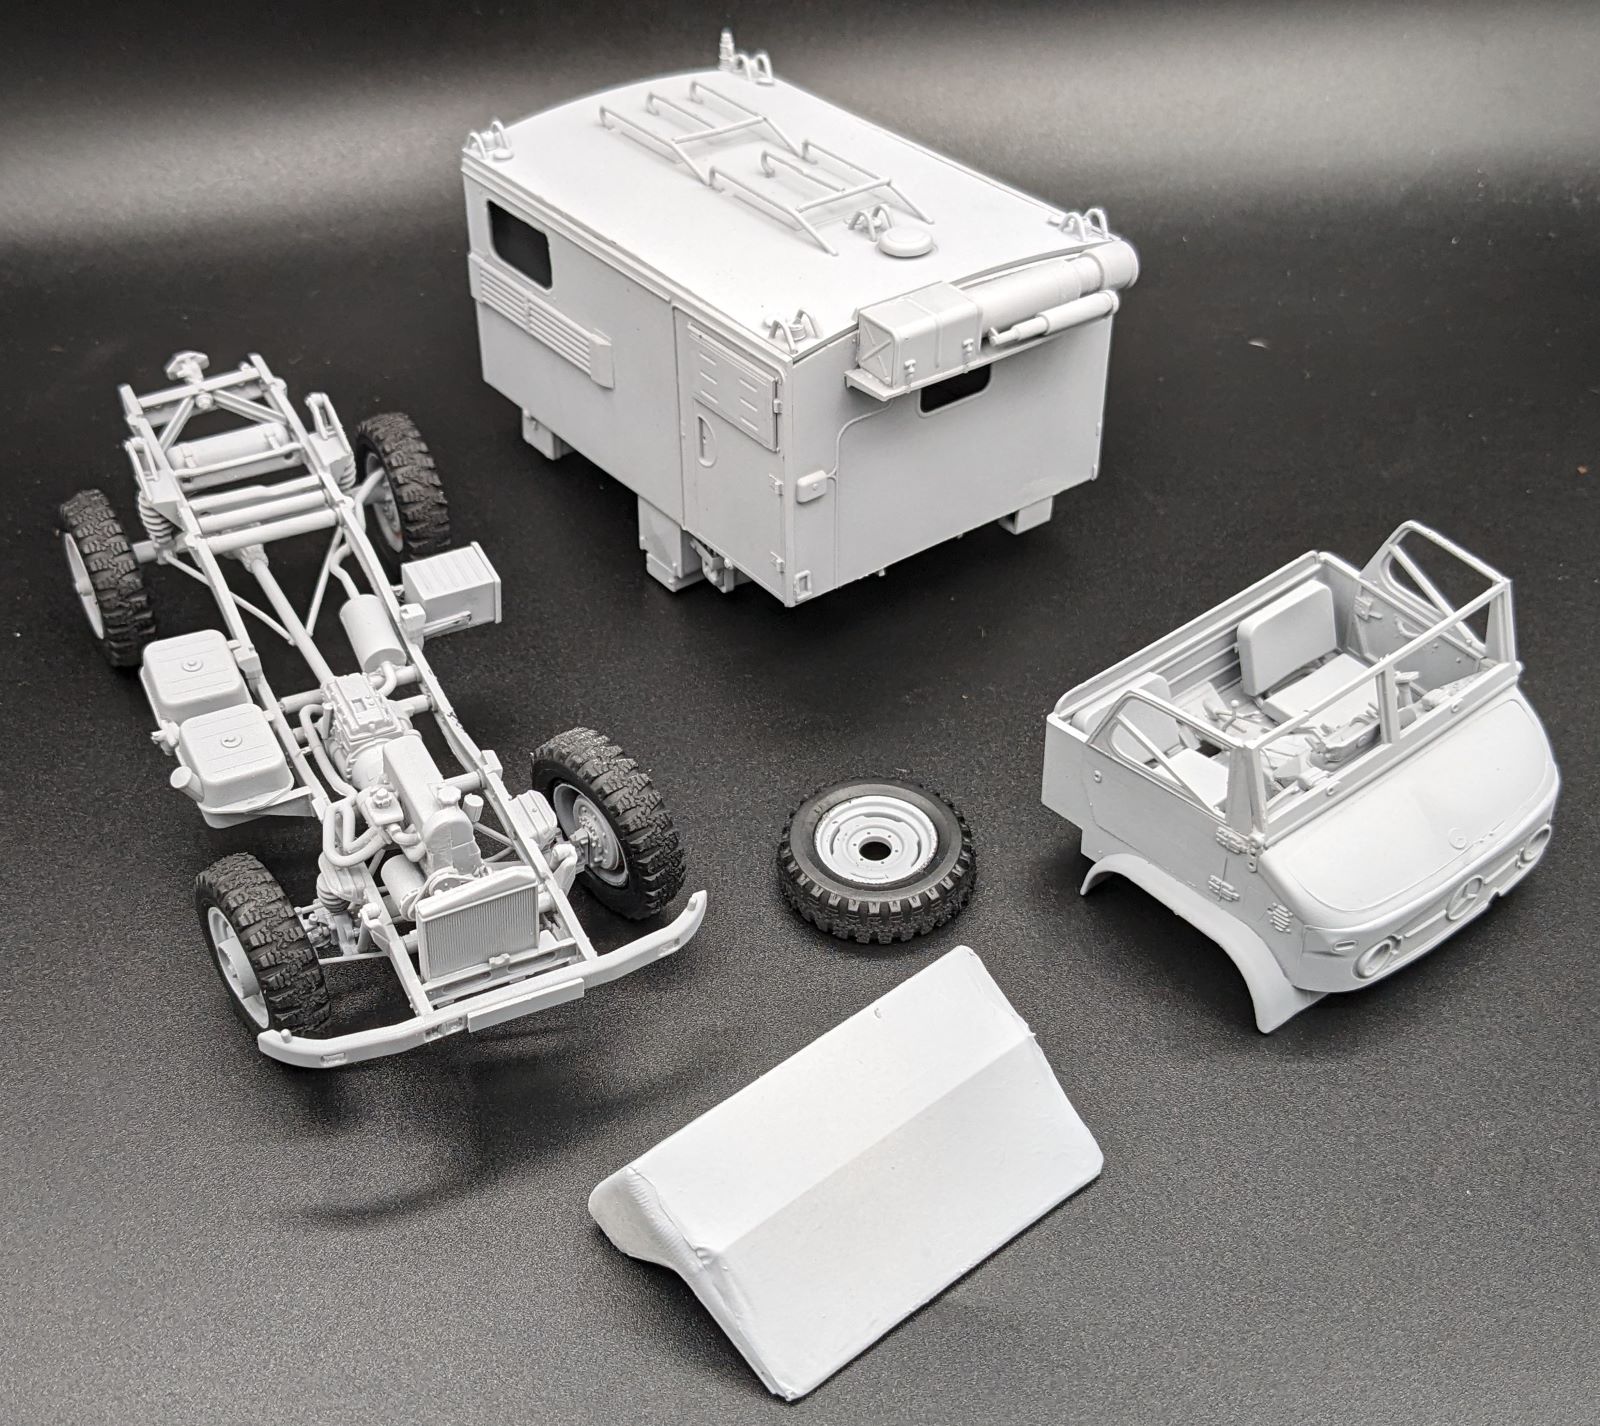
Upon opening the cover, there is a reinforced white inner box that does a good job of protecting the kit’s six soft plastic sprues, clear sprue for glass, and five rubber tires. The 28-page instruction manual covers 123 steps, split into major subassemblies of the ladder-type chassis (good engineering and following instructions ensure the truck sits on all four wheels), cab, and enclosed radio shelter.
The model builds straightforwardly, and the sequence is logical. Most of the parts are used except for two optional rear-view mirrors; there are two spare roofs and a cargo side wall for other variants. There are minor notes that are identified here by their instruction step:
Step 19: Take care and study the exhaust manifold locations as improper assembly can affect the fitting of the cab to the frame. Take note of the location and refer to Step 24 for the exhaust pipe.
Step 24: This is where the exhaust pipe joins to the manifold.
Step 27: This step calls for the installation of the steering column. I tried it and had to remove it during Step 60 to fit the cab to the frame.
Steps 38-41: Take care with the steering and support arms as they are delicate and detailed fiddly bits.
Step 41: There are no locating tabs for the bumper, so temporarily place the cab on the frame to determine the proper center location or hold off until Step 60 when the cab is installed.
Step 46: The location and orientation for the fuel tank selector valve isn’t obvious, so check reference material (I chose vertically straight between the tanks, above the fuel tank ridges, but have seen them mounted differently).
Step 59: If the bonnet is closed, none of this detail will be visible, along with the beautifully detailed engine installed earlier.
Step 60: Install the steering column from Step 27 after the cab is in place.
Steps 64 and 66: Be very careful removing the door handles as they are very small and delicate and insatiable to the carpet monster.
Step 79: For ease of painting the cab, I left the canvas cover off until the end of the build. This allowed for the installation of the steering wheel and cab details without having to go through the windows. The cab cover should be installed before the radio container box in Step 108 as the tight is very fit and hard once the container is glued to the chassis.
Steps 82-85: Options are for the windows uncovered or covered with their plates. There is no interior detail, so if the windows are uncovered, there should be interior detail. I installed blackout shades inside before placing the roof on in Step 88.
Steps 103 and 116: Paint the jerry cans before installation as they can’t be placed in their mounts afterward.
Steps 106, 108 and 118: The spare tire mount under the bed is very tight. If the tire is going to be placed here, either paint ahead of installation, or keep the mount (Part No. C2-12) off until the model is complete so it can be glued in place afterward.
Step 107: The three boarding ladders have the option of stowed or extended based on your preference. Note that on the right side of the illustration, the stowed (C2-2) and extended (C2-23) boarding ladders are reversed (it is correct on the left side of the illustration).
I followed the instructions, and it was easy, if not tedious, to build. Attention and care must be used as there are a lot of fiddly bits that appear to scale on this smaller 1/35 model. I used tissue paper over the cab cover (Parts A20-22) to replicate the rubberized canvas used on the actual Unimog.
The Unimog was painted over in standard NATO three-color camouflage, wearing the markings of the 5th Signal Battalion, 5th Panzer Division so I could pose it with an earlier bronze green Unimog for comparison. The decals are crisp, clear, and settled in well. ICM has taken the guesswork out of the earlier Bundeswehr bronze green paint colors with their acrylic paint set for Bundeswehr vehicles and AFVs (Item No. 3017). As for the NATO three-tone camo scheme, there are numerous options available for the NATO black, brown, and green.
I had a lot of fun building this gem from ICM. It is a lesser-known German Cold War workhorse truck, that builds into a great model with lots of detail. This is not a kit for beginners, and while there are a lot of building steps, they are logical, easy to follow and enjoyable. While it builds up externally into a fantastic-looking truck (with window covers for blackout operations – I installed blackout shades on the inside), there are no interior radio compartment details, although there is a conversion set by German company, Perfect Scale Modellbau (Product No. 35017 for 116.65 €). This is a great kit of an underrepresented vehicle. The unofficial Signal Branch’s motto is, “You can talk about us, but you can’t talk without us!” While tanks and fighting vehicles get the limelight, they need to be able to communicate to do their jobs. This is where the Unimog S 404 German Military Radio Truck fits in…right next to my Leopard 1A5 or early Leopard 2 in their NATO camo schemes.
Wir. Dienen. Deutschland. And Slava Ukraini! (We. Serve. Germany. And Glory to Ukraine!)
Profuse thanks to ICM and IPMS/USA for providing the review sample.

Comments
Add new comment
This site is protected by reCAPTCHA and the Google Privacy Policy and Terms of Service apply.
Similar Reviews