
T-54B Early Production Soviet Medium Tank
Background
The T-54B variant of the T-54 range of Soviet medium tanks was the last major variant prior to the introduction of the T-55 series. Production occurred from 1957 to 1959, and saw the introduction of a rifled barrel as the main turret armament, together with a two-plane main gun stabilization system which dramatically improved the probability of hitting the target.
This is the third T-54 kit from MiniArt that I have had the great pleasure of reviewing for IPMS/USA. The first, MiniArt Kit #37003, was of the T-54-1 Model 1947, the first production variant of this important Soviet Cold War warrior. The second was Kit #37012, the T-54-2 Model 1949.
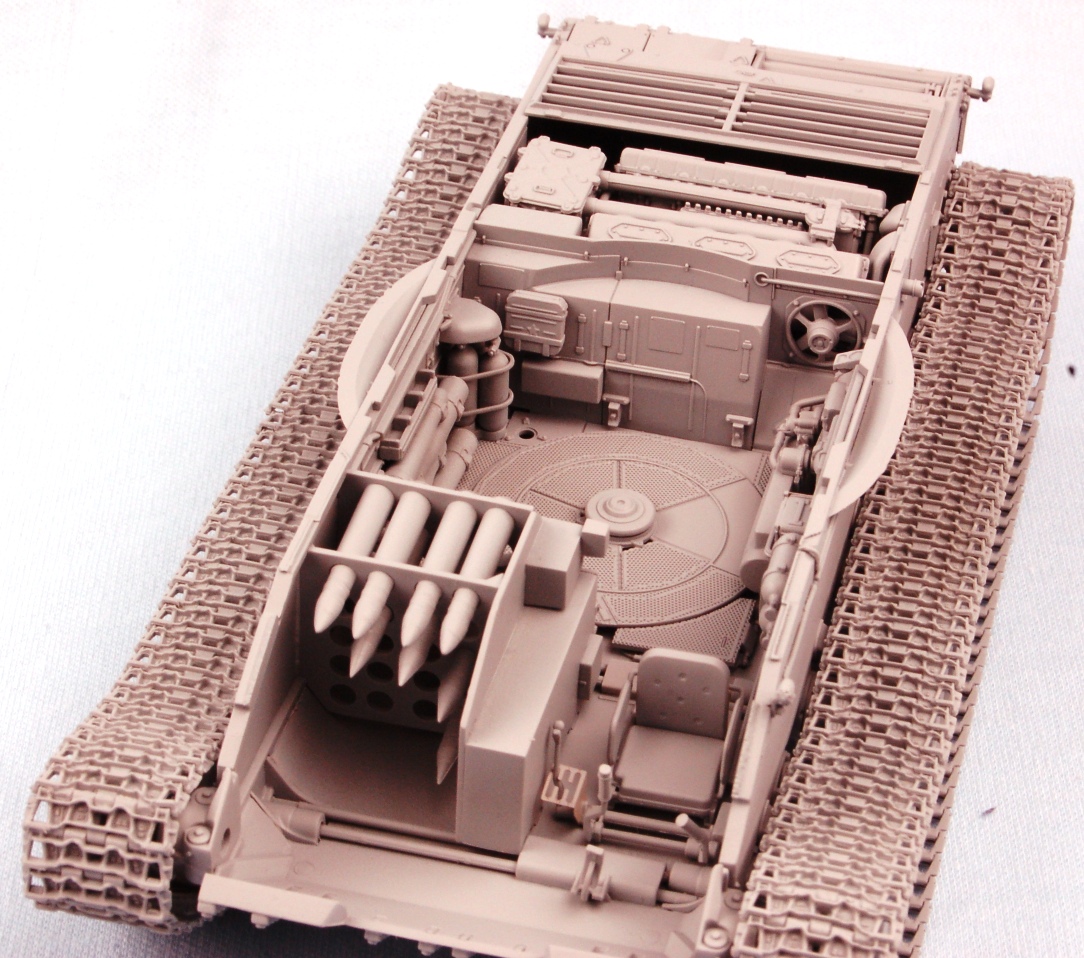
The T-54B under review today, like the T-54-1 Model 1947, is an "Interior Kit", which means it includes an almost full interior: driver's area, hull shell stowage, and a superb engine, plus a fairly complete turret interior. For the record, MiniArt seems to have a release program that offers the modeler a "first choice" of an "Interior Kit" followed by the release a number of months later of a "stripped-down" version, being minus the interior. I think this is a great marking idea, leaving it up to the modeler to decide which form of the kit they wish to invest their hard-earned money in.
What's in the MiniArt Box
- 89 sprues large and small of gray plastic parts
- 2 sprues of clear plastic parts
- 2 frets of photo etched brass parts
- 1 sheet of water slide decals with 4 different marking options
- 1 booklet, with 21 pages of black and white assembly instructions covering 100 assembly steps and incorporating a color markings and painting guide
Before You Start Construction
As I said in my earlier reviews of MiniArt's T-54 series of kits, before you start construction of this kit, you will need to figure out a very important matter: how to create a sane system to keep track of where each sprue is on your workbench and the parts thereon. With over 90 sprues of plastic parts, this is quite a task! I came up with the idea of getting a large document storage box, and a bunch of large file folders. These were then labelled "A", "Ba", "Cb", "Hk" etc and the appropriate sprue(s) slipped into each folder. Then as you need a part, you reach into the storage box and pull out the appropriate folder and the sprue(s) contained therein.
Under Construction
The MiniArt T-54 series of kits are a tour de force of model engineering. Whether you tackle a full interior kit, or one that is minus the interior detail, each model is loaded down with parts that contain the highest levels of detail, and, thanks to CAD, that fit together surprisingly well for incorporating such a smorgasbord of parts, both plastic and photo etched brass. Everywhere you look you find crisp bolt detail, fine weld detail, and great representations of cast metal. Strangely for a kit as new as this one, there were a number of parts with "flash". This isn't a big deal as some simple work with a hobby knife and sand paper soon eliminates this imperfection, but it was a surprise to see it present. The parts in this kit were without ejection pin marks that were visible once model construction was completed with one exception. One note however before construction begins: make sure you have a VERY fine razor saw blade.
Why? Because if there is one "fault" to MiniArt kits that I have built, in terms of ease of assembly, it is that some very fine parts are attached to the sprues by masses of sprue attachment points. Even though the plastic used by MiniArt in this kit is fairly robust and flexible, there is a risk of damage if you try to remove these finer parts from the sprues with regular sprue cutters. Be warned!
Construction of the kit starts with the engine components, Construction Sequences 1 through 8. MiniArt provides the modeler with incredible detail in this area, a total of just over 40 parts for the engine and its hull mount platform. The fit of the parts is superb, and about the only thing "missing" is the wiring harness for the spark plugs.
Next comes the lower hull plate, part L19, and the start of the torsion bar installation. MiniArt offers the modeler the ability, if they are careful, to install "working" torsion bar suspension, or "fixed" torsion bars. Study the Construction Sequence (10) carefully to choose the parts appropriate for which method you wish to incorporate into your model. There are a great number of parts that need to be free moving if you choose the "working" torsion bar set up, so make sure you are very careful as to where liquid cement is used to avoid gumming up the "working" parts. If you go with the "fixed" torsion bar set up, make sure that you carefully align the parts so that when you come to install the road wheels, they will sit evenly.
Next in the instructions come additions to the interior of the lower hull plate. This includes the driver position and lower hull shell storage areas. I noticed that during the construction of this particular variant of MiniArt's T-54 series there were a number of parts that were mis-identified. The first of these appear in Construction Sequence 22. Here you will find the construction of a multi part box shaped sub assembly that fits onto the engine. At a guess (for I am no engine expert) it is an air filter unit. Parts are Ha4 through Ha18. The part labeled Ha11 is actually part Ha5. Also in this Construction Sequence, there is a shell for the main gun listed as Ha2 that attaches to the hull sidewall. It is actually part Na2. In Construction Sequence 23, part Gf8 is shown only from the rear, and thus you are clueless as to which way is "up" (the detail is on the front of the part).
In Assembly Sequence 26, we come to the assembly of the 10 pairs of main road wheels. MiniArt generously provides the modeler with two distinct variants of road wheels: a version that appeared on earlier variants of the T-54 with welded ribbing, and a later all-stamped version no doubt introduced for ease of production. Be sure to avoid getting the parts for these mixed up when making your choice of road wheels. It was on these road wheels that I noticed a number of instances of "flash" appearing. Nothing major, and fairly easy to remove, but interesting on such a new kit.
When it comes to the mounting of the main road wheels to the hull, there is a rather poor join incorporated by MiniArt. MiniArt utilizes a "pin", parts Hm3, that holds the road wheel to the hull, via a slotted point that is supposed to fit into a notched groove. This has not worked once in the three T-54 kits that I have now worked on, and I suggest dispensing with part Hm3, and gluing the road wheels directly to the hub on the side of the hull.
Another area where MiniArt has its part numbers mixed up is Construction Sequence 30, the construction of the rear hull fuel barrel mounts. There are two photo etched parts listed as "PE a12" but in fact they are parts PE a15. Also, in Construction Sequence 29, make sure you carefully study part Ca30 (rear hull plate), and drill the appropriate holes into it PRIOR to gluing it into place on the rear hull.
When you arrive at Construction Sequence (CS) 34 through 38, you will see a number of rear hull engine deck sub assembly sequences. Note that in CS 37 and CS 38, you install four photo etched screens atop this detail. I would advise the modeler to take the time to prime and paint the sub-assemblies AND the PE screens PRIOR to installation. Otherwise if you simply glue these parts all in place thinking you will paint them later: A/ you risk the screens getting clogged with paint, and B/ the screens interfere with the paint reaching the plastic parts underneath.
Construction Sequences (CS) 39 through 47 cover the assembly of the fender fuel tanks and storage boxes, and their attachment to the fenders. MiniArt provides the modeler with very delicate fuel lines such as parts R10 and R8 in CS 45. These were attached to the sprues by no fewer than 16 (!!) attachment points. Despite utilizing a very fine razor saw, these parts both broke as I attempted to remove them from their sprues. Also in CS 43, photo etched parts are once again misidentified. Parts "PE a13" are actually parts PE a12.
Construction Sequence 48 covers the tank tracks. The track parts are individual links, are beautifully detailed, and are WITHOUT any injection pin marks, so bravo to MiniArt for this! However, each track link is attached to its respective sprue by four attachment points that need careful clean up, and there are 90 links per side! I would suggest say cleaning up 10 links per modeling session over multiple sessions, to avoid "parts clean up fatigue"!!
In Construction Sequence 49, you will find that tow cable parts Kb1 are fairly well detailed as such parts go, but again there a numerous sprue attachment points which tend to mar the braided cable texture of these parts. My solution was to remove the "cable" section, drill out the tow loop ends, and instead utilize an appropriate diameter of the superb line of Eureka brand cables. I love Eureka cables because the wire material they use is so forgiving when it comes to bending the cables to the angles required.
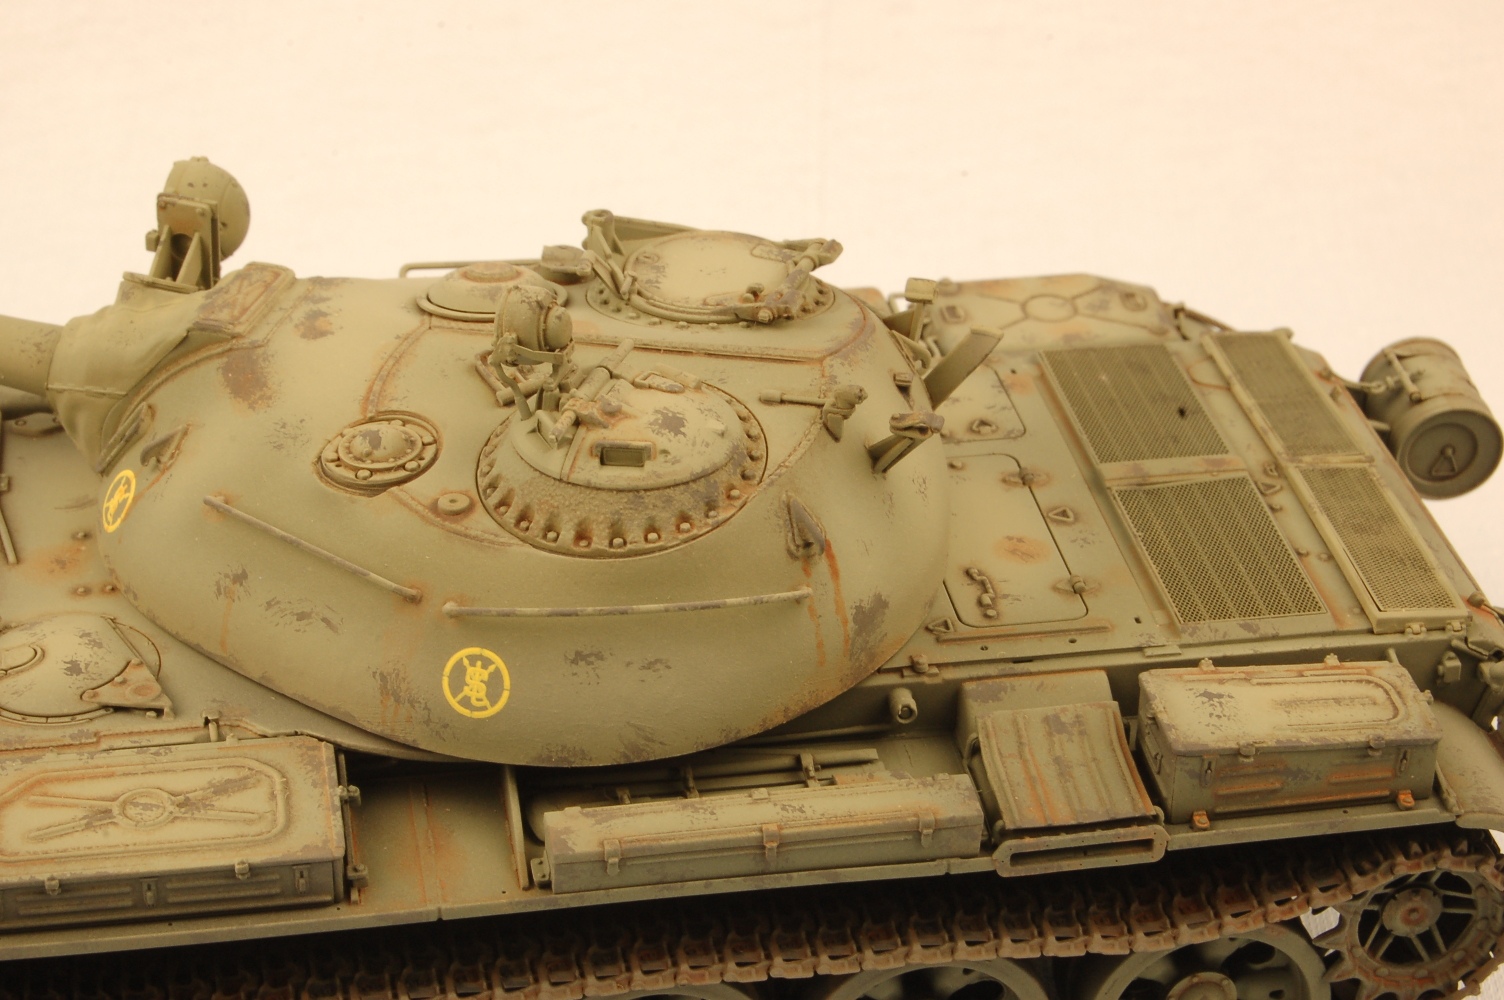
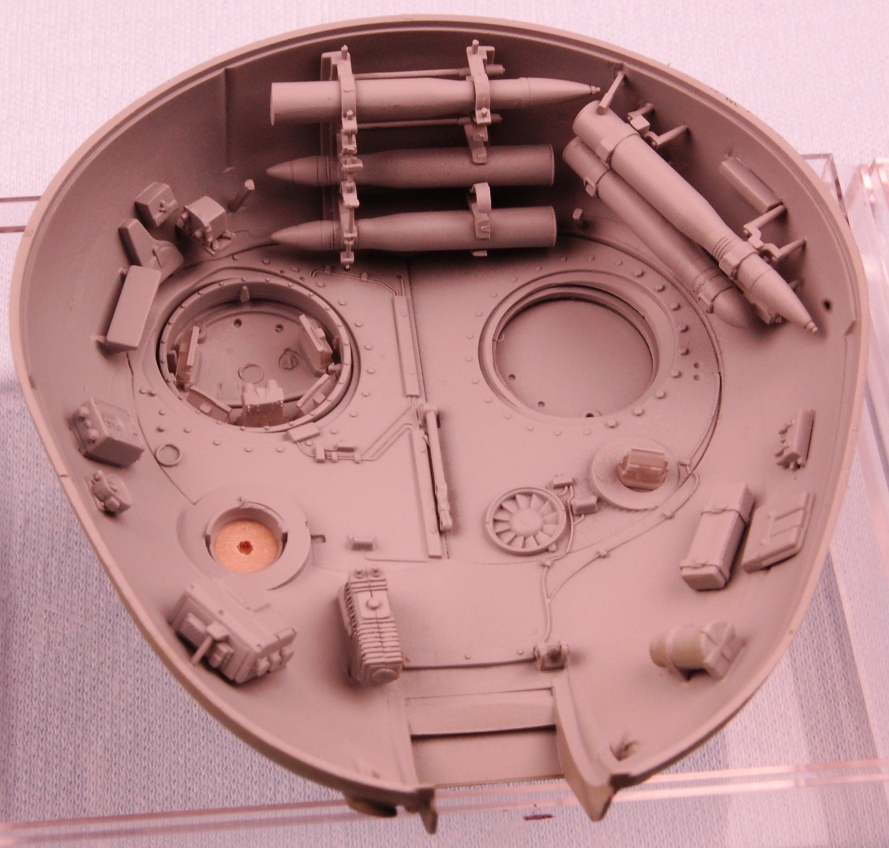
Next comes the assembly of the turret interior parts, and the detail that MiniArt has managed to incorporate into these "Interior Kits" is really nothing short of breath-taking! About the only thing "missing" is any electrical cabling that links the various sub units together in such a turret interior. The molded-on detail of the various small parts is amazing, and the fit of the parts one to another is excellent. The key to success in assembling all the various sub-assemblies into a "whole" is careful study of the instructions, and making sure that each sub assembly goes EXACTLY where it is supposed to. Get this right, and everything manages to fit onto the two main turret parts, R33 (lower turret ring) and L1 (turret shell). There are some molding flaws on the interior of turret shell part L2 which need removing. I utilized a scalpel blade with a curved blade, together with some appropriate grit sand paper to achieve a superior finish.
Following the interior of the turret, comes the exterior turret parts. Note there are alternative parts for "night operation mode", so study the instructions carefully and make notes as to which mode you want your model in. The exterior turret grab railings that are attached in Construction Sequence 80 (parts Tc3 and Tc2) are very fragile and once again probably have "too many" sprue attachment points for their own good. Five in the case of parts Tc3, so extreme care is necessary when removing them from the sprue, and cleaning up the attachment points and seam line. Also, yet another misidentified part appears in Construction Sequence 82. The large part listed as "L6" is actually L4.
The exterior hatch-mounted 12.7 mm DShK anti-aircraft heavy machine gun, Construction Sequence 92 through 95, is a gem. Consisting as it does of nearly 30 extremely well detailed photo etched brass and plastic parts, it is far and away the best example of this gun in 35th scale that comes in a T-54 or T-55 kit. On the other hand, the D-10T main gun barrel comes in the kit as a one-piece unit with a small photo etched part for the barrel tip. There is excellent detail around the bore evacuator and barrel tip. The modeling quality is such that the gun is not warped, and the mold line the runs the length of the barrel is relatively easy to remove using sanding sticks, sand paper and steel wool.
Paint and Decals
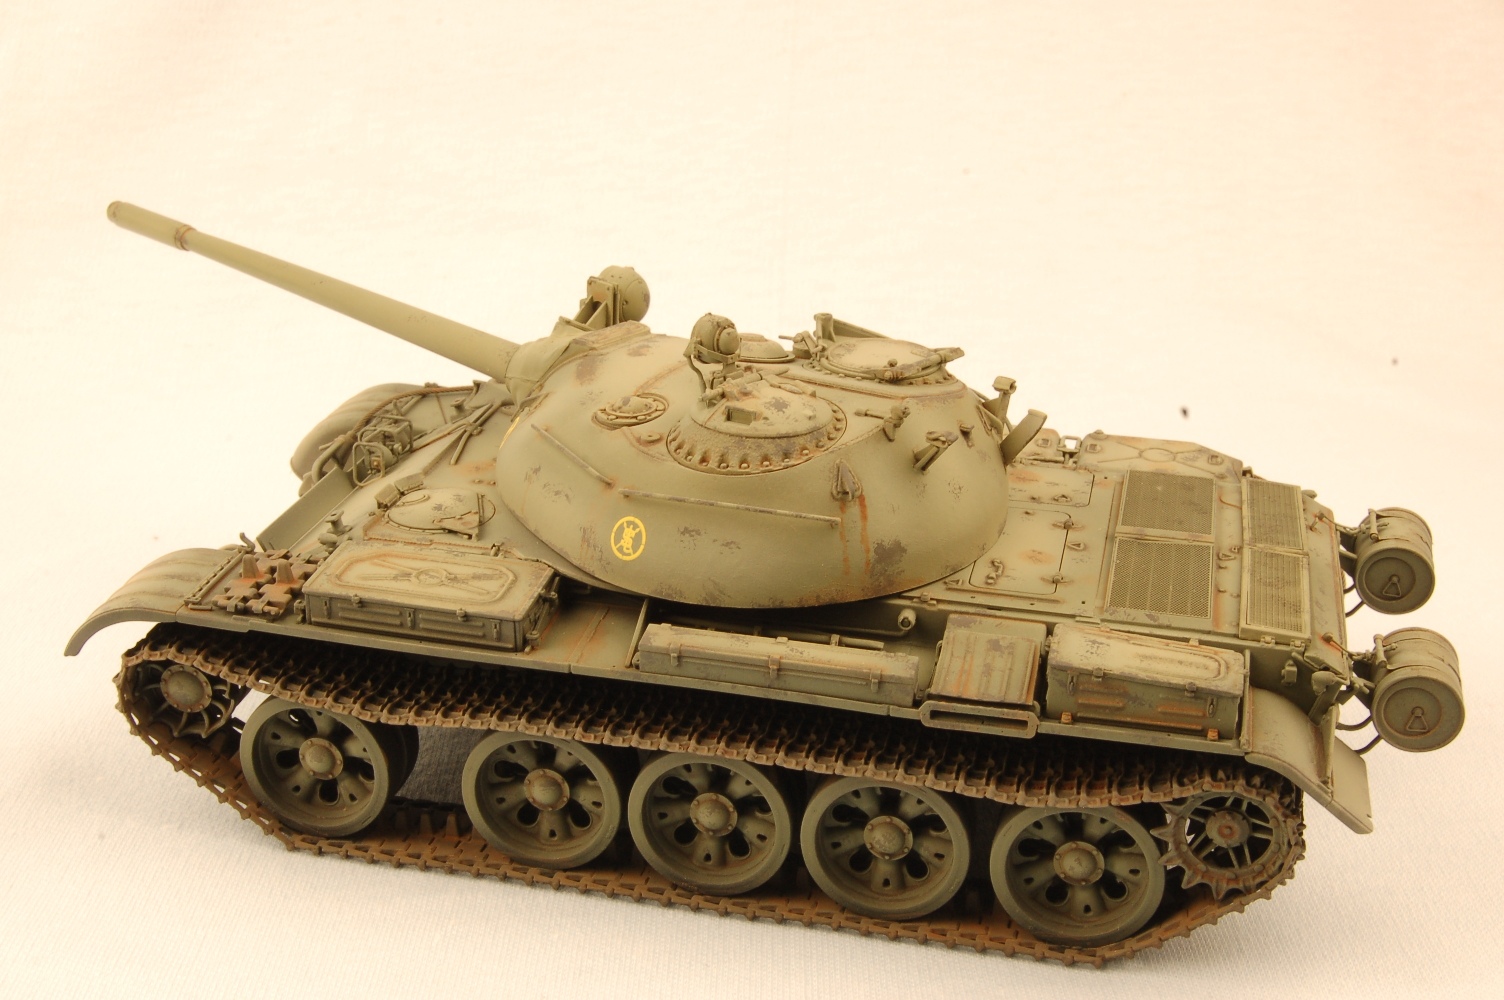
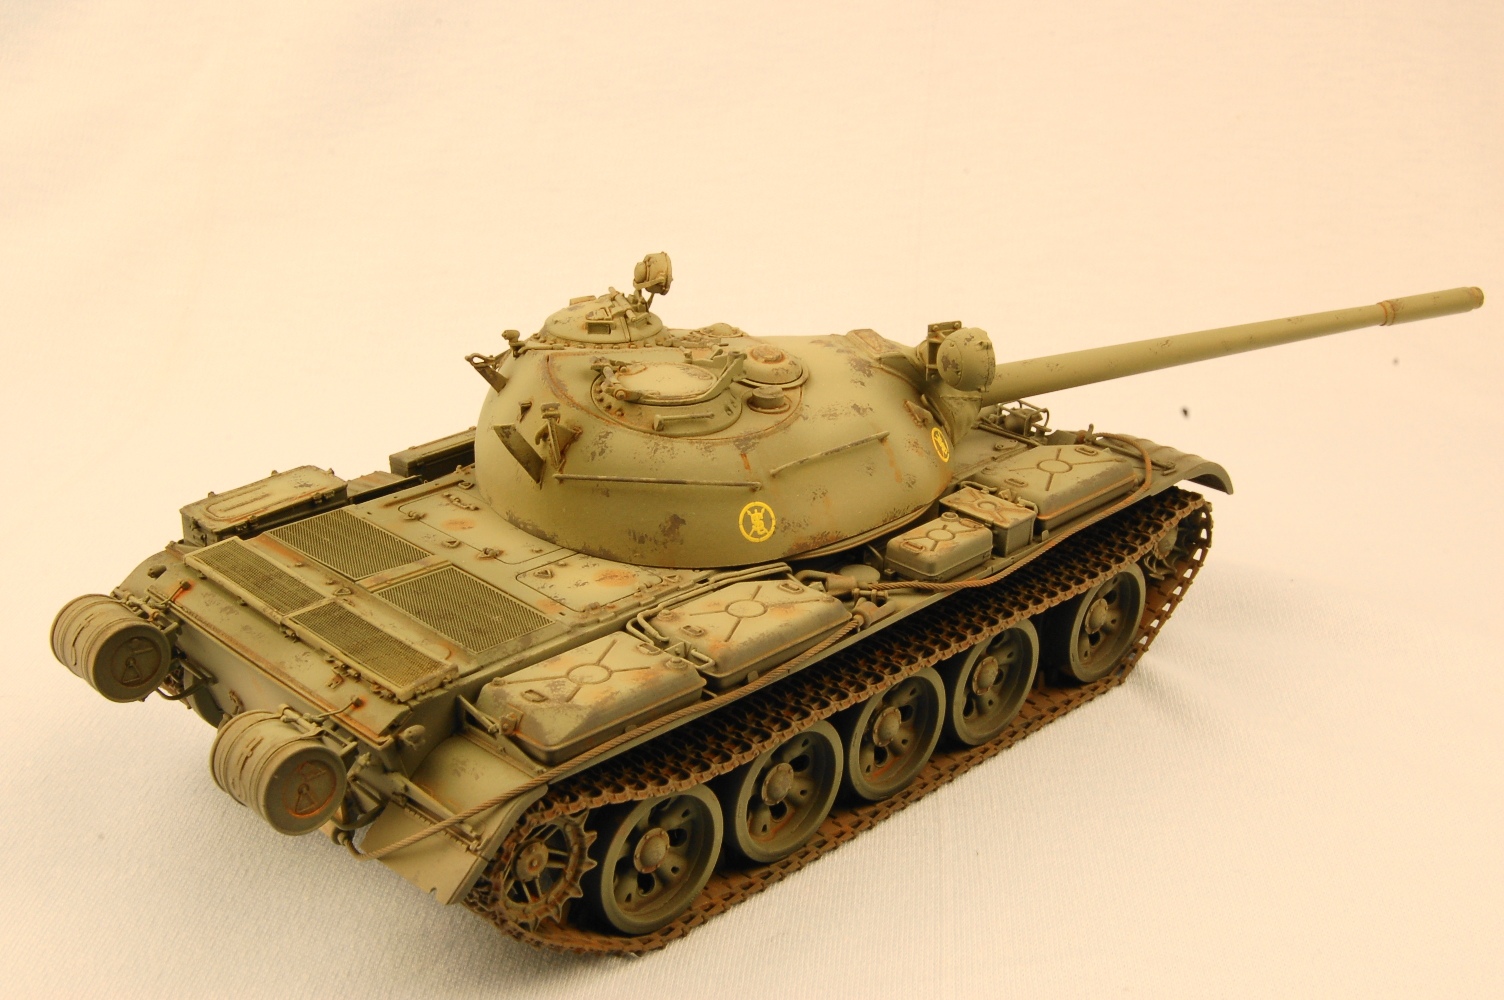
MiniArt provides the modeler with four marking options. All are for Soviet/Russian vehicles, 3 in standard "Soviet Green" and 1 in a green/white "winter" scheme. All are from the 1950's/60's time period, though no specific units are listed, nor exact geographical locations or dates. Based on my experience with the previous two MiniArt T-54 variants I have built, I presumed the decals would be perfectly serviceable, and conform well to the standard setting solutions such as MicroSet/Sol, Mr Color's range of decal setting solutions, or Tamiya's etc. HOWEVER, having built two Soviet T-54s already, I decided to utilize a simple set of aftermarket water slide decals from the "Star Decals" range (www.star-decals.net), sheet 35-950 "Modern African Wars, Part 1" for the kit under review. I chose a Somalia Army tank in overall green, with yellow markings. I painted the model using Mission Model Paints.
I first airbrushed the kit in my favorite primer, Tamiya rattle can "Fine Surface Primer Light Gray". This is an acrylic lacquer product and one of the best primers on the market IMHO. I first get a bucket of hot water from the tap and immerse the rattle can in the water for 5 minutes. I remove and dry the can, and then shake the living daylights out of it, to insure a thoroughly mixed can of paint. The hot water heats the paint, thus allowing it to flow better, and by heating the can, I also increase the pressure within the can, thus providing a higher PSI as the paint exits the spray nozzle. This is particularly helpful when the can is less than a quarter full near the end of its life. The Tamiya primer leaves the model with a very smooth surface once fully cured, and doesn't obscure the fine detail on the kit parts. It adheres very well to both injection molded plastic parts as well as photo etched brass parts. I let the primer cure for at least a week. I then airbrushed Vallejo Black acrylic primer over the entire model. This was allowed to cure for three days.
The Mission Models Paint Russian Green 4BO (MMP-031) was thinned utilizing their own thinner. For panel shading, I took the base green and added some MMP-019 Dunkelgelb Late 1944. I then found a couple of additional green colors from my various paint stores, and airbrushed these randomly about the place, including various fuel cells, hatches, etc. This to break up the "uniform green" look of the original MMP color. This isn't necessarily accurate, but it certainly is appealing to my eye, in a sort of "Impressionist" way of painting a model kit. Like the original Impressionists from the late 1800s, my intention isn't to portray life "with complete accuracy", but rather to give the viewer something interesting to look at. My model, my way of enjoying the hobby, and I have found many people enjoy looking at this way of depicting a vehicle model.
Once the paint had cured for a couple of days, I airbrushed a few thin layers of Tamiya X-22 onto the model, and applied the decals, of which there were only four in total. I utilized the Gunze Sanyo setting solution combo (blue top, green top), and after allowing them to dry for 24 hours, applied some light coats of Tamiya X-22 to seal the decals.
After the final clear coat was given a couple of days to cure, I mixed up some dark brown oil paint "wash", and applied it liberally to the areas of raised detail and in the various recesses. This was allowed to dry for 24 hours before some Q-tips dipped in odorless mineral spirits were used to remove any excess "wash" and clean up "tide marks". The model was then left alone for 72 hours to allow the oil paint wash to set up, before a few light coats of acrylic matt clear were applied. My favorite is AK Interactive's "Ultra Matt Varnish AK 183", the "matt-est" matt on the market. I airbrush this without thinning it, straight from the bottle. All my paints are airbrushed utilizing an Iwata HP-C and the paint is sprayed at between 12 and 15PSI depending on the consistency of the paint (if thin for post shading, then 12PSI, but otherwise 15PSI for most applications).
I then took a suitably dark gray color from the Vallejo range of acrylic paints and mixed a couple of drops with a drop of distilled water, plus a dab of Vallejo airbrush thinner to break the surface tension. I snipped off a small piece of sponge from a sheet I have of this material, and dipped the sponge material in the paint utilizing some tweezers. I then wicked most of the paint off on a paper towel, and then proceeded to dab the paint-covered piece of sponge randomly about the model, "chipping" the Soviet Green paint. I then repeated this process using a dark rust color, only less so. I added to the "chipping" using both these colors, and a fine tipped brush, making scratch marks etc.
Once this was dry, I got out two suitable "rust" colors from my store of artists' oil paint, mixed these up with some odorless mineral thinner, and went about beating up the vehicle's condition. Given the climactic and environmental conditions in Somalia together with a generally "lax" vehicle maintenance environment, I decided to add a fair bit of "rusted metal" to this model tank. Besides, the rust color helps give "life" to an otherwise "green" vehicle.
The tracks were hand painted utilizing Vallejo "Track Color", a dull rusty brown color. Various shades of "rust color" oil paint was utilized as "washes" for the tracks.
I then airbrushed some Tamiya XF-57 Buff over the running gear and parts of the lower hull as "road dust". A very light coating was applied to the entire vehicle.
The AA gun was attached to the turret, and the turret to the hull, and the whole model given a few light coats of AK Interactive Ultra Matt Varnish to seal the whole deal.
In conclusion: I very much enjoyed the challenge of this model kit with its full interior. It was a very time-consuming build, though due to the excellent fit of most of the parts, it wasn't in any way a frustrating build. The end result of all one's effort is a really great model kit. If you are looking for a great T-54 kit, you need look no further than the MiniArt range. This kit is HIGHLY recommended for its superbly detailed parts, and excellent parts fit. My sincere thanks to MiniArt for allowing IPMS USA to review this wonderful model kit.


Comments
Add new comment
This site is protected by reCAPTCHA and the Google Privacy Policy and Terms of Service apply.
Similar Reviews