
Pie Wagon
Back in the late 60s through the mid 70s Monogram released a bunch of kits designed by Tom Daniels. I built a dozen of them in my youth, but lost all of them during one of our moves when the box didn’t show up at our new base housing. Since then I have managed to collect all but a couple of the ones I had and several I didn’t have but always wanted. Now, thanks to Atlantis Models, some of these kits have been re-released, and I took the opportunity to grab the Pie Wagon.
The kit comes packaged looking like the old Monogram kit, including the classic instructions. The parts are molded in red and clear plastic with chrome and brass-plated parts and rubber tires.
The first thing I did was some research to see how the kit goes together and anything to watch out for. The first review/build I found was done by Doug Cole and found on the IPMS/USA Reviews page.
A quick email to John (who was the 1st VP when I started this) and he advised I could pass on the review since we already had one but I needed to build something and I hadn’t done a car model since 2015 so I decided to go for it and if nothing else you get a kit review by someone who doesn’t do a lot of cars.
The kit does offer 3 decal choices: the original Mother’s Pies, Mamma’s Pizza Pie and Mamacita’s Tamale Pie. I thought about doing one of the other schemes to be different, but since the kit comes with a load of pies in the back, I stuck with the original. Also I have noticed that many who build this model give it a red body but the box top has always looked purple to me, and that was how I was going to do it.
The kit comes with a wood grain look on the bottom, so I tried some things to get the look. Even with a dry brush with Raw Sienna and a Clear Orange glaze and mine still ended up just looking brown. Ah well.
I decided to paint the body parts before assembly so after cleaning up a couple of small mold lines, I used Tamiya TS-24 Purple but it came out looking more Lilac and not what I wanted. It took a lot of searching before I finally found Tamiya TS-37 Lavender at MRS Models in Sandy and after a new coat and a Gloss coat it looked much better to me and was ready for decals. These went on with no issues but I found out later I forgot to add the license plate holder before adding the plate decal. Model building is fun.
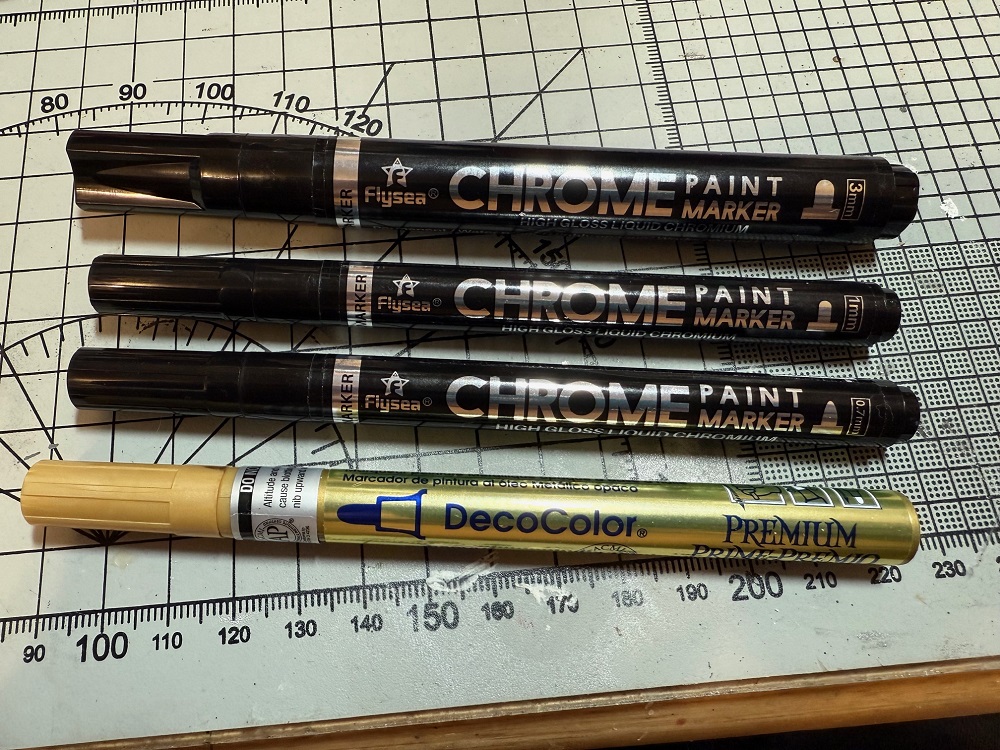
I painted the engine block a green color to match one of the options Ford offered. Cleaning up Chrome plated parts is always an issue with auto kits. A lot of guys strip them completely and then repaint but I didn’t have a good Chrome spray and I was building this more like a novice would so what to use. I had picked up some Chrome Paint Markers from Flysea off of Amazon a while ago, so Idecided to try them and they worked a charm. Maybe not perfect but close enough for me.
Now the brass-plated parts presented their own clean-up problem. I tried several paints and markers and couldn’t seem to get a shade close enough until I found DecoColor Gold and it looked pretty good.
The floor received a glossy black coat. The pie rack in the back got more brown paint, and the pie's detail waspainted. The seats called for Ivory but I only had an old can of Model Master, which decided to splatter for me. I sanded that back and looked to see what else looked good. Rust-Oleum Painter’s Touch Gloss Almond. Sure, hmm, looks ok to me. The shifter has a cherry on it but all I had was Flat Red. A touch-up afterwards with Clear Red and it looked the business.
The chrome wheels needed a little cleaning up as did the chrome suspension. The tires are two-part and did not have that parting line down the middle, which was nice. I used some super glue to hold the wheels together.
The rear suspension is an odd design but if you follow the instructions, it is actually pretty stable.
I had a problem with the rear door. You add a hinge piece to the door part and then trap it inside the rear. I must have set it in the wrong spot on the door and I cannot make the door close or open completely so now I have it partially open so you can see the pies in the rack. I reread Doug’s review and emailed him and he confirmed he used a slow-setting glue when placing the hinge so he could do it all together. Another lesson learned.
The last thing I did was glue the top body to the bottom and learned another lesson. I suggest gluing the body parts together before you add the suspension because I could not get in to squeeze the parts together enough for a solid fit all around.
In the end, I have a finished car and my first Tom Daniel kit back in the case. So what if it is a decent 3 footer.
Thanks to Atlantis Models and IPMS/USA for supplying the review sample.


Comments
Complete
NICE REVIEW - VERY DETAILED AND ENTERTAINING!
Add new comment
This site is protected by reCAPTCHA and the Google Privacy Policy and Terms of Service apply.
Similar Reviews