
HMS Campbeltown 'St Nazaire' Operation Chariot, 26 March 1942
Background
I don't know why we need fictional action movies -- there are more than enough tales of derring-do in the real world and in my book Operation CHARIOT, the raid on St Nazaire, is right up there near the top.
The British were ever concerned about the various German battleships, battle-cruisers, etc., and numerous air raids were flown to sink or cripple them in port, damage the ports facilities, etc. One such target was to render the graving, or Normandie, dock at St Nazaire incapable of handling Tirpitz and thus forcing her off the western coast of France -- from this was born OPERATION CHARIOT. The basic plan was to disguise a ship to look like a German patrol boat, load it with explosives, and ram it into the Normandie Dock, rendering it useless. The secondary objective was to destroy port facilities and smaller docks such that the port was rendered tidal and thus severely restrict use by U-boats and other vessels.
USS Buchananwas one of the 50 flush-deck, 4-stacker Lend-Lease destroyers provided to England in 1940. As part of the new 'Town' class, she was modified and renamed HMS Campbeltown and engaged in Atlantic convoy duties. If you wish to see Campbeltown at this stage of her career, please see Paul Helfrich's review of the 1/240 scale Revell kit on the IPMS/USA website.
Campbeltownwas selected for the main role and refit started only 17 days prior to the raid. She was stripped of everything non-essential to reduce her draft and account for the addition of armor protection for commandos and the bridge, increased quick-firing weaponry, and 24 depth charges, about 4 tons explosive power, to be placed in the bow. She had enough fuel for a one-way trip. In the attack force were MGB 314 (the headquarters boat), MTB 74 (a special torpedo boat), 16 motor launches (ML's), and two escort destroyers who also towed the smaller boats which did not have the fuel for a round trip.
To make a long story short, they departed on March 26, arrived offshore on 27 March, and proceeded up the Loire early on March 28, aided by a mist which reduced visibility to a couple miles. Spotted by searchlights, the force was challenged but responded with false signals which bought them a little time before heavy firing broke out, chiefly from a flak ship which Able Seaman Savage on MGB 314 silenced. After several minutes, ship's gunners had temporarily suppressed many of the shore batteries and the flotilla started the final run.
MGB 314, as HQ boat, veered off as did MTB 74 which headed for the Old Dock. Despite the adverse impact of the modifications and explosives load on Campbeltown's handling, Commander Beattie timed the turn perfectly and she cut through a torpedo net and raced down the lock to hit the gates squarely, riding some 30 feet into them.
With Campbeltown jammed into the lock, and with heavy gunfire chewing up the small ML's and preventing the commandos from completing all of their missions, the force retired, still under heavy fire. 2-1/2 hours later while some 300 Germans were inspecting Campbeltown, the load of depth charges in the bow went off, ruining the lock gate, vaporizing the inspecting party, and planting the remains of Campbeltown right in the middle of the Normandie Dock.
Much has been skipped here, particularly the Commando mission. British naval losses were Campbeltown, MGB314, MTB74, 14 MLs, 34 officers and 157 ratings killed or missing. Of the Commandos, 168 were killed, missing, or prisoner. Overall, about 58% casualties. Yet the raid succeeded -- the big strategic objective, to deny use of the Normandie Dock was achieved. There was also damage to the Old Dock and other port facilities, although the port was not rendered tidal, and the Germans were forced to shift forces to protect this and other naval bases from subsequent attempts.
Five Victoria Cross were awarded, two posthumously -- one of those to Able Seaman Savage of MGB314. Lieutenant-Commander Beattie, RN, received the VC "in recognition of not only of his own valour but also that of the unnamed officers and men of the very gallant ships' company".
Wow, heavy stuff and certainly more deserving of a better movie than "Attack on the Iron Coast".
I don't have exhaustive knowledge of the subject, but I'm not aware of any other 'St Nazaire' Campbeltown kit. This review opportunity came at just the right time -- I had just pulled my Airfix 1/600 HMS Campbeltown (in its 1941 configuration) off the shelf, assembled my references and some White Ensign aftermarket, and was ready to start the conversion of that kit to the St Nazaire configuration.
The Kit
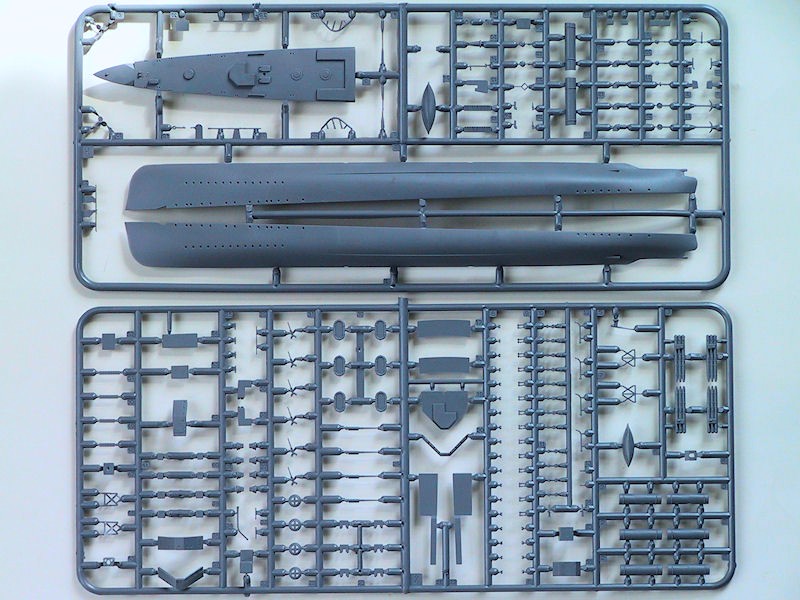
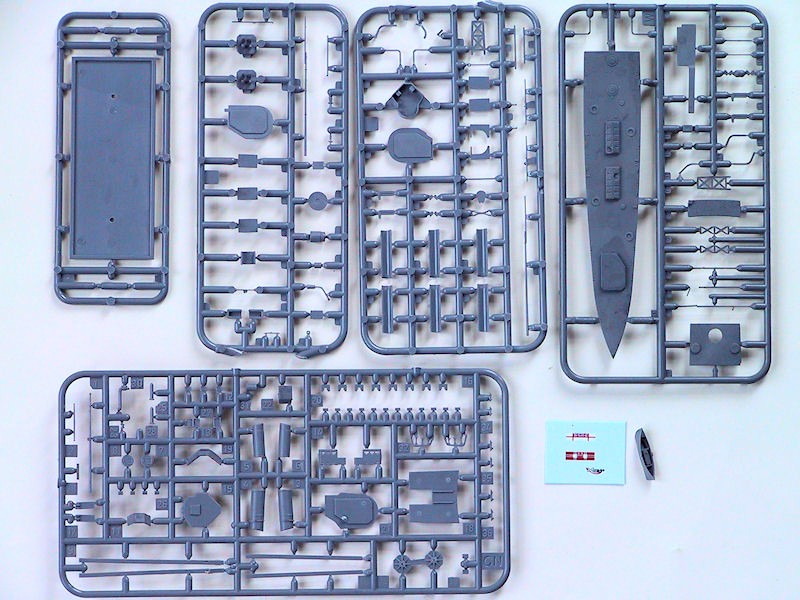
I've not owned or built a Mirage Hobby kit before, so this is new turf and at first look, I'm fairly pleased with it. Evidently Mirage has issued other flush-deck '4-stackers' before, so what you get is one of those kits plus a new sprue (CN) for the Campbeltown mods. In general I found a mixture of quality -- there are some hefty parts, the ladders and the usual railings, tubs, etc. -- and some very tiny finely detailed parts, such as masts, vents, etc. There is some flash and some seams, but I don't see any major issues or hard clean-up work. The parts are all numbered.
The box says there are photo-etch parts but none are included or shown on the instruction sheet. All parts were in one plastic bag. There were a few loose parts and a dozen or so broken parts, mostly the very fine staffs, shafts, etc. Other than the prop shafts, most were easily fixed. I think the problem is the fine parts have heavy attachment points and are under stress. During assembly, many that weren't broken, did so when cut from the sprue, no matter how careful I was.
There is a problem. Typical RN flush-decker destroyers had 6 20mm gun mounts -- the 6 guns and shields are on sprue X. Campbeltown had 8 20mm gun mounts -- and sprue CN has 8 new shields, 6 of which are unnecessary as they are identical to those on sprue X, BUT it does NOT have 2 extra 20mm to bring the total to 8. This is a bit of a bummer as this is my only 400 scale ship so I have nothing to rob.
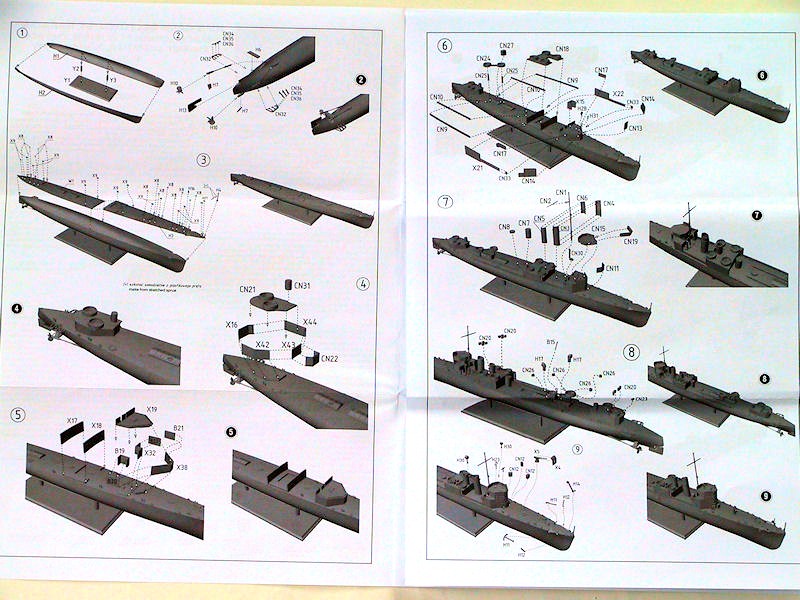
The instructions usually have 2 images per step -- an exploded view of the parts to use and then a picture of the completed assembly. The problem is the images are gray-scale solid-model renderings and not very clear, especially on some of the busier steps -- there isn't enough contrast to see detail clearly. Most views are off the starboard bow, so some port side things are guess work. There are a few incorrect part numbers on the instructions (Step 3: H4 is H40; Step 6: H28 is H29, H31 is H28; Step 9: unlabeled "T"-shape part is H31). A number of things work to make part location difficult -- I can only say to study the parts and the instructions together, things become clearer. I relied very heavily on the AOTS drawings.
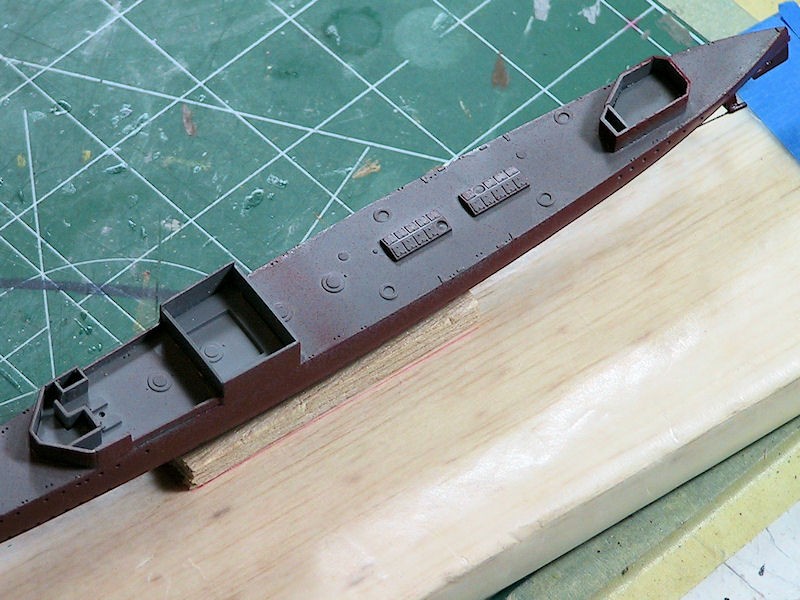
Most the hard work occurs in part of the first 3 steps -- getting the hull halves glued together and the 2 deck halves glued into that. The hull halves are long and thin, think "greyhound of the seas", with a beautiful knife-edge bow and pointed stern -- they are identical, they match perfectly. The problem is there are no locator pins, the matching surfaces are very small, and because of the hull shape there is no way to get a clamp in there. I used Tenax and the Mark.1 Thumb & Finger Clamp to work my way down the length of the hull in 5 or 6 stages. It came out perfect, not my fault.
The hull goes together with insufficient space to install the two deck halves. I carefully spread the hull, stuck a brace in and got the front half on, then the rear half fit nicely. Do not get concerned with the seam between the deck halves -- it is covered up by structure later.
At this point, I diverted from the instructions, deciding to get the bigger pieces on because it appeared there might be some rough handling and I didn't want to break props, etc.
The problem is the center deckhouse structure. The instructions have you put on the bridge, then the fore/aft sides (X17-18) of the center structure. The deck (CN18) of that structure is scalloped to the rear and both model and real pix of Campbeltown show the edges should extend past the aft side. The kit shows putting a spacer (CN33) just aft of the bridge, then mounting the sides (X21-22) such that they extend back past the aft side to match with the scallop of the upper deck.
Doesn't work -- at least not for me. The parts X21-22 are too thick, the sides X17-18 take up too much room, and the hull isn't grooved right -- I don't know. What I ended up doing is forgetting the spacers, putting the sides where they fit best, setting the upper deck such that there was an overhang and then using some card to fill in the sides to match the scallop.
And that's the build -- the rest of it is just a matter of not losing (or breaking) very small parts -- and there are a lot of those -- ammo boxes, bitts, cable reels, etc. Mirage did not skimp on the detail. Probably the disappointment is the upper bridge structure -- I'm not sure what look they were trying to achieve, but it bears little resemblance to the steel plate and splinter padding shown in the references.
With the big structures on, I could go back to the prop-shafts -- one deformed and the other broken. By the time I got the one straightened out, it was also broken. I made one more effort to fix them, then cut the shafts from between the housings and replaced them with .015" wire, used a little CA to fair in the housings and called it good enough. Both props are numbered H10, but they are handed. After studying a photo of another ship of this class, I think the picture in the instructions has the props reversed.
Then the prop guards (CN32) shattered while (carefully) cutting them from the sprue. Campbeltown had a different style prop guard, more squarish, and mounted high. I wasn't about to remake these from scratch so I took the stock prop guards (H32-33) and tacked them into the correct location for Campbeltown, added a few braces in lieu of CN34-36, and called it good enough.
Drawings of Campbeltown indicate part H14 should not be installed on the bow in step 9. In step 10, the helm and binnacle should be mounted forward on the aft deckhouse next to the compass house, not in the middle as shown. Also, there should be a shield for the aft helm station -- there is none, so I made one from strip. In step 12, the two Carley floats should be mounted on the fantail -- the problem is that Mirage forgot to include the sponson (that the Brits added to the 4-stackers to make more room for depth charge racks) on which they were stored so I made a simple one from card stock. Also in step 12, ladder X49 does not belong -- simple vertical ladders were used on the rear of the deckhouse. Speaking of ladders, there should be one (or two) vertical ladders leading up to the diagonal gun tubs. In step 13, the two W7 are really W7 and W8, but they aren't long enough to do the job, so I used some thin strip.
What to do with the 20mm??? Well, the six provided are actually bigger than the deck gun, so they don't look good anyway. I took 8 from the 1/350 Trumpeter Liberty Ship I'm working on, since they are being replaced with better ones. Although a bigger scale, they are much smaller than the kit guns and look good enough. I added some PE shields to them -- problem solved.
What else? Well, I deviated from OOB and added a piece of PE anchor chain, a few ladders, and a little PE railing, all from Gold Medal Models, and it's done. I should note here that GMM has a PE set, #400-10, for the Mirage USS Ward/4-Piper that can provide a few bits for Campbeltown. They have another more generic 1/400 PE set, 400-1, but it's a broad brush. All photo-etch is fastened tightly to the model with Gator's Grip Acrylic Hobby Glue.
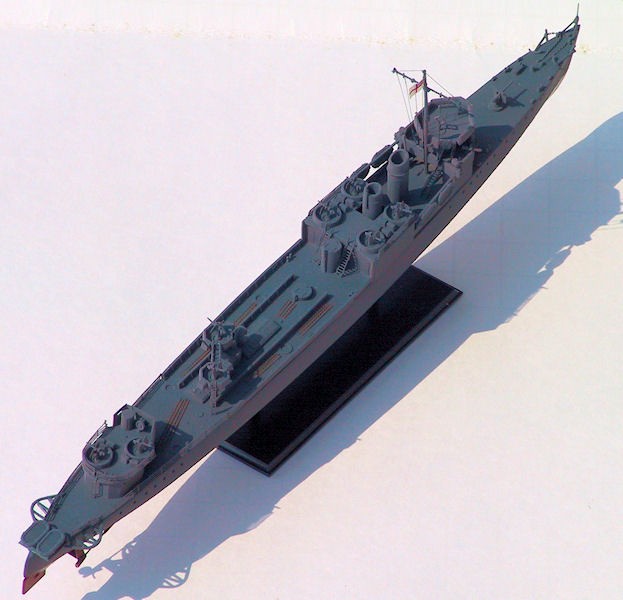
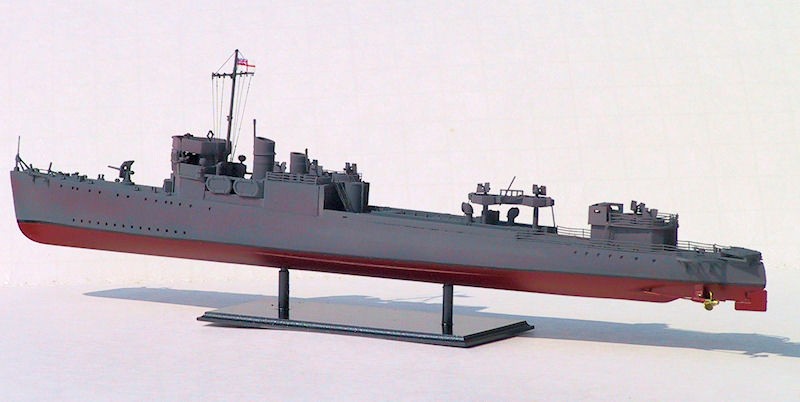
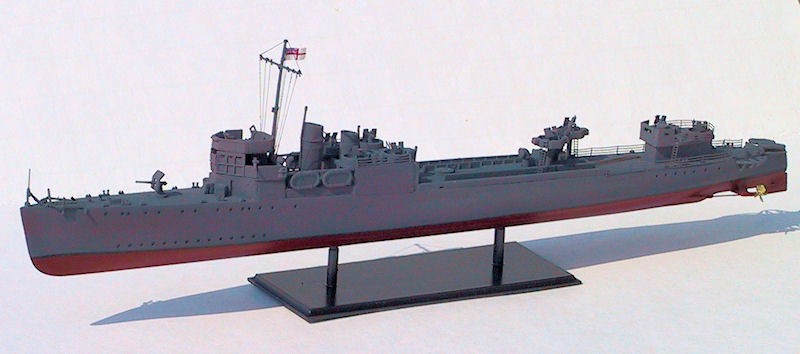
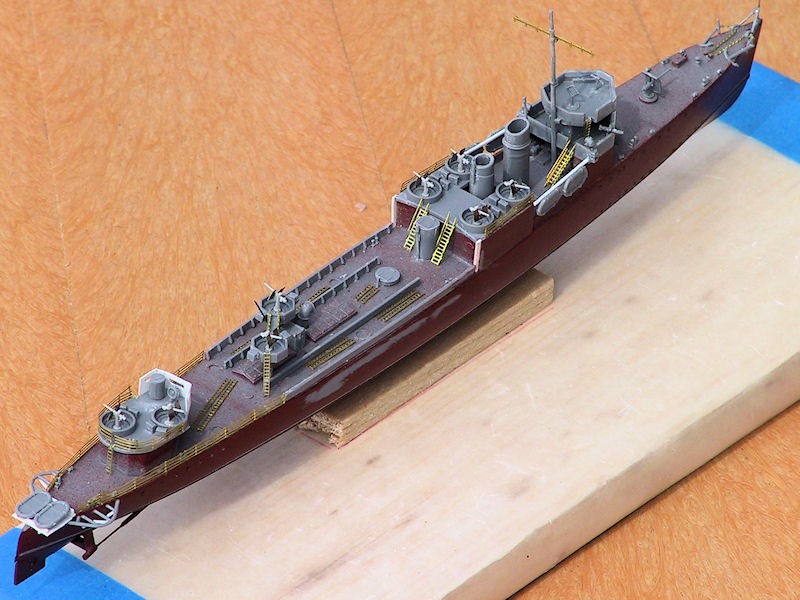
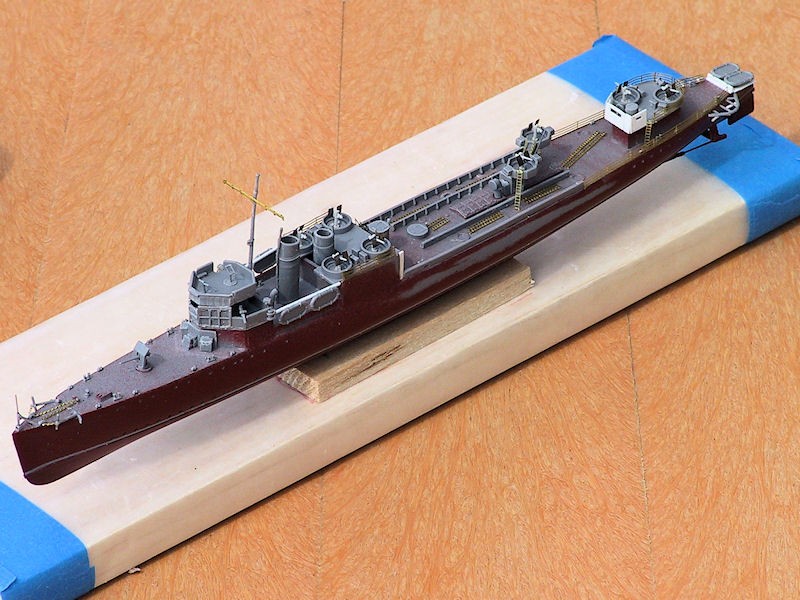
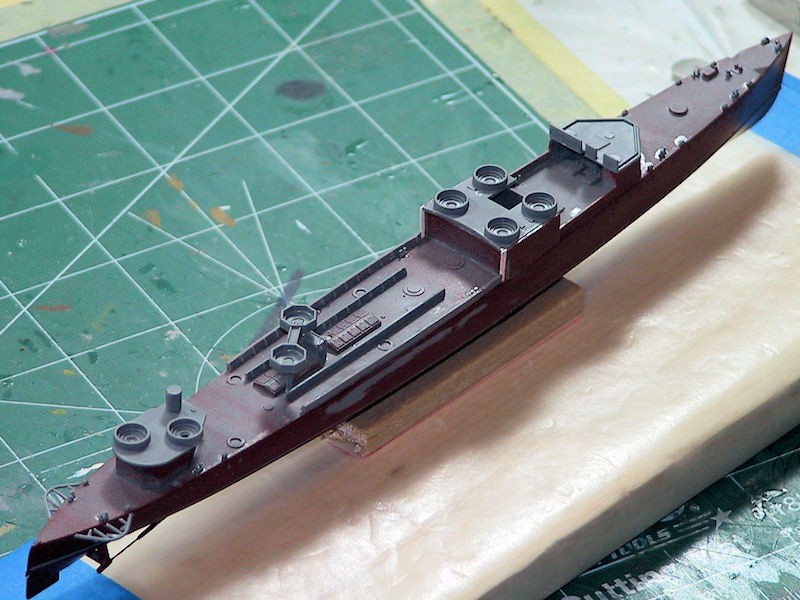
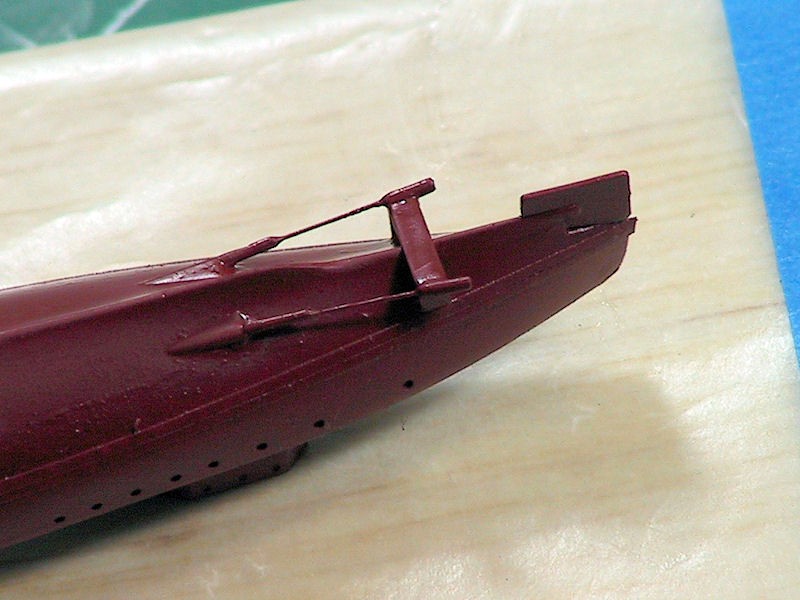
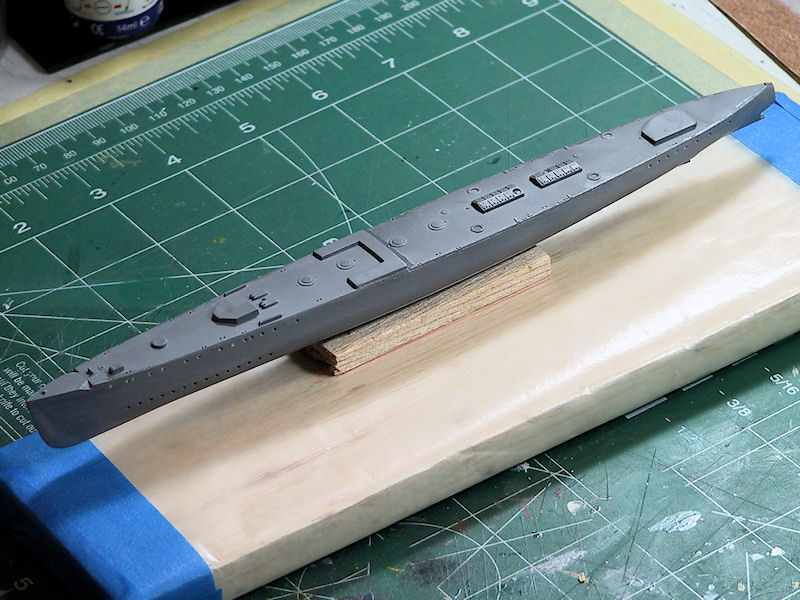
Here are a few pictures of the model before paint. Where you see white (card stock) or metal (P/E) or the 20mm guns/shields is something I've done to the basic kit and should match the comments above.
Paint and Finishing Up
The instructions give Vallejo color equivalents and the only difficulty is picking the base color, given as Vallejo 886, Grey. The instructions state that the ship was repainted overall a dark grey. The AOTS is essentially silent on the issue, but the Profile makes the statement that it was repainted overall in "Mountbatten (Plymouth) Pink", the standard for in-channel operations. FYI, we're not talking "Operation Petticoat" pink here, it's much more of a light purple, at least to me.
I have the White Ensign Royal Navy Colour Coats so that's what I'll dress Campbeltown up in -- it's my model. Initially it looked like a one-color scheme, nothing fancy, but further study showed it to be somewhat blotchy. I opened the paint tin and asked my wife, who is the color expert in our house, what color it was -- she said, "oh, pink-ish purple with some gray and brown". Then I showed her the color profiles and she suggested I should just do a light coat over some dark patches and such.
I sprayed the upper deck surfaces WEM's RN01, AP507a Dark Grey, then gently applied that also along the sides, preserving much of the primer, clear spots, etc., but hitting other areas heavy. Then I over sprayed with RN18 Mountbatten Pink on the sides only, keeping it pretty thin. The upper decks were not painted Pink but I didn't worry much about overspray either.
I had added some boarding ladders, lying on the deck, but erred by gluing them down before I painted the ship itself so I had to do some careful dry-brushing to make them look other than ship color.
If Campbeltown flew any flag, it may have been from the jackstaff (B15) on the diagonal 20mm platform -- but the heroic prints of course show the White Ensign at the mast and that's how I did it. Using the AOTS I ran some stays to the mast then touched up the paint.
I had quit spraying 'Pink' when I was afraid it would get too heavy. Unfortunately much of the 'Pink" got lost in the pictures I took. Next time I'll need to play with this more -- try for a better balance between how it looks in the person versus how it looks in pictures. Also, the cover picture on the 3rd reference has been colorized and suggests to me at least that the 'Pink' was applied over a Western Approaches scheme, which it is likely that Campbeltown carried before selection for this mission -- so I think I'll go that route.
Summary
Campbeltownis tough to portray because there aren't any manufacturing drawings -- they hacked it into shape and sent it off. Both AOTS & Profile say their renderings are based on available photographs. So, by those standards Mirage has produced a good representation of Campbeltown with the few exceptions I have noted, but those aren't hideously wrong.
The kit is just frustrating -- the lack of contrast in the instructions, a few errors, but mostly the amount of breakage of small, thin, fine parts -- either on the sprue or while trying to get them off. Because of this, it has to be for experienced modelers.
Nonetheless, I like my little model and rather had fun bouncing back and forth between the kit and references. If you want Campbeltown at St Nazaire then you should consider this kit.
I'd like to sincerely thank Dragon Models USA for providing the review sample and IPMS/USA for allowing me to review it.
References
I could not have done without the first two; the 2nd two are more focused on the Commando aspect. The Profile gives a great good story about the preparation for the raid and the execution thereof with some great contemporary sketches. It also has good history on the class and Campbeltown's life before glory. The AOTS was invaluable to make some sense of the kit instructions, which as I mentioned, were just too difficult to read. Both books confirm that Mirage did a good job with the representation historically.
- Anatomy of the Ship: The Destroyer Campbeltown, Al Ross, Naval Institute Press, 1990, ISBN 1-55750-725-2.
- Warship Profile 5 HMS Campbeltown (USS Buchanan), John Wingate, Profile Publications Ltd, 1971.
- Operation Chariot The Raid on St Nazaire, John Cooksey, Pen & Sword, 2005, ISBN 1-84415-116-6.
- St Nazaire 1942 The Great Commando Raid, Ken Ford, Osprey Publishing, 2002, ISBN 978-1-84176-231-9.


Comments
Add new comment
This site is protected by reCAPTCHA and the Google Privacy Policy and Terms of Service apply.
Similar Reviews