
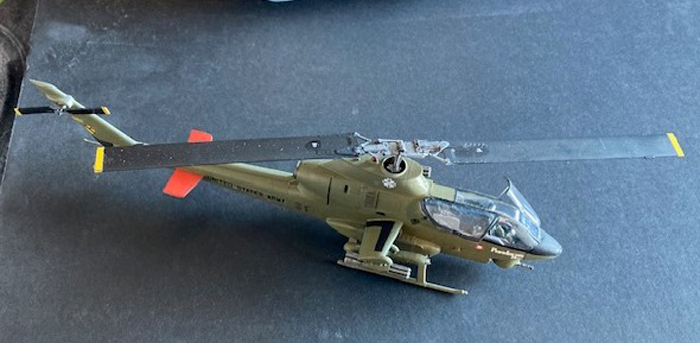
AH-1G Cobra 'Over Vietnam with M-35 Gun System' (HI-TECH)
It has been an honor to review Special Hobby’s new AH-1G kit, and hereby express extreme thanks to them for providing IPMS USA with this new release. We continue to be fortunate with their ongoing support of the reviewer corps!
Special Hobby continues to provide subjects avoided by others… as a business model, this ensures they continue to exist and thrive on the concept of “do what others can’t or won’t”.
(Note: the Air Force Reserve unit here in Oklahoma has always had “SH” as their Fighter unit tail marking, meaning what everyone should know it does. In the case of this review as a transplant Okie I shall use SH as an abbreviation for Special Hobby, intending it to mean “S-Hot” in their case for untouchable ability and a quality product)
SH’s Huey Cobra line is exceptional; although previously catered to by other companies with modern upgraded snakes in 1/48 and 1/72 scale (and the 1969 release of the venerable 1/32 Revell Huey cobra), the modeling world still has room to accept newer-technology mold kits of the original Vietnam-era development of this important part of Army Heli aviation.
With this 1/48 release, SH has addressed the issue of the original Bell aircraft company’s purpose-designed gunship in all three scales. When I reviewed the 1/72 version of this kit back in 2018 or so, I lamented the fact it was on the smaller scale; but SH has now stepped up to provide us with a size that won’t take up as much space as the larger (and more expensive) 1/32 or ’35 kits. Such is the benefit of investing time in CAD work for a basic version, and taking advantage of “Scale-able” metal mold-cutting to address different scales of the same basic kit.
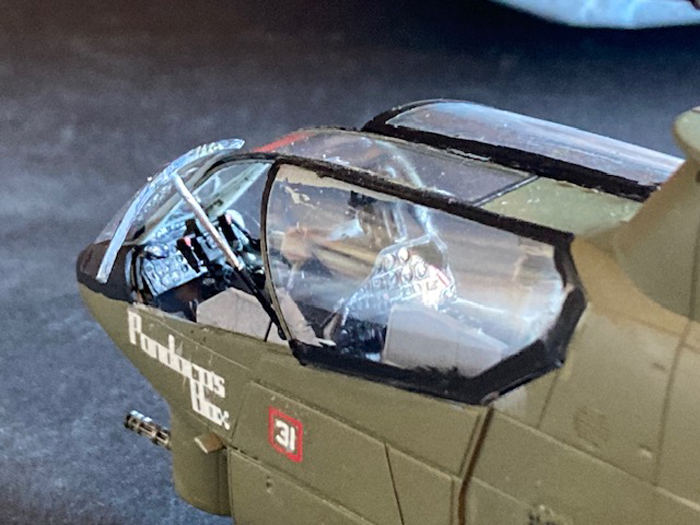
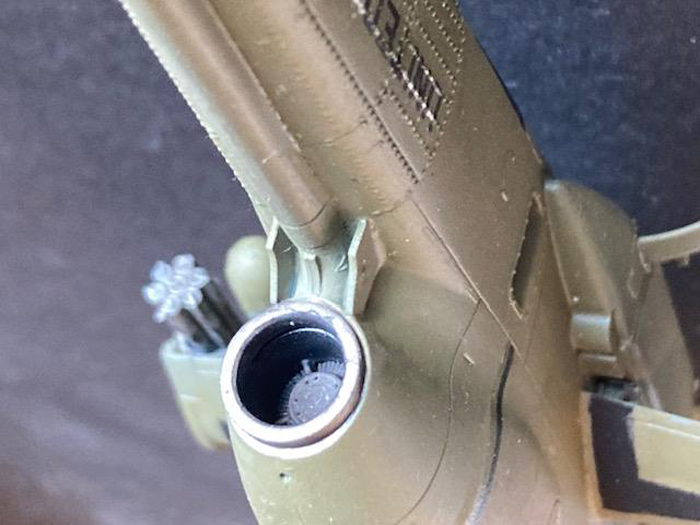
Included in this model are Photoetch and resin parts to complement the plastic basic kit. The instrument panels are multiple-layer items, along with a few basic cockpit enhancements such as map boxes, crew seat harnesses, etc. These appear to be subcontracted items from Eduard based on the lettering and copyrights. Additional resin includes two very nicely detailed crew helmets incorporating helmet straps and mini PE microphones to hang or sit on the seat pads, and a pair of multiple-tube rocket launchers with etch mounting plates for detailing the early version resin 7-round 2.75” rocket launchers. The kit includes these items in plastic as well… which I used for this build. The resin items have more detail, but I learned too late after using a regular X-acto saw to remove the front and back of the resin tube assemblies from their pour stub that a thinner saw version should have been used to preserve the mounting ring detail.
As it is I cut off too much resin to leave the circular brackets and account for the inevitable sanding to bring them into level and alignment, driving a decision to use the plastic versions. The resin versions were more detailed in the rocket warhead and ignitor section of the rockets, but in the end, the plastic ones were ok with the use of black detail fluid to bring out the relief of the front and tail section after painting.
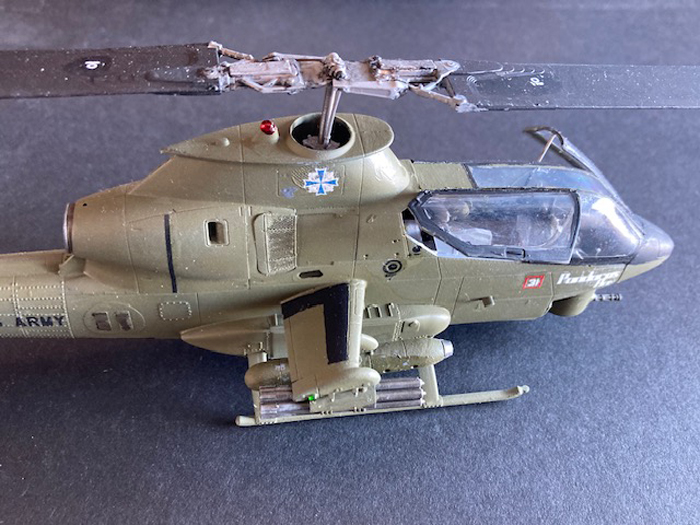
The cockpit includes resin seats and minuscule (fragile) mounting points, along with the side armor plates which were incorporated early on in the ‘cobra’s life.
One major investment in SH’s kit is the inclusion of the forward cockpit moveable pantograph gunsight and handle/firing assembly, the cockpit cyclic and Pitch control arms, and the rear cockpit coaming gunsight assembly, all molded in orange 3D resin. These are HYPER fragile, and I recommend waiting until the point where the canopy is about to be installed to cement these into place with super glue. I’d recommend light-curing UV resin, but have yet to figure out how to get the resin to cure where the light cannot reach. (This technique works great for clear parts installation on a clean surface).
The basic fuselage assembly is simple, just don’t forget to install the pitch swashplate and mounting for the main rotor. ALSO, a bit of weight in the nose and gun turret is advised. I used liquid gravity to ensure the kit stood on its skids. Included in the PE are Inlet FOD screens… extremely petit and well executed, and THEY FIT!
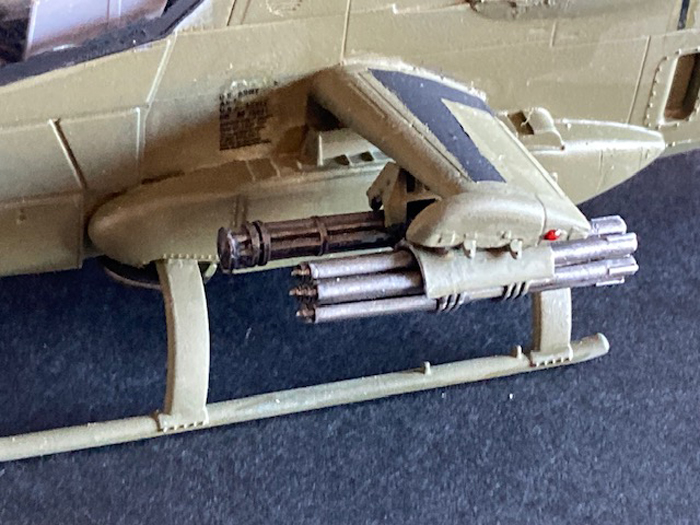
The rest of the kit went together very predictably and easily; decide early on which final version you are modeling, as there are early or late skids to install, and the same for the gun turret configuration (one minigun, one 40mm thumper, or twin miniguns). Main wings are detailed with the left inboard mount for the 20MM Vulcan cannon, and three other stations for mounting a minigun pod, seven, or 19-round rocket pods. I understand the larger pods were not carried on the outboard stub mounts due to weight issues, but if your research is different, have at it.
External left-side armor is provided for this Cobra; this was to keep the Vulcan muzzle blast from oil-canning the side of the aircraft and possibly compromising the structure next to the cockpit. This variant also includes the belly-mounted pannier ammunition system to feed the 20mm beast.
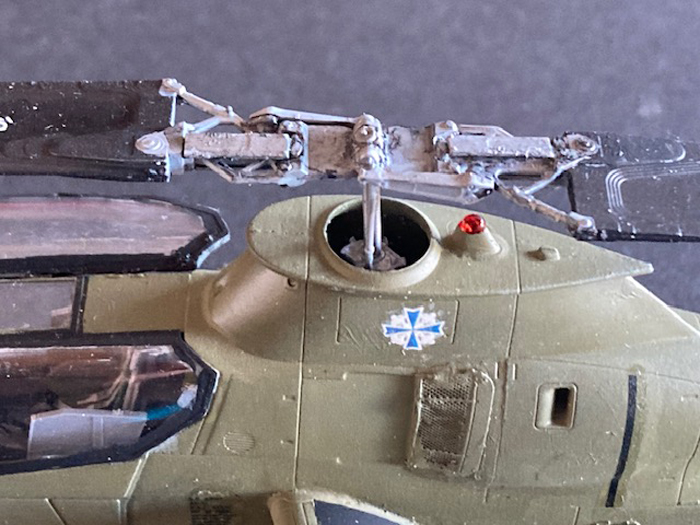
One area I modified was to replace the main rotor shaft with a metal rod made from coat-hangar wire; while I was at it, I ensured the shaft was about 1” longer under the rotor shaft hub bottom point. WHY? The kit shaft is intended to be cemented in place. No Bueno. I drilled through the collective arm and rotor mounting plate while I was at it, making sure the hole size matched the rotor shaft with the correct diameter after sanding off the protective paint on the wire; it was easily cut to length using the kit part for measurements. On the top, I also made it long enough to enter the rotor hub mounting point, and made sure to grind the “D” shape into the shaft at the correct location. The lower hub assembly was carefully removed from the kit shaft, and then center punched and drilled so it slid (tightly) on the new metal shaft. I also ensured measurements were copied and transferred to the location of the lower hub top point so the remainder of the rotor hub parts and pitch-rods would properly fit. Yes, you can install it incorrectly, so keep an eye on where the centering “pip” is on the top of the main rotor shaft hub. After using super glue Gel to attach the shaft to the rotor head, I then added all the delicate pitch links and other bits included in the kit to the rotor hub. (Altering Goldielocks porridge comment, “…not too short, not too long, just right…”). Stop snorting your beer…
Why go through the effort of making a metal shaft? We old men have experience and learned early on visitors tend to always want to “flick” a rotor to make it spin. Plastic prop and rotor shafts are frequently not up to the abuse and I want to keep this rotor intact. Also, it makes it a lot easier to transport a heli when you can remove the rotor assembly.
This variant may or may not have had the aerodynamic transmission rotor head cover plate of earlier variants, but none is provided in the kit.
At this point, I masked off the assembled cockpit assembly, and painted the whole helicopter “Russian Uniform Green”. It looks correct to me in that it provides a slightly faded Tan-ish olive drab that I remember seeing on all Vietnam-era Hueys (The 1980s paint was definitely darker, tending to be more along the lines of current Army heli greens).
Decal time; Future coating, nice glossy surface. The decals worked well but I had a bit of silvering over the tail boom “United States Army” markings over the boom rivets, as well as the dataplate. Microsoft Solvent, followed by Solv-a-Set, and then later the Belgian Decal fix (The strongest they had) did not fix it. I then became annoyed and returned to the “Same stuff” light application of a drop of solvent cement and DON’T TOUCH IT method, and finally had most of the silvering solved.
The last technique is very risky; I have had instrument panel decals curl up and die when hit with hot solvents, but in this case, the decals finally behaved. Your mileage may vary.
I shot the model with Vallejo flat, then proceeded to fight the canopy. I used Future to coat the parts, let them dry overnight, and then started to paint. I used the kit-supplied masking and had overspray where the center part was used, and some of the masking allowed a bit of creep under the edges. I’ll revert to my older techniques in the future. As it was I heretically used my Vallejo flat black on the edges and then used a wood chisel-cut cocktail stick to clean up the overspray and creep. Final verdict; It fit well where it touched. The fact most of it was open therefore was a benefit.
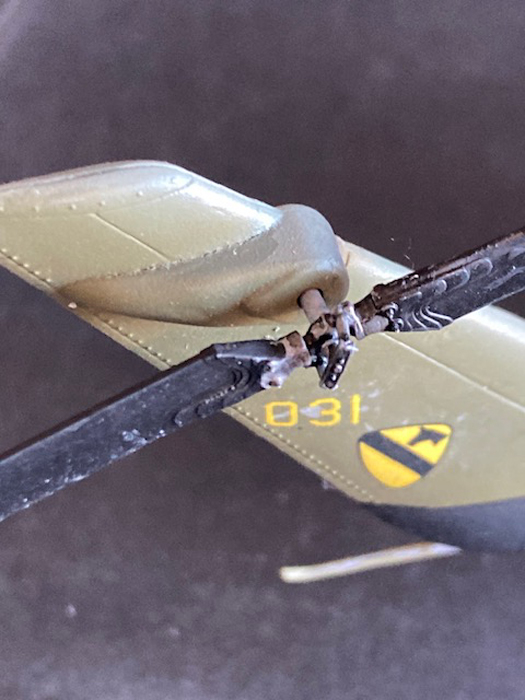
The tail rotor was painted in the same manner as the main rotor; black on both sides, white undercoated golden yellow blade tips, and the hub and pitch mechanisms painted in ½ ocean gray and steel mix. This provided the protective paint color appearance of these items. (They aren’t pure silver/aluminum paint). Later Army Huey rotor mechanical parts were painted flat black.
Addition of the rocket tubes, one minigun pod, (That’s a lot of 7.62mm ammo going out the front next to the 20MM stuff), the tail bumper skid, and then I was finished.
I’ll worry about “weathering” later, have to move on.
Final Verdict
I give this one a “10” due to the subject and relative ease of assembly. I’m getting older and 1/72 doesn’t hold the charm it used to.

Comments
Add new comment
This site is protected by reCAPTCHA and the Google Privacy Policy and Terms of Service apply.
Similar Reviews