
Douglas A-1E "Fat Face" Skyraider Conversion
IPMS/USA extends extreme gratitude to Paul and Susy Fisher for sending us this excellent set to upgrade the Trumpeter AD-2/6 or A-1H to an A-1E Hallelujah! WE HAVE A LARGE SPAD! And thanks to Phil and John for graciously allowing me to review this set.
On the “be patient” side of the ledger, Paul and Susy have had some misfortune by being located in Paradise, California. Although they lost most all their manufacturing capability and personal possessions, they are still here with us, and my last note from him showed he’s temporarily out of the business until they can recover with a new place. I expect they will be back.
On to modeling: This shall be a basic review of the set as received and built so you can see what is in the box.
The kit I received contained one upgrade with fuselage, cowling, and details for the two seater, with both early non-ejection seat version, and later YANKEE ejection seats; I purchased the Trumpeter AD-2/6 unarmored Korean war single seat version as a donor kit. It also would be appropriate for an early model spAD, before armor was added to the airframe in Vietnam conflict, (AkA A-1H later on),
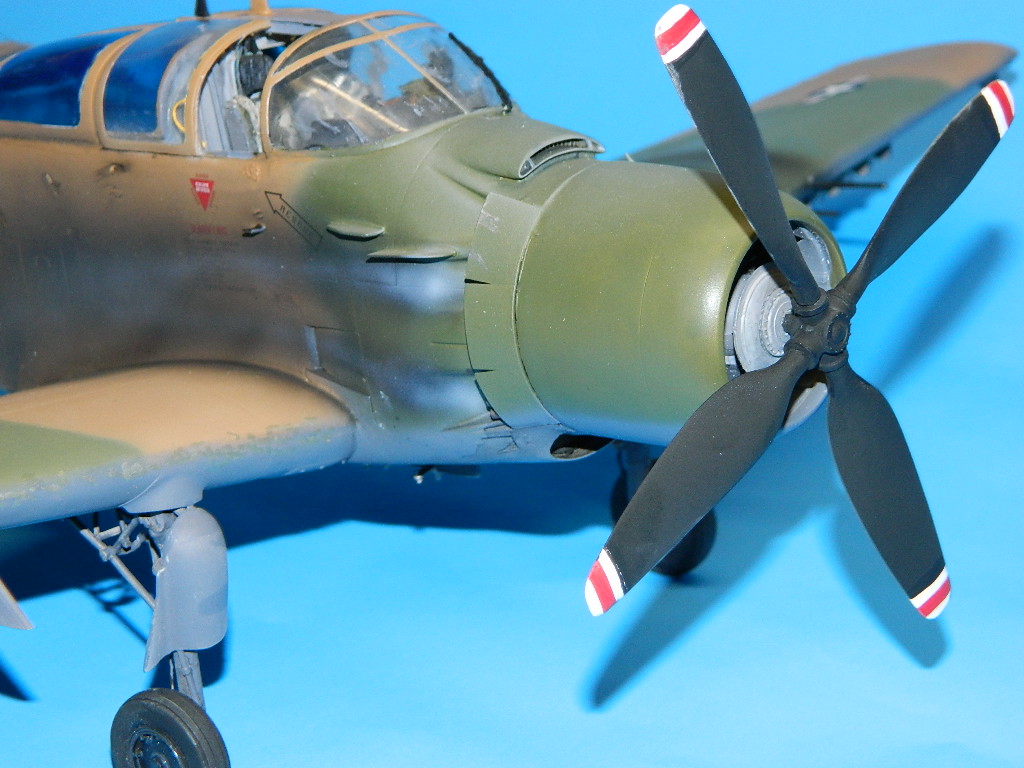
I also acquired all the extras to finish the kit to a higher standard: SAC metal Gear with its vastly improved mounting setup and framing, Master Detail metal 20mm cannon barrels and pitot tube, AMS resin Wheels and tires, and AMS improved Propeller. As provided, the Trumpeter kit has oversized cannon, simplified main landing gear, rubber tires that really don’t fit the wheels well, and a propeller that is a bit too skinny in chord with improper pitch. It also does not have the bigger land-version tail wheel.
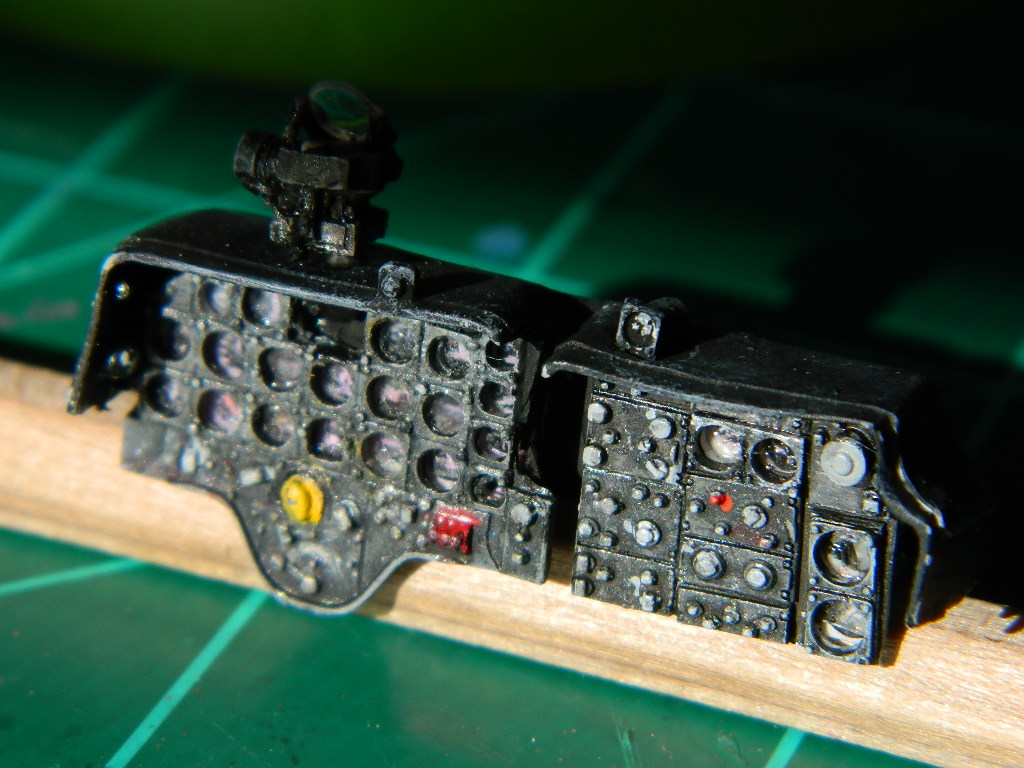
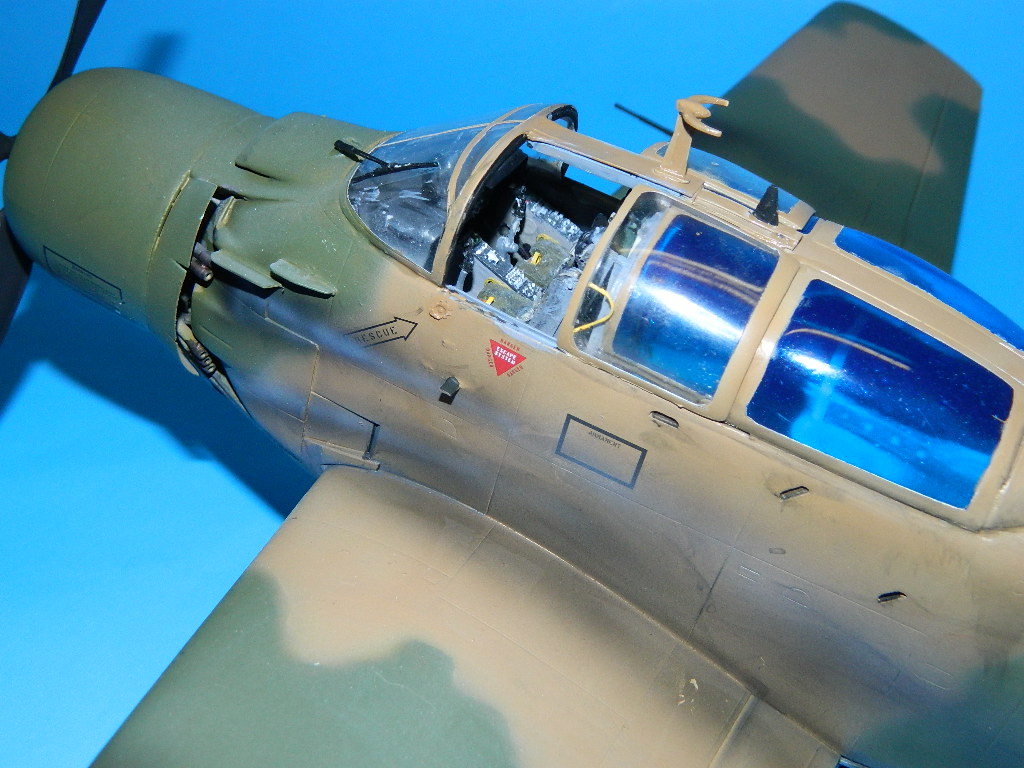
This kit is, in my opinion, truly a Magnum Opus for Paul Fisher at Fisher model products. When finished with the conversion, you will have a large, imposing and impressive “Fat Face” Skyraider (SPAD) to dominate your display. Fisher provides the complete fuselage, a corrected cowling to replace the odd-shaped Trumpeter kit item, and a complete interior setup including standard issue Navy seats and later “Yankee” rocket seats. Also included are control columns, all instrument panels (Using the tried and true “sandwich” method with clear plastic in front of a decal instrument cluster behind the open panel). The resin instrument panel has accurate bezels and dials. A separate detailed gunsight, antennas, corrected “Knee” landing gear covers, enclosure plates to cover the main gear openings where the gear doors are not needed and to fill the underside cooling vent, a new center Pylon, and much more. The decals are by Caracal, and include three options. I have used the decal set on my first build of this kit last year to get my feet wet, and learned much from it. Pictures of it are provided on this review, but commentary is from the second/third iterations I have constructed.
I noted earlier sourcing AMS wheels (Maj Fisher’s bird had the original “Open” Navy wheels with triangular cooling holes, and an Air-Force large land-version tail wheel verses the shipboard, castering solid “cabinet roller pin” rubber tire on a solid metal wheel. The land tailwheel is included in AMS’ USAF “Solid cast metal main wheel” set, so you will need to combine them to get one early AF setup.
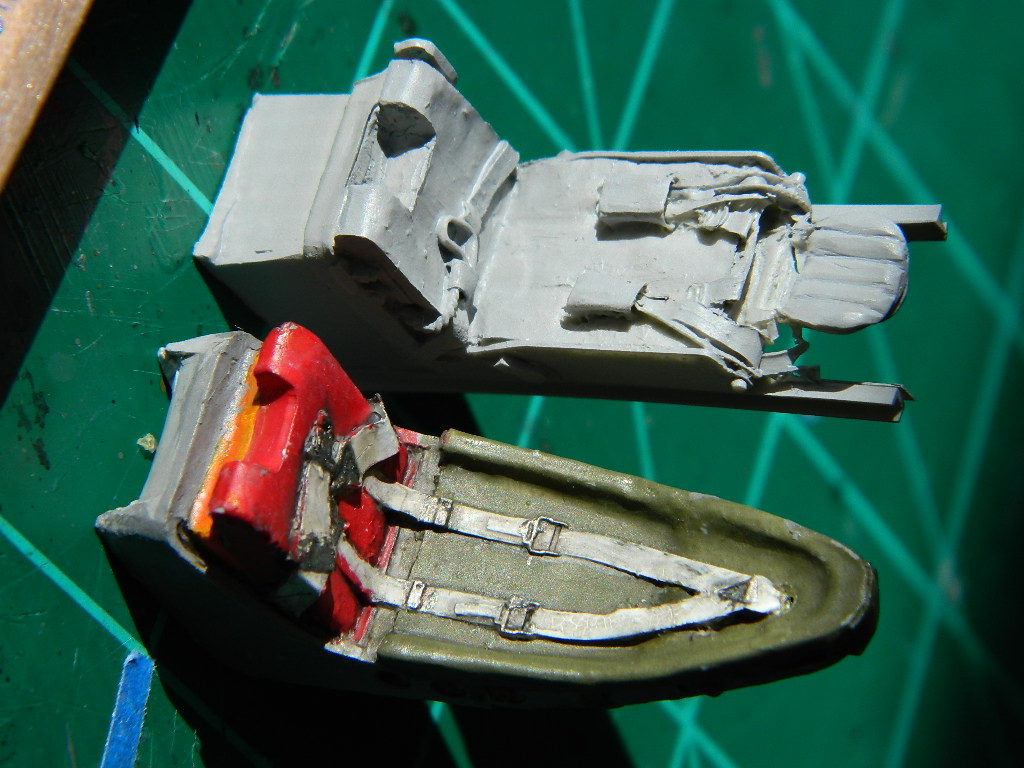
Included in the kit are early fixed seats and later “YANKEE” extraction seats (Not ejection seats). A note about Yankee extraction systems: This was a true Band-Aid solution to the problem of crew escape. Early SPAD drivers were required to slide back the canopy, release their harness, then stand up and “Dive” toward the wing, as their predecessors in World War II were required to do. Yankee was a play on words, as it was an “Extraction” system, in that the rocket motor flew out of the aircraft with a lanyard, which “Yanked” the pilot out of the aircraft while attached to said lanyard and a bungee cord; this was all attached to the pilot’s seat and parachute harness. Imagine, if you will, a large (E-size for those familiar with that hobby) model rocket engine, with a long rubber band attached to a GI-Joe toy soldier. Same thing.
In operation, the pilot would initiate the sequence by opening the canopy, then fire the rocket. This would act as a ballistic mass, which rapidly pulled (“Extracted”) the pilot from the aircraft with the seat. It was then up to the man to separate from the now-expended rocket motor and seat, and then pull the parachute rip cord. What could possibly go wrong? But it worked on several occasions… so we doff our hats to the engineers who came up with this one. Early ejection systems had serious issues, with rapid-onset impulse injuries, where instantaneous “G” force of from 20 to 30 G’s were not uncommon, resulting in permanent damage or death to the operator. A Yankee rocket provided a smooth, vertical and exponential pull of 10 to 20 G’s over a rapid, short period time due to the initial impulse being absorbed by the bungee, thereby minimizing spinal column damage caused by the instantaneous “Hammer Slam” of a 40MM cannon round used on other systems.
I started this build by making sure I had not thrown away any parts in the tissue paper parts-cushion wrapping. Yes, tissue paper. Fisher’s wife Susy packs the kits, and they opt to have a classy, wrapped approach for these high-end masterpieces. Just like Christmas, with extreme happiness that your hard-earned has been well spent and you have been personally tailored for. The parts are carefully and tightly packed in the box, and it’s YOUR job to make sure you don’t start the build with less parts than you need. Oh, and if you love removing parts and fondling then returning to the original box, be prepared to have it not fit back in well; we ham-hands modelers don’t have the “repack the box” gene.
Step one involves cleaning the resin. Many companies don’t use mold release to do their casting but Fisher does and states up front on the instructions to carefully clean the parts. I took all the bits, big and small, put a rag in my garage sink drain, and then sprayed all the parts with Wesley’s Blech White ®. This is a strong solvent designed to clean car tires, and it does a fantastic job of removing mold release, even in cracks and crannies. WEAR EYE, RESPIRATORY, and SKIN protection… this stuff will chemically burn you. After about ½ hour, gently run WARM water over the parts. Use a soft toothbrush to clean up the detail areas, but just use warm running water around the delicate parts. Set everything aside to air dry.
Next step is to spray everything with high-quality primer. I prefer Tamiya’s gray primer in a rattle can, as it covers well, is not too thick, and bonds to the resin better than other primers I’ve tried.
If you have not gathered the reference you need to build the kit, a search engine provides actual period photos of the aircraft, particularly MOA-recipient Major Bernie Fisher’s actual bird before it had the major accident that resulted in one fatality when the aircraft turned turtle in a swampy area after running off the runway. The “National Museum of the United States Air Force” (what ever happened to simplification?), or NMUSAF, had recovered the airframe from a trash dump, and restored it to excellent condition. It also has an excellent website with a full 360 degree photo montage of the cockpit. It will reveal a multitude of small details needed to be added if that’s the bird you are building.
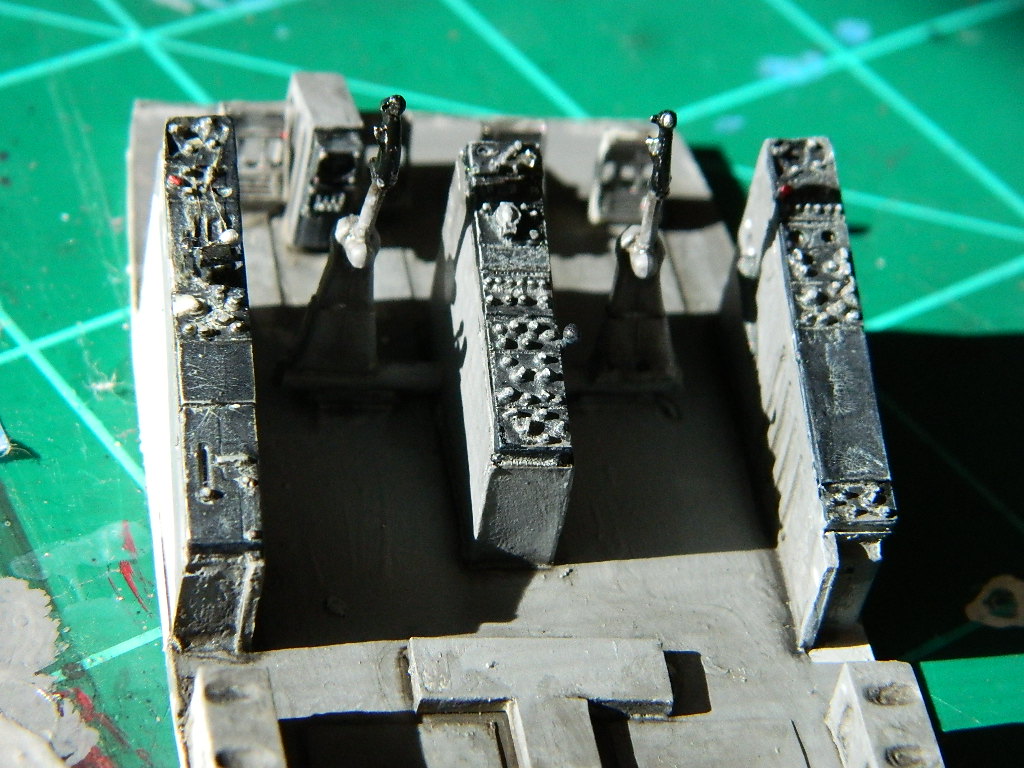
Speaking of the cockpit, the forward instrument panel was a good starting point, and after cleaning up the holes and edges, I painted the panel flat black using black filler primer Lacquer. Details were picked out with drybrush and silver on the smallest round brush I had. It’s worth it to take your time! The remainder of the interior is pretty well self-explanatory, and it went together fast. On the intermediate bulkhead behind the cockpit seats, research will help determine if your aircraft has soundproofing installation or not. I left it as it was, because in many cases the Southeast Asian climate allowed mold to build up on the soundproofing, and it got in the way for fast maintenance.
This all slides into the hollow fuselage, and the aft bulkhead is installed. Here I have to give a lot of credit to Paul; the instructions are first rate, and really make a difference. FOLLOW THEM!
Next up: Installing the power plant. The kit engine is perfectly fine for our purposes. It’s not the easiest to assemble, but by being careful and methodical, even I was able to do it. The pushrods are delicate, and the rocker covers are handed AND designed for fore/aft location. I used the front and back bank of cylinders, and parts of the engine mount and exhaust system. This is ALL very accurate. I recommend leaving off the forward gearbox case until you have the tail gear well, the mid-center and cockpit interior, and the forward fuselage ready to close up. I also pre-painted the exhaust air-duct cowling area to prevent having to re-paint the exhaust stacks (steel, rusty metal, and exhaust soot and grime).
Paul provides an improved cowling, and now that I notice it the kit item is too cylindrical, with too large an intake opening. I provide a picture of the trumpeter cowling interior parts and front engine doors. AH, let’s talk about those.
As designed, Douglas incorporated huge dive-bombing aerodynamic brakes into the airframe; they are rarely deployed, but are there. On the single seater, they are obvious on the sides of the fuselage, but the single seater has only the underside centerline brake. One little detail Douglas remembered was when operating air cooled engines, rapid cooling such as would occur in a dive to a target would frequently induce stress cracking of cylinders due to thermal effects on the metal along with dissimilar metals having different expansion and contraction coefficients. An engine exploding due to parts failure on a combat dive would ruin your day as surely as AAA flak. The front door cowl petals were designed to close off the cowl to minimize this thermal cracking. It also helped when the engine is on the ground in cold weather to help it warm up to optimal operating temperature. That’s why they are there… lesson over.
The A-1E retains the lowermost dive brake on the aft fuselage section. Use the Trumpeter door to cover or use the rest of the Trumpeter door interior parts and have it partially opened on the ground; your choice, Paul has incorporated the well for it.
I cemented the engine in place, carefully following Paul’s admonition about using the round access doors on the engine accessory gearbox as a measuring tool, and then eyeballed everything from top and bottom with the cowling to ensure the prop boss was where it needed to be, and then tackled the wing.
First order of business is to fit the supplied wing inserts in the forward cooling duct of the single seater (not on the “H”), and the two wheel well inserts. If you are careful and follow Paul’s instructions, you will not have to do a lot of heavy filler work. I was able to get an almost flush fit with all these items by careful sanding and installation. The forward oil cooler duct cover under the nose also has a chamfered rear section, at almost knife edge to offer up to the aft duct area. VERY thoughtful of Paul to do it this way, as it makes for a successful installation. There are also modifications to the interior of the resin wheel well insert which require careful cutting to allow the wing halves to fit the gear well bulkheads and airfoil sections. If you don’t do this, the wings will not fit together. Just warning ya…
As this was my third time building a Trumpeter SpAD, I spend a lot of time making sure the wing folding mechanism and guns were properly lined up and installed. It is possible to get a nice, flush fit to all the parts, but required meticulous precision in assembly. Fortunately the parts all mate up well.
A note about the wing guns: you need to install all the parts for a good installation. I recommend the master brass barrel set, as the internal barrel can be installed and just fit inside the wing openings. Then after you have closed up and cleaned up the seams, you will have someplace to poke the rest of the gun barrels and muzzle assembly when the painting is over. Just my experience showing. The Trumpeter cannon barrels are much larger than the actual 20MM cannons. Buy the Master set; it also provides the pitot tube that goes on the vertical fin.
The Trumpeter Stabilizers and elevators also fit perfectly. Make sure you chain drill and clean out the resin mounting holes for the stabilizers in the fuselage using a small drill bit and a sharp #11 blade. If you are careful, the stab stub spars will slide right in, and all you have to do is the same superglue magic. Make sure they are aligned using the wings, fin, and the ol’ Mark 1 eyeball.
Before you get excited and ahead of yourself, assemble and install the tail wheel well into the lower fuselage cover plate. I ALMOST forgot this really important step, and the temper tantrum it would have entailed would have been a sight to see… ah, but was not to be, as I caught it before the glue fully cured. What a mess… lots of acetone cleaning up the superglue. Then try again. (BTW, don’t overdo the acetone on mistakes, as it can sometimes cause some resins to internally delaminate. Paul’s didn’t, but that’s experience speaking there again…)
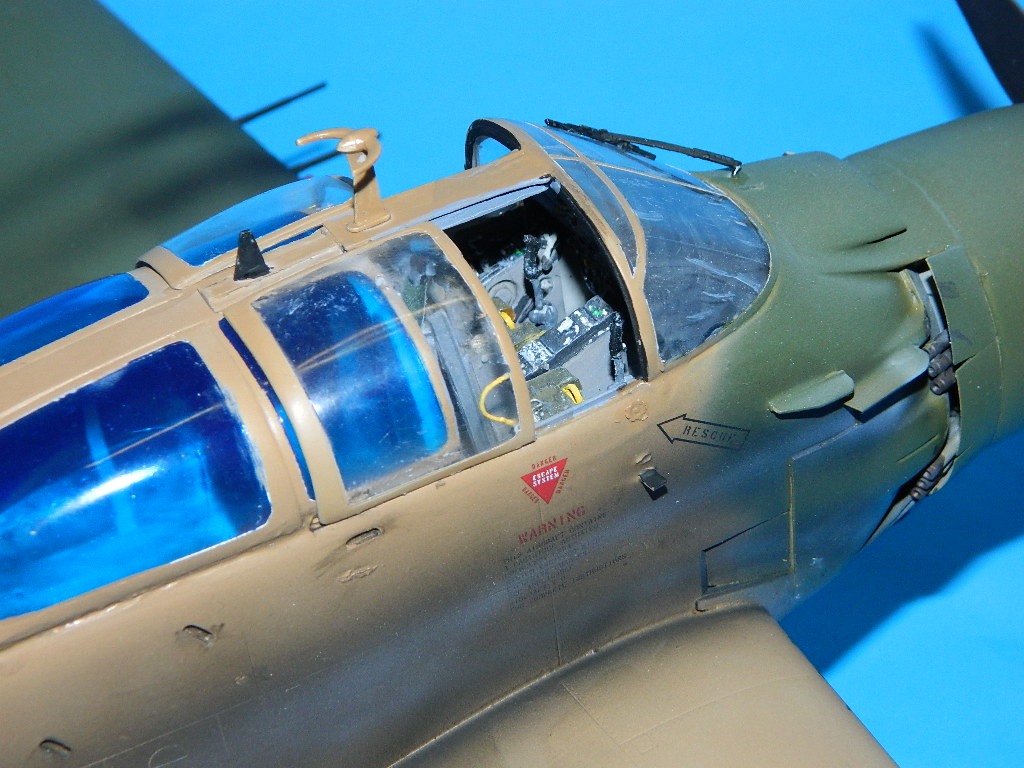
The rest of the build was more an assembly party than anything. I painted the “blue room” clear canopy section with Tamiya clear blue from a rattle can, and let it dry for a couple of days. Future dip afterwards for all clear parts, and installation. Heating for any resin is best done with hot water. I turn on my garage sink to get the hottest possible water, and once the part is heat soaked with running water, I turn off the hot while holding the part in the correct position and run cold over it to set the part. Has never failed… I had a slight resin warp with the AMS prop blades as they are scale thickness and the heat of the past few days in the box got to them. Running hot and cold actually allowed them to self-return to their cast shape, and it was interesting to watch! AMS’ blades even have the welding press marks molded in to the back surface. Another fun fact: The actual SPAD blades are hollow, two-part steel, press-welded together, and are very strong but light for a blade this size.
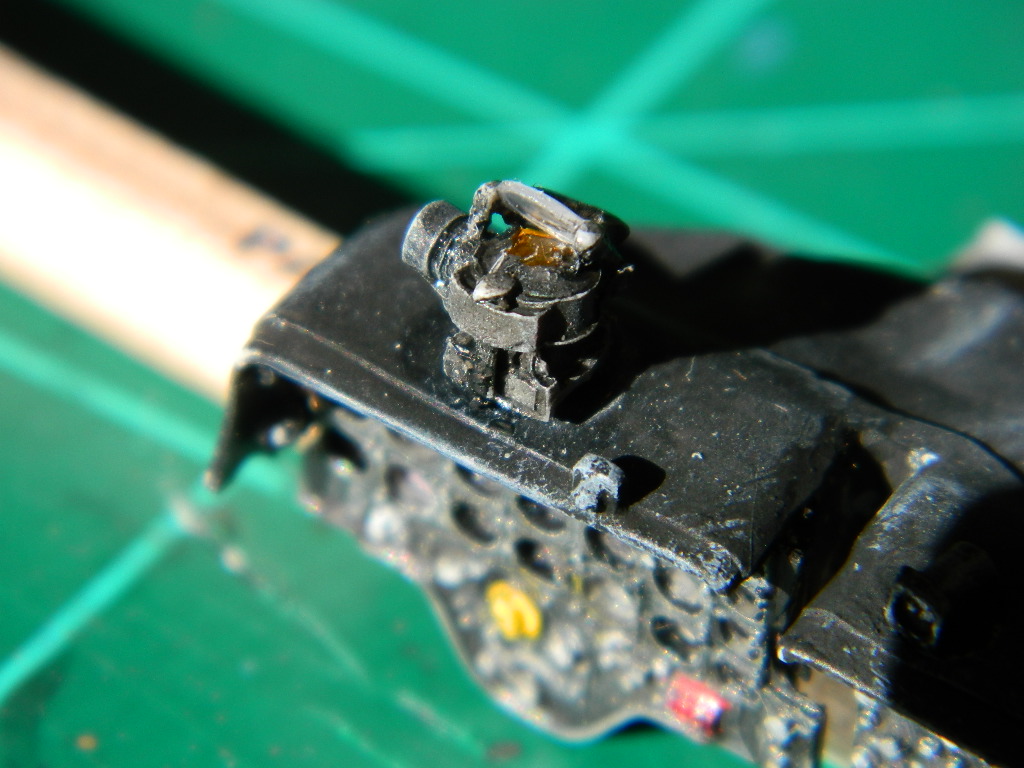
The gunsight was added, and some lead wiring provided a little bit of detail. Clear reflector glass is provided, and I used gel superglue to hold it on the gunsight frame.
It was time to install the landing gear, and in this case SAC was chosen because it is stronger than the Trumpeter kit parts, and provides framing detail for the strut bracing missing in the simplified Trumpy parts at the base of the strut fittings. Make sure you install the downlock ram before installation, as it really does make it easier to fit into place.
The AF SpADs also had a scabbed-on wing tip underside swingdown landing light and fairing on both sides. Paul Provides these field-level modifications; I did the required surgery on the wing undersides per the manual A separate light is provided for the port kneecap gear door but is not on all SpAD’s. I have not seen those on the one I’m modeling.
Before anything else, I assembled the inboard weapon pylons and the outer pylons without the sway braces, that way they can go on before you install the upper antennas and sliding glass windows for the pilots. On installing the pylons, you should not be able to screw this up, as the attachment pins are spaced to match the holes for where they belong. THANK YOU Trumpeter.
Paul demonstrates a method of masking clear parts where tape dots are punched out and applied to all the window radiuses; This worked well, applying the dots then matching with strip tape, and filling in the open areas with more tape was a good option. FINALLY it was time to paint.
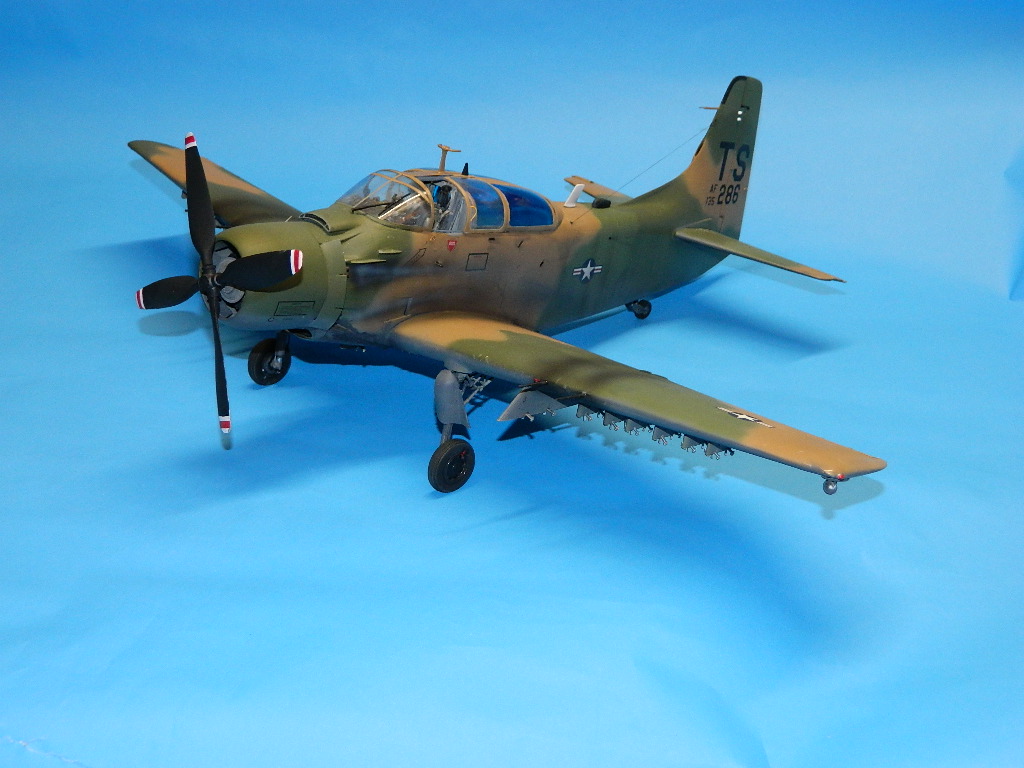
I sprayed the model one more time overall after masking with Tamiya gray primer to ensure I had cleaned up all the gaps, and then shot overall with Tamiya’s rattle can Vietnam tan FS30219. For the Greens I used Akan’s Vietnam set, as the colors are spot on for the Vietnam era (the tan 30219 faded rapidly in the sun, and they captured the lighter look of the paints). The underside was painted Vallejo basalt gray, which seemed to match the few pictures of night camo-ed SPADS for a different look.
A quick gloss coat of Future and I used the Trumpeter black tail codes from their AD-6 kit (I had built it last year for a review of AoA Vietnam spAD decals). The tail numbers were individually matched to a white-painted underside A-1E, as I figure this unit was one that had gray undersides later in life. Research will prove me wrong later, no doubt.
The wheels were painted up and flattened, and installed on the struts. Same for the tailwheel; More AoA items at work. I also installed brake lines, and the bird was on its shoes.
It was at this point I cemented the sway braces on the pylons (including the Fisher centerline pylon which replaces the kit item for the single seater) and we’re on the home stretch. Cementing the antennas and various little bits in place was accomplished, and then it was flat coat time.
Remove the masking from the canopy, and do a bit of weathering. I installed the cowl flaps after I sprayed the engine exhaust stains. You can go to town on this one, as most field birds were pretty dirty, with lots of oil sprayed on the whole bird. I tried to match what I’ve seen in photographs where a properly leaned out fuel mixture had black base with light tan lead trailing on the huge canvas of the fuselage sides. I also know the old 20mm cannons were extremely dirty firing weapons, so plan to have at least SOME trailing marks if the quick turn between missions is underway on your item.
I installed a RESCAP (Rescue Helicopter support missions, where the A-1 had longevity and plenty of ordinance capability), incorporating two funny bombs from DACO in the mix. These were actually smoke generators to provide a smoke screen to mask rescue helicopter ingress and make it difficult for the enemy to target the helis) and a mixed load of 2.75 19-round rocket pods along with cluster bomb unit dispensers (CBU) where appropriate. A finned Napalm bomb from Video Aviation was used here, an item left over from my review of that set a while back. And while I was at it, I added a Minigun Pod from Roden’s O-2. Before anyone gets all spun up, I used this total loadout based on actual pictures of RESCAP birds in flight.
At the end of the build, I put the prop on, and had a short photo party. I’m pleased with both SpAD’s, and need to finish a few items on them for final write-up, but take my word these are the best resin kits I’ve worked on, without doubt. Thanks Paul and Susy for taking a business risk with this kit; I’m sure the Navy guys are anxiously waiting on their versions. Some of these were undoubtedly distributed before the fire, and we pray Fisher Model Products will rise like the Proverbial Phoenix. (There’s your new company name, Paul?) And thanks again to my reviewer boss and distributor, John and Phil, for watching over me as I build.


Comments
Fisher "Spad"
Awesome job Rod!
Fisher models
It was sad to hear about the home of this couple I was wondering when they are able to live a normal life again would this model then be in production?
Add new comment
This site is protected by reCAPTCHA and the Google Privacy Policy and Terms of Service apply.
Similar Reviews