Last summer Squadron Hobbies released three sets of decals for the F/A-18 Hornet and Super Hornet family. Set 72003 provides decals for three legacy F/A-18C’s - two in high-visibility schemes, the CAG (the carrier air wing commander) aircraft from VFA-192 Golden Dragons (2009) and VFA-34 Blue Blasters (2018) and a standard low visibility scheme from VMFA-122 Werewolves (2009).
Last summer Squadron Hobbies released three sets of decals for the F/A-18 Hornet and Super Hornet family. Set 72002 provides decals for three Super Hornets in high-visibility schemes – two CAG (the carrier air wing commander) aircraft from VFA-81 Sunliners (2009) and VFA-143 Pukin Dog (2009) and an aircraft from VX-9 Vampires (2013).
Last summer Squadron Hobbies released three sets of decals for the F/A-18 Hornet and Super Hornet family. Set 72001 provides decals for three legacy F/A-18C’s in high-visibility schemes, the CAG (the carrier air wing commander) aircraft from VFA-97 Warhawks, VFA-37 Ragin Bulls and VFA-15 Valions (2001).
The instructions include a full color profile view of the left side of each aircraft, the right side of the nose of each jet and full color overhead view along with a color key listing the FS numbers for each color. There is also a small detail drawing of the drop tank markings for each squadron.
The Bristol Blenheim was one of the most popular British aircraft at the beginning of World War II. It was a very versatile and modifiable machine, and therefore typical bomber, reconnaissance, and fighter (including night) versions were created.
The Airspeed Company was set up by future novelist Neville Shute Norway in Portsmouth, Britain, in the mid-Thirties, building small passenger aircraft. During WWII, the RAF relied on the twin-engined Airspeed Oxford as a multi-purpose trainer for a wide variety of roles, including pilot and aircrew training, aerial photography, navigation, and even gunnery training when fitted with an Armstrong Whitworth turret. Derived from the earlier Airspeed Envoy, an early executive aircraft, the Oxford was, post-war, also developed into an effective small airliner, the Consul. Over 8,900 Oxfords and Consuls were built, a testimony to its effectiveness in all roles. The Oxford and Consul have now been made a subject of the long-running Warpaint series from Guideline Publications in Britain.
The Yak-9 was a development of the successful Yak-7, which was itself a development of an advanced trainer in use by the Soviet Air Force. Fast and robust, it came into fighter regiments on the Eastern Front in late 1942 and directly challenged the best the Luftwaffe was able to throw at them, although it suffered at first due to poor training.
So, we have a 1/144 Mustang out there from Platz/Eduard, and an interior detail set from Eduard as well, available on in their own release. The canopy on the basic kit is closed, and within the limits of thickness which can be successfully injected. It fits and looks nice (and the Eduard kit has a masking set to go with it.
Insane? Yep. But an open cockpit requires an open canopy. HEAVY insanity. I had to try it. Tweezers: yep. Magnifier for vision: Mandatory Ham hands: Standard.
Here is where Brengun excels! They provide a set of four canopies in a clear plastic envelope which allows (with careful, NEW scalpel or #11 blade work) an open canopy!
This set is designed for use with Modelsvit’s Su-17, Su-20 and Su-22 kits and fits both the 2017 and 2014 kits.
The set provides replacement parts for both the nose landing gear and both main landing gear and is comprised of thirteen parts, five for the nose gear assembly and four for each main landing assembly. The nose gear parts include the nose wheel, but the main gear parts do not. The cast parts are designed to be drop-in replacements for the kit parts.
Andy Evans (managing Editor)
With retirement, I have of course had to seriously curtail spending, and as such, just personally had opportunity to read and learn of this magazine by obtaining it from our reviewer corps. I had read a few kerfluffles online about jealous rivals, and this was an opportunity to find out exactly what this new Mag was about. For Simplicity, I am using PAMI as an abbreviated form of the magazine title.
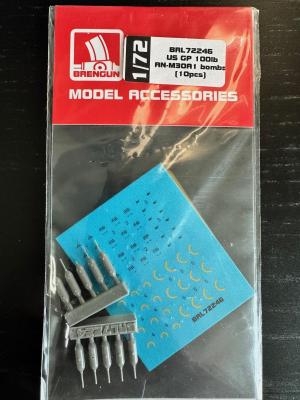
This set from Brengun provides parts to build ten 100lb bombs. Each bomb consists of a resin main body and four photoetched parts to represent the fins and the fuse arming prop on the nose. Separating the bombs from the pour gates is quickly done as they have a pouring extension on the front and are attached to a runner of five at the back. Attaching the fin assemblies requires removing three parts from the photoetch fret. These parts are done in brass and are not only thin, but easy to cut off and clean up. The fin assembly requires the builder to cut a cross hatched slot on the back of each resin bomb. The instructions suggest using a knife, but I found it easier to use a very thin saw blade. Interlocking fin legs are inserted into the slot and a fin “box” is formed by folding the PE part into a square and inserting it into the fin legs. The trick is getting all these parts to align. I didn’t get a usable copy till the third try.