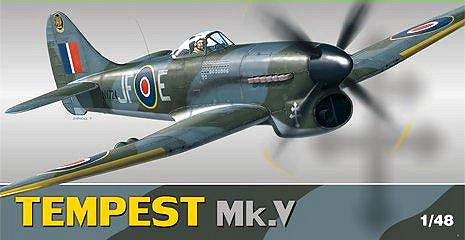
Tempest Mk. V
History Brief
Hawker’s next sibling in line following its older brother the Typhoon, the Tempest featured a new, more advanced laminar flow wing, newer and more powerful engines, and other numerous innovations. The first Tempest Mk V prototype flew on September 2nd, 1942. Pressing onward into service, the Hawker Tempest Mk V saw two notable types. Series 1 had the older style long barrel Hispano Mk. II cannon extending past the leading edge of the wing and small fish plates riveted over the joint between the rear fuselage and tail unit as reinforcement. Series II aircraft were fitted with the new short-barreled Hispano Mk. V cannon completely fitted in the wing and were able to carry two 45-gal drop tanks.
Famous for defending against the dreaded V-1 buzz bombs and for their ground attack capabilities, the Tempest Mk Vs served the RAF from April 1944 to well past the war’s end with honor and was truly a beauty of a beast.
The Product
Former Eduard tooling, six marking options, resin parts for complete cockpit interior, color photo-etch accessories, painting mask, decals by Cartograf.
The Build
Starting with the resin cockpit, I began the process of removing the pour stubs from the parts and cleaning up some minor flashing. The castings are flawless; they are well appointed and exhibit fine detailing. Stepping forward, I found the first test fitting to be superb and almost effortless. I had the proper prep work done in just a few minutes. Here, I painted the resin parts and added the photo-etch bits. The instrument panel was a rewarding compilation of photo-etch. The pieces are very nice and really looked great once completed on their resin backboard. Other items, such as attaching the small photo-etch control levers to the small photo-etch side consoles, were less entertaining and proved somewhat difficult, even though I did managed to pull it together and make it somewhat presentable. I’m sure others should have better luck than me.
Next up was fitting the fuselage halves together, fitting the wings with the gearbay, adding photo-etch upgrades and then mating the wings to the fuselage.
Starting with the fuselage, I began by cleaning up the unwanted interior details around the cockpit area. This requires minimal modeling skills. Anyone should be able to perform this task. However, I found a great deal of attention was needed to thin down both the resin cockpit tub and the fuselage halves to obtain a proper fit. Also, before gluing the halves, the radiator kit part must be trimmed and fitted prior to adding its photo-etch facing. Lastly, the tail gear bay receives a photo-etch upgrade that replaces the featureless plastic bulkhead part. Happy with test fitting and paintwork, I closed up the fuselage and cleaned up the joint lines.
Setting the fuselage aside and moving onto the next build step, I added the photo-etch bits to the interior main gearbay shells. After painting, I glued them into the lower wing half (it is at this point in the build you need to decide whether to drill out the holes for the drop tanks) and, with a little clean up, I soon had the upper halves on and the wing assemble completed. Happy with the progress, I am ready to mate the fuselage to the wing and…HOUSTON, WE HAVE A PROBLEM…the bottom of the resin cockpit interferes substantially with the landing gear bays. My fix: after an hour or so of whittling down the affected areas with a dremel tool and files, I had paper thin gear bays and a floorless cockpit which surprisingly worked out fine and only needed a little touch-up paint. Despite what seemed like drastic measures, once mated, the modification is undetectable when viewed from the top looking into the open cockpit.
The rest of the build went without a hitch, adding the rest of the pieces after the major paintwork was completed. I did swap out the kit wheels with a set from the spares bin (Hasegawa Typhoon), just my personal preference.
The Bottom Line
To achieve the best results my advice is:
- Make precise marks when test fitting.
- Exercise patience when removing unwanted material.
- Enjoy yourself.
I am pleased with the final results and rate it a 4.5 out of 5 stars. I really enjoyed the build and recommend this one for the seasoned modeler.
Thank you Eduard and thank you IPMS/USA for the review sample.


Comments
Add new comment
This site is protected by reCAPTCHA and the Google Privacy Policy and Terms of Service apply.
Similar Reviews