
SH-3D Sea King Exterior
Introduction
The Sikorsky Sea King helicopter was developed in the late 1950s for the US Navy’s growing anti-submarine warfare role. Becoming operational in 1961, the Sea King would serve with the US Navy until 2006, and continues in service with other operators to this day. Over its lifetime, the Sea King would spawn multiple variants and revisions. This included versions to meet USAF and USCG roles, such as the well-known HH-3E Jolly Green Giant combat search-and-rescue helicopters. Additionally, licensed-built versions of the Sea King were made by Mitsubishi, Agusta, and Westland. The British-built Westland Sea King variants differ in quite a few points from the Sikorsky-built Sea Kings, and are the basis for Cyber-Hobby’s 1/72 Sea King kits.
Cyber-Hobby has released a wide array of 1/72 Sea King helicopter variants in the last two years, and Eduard has met these releases with several photo etched (PE) detail sets. Most recently, Eduard has developed interior and exterior PE sets for Cyber-Hobby’s SH-3D version of the Sea King. This review will cover the exterior PE set, while the interior PE set has previously been reviewed.
The base kit used for this review, Cyber-Hobby’s SH-3D Sea King, has also previously been covered on the IPMS/USA review site.
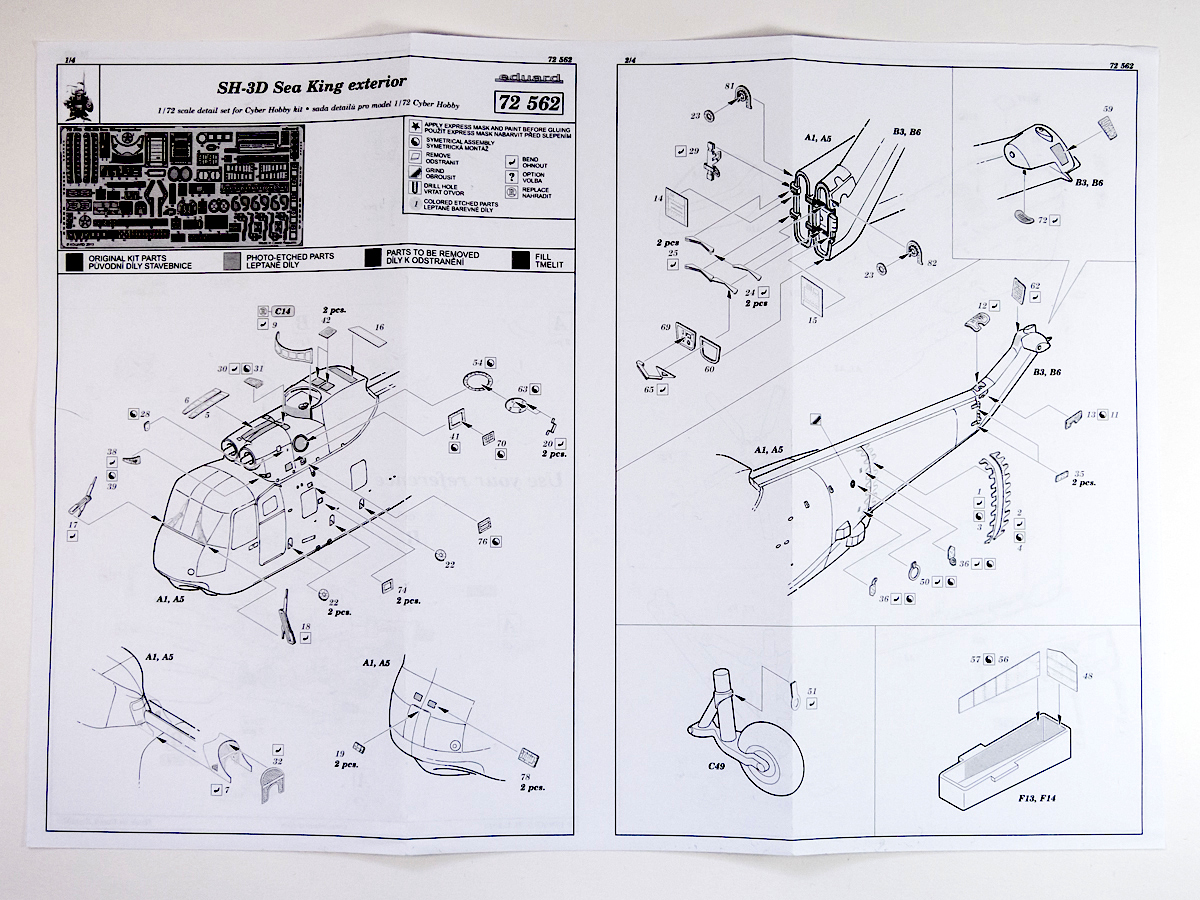
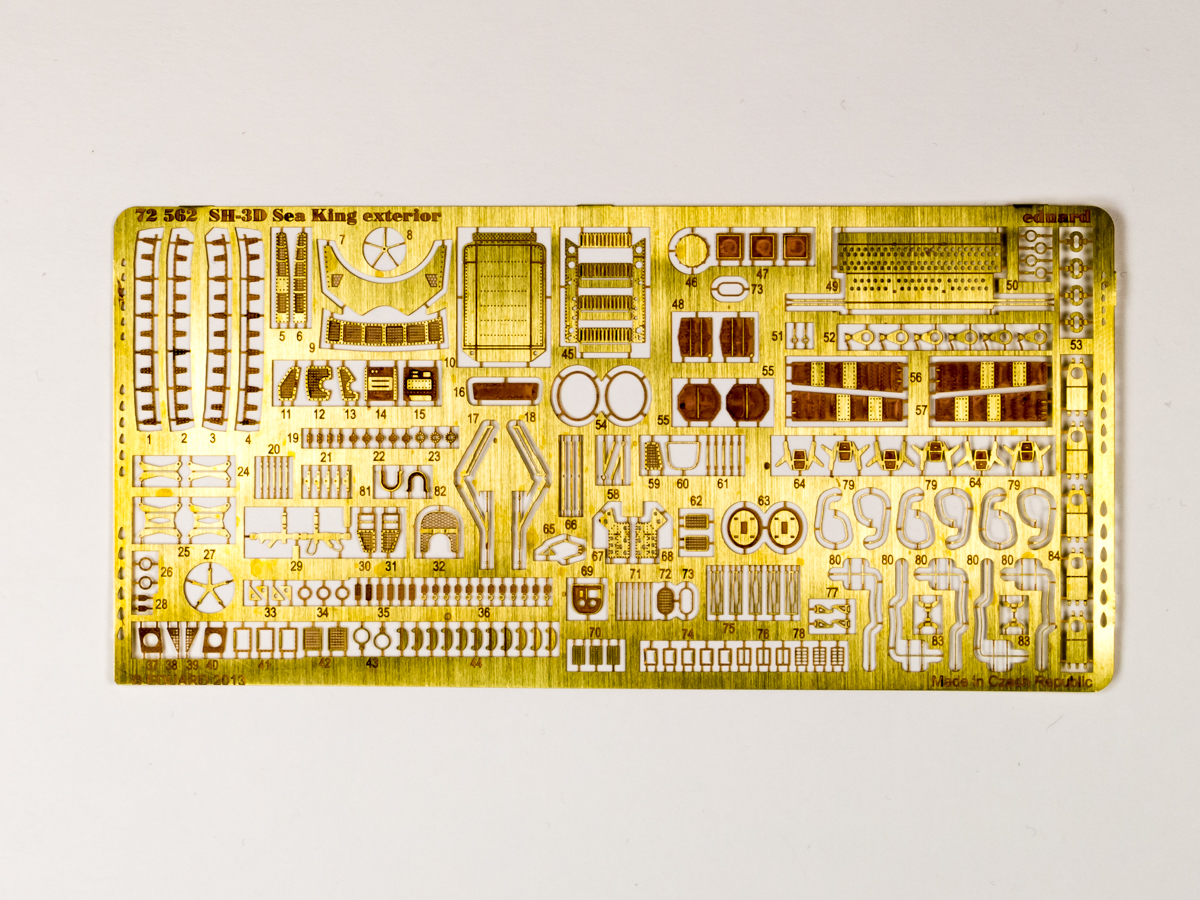
Eduard’s SH-3D Sea King exterior set consists of a single fret of PE in raw brass. As usual, the included black and white instructions are available in color on Eduard’s website.
US Navy SH-3D Exterior Update Considerations
Cyber-Hobby’s Sea King will need a great deal of exterior conversion work to replicate a US Navy SH-3D. Despite this, the vast majority of the Eduard exterior PE parts provided will be applicable to a US Navy bird.
The main exception is the starboard-side exterior step below the sliding door. The kit’s instructions call for the use of the exterior step, kit part C38, and Eduard has dutifully included a nice, three-part replacement, PE part 49 and parts 66. However, this exterior step is only used on a few of the British troop-carrier variants, and isn’t appropriate for the SH-3D. The mounting slot for the step should be filled in (along with the removal and filling of the protruding equipment box just aft of the step).
Applying the PE Set
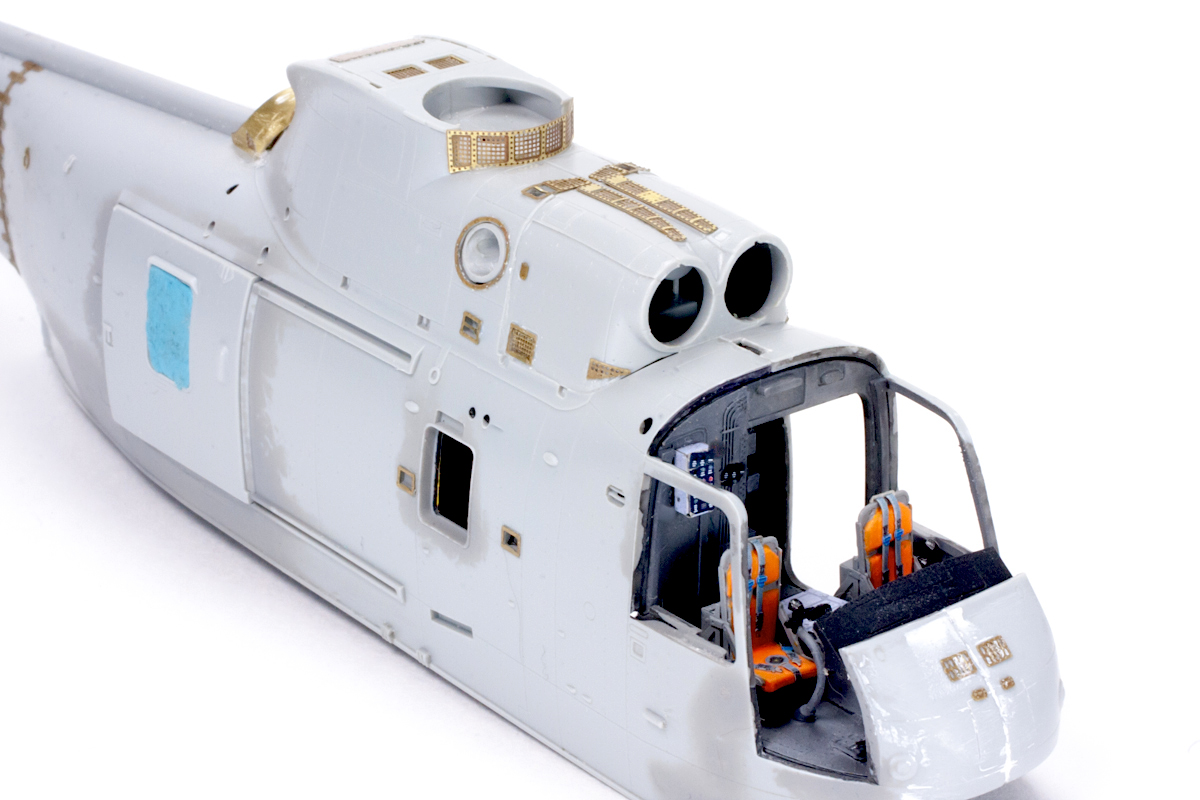
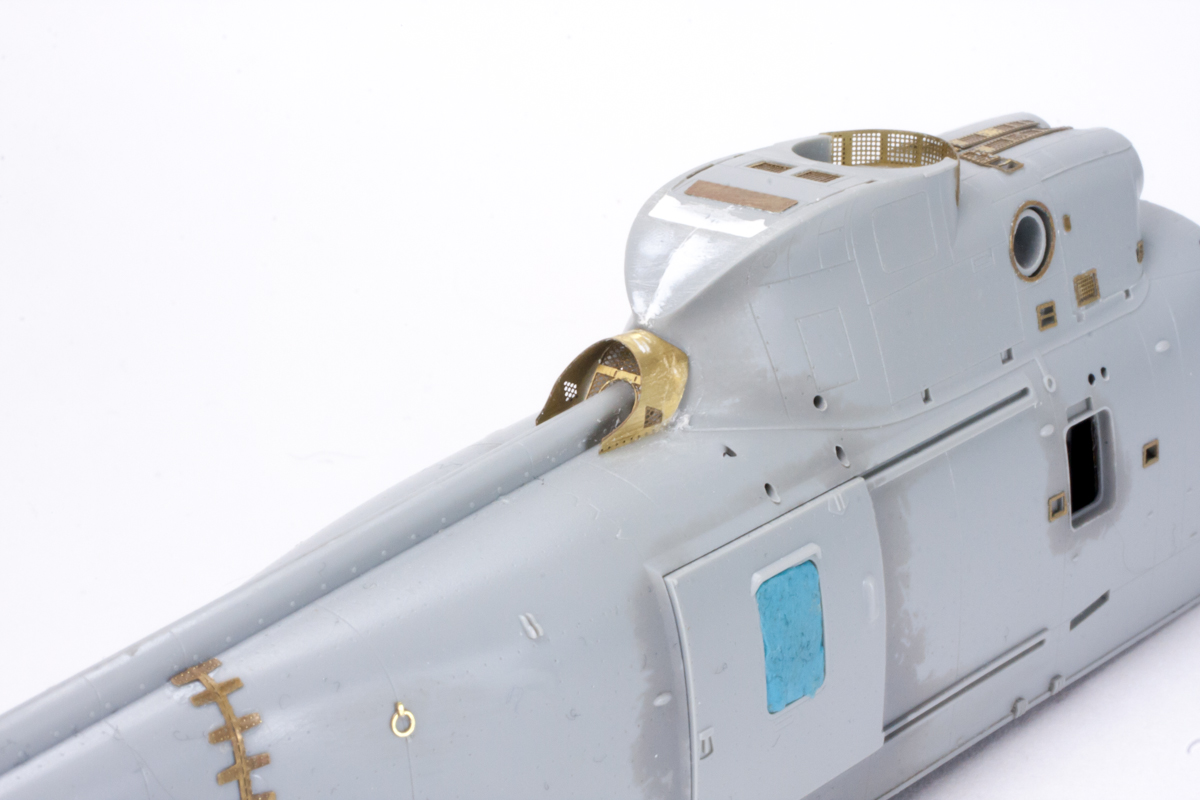
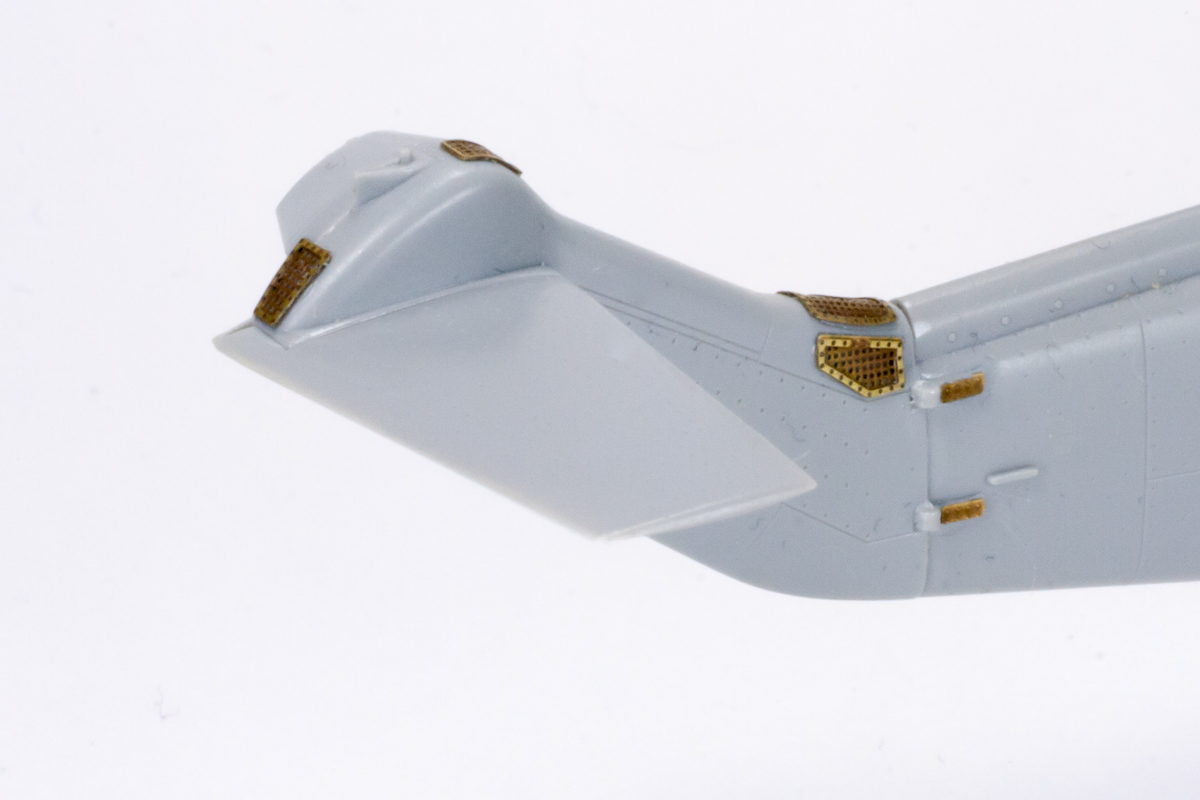
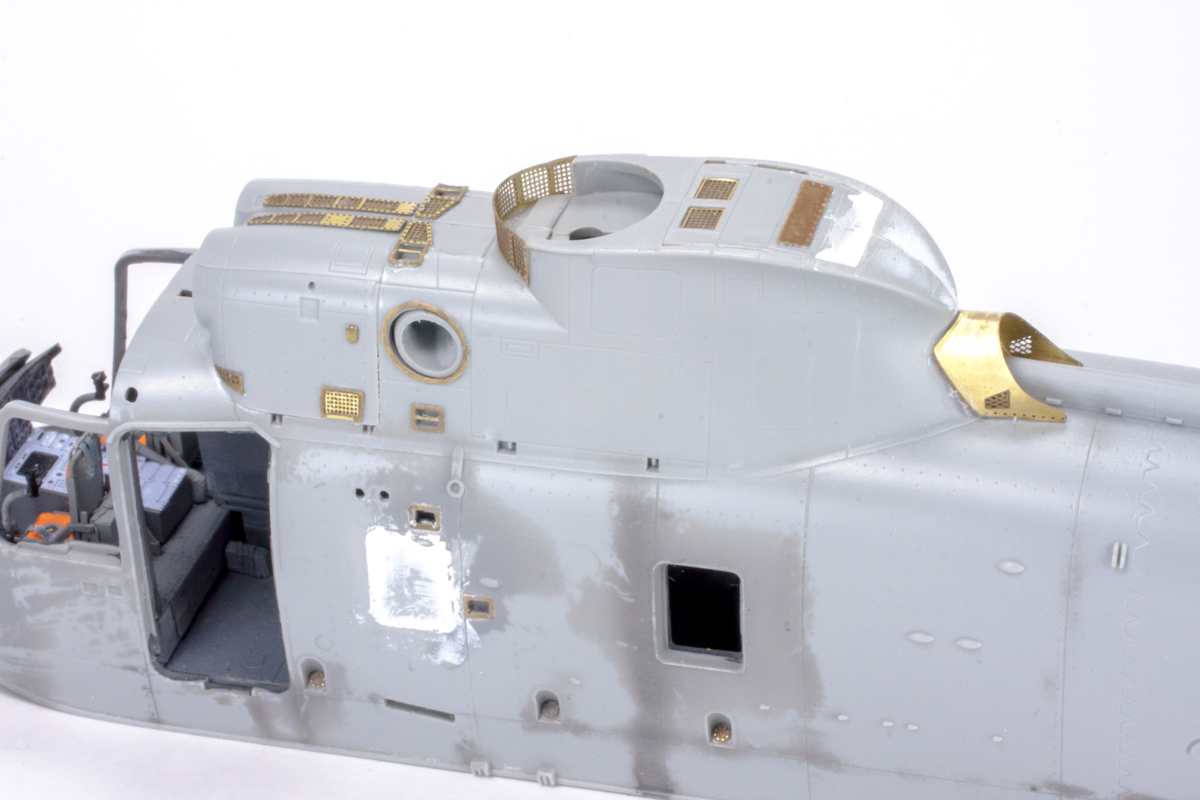
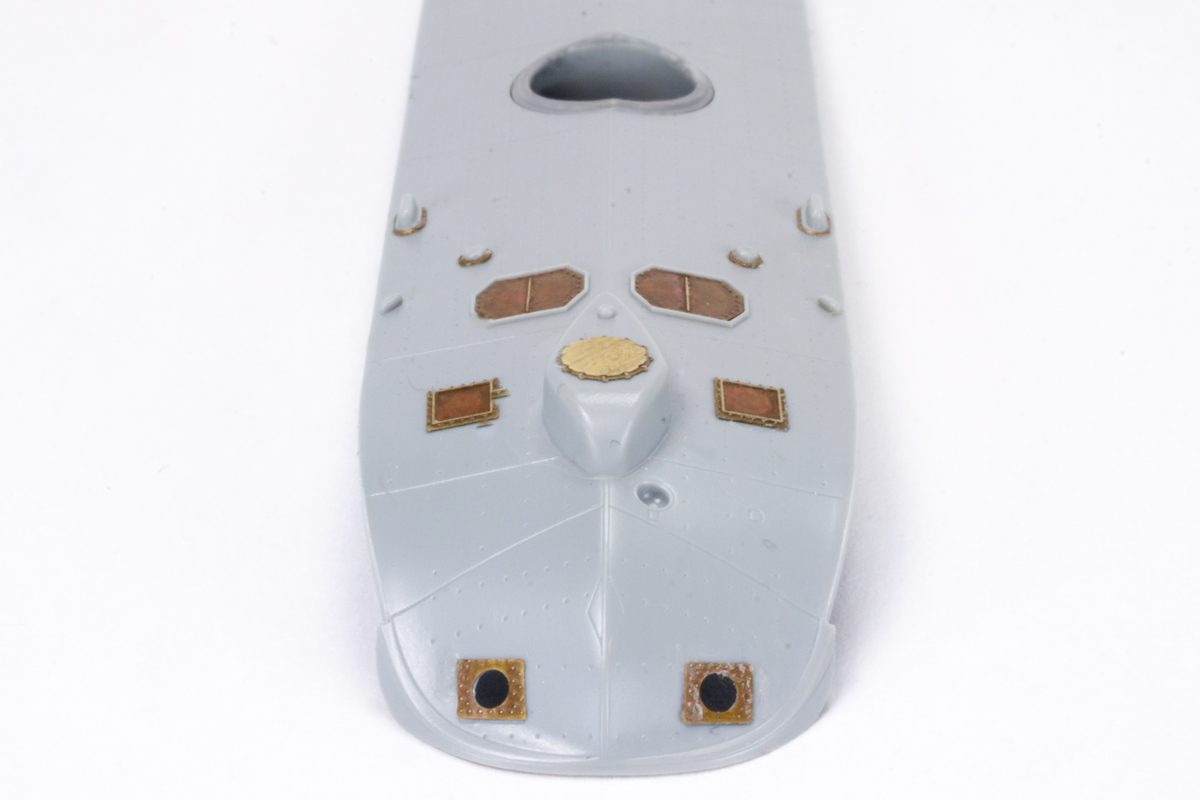
One important improvement provided by the Eduard set is a “doghouse” vent cover, PE part 7, located on the top of the tail boom where it meets the engine/rotor housing. Cyber-Hobby’s kit has depressions on the boom that would appear to allow for placement of a doghouse part; however, the kit does not provide the part. Eduard’s doghouse needs to be carefully rolled into shape, but it settles nicely into the depressions on the boom. A bit of gap-filling superglue will be needed to create a seamless joint between the engine/rotor housing and the doghouse itself. Additionally, a bit of superglue will be needed to fill the spurious vent holes on each side of the exterior of the doghouse. The missing vent covered by the doghouse is added with a vent screen, PE part 32.
Much of the exterior PE set consists of vent screens. Cyber-Hobby’s kit has depressions molded into the fuselage for the many vents found on the Sea King. In full scale, each vent has a fine mesh screen. Eduard’s set provides very nice, scale-looking screens for each of these depressions. The screens are sized so that they easily lay over the vent depressions with enough overlap onto the fuselage to allow for a solid bond when using superglue. Additionally, the set includes several PE surrounds, depicting fine rivet and bolt mounting hardware, for antennas, lights, and the engine exhaust ports.
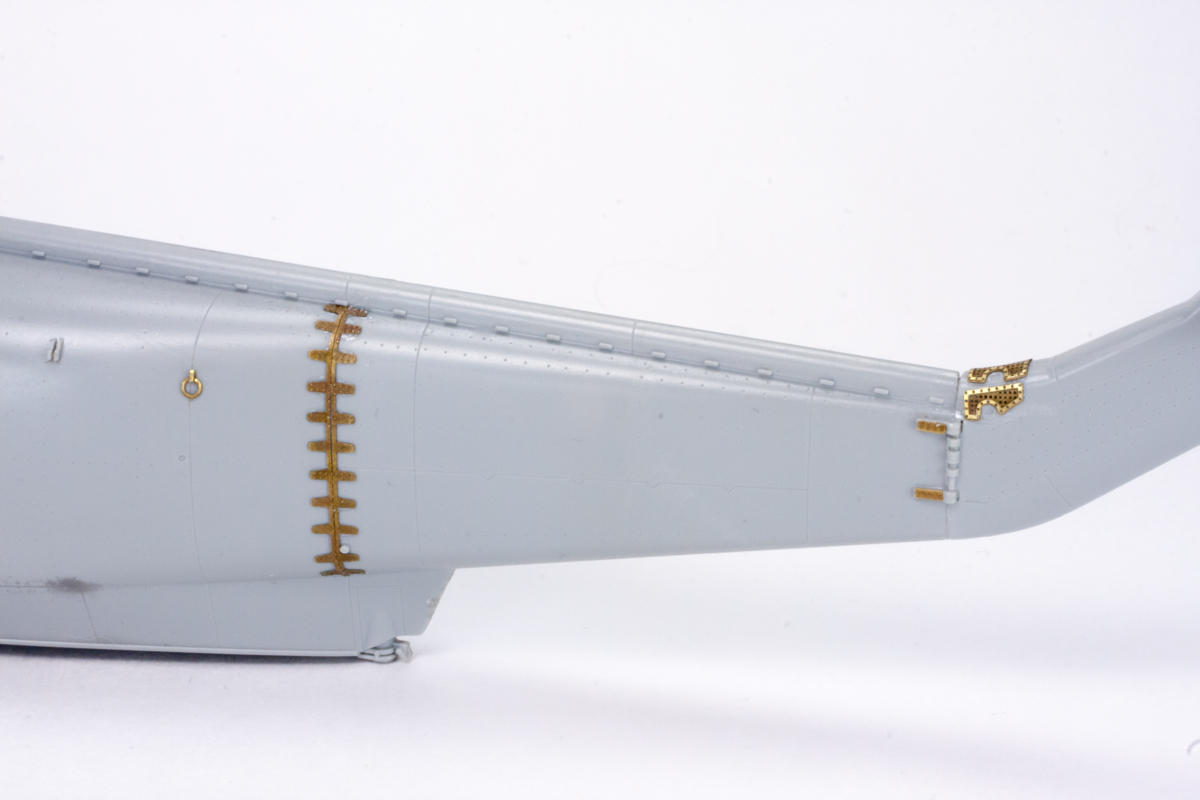
The tail boom receives some nice PE upgrades with the set. Tie-down rings, stiffening plates, and multiple vent screens add detail to the boom’s exterior. If the kit’s tail is built in the folded position, Eduard has provided multiple PE parts to detail the exposed joint, including delicate replacements for the thick kit representation of the hinges.
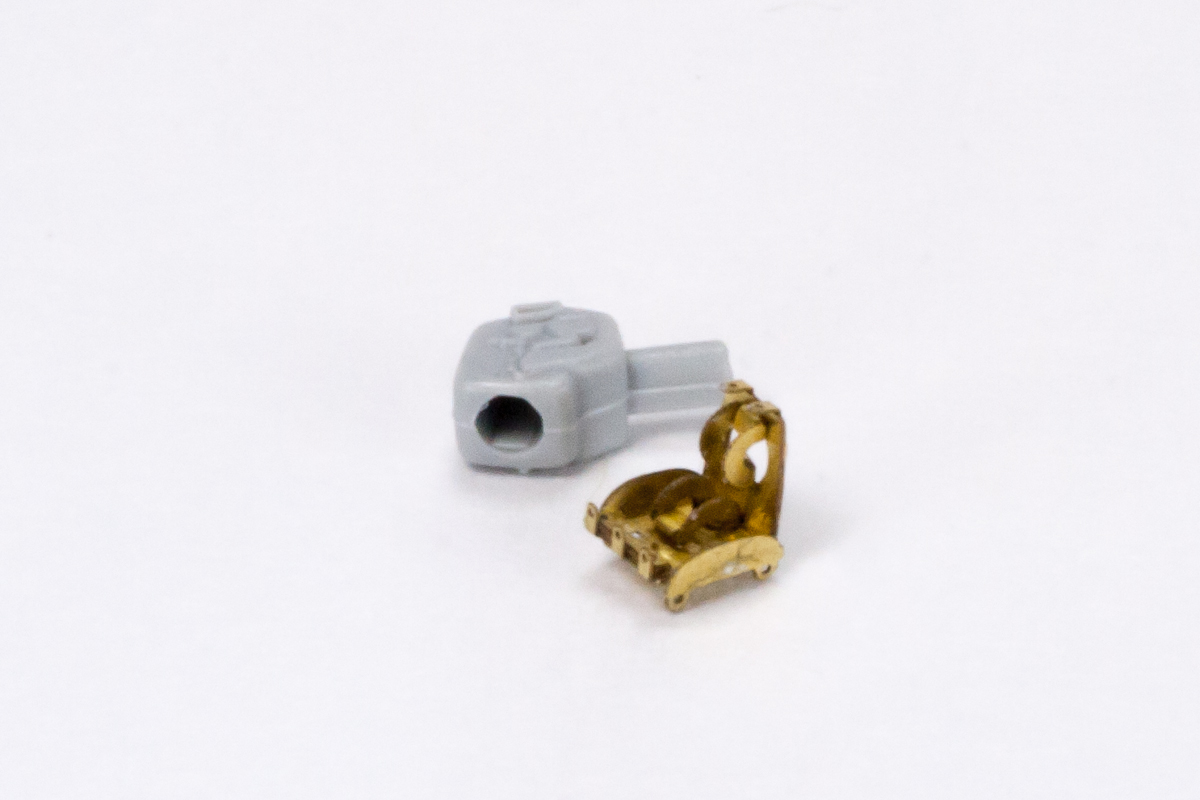
Eduard also provides replacement hinges for the main rotor blades when built in the folded position. I assembled one PE hinge to compare to the kit’s folded main rotor hinges, and the Eduard piece is far more realistic: two plates at a 90 degree angle with open space between them, versus the solid square plastic kit hinges that are simply molded at an angle. Eduard’s superior look established, I must say that I don’t think that I personally could use their hinges for the folded rotor blades and get a result that was solid enough to handle. A modeler with more PE experience, superglue experience, and patience would probably be able to get an amazing looking result using the PE hinges.
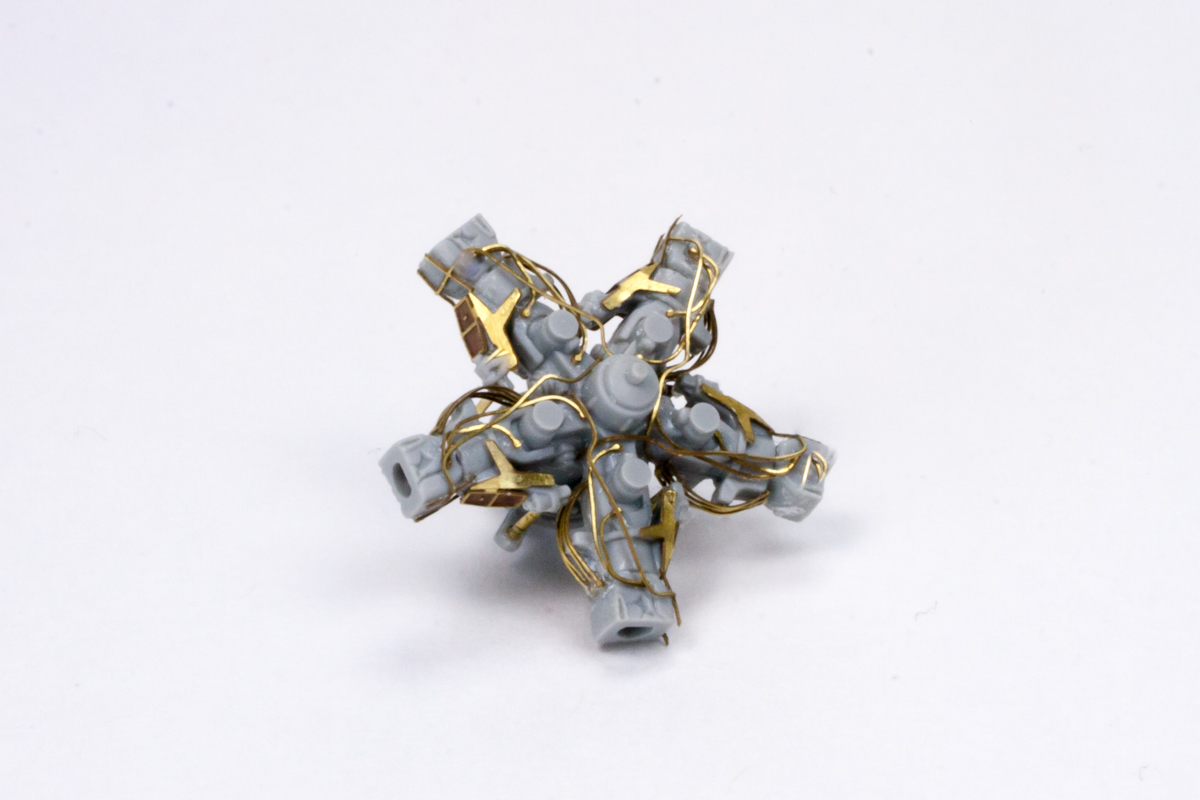
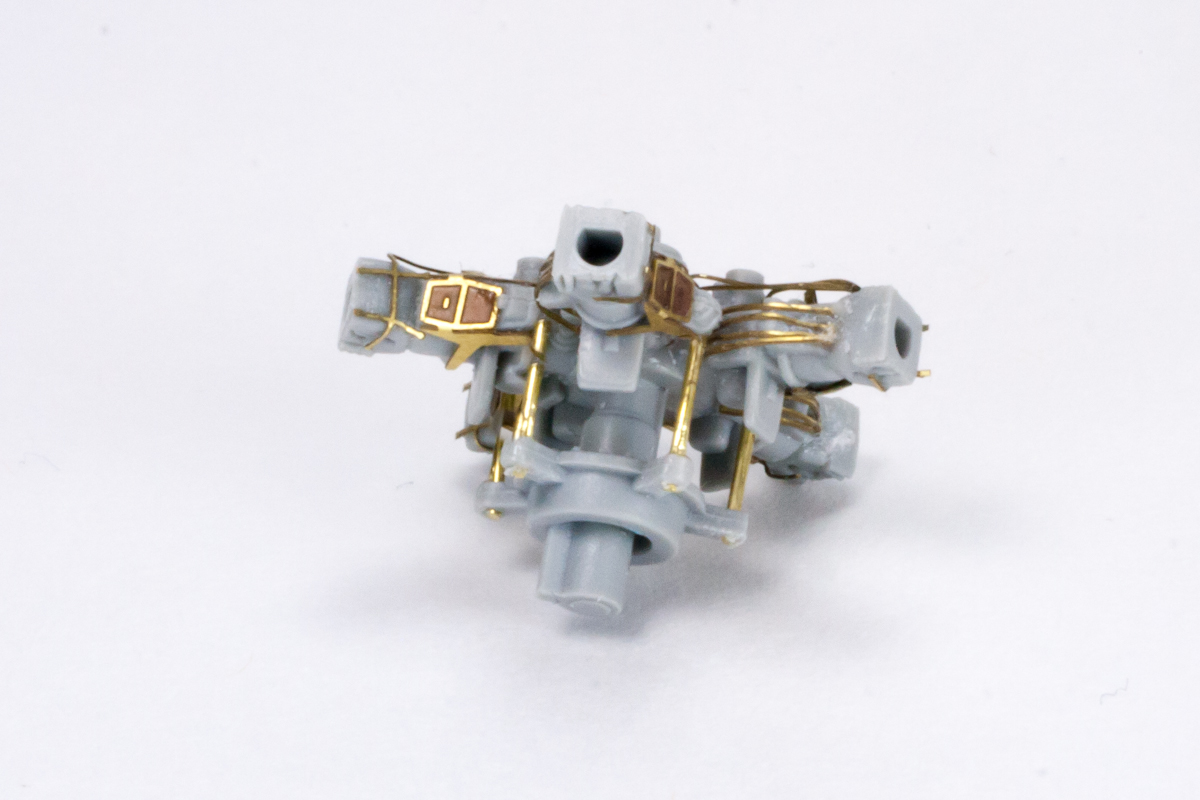
Helpfully, the set also includes some PE lines to represent the myriad of wires and tubing that adorn full-size rotor head. These lines are placed on the assembled rotor head, kit parts C8 and C9. Eduard’s instructions do a good job of showing the approximate location of each line, although reference photos can also be helpful. I chose to add control links between the rotor head and the swash plate, kit part C11, using thin brass rod. Altogether, the improvements make the rotor head look sufficiently busy when compared to the real thing.
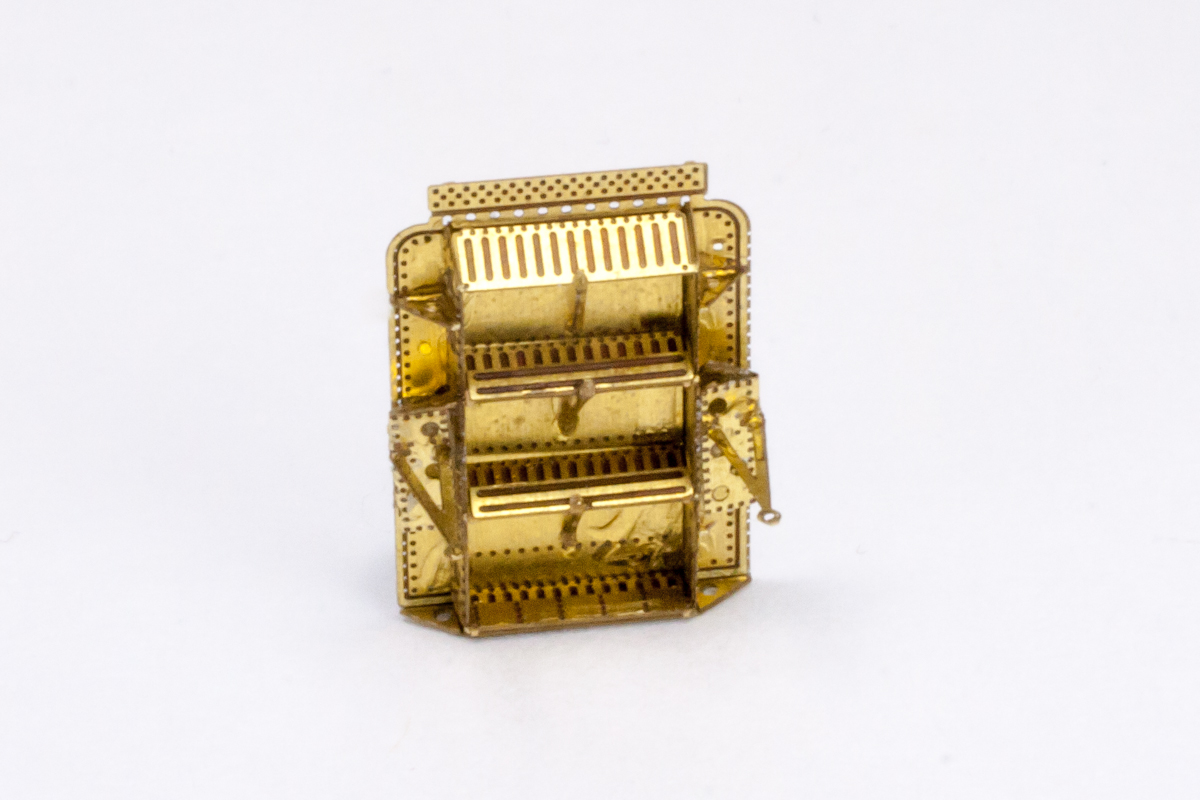
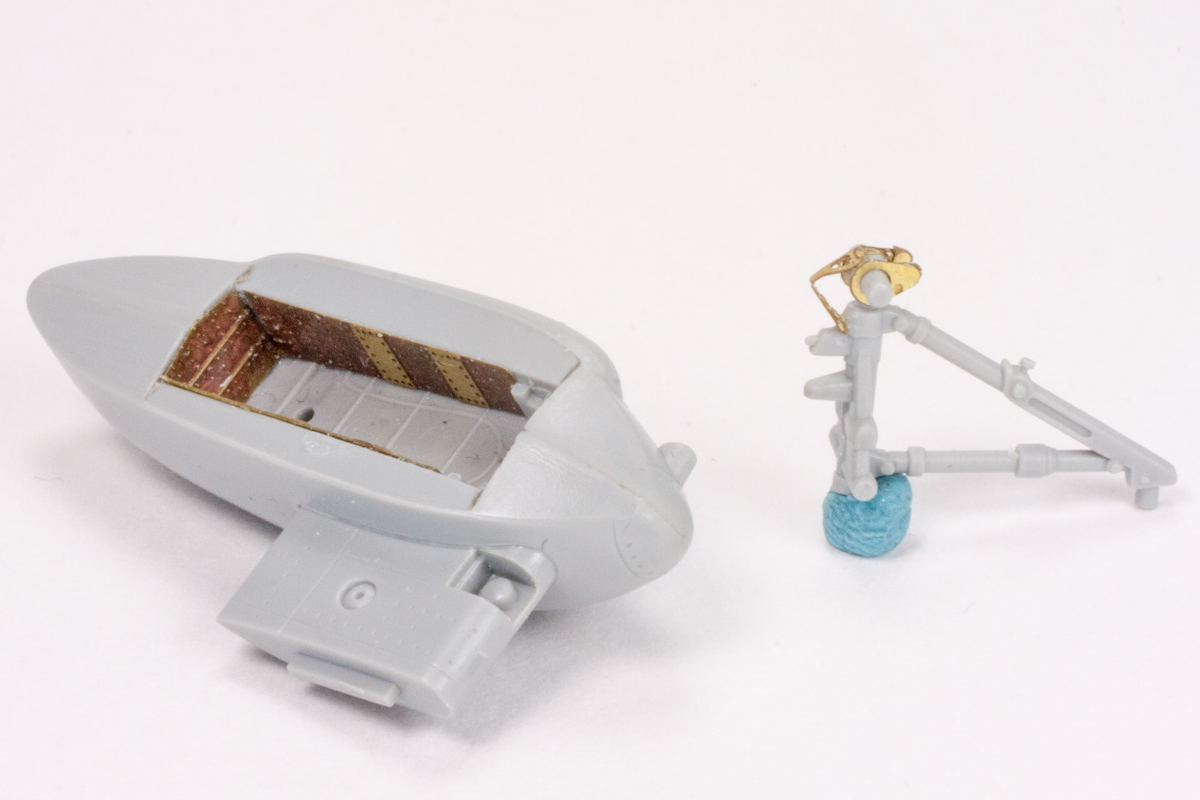
The lower three-quarters of SH-3D’s smaller port-side crew door hinges downward and features an integrated boarding ladder on its interior side, much like a small business jet. The kit offers a closed door with no ladder, part B17, and a lowered door with a ladder, made up of three parts, B19, B20, and B11. Eduard provides a multipart PE replacement ladder which includes a new door, PE part 10. The PE door is very thin, and it is a great upgrade for the much thicker kit door if you’re planning to display your Sea King with the hatches opened. The ladder itself, PE part 45, will require multiple, careful folds, and it’s best to look at reference photos to ensure that each step’s angle is set right the first time as the larger PE parts can easily break apart due to fatigue if the scored sections for the folds are adjusted too many times.
The remainder of the set adds a few fine details to various areas. The main landing gear bays are provided with ribbed wall panels, and each landing gear gets a few PE details. The kit’s clunky windshield wipers, parts C58 and C59, are replaced with PE versions, PE parts 17 and 18. A final nice touch is the inclusion of prototypical exhaust port covers.
Conclusion
With the PE in place, all that’s left is to paint the SH-3D in one of the many paint schemes they have worn over the years. The exterior detail set was very easy to apply, and the vent screens alone are forth the cost of the set; they make that much of a difference!
There are only a few challenging assembly areas, such as the rotor fold hinges, tail fold hinges, and boarding door, but these portions of the PE set will likely not be used on every build. To this end, the majority of the set is accessible to even a novice PE user while still providing great options to the most advanced builders. This Eduard set is highly recommended, again, even if just for providing all of vent screens!
If you’re interested in making an accurate US Navy SH-3D from the Cyber-Hobby kit, there is a great article by Jodie Peeler, found at the Tailhook Topics blog, covering the full conversion.
I personally found this to be the best reference available on the SH-3D, followed closely by the Japanese language book Famous Airplanes of the World, No. 15: Sikorsky SH-3 Seaking, which has a very usable section of detail shots, despite the language barrier.
My many thanks to Eduard for supplying this photo etched set, and my thanks to IPMS/USA for the chance to review it.

Comments
Westland Sea Kings
"The British-built Westland Sea King variants differ in quite a few points from the Sikorsky-built Sea Kings" - they are totally different aircraft! They share only a common Airframe base and a Main-Rotor-head !
Eduard's "Detail kit" has used a LOT of Artistic licence.
The average modeller will not realise it, but there are a load of errors.
Add new comment
This site is protected by reCAPTCHA and the Google Privacy Policy and Terms of Service apply.
Similar Reviews