
ROCAF S-2A/E/G Tracker
History
The S-2 Tracker carried an internal torpedo bay capable of carrying tow lightweight torpedoes or one nuclear depth charge. There were six underwing hard points for rocket pods and conventional depth charges or up to four additional torpedoes. A ventrally-mounted retractable radome for AN/APS-38 radar and Magnetic Anomaly Detector (MAD) AN/ASQ-8 mounted on an extendable rear mounted boom were also fitted.
In the Box
Instructions
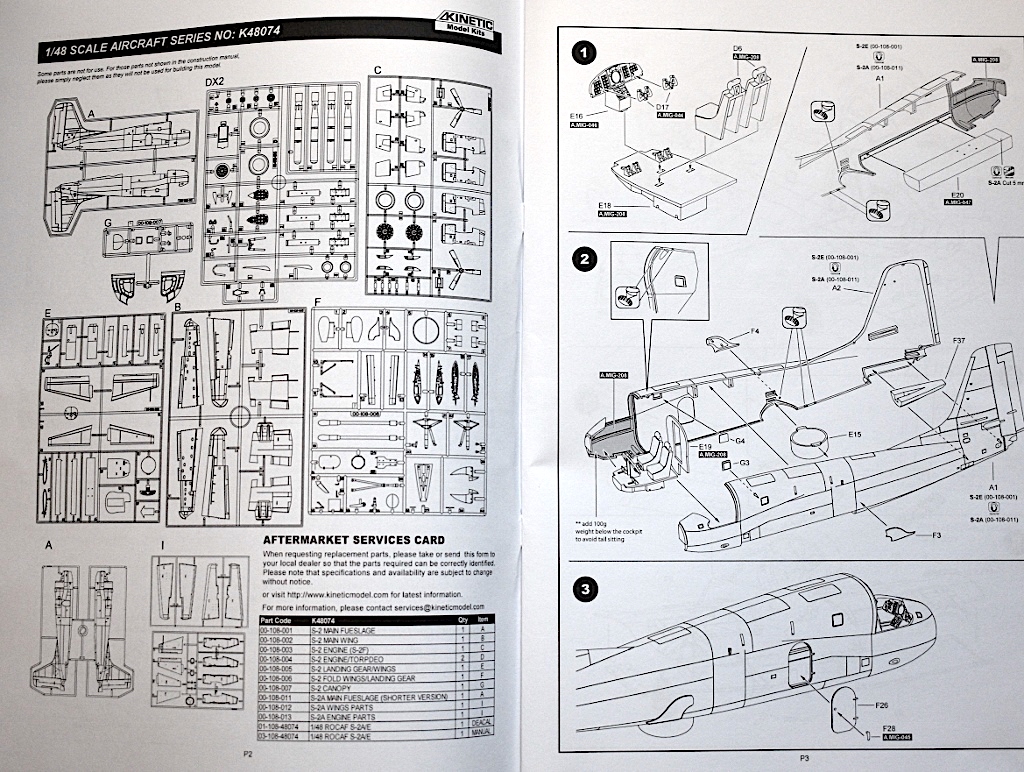
The instruction booklet was divided into eight pages of clearly marked parts and their construction sequence. Illustrations for the parts and their construction sequence were very clear and crisp. The instructions contained 49 separate steps to complete the model. Included with the instructions is a drawing for paint and decal applications for either of two aircraft.
Sprues
A total of ten sprues are included in the Kit with 9 being molded in gray and one for clear parts. Two sprues were for a short fuselage (A version) and engine nacelles.
Clear plastic
Canopy, searchlight lens cover and position lights make up the clear parts
Canopy Mask
The kit does not contain a canopy mask so I decided to purchase one from Eduard, I am glad I did.
Decal Sheet
The decals are printed by Cartograf and provide markings for new and old ROCAF emblems and for a Sea Camouflage or Gray camouflage markings. The decal sheet is full of stencils and warning labels too.
Building the Model
Cockpit
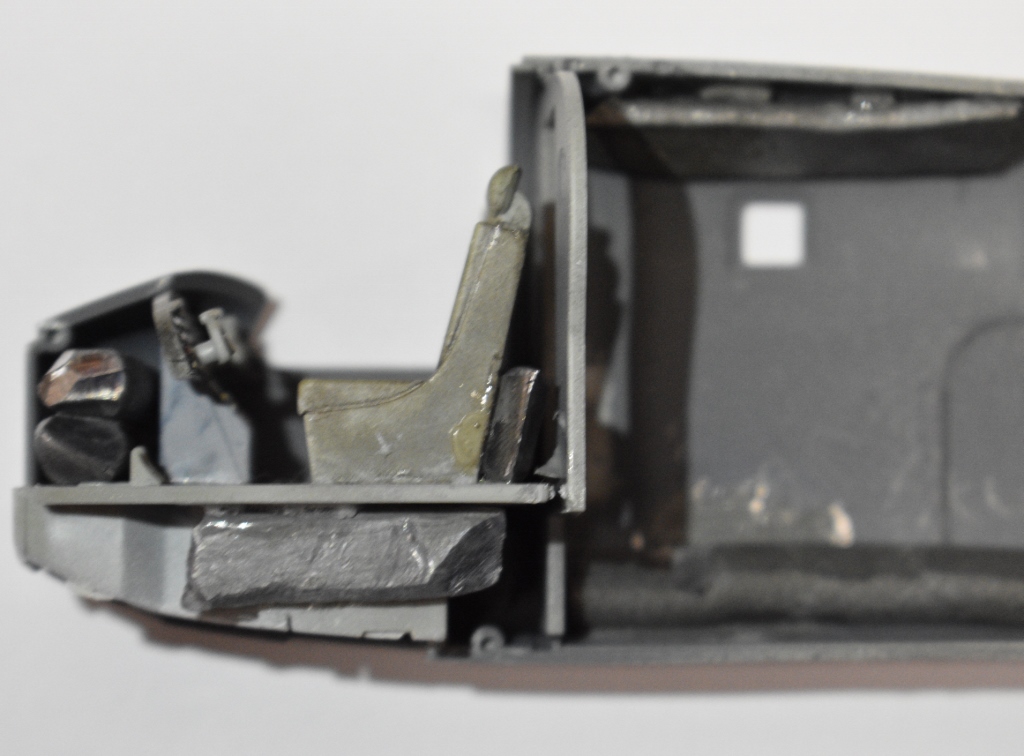
The instructions start off with building the cockpit. Seatbelts were not included with the kit, which was a shame. There is a lot of viewing room into the cockpit, so I had to fabricate my own belts out of tape (would have been a nice touch to have included some belts).
Cockpit Painting
I painted the interior of the cockpit with Mission Models Light Gull Gray (MMP063), and the seats Olive Drab (MMP021)
Fuselage Assembly
When matting the fuse halves, take into account the amount of nose weight the model will need so it doesn’t tail sit. This is a little difficult because of the airplane’s design, as it sits tail low. The instructions say that 100 grams of weight are required in the nose of the model, but I ended up using 150 grams. I used some lead worms and placed them under and behind the cockpit (see supplied photo). I suggest building as much of the model as you can with tape to hold parts together, then start adding weight to see how much it will take to get a nose down attitude when the model is finished.
Canopy Assembly
The canopy comes in two halves, which means there will be a seam down the middle. I lightly sanded the seam after the halves of the canopy were joined with odorless C/A. Then I applied some Vallejo acrylic putty over the seam and sanded it again. I attached the canopy to the fuselage again using odorless C/A and filled some gaps between the canopy and fuselage with more acrylic putty. Looking at the molded lines for canopy windows and how intricate they were I decided to buy the canopy paint mask made by Eduard. Like I said earlier, I am glad I did and would highly recommend doing the same if you decide to build this kit.
Wing Construction
Early in the wing construction you need to decide if you want to have the wings extended or folded, an option with supplied parts in the kit. I decided to have the wings in an extended position. I was a little concerned with the outer and inner wing joint connection basically being almost a butt joint (not much gluing surface), so I added some reinforcement to the area. I cemented about a 3 inch “I” beam (Evergreen Plastic) to the underside of the top of the wing skin to span the wing join point to give the area lots of strength. The kit has supplied parts for two different wing sections: a set for the A model and a set for the E model. The obvious difference is the A model has cut outs for anti-collision lights in the tips and the E model does not.
I glued the wings to the fuselage using Tamiya Cement, the glue in the bottle with the orange label and lid.
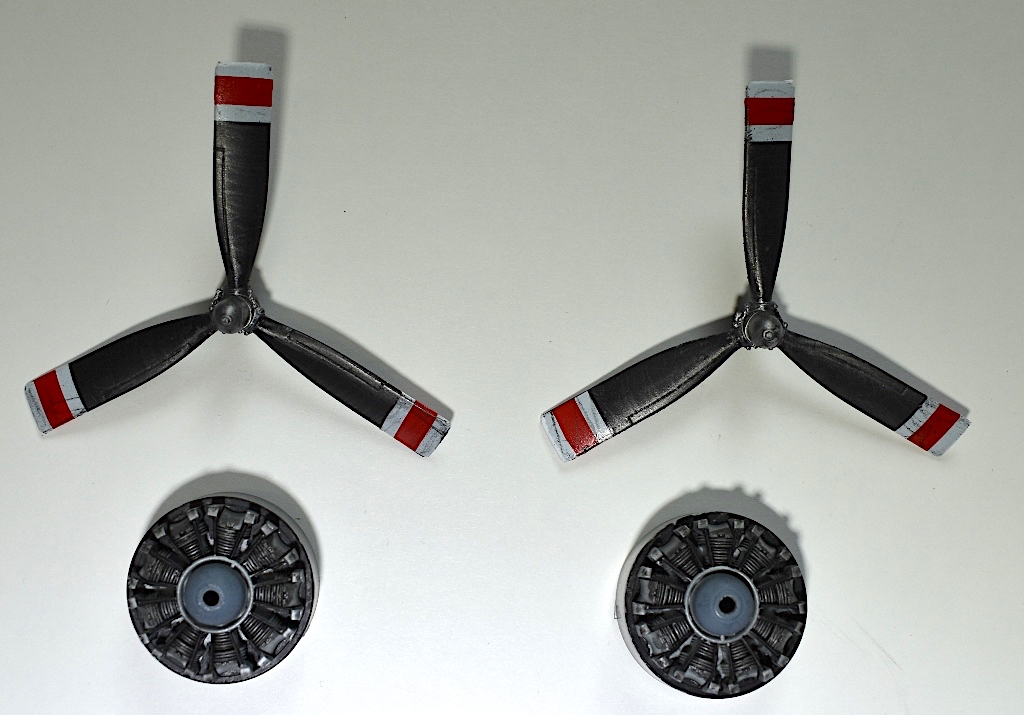
Engine and Propellers
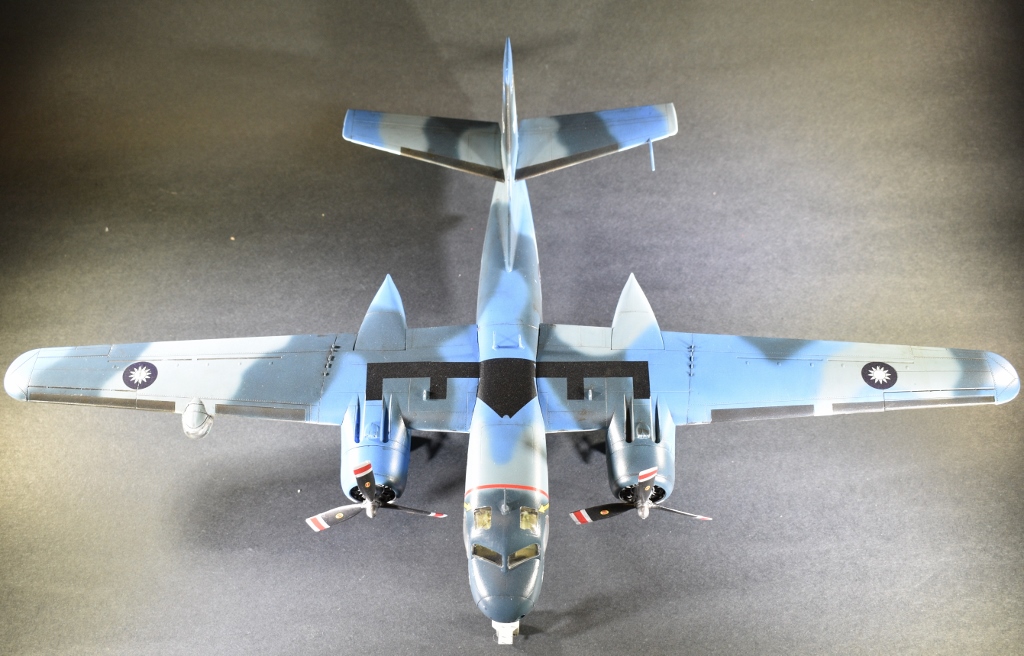
The Propellers were big, and the tips had red and white colored stripes on them which was applied via supplied decal. The engines were molded with nice detail. Once they are in the nacelles not much is visible behind the propellers, but still a nice addition.
Engine Nacelles
This part of the construction is straight forward, and the kit gives you three versions to build. The differences in the nacelles (A or E model) is the aft end where different ordinance is dropped from the airplane. The main landing gear well was a molded tub that made up part of the nacelle, three parts altogether. I painted the gear area with Mission Models White(MMP001).
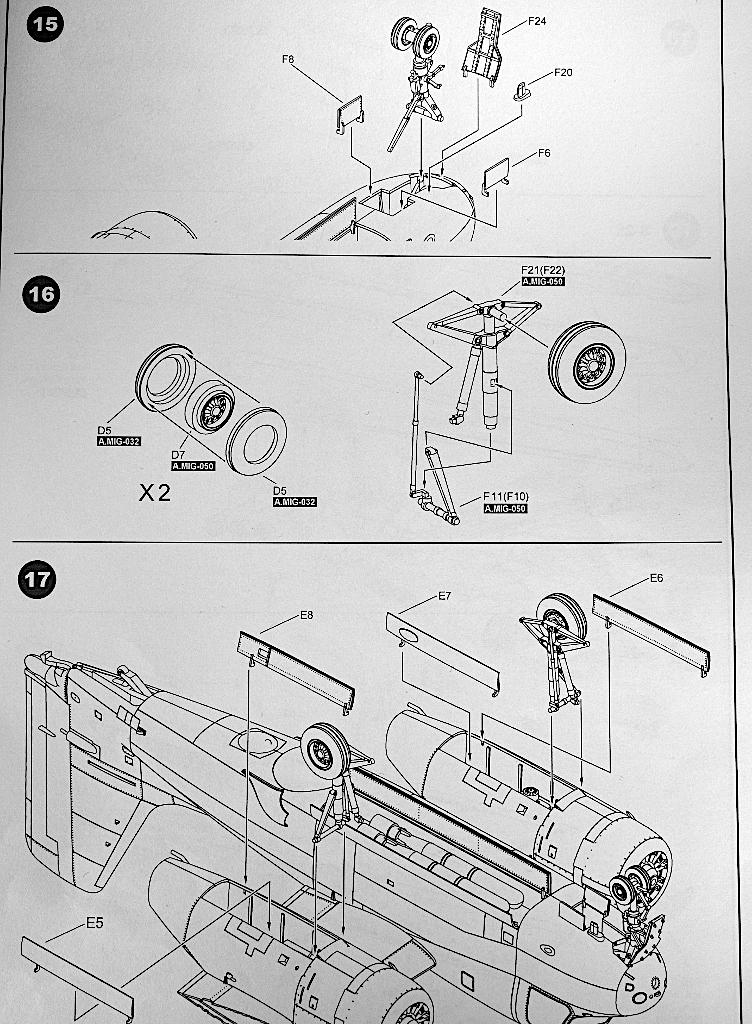
Front Wheel Landing Gear
I painted the wheel well with Mission Models White (MMP001) and then gave it a wash with Tamiya Black panel liner.
Main Gear / Wheel wells
Included in the model are inserts in the nacelles for the wheel wells for the main landing gear. There is some detail that was brought out with Tamiya Black panel liner after the wheel well was painted with MMP White.
Landing gear comment: I was concerned with this part of construction in that the fuselage is heavy with the nose weight and the landing gear were constructed with a couple of butt joints. The attachment of the gear to the fuselage and nacelles was pretty much a butt joint also. There was no interlocking areas or holes for the landing gear to make a positive fit (see landing gear photos and the construction of the main gear placed over the yellow tape). Once I initially set the landing gear with Tamiya thin cement, I came back and reinforced the join areas of the landing gear to the airplane with gap filling C/A to make sure the landing gear would stand up to the weight of the model.
Final Assembly
Underwing search light was made by using Aluminum foil as a reflector and melting clear sprue pushed into a small round template to form a light for the assembly.
Once all the parts of the airplane were attached I built a jig out of thin plywood and packing cardboard to hold the model. The airplane was quite large, and I needed something to hold it steady while I painted and applied the landing gear.
Painting
On my models before I add any paint I wipe the them down with Denatured Alcohol made by Crown (the “Cleans Windows” type, not the one labeled “Fuel” found at Lowes hardware) to remove dirt and grease.
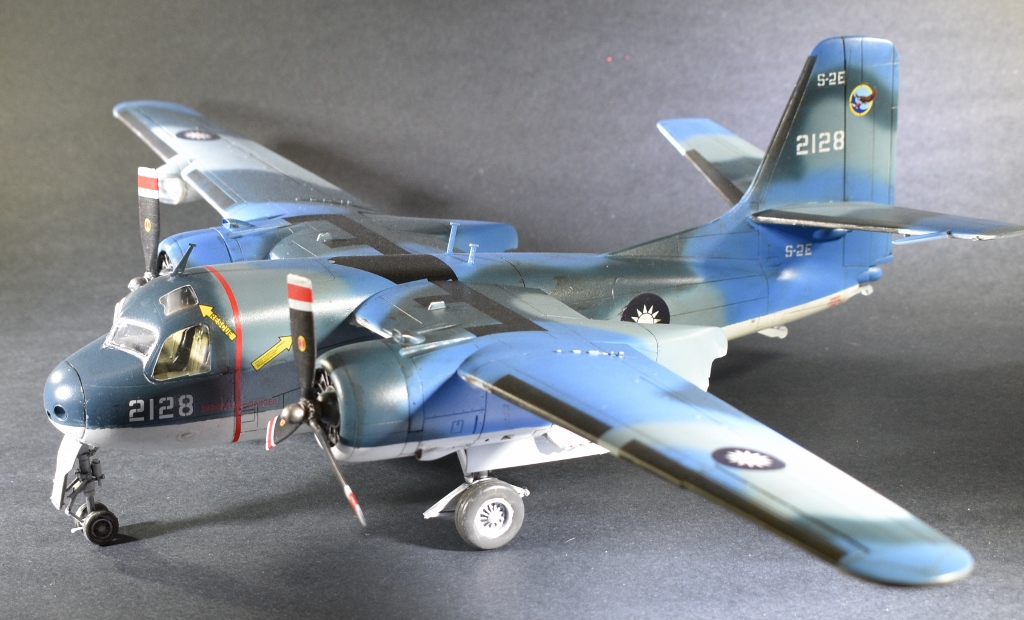
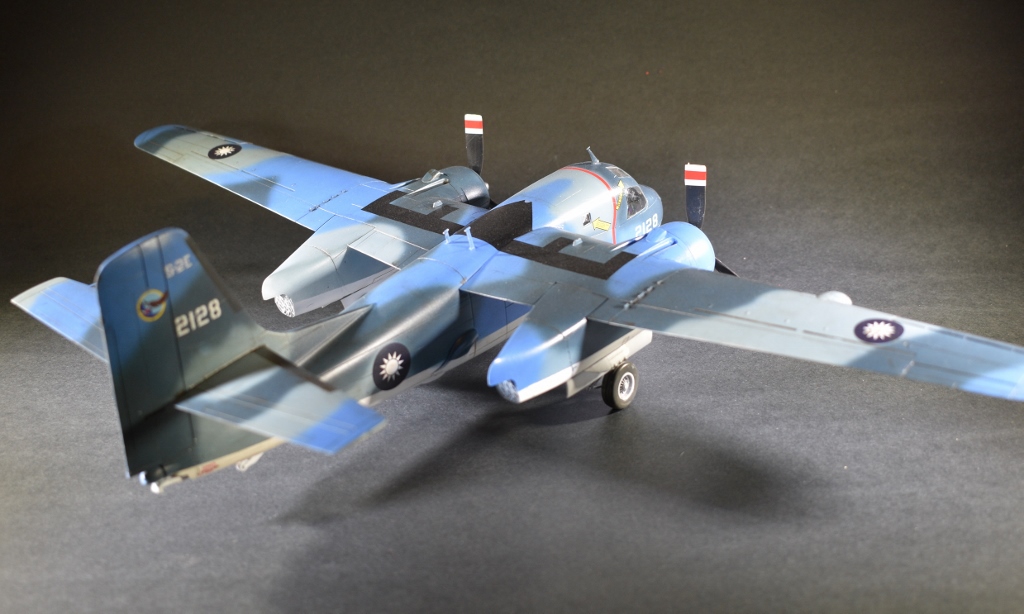
I decided to paint the SEA Camouflage scheme consisting of a White underside, Light Blue, Light Gray and Dark Blue.
Primer
I decided to prime the model with Mission Models White Primer MMS002 thinned to a 50/50 mix with MMA003 thinner. Once I let the primer dry for 24 hours, I gently” buffed” the primer with a 4000 grit micro mesh finishing sponge and soapy water to smooth out the surface.
Paint Colors
Thank you to John Miller of Model Paint Solutions www.modelpaintsol.com for the Mission Models Paints and also mixing the custom paint colors.
White: MMP001 was sprayed over the whole underside of the model and part way up the sides. When that paint had dried for 24 hours I masked it off with Tamiya tape and got ready to spray the Camouflage colors.
- Light Blue: MMP092 +MMP048 at 10% was the first color painted. Areas were picked out where the paint was to be applied.
- Light Gray: MMP057 +MMP048 at 5%+ MMP001 at 5% sprayed to fill in part of the camo area freehand to get a soft break between colors.
- Dark Blue: MMP062 +MMP072 at 5% +MMP001 at 5% sprayed in the remaining areas also freehand to get a soft break between colors.
De-Icing boots were sprayed with a mix of Black Tire MMP040 at 75% +Black MMP047 at 25%.
Clearcoat
Once all the paint had been applied and dried for 24 hours I covered the entire model twice with a spray of Mission Models Gloss Clear MMA006 Thinned with 60% Mission Models Thinner MMA003.
Decals
The decals were very crisp and had a very thin carrier film. Once they were applied I covered them with MicroSol to get them to adhere to the model surface.
After the decals were applied, I sprayed three more coats of Mission Models Gloss Clear to blend the edges of the decals.
Weathering
Tamiya Black panel liner was used for the edges of flight controls. Panel lines, access hatches and covers were highlighted with Tamiya dark brown panel liner.
A mixture of brown and black dry pigments, were used to indicate exhaust stains from the engine on the sides of the engine nacelles.
Final Model Coating
Once al the weathering had been applied I sprayed the model with four coats of Mission Models Flat Clear MMA004 thinned with 60% Mission Models Thinner to dull the Gloss sheen.
Construction Notes
Landing gear was glued with gap filling C/A for added strength (highly recommended)
Mission Models Paint
The Mission Models paint colors were diluted with 50% paint and 50% thinner/ poly mix. The thinner mix was made up of 10% Mission polyurethane and 90% Mission Models thinner (thinner/polyurethane 10% mix).
The paint was sprayed in multiple dry coat layers to build up the opacity color needed.
Summary
The initial construction of the model was straight forward, and once the version I wanted to build was figured out, construction went smoothly.
This was a unique model with the landing gear construction. Initially I had concerns about its ability to hold up the weight (nose weight added) of the model but once finished, the landing gear did fine. The Camo paint scheme was fun to paint especially with the soft break lines between colors. The soft line between colors allowed me to freehand the whole scheme.
This was a fun model to build and paint. I can recommend adding it to your collection. Thank you to Lucky Models and IPMS/USA for the opportunity to review this model.


Comments
Add new comment
This site is protected by reCAPTCHA and the Google Privacy Policy and Terms of Service apply.
Similar Reviews