
P-47D-25RE Thunderbolt - Advanced Kit
A Very Brief History the P-47
A great deal of information and data is readily available online about the legendary P-47, often referred to as ‘Juggernaut’ or just the ‘Jug.’ The thousands of women and men working around the United States produced over 15,683 P-47s with the P-47s accounting for over astounding 7,000 enemy aircraft losses,86,000 railway cars, 9,000 locomotives, 6,000 armored fighting vehicles and 68,000 trucks. You can easily spend hours reading about the exploits of the P-47 and many of the well-known pilots who flew them. The P-47’s maximum weight capacity was almost 17,000 pounds, compared to the P-51’s at 12,000 pounds, an increase of approximately 5,000 pounds or 41% more than the Mustang. It’s eight .50 caliber guns carried 3,500 rounds compared with the 1,840 rounds for the P-51 (a whopping 90% increase). Take a few minutes to digest those numbers and you’ll quickly come to the realization that the P-47 was one of the key successes in our World War II efforts.
These and many other statistical and aircraft development facts can be found at:
- The Smithsonian
- Wikipedia
- Air Force Museum
- Detail & Scale P-47 Thunderbolt book
- Another very interesting source of information can be found in Tom Cleaver’s article, which provides specific color data: "Gabreski’s P-47 – another take"
Along with there are numerous YouTube videos which you can easily immerse yourself in and decide how you wish to construct your excellent MiniArt P-47D kit.
This Kit
This is a large and impressive kit. This may be the first kit in the P-47 that this produced, and MiniArt has subsequently issued with several other basic kits as well. As you open the box you’ll find twenty-one sprue sections, two decal sheets, a clear sprue section and a large photo-etch fret—there is a lot of plastic and as in other MiniArt kits a lot of material to read and contemplate. It is a tribute to the tenacity of the Ukrainian company can even produce any kits while their country is waging a costly war against Russia;nevertheless despite the naked aggression MiniArt has continued to produce such high-quality kits.
My approximate count the number of individual pieces is 330. The instruction ‘manual’ is twenty three pages long, including three four-view full color painting and marking guides, including three full color four view illustrating the P-47D-25RE, one of which shows Col. Stanley ‘Gabby’ Gabreski’s aircraft (which is the subject of this review, along with a stencil color guide, several 3-dimensional drawings, 3 different tire patterns, hatches which can be assembled in either the open or closed position, a full color ordnance painting guide and paint color chart (which includes Vallejo, Mr. Color, AK Real Color, Mission Models, Ammo by MIG, and Tamiya colors). This last point is significant as many kits only offer their proprietary colors, which may or may not be available for many modelers.
As you start to look at the kit parts, you can’t help but be impressed with engineering effort that has gone into planning and production of this plastic scale model. It’s just that good! I know you will be quickly attracted to the superb surface details, which are, in comparison to the current Tamiya kit, a major leap forward (in my opinion). And comparing the Tamiya or Hobby Boss kits illustrates the many differences between those kits and the MiniArt kits—which (again in my opinion) don’t measure up in almost every respect.
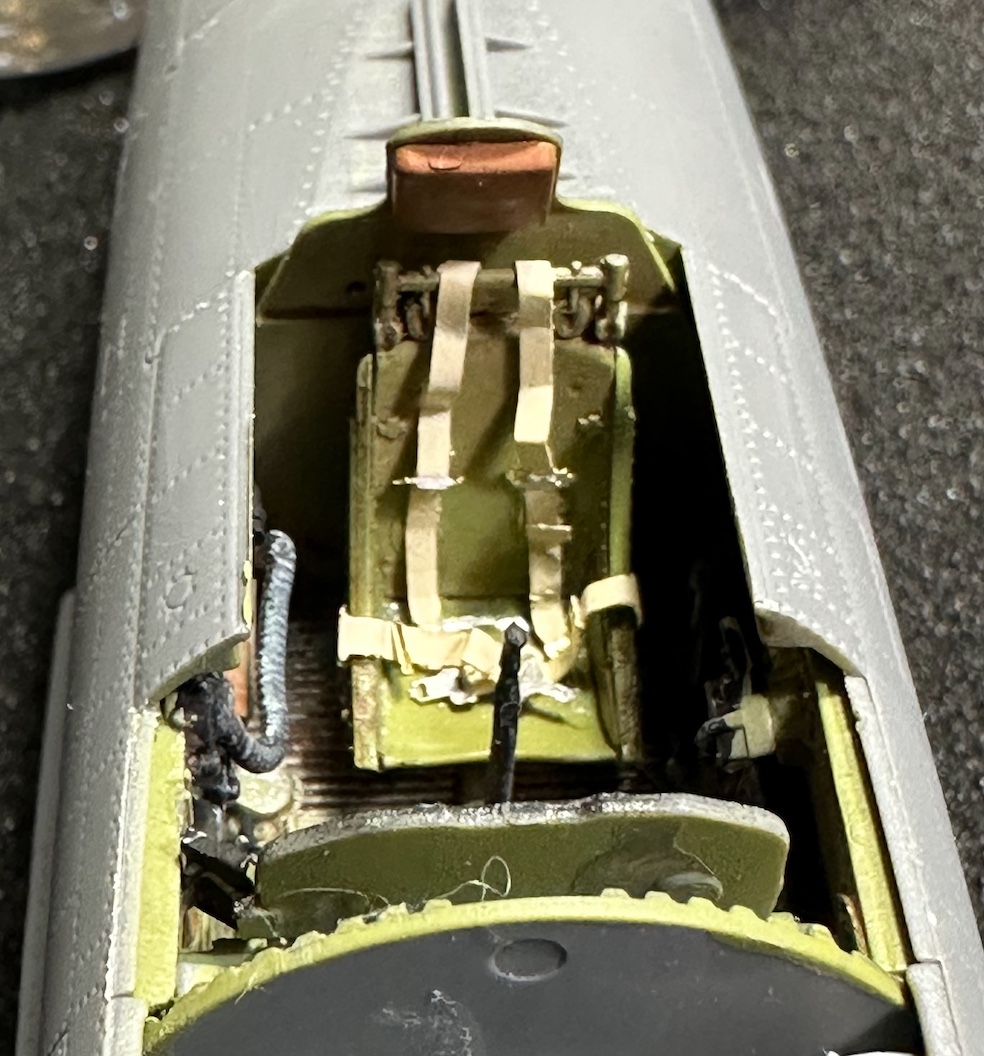
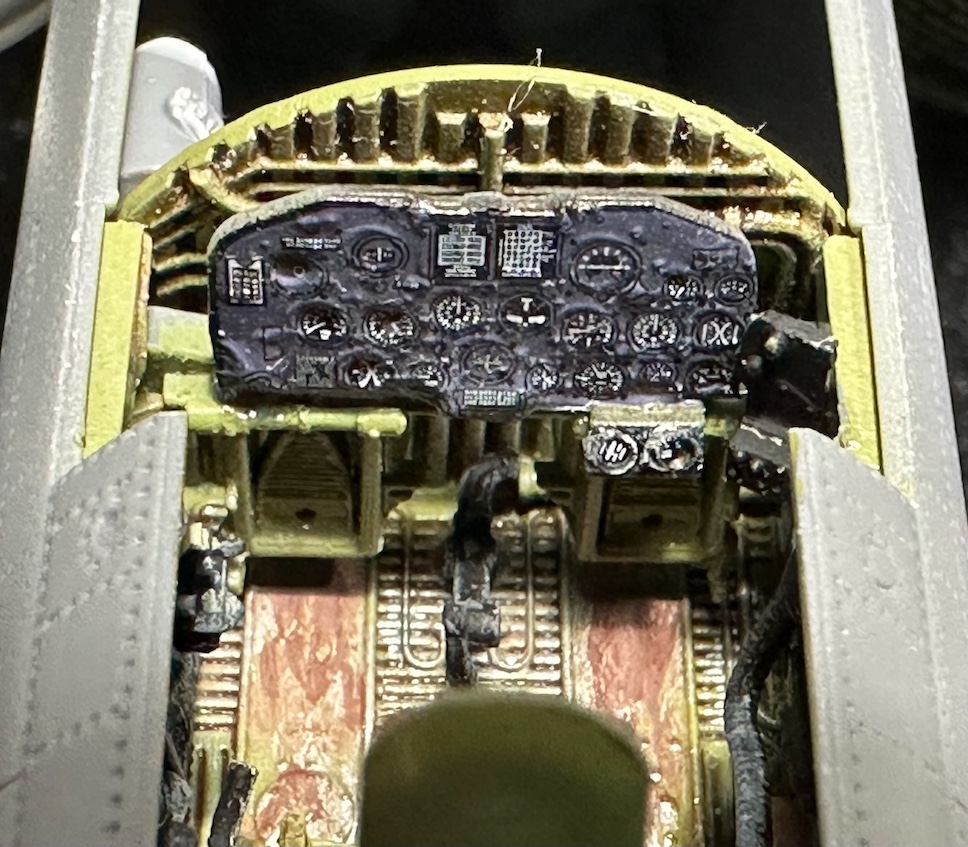
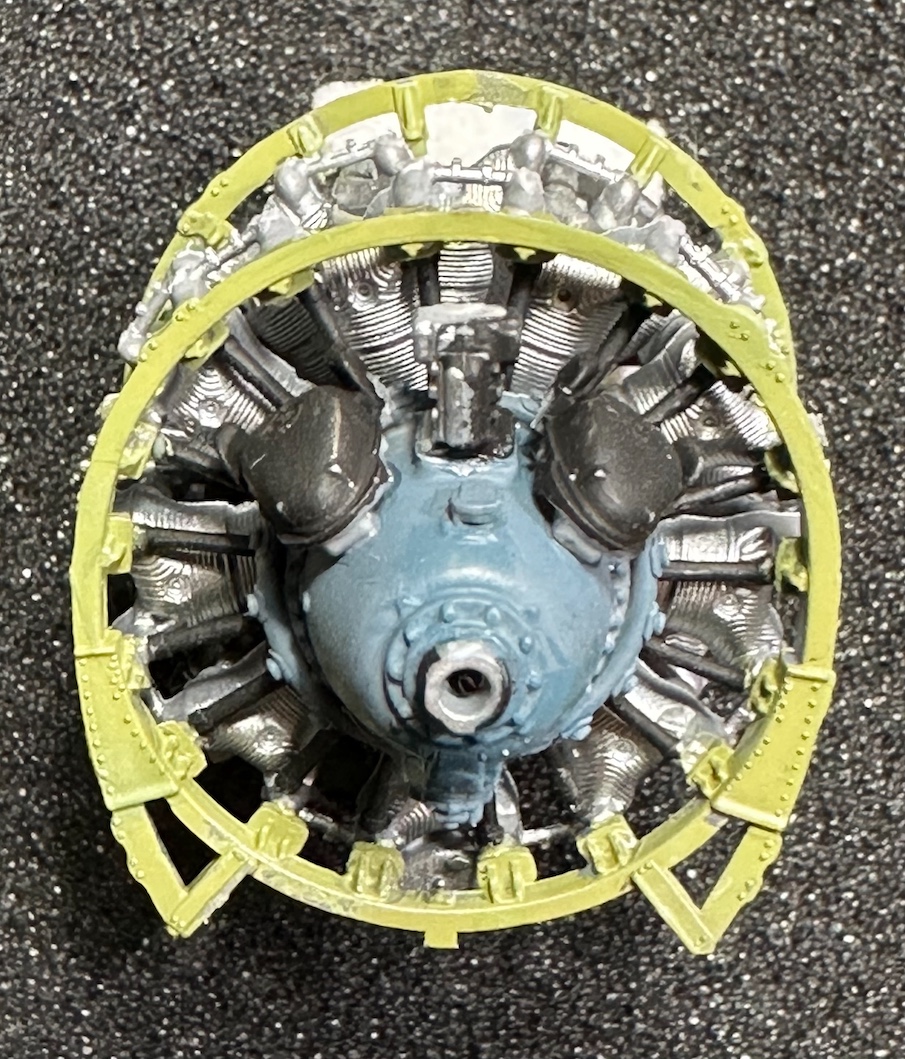
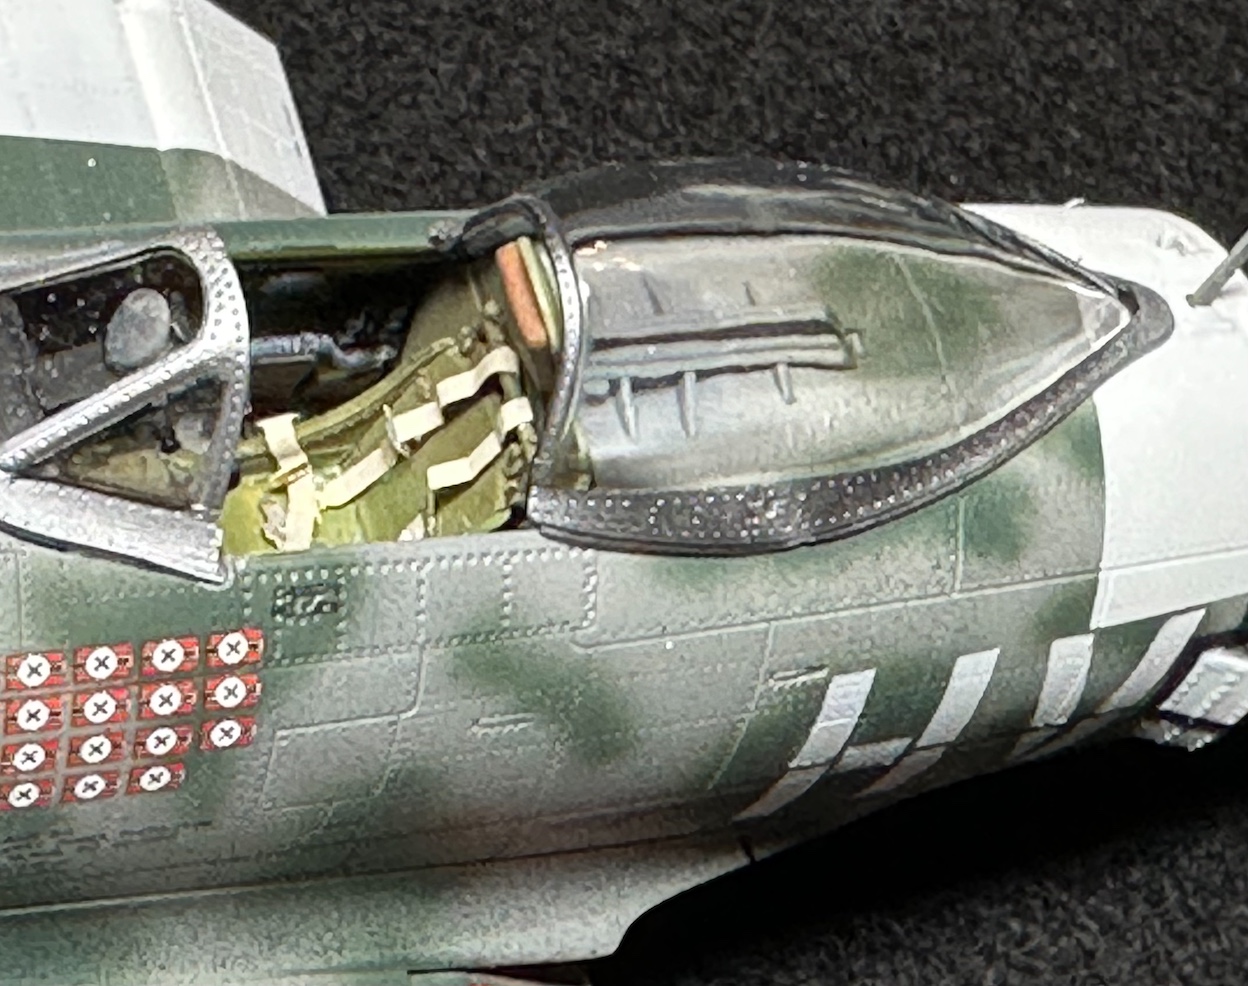
At first glance, you will find a highly detailed plastic scale model of the fabled Republic aircraft. Each of the exterior surfaces are covered with an incredible amount rivet details. The main fuselage is raised in some areas just enough to delineate panels and compartments as well as steps, vents, handholds, and the interior areas where the main landing gear doors will be detailed. The plastic is of medium weight and strength, which should ensure it will set upright without any additional support required. And I have yet to discuss the amount of engine details available display, including two complete engine cowls and the option to include detailed wiring in and around the individual cylinder heads (along with full colored photos illustrating these details).
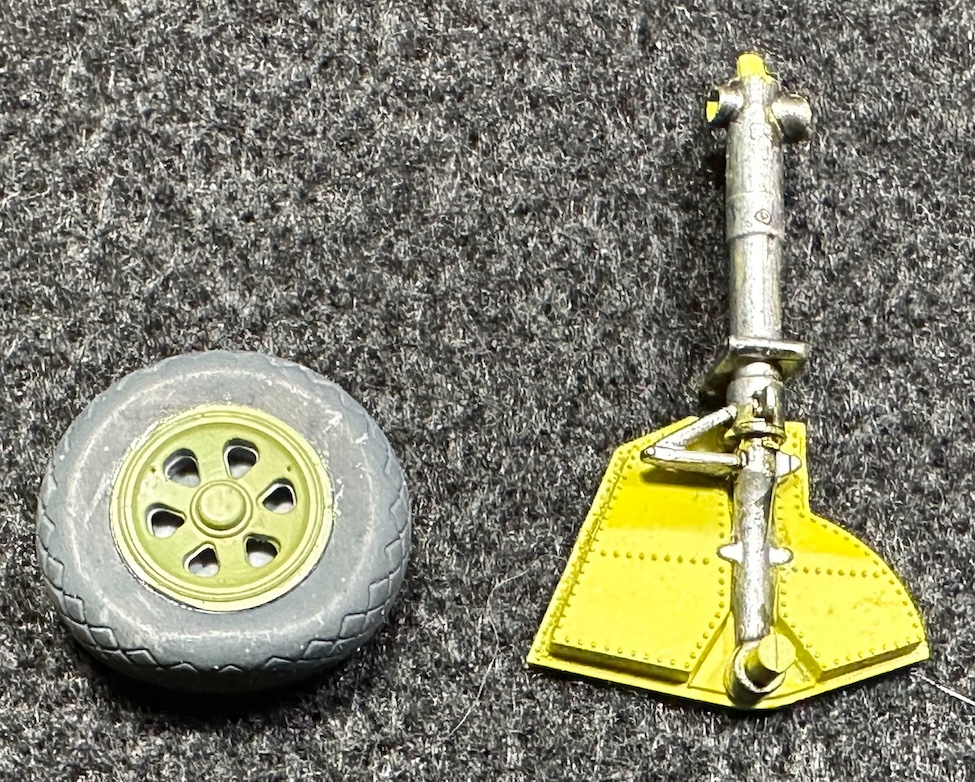
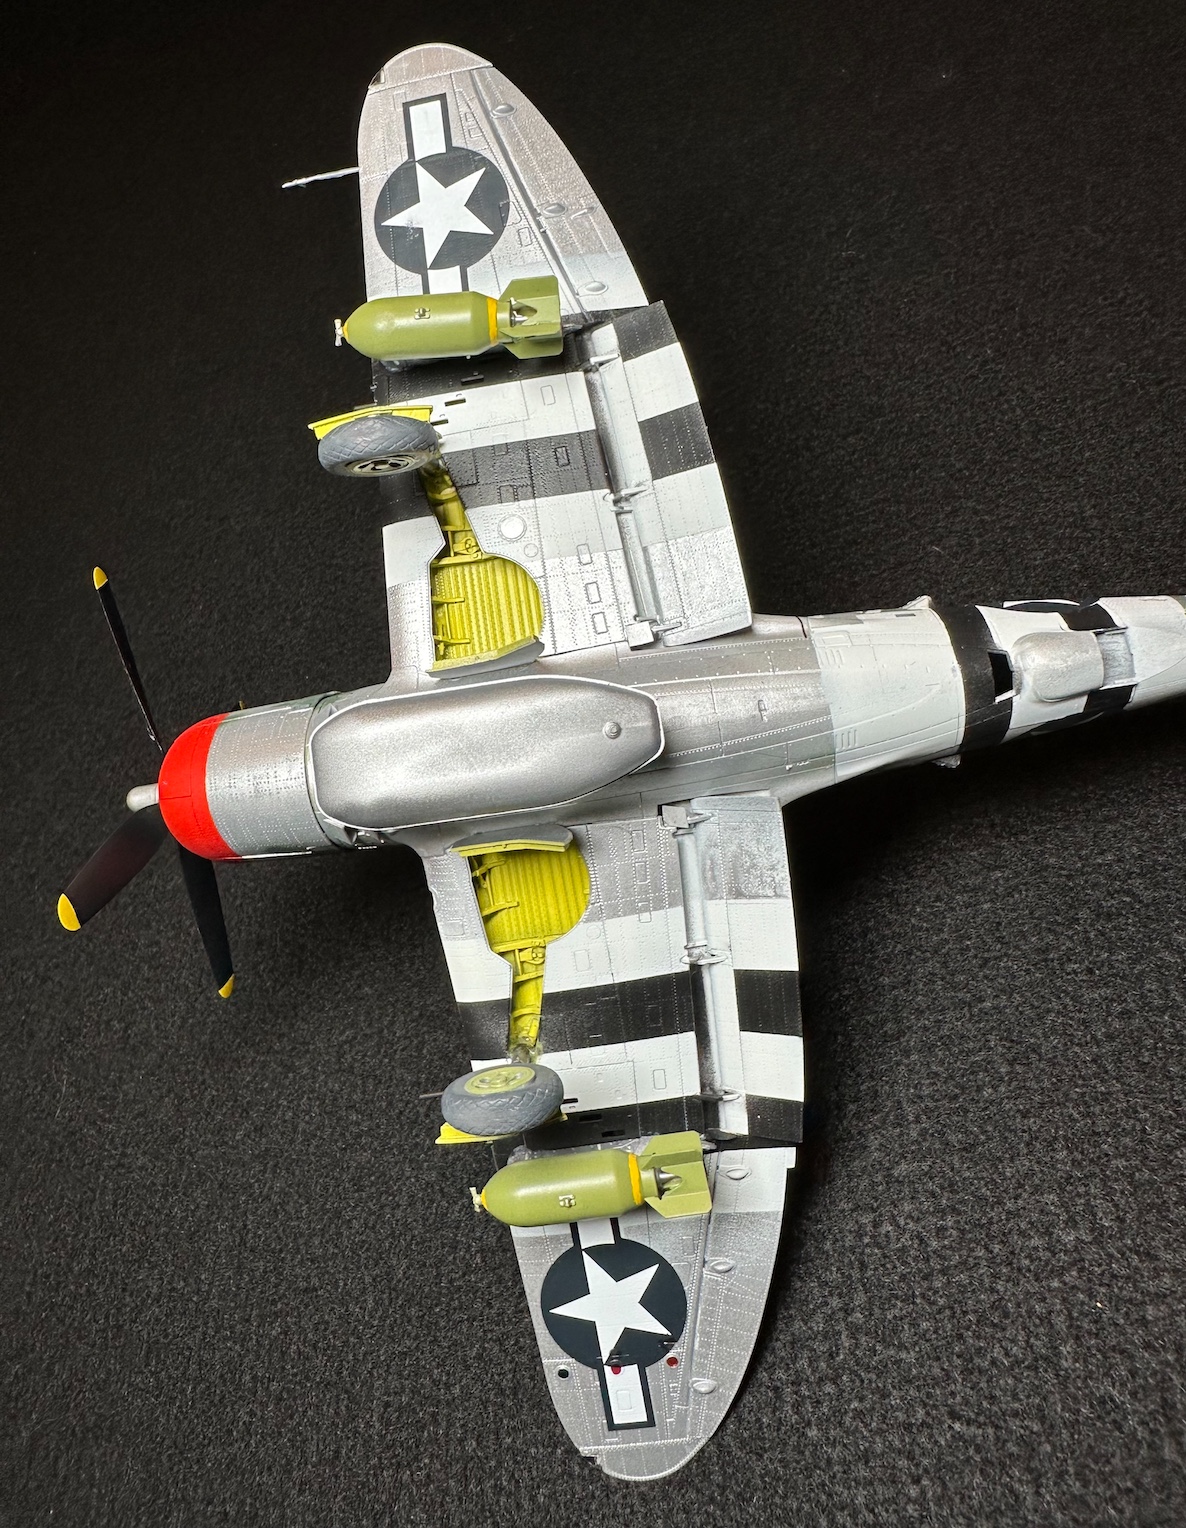
You will also find that many parts in this kit represent those which expect will be found in this or later versions of the P-47; examples include a variety of bombs (4 types from 250 pounds to 1000 pounds), fuel tanks (again 4 different types), a smoke generator, open and closed versions of gear doors, a variety of cowl opens (open and enclosed), full open gun bay areas with the ammo trays and 8 .50 cal. machine guns, compressed and extended oleo gear legs (indexed with small locating tabs to insure proper alignment for the tires), three types of wheels and tread designs and different types of wheel hubs themselves. Even the pylons include several parts as determined by the different wing tanks or weapon loads.
I am also attaching several of the ICM images to illustrate what ‘might have been’ were I much more talented modeler and the fully detailed engine is possible, though these details elude me.
The Build
There are at least two options at every turn as to begin when confronting your P-47D build.
Some of the most significant aspects includes the almost fanatical fit of the parts. In this area as you construct the lower wing sections (as just one example of the attention to details), which includes 18 separate pieces.When inserting the two machine barrel sections, you notice that each lower wing section is notched to ensure the correct orientation and the location and barrel elevation is positioned correctly. Nothing is left to chance (or imagination). Throughout this P-47D kit there are many nuanced aspects of this kit. Additionally, for those of us in the Pacific Northwest we are blessed with two fully restored models of the venerable ‘Thunderchief’ that we can walk up to and enjoy the full size and might of the P-47D in Seattle at the Museum of Flight at Boeing Field and The Flying Heritage & Combat Armor Museum at Paine Field at nearby Everett.
First there is the fabled Pratt & Whitney R-2800 Double Wasp engine. The kit’s engine is a magnificent model, demonstrating superb engineering and well attention though out, including a full wiring diagram (page 22).From the engine’s cylinder heads, to the exhaust manifolds, various wiring facets and the engine head parts (eight parts in this small portion alone), the fire wall and engine intakes, exhaust waste gates, position able intercooler doors, the large reduction gear, the distinctive twin distributors, and the large air scoop beneath the main cowling.
In several areas I found a small amount water soluble filler and sanding was needed to insure a proper fit. I also used Devcon 5 Minute epoxy (#20545)around the canopies and wing tip position lights as this epoxy glue is clear and provides a fast setting, two-part glue and a very strong attachment wherever used.
Issues (problems that I encountered in the build)
One other significant attribute to the MiniArt kit is on page 22, where you will find guide to the wiring diagram for the engine, and both wing interiors. My failure was in laying out the engine pieces and trying to figure out how to place the brass wires as shown in this images. I was unable to accomplish this and finally gave up this task. As most of these steps are including for the ‘advance version’ they won’t be a problem for those of us who don’t fit into the ‘advanced’ (except by age….unfortunately).
I also ran into issues starting with page 9 steps (covering the ‘advanced assembly’) while comparing them with pages 10 & 11. Some component parts (step 11) are required for either the basic or advanced assembly.As non-engineer, I am not only somewhat ham-fisted and confused with much of these steps. If as in my case, you are following the steps in page order, I urge you read ahead and go to pages 10 & 11 before proceeding to page 9.
Again, I had an issue when I was working with the cowl enclosure. I worked it for some time, attempting to install the splayed cowl flaps and was never able to attain the tight fit I needed. However, switching to the ‘closed’ cowl flaps it worked great.My only issue here was that kit parts needed a small amount water soluble filler a skosh of sanding around overlapping cowl flaps to insure a tight fit. The issue of fitting came back to haunt me in step 40, when I attempted to seat the front windscreen (item Gb2) as well. As much as I filed away, I was unable to have the windscreen set down in the front as much as I wanted.
Unfortunately, there are only two wing pylons provided, which limits you to choosing only two of the pylons for whichever underwing ordnance you choose to display your model with. This issue is because there are only two pylons (though there are several attachment points provide, depending on which ordnance or drop tanks are being displayed (steps 41).
Another place I ran into the issue of ‘small parts’ was for the tail assembly. I tell myself I know better, though I inevitably break several small parts off during my sub-assembly process. Again I ran into this issue with parts: both of short supporting struts for the two tail wheel doors and tail wheel strut itself (despite the inclusion of two separate such parts). I fabricated the offending strut from a short piece of brass rod. Carpet monster: 2, me 0.
Painting
I used a variety of paints to complete my P-47D. Initially I chose interior colors: AK Real Color’s US Interior Yellow Green (#RC 262) and Zinc Chromate Yellow (#RC 263);these two interior colors as the original plants painting various parts used one of these two colors.
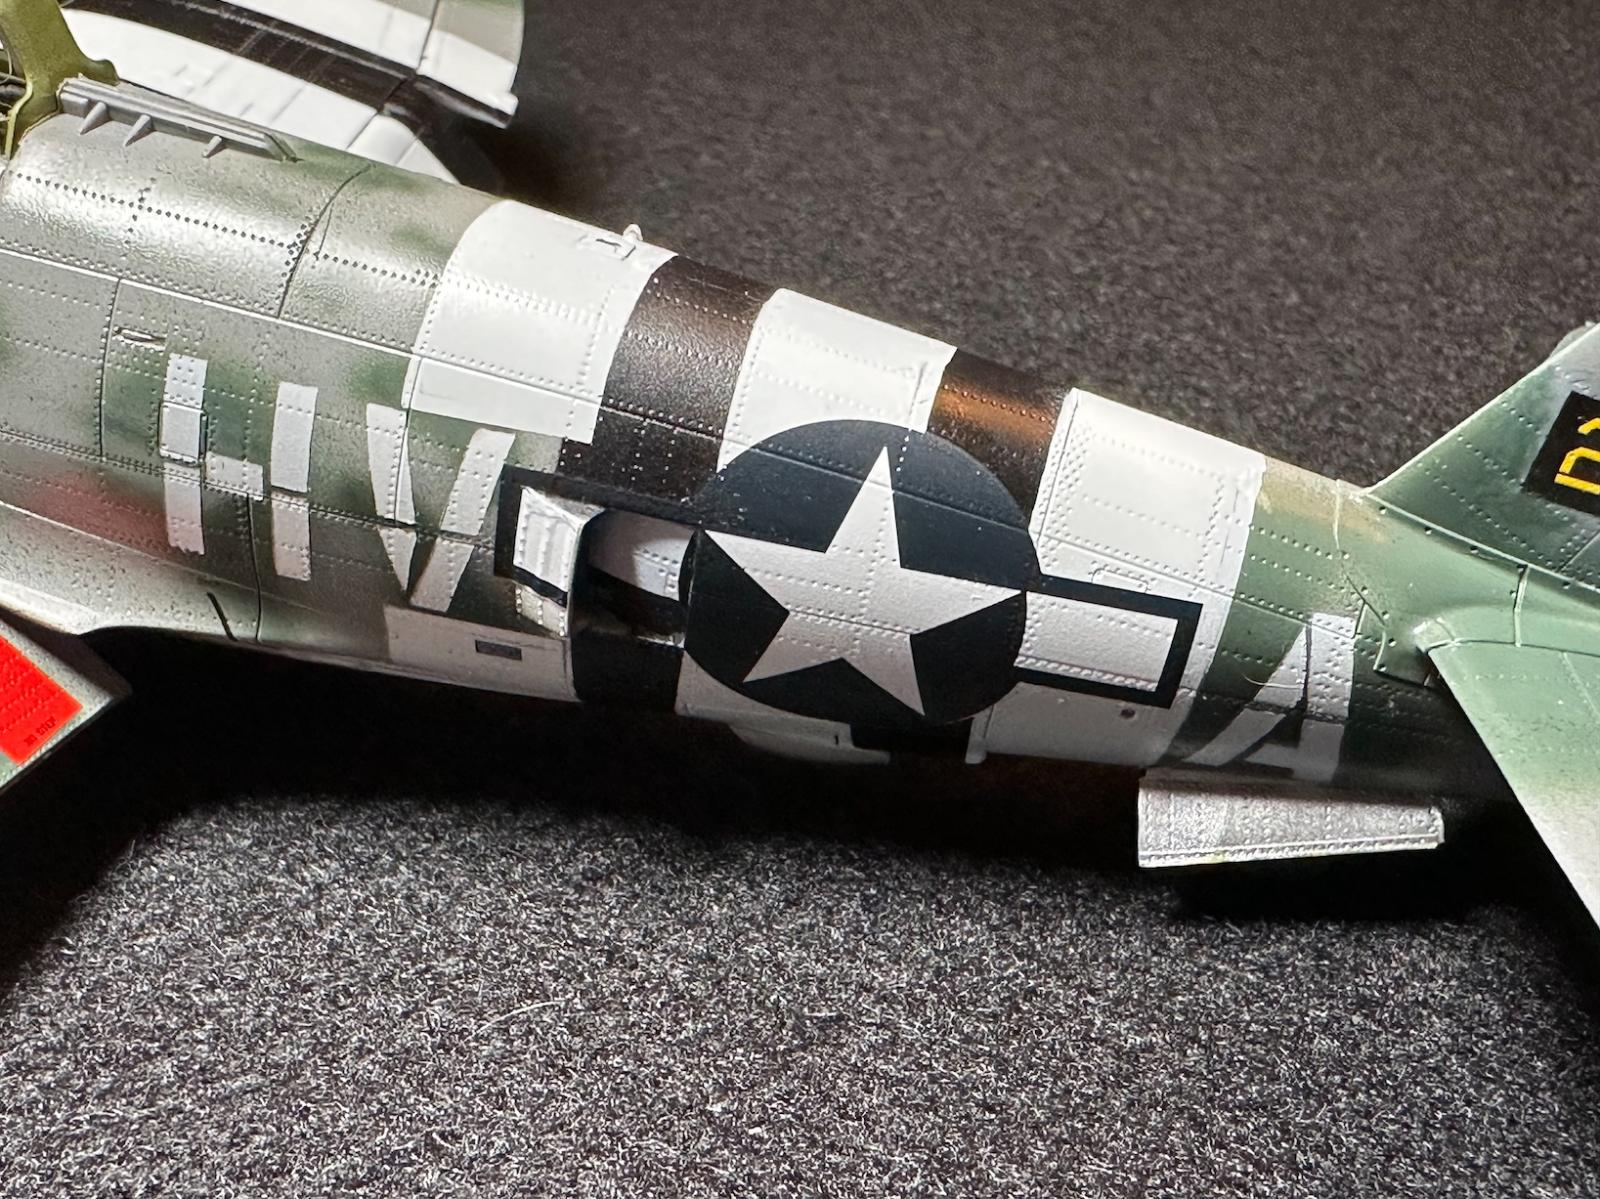
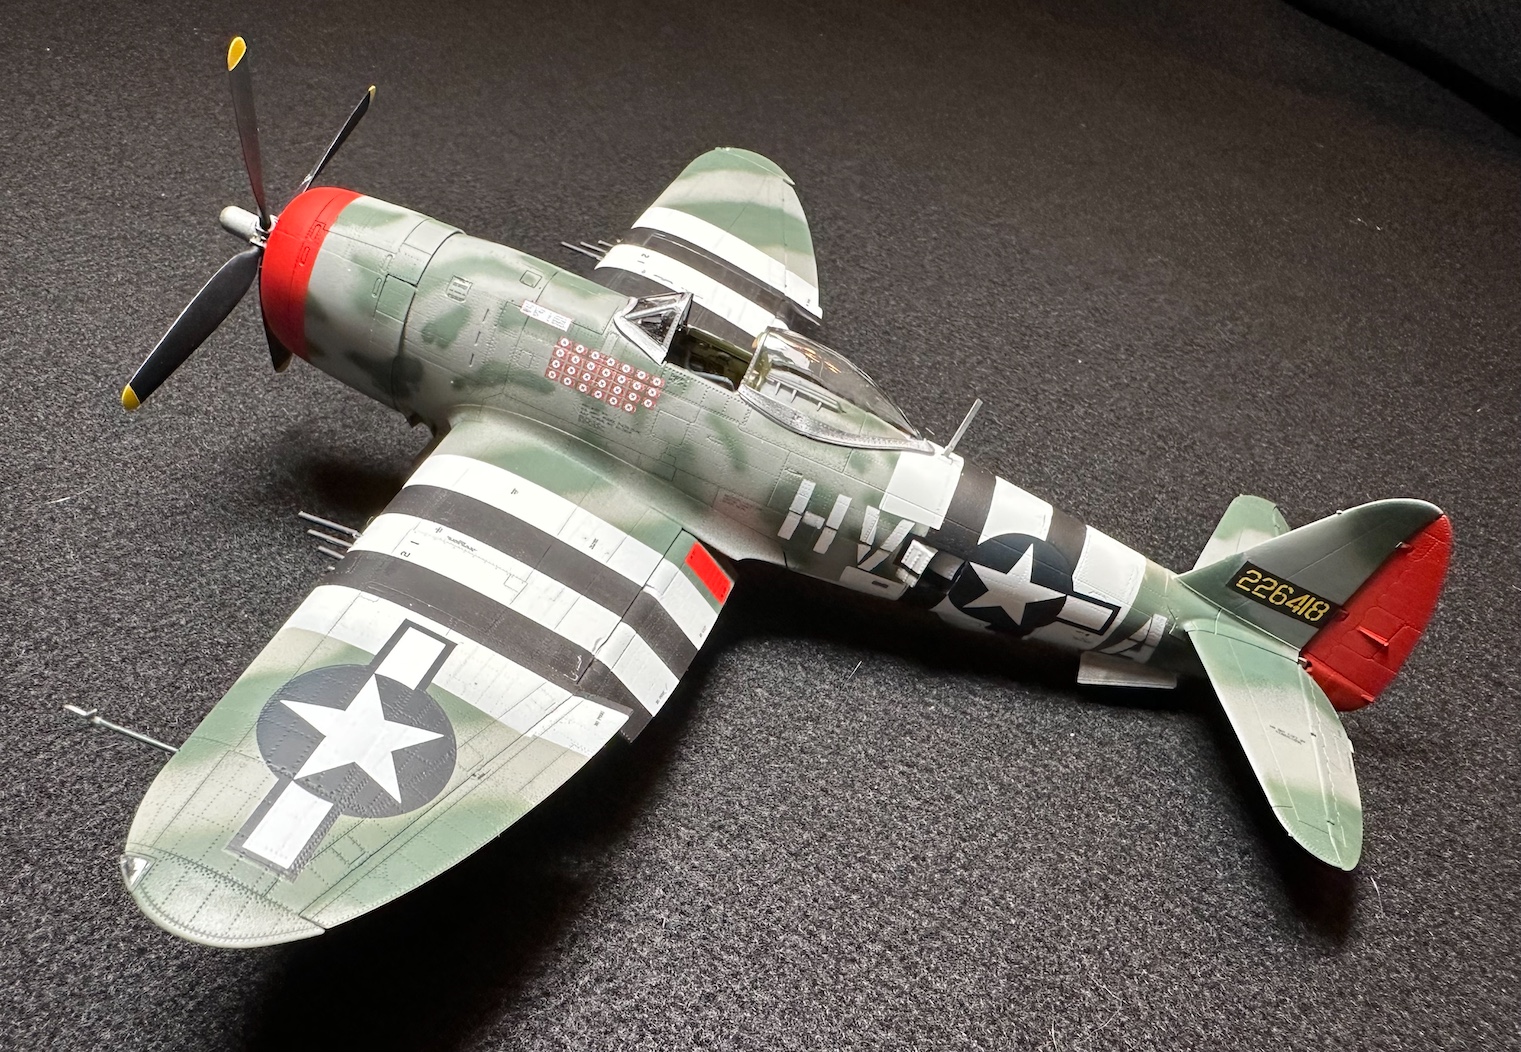
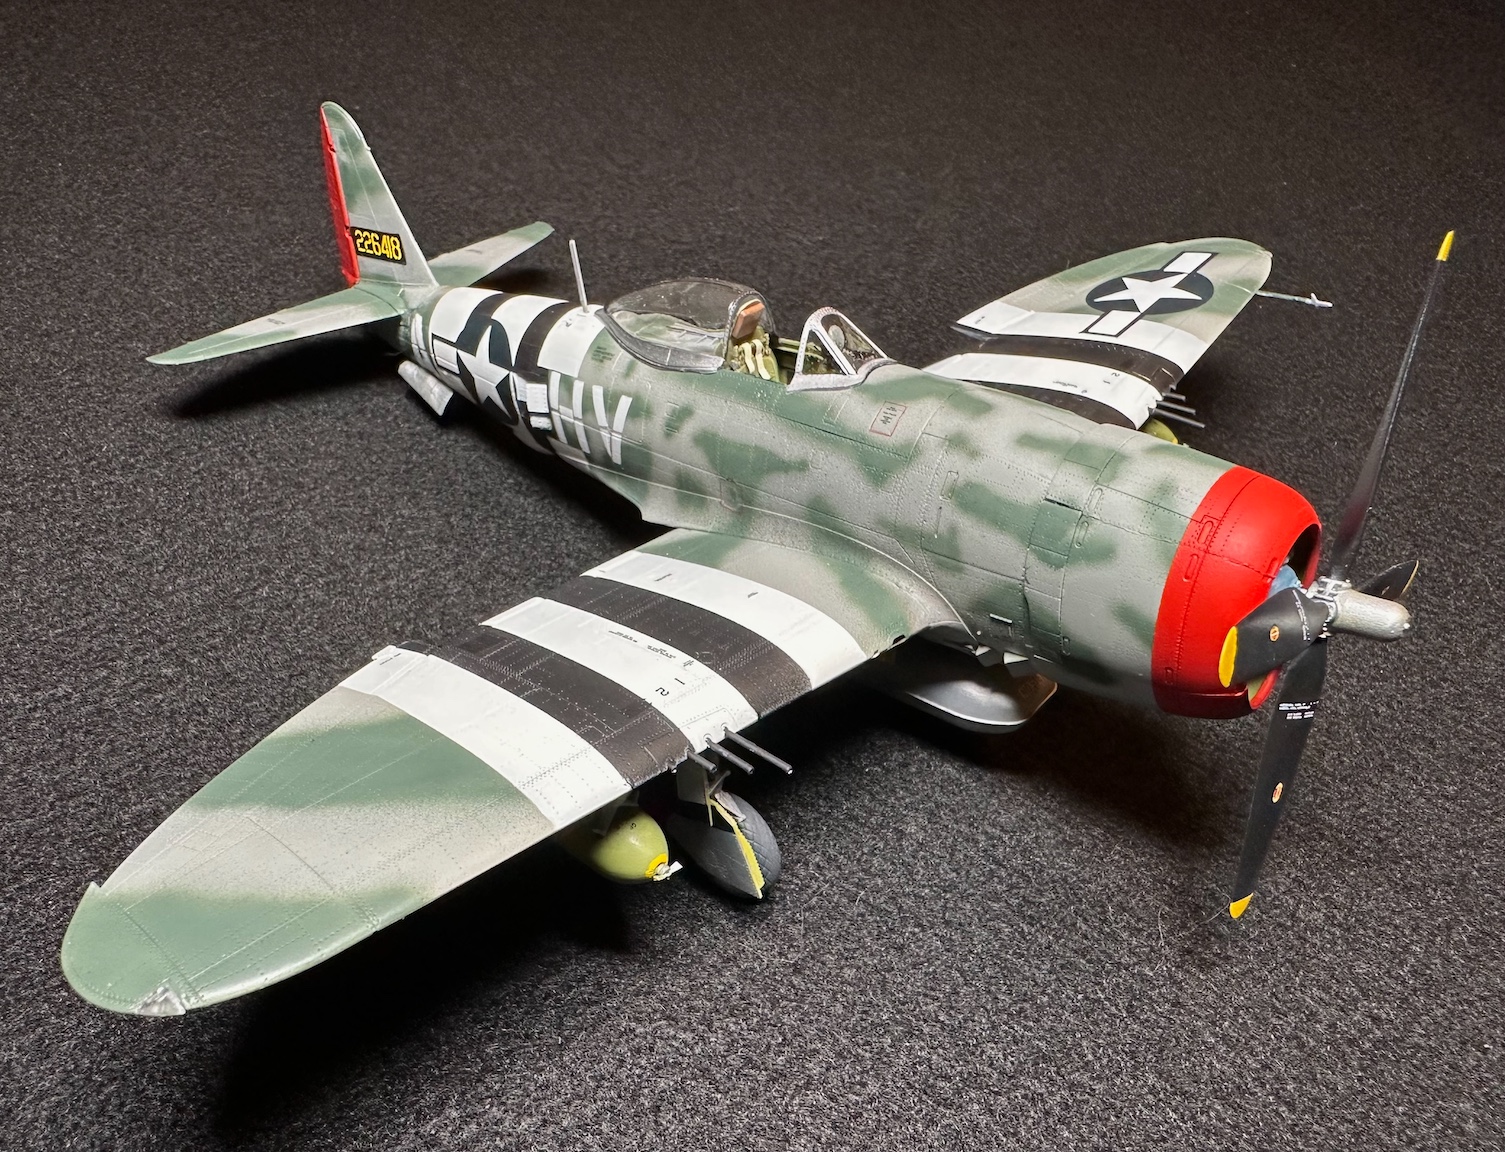
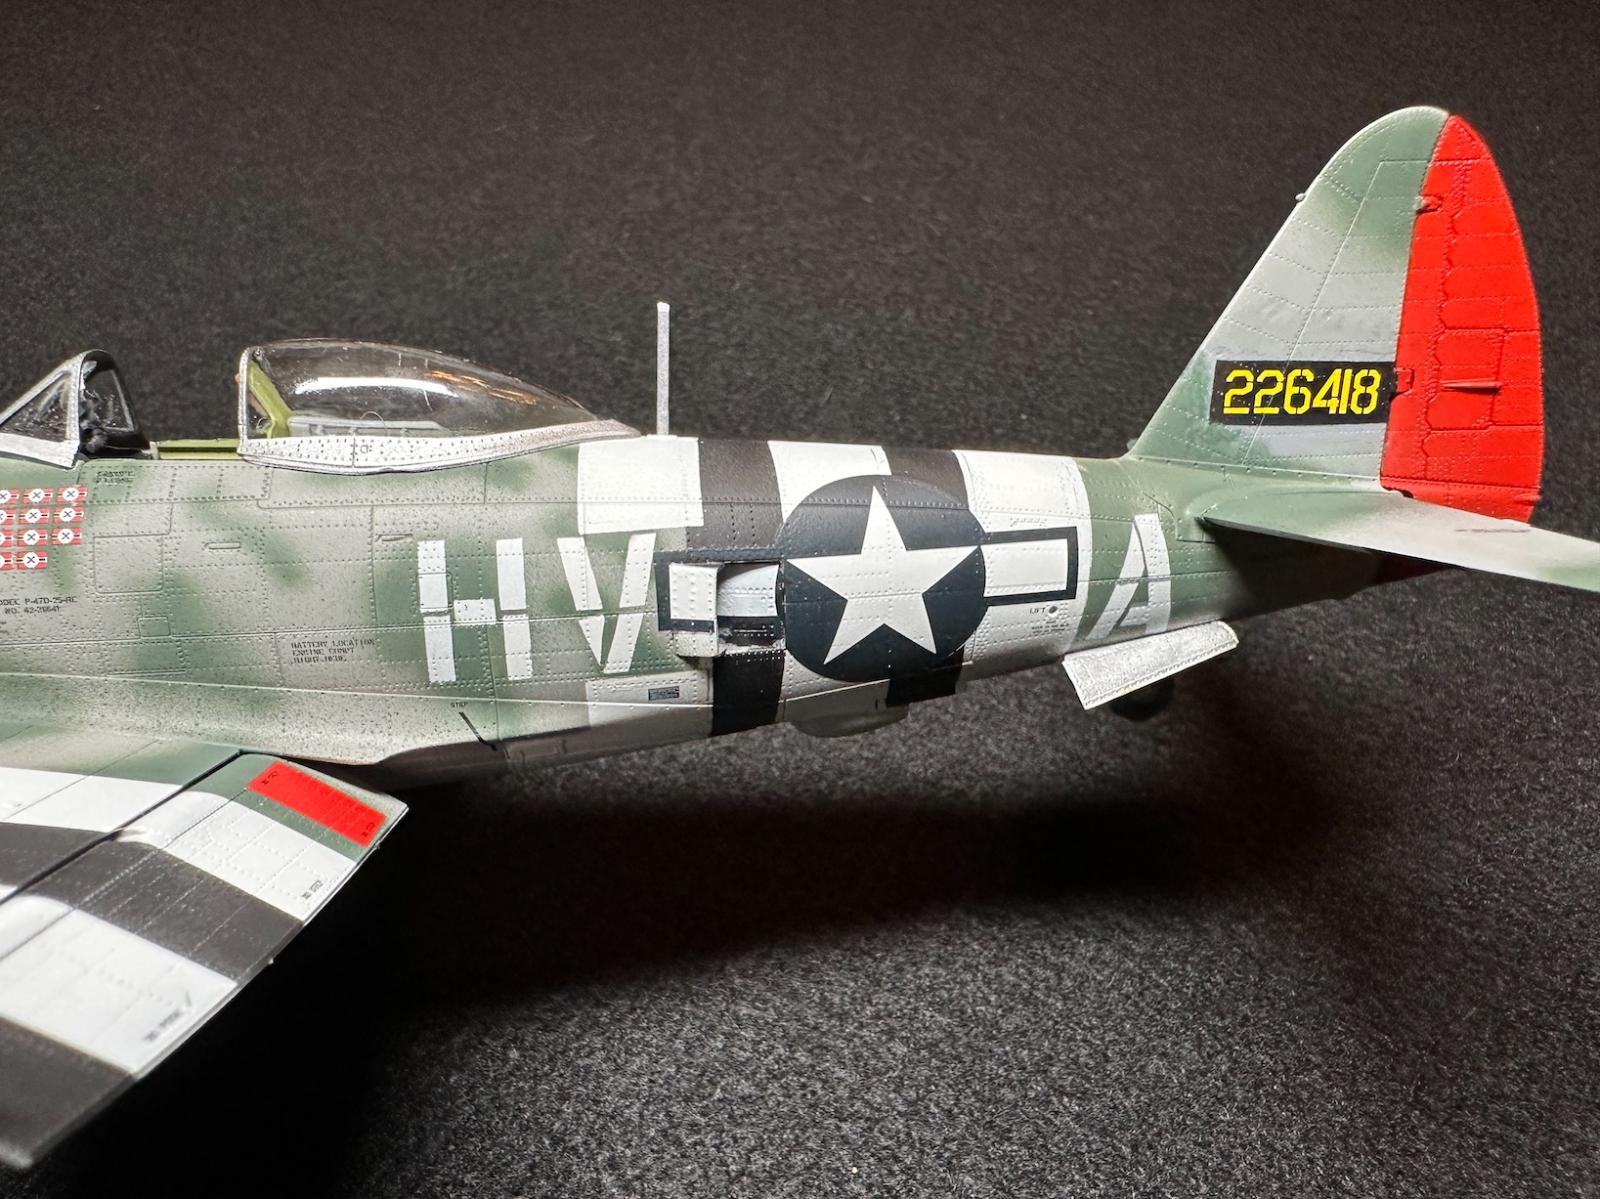
The major consideration is which colors to use for the overall camouflage scheme. I have yet to find good color photos of Gabreski aircraft.Every modeler choosing to replicate the Gabreski a/c is going to confront the issue of what colors should I use?My internet search brought me to any number of artist impressions of what his a/c might have looked like and I must admit these renderings provided a beginning point for my model painting approach. I began this research using the one well known available color photo of the armorers loading the .50 caliber ammunition into the port wing. I chose two base colors: AK Real Colors’ Medium Grey (#RC 249) and Dull Dark Green (#RC 230).While I looked at several other colors, including RAF Ocean Grey (#RC 288), British Dark Olive Green (#RC 286), and British Dark Green (#RC 042), none seemed to match what I saw in both the instruction rending nor those in several of graphic artist depictions.The bottom color remains a mystery, though most often called out as a bare aluminum (and sometimes a lighter grey).I have used Vallejo White Aluminum (#77.706) and feel this matches what I have ‘guessed’ for the overall bottom color.The front cowl piece and rudder were both painted with Real Color Signal Red (#RC 005), the canopy mask in AK Real Color Aluminium (#AK 479), while the invasion stripes are painted in AK Flat Black (#RC 001), ordnance in Green FS 34258 (#RC 233), and the propellor tips with AK Yellow (#RC 007).
I also attempted to use several of the available black and white images as well as references. Most of these images provide a picture of a well-worn and splotchy paint job. One additional bit of color information is available in the form of a vintage Kodachrome image of Schilling’s ‘Hairless Joe.’ While small, this image clearly illustrates the overall grey and green camouflage for another P-47D at that time and provides a significant photographic reference for modelers.
I also used a very small amount of Vallejo Plastic Putty (#70.401) to fill in where small seam gaps appeared. However, I suspect you may be pleased with the extremely tight fit around the wing and elevator area and realize that even a small amount of paint will fill this areas.
Before painting my models, always lay down several layers of Alclad’s Aqua Gloss Clear (#ALC 600).This ensures that I have a smooth glossy finish and prepares the model for subsequent decal applications. I am often ask about Aqua Gloss Clear which in the bottle appears to be about the 2% skim milk consistency—once it’s applied to the model, it dries perfectly clear and is imperious to subsequent washes and oils or other coatings. I used a small amounts of Walters Solvaset #904-470 and Microscales Micro Set #MI-1, which provided the decals to snuggle down and fit tighter when dry.
My painting included a small amount of pin washes, using 502 Abteilung Brown Wash #ABT080. I completed my dry brushings, using my regular Winsor & Newton’s Artist Oil color Naples Yellow Light, No. 426. I completed my model with a final finish using Testors Dullcoat Lacquer (#1160).
Decals
There are three sets of markings laid out the modeler to choose from and this is where the ‘plot thickens.’ These include an a/c from the 56th FG flown by Capt. Frederick Christensen Jr.(‘Rozzie Geth II’), 78th FG flown by Capt. Ben Mayo (‘No Guts, No Glory’) both a/c in overall metal and invasion stripes and Col. Gabreski’s 56th FG in an upper camouflaged fuselage and invasion strips.
Hawaiian Air Depot
I want to note that this MiniArt kit review is closely related to the Hawaiian Air Depot masks which started me on this kit review as the project involved many large masking approaches, each of which was made easier with the HAD masks. They provided a set of masking tools or templates to assist in the often-tedious task of masking your P-47 model. Enter the Hawaiian Air Depot company. Along with the masks themselves, owner John Ferdico includes several B&W images of Col. Gabreski’s aircraft as a welcome reference. I recommend that you include these masks in your painting and finishing your P-47D.
Overall Evaluation
This is an excellent kit and builds into a terrific model. In any respect, it has set a new bar in terms of the of details available to any P-47D fan. The attention to details, surfaces and overall quality are excellent. And, at the msrp, means that we all benefit as modelers. It isn’t a stretch when I recommend this kit for all fans of the famous jug.
The MiniArt P-47D Advanced kit was purchased by me and as you can see, I have become a fan of their efforts with this kit.


Comments
Add new comment
This site is protected by reCAPTCHA and the Google Privacy Policy and Terms of Service apply.
Similar Reviews