
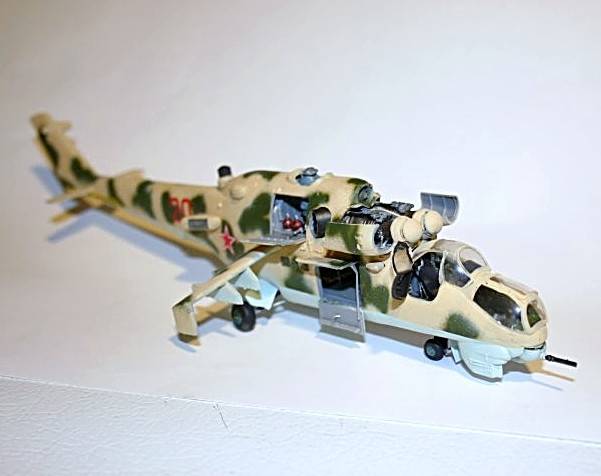
Mi-24V/VP Hind E
The Helicopter
The Mi-24 has been in service with the Soviet/Russian air forces since 1972. The design is interesting in that it has three engines; another tri-motor to add to the list. The 24 has undergone a number of redesigns, and the early versions had a much different cockpit setup. The Russian Air Force has announced that it will replace its 250 Mi-24s with newer more capable helicopters, starting in 2015.
The Mi-24 is nicknamed “crocodile” by the troops. The Mujahedeen in Afghanistan called it "Shaitan-Arba" (Satan's Chariot)". The Hind is unique in that it can carry 8 troops and weapons at the same time. Huey gunships had to have the seats removed to allow for ammunition and extra fuel storage. The crews didn’t think much of carrying the passengers, as they became a liability if the pilot had to do extreme maneuvers and return fire.
Hinds have been involved in 21 different conflicts, ranging from Soviet Afghanistan from 1979 to the present (the Polish contingent currently has 5) to the current Libyan Civil War, where both sides have a few.
The number of users prevents a complete list, but Wikipedia lists 58 current users, from Afghanistan to Zimbabwe, and 10 former users. Interestingly, the US is on both lists. There are 7 privately owned Mi-24s in the USA, and the US Army had several which were used for adversary training.
While working on this project, a number of folks said that I should look at the scene in Rambo III where a Hind appears. Well, most of us could pick out the Texans made to look like Zeros at Pearl Harbor, but the Puma with added winglets managed to fooled us.
The Kit
The kit includes 6 sprues, 5 gray, one clear. There are a lot of small parts in there! The large decal sheet gives markings for three helicopters, two Mi-24Vs in Afghanistan in 1982 and 88 and a VP of the Baltic Fleet at Kaliningrad in 2001. The instruction sheet is 12 A4 size pages, with 35 major assembly steps, and 23 subassemblies. So be aware that this is not a weekend kit. It has a lot of fiddly little parts and some fit issues. I would classify this as a “craftsman’s kit”, one which requires a modeler to have skill, time and patience.
Construction
As I started this kit, I ran into a paperwork problem. I would start working on parts, and I’d have to stop, page back to the color codes in the front of the instructions, then go back to my spot in the assembly. I overcame this by making my own color reference sheet, which I could then find (somewhere on the bench) and look up the color codes.
One nice thing about all of those parts is that whoever did the part numbering used the position on the sprues for part numbers. So part F23 is right there between F22 and F24. When you’re dealing with hundreds of small parts spread out over 5 sprues, this is a real plus.
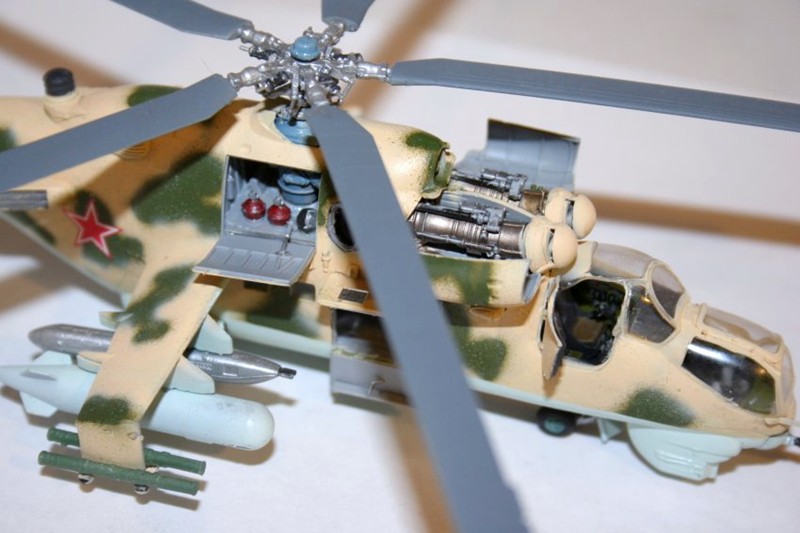
The project begins with the interior. This is truly a wonderful piece of engineering. It is gorgeous, and goes together with only a few adjustments needed to make things fit. The decals for the cockpit fit the spots they belong in (don’t laugh, it happens that sometimes they
I sent an e-mail to Dragon and Zvezda, and they replied promptly. The color is supposed to be a dark reddish brown. They know about it, and will fix it. You can’t ask for more than that. Thanks Dragon/Zvezda.
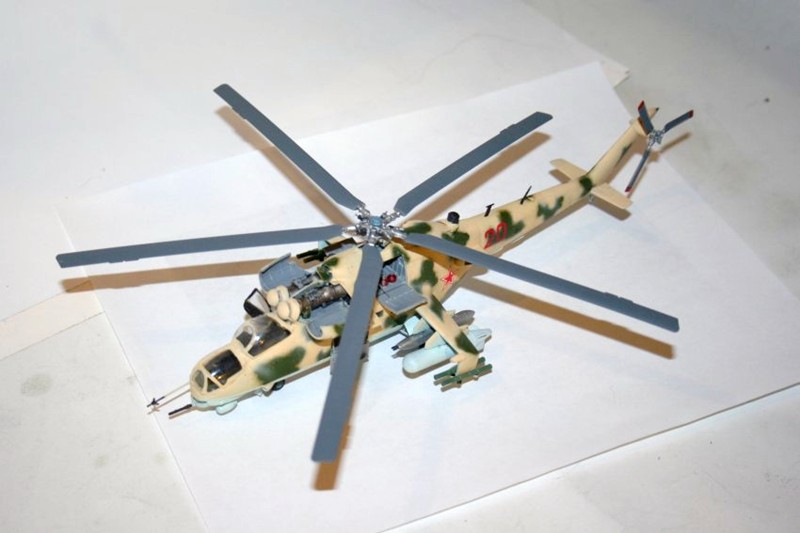
With the interior finished, I was ready to continue. And this is where I ran into the biggest problem of the whole project. I glued the interior into one of the fuselage halves, and then put the other fuselage half in place. Huge mistake on my part. I should have dry-fitted the interior to both fuselage halves and checked fit before applying any glue. The interior was too large, and the fuselage halves failed to meet by about 5mm. Trimming, filing and sanding brought the interior down to where the fuselage halves fit, but I lost some of that wonderful interior detail. I didn’t do anything with the crew figures because I wanted to display the Hind with all those access doors open to show off the interior. You wouldn’t see the crew wasting their time sitting in the cockpit while the maintainers had all the doors open and parts lying around.
With the exterior in place, I was ready to begin painting. I had just finished putting on the base yellow coat for the bird based at Djelalabad in 1992 when John Noack sent me a real gift, the Eduard mask for this kit. I’ve also got a review of the mask elsewhere.
I was able to install the cockpit clear parts and mask them at this time. My original plan was to do the glass separately and install it after the green splotches and blue undersides were done. The mask allowed me to paint the canopies in place, making for a much better looking attachment. The mask did arrive too late for me to install and mask the back windows in the cabin, as they were blocked by the interior.
I also temporarily installed all of those maintenance panels and doors, using white glue. This allowed me to match the green splotches as I airbrushed them.
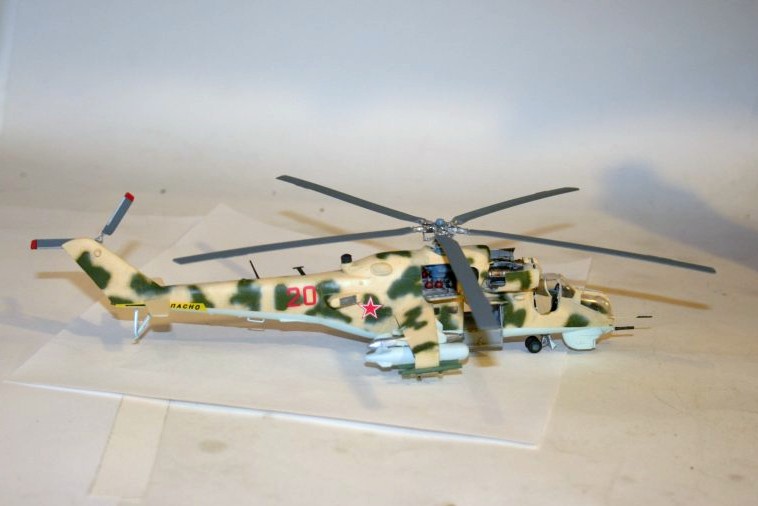
Once I had the paint applied, I put on a coat of Future and applied the markings. The decals were of good quality, they came off the paper quickly, and I was able to adjust them without wrinkling or tearing any of them. The markings are also pretty thin and have a glossy finish, which means a final application of flat acrylic makes them look painted on.
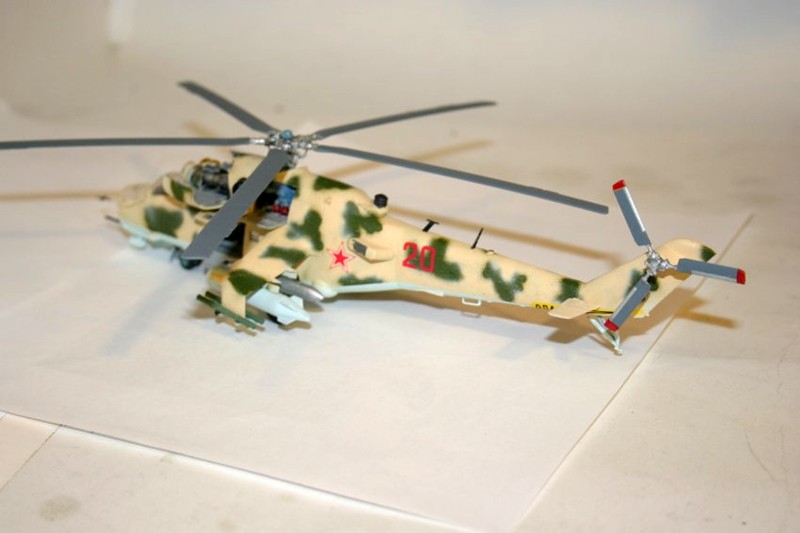
I then spent several sessions opening the maintenance panels and gluing them in place, putting on the landing gear and doors, then adding the gun, the antennas, the rotors, the armament and the pitot. Finished!!
Overall Evaluation
Recommended for the experienced modeler with patience. Except for the fit with the interior vs. the fuselage, there were no huge problems. You can’t hurry through the assembly; it has to be taken slowly and carefully. The ability to open all those doors and panels and show off the interior is a huge plus for this kit too. Someone could win trophies with this kit “out of the box”. Zvezda didn’t take short cuts by combining parts into an assembly, like putting the pilot and the ejection seat as a single part.
And since I didn’t use the crew, I’m happy for that.
Thanks to Dragon USA and Zvezda for the review kit, and to John Noack for his patience while I whaled away at this project.


Comments
Add new comment
This site is protected by reCAPTCHA and the Google Privacy Policy and Terms of Service apply.
Similar Reviews