
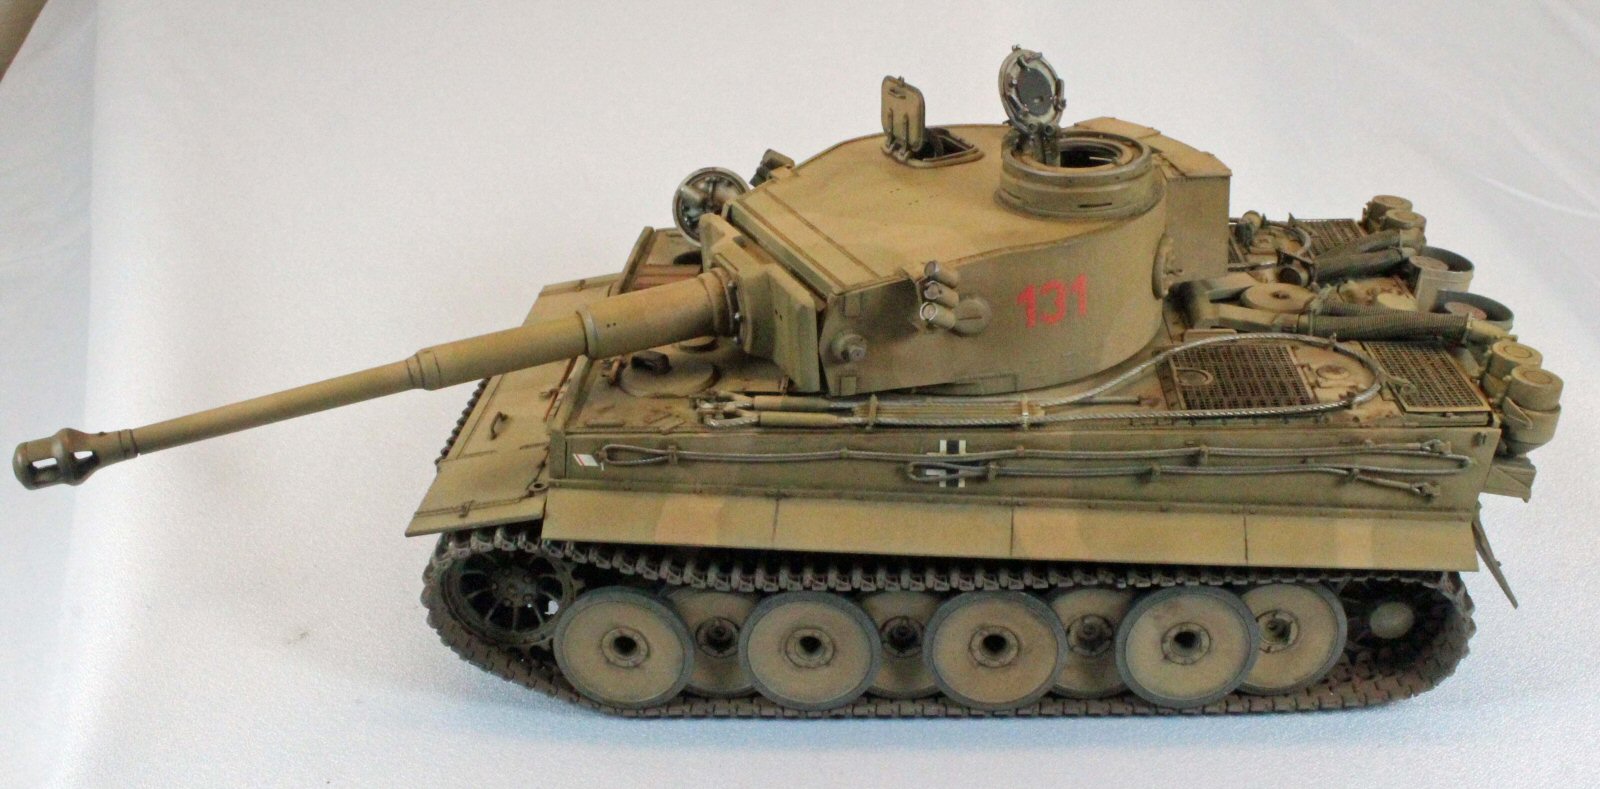
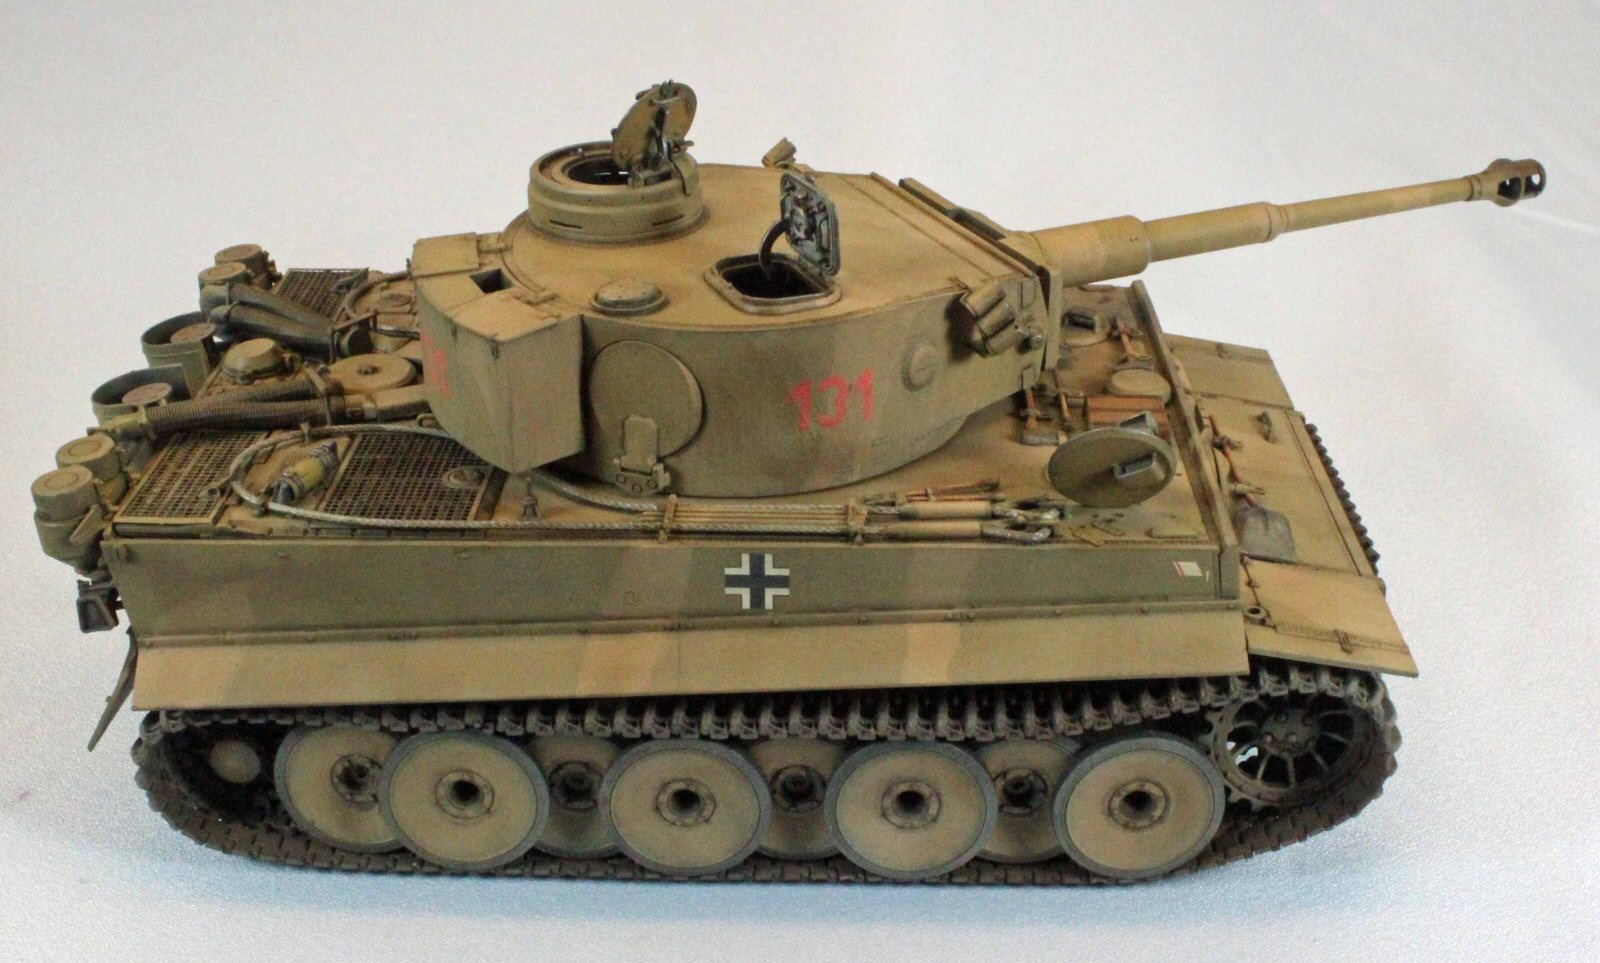
Tiger I - 131 s.Pz.Abt.504 Tunisia Smart Kit
Dragon Models offers up yet another premium early Tiger I kit for German WWII armor enthusiasts; this time with the famous ‘131’ vehicle captured in North Africa. This particular vehicle was shipped to Tunisia between 12 March and 16 April 1943. The tank was assigned to No. 3 Platoon in No. 1 Company of the 504th Schwere Heerespanzerabteilung (German heavy tank battalion) during the North African Campaign. It bears the turret number 131 by which it has come to be known. Preserved at The Tank Museum in Bovington, England, it is the only operating Tiger tank in the world.
Knowing that the Allies were preparing a major push towards Tunis, the Germans launched a spoiling attack on the night of 20/21 April 1943. Four points were attacked simultaneously, including a pass on the north side of a hill called Djebel Djaffa. Two Tigers and several other Panzers advanced through this pass before dawn, and were gradually driven back during the day. Tiger 131 was hit by three shots from British Churchill tanks of A Squadron, 4 Troop of the 48th Royal Tank Regiment. A solid shot hit the Tiger's gun barrel and ricocheted into its turret ring, jamming its traverse, wounding the driver and front gunner and destroying the radio. A second shot hit the turret lifting lug, disabling the gun's elevation device. The third shot hit the loader's hatch, deflecting fragments into the turret. The German crew bailed out, taking their wounded with them and leaving the knocked-out (but still drivable and largely intact) tank behind. Their identity and fate are unknown. The tank was secured by the British as they captured Djebel Djaffa hill.
This tank was used in the 2014 film Fury, the first time a real Tiger has appeared in a feature film since Theirs Is the Glory (1946) and They Were Not Divided (1950).
The kitted version is the early production Ausf E, sporting smoke dischargers, the prominent cupola, exhaust hoses, and other distinguishing features of the early type. Dragon has packed the box with a wide array of options as well, and includes DS track again to help those who feel slightly track-challenged.
Opening the Box
All of Dragon’s Tigers come with enough parts to completely fill a sturdy box and then some. There are extra parts on nearly every sprue for your stash, including pioneer tools, wheels, gun mantels, track links, road lights, etc, etc., etc..
The contents of the box include:
- Lower hull packaged separately.
- 25 sprues in soft, light grey plastic, most packaged separately.
- 1 clear plastic sprue
- 4 photo-etch screens (engine exhaust mesh), individually wrapped.
- 2 runs of yellow-tan DS track
- 1 8-page blue and white instruction sheet with 19 steps
The kit comes with three color schemes represented, using blue-and-white ink, three-view drawings. A small (but perfectly registered) sheet of decals from Cartograf of Italy includes the following units:
- s.Pz.Abt. 504, Medjez el Bab, Tunisia, April 1943
- s.Pz.Abt. 502, 2nd Battle of Lake Ladoga, March 1943
- s.Pz.Abt. 505, Ukraine, Spring 1944
The Instructions
This is a ‘fortified re-box’, so there are sprues from several Dragon Tiger kits included in the box. This results in a slightly-confusing parts map (three sprues marked M, two V’s, two P’s, two C’s, etc.), but Dragon-kit builders should be used to this by now. The duplicate sets of sprue letters are conveniently distinguished with different colors (blue and black) throughout the instructions to assist the builder in any case.
Things to Consider Before Building
The three build options represented by the three color schemes are labeled (a), (b) and (c) – (a) being the Tunisia 131 version - throughout the instructions. In some cases the differentiation is vague and busy; care must be taken to avoid adding (or omitting) features for your specific build.
That said, the Tiger is a pretty straight-forward tank to build. Chassis, fenders, main deck, turret, gun, hatches – it’s all there. There are an abundance of options (18) even though this is a representation of a specific vehicle. As a consequence there are some up-front decisions to be made, mostly with hatches and wheel alternatives. You’ll need to decide whether you will build your tank in travel mode or combat mode as well.
There is a Balkan cross decal that goes underneath the track-cable on the port side of the hull. By selectively applying glue I was able to attach the cables before painting and then slip the decal down behind the cables once the paint was dry. You may want to simply attach the cable after applying the decals, but then you will need to match the cable hardware color with the background paint.
The area beneath the fenders is un-obstructed so the DS track can be attached late in the build without any problems. You can build the entire vehicle before painting, with the only exception being the interleaved wheels if you want to paint the tire portions separately. I left the outer layer of wheels off until final assembly to simplify this task.
The Rear Hull and Suspension
The early Tiger sports two large exhaust stacks and Dragon has a fiddly design for the tops of those stacks (Parts G15/16). After producing so many different Tiger kits I would have hoped Dragon could come up with a slicker way of designing these.
At the other end of the spectrum, the design and engineering of the interleaved wheels and hull structure is brilliant. Everything fits perfectly and fits only one way.
I’ve seen the two prominent exhaust covers offered in PE before, but those in this kit are made of reasonably thin plastic and look fine.
Step 2 brings the impressive wheel assembly together. Dragon allows you to build your Tiger in transport mode or combat mode. Use the closed caps (Parts G12) for the transport mode, and open caps (Parts G11) for combat mode. The open caps allow you to attach the outer wheels (Parts G5/G6 in Step 3). Disregard the instructions for attaching the open caps in Step 2 – they are actually made to attach to the back of the outer wheels (Parts G5/G6) in Step 3.
You can adjust the tension of the track by moving Parts B26 forward or aft. I chose the center position, although the tightness of the DS track makes me wish I had moved these forward to allow more track sag.
When you’re done, the hull feels solid and heavy – very Tiger like.
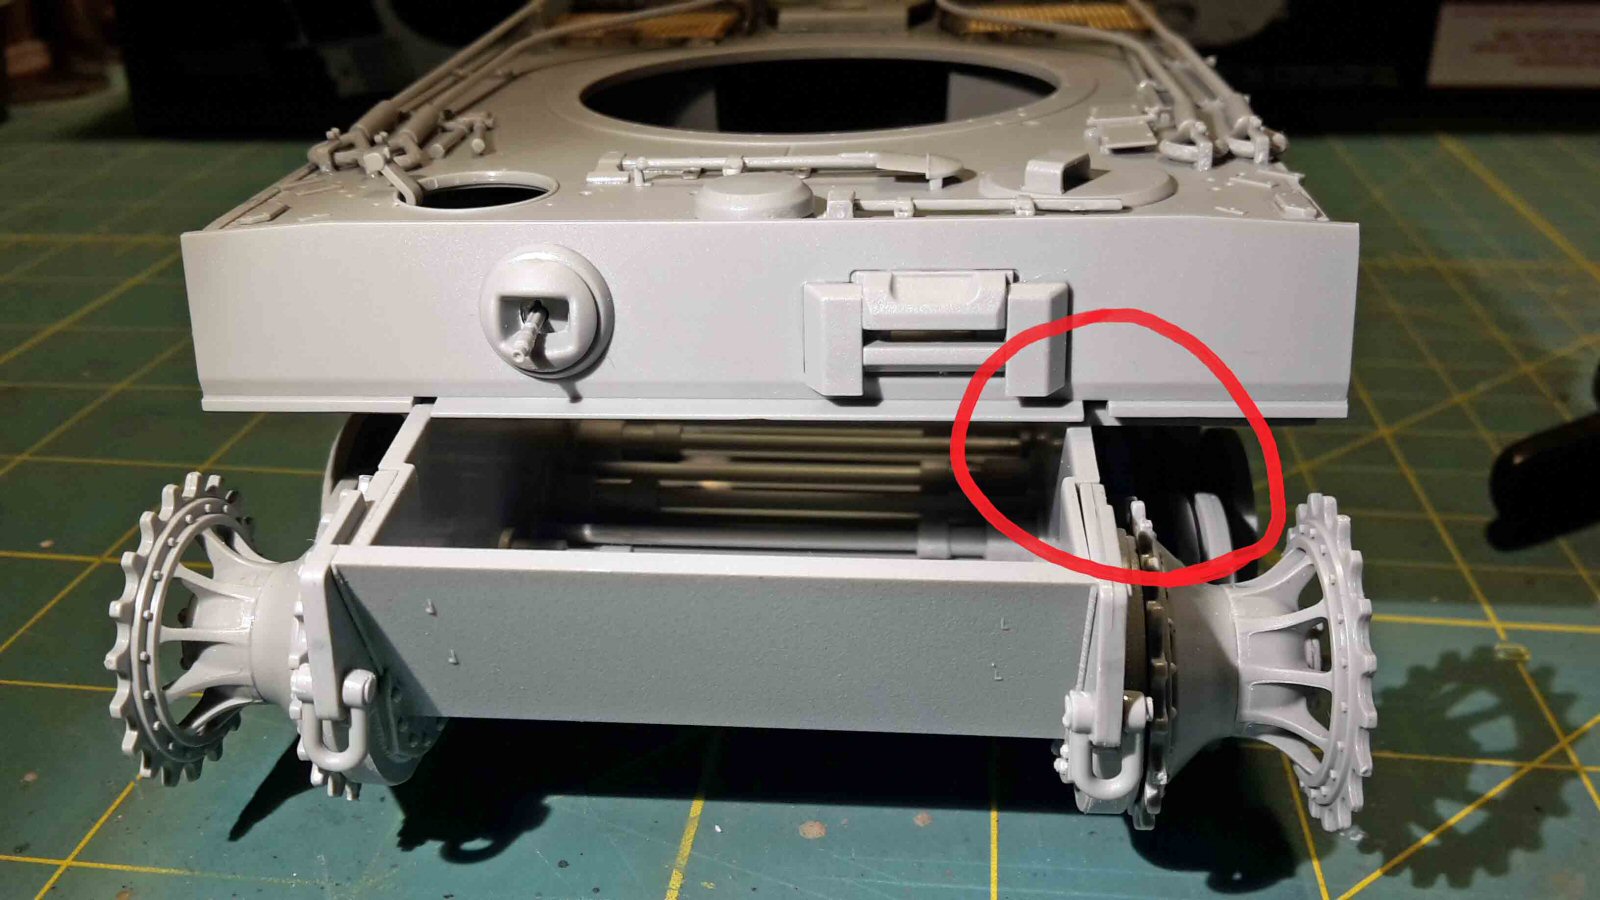
Dragon is forever tinkering with the design of the jack assembly. This time the jack is attached to the rear hull via two ‘U’ shaped parts that need to line up exactly with the four holes they go into to. I lined them up as well as I could and let the assembly dry completely before snapping the jack into place. I give them an A for effort here.
The Engine Compartment
Dragon’s Tigers usually offer some nice detail under the engine intake area and this kit uses those same parts, including some nice photo-etch. Impressive, but hidden unless you choose to pose the engine intakes open, which is offered as an option.
Note: In Step 6 – (Two) Parts G24 appear to prevent the proper fitting of the main deck down onto the top of the lower hull. I ended up snipping these parts off – I suggest that if you are going to close up the engine compartment, leave these two pieces off since you can’t see them anyway.
The Main Deck
Dragon includes some nice PE screens for the engine intakes. I painted the area beneath the screens flat black to insure that grey plastic won’t be visible under the photo-etch.
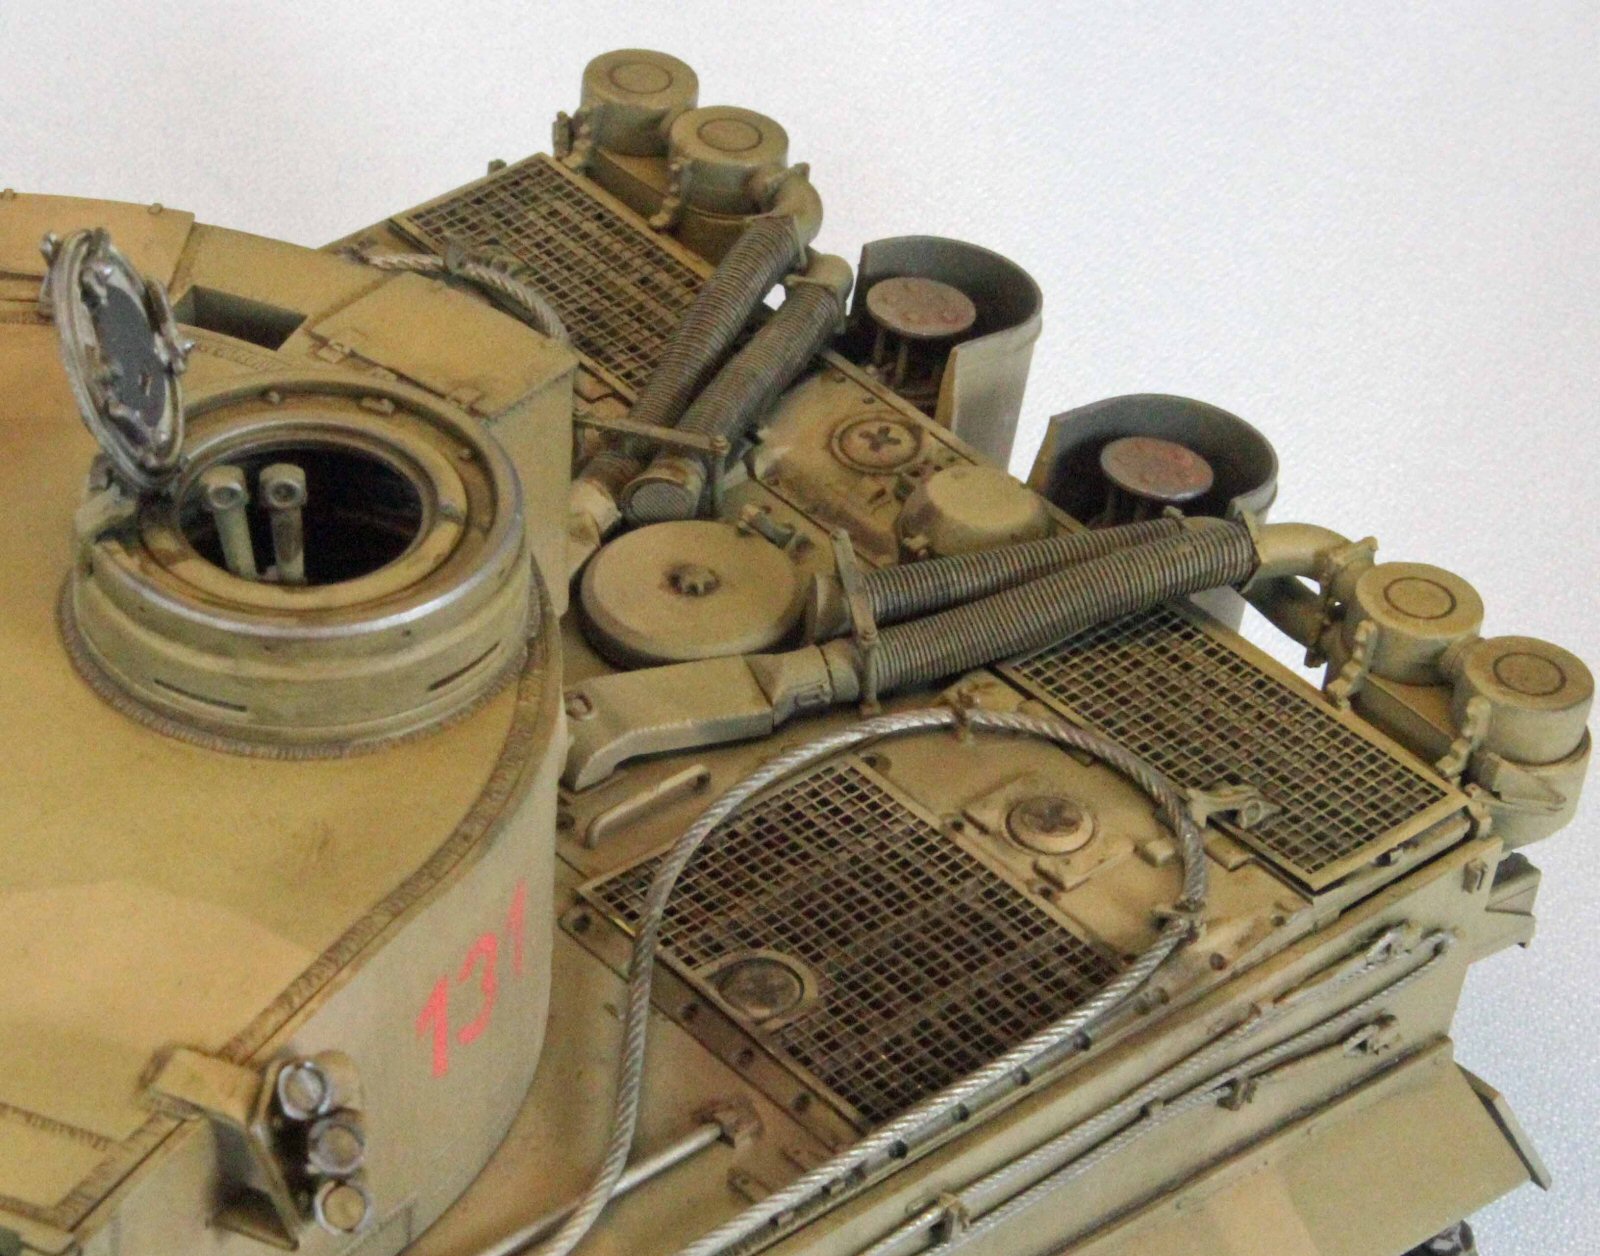
If you build the Tunisia version, there are four nicely molded exhaust hoses that snake back to the rear of the vehicle. You begin assembling these in Step 9, but things are somewhat tricky since they have to end up attached to an air cleaner on each side – items that won’t be built until two steps later (Step 12). I decided to skip assembling and attaching these until I knew the orientation the ends needed to be in.
As a consequence, I suggest using the following procedure, starting in Step 9:
- Attach the front armor plate (Assembly B) to the main deck.
- Attach the main deck to the lower hull (see note re: *Warped Hull, below).
- Attach the 4 photo-etch screens to the rear deck.
- Assemble/attach the two air cleaners, one on each side of the rear (see Step 12 and note re: **Air Cleaners, below).
- Assemble/attach the four exhaust hoses to the rear deck and the air cleaners. (see note re: ***Hoses, below)
- Attach the front of the two tow cables and secure them with the 2 front brackets (Parts C17 that appear in Step 10).
- Let everything dry fast.
- Return to Step 9 and assemble/attach everything else through Step 13.
* Warped Hull – On my sample kit, the main hull was slightly warped inward (see image labeled ‘Warped Hull’). I put one thick piece of sprue between the inner sides to hold them straight, but it ‘bowed up’ after a few minutes. So I strengthened the support with two more pieces, and that seemed to do the trick.
** Air Cleaners – These attach more to the hoses than they do to the main hull at this stage. I glued them on the hull with Testors (black bottle) liquid cement to give me some working time. With the hoses in place, the cleaners should attach on at the top only, with the bottom being left in mid-air, parallel with the rear of the tank. On my sample, the starboard-side air cleaner was obstructed by the jack just below it – I ended up moving the jack down just a little.
*** Hoses – The longer set of hoses needs to attach to the upper nipple of the air cleaners, so the bend in the hose needs to raise the hose ‘up’ to that height – this is not clear in the instructions. The (shorter) set of hoses rest on two nubs, and needs to fit underneath and within the brackets (Parts M12) added later.
In Step 9, the large, thick 2-part grills (Parts D2/D4/D3/D5) are meant to be posed open or closed, swiveling on tiny pins on each side. A portion of the main deck interferes with attaching them from underneath, however, so I had to scrape off the pins and drop the two grills into place from the top.
Also in Step 9, the unidentified (but nicely molded) round-end shovel appears, magically, in the image next to the axe.
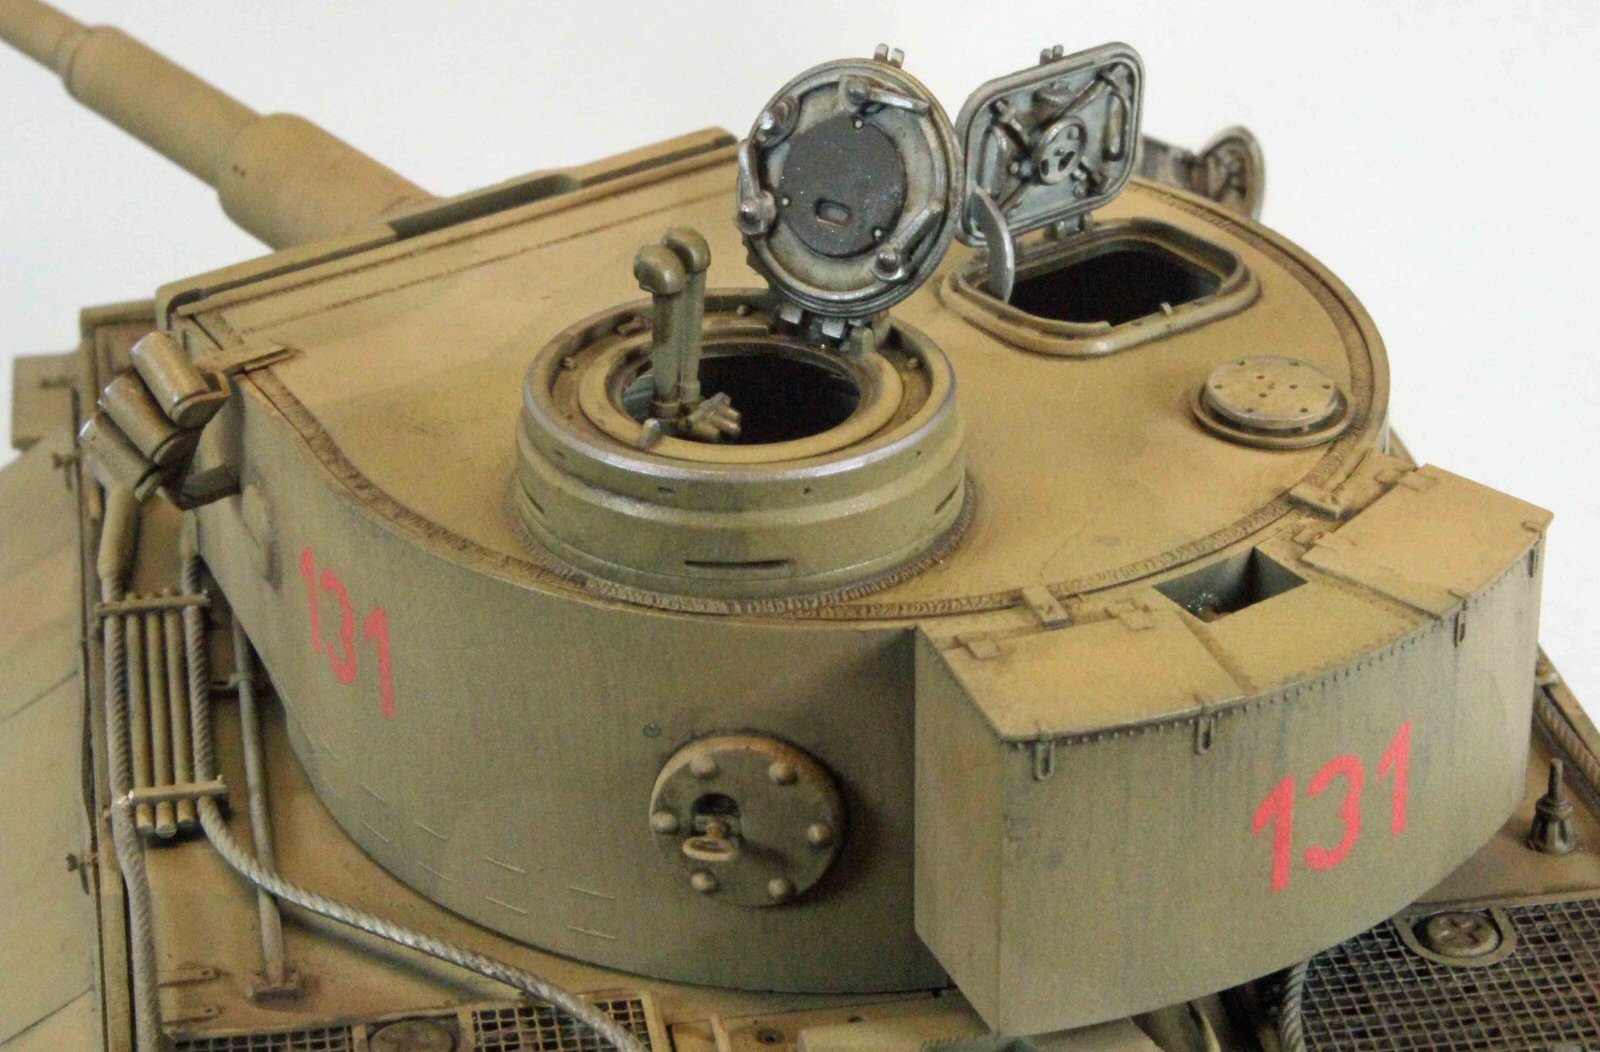
Hatches
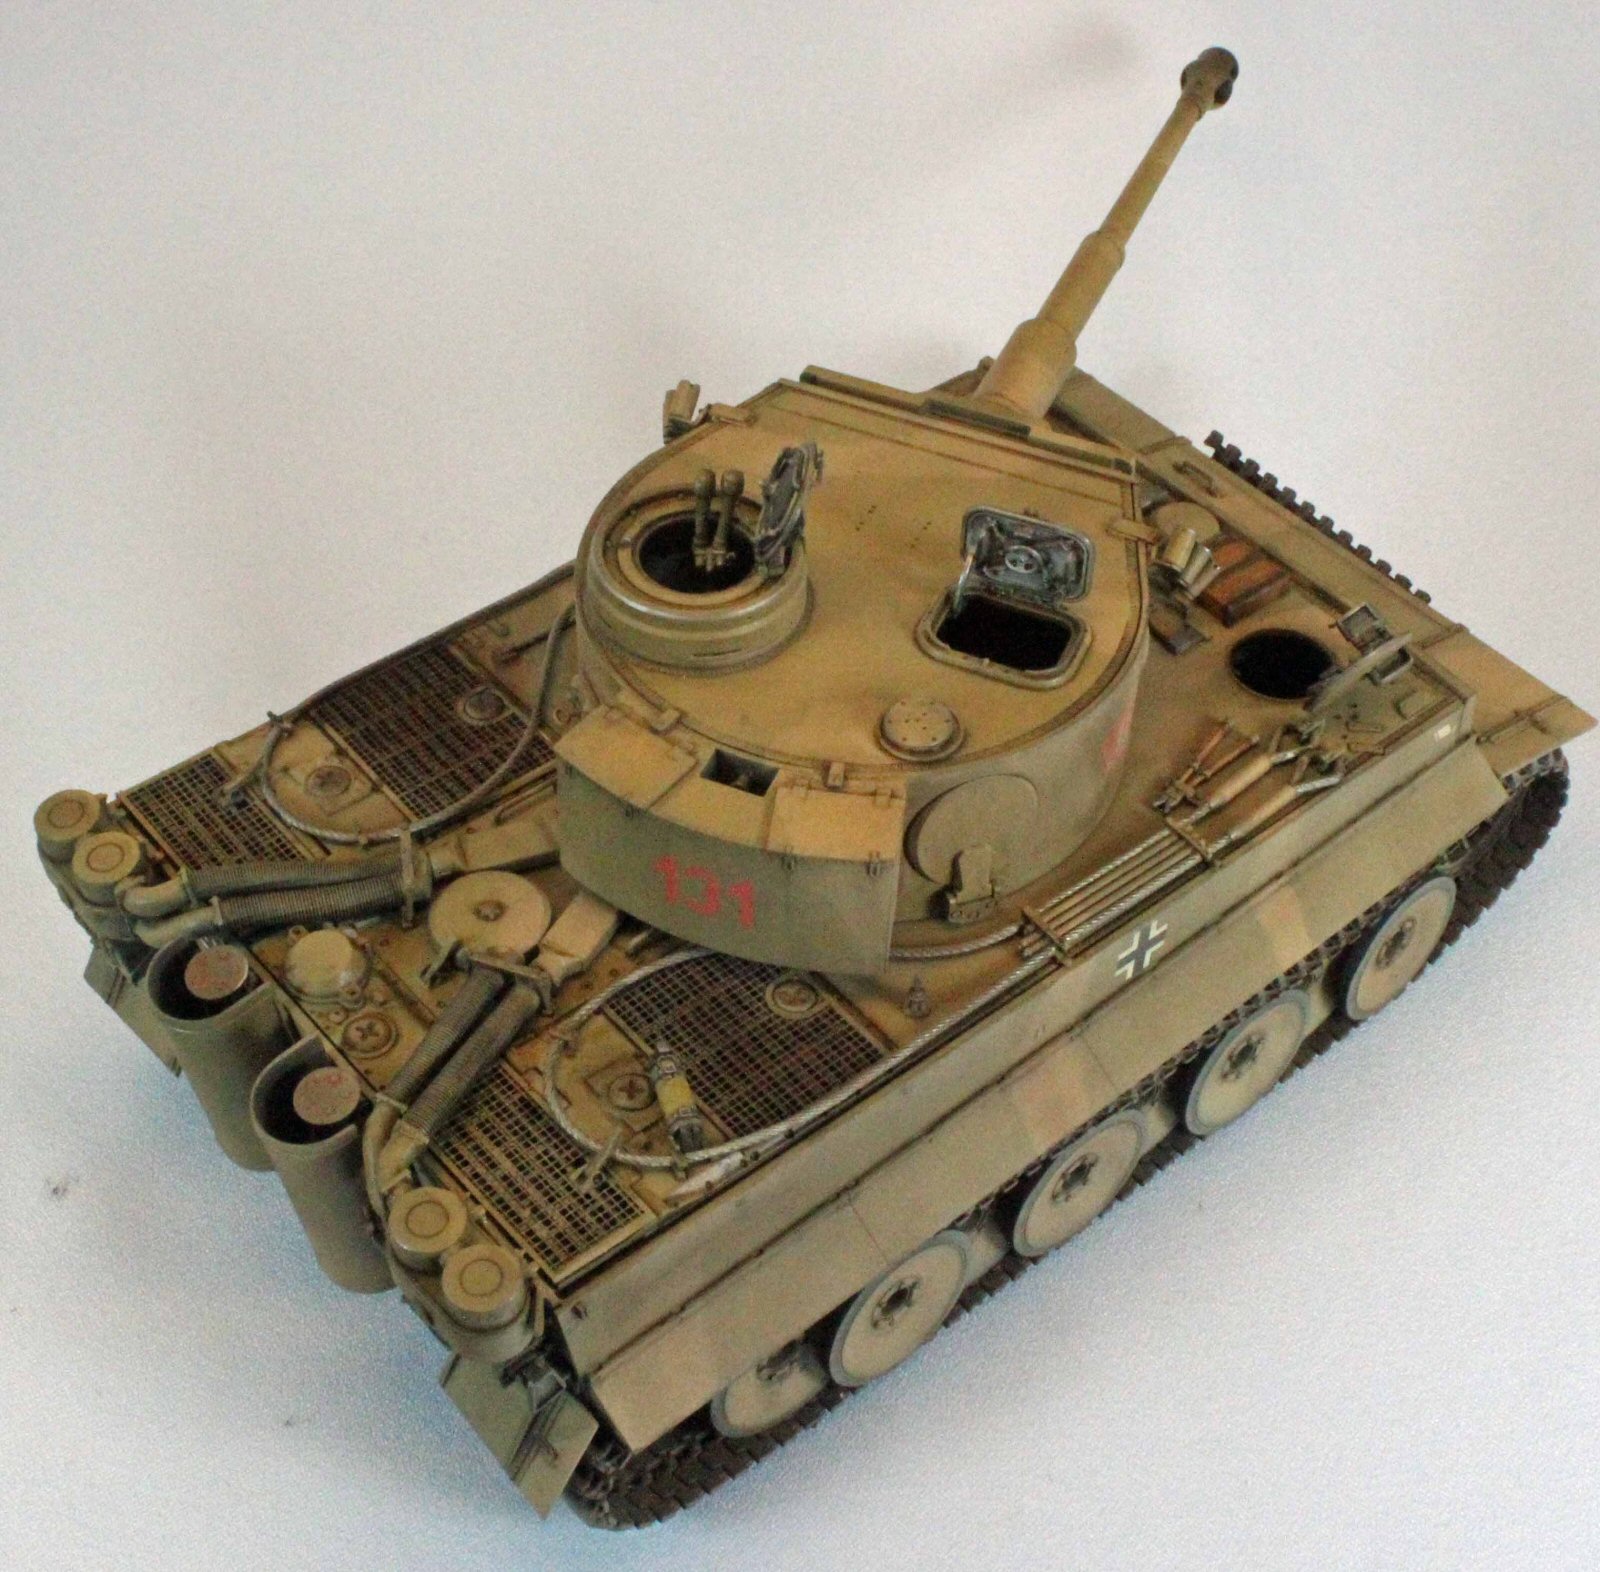
As with most other Dragon kits, all hatches can be positioned open or closed. The interior of the hatches is beautifully detailed and prominent if the hatch is posed open.
Part of the hardware on the commanders hatch incorporates a sliding bar that is positioned based on how you glue down the hatch. I wanted to attach the hatch later (after painting and weathering), so I made my best guess at its position and called it done.
The Turret and Main Weapon
The turret ring (Part N24) is a tight fit at the bottom of the turret shell – keep at it. It will fit.
I wanted to pose two of the hatches open, so after putting together the sub-assemblies in Steps 14-17, I stopped to give the visible interior areas a pre-shade coat of Tamiya XF-69 NATO Black, followed by a dusting of Model Master 2104 Panzer Interior Buff.
The seven-part barrel is slide molded and does not sport the gimmicky spring-recoil deal found in some of Dragon’s other Tiger kits, which is fine with me. The somewhat simplified design of the breech and mantlet is also a welcome change from some of the older armor kits from Dragon. Fewer parts, but the detail included is as sharp as ever.
The prominent cupola on top of the turret is a circular ‘sandwich’ of seven parts, but it comes together without any problems.
The Track
The two runs of DS track in this kit are beautifully detailed, and assembly was a snap using Tamiya ‘Green Top’ liquid cement. The track can be painted using any type of paint, although it might be prudent to first put on a coat of primer. I used Rustoleum Leather Brown Enamel Primer, dusted with Tamiya XF-57 Buff and detailed using Uschi’s excellent Chrome Metal Polishing Powder.
The track is attached in the last step, so it can be painted and weathered before gluing it and stretching it over the wheels.
Once the track was on, I applied Testor’s ‘Black Bottle’ liquid cement to the tops of the running wheels and held the track in place with ear plugs and Q-tips until dry, capturing the proper sag of a Tiger at rest.
Painting and Finish
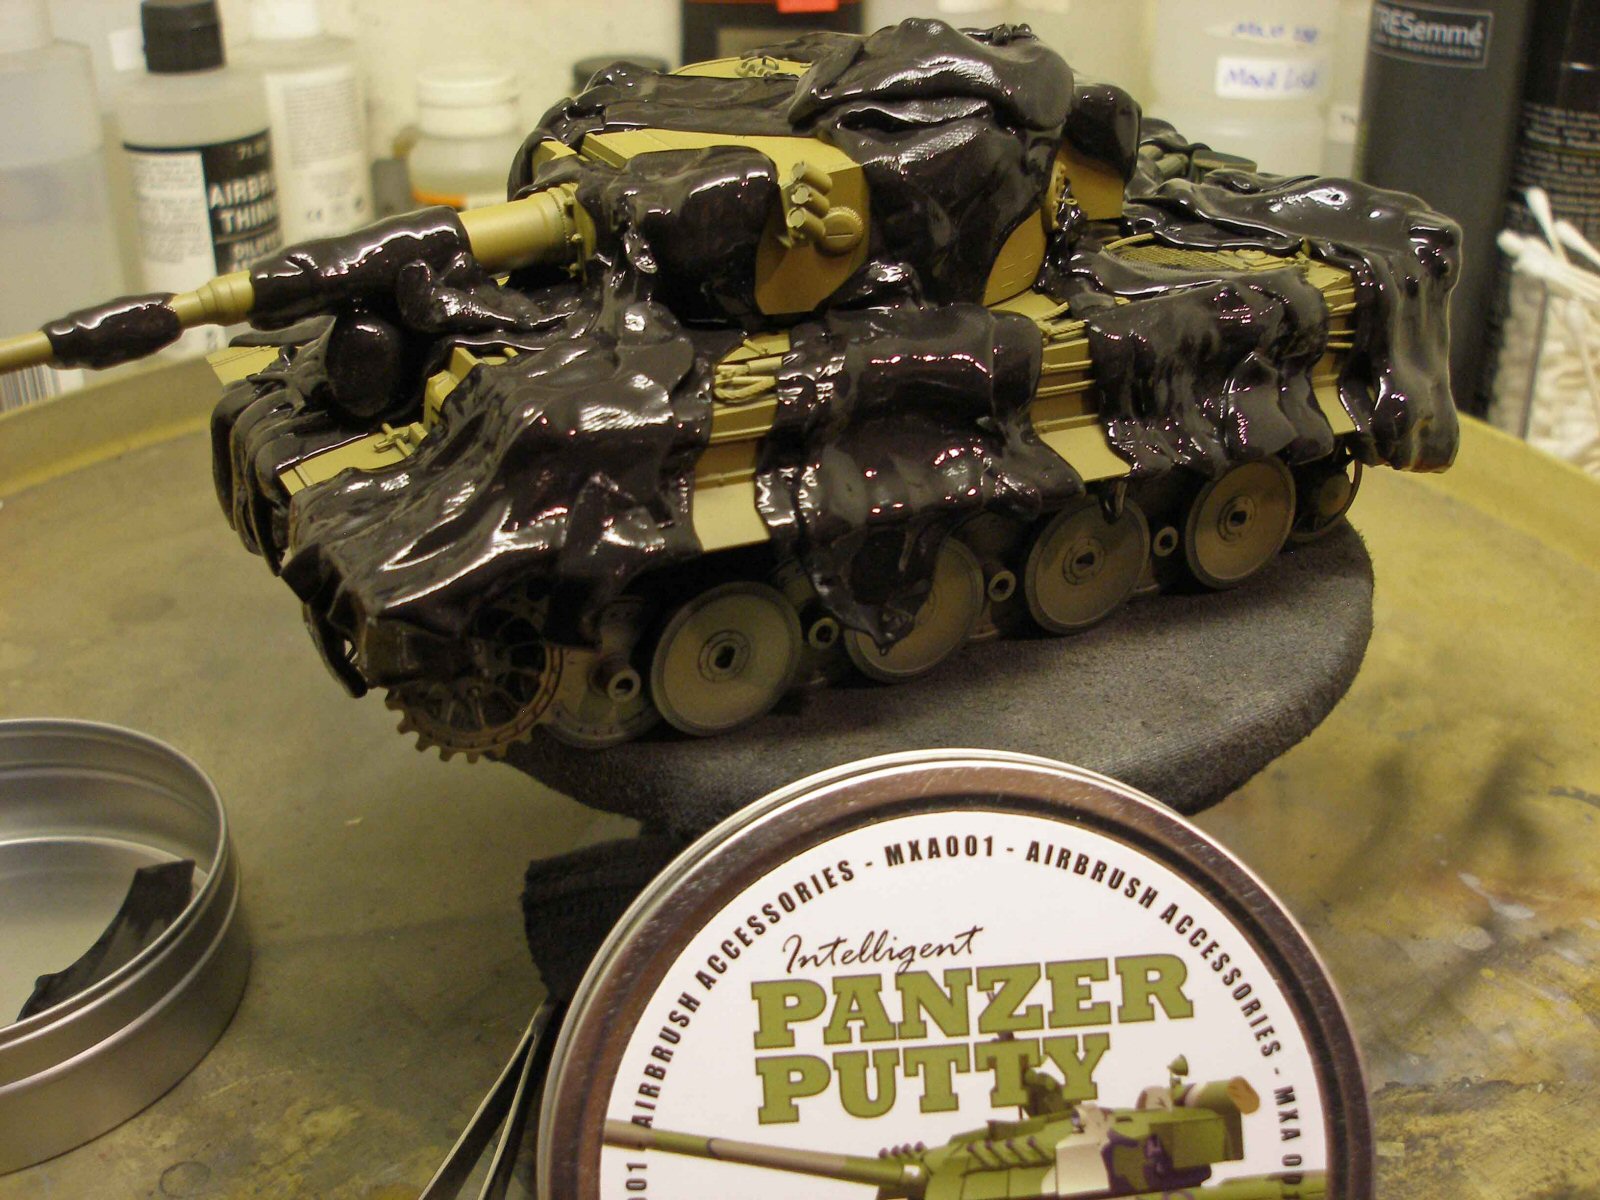
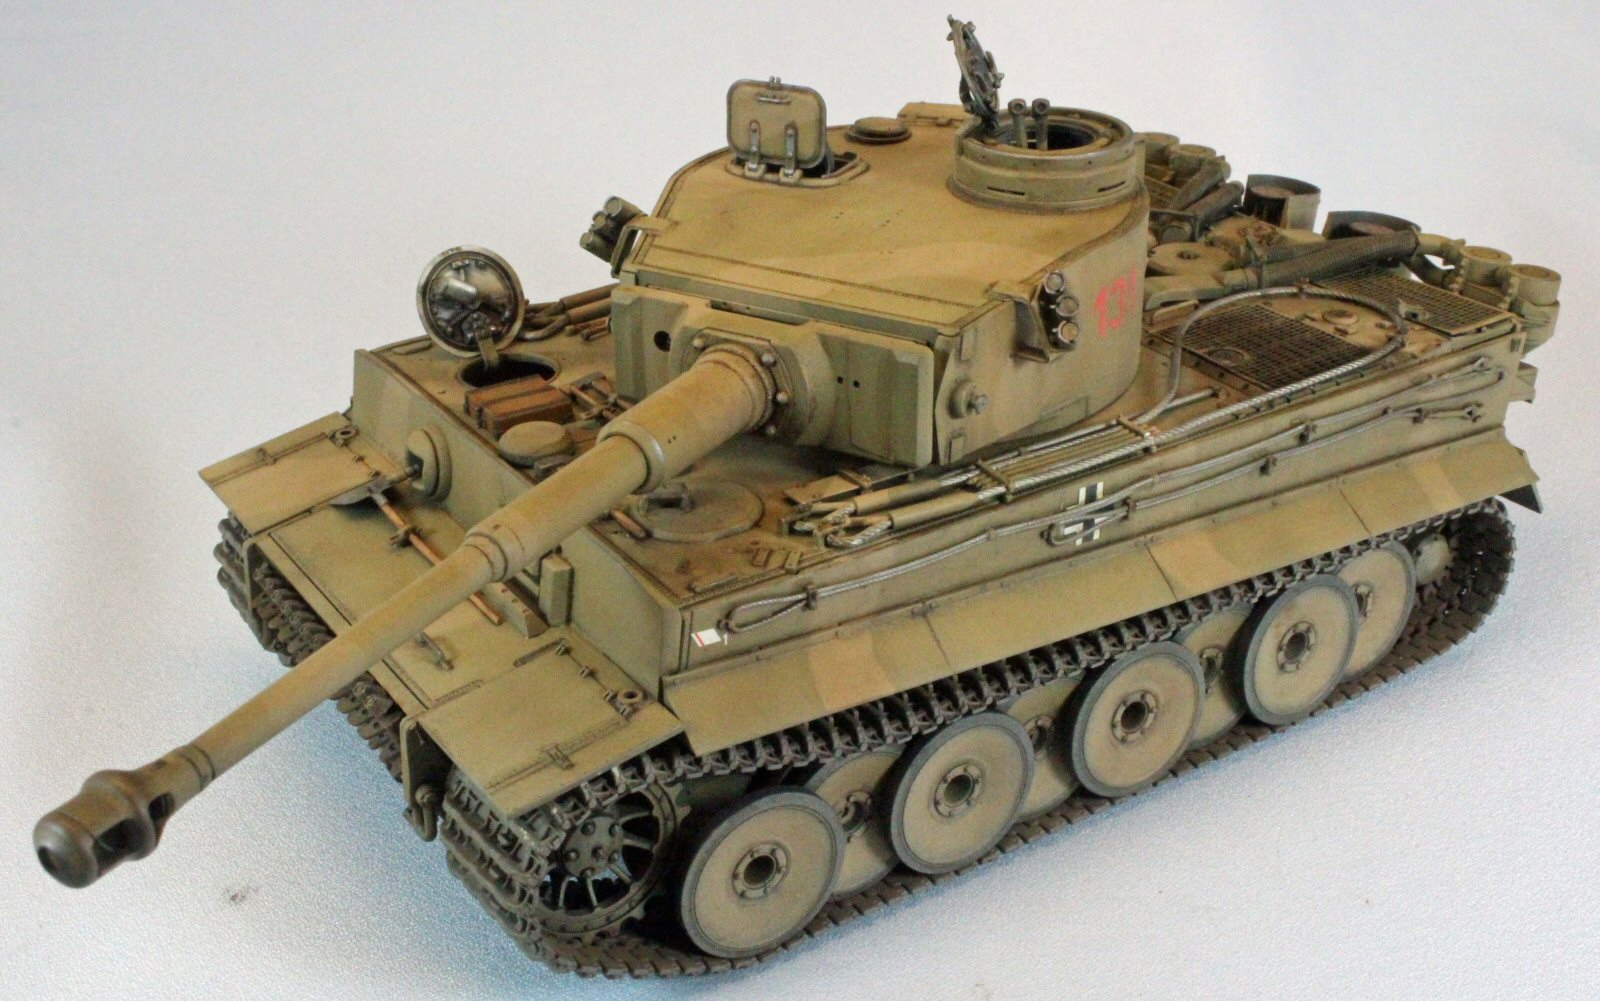
This particular Tiger is famous for a variety of reasons. It was captured early in the war, and since then has been maintained as the only working Tiger in the world. I couldn’t just paint it any old way I wanted - not this time. Doing some research I came across the results of a study of the issue detailed in Osprey ‘Modeling the Tiger 1’ book for the Bovington vehicle. I decided to use the colors listed there, specifically, Vallejo Model Air 71.030 Green Brown for the ‘German Yellow’ color, and Vallejo Model Air 71.024 Khaki Brown for the slightly darker color, arranged in a hard-edge camouflage pattern. The hard edge finish would also allow me to use Panzer Putty again, which worked so well on my British Saladin. Since I modeled three of the hatches open, I had to account for them as well as the open holes in the turret and main deck.
Primer & Pre-Shade
I started by airbrushing a primer/pre-shade coat of Vallejo 73.603 DunkelGrau Ral7021 German Panzer Grey Surface Primer, thinned 50/50 with Vallejo thinner, and a few drops of Liquitex Flow Aid. I’ve never used the Vallejo primers before and the Grey went on beautifully; holding up well over the PE and DS track. One critique – the grey is very dark, nearly identical to the Tamiya NATO Black I normally use. I was hoping it would come out more toward the German grey color.
The pre-shade gives the plastic and PE some grip for the following coats, and fills in the recesses and creates a shadow effect near the flat surface edges, adding depth for the subsequent coats to come.
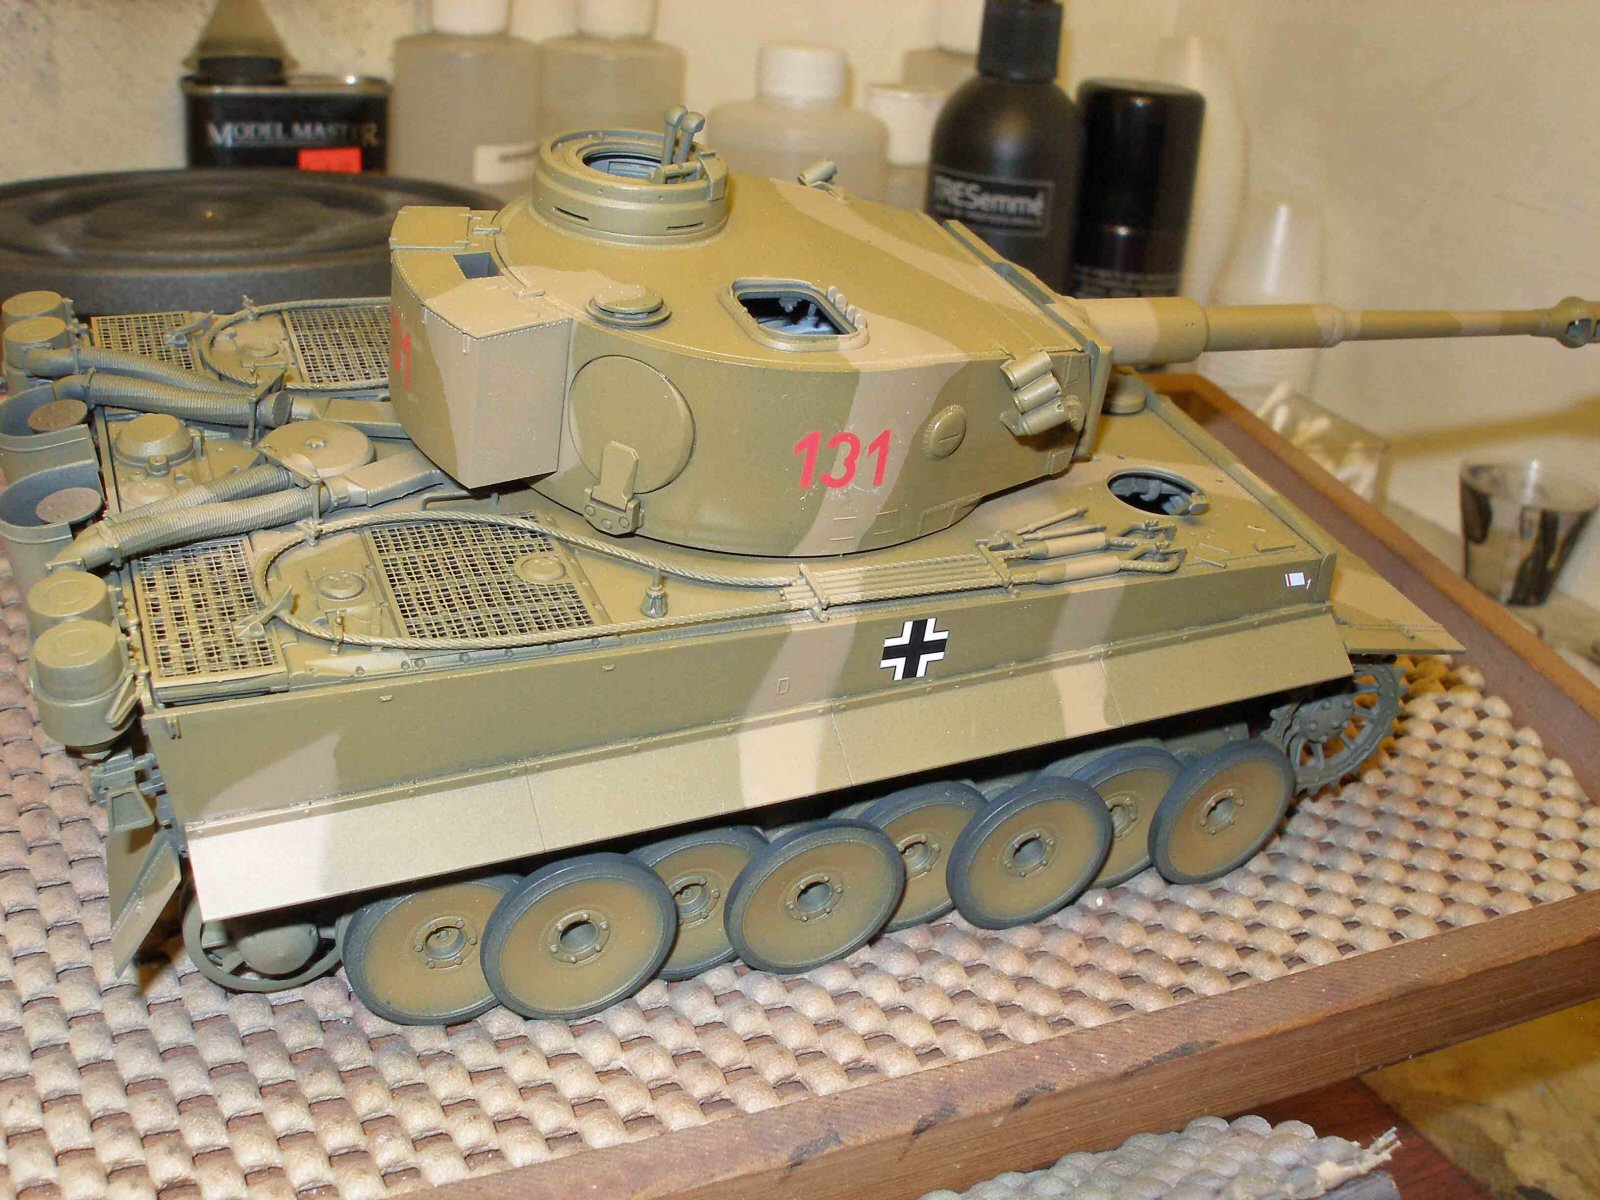
Camouflage
In my eye, the two-color camouflage of the Tiger 131 is so close it’s almost monochromatic – I knew that I would need to add a lot of depth and weathering to make it as interesting as possible. I laid down an initial camouflage coat of the Green Brown, making sure to leave some of the pre-shade showing through along the edges and in the recesses.
After about two hours I went to work with Panzer Putty, a great little product that I picked up last year. The putty has some particular traits that make it perfect for a job like this, especially with so many protuberances poking out all over the place. For one thing, it has zero adhesion to the model, it only sticks to itself. Secondly, it settles down using gravity in about 15 minutes.
Once the putty was where I wanted it to be, I laid down the second camouflage coat using the Khaki Brown. Once the second layer of paint was on, I lifted the putty off in one piece and took a look – everything came out pretty well - the lines are sharp and there are no broken model pieces to be found.
Decals
Once the paint was dry, I hand-brushed Future over the areas that would receive decals and applied them using the Red and Blue Micro Sol/Set system without any problems.
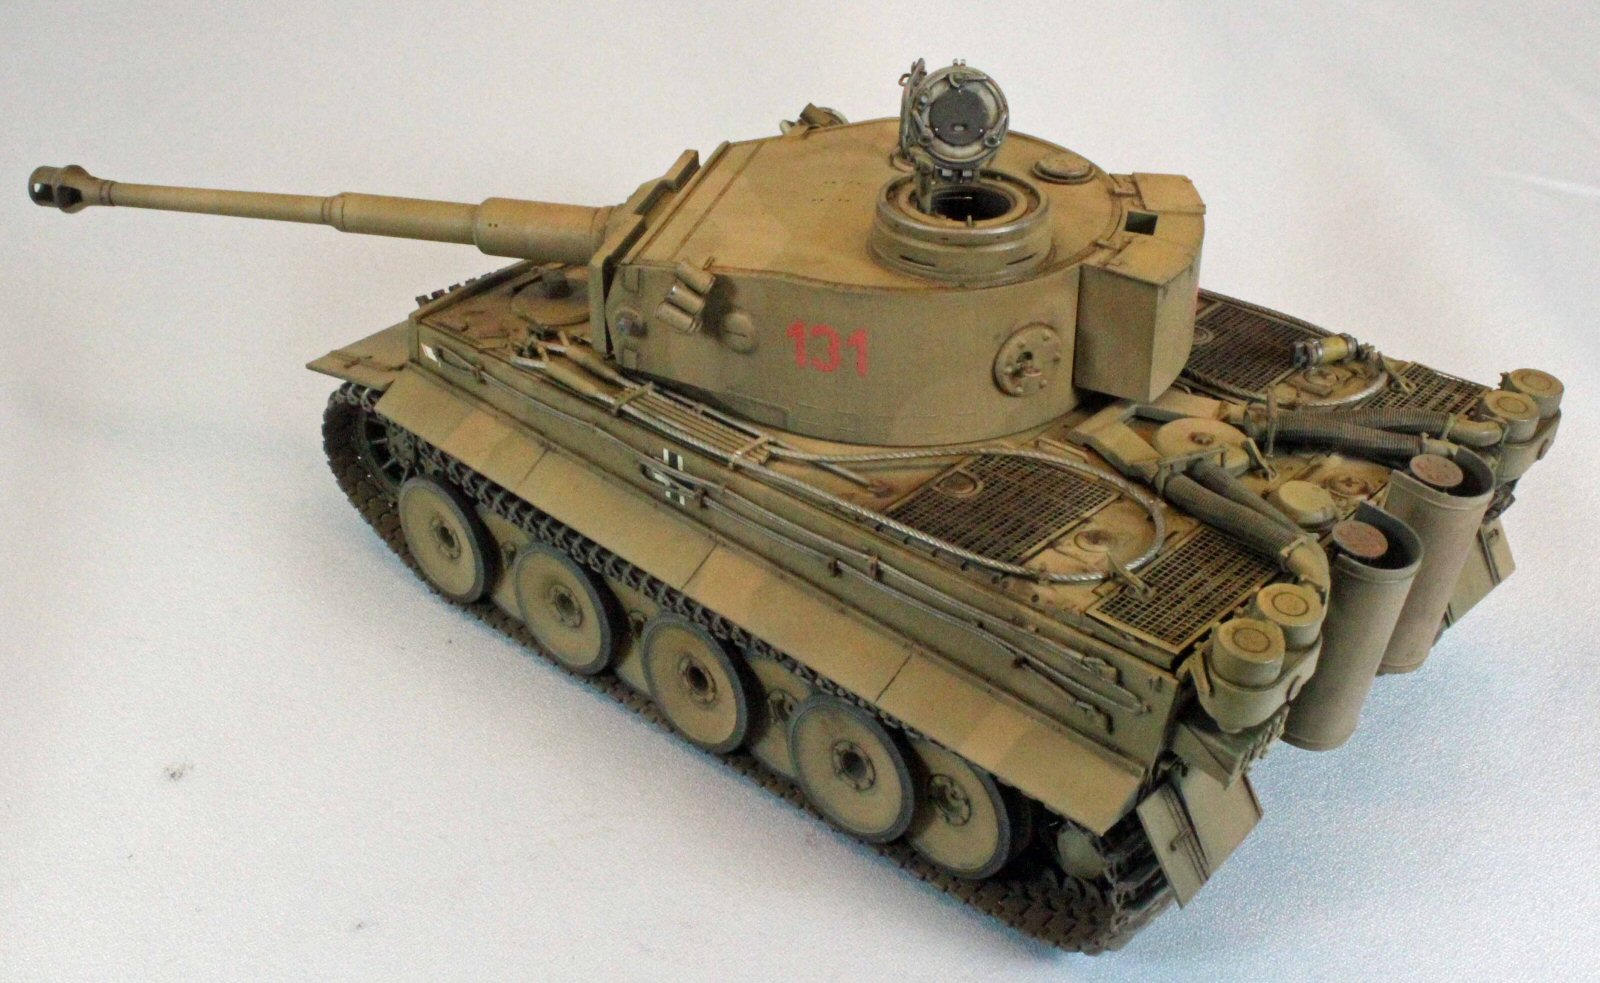
I thought the three red ‘131’ numerals were a little light and bright, so I gave those areas on each side of the turret a grey filter later on to calm them down a bit. I hand brushed Vallejo Matt Varnish over the decals for now, to bring the finish back to flat.
Remaining Details
(Note: For hand-brushing Vallejo paints, I put a drop of Vallejo Slow Dry and a drop water onto an old CD and then single drop of all the colors I need. I mix the colors with the water and slow dry until the paint flows smoothly off a red sable brush.)
I painted the wooden parts of the pioneer tools and the jack block with a 1:1 mix of Vallejo Panzer Aces 311 New Wood and Vallejo Model Air 71.75 Sand (Ivory). Later, once a gloss coat was applied, I brushed a layer of Mig Wash Brown straight for the tube over the ‘wood’ parts, let that dry overnight, and then, in the morning, used a Q-tip to remove just enough oil paint to make them look right.
I painted the metal parts of the tools and the tow cables using Vallejo Model Color 70865 Oily Steel, and once dry, dropped a black wash on them to simulate wear.
I went over the hatch detail first with a brown wash and then with Uschi’s pigment products (Chrome, Steel, Iron), buffing them out with a rubber artists blender.
Filters and Pin Wash
While the surface of everything was still flat, I applied a Mig 110 Black filter on the exhaust piping over the back of the deck, the four screens and the jack. I followed this with a filter of Mig Dark Rust on the tops of the two exhaust stacks.
Satisfied, I gave the entire model a good coat of Future acrylic to prepare the surfaces for a pin wash and some streaking.
Once the Future was thoroughly dry, I gave everything a pin wash using AK Interactive Wash for DAK Vehicles using a small red sable brush, concentrating on the panel lines, recesses, rivets, buckles, on-board equipment, etc. I thin all of my washes and filters using Mona Lisa Odorless Thinner, which will not affect underlying layers of paint.
I then added some streaking using AK Interactive’s Streaking Grime for DAK Vehicles, concentrating on the vertical sides of the hull and turret – anywhere rain and condensation might roll down. The color of this product is a light, muddy gray and can overwhelm the existing base colors so I used it sparingly.
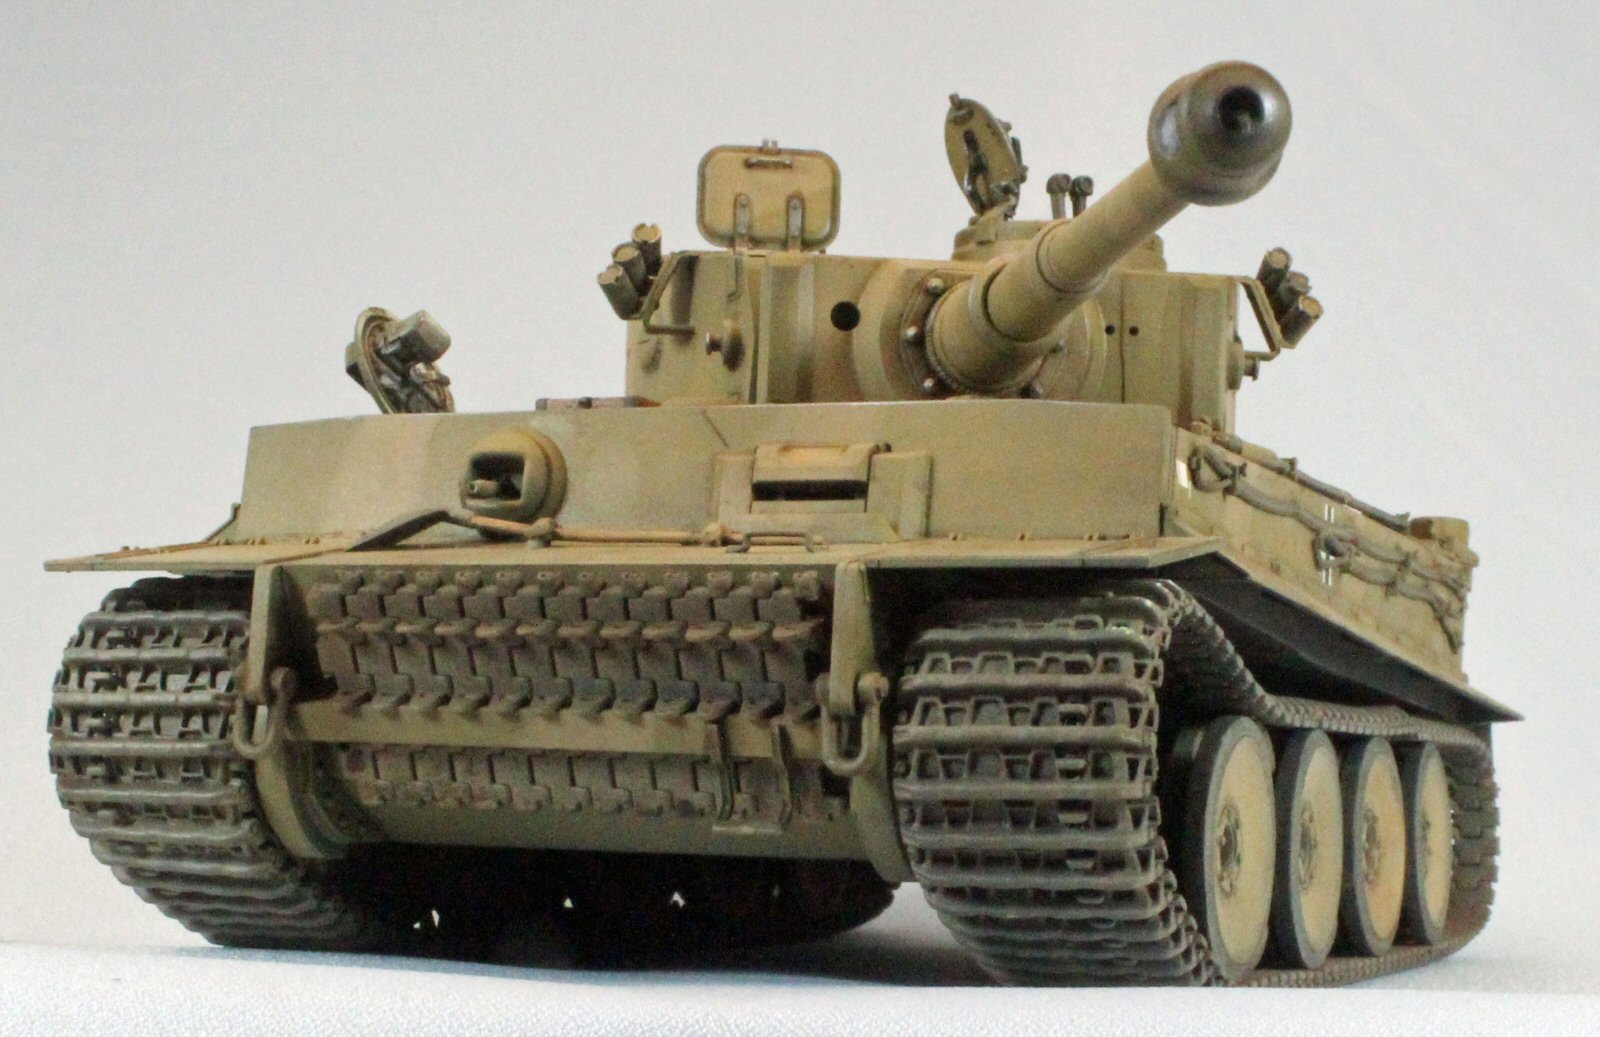
Road Dust and Final Assembly
After attaching the hatches, wooden jack block and fire extinguisher, I applied a ‘road-dusting’ coat consisting of Vallejo Model Air Light Brown, coming up from the ground, followed by a coat of Vallejo Flat Varnish to kill any shiny spots still remaining. I cut each of these 50/50 with Vallejo Airbrush Thinner and a drop of Liquitex Flow Aid to improve flow. Once everything was dry I dusted a mix of Mig Russian Earth and Black pigments on the sides of the armor here and there, as well as the track to roughen the visible surfaces up a little.
Conclusion
The Tiger I is one of the iconic tanks of World War II, and it is no wonder that Dragon has taken on this family of AFV’s to produce some of the very best models on the market. Dragon parts fit, and are beautifully detailed; together making these kits a lot of fun to build.
The design of the some of the parts such as the commander’s cupola and opening hatch hardware is simply brilliant, and in my opinion, the very best available; Dragon sets the bar here.
The DS track has evolved into an excellent alternative to the Magic Track, which itself is a wonderful product.
The slide molding, included in all Dragon kits now, has really improved the detail and build-ability of their kits. This is nowhere more apparent than with their tank barrels which are, in my opinion, a vast improvement over the ill-fitting and hard-to-paint aluminum versions.
And last but not least, Dragon thoughtfully designs their models so that every hatch, door or access panel can be modeled in the open position, with more than enough interior detail to get you started.
I heartily recommend this kit to all modelers who are up to the small challenges that a kit with so many parts and options will offer. If you mark up the instructions beforehand as suggested, and go slow, you shouldn’t have any problems.
I would like to thank Dragon Models for providing this kit for review, and to IPMS USA for giving me the opportunity to review it.


Reviewer Bio
Eric Christianson

Eric Christianson is a father to two boys (Reed and Dean), the President of the Seattle Chapter of IPMS, and a long-time Little League umpire. He is also a devoted husband and companion to a wonderful woman named Jackie who enthusiastically supports his passions. Recently retired as a programmer, his home office has been scratch-built into ‘a perfect model room’. Modeling since he was a boy, Eric mostly builds armor these days, but still dabbles in 1/32nd aircraft and other types of models from time to time. He also enjoys presenting seminars on weathering and technique at local shows. Many of Eric’s kit reviews can be found on the IPMS USA website.
Comments
Great clear review of this Tiger I,
Beautifully played out, I appreciate the explanation of the hull problem and setting the friedel cleaners.all together outstanding. Great build and super paint job and finish, I like the weathering and detailing in painting and your choice of the DAK Colors
Thank you
Sincerely
Don Frandsen
Add new comment
This site is protected by reCAPTCHA and the Google Privacy Policy and Terms of Service apply.
Similar Reviews