
WWII USN Crane Barges II YD98
Thanks to DragonUSA for supplying the resin/PE set for review and IPMSUSA staff for handling the request and publishing this review. Special thanks to Dave Morrissette who forwarded this kit to me after I and everyone else refused to review it in 2014. I said it would take me a while to get to it, but better late than never! Apologies to DragonUSA for the delay. YD98 is still available!
Photoetch Set Review
LionRoar has produced a line of WW2 US Navy barges, either mixed resin + photoetch or all metal photoetch. This small box kit is the US Navy Crane Barge YD98, in service during WW2 and into the 1960s at Mare Island, California. Kit has 17 parts (2 resin, 15 steel PE), and a simple instruction sheet (front & back) for PE folding and assembly. 1/700 crane barges are an unusual subject that would be a necessity for dockyard dioramas. Like the other LionRoar barges, these are basic and simply detailed, in the case of YD98 too simple. Would have liked better instructions, more parts and/or decals for the barge YD number, but a quirky, fun build. A few reference photographs available show this kit is close to the actual WW2 appearance, but lack all the usual deck gear crane barges need. Folding of the PE crane was straightforward, but the housing did not match the actual. Only a problem for purists, and will build into an odd finished model OOB. For the more advanced modeler.
Brief History
Cranes are ubiquitous at harbor dockyards. Some are permanently mounted on a flat barge and towed to wherever they are needed. Unlike warships and auxiliary ships, information on barges is rare and suspect. In 1941, the US Navy received YD78, built by Washington Iron Works. Photographs of YD98 are usually in the background from other ship photos, but there is one side view from 1956 or 1968, depending on which website you find it. These few photos were extremely helpful for assessing the accuracy and add-ons for this kit, which I decided to do, having built LionRoar R7009 YD72 OOB and not liking the lack of details.
What You Get
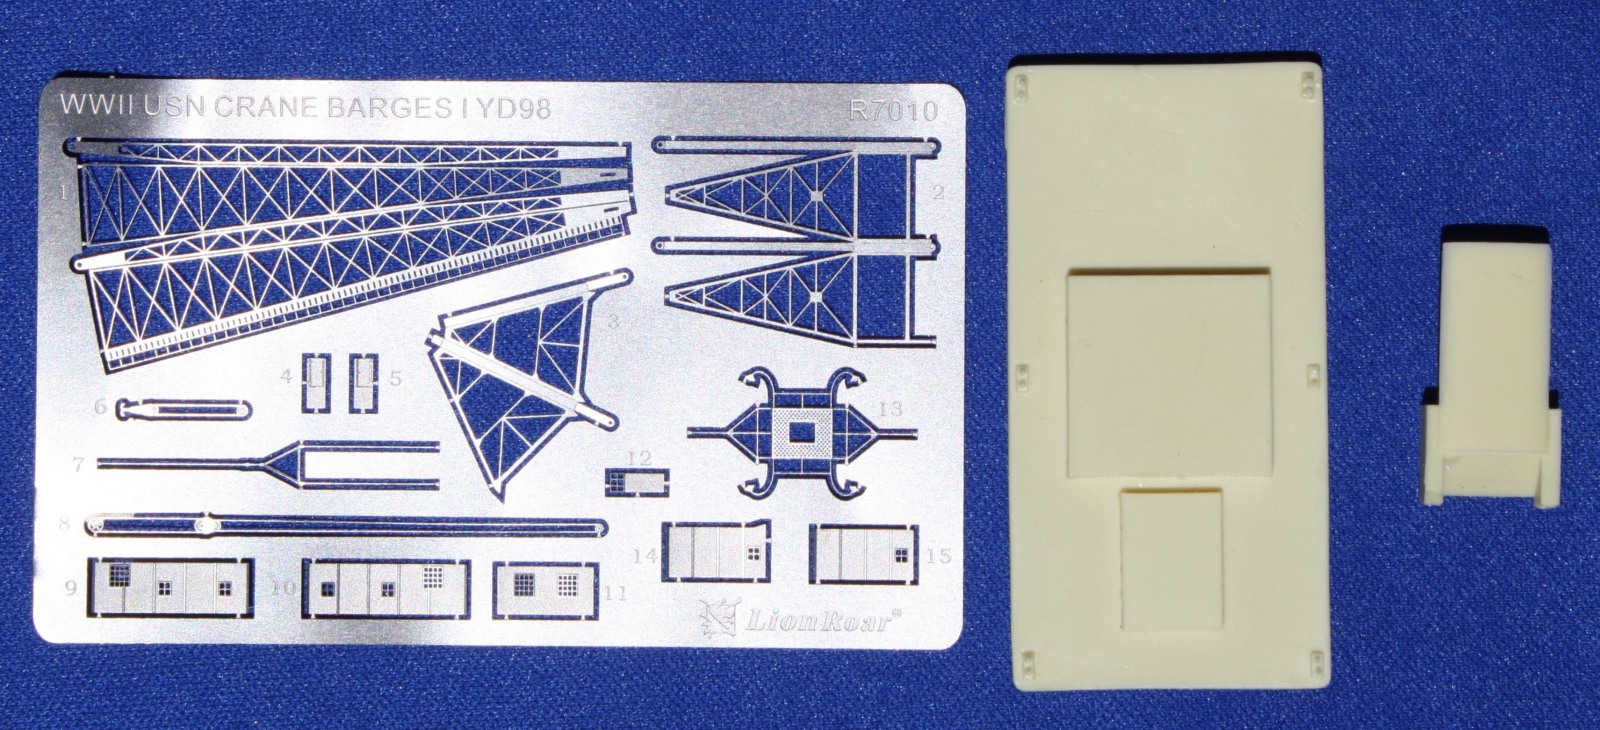
LionRoar, a prolific Chinese producer of 1/700 photoetch sets for naval topics, launched a series of 1/700 cranes, crane barges and barges in 2011 to little fanfare, but a relief for dockyard diorama builders. YD (aka Yard Dog, actually Floating Derrick) 98 was one of the first released. The resin/PE set comes in a nominal 4x2x1 inch (97x64x30 mm) box with pegboard on top and the usual LionRoar black-to-blue fade from top to bottom, and a photo of the finished model and a picture of the fret. Inside you have a small page of Instructions, front and back. Two small bags contain the two resin parts: 1) barge with crane mount base; and 2) crane house. The PE fret is stainless steel (just like the real crane) with 15 steel PE pieces (numbered 1-15).
The PE fret has sticky clear plastic on both sides, which means the fret needs to be cleaned with soap and water after removal of the protective film. The PE parts are fine and detailed, and on the sturdy side of metal heft. Some pieces have embossed detailing. The Instructions are very basic, and use exploded views with curved arrows to indicate how to fold the crane, and straight arrows to show where the doors and panels go on the resin crane house. There is no text and no explanations. The instructions need explanation of the order of assembly and that the crane only has one way it can be assembled (unless you practice microsurgery on the cables). YD98 can only be built with one orientation of the crane. But there were other issues too.
The Build
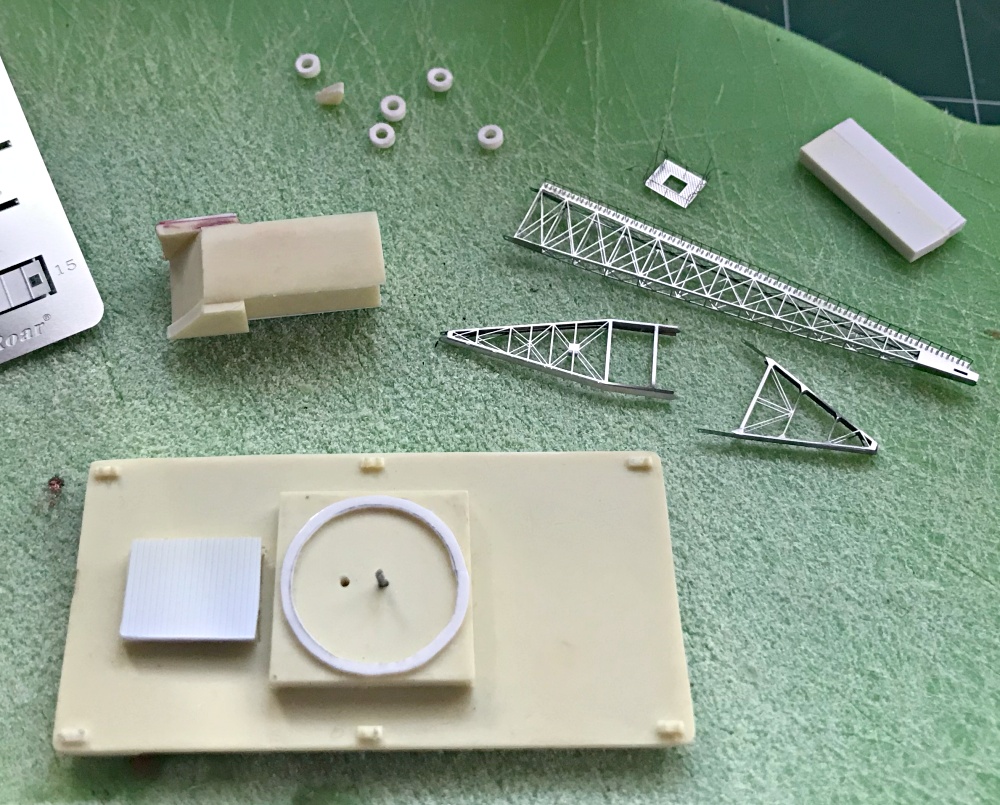
This build was stretched out over 19 months due to my schedule and because I decided to accurize the kit based on photographic evidence. After reviewing YD72 OOB and not liking its simplicity, and seeing that some structural features of YD98 were incorrect in the kit, I attempted to right the wrongs, since building YD98 OOB would be building a slightly defective appearance. The major changes were:
- The resin barge itself had lumpy flash on the bottom, necessitating vigorous sanding to keep it flat;
- One bollard was broken on receipt, and I broke two more during assembly – easily replacing by cutting the right diameter of stretched plastic sprue;
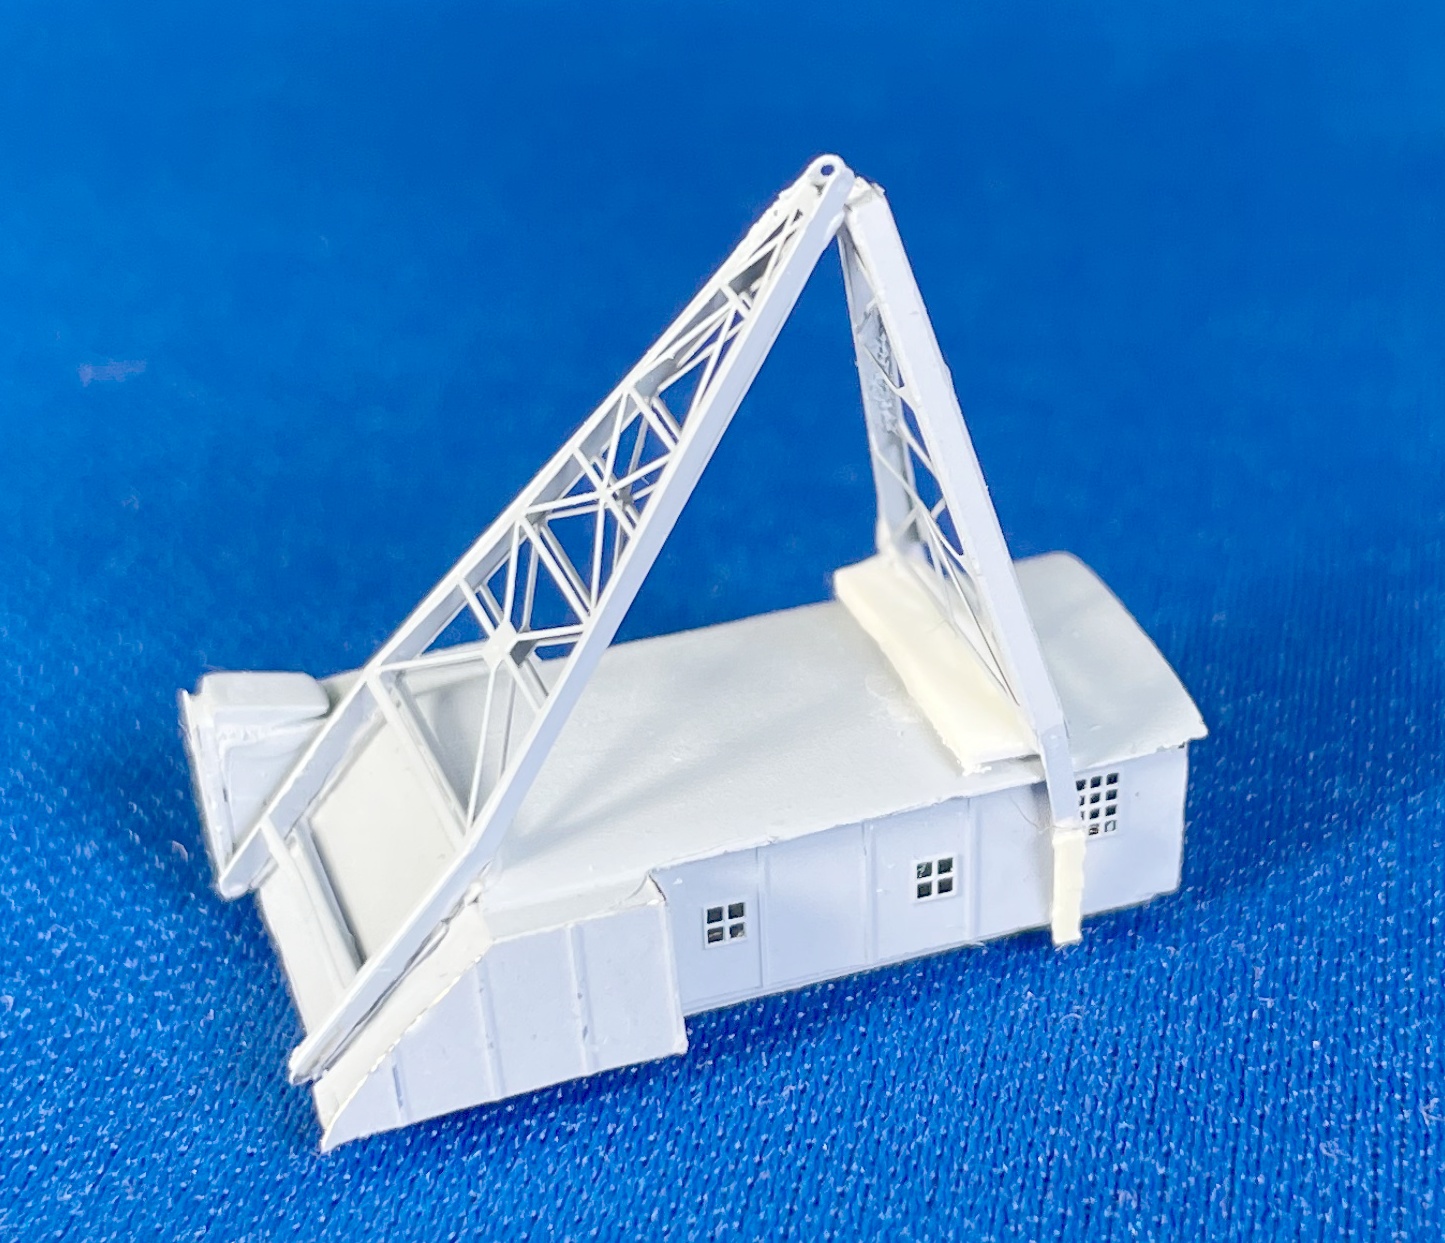
- correcting the portside front projection of the resin housing (from the perspective of the crane operator), by removing the projection to make the slope same as the center section – this also meant cutting part 15 to match the side profile, removing a window;
- reworked the crane operator starboard projection, also necessitating cutting parts 12 & 14;
- adding deck features (cable reels & winches, portholes, doors, ladders, roofing, skylight);
- adding girders to the housing roof where the crane attached;
- Added circular ring mount on base for crane house from plastic sheet;
- mounting the crane housing on four semicircular clamps to the rotation ring. The latter edit meant that the crane could not be rotated. Simply cut Evergreen hollow plastic tubing into slices and cut those in half to make four semicircles, place them on the rotation ring of the base, so that the housing would be mounted on them. In other words, the crane house did not sit flat on the ring, but was raised by the arc-shaped clamps (blocks?).
- The bottom of the crane house did not match photographs – there were girders that attached to the clamps, so I built a box on the bottom of the crane house to accurize the crane house appearance. If you do not have (or want to have) photos of the crane house, ignore this part, but beware the house is low enough to bump into deck fittings.
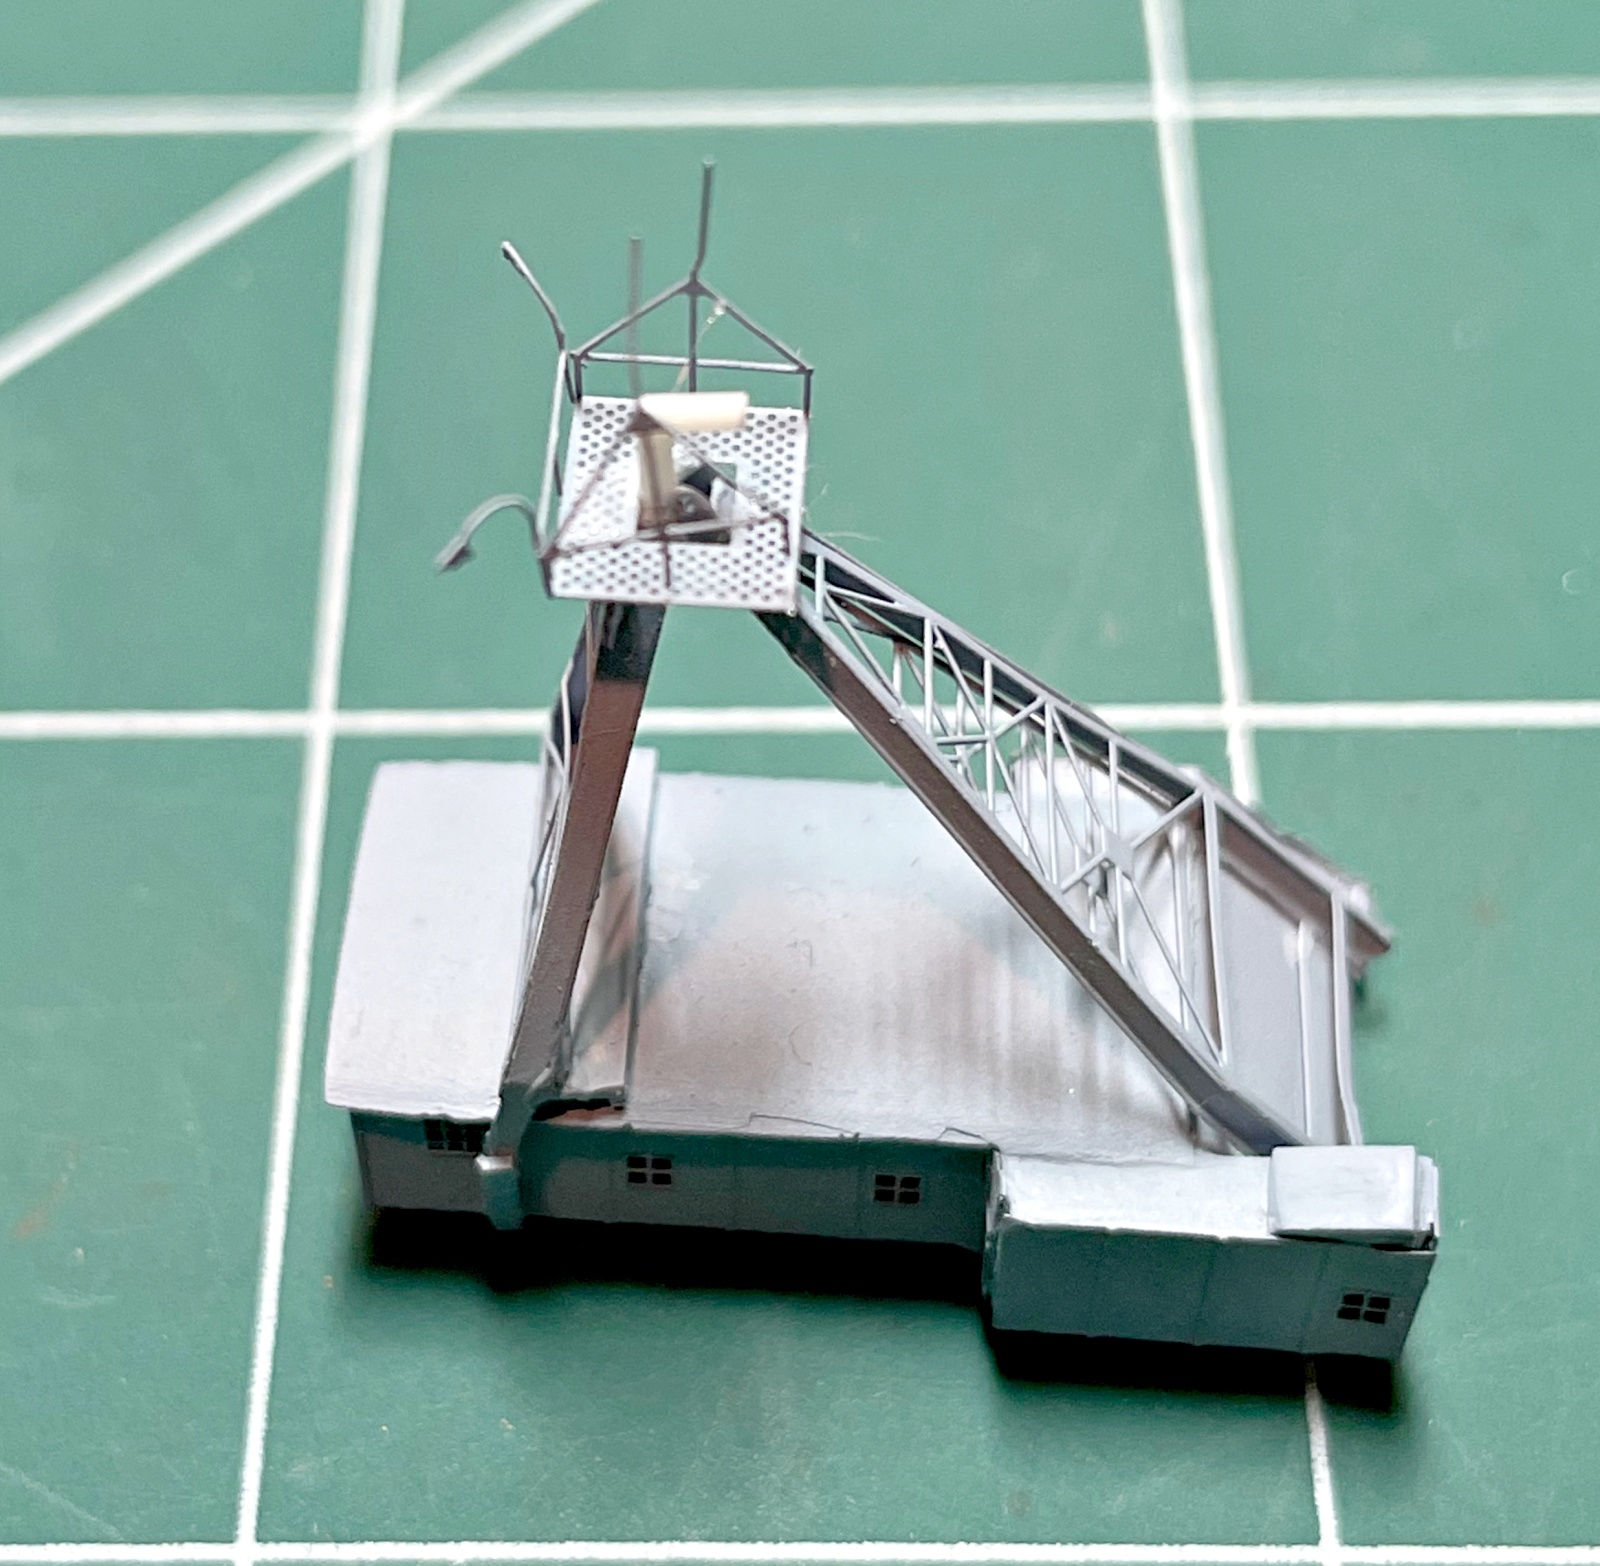
- The top of the girders poking through the platform (part #13) was insufficient to give the cables clearance over the platform railings at the only angle allowed for the crane because of the length of the cables (parts 7 & 8). Also, there was an L-shaped metal support at the top of the girders that the cables to the crane were attached to, obvious from photos, but not considered for the kit. I constructed an L-shaped piece from square plastic rod that was glued to the top of the girders, and that the cables (parts 7 & 8) were attached – this cleared the platform railing handily and accurized the kit a little more.
It was apparent that determining the colors of the barge, deck, crane house and crane were not going to be authoritative, but by piecing together hints from various sources, I concluded that the house and most of the crane and crane support girders was 5-H Haze Gray (Model Master 4238 5-H). The barge sides were very dark gray or faded black and was painted a dark gray (Tamiya XF-63 German Gray). The deck was intermediate in shade between the light gray barge house Haze Gray and the dark gray barge. I decided from pictures that the barge deck was probably wood, as the shade did not seem to match any of the usual gray shades used in WW2, especially compared to the ships nearby, so I chose Model Master 4235 Mahogany Flight Deck. The crane arm obviously darker than the Haze Gray areas, but slightly less dark than the barge sides, so 5-D Dark Gray (Model Master 4237) was used for the crane arm and the base for the house on the barge. The cables attached to the crane were painted black and rollers/pulleys were painted 5-H. Part 7 was black for the single arm section, and 5-H for the two-armed section.
The PE pieces were very easy to remove from the fret without distorting the pieces – this is a big plus. Airbrushing or hand painting of the parts was also trouble-free. I kept the PE parts on the fret to be painted, and then removed, and the parts touched up later. Remember the crane is 5-D, not 5-H, meaning masking the fret carefully for painting.
Order of assembly is important
- Fold the large crane (part #1) and support girders and platform (parts 2,3 & 13). Folding was easier than expected. A tiny application of CA glue to key points was applied, then these parts were airbrushed 5-H. A long enough straight edge is critical for getting a 90-degree fold for these PE parts.
- Modify the crane house then add siding (parts 4, 5, 9, 10, 11, 12, 14). Be sure to paint the areas under the windows flat black before adding the panels.
- Add the girders (parts 2, 3) to the crane house, checking photographs for correct positioning of the girders to the house – the picture on the box is wrong and covers the window. I added plastic flat bars to the bottoms of tripod part 3 to extend to the crane house bottom – in front of the window. Also added a plastic bar to the top of the crane house under part 3 tripod, as photos indicated. Then add the platform (part 13)
- Add the L-shaped plastic to the top of the girders poking out from the platform (Note: this is not in the Instructions but is crucial for easy assembly).
- Add the crane to the house...carefully. Best way is to place the house on its side and then dry fit the crane and the two cables (parts 7, 8) to make sure they both reach the crane at the proper angle. I also used a compass to measure the length of the cable parts to determine the angle of the crane when attached to the house, and held the crane in place with spare parts and blocks and test fit the cables. If it all lines up, then glue the crane to the house and then the cables. Better to have a tiny less angle on the crane because you can fudge the cable placements easier than trying to move the crane around.
- Add the four semicircular clamps on the base ring – test fit the house first and then set aside for final assembly.
- Add the deck gear and modifications listed above – much easier to touchup and attach when the crane house is not in the way. These pieces were raided from other PE sets (cable reels, ladders, and plastic sheets, rods, and
- Glue the crane house to the base on the four clamps and the add hook (part #6).
After assembly, the crane house, deck and barge sides were weathered with Weather System Rust & Weather Kit, using the black powder mostly, and white & light gray pencils to streak the barge sides and deck. The deck was washed with light grey to simulate weathered mahogany. The entire model was sprayed with Testors Dullcote (outdoors), making sure the crane was matte and not shiny.
Value
At $22 MSRP, this PE set is the same cost as a destroyer-sized ship but is considerably shorter and with fewer pieces. By itself, this kit is basic but can represent YD98 well enough to be presentable when viewed at a distance. The kit is enhanced by additional details and corrections and would benefit from 1/700 personnel and ropes laying around.
Summary
This PE set is recommended for advanced 1/700 scale modelers because of some very small and easily distortable pieces, tight tolerances, needing scratchbuilding skills and a well-stocked spare parts stash. YD98 can be built in a short time OOB, but will look too sterile, will be difficult to build as directed, and not as accurate as it could be. It is an unusual subject and looks just fine next to warships. With a little thought and extra accoutrements this can be turned into an attractive addition to any fleet.
Pros
- Few pieces, easy separation of PE pieces from the fret.
- Unusual subject, and much needed and appreciated for dockyard dioramas.
- PE pieces were easy to fold and fit well together.
- Scale appearance was good – especially the crane itself.
- Easy to embellish with spare parts to accurize the appearance.
Cons
- You are on your own for looking up references or information – no easy resources.
- This kit would be better characterized as a Craftsman kit (needing a lot of work).
- The build is not straightforward and would benefit from the order of assembly listed above.
- Several flaws in appearance need to be addressed or if ignored, will lead to a less attractive model.
- The lack of the L-shaped arm for attaching the cables from the girders to the crane is a serious flaw and needs correcting or there will be trouble with alignment of crane and cables.
- Very basic other than the PE siding and crane – lack of details makes for a less interesting model OOB.
- Test fitting is very crucial for keeping one’s sanity.
- The PE parts are delicate, and more handling means more chance for damage, especially the crane and its cables.
Recommended for medium to advanced modelers of 1/700 scale ships with experience in handling, folding, and gluing small, metal PE parts. Very highly recommended for dioramas and has the room to superdetail easily. An odd but rewarding project that will test your 1/700 modeling skills.

Resin pieces & PE fret

Instructions Front

Instructions Rear
Major assemblies, showing modified crane house, modified base, folder crane and supports.

Modifications to underside of crane house
Modification to crane supports
YD98 L-shaped arm addition
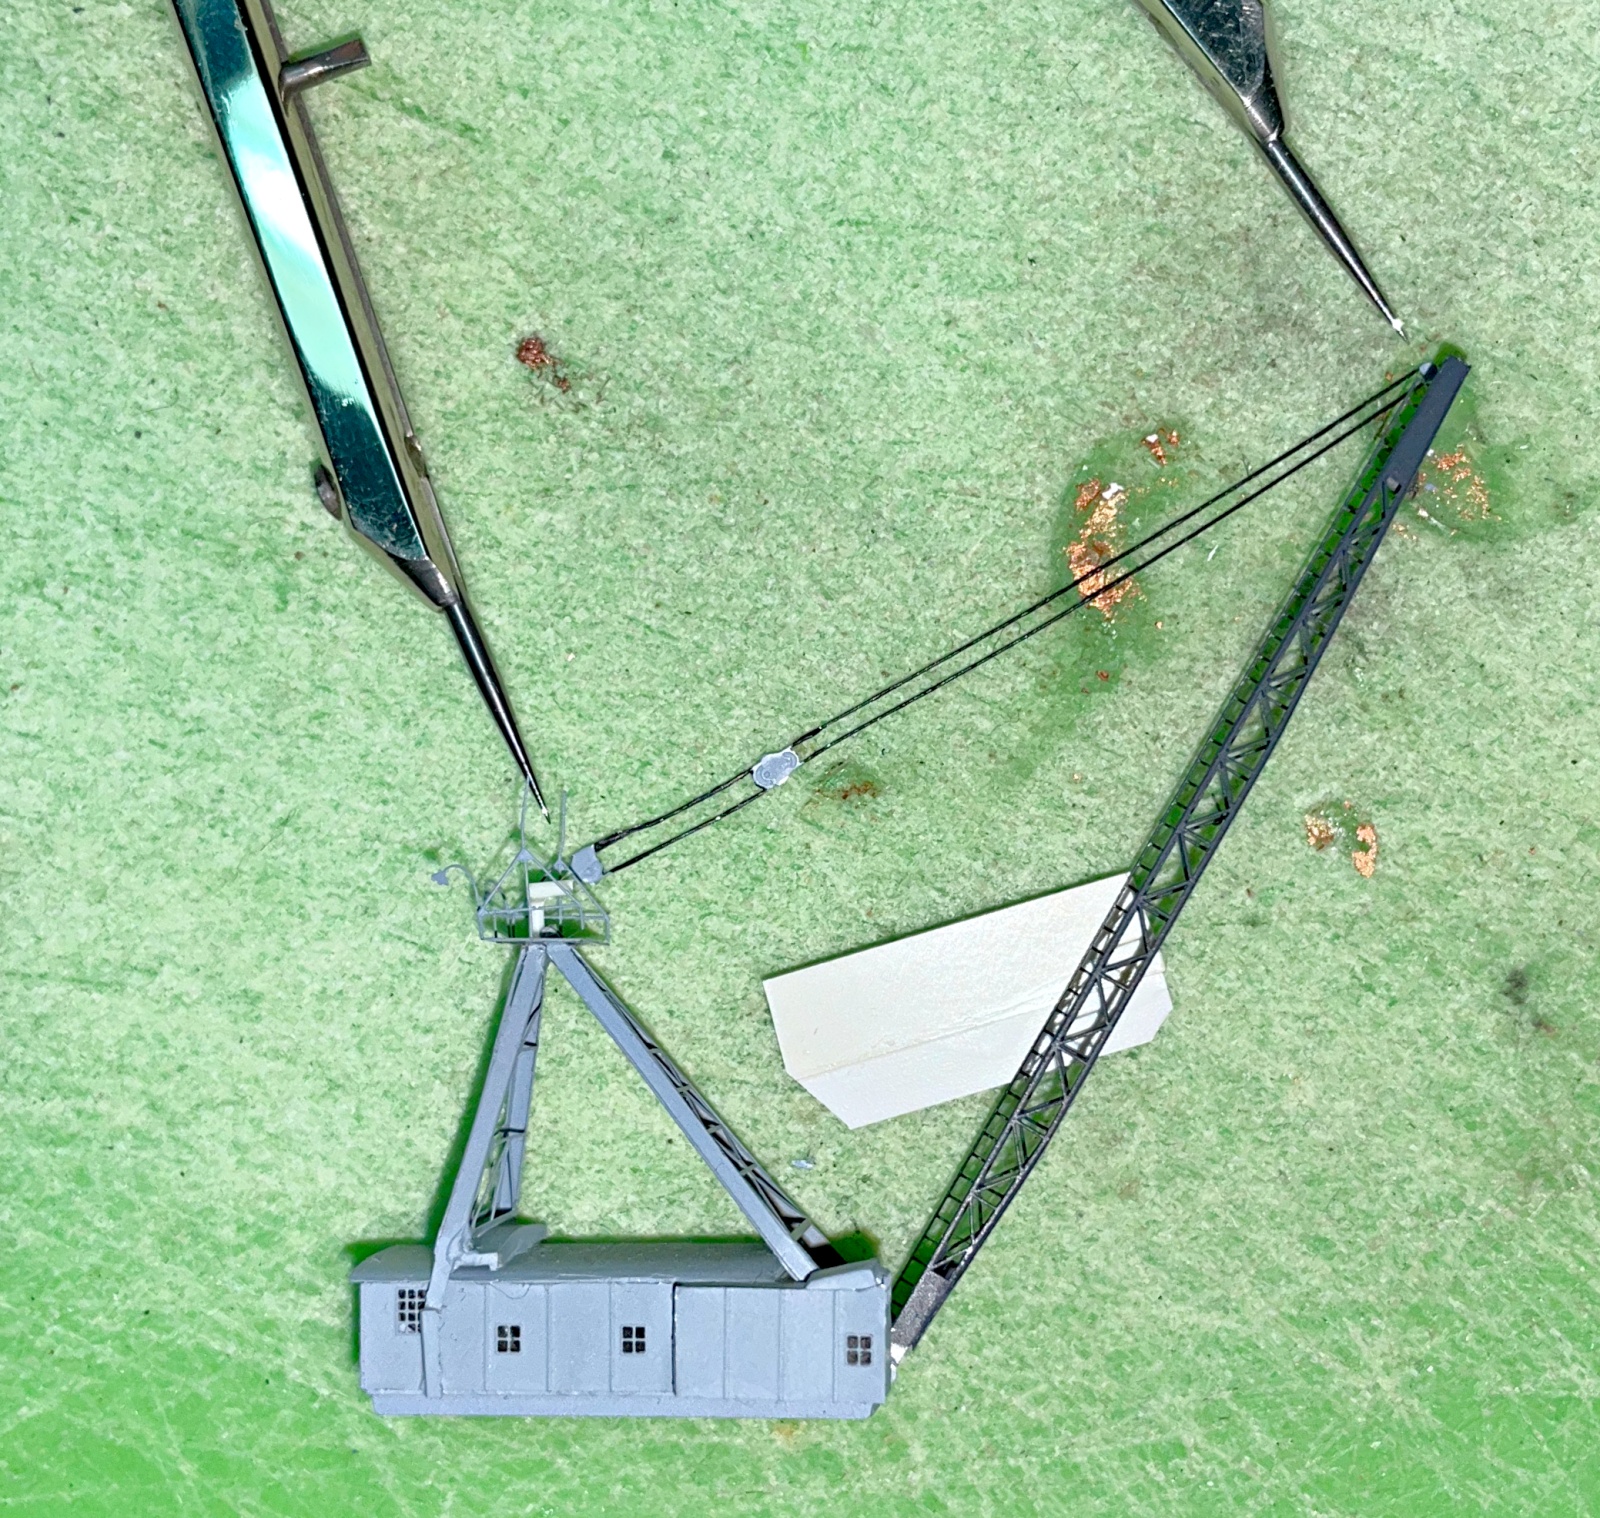
Measuring crane angle for cable length
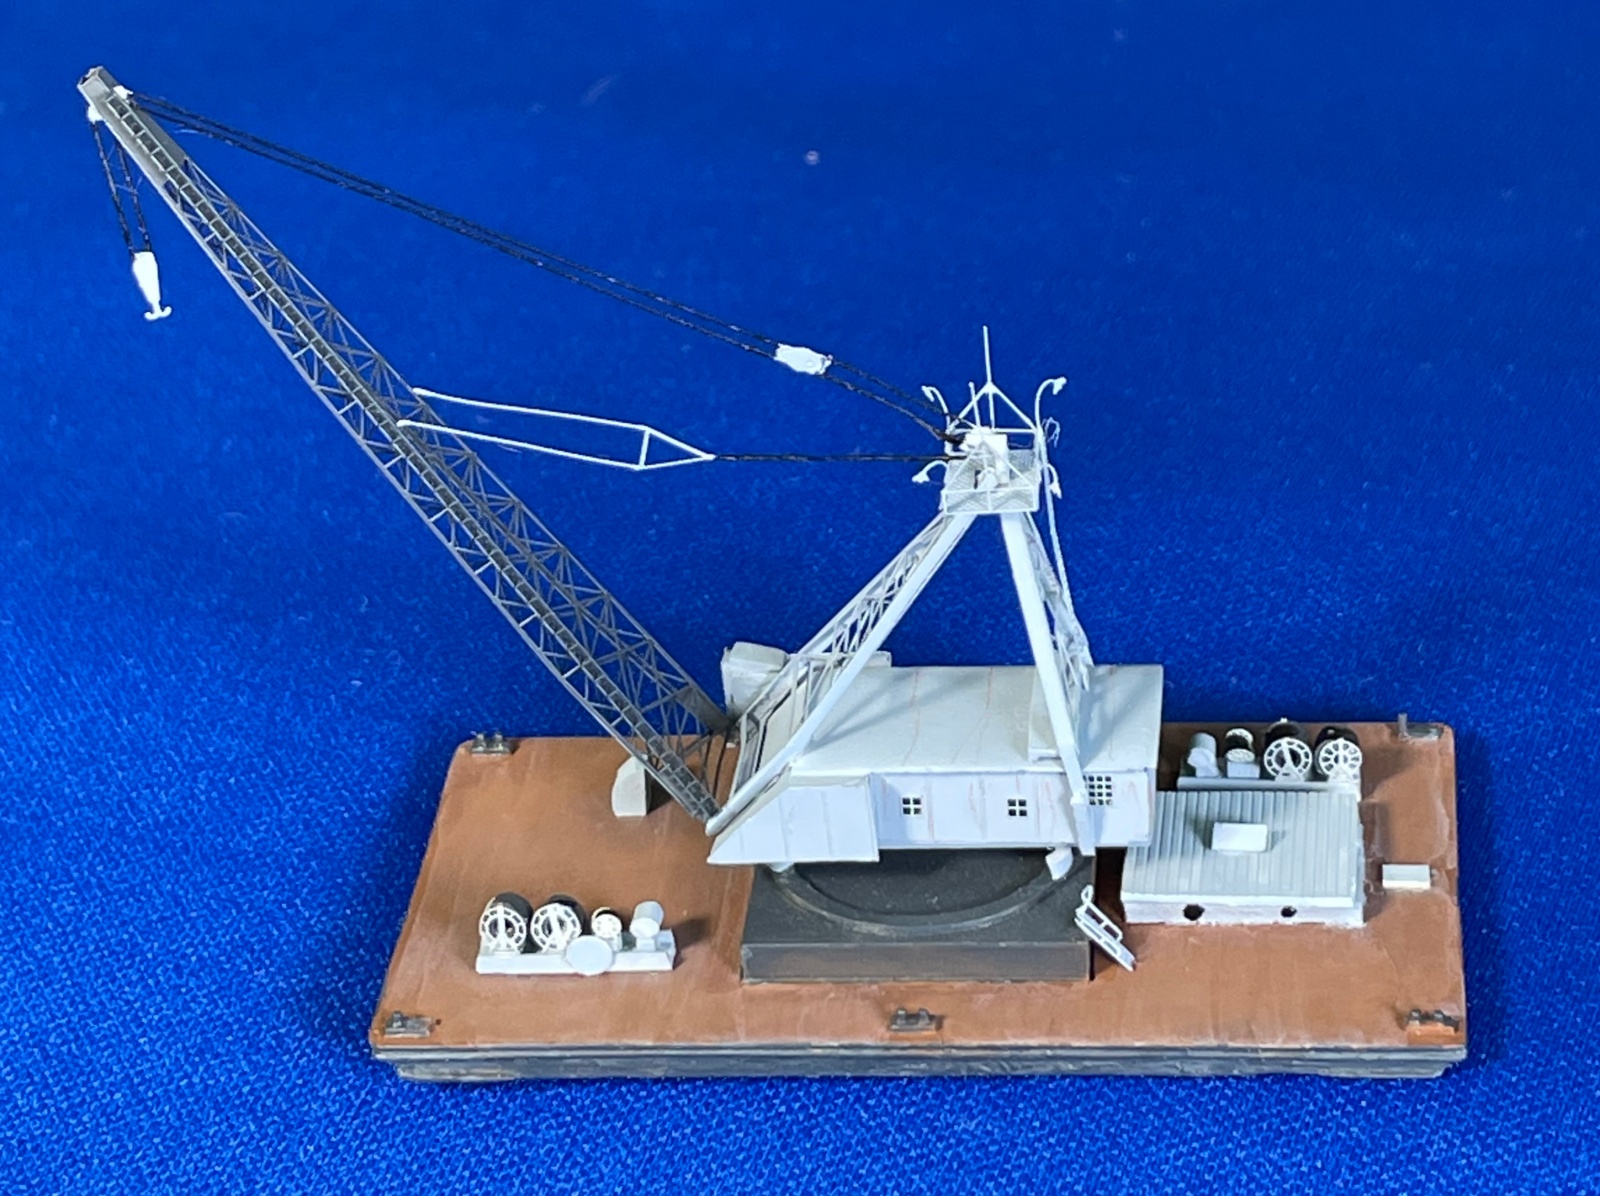
Portside view

Rear view

Front view
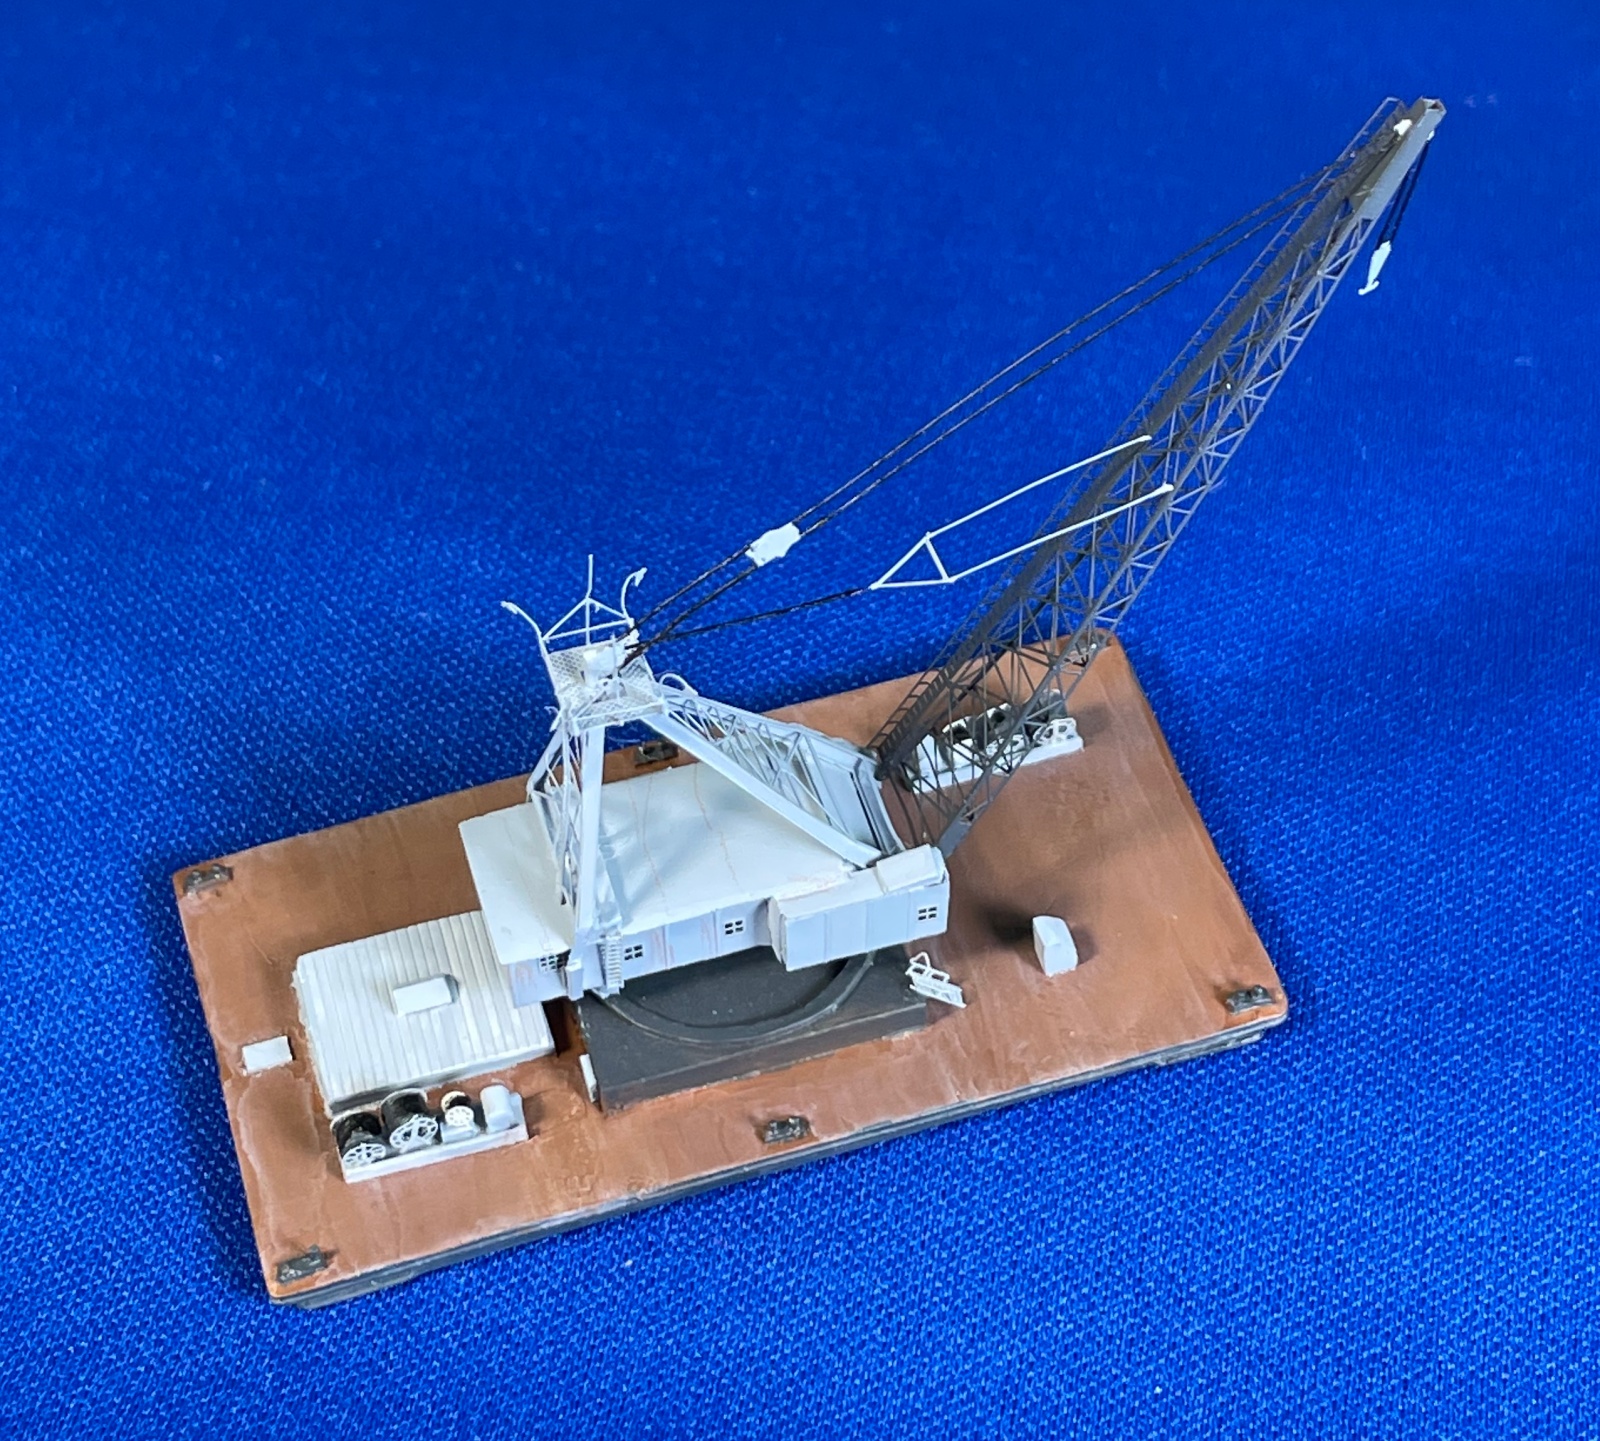
Starboard view
Reviewer Bio
Luke R. Bucci, PhD

Luke built all kinds of models starting in the early '60s, but school, wife Naniece, and work (PhD Clinical Nutritionist) caused the usual absence from building. Picked up modeling to decompress from grad school, joined IPMSUSA in 1994 and focused on solely 1/700 warships (waterline!) and still do. I like to upgrade and kitbash the old kits and semi-accurize them, and even scratchbuild a few. Joined the Reviewer Corps to expand my horizon, especially the books nobody wants to review - have learned a lot that way. Shout out to Salt Lake and Reno IPMSUSA clubs - they're both fine, fun groups and better modelers than I, which is another way to learn. Other hobbies are: yes, dear; playing electric bass and playing with the canine kids.
Comments
Add new comment
This site is protected by reCAPTCHA and the Google Privacy Policy and Terms of Service apply.
Similar Reviews