
Westland Lysander Mk.II
Allow me to start by thanking Pavla Models for their most generous contribution of numerous models for review by IPMS/USA.
Background
The "Lizzie" is one of my favorite aircraft for some quirky reason, and one on a very short list of those I wish I had the opportunity to fly myself. There were three versions - unsurprisingly the Mk.I, II, and III. There were a 189 Mk.I, 517 Mk.II, and 964 Mk.III, including license built. The Mk.I and Mk.III pretty much look alike - the Mk.II is recognizable by the smooth, slightly tapered engine cowl. As the Mk.I were quickly shunted off to the Middle East, the Mk.II is most prevalent in the early war years in Europe.
There are numerous Lysander kits in 1/72, a few in 1/48, and even one in 1/32. Many have some issue or another, particularly with markings, about which version they really are. I have also found a huge number of errors in reference books - the captions and color profiles tag the aircraft an incorrect Mark, even though there is a correct table of serial numbers, just a few pages away. I have learned to check everything twice.
The Kit
With exception to my comments above, Pavla appears to have it right!
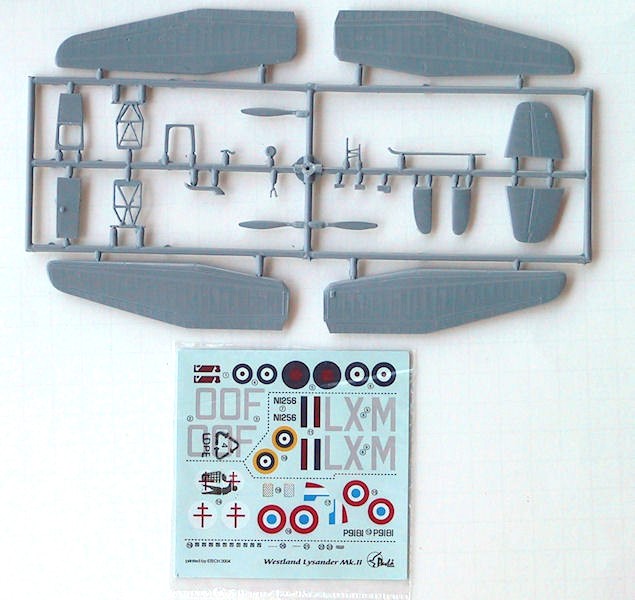
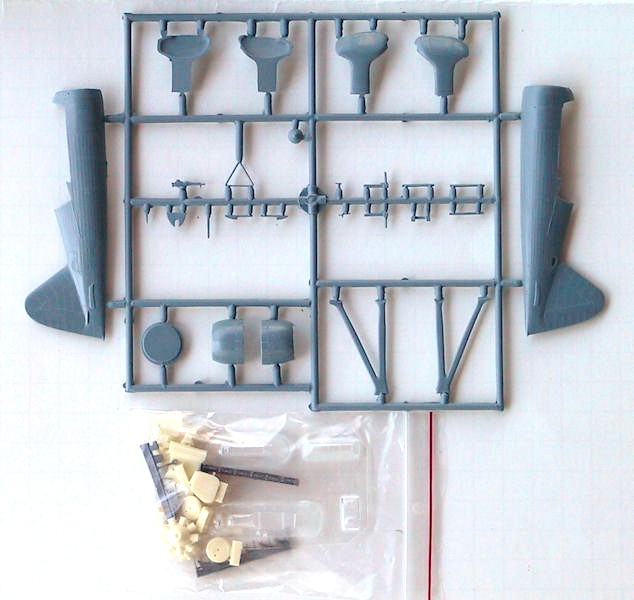
There are 51 styrene parts on two sprues, 34 resin parts, a vac-form canopy in several pieces, and a sheet of decals with markings for 3 aircraft. The styrene parts have thick attachments to their sprue, requiring some care when detaching them, but are otherwise decently detailed. The fabric effect is appropriate to the scale and the kit clearly captures the difference in panels on the right and left fuselage sides. There is some flash, but unlike their Gloster Pioneer which I reviewed, the scribing is consistently done. The only major molding issue is 2 large ejector pins inside each wing half which will take a while to get trimmed down flat - you've got until step 29 before you install the wings, but I'd start early on the clean-up because you need them to verify cockpit construction.
The first great thing that jumps out is that Pavla included the rectangular inspection ports in the rear fuselage. The purpose was a clear view of the tail balance weights (C/G) during walk-around - it also opened on the right to access the engine crank. Canadian built Lysanders had a smaller porthole and some machines have it blanked out on the left side. It's funny, but most all box art and kit profiles show the windows but they don't represent it in the kit other than by scribing. However, only the left side is open - the right side is filled on the inside with a lump of plastic and the outside is rather rough and concave. This appears to be a production flaw as the instructions show that both sides should be open. Pavla does not include any detail (shelf, weights, crank) inside the inspection port and expects you to make your own clear "cover" with something like Kleer.
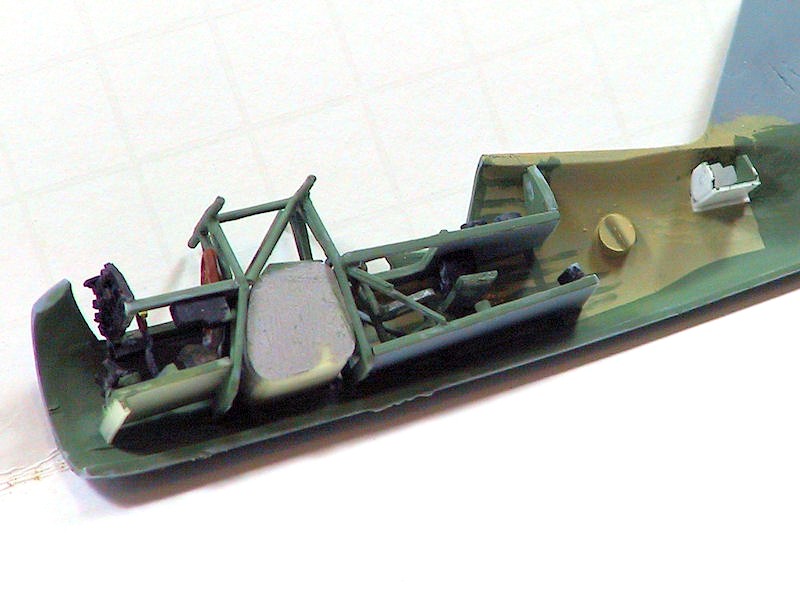
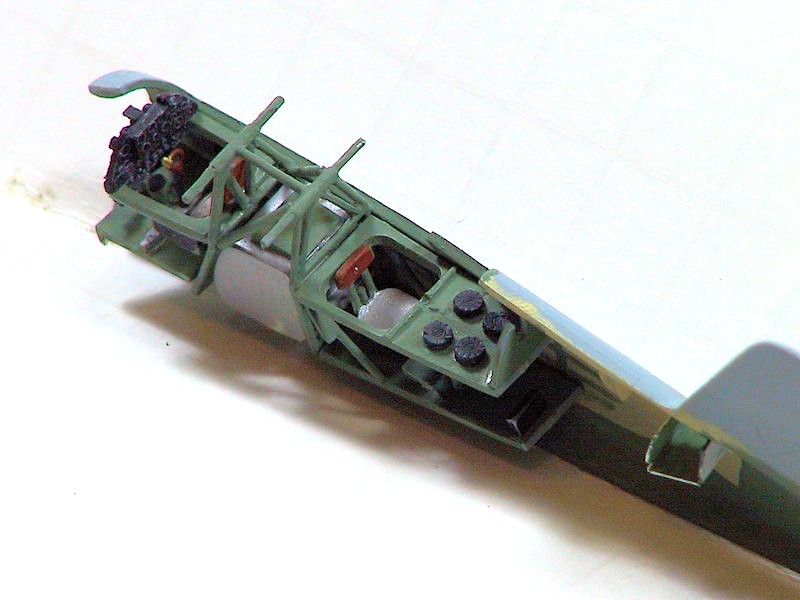
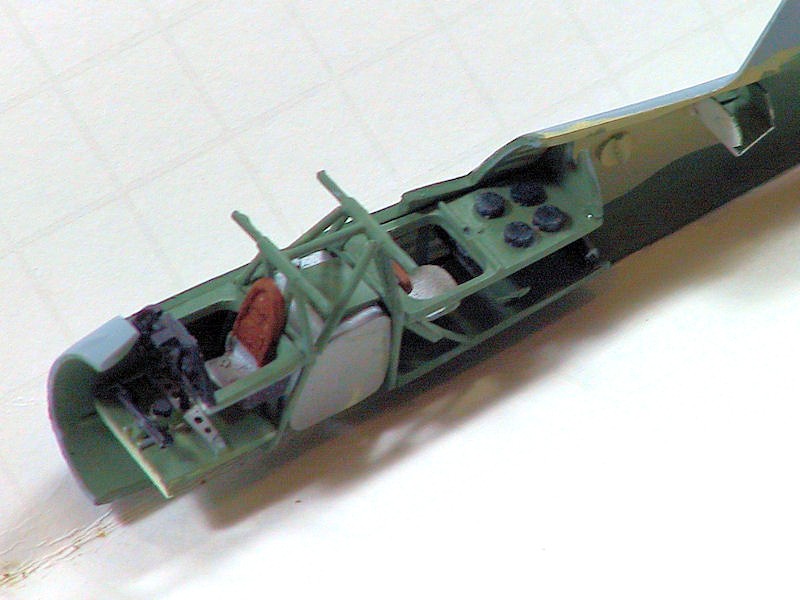
The next great thing about this kit is the amount of included interior detail - useful with all that cockpit glass - but not all that visible afterwards. The Pavla kit is loaded - seats, control column and rudder pedals, fuel tank, radio, Vickers and ammo, plus all the support structure. This gives you a great start on detailing, but also ups the complexity level quite a bit - and I suspect will make the wing mounting a bit tricky.
And last on my “Oh, Wow!” list is that the wheels can be built with wheel covers on or off - a really super option that easily expands the markings options. I have to caveat that as the peculiar wheel/axle detail with open spats is not included - that would have needed some photo-etch.
On the slightly negative side, the prop comes in 5 pieces - spinner, hub, and 3 blades - with no assembly jig or locator holes. The resin hub is very accurate but delicate. Personally, I'd rather not go thru having to nurse-maid the blade assembly. The other thing I noticed is that while Pavla provides bomb racks for the stub wings, they do not provide the little bomb rack that optionally went under the rear fuselage, even though it is mentioned in the history. They don't provide any little bombs for the racks. The instructions show a seatbelt for the pilot's seat but in fact there is no such part, so I guess they want tape or something.
The other difficult assembly step may be putting on the landing gear - there are no locator pins/holes, just a note in the instructions that show them mounted 2mm forward of a panel and apparently on a horizontal panel line. This will be a critical assembly because the correct mounting of the gear is crucial to the overall alignment of the whole model.
Other than that, Pavla provides a message hook, so they've got just about everything covered.
The resin parts are nicely done - the back of the instrument panel has gage housings and wiring. There is little flash, the pour blocks are reasonable, and I see no air holes or flaws. One prong on one bomb rack was broken off but present and so can be repaired. Learning from the Pioneer build, I did inventory all the parts.
The vac-form canopy comes in 3 pieces - the main canopy, a top piece, and the sliding rear canopy. Like the Pioneer, the vac-form is thick and you only get one copy of each piece, so be careful. Making things more difficult, the top of the main canopy is very thinly formed, making it fragile to work with. There are also 2 covers for the big lights in the spats although I couldn't get them and the resin lenses to fit at all and just used Kleer.
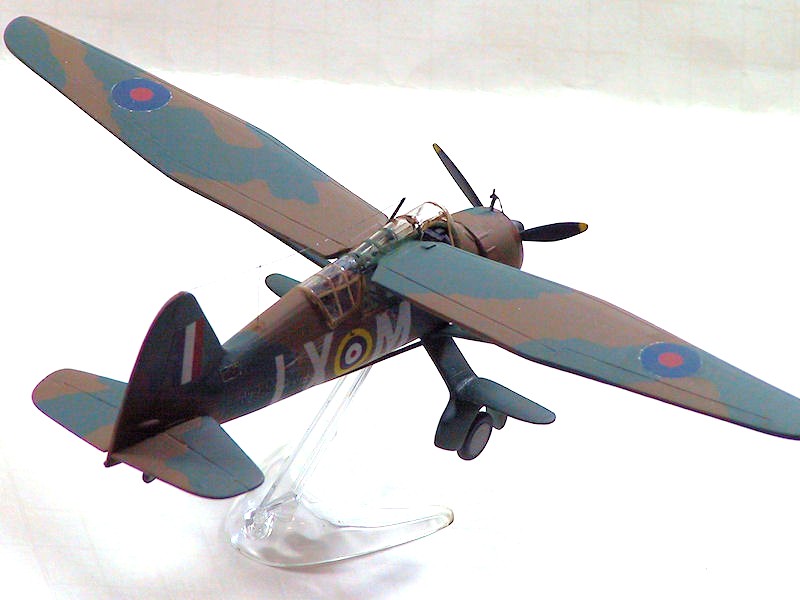
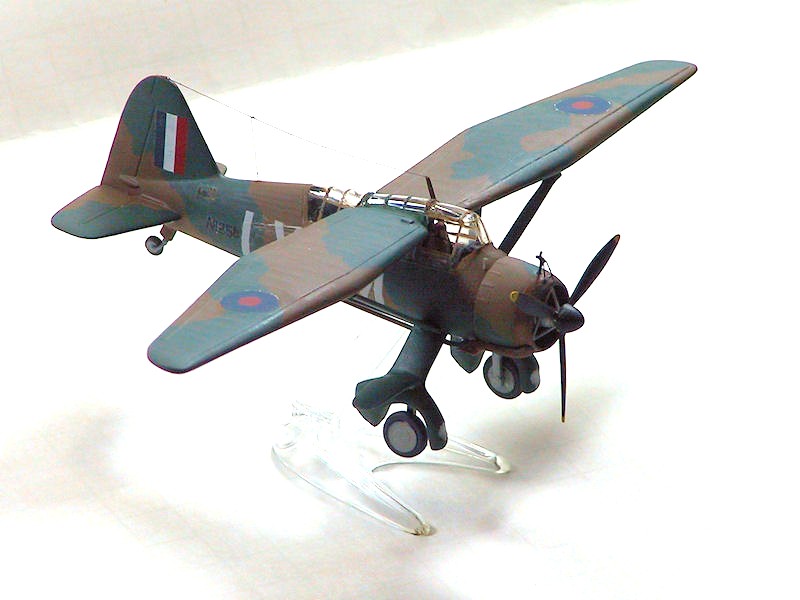
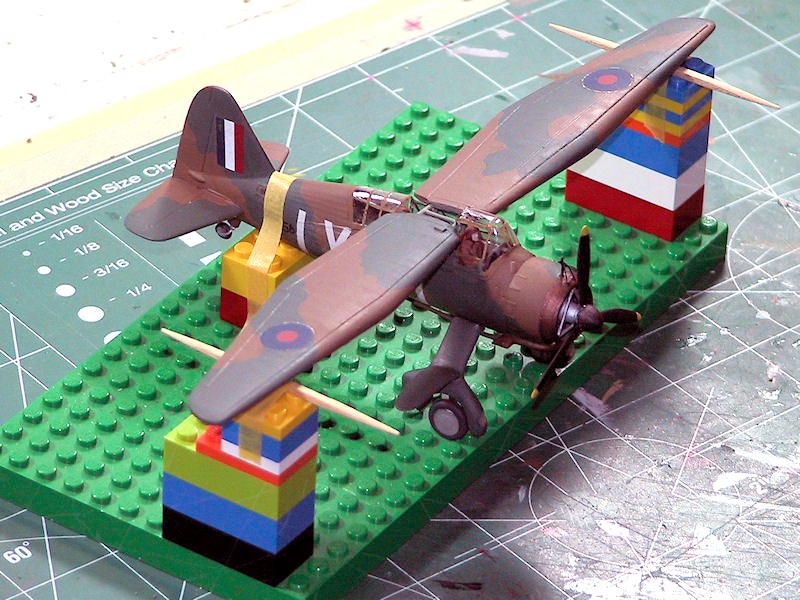
The decal sheet is by Etech and as it was produced in 2004 shows that this isn't a new kit. Unlike the Pioneer decals, nothing is out of registration. There are 3 marking options - the first two are RAF (OO-F, 13 Sqn; LX-M, 225 Sqn) in Europe 1939-40, and one is Free French in Africa, 1942. There is a Vokes filter included for the latter. The instruction sheet lists the references from whence the scheme is drawn, handy if you want more information. Given the age of the kit, neither the Mushroom nor the Warpaint books are referenced, but contain the same schemes. LX-M is the "centerfold" in the 4+ reference and is one of my favorite Lysander pictures - this will be the one I build because of the open wheel spats.
Anyway, there are two construction options - RAF or FF. However, given all the parts, you can come up with lots of other options, so this is a great kit in that regard. In the early/phony war days, there were a lot of non-standard roundels and unit codes and several variations of underside color so you can make something distinctive with a little research and a good stash of generic markings.
The instruction booklet is 16 half-pages. Potted history, parts layout (necessary because the sprues aren't numbered), paint codes (Humbrol & Agama, a Czech brand), 6 pages of assembly instructions in 32 steps, a 3-view drawing, and 6 pages of camo & markings. The instructions are logical, clear, and paint callouts are prevalent throughout. My only raised eye-brow is painting the inside of the fuselage fabric interior green rather than a linen, perhaps with a dry-brush to show external color bleed - but then again, with no detail in that area, maybe it's moot.
The Build
I'll not go into a blow-by-blow assembly description, rather just point out where I had problems or think there might be a better way. I will tell you up front that this build did not go the way I thought and hoped it would.
Step 2: Defer the gunner's seat until later; it sits too high leaving no room for legs & knees under the shelf so trim and assemble when you put the seat in later.
Steps 3, 4: The engine is just slightly too big for the cowl. I knocked the side edges off the cylinders and it slid right in - of course that was after my first test fit when it split the cowling in half ….
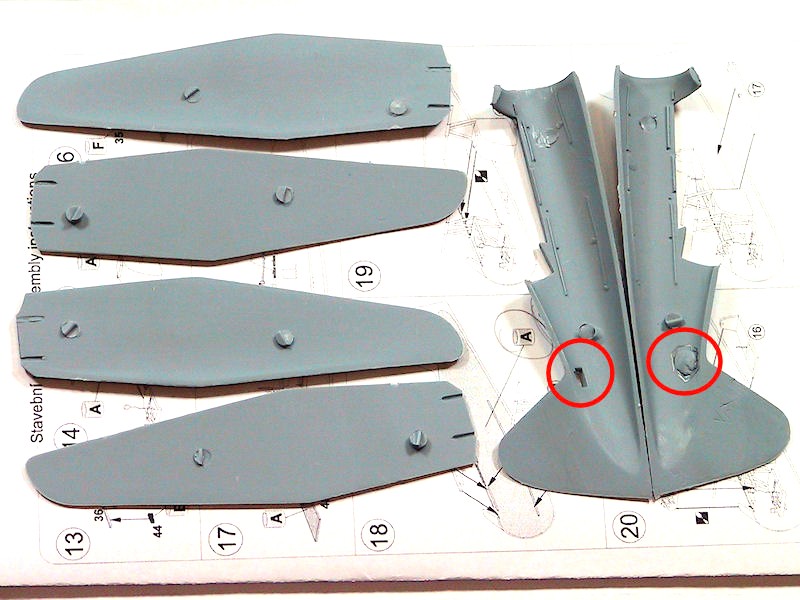
Steps 6, 7 (& 27): It's a chore to open the wheel pants due to the thick plastic. However you do it, cut/scribe inside the engraved cover lines, not along them, so you don't take too much away from the pant itself. Then sand off any excess to get a clean rounded shape. Also, fill the opening - I covered it with card and putty. If you are going to open up the gear, you need some more gear detail - I chose not to.
Stop - go do the wing assembly from Step 29. I redrilled the holes in the end with a #56 drill to get them big enough to slide on the structure (parts 47 and 37) and to be sure they were straight and centered.
Steps 14 - 21: I did these steps in a different order - inspection of all the parts and looking carefully at how the cockpit structure affected the wing mounting indicated there could be problems. One thing to know is that the little shelf running along the bottom of each fuselage half isn't very relevant to the assembly process. I used the cutaway profile between steps 17 and 18 as a guide while I fit the parts. As always test fit every couple parts to be sure you're going the right way.
First I glued in the front cockpit framing from Step 13. Then I glued on the front support, part 47, taking care to get the top part standing straight up - ensuring that it is squared away in all 3 dimensions. When they were completely dry and locked in, I glued on the cockpit floor from Step 9 and waited until it was dry.
Then I taped the rear structure, part 37, on the fuel tank from Step 11, and test fit against the back of the front support, part 47. You'll need a couple hands as you want to be sure the top bar on the rear structure aligns with that on the front structure, again in all 3 dimensions, and that the wings will slide onto each of them. Once I figured all that out and made adjustments, I glued the fuel tank to the front support and when dry the rear support to the fuel tank - again checking the wings went on right and then let it sit.
With all that done I started on the rear cockpit by gluing on the upper shelf from Step 16, then the lower shelf from Step 17 and finished up all the little pieces in these steps.
Steps 22 - 25: Now you can add all the little details, trim up the paint, etc. Here is where I fiddled with my crew, adjusting kit parts and modifying anatomy until they fit reasonably. The crew, by the way, is from the Revell of Germany 1/72 RAF Pilots & Ground Crew figure set (#02401). Some people say they are too big, but it really depends on the room available in the kit you are fitting them into - I like them.
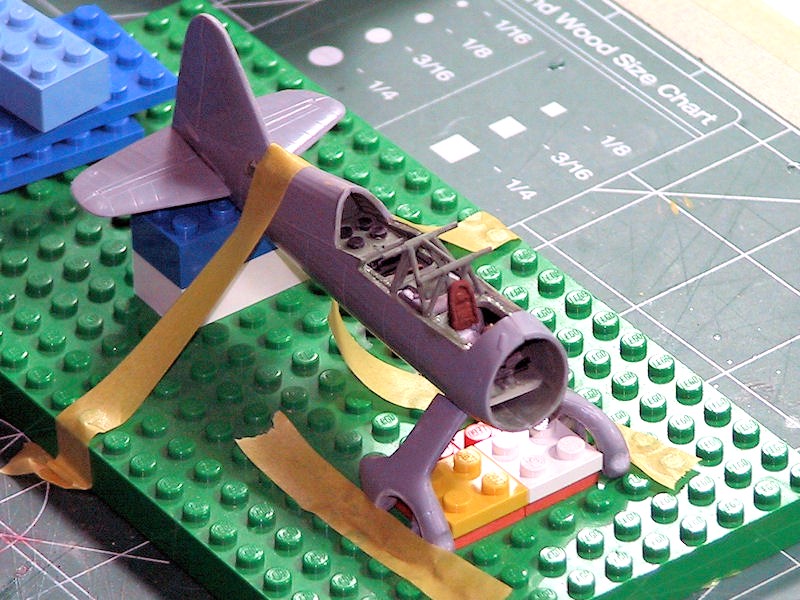
Here also is where you should do whatever you are going to do with the inspection compartment in the rear fuselage - I put in a floor, bulkheads, and cut a little piece of .010" clear for panels, gluing that in with Kleer.
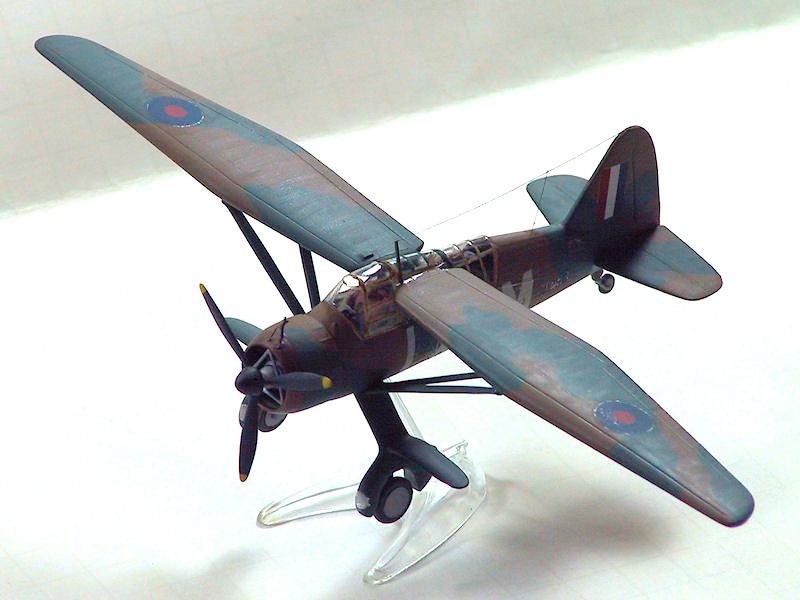
Step 26: The fuselage fit together OK, but the firewall (3) just doesn't look right. I finally went back to the engine cowl assembly from step 3 and fiddled with things until the firewall slid into the back of the cowl, then glued the whole thing onto the front of the fuselage in step 28. If nothing else that managed to hide some of the things I wasn't happy with. Here I decided to have my model "flying" so I cut a slot under the fuselage for an old Airfix stand.
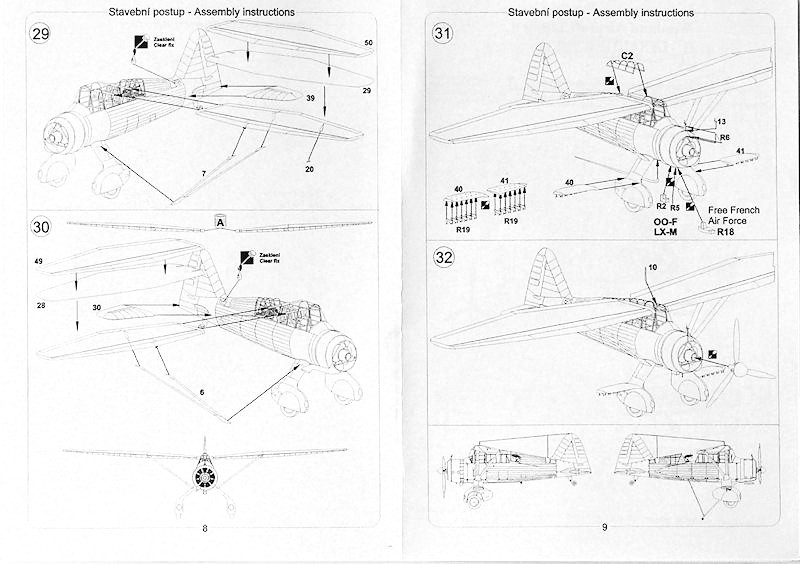
Step 27: A crucial step and not easy at all. As I mentioned earlier there are no locator pins; I drilled holes in the gear & fuselage and used .032" rod to hold them. It is here that I discovered the legs on the two gear assemblies weren't the same width. Anyway, getting the gear right is crucial on the Lizzie - in 1/72 there should be 36mm between the inside of each wheel and 20.5 mm from the bottom of the wheel to the underside of the fuselage. I had to adjust these measurements because I'm doing it in flying mode so the gear hangs down more. I jumped ahead to step 31 and put on the stub wings at this point.
Step 28: I recommend you paint, decal, cote, etc, at this point, before you put the canopy glass on - whatever works best for you. The vac-form is thick; except for one spot on top the main canopy which it really thin. Pavla only gives you one, so tension runs high while cutting and fitting. Right off the bat, the rear canopy (C3) fits semi-OK if closed but not at all if you want it slid back open. The front canopy didn't fit well either and I found myself spending a lot of time trying to carefully cut/shape it. The good news is that you can semi-butcher the top rail as it's hidden under the wing. Note that I wanted the right cockpit window open and did so, adding nothing to the integrity or fit of the main canopy.
Step 29-30: Put the wings on - again you have no locator pins/holes to help, just some markings under the wing where the struts should go. I set up a jig to get some dihedral, test fit a few times for alignment, then slid them onto the structure using slow CA to lock them down. Then, with the wings pretty well locked in, I added the struts to prop them up a bit more.
Step 31-32: If you are going to use the stub wing bomb rack you can add them here - I skipped them. I had some casualties while trying to clean them up and then didn't like them - nor did I feel like trying to get them all neatly lined up.
Decals: I painted, then put on a little coat of Future and used Micro-Sol/Set in the process with no problems. The decals came off easily, but I found them a bit delicate - particularly since they were very hard to move around, once put down. See the tear hole in the left fuselage roundel and the mangled right serial number. Given these issues, I didn't even bother with the W/T and other stencils. I have a bit of silvering in the squadron codes because of the fabric detail - I assume that is me. Also the roundel red is a bit too bright, but I solved that on the upper wing roundels when an errant piece of tape lifted them right off and I had to replace them.
Summary
Well, here she is …. But I just don't think it was worth the effort. I had really high hopes for this kit when I started, but it just took so much work and the result isn't that good unless you add a whole lot more effort, such as detailing the wheels if you open the pants. I fought, and lost, several battles trying to keep things - interior, fuselage, gear, wings - lined up. At some camera angles it almost looks right - at others it seems no two parts of the airplane are going the same way. Then there's the effort required with the canopy.
I know it's a limited run, but multi-part props are simply un-necessary while having 2 copies of the vac-form canopy are. On the other hand, I give them top score for instructions, history, research, and options - or at least the effort at same. If I ever find a couple of these cheaply, I'll pick them up for parts for my more usual Classic British Kits of the Lizzie.
It is not a kit for beginners, and maybe not even newbie intermediates. Have some experience and some patience before you tackle this one.
Again, my thanks to Pavla for the review sample and to IPMS/USA for allowing me to review it.
References:
- The Westland Lysander, Profile Publications #159.
- Westland Lysander, 4+ Publications, ISBN (978)8090255914.
- Westland Lysander, Warpaint #48, Warpaint Books, Ltd.
- Westland Lysander, Mushroom Model Publications, ISBN (978)8391717844.
- Pilot's Notes, Lysander III and IIIA Aeroplanes, Air Ministry, 1941.

Comments
Add new comment
This site is protected by reCAPTCHA and the Google Privacy Policy and Terms of Service apply.
Similar Reviews