
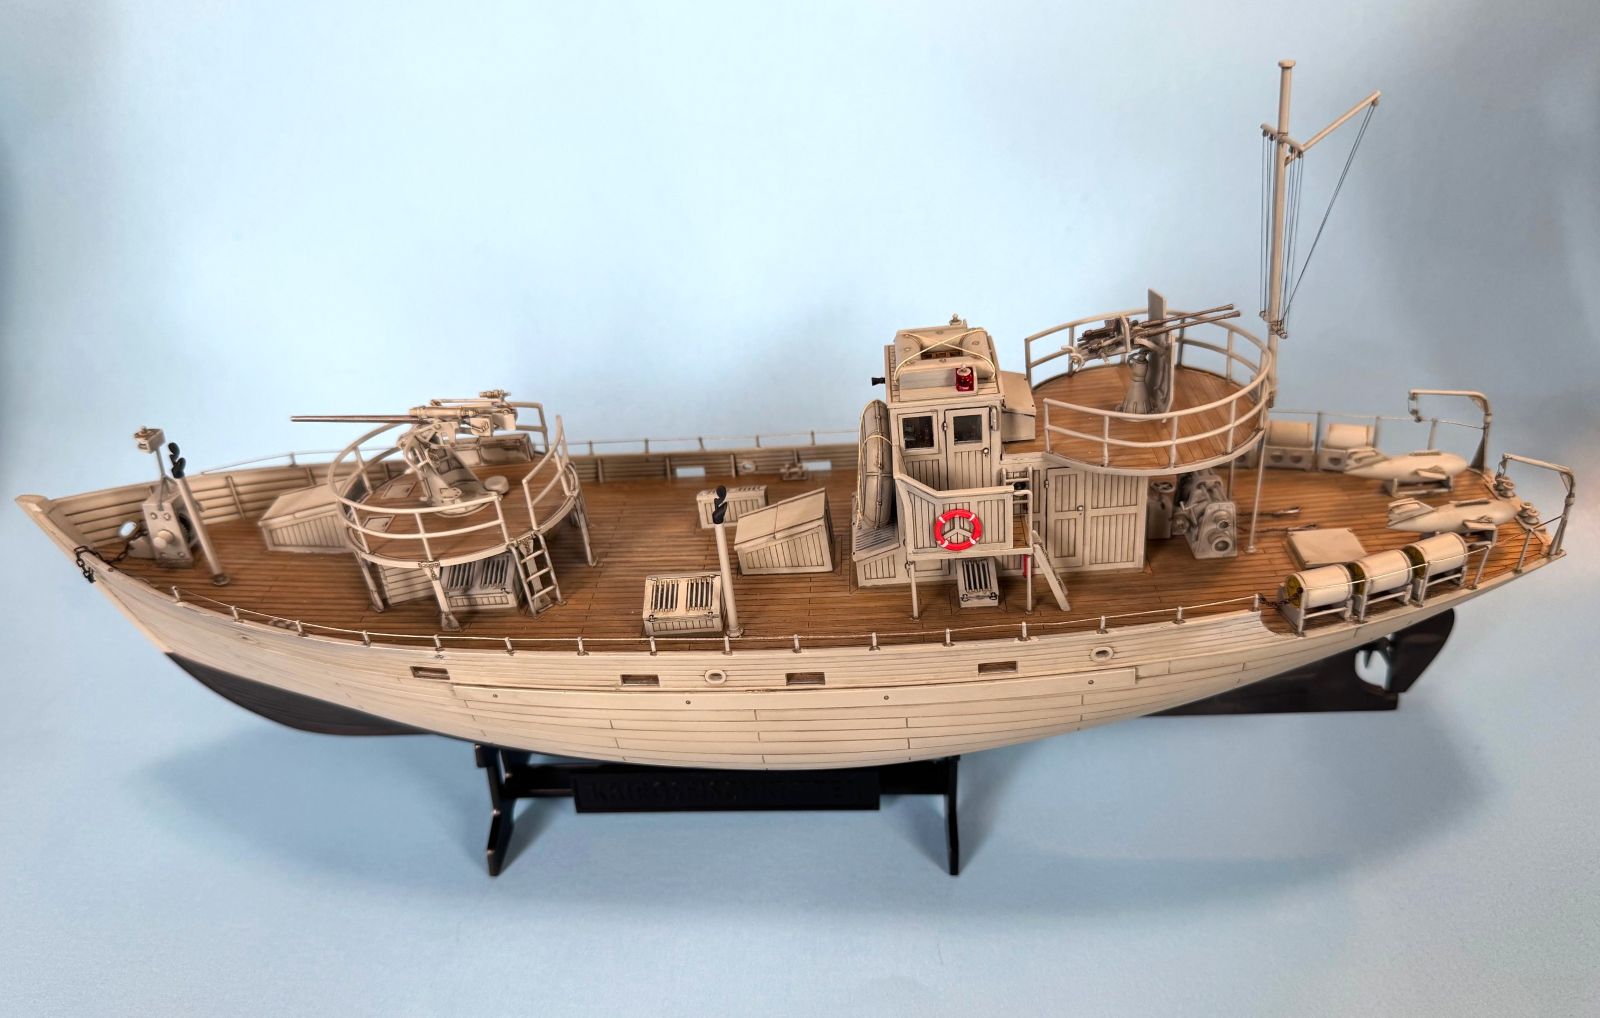
Kriegsfischkutter WWII German Patrol and Minesweeper Ship
While you may not have heard of Special Navy before, they are in fact under the Special Hobby umbrella and offer naval vessels in 1/72 scale. This kit was a recent release when it was provided to the Review Corps at the IPMS/USA Nationals this past summer. While not for beginners (the kit contains nearly 500 parts), a modeler with some experience can produce a very nice looking Kriegsfischkutter with this kit.
History
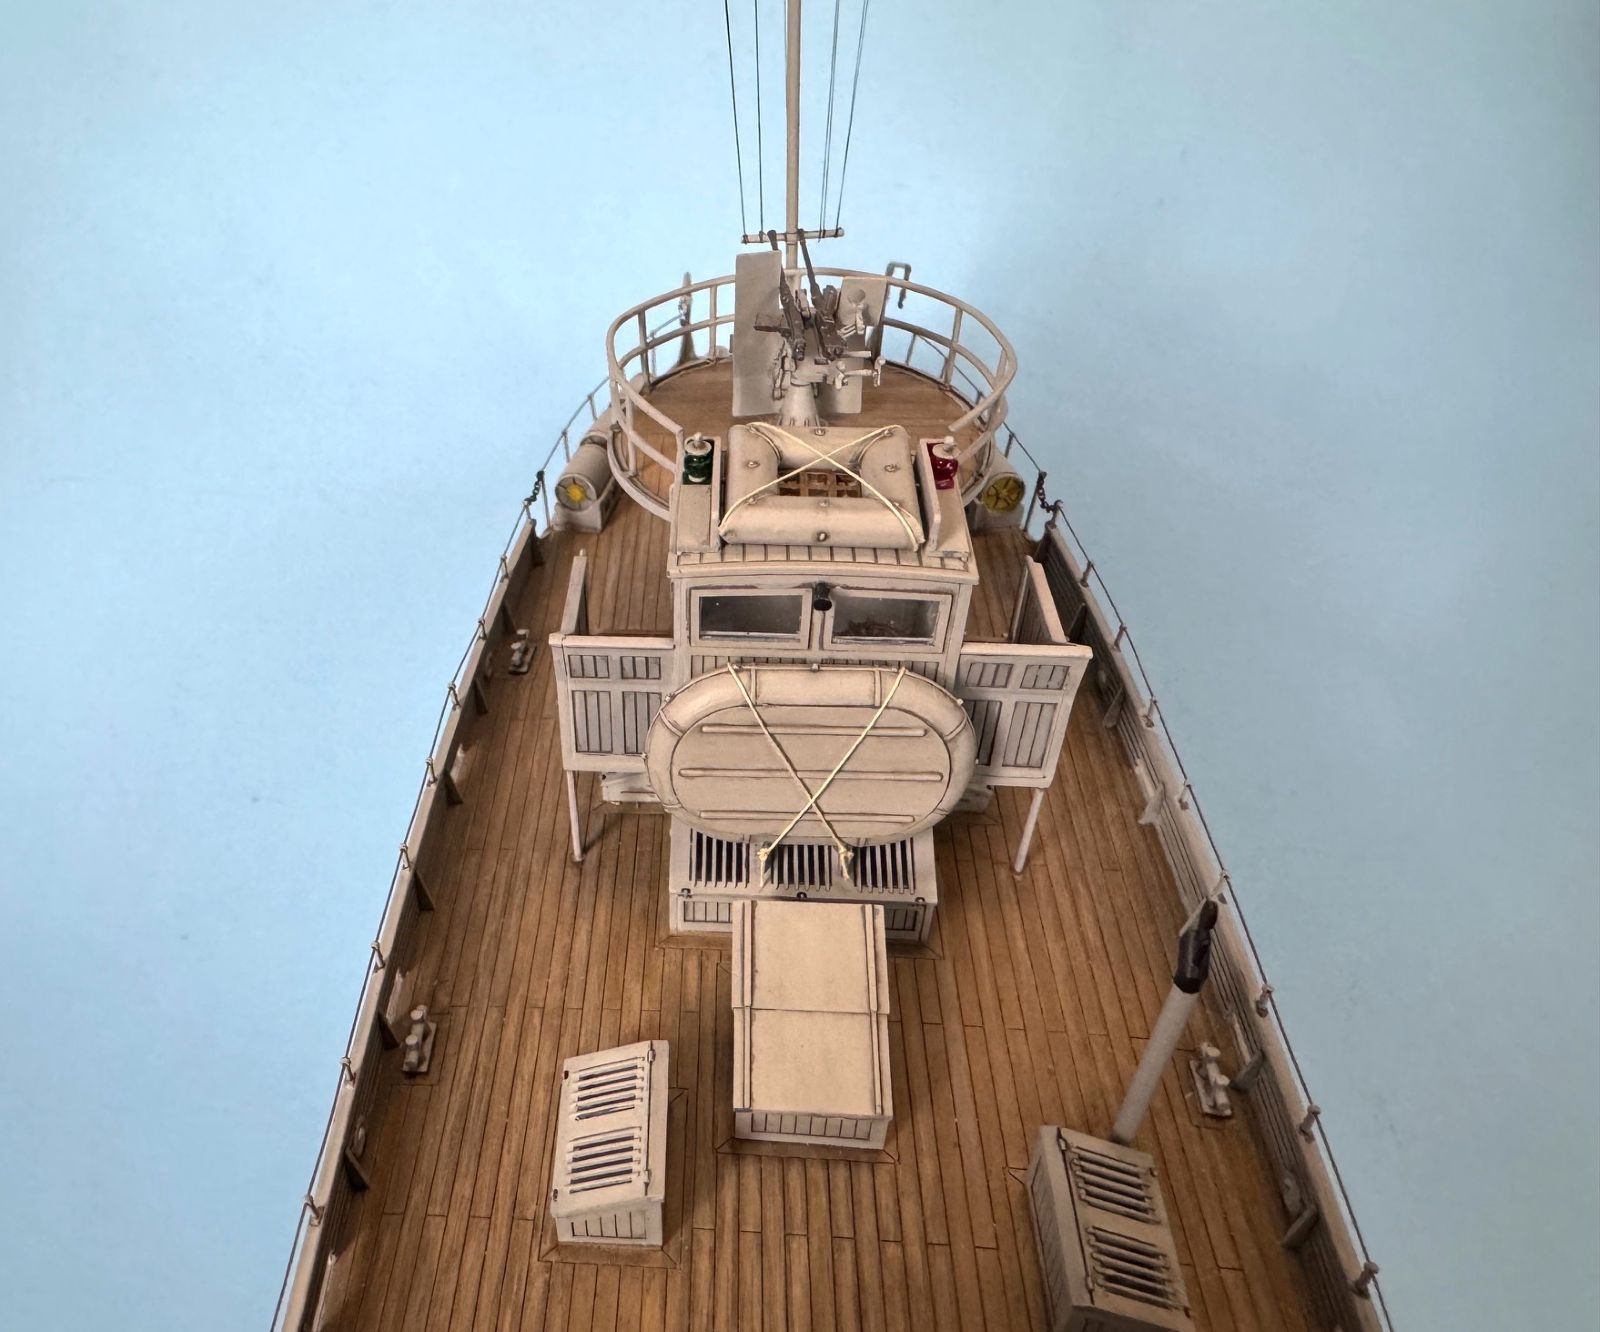
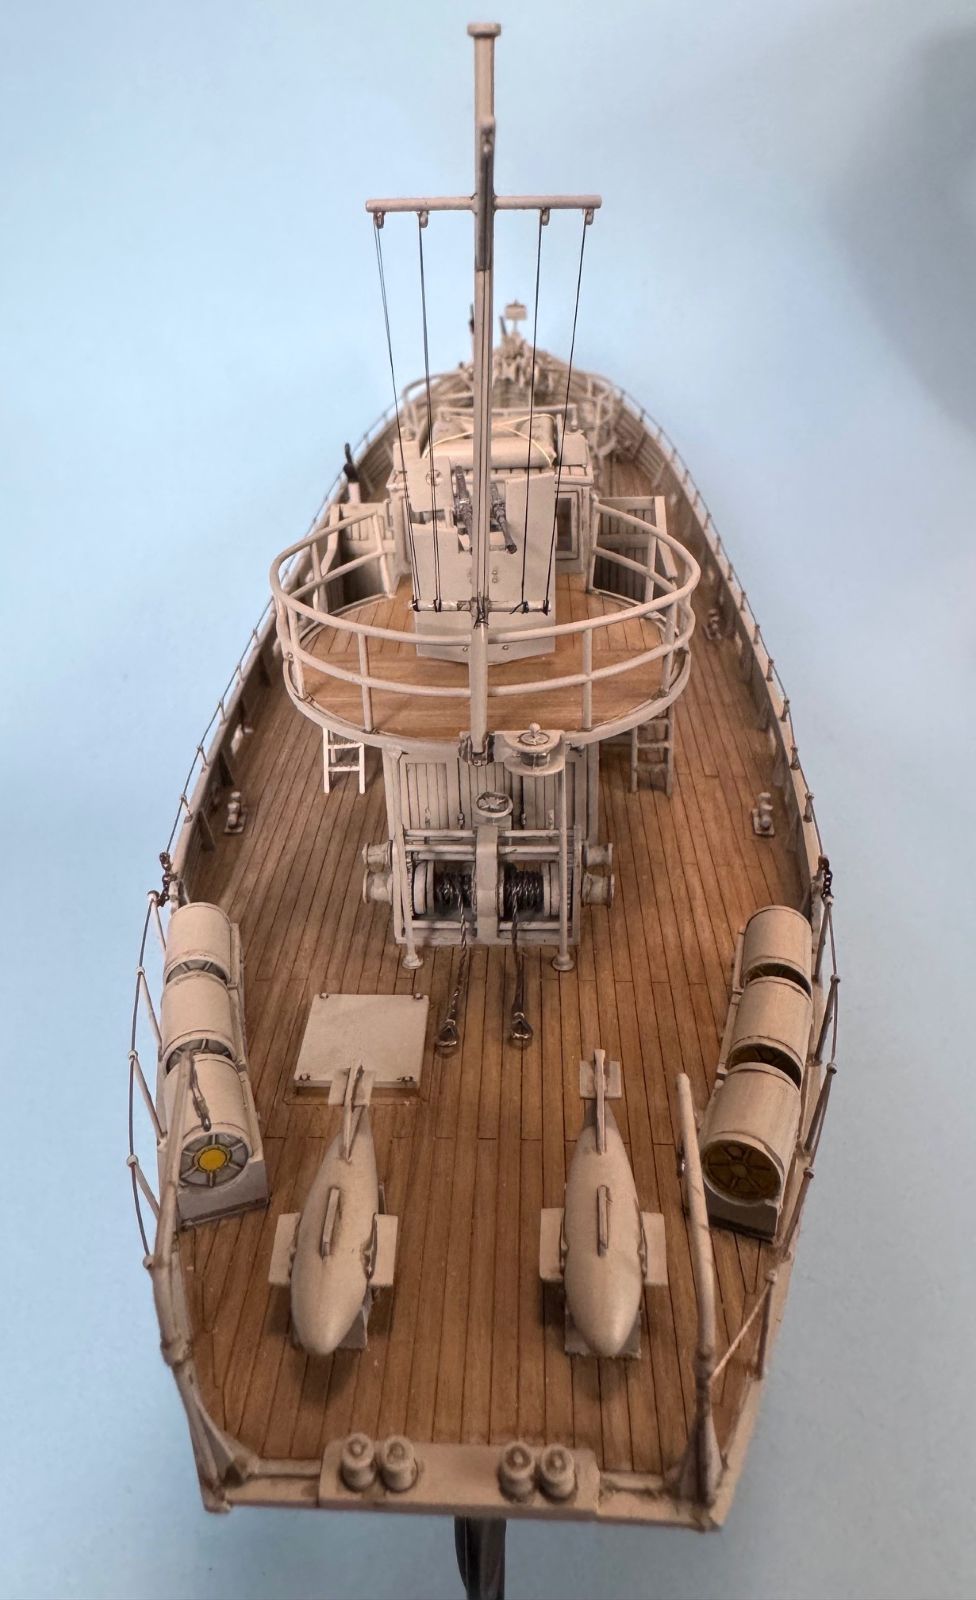
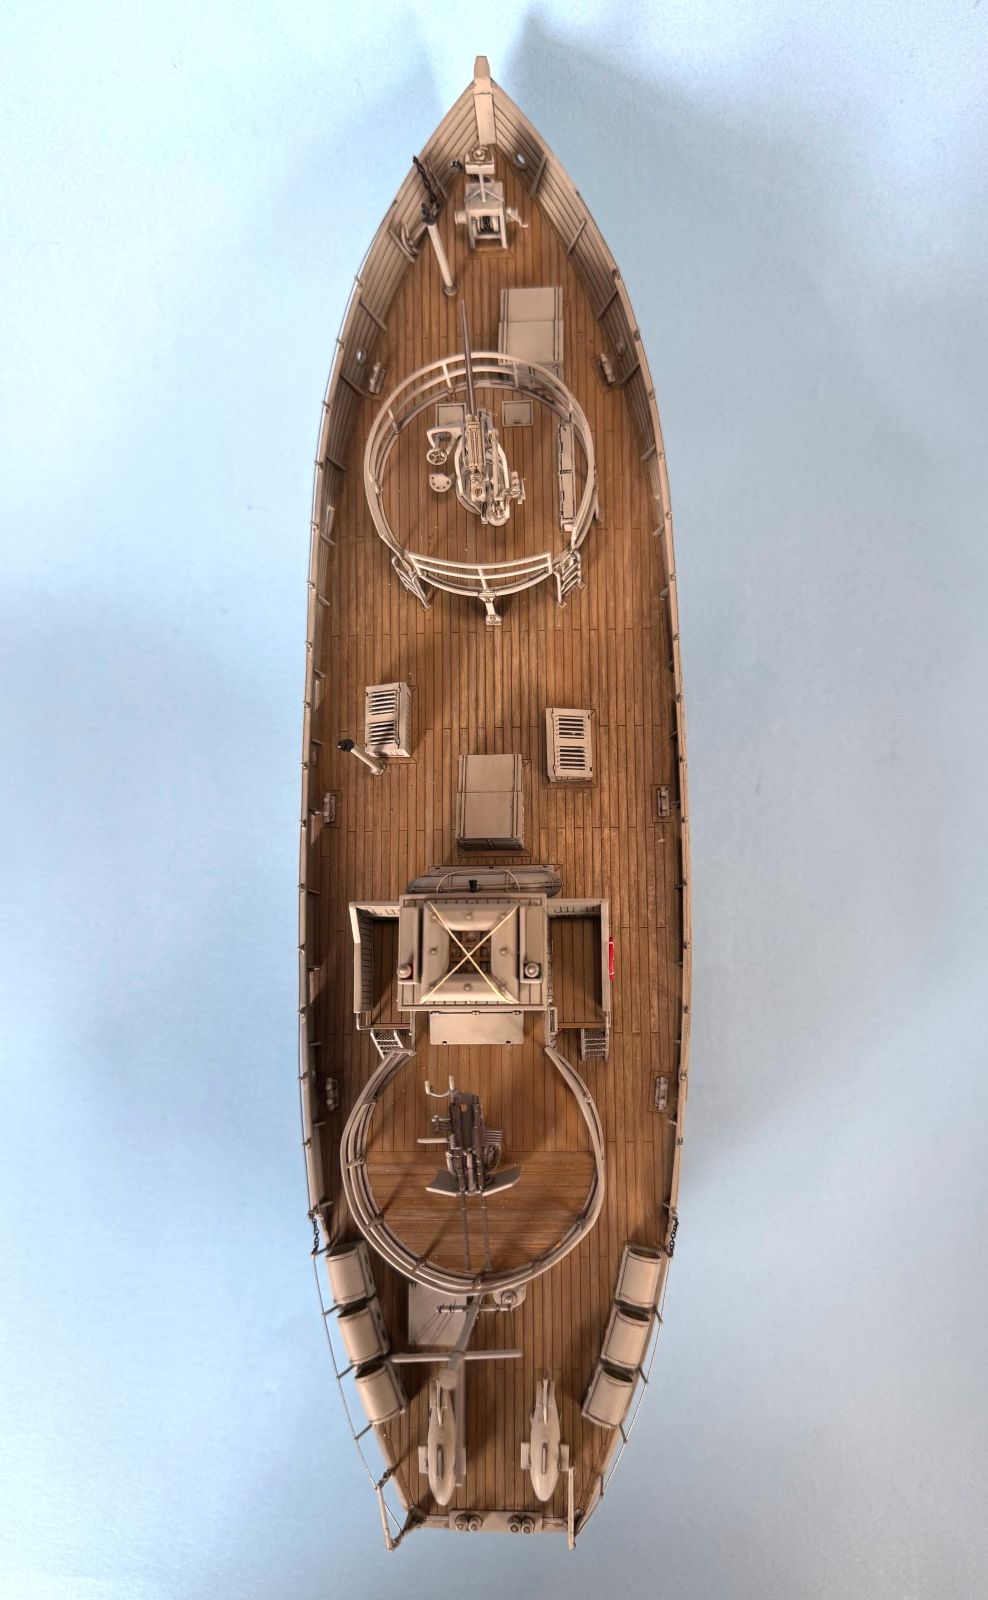
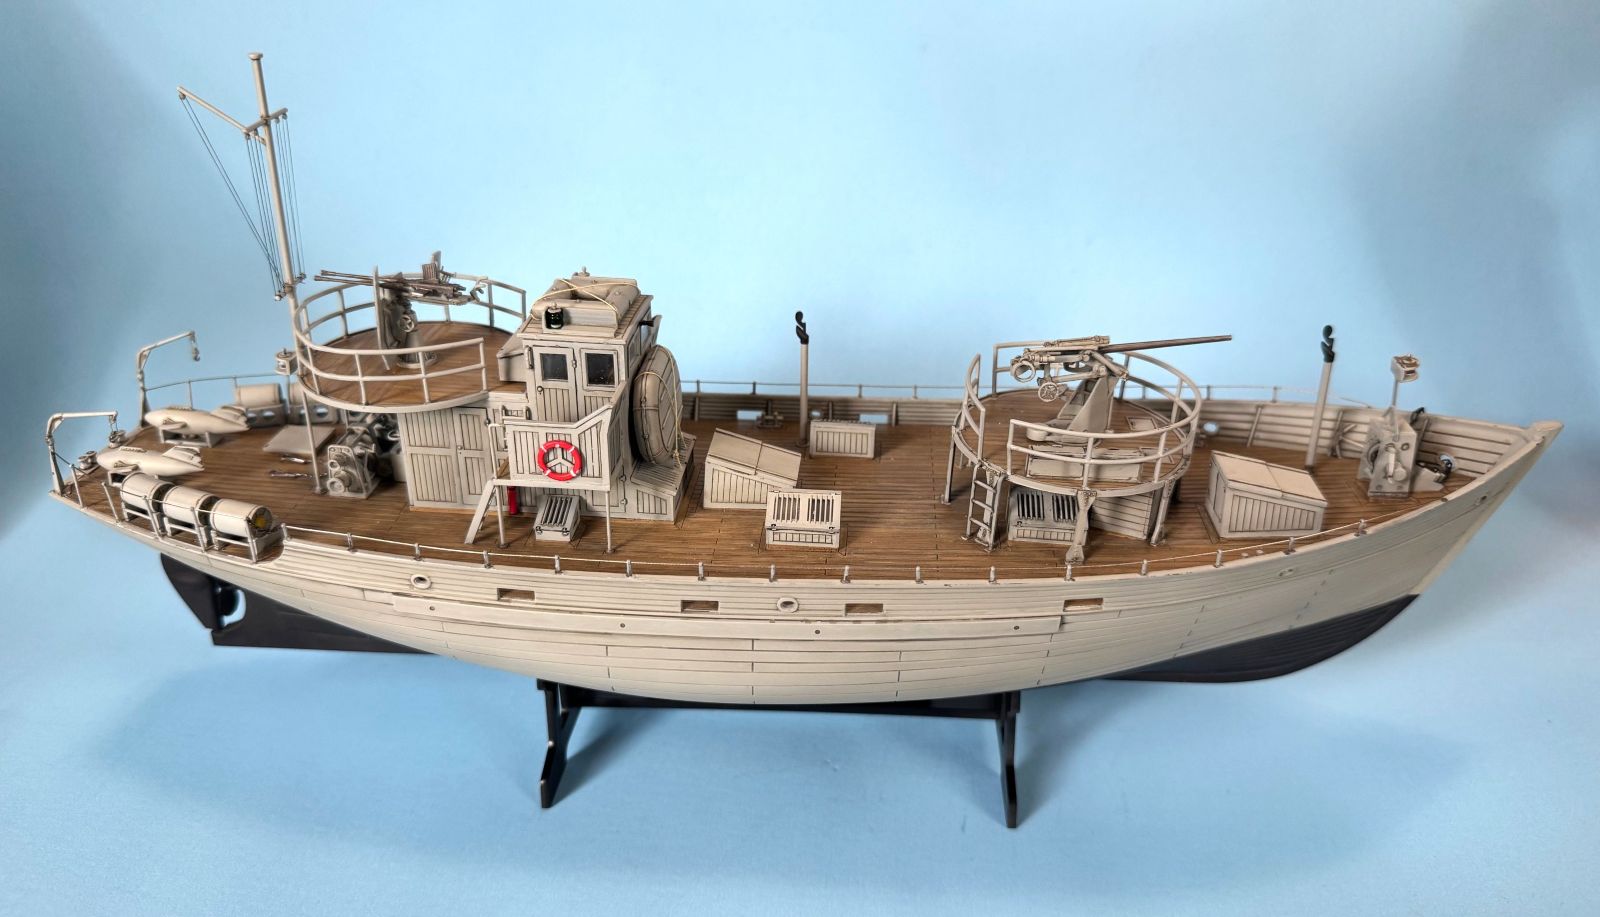
Beginning in 1941, the German Navy (Kriegsmarine) began developing fishing trawlers for various uses in the coastal waters near their occupied lands. Of the 1000 boats ordered, 612 were delivered and of these, 544 saw combat and 135 were lost in combat. These boats were manufactured by different companies in Germany as well as by Sweden and could be constructed of wood, metal, or composite materials. The boats were armed with an assortment of weapons including 20mm and 37mm guns as well as depth charges and could carry acoustic, contact, and magnetic towed sonar to search for enemy submarines. Following the war, many of the surviving boats were transformed into civilian fishing cutters by removing the gun decks and installing a pair of masts.
Kit Contents and Construction Tips
Upon opening the large box for this kit, you will find nine gray plastic sprues holding 448 parts, one clear plastic sprue with 29 parts, a 20-page instruction manual, and a small decal sheet. The 78 steps of the instructions begin with the assembly of the stand for the boat, then progress from the hull assembly to adding the deck and then building and adding the various items installed on the deck.
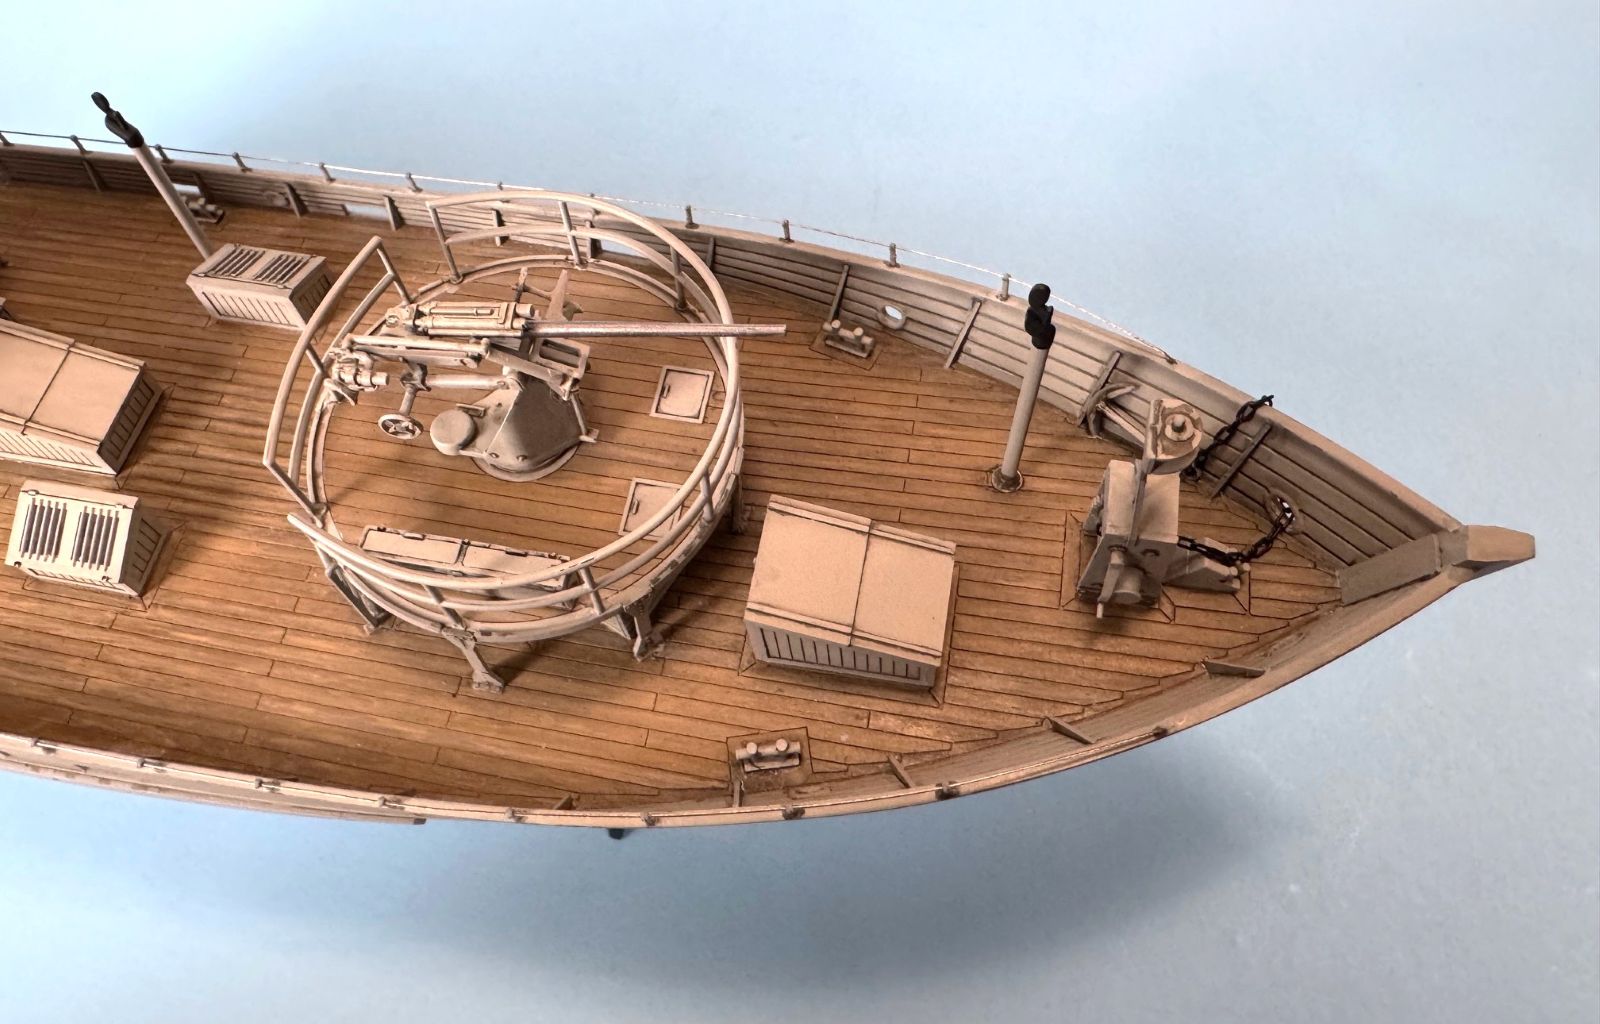
In Step 5, you need to pay attention to the order of the parts for the bulwark stanchions as they are not placed on the model in numerical order. I also found that each stanchion needed to be cut down slightly to properly fit. In Step 44, I elected to install part F24 on the underside of the forward gun platform first, and then I attached the six supports (all parts F25) to align them better with the locations under the deck. I also decided to perform Step 53 (installing the railing and supports) after everything was attached to the deck to avoid damaging the railing. I will also mention that in Step 74 there is nothing to align the 37mm gun with the forward gun deck, although there is an indentation in the deck. I used a piece of styrene tubing the same diameter as the indentation and drilled a shallow hole in the gun base to ensure proper alignment.
I touched up nearly every indentation to better accept the locating pins of the associated parts, which is not a bad idea after applying paint anyway. I touched the railing supports with a 0.4mm drill bit to accept the wire I used for the railing, more on this later, and I used a 0.3mm drill bit to create openings for the mast rigging and for the hoists on the stern of the boat.
Painting
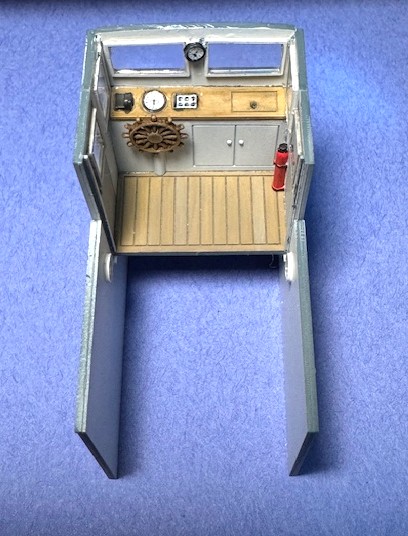
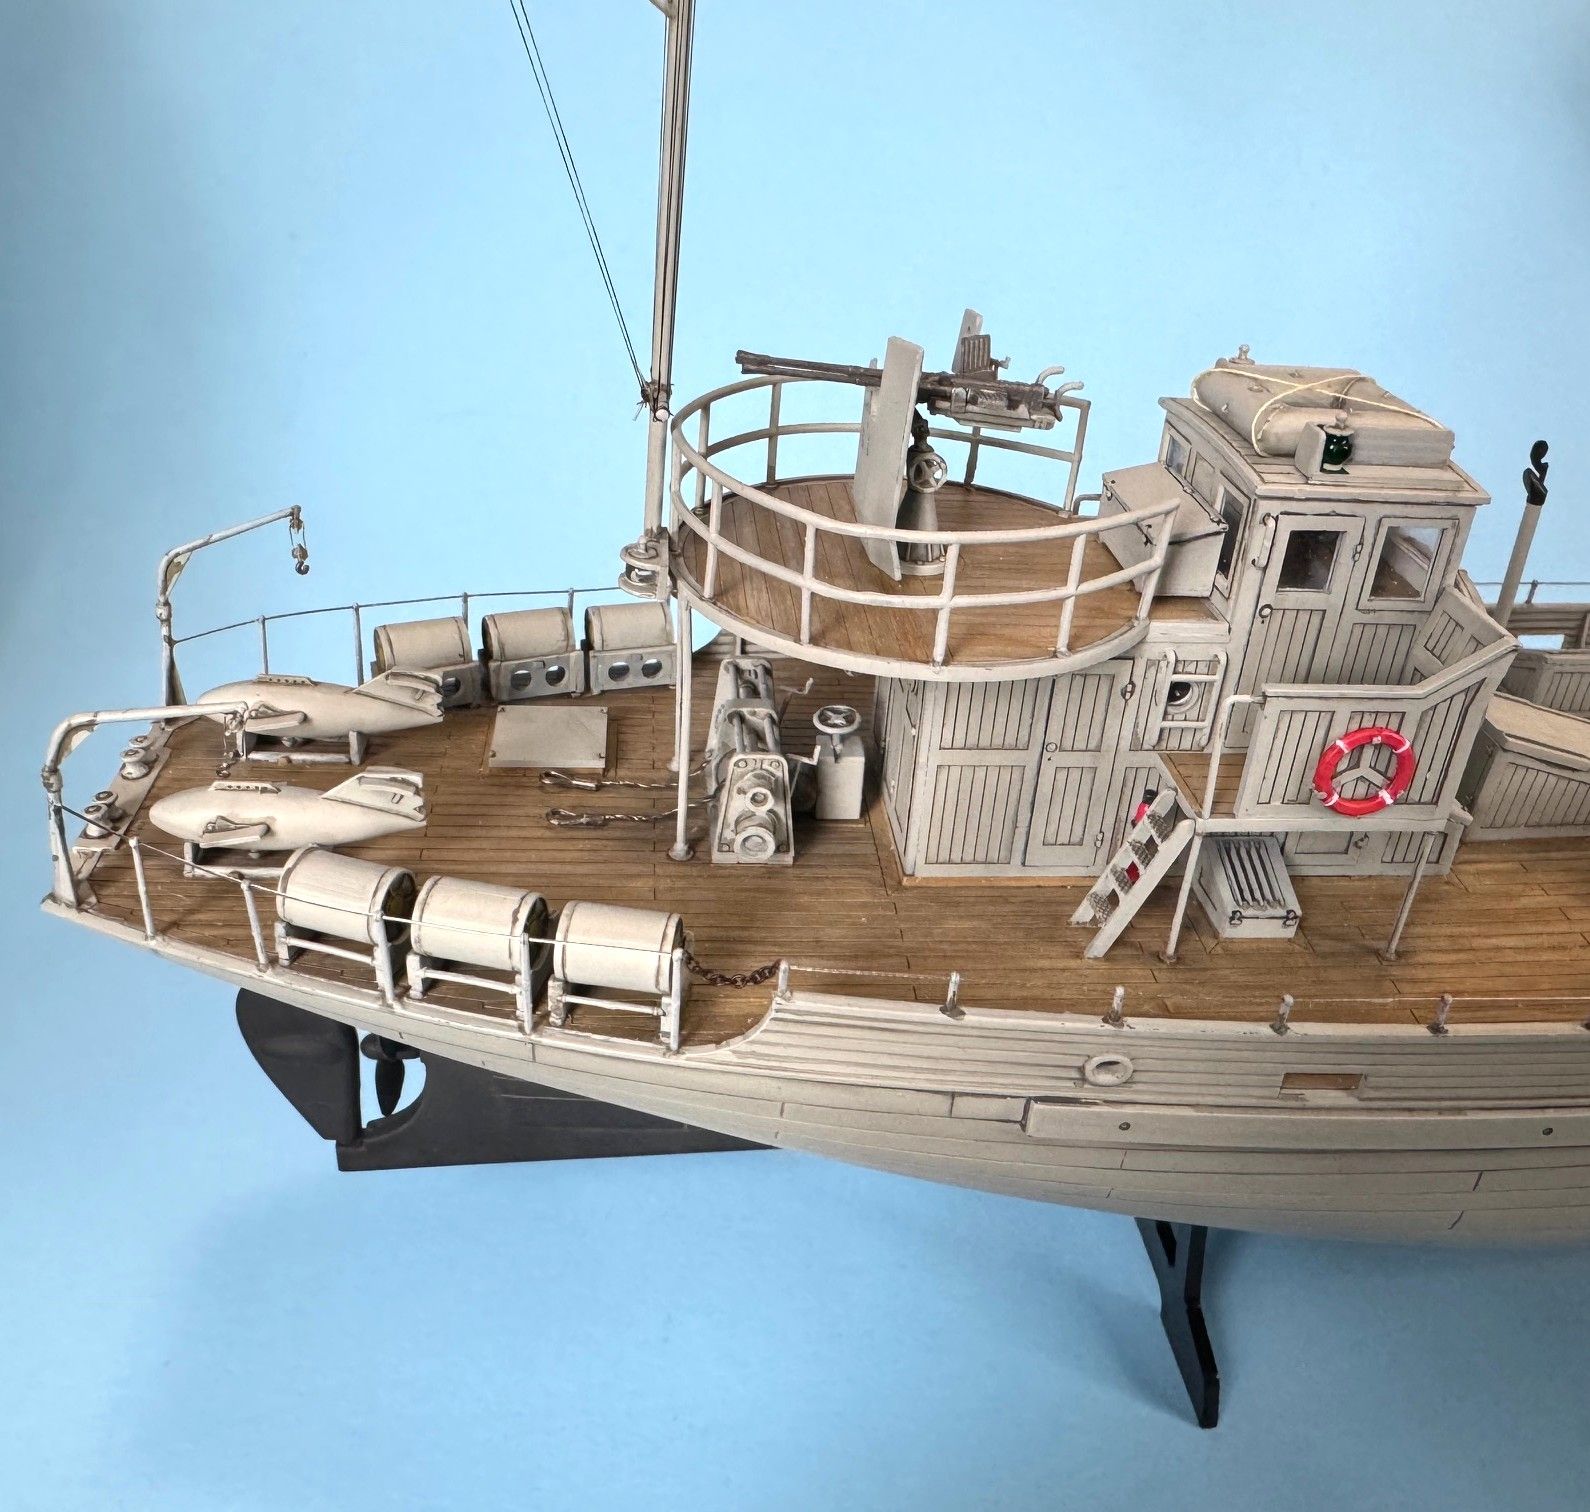
For this build, I primed everything that was going to be gray or black with Stynylrez Gray and the wood areas with Stynylrez Neutral Yellow. The boat received Model Master Acryl Flat Gull Gray (FS36440) and Flat Black for the hull and all the items above deck. The interior of the Control Cabin received Vallejo Off White. The decks were painted using the Vallejo Old and New Wood set and following the included instructions for new wood. I also used AK Interactive Grey Wash for Kriegsmarine Ships as my overall wash.
Regarding some detail painting, I used Model Master Acryl Yellow Zinc Chromate for the depth charge end caps. For the side running lights, I utilized Cobra British Racing Green for the area behind the starboard light with the light itself receiving Tamiya Clear Green. The port side has Model Master Acryl Guards Red for the area behind the light and the light is painted with Tamiya Clear Red. Life preservers received their colors from an AK Flat White marker and a Dspiae Red marker, which was also used on the fire extinguishers, along with an AK Black Rubber marker.
Added Details
I pulled out some 0.30mm Silver Beading Wire to recreate the railing around the boat and used some small chains to create the openings for boarding and departing the boat in port. Infini Fine 1/48 Aero Black Rigging (0.082mm) was used for the mast lines, and some small diameter stainless steel wire was used for the hoists. I used a slightly larger chain for the anchor than I used for the railing openings, and 0.3mm ship rigging line was used to “secure” the two rafts.
Hits and a Miss
As far as my hits are concerned, the level of detail is great with this kit and there was only minimal mold line cleanup needed during the construction. The instrument and clock decals went on easily with Micro Set and Micro Sol. I previously reviewed the ICM Kriegsfischkutter in 1/144 scale, and this kit provides details that are a little easier to see. The kit builds well with no fit issues that I identified during construction.
My one real miss about this kit was the flat railings provided for the gun platforms. No suggestions are provided on how to roll them for installation, and in my over 50 years of modeling, I have not run into such an issue. I first tried placing a section on an appropriately sized container and waving it over a candle a few inches above the flame. This resulted in creating a droop in one spot that I fought for the remainder of the build. I had better success dipping the parts wrapped around a container in water heated to 170F. The results were not perfect, but it was at least “OK.” If a 3D printed resin set of railings became available, I would replace mine in a heartbeat.
Conclusion
Overall, I would highly recommend this kit to modelers with some building experience due to the high number of small parts. The assembled boat measures 13-1/2 inches long, 4 inches at the beam, and 7 inches from the bottom of the base to the top of the mast. My appreciation to the folks at Special Hobby/Special Navy for providing this kit for review and the IPMS/USA for allowing me to perform this evaluation.

Reviewer Bio
Scott Hollingshead

Scott retired from the commercial nuclear industry with over thirty years of experience in Maintenance, Engineering, and Training. Prior to that he served on two aircraft carriers during his time in the U.S. Navy. He has been building models for over 50 years with his first kit being purchased with money from his grandparents for his sixth birthday. With a stash that consists of more aircraft than anything else, Scott still enjoys building a little bit of everything (including but not limited to tanks, cars, show cars, military vehicles (aside from tanks), ships, figures, real space, and some science fiction), which keeps his stash growing. Scott and his wife Fern reside in southwest lower Michigan, not far from South Bend, Indiana, and have three adult children and currently three grandchildren as well as a small dog and a large cat.
Comments
Add new comment
This site is protected by reCAPTCHA and the Google Privacy Policy and Terms of Service apply.
Similar Reviews