
Kawasaki Type Tanker PE Scale Set #794
Bottom Line
Tom’s Modelworks supplies a hefty, highly-detailed PE set for the Fujimi family of 12 large, Kawasaki-type Imperial Japanese Navy fleet tankers. This PE set is for advanced modelers with some scratch-building experience.
Brief History
The Kawasaki type tankers were twelve large (~10000 tons) tankers that were designed in the mid-1930s with the intention of joining the fleet in wartime, to be refitted with underway refueling of warships. Although there were some variations in dimensions from different yards, they were very similar in appearance and performance. Seven were used during the Pearl Harbor attack, and all were extensively used by the fleet, but none survived the war.
What You Get
This PE set includes parts for twelve Kawasaki type auxiliary tankers in pre-war or wartime appearances. Ships in this class where: Genyo Maru, Itsukushima Maru, Kenyo Maru, Kokuyo Maru, Kyokuto Maru, Nichiei Maru, Nippon Maru, Shinkoku Maru, Tatekawa Maru, Toa Maru, Toei Maru and Toho Maru.
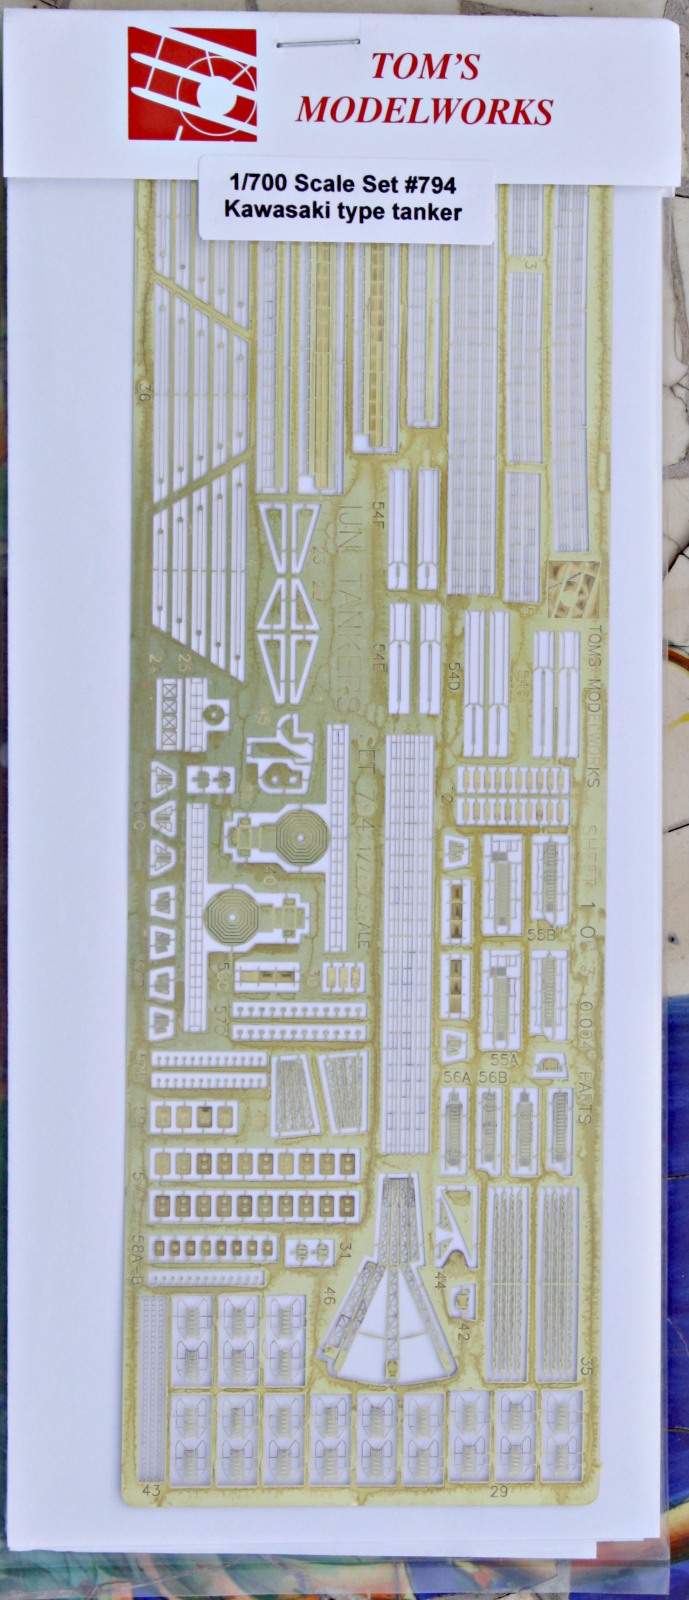
The PE set comes in a 9.5 X 4 inch plastic bag with paper header. Inside you have six pages of Instructions, front and back. There are three 0.005” brass photoetch (PE) sheets. Sheet 1 is 219x72 mm (8½ X 3 7/8 inches), consisting mostly of railings, walkways, cranes, small platforms, inclined ladders, rigging, hatches and deck hatches (234 pieces). Sheet 2 is 147 X 72 mm (5½ X 3 7/8 inches) and mostly has booms and supports for the refueling masts plus the anchors. Sheet 2 has 67 pieces, including different boom masts for the refueling lines. Sheet 3 is 147 X 72 mm (5½ X 3 7/8 inches) and mostly has bridge fronts, bridge decks, boat davits, funnel caps, liferings, walkway supports, small masts and other small parts. Sheet 3 has 116 pieces, including five different bridge fronts that depict all of the Kawasaki tankers. Altogether, you get ~448 separate pieces with this set.
The parts are fine and detailed, as good as any PE sets available. Some pieces have embossed detailing. The research behind Tom’s IJN Tanker PE set #794 is outstanding and deserves applause. Credit is given to Dan Kaplan and Mr. Motoyuki Iwashige for the detailed work on differences among ship appearances and making this PE set extremely accurate. See References for further information online.
The Instructions are a small book, and through line drawings and photos of particular ships and the plastic model with arrows showing which parts to use, carefully show which parts belong where, and which kit parts need to be replaced or modified. It also has suggestions for scratchbuilding some items, especially masts, for particular ships or fits.
The Build
Fujimi 400839 Kokuyo Maru was the kit on hand, a waterline only version (Figure 1). It is basic, rather crude and screams a need for PE parts. The kit PE parts are sparse, and railings have feet instead of a full lower bar – they will not be used. The text on the box and in the Instructions was mostly Japanese. There are three sprues, the hull, the usual metal weight and a small PE fret (~10½ X ¾ inches) – 90 plastic parts and 24 PE parts. The PE fret has railings with feet, walkways with feet, a few small platforms, one solid crane and six lifeboat davits.
Instructions are one page (front and back) measuring 17 X 8¼ inches, in B&W. The front has the usual instructions for the Instructions, a list of paint colors needed (Dark Grey, Flat Black, Silver, Tan) and a profile and overhead line drawing. The back has assembly instructions showing exploded line drawings of where parts go, and line drawings of the kit parts and sprues.
The hull length is the correct length (525.9 feet vs. 525.6 feet actual), but slightly less wide (64.3 vs. ~65 feet beam actual or 98.9%), close enough to not worry about modifying the hull dimensions. The bow looked too curved instead of near vertical. The hull has a flat bottom, unusually for 1/700 scale waterline ship models, and the bottom plate is actually a continuation of the hull for a thickness of about 3 mm. Using the bottom plate (which is the same light grey color as the other kit parts, instead of the usual bright red in other kits) would leave a seam that needs to be filled. Since loaded tankers had deep draft, it made sense to me to not include the bottom plate in this build.
All sprues, parts and PE frets were washed with detergent, rinsed and dried. PE Fret and sprues with parts attached were airbrushed Polly Scale Model Railroad Paint UP Harbor Mist Gray (182) F414176. I have used Polly Scale acrylics and they are a good match for my previously preferred oil-based paints. UP Harbor Mist Gray is a good match for WW2 IJN Grey, especially the Kure shade.
Paints Used
- IJN Grey: Hull, decks, fittings – Polly Scale Model Railroad Paint UP Harbor Mist Gray (182) F414176
- Wood decks: Tamiya XF-57 Buff
- Black: Funnel & crane tops – Floquil Railroad Colors Weathered Black F110017
- Red for ventilator openings: Tamiya XF-9 Hull Red
- Red for signal lights (parts #33), starboard running light: Tamiya XF-7 Flat Red
- Green for signal lights, port running light: Tamiya XF-15 Light Green
- Off-white for signal lights, lifeboat canvas tops and mast tops: Polly Scale IJN Sky Gray F505280 36495
- Testors All Purpose Dullcote 1260 Flat Clear Lacquer
- Weathering: #FF-60 Weather System Rust & Weather Kit, Bragdon Enterprises
A first-class feature of Tom’s IJN Tanker PE set #794 is inclusion of pieces unique to each ship. Five different bridge fronts were supplied and which ship they belonged to was identified. I followed the instructions for Kokuyo Maru for this build (mostly). Throughout the instructions, it is clear which pieces to use for which ships for bridge fronts, kingposts and for possible gun arrangements. There is even the massive stern crane for Kyokuto Maru – truly unique.
For building the Kokuyo Maru, you will need to keep track of the plastic kit parts, Fujimi kit PE parts and Tom’s PE parts. This can be confusing so pay close attention to Tom’s instructions. Rather than go over the instructions line-by-line, I would like to give some generalizations. Some assemblies were not visualized or explained enough to have a clear picture of what to do. Order of assembly of subunits and pieces was scattered and not conducive to lowering risk of damaging the fine parts or for ease of assembly (just look at the cable pulleys on masts). My advice is to read through the entire order of assembly and make up your own mind. For example, anchors and signaling masts were steps 13-15, 33 (out of 60), but to me, these are far better applied at the end of the build – they are much too fragile to withstand handling the model during assembly. A different order of addition would have saved a lot of trouble.
In general, I prefer to build from the bottom up and center to sides. In hindsight, this may not be the best strategy for this PE set. First, follow kit directions to open holes in the decks you will need in the future. Then using Tom’s PE instructions, do the five modifications to hull, deck and parts to remove pieces and details from plastic kit parts. You will need a ruler in mm units. Be prepared to fine-tune these modifications during assembly.
I started with the hull and made the corrections, added the decks and sanded down the plate marks on the hull – they were too raised to be in scale. I added a lot of small Tom’s PE parts to the decks while I could reach them unencumbered. Next, I tried to follow the numerical sequence of steps in Tom’s PE instructions. Steps 1-6 describe the railings, nicely laid out for different parts of the ship. Railings need to go on last, so I continued to the catwalks (steps 7-11). Kit PE parts are used here, and numbers for Tom’s and kit PE parts overlap. Overall, I did not like the Fujimi PE catwalk feet and cut off some of them to make the finished catwalk avoid deck obstructions. I set aside the finished catwalks until after the bridge was constructed. It was not specifically mentioned when to attach the catwalks – now to the deck or after the bridge is in place? In retrospect, it would have been better to attach the front catwalk, then the bridge, then the aft catwalk.
Bridge assembly (steps 16-34) did not go as well as I would have liked, although I have mostly myself to blame for not folding as well as desired. In retrospect, it would have been better to build the bridge on the ship itself rather than as a separate unit. Be aware of some play in the position of the kit bridge to the deck that greatly influences how the PE bridge face, catwalks and decks connect. Be sure to test fit catwalks and bridge structure repeatedly to ensure good fit. I glued the assembled bridge to the deck first and that was a mistake, as the catwalks had overhangs fore and aft. Awning supports on the bridge were a major headache and later I found out they were not sized properly – this was not in the instructions. I even made mounting holes to facilitate the fit, to no avail. They caused railing fit problems later. I destroyed the wider support and substituted two single 25mm AA guns with shields to cover the holes. Also added ammo boxes nearby. These two additions were from my spare parts box and not included in the PE sets. Otherwise the majority of adding Tom’s PE parts to this kit was routine, but required careful reading and re-reading of Tom’s instructions and careful planning on how to fold Tom’s PE items. Most parts are exceedingly small and require the right tools for tiny, fragile parts.
Scratchbuilding is necessary, something that advanced modelers can accomplish. It sure helps to have a spare parts collection, as well as various plastic and brass rods, sheets, etc. and putty and plenty of grades of sanding devices. Knowing this in advance would help budget one’s time and approach. For example, positioning the kingposts and their PE trusses necessitated scratchbuilding the posts – depends on which ship you are building. The funnel on Kokuyo Maru needed to be heightened, another scratchbuild project (I was lucky in that my spares box had a stack that was very close in size to the kit stack and easy to add). The fenders needed tires (made from slicing sections off of plastic rod and tubes) or cotton batting/bags (made by shaping Russian olive tree branchlets) – this adds more than a dozen more pieces to the final outcome. I positioned the fenders onboard near the fender davits. The aft tripod mast used the kit plastic pieces, but there was no mention of horizontal platforms and supports which are visible on the photographs in the instructions. There was also no mention of needing a spar and PE cables, but I added them anyway. And folding each footstep of the 44 inclined ladders and the boarding ladders is actually easier than suspected, but consumed considerable time. I also added sheet plastic around the forward and aft refueling platforms as per photos in the instructions and online. The forward platform needed plastic sheet replacements for the PE parts that broke off during handling – that is how delicate this set is.
There were a dozen hatches (doors) left over, but I did not find any mention of whether they would go on the aft deckhouse. So I added six hatches in visible spots, but needed to cut off the bottoms to make them fit the height of the aft deckhouse.
Railings were generously supplied, with more than enough to cover all the areas. The aft deckhouse railings were not illustrated or explained fully, leaving the modeler to decide where to cut railings. However, as is typical with PE railings, the width between stanchions was preset, but the lengths of railing needed for bridge and aft deckhouses meant stanchions were not at corners or bends. One solution is to ignore putting a stanchion at a corner or sharp bend, which I did to save time and railings. The better way to lay railing is to chop them up into smaller pieces so that there is a stanchion on every corner, with some between-stanchion lengths variable. This method is more time-consuming because it involved precise measuring and cutting PE railings, and either mating open ends of railing pieces or having stanchions at variable distances– always tricky in 1/700 scale.
A flagstaff at for the extreme aft of the ship would have been helpful to show off the decent IJN ensign flag decal. One of those little details I forgot until reviewing photos for this review.
Value
At $40 MSRP, this PE set is priced in the middle tier for a comprehensive, single-ship PE set. Tom’s PE set is highly detailed and scale-conscious, intended for a more serious, advanced skill modeler. There probably will never be anything better to super-detail WW2 IJN Kawasaki tankers. You also have many leftover, unused parts that would fit fine on other IJN merchant ships, including other oiler classes. Value is good.
Summary
This PE set is recommended for advanced modelers outfitting Fujimi’s Kawasaki type tankers, and has a plethora of parts to outfit and accurize any one of the twelve ships of this class in pre-war or wartime appearances. The PE is close to scale and highly detailed, but some pieces are very difficult to utilize, and the bridge awning supports were incorrectly sized. There were some fit problems with the bridge, and some folding parts were too small to fold (deck pipes), but most of the PE parts were easy to use. The instructions could be more illustrative, but with careful attention and planning ahead, a very detailed model can be had. Scratchbuilding is also needed, another reason this PE set is best suited for advanced modelers. Would have been even better if hoses were included.
Pros
- Superdetail! Close to scale throughout and tremendous attention to detail and accuracy.
- Different bridge fronts and kingpost truss options allow one to build any of the twelve Kawasaki tankers before and during WW2.
- Many parts and fittings are replaced or modified with PE parts, converting the basic kit into an accurate rendition.
- Where there is no or doubtful information on a ship’s appearance is carefully explained.
- Some PE parts have grooves to facilitate correct folding.
- Pre-measured railing lengths for long-span deck railings.
- Extra pieces are greatly appreciated.
- Converts a crude and inaccurate kit into a good-looking model.
Cons
- Instruction steps are arranged oddly in relation to the build sequence and can be confusing at first.
- Suggest that illustrations be used to pinpoint exactly where PE parts go, how they fold and how they connect, in addition to the existing illustrations and photographs.
- Suggest changing the order of assembly in the instructions to focus more on completing subassemblies or areas, and clearer direction on when to put parts or subassemblies on the model.
- Update the bridge awning support pieces or show how to correct their shape.
- Inclusion of plastic rods would facilitate scratchbuilding – especially kingposts and tires for the numerous fenders.
- Need for the right tools and adhesives for handling tiny parts, scratchbuilding, lighting (and magnification for some of us).
- Would be helpful to list some online resources for more detailed information (such as Dan Kaplan’s Model Ship Forum).
- Some of the parts and assemblies work better if original kit parts were replaced with aftermarket pieces – this is not immediately evident or explained.
- Suggest showing where to drill tiny holes for easier and stronger attachments for some parts (awnings, davits, piping).
- Would really be nice to include PE hoses or detailed explanations of how to make them – this is the only major missed opportunity.
- Deck fittings (such as winches) would also be a good idea to include as the kit pieces are either absent or are very crude and detract from the higher quality of the PE parts.
Recommended for superdetailers and advanced modelers of 1/700 scale IJN tankers. Very highly recommended! If you dare.
References
- https://en.wikipedia.org/wiki/Kawasaki-type_oiler
- https://nihonkaigun.wordpress.com
- http://pwencycl.kgbudge.com/K/y/Kyokuto_Maru_class.htm
- http://www.combinedfleet.com/Kokuyo_t.htm
- http://www.shipmodels.info/mws_forum/viewtopic.php?f=59&t=155495
Figures
- Figure 1: Box art for Fujimi 400839 IJN Kokuyo Maru plastic kit with photoetch parts (note that the box art is not accurate). 002
- Figure 2: Fujimi kit PE fret – the catwalks and a few other pieces are used.
- Figure 3: Tom’s PE set #794 for IJN Kawasaki type Tankers.
- Figure 4: Tom’s IJN Kawasaki type Tanker PE Sheet 1.
- Figure 5: Tom’s IJN Kawasaki type Tanker PE Sheet 2.
- Figure 6: Tom’s IJN Kawasaki type Tanker PE Sheet 3.
- Figure 7: Waterline view of starboard side of IJN Kokuyo.
- Figure 8: Overhead view of starboard side of IJN Kokuyo.
- Figure 9: Port waterline view.
- Figure 10: Port overhead view.
- Figure 11: Bridge front showing colored signal lights.
- Figure 12: Starboard bridge and masts closeup.
- Figure 13: Bow refueling platform.
- Figure 14: Aft Refueling platform.


Reviewer Bio
Luke R. Bucci, PhD

Luke built all kinds of models starting in the early '60s, but school, wife Naniece, and work (PhD Clinical Nutritionist) caused the usual absence from building. Picked up modeling to decompress from grad school, joined IPMSUSA in 1994 and focused on solely 1/700 warships (waterline!) and still do. I like to upgrade and kitbash the old kits and semi-accurize them, and even scratchbuild a few. Joined the Reviewer Corps to expand my horizon, especially the books nobody wants to review - have learned a lot that way. Shout out to Salt Lake and Reno IPMSUSA clubs - they're both fine, fun groups and better modelers than I, which is another way to learn. Other hobbies are: yes, dear; playing electric bass and playing with the canine kids.
Comments
Add new comment
This site is protected by reCAPTCHA and the Google Privacy Policy and Terms of Service apply.
Similar Reviews