
HMS Colombo
Thanks to MRC for the review kit and IPMSUSA for the opportunity to conduct and publish this review.
Bottom Line: 1/700 scale models of Royal Navy light cruisers built in WW I and repurposed as anti-aircraft (AA) cruisers in WW II have been long awaited as injection-molded plastic kits, and HMS Colombo is the latest arrival, and well done.
History
HMS Colombo (Pennant D89) was a later C Class light cruiser (also called Carlisle or Capetown sub-class) built near the end of World War I and launched in 1918, too late to see action. There were 28 C class light cruisers in seven groups built, and Colombo was in the last group along with Cairo, Calcutta, Capetown, and Carlisle. The later C class cruisers had a peaked forecastle to give better seakeeping qualities, distinguishing them from earlier C class ships. C class light cruisers originally carried five centerline, single 6in mounts, two single 3in AA guns, and light AA (single 2pdr, 20mm) added in the 1930s. C class light cruisers were built with overseas service in mind, with long range, twin shafts, a top speed of 29 knots and were lightly armored. Colombo served mainly in the Indian Ocean (befitting her namesake, the city and British naval port of Colombo in Ceylon – present-day Sri Lanka). She spent some time in the West Indies, but was put in reserve from 1936 to 1939, when she was hastily recommissioned for World War 2.
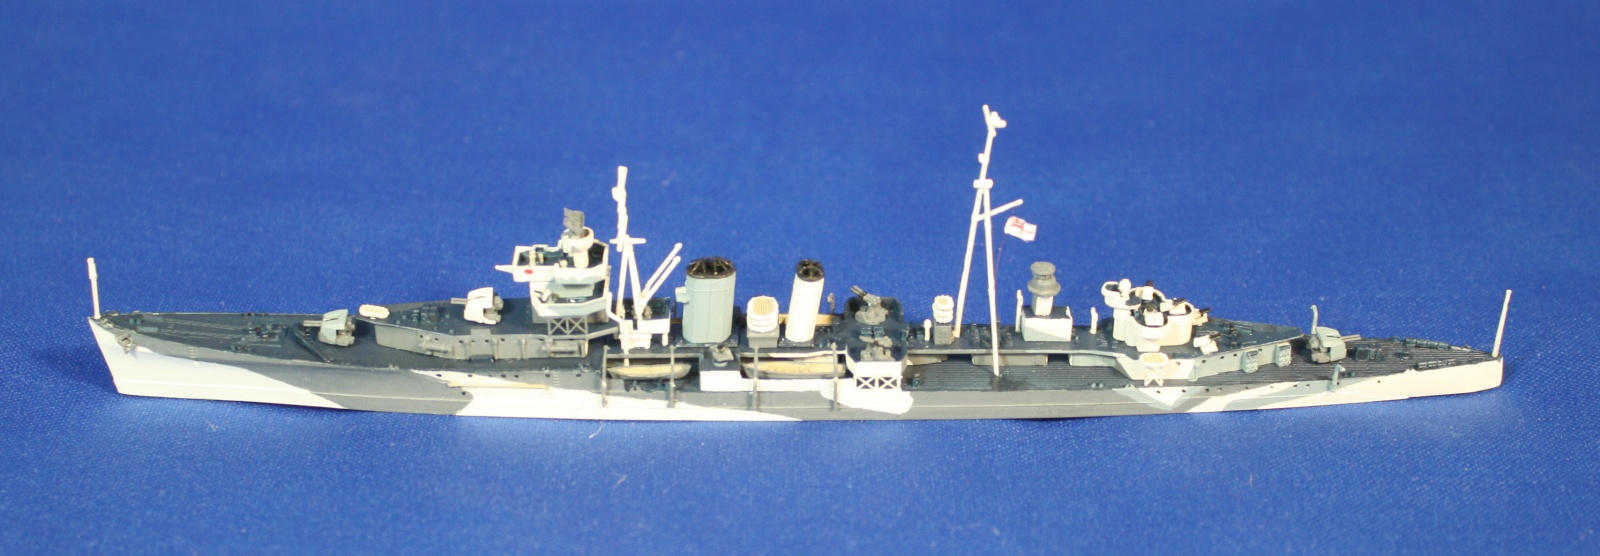
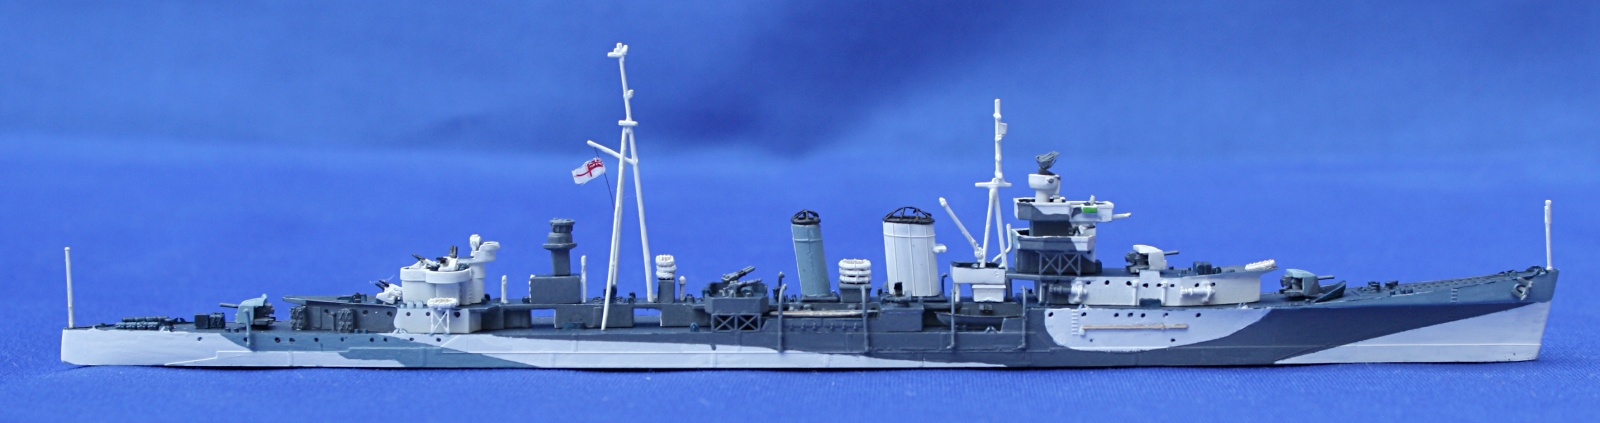
She was mostly used for convoy escort and blockade patrols, and captured a German merchant ship blockade runner in November 1939. After 1940 she was stationed in the Eastern Fleet (Indian Ocean), again participating in convoy escort, blockage patrol and some raids. In 1942 she was sent to England for conversion to the ultimate fit for a C class antiaircraft cruiser, ready for action in March 1943. She wore an Admiralty disruptive camouflage pattern during this time period as shown on the box cover and profile page (see below for details). She saw service in the Mediterranean including Operation Dragoon (invasion of southern France) and operations near Greece, but in 1945 was decommissioned and scrapped in 1948.
What You Get
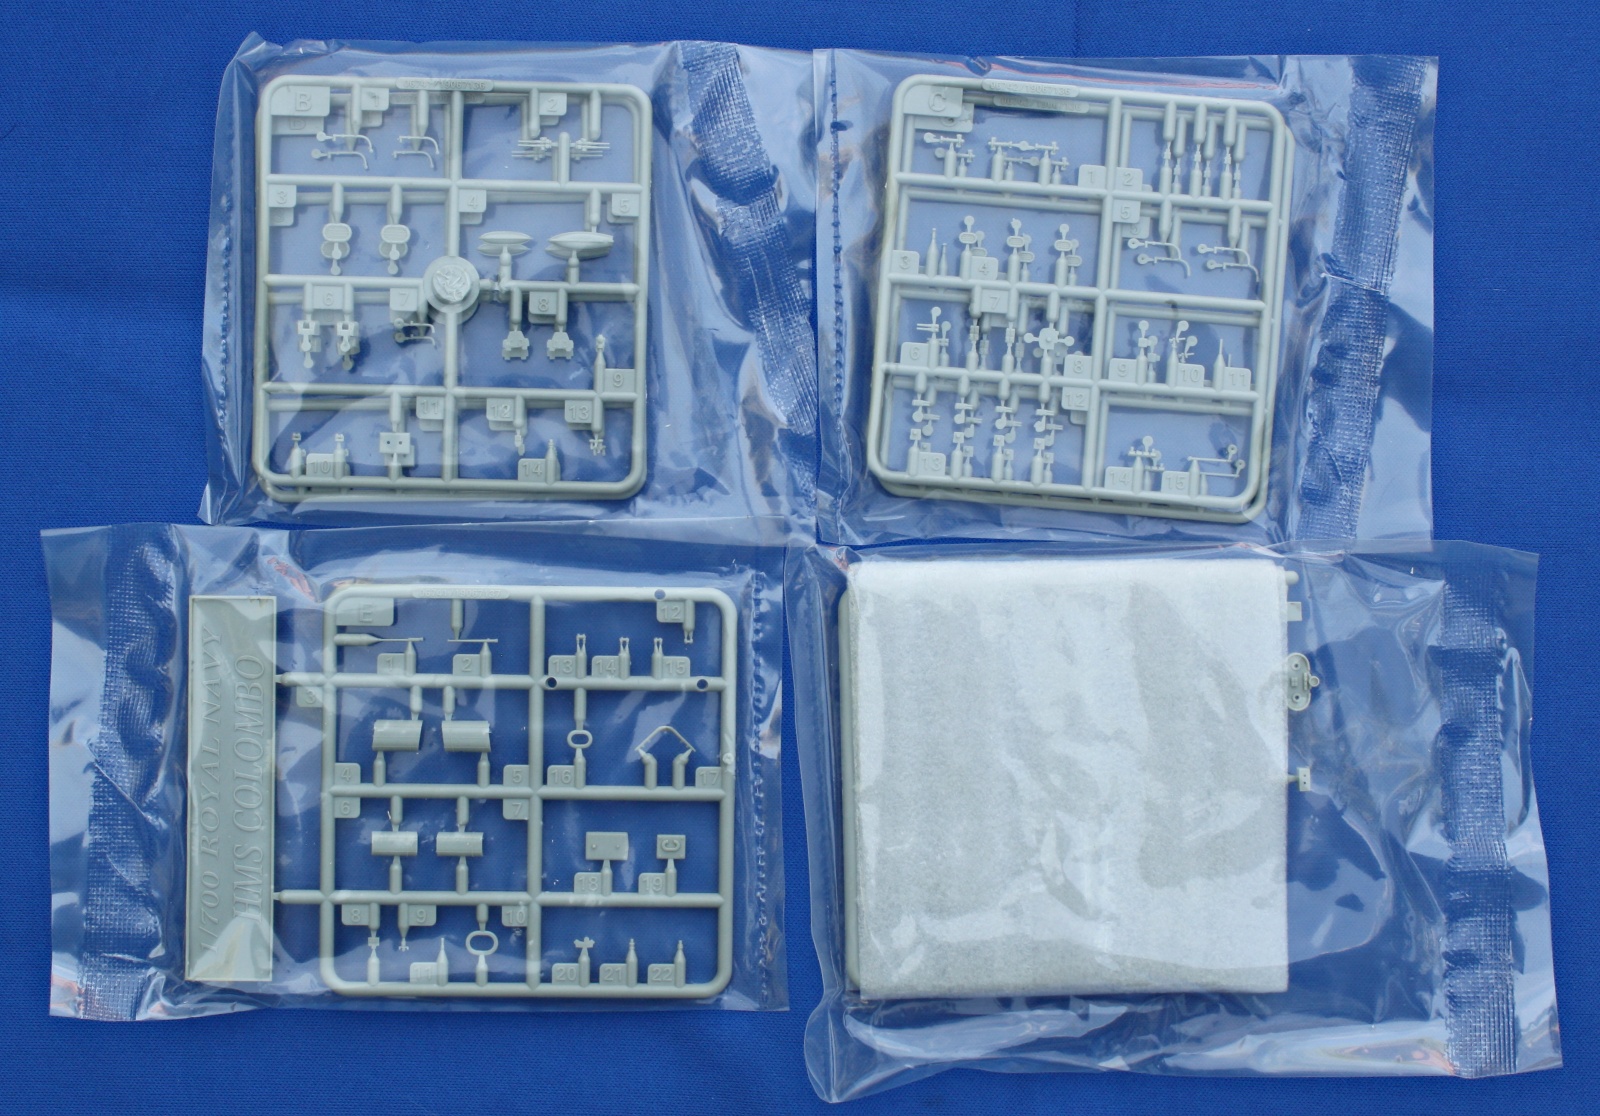
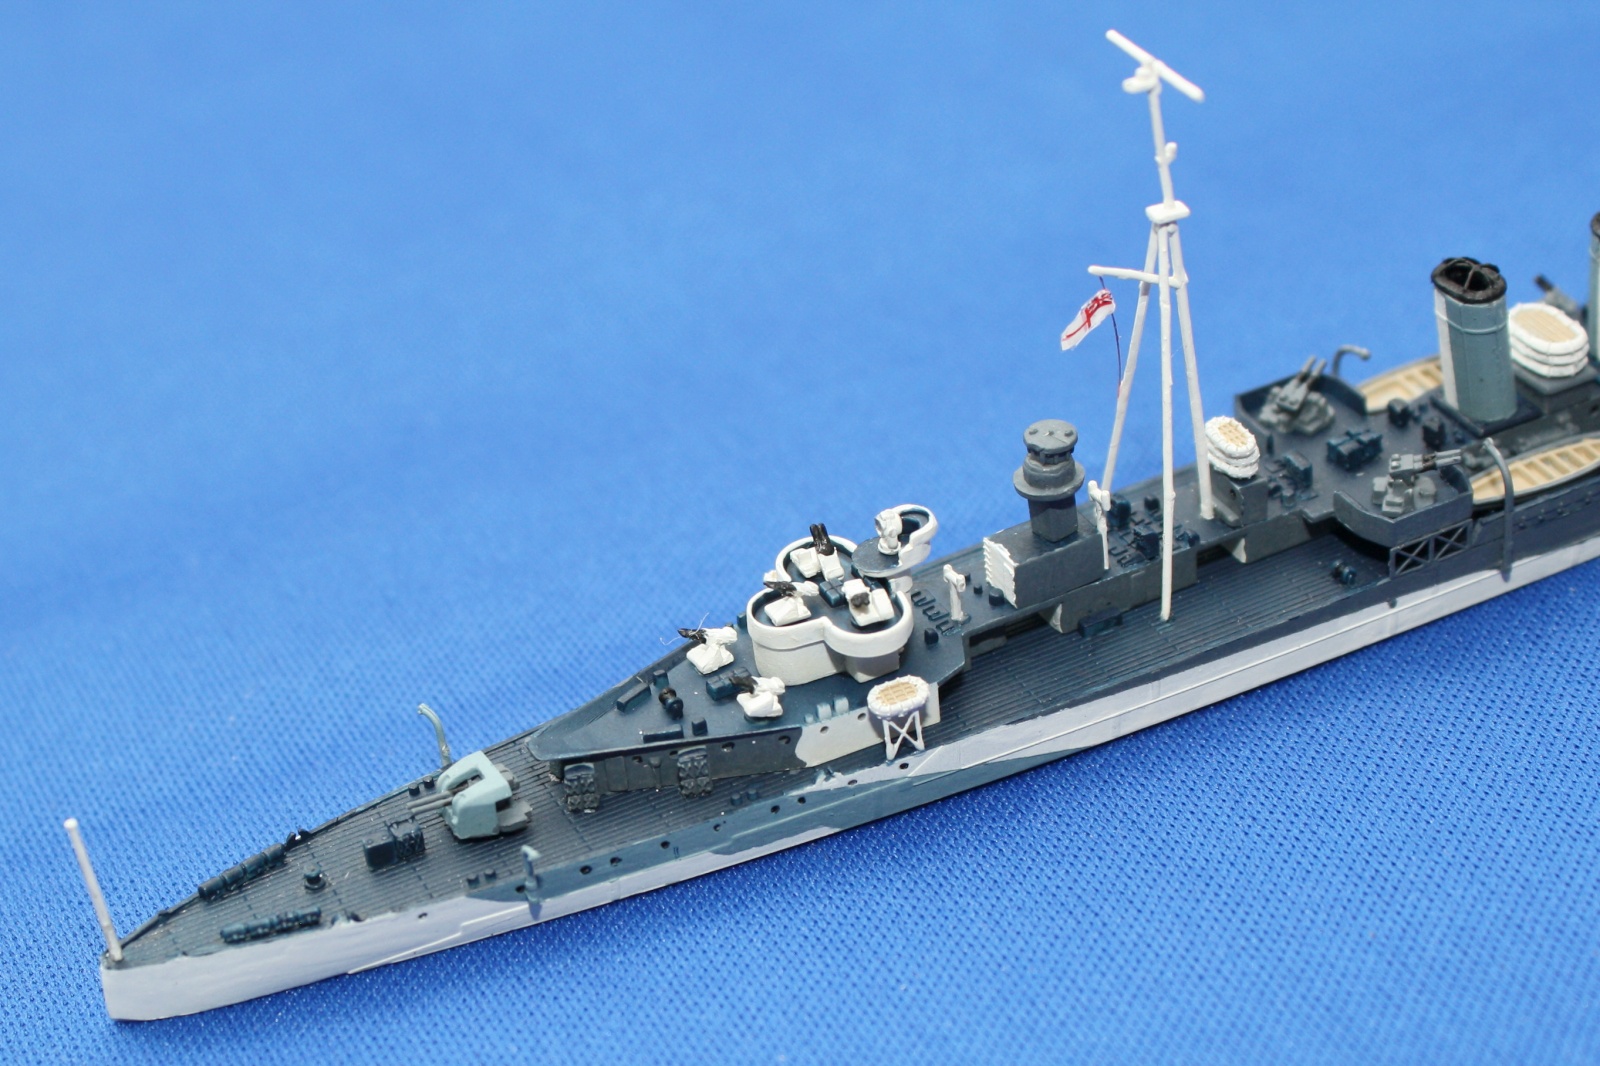
Trumpeter 06742 HMS Colombo in her 1943 fit as an AA cruiser with twin 4in mounts, two Hazemeyer 40mmx2 and twin (Boffin) and single 20mm mounts. Trumpeter launched the injection-molded waterline 1/700 HMS Colombo AA kit in 2022 after the 1/350 kit, and this kit has new tools for 2023, including a small photoetch fret. Box art is attractive and helpful for painting details. Kit is well packaged – all pieces, sprues, accessories and the box itself come in their own plastic bags, and delicate pieces were wrapped in cushioning. My kit arrived with no damage.
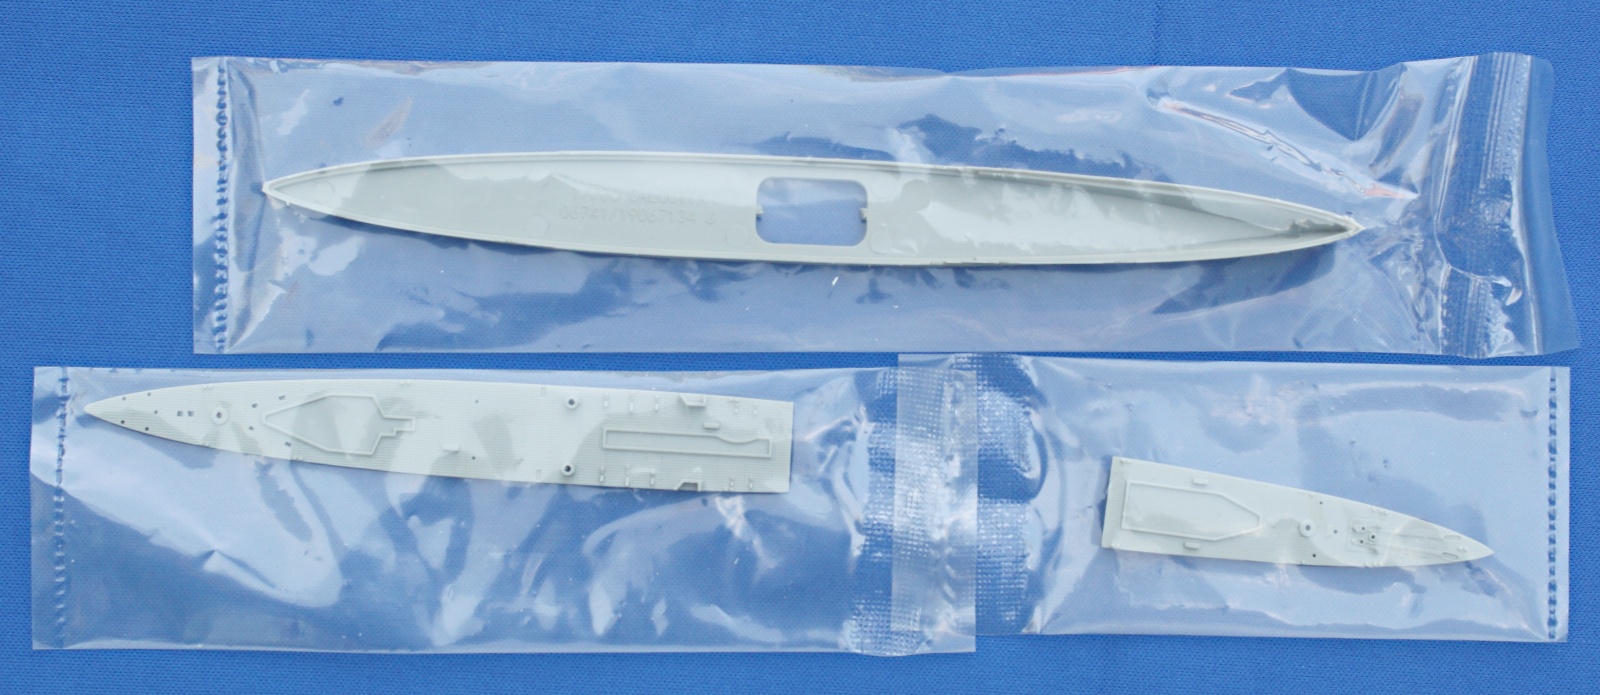
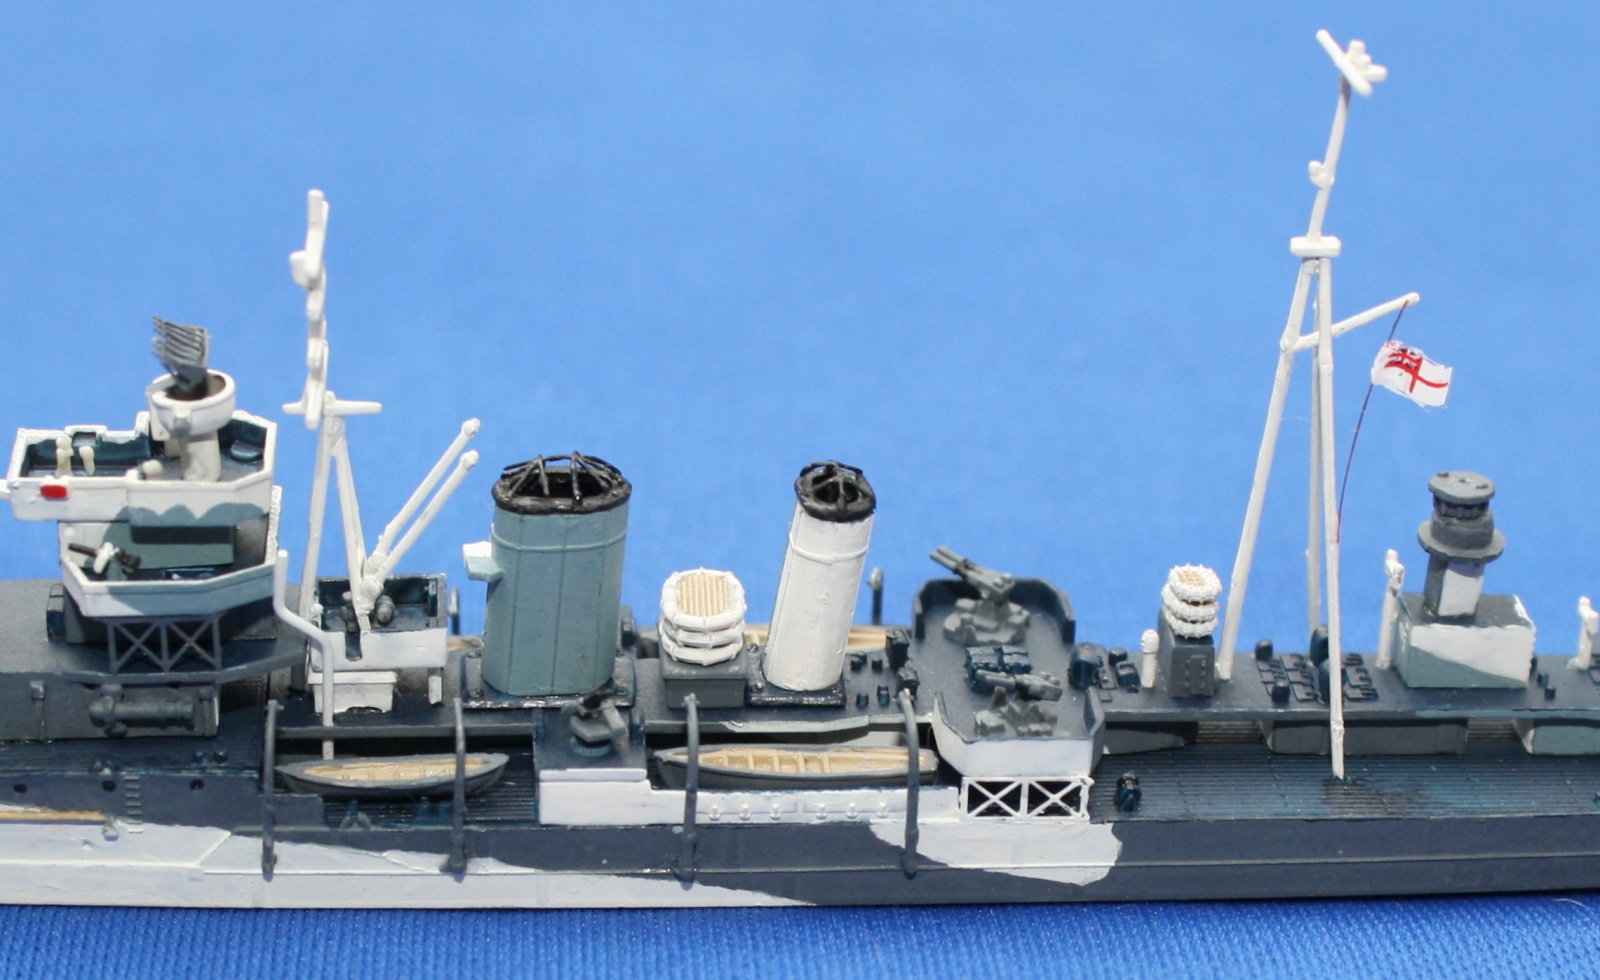
Parts include: 1) waterline hull with no weights or bottom plate to add (finally! – no ugly seams to fill); 2) Fore deck; 3) Aft deck; 4) Two Sprue B with guns, boats, rafts and small gear; 5) Two Sprue C with rafts, small deck fittings and small AA guns; 6) Sprue E with funnels and superstructure fittings; 7) Sprue F (wrapped) with masts, deckhouses and superstructure pieces; 8) H1, H2 & H3 make up the forward superstructure and bridge; 9) H4 is the rest of the superstructure. The PE fret is small but has important pieces such as funnel grilles and supports and a radar aerial. A Decal sheet has White Ensign and Union Jack flags. The hull bottom has a large open hole in the middle in case you really want to add some weights. The kit hull is 102% of actual length (452 feet) and the width is 105% of actual 43.5 feet). These dimensions are acceptably close for 1/700 scale. Don’t be surprised if you see HMS Calcutta on the backsides of some parts – that’s common practice for different kits to share common parts in a class of warships. And don’t freak out if the Fore deck looks warped – that’s a perfect fit for the raised forecastle.
About 153 plastic pieces and 11 PE pieces – a lot for a relatively small 1/700 ship but gives a high level of decent detail. Looking at the sprues shows excellent detail and scale for a 1/700 kit. The worst offenders were the twin 20mm Boffin mounts with barrels stuck together looking more like 200mm mortar barrels, but overall, the detail is good enough on everything else to not need replacing. Wood decks are planked and look fine for this scale.
The Instruction booklet (approx. 10 X 7.5 inches) is 12 pages plus a separate glossy page of color profiles of HMS Colombo in overhead, port and starboard waterline profiles showing the camouflage scheme. The Instructions pages show 10 Steps with illustrations of the model and where the parts to be added belong. Order of assembly appeared similar to my build approach – hull and main deck first, then build up and out. Parts are clearly identified and clearly marked where they are supposed to be.
The Build
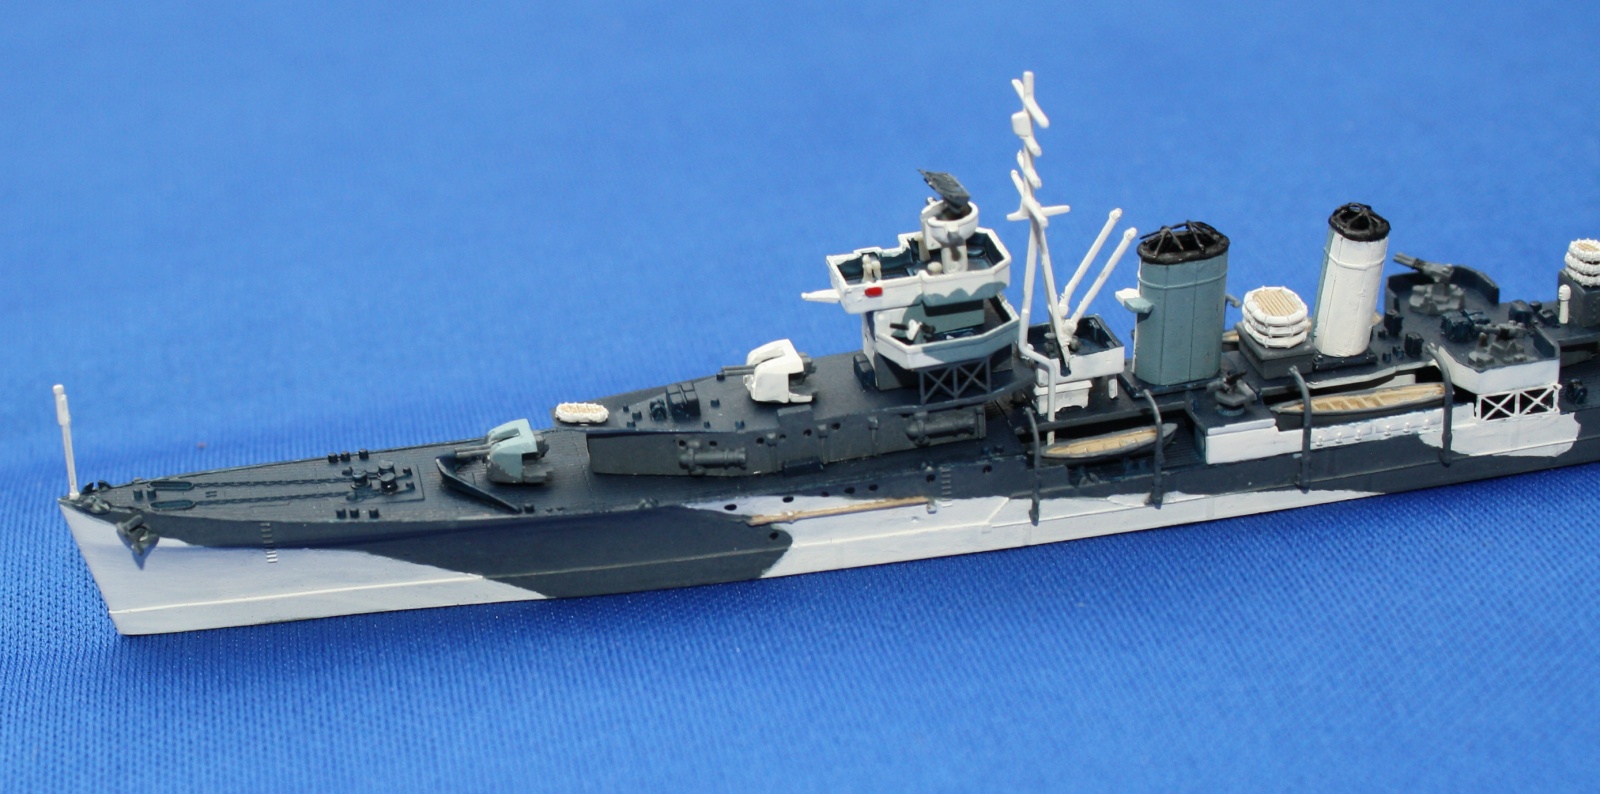
Since this is a review kit, I built it OOB. As usual, I first washed all parts in Synbiont in water (a quaternary ammonium detergent used for dog and horse kennel cleaning). Then sanded major pieces and tested fits. The advanced casting quality of this kit is immediately apparent, and test fitting major pieces showed attention was given to ensure tight fits – as an example, the foredeck piece is slightly bent in order to fit the curve of the peaked forecastle unique to this class – a nice touch. Most of the parts look close to scale – not easy with injection-molded kits – a real plus. The twin 4inx2 mounts were realistic, and surface detail on parts is excellent. The detail is so good that you will need to handle the hull very carefully because of the fineness of the open chocks on the deck edges – they are easy to break without realizing it.
Normally I ignore the sequence of assembly from kit Instructions, but the 12-page, 10-Step kit was well thought, sensible and acceptable. I followed the sequence of Steps in the Instructions and was pleased with the order of assembly. VERY IMPORTANT! To make following the Instruction Steps easier, you need to decide how to paint the kit pieces – this is critical for saving time and frustration and opening/closing paint bottles every step. How to paint was not presented in the Instructions. From my experience, I feel the best way to paint this model is finish the hull first. I used Wright’s book images and used my color copier to resize to match the length of Trumper’s Colombo hull. I then added Tamiya orange masking tape over the paper copy and carefully cut out the individual color panels for the hull, removed the carefully from the paper, then applied to the hull as needed. Then airbrush the dark blue decks, including the bridge and aft AA platforms and the roofs of F4 & F16. Superstructure verticals are next, with the decks facing down. Rather than taking off and sanding all pieces and then painting each, which would be a nightmare to keep track, I painted all the other parts on the sprues, mostly by hand brushing, and repainted the sanded attachment points after removal just before or after sometimes after adding to the model, sometimes using the tip of a dissection needle as a brush for tiny spots.
Almost all parts on sprues needed to be trimmed and sanded (even when removed with Micro Mark tweezer snippers). With all those tiny parts this takes a lot of time and complicates painting strategy. Three parts broke during removal from sprue: a cable reel (E14) and two small mast arms/pipes (F15 & F21 which were replaced by brass rods). Fortunately, very light sanding or X-Acto knife work took care of cleaning up most parts. However, masts legs, davits bases and a few other parts were too big for their mounting holes and needed careful trimming (a magnifier is recommended). TEST FIT ALL PARTS TO MAKE SURE NO FURTHER MODIFICATIONS ARE NEEDED. Also, the bow and stern flagstaffs were NOT mounted on photos of HMS Colombo and should not be used (I added them anyway to show how following the build Instructions would look). The large number of tiny pieces demand careful and gentle handling with steady hands (not a good idea to drink caffeine prior to building!). The only non-kit part added was the lanyard (rope) for the flag decal hanging on the mainmast.
Light AA armament 20mmx2 Boffin mounts were terrible, and the 20mmx1 mounts did not have the notch in the shield, but were sized OK. 40mm mounts were acceptable but did not have accompanying radars on top of the guns. The 4inx2 barrels were too tight of a fit and could not be elevated at all, although the barrel lengths and widths looked good. Other parts acceptably good enough, especially the masts, which were not too thick, and went together much better than I thought they would. I used either Tamiya Extra Thin Plastic Cement liquid, or CA glue, depending on the size and position of the pieces.
Painting
About the only criticism I have of this kit is the colors and paint choices made by Trumpeter, which follows the Profile Morskie book (I do not have that one). Now we have access to a growing number of accurate Admiralty Standard Royal Navy WWII paints, instead of eyeballing random paints to match. And I do have the ultimate authority on Royal Navy WWII paint colors – Malcolm Wright has a series of books on Royal Navy WW II camouflage (Naval Institute Press), and the third book is all about cruisers, including HMS Colombo (page 34). After checking paint chip comparisons between Lifecolor and Tru-Color Royal Navy paint sets on hand (see the recent review on Tru-Colors Royal Navy Set #1 recently posted) and careful comparison of intensities and shades from the few 1943 B&W photographs available for Colombo, it is my conclusion that both Wright and Trumpeter did not get the colors or patterns right. Each has obvious differences from the available photos.
The camo pattern on photos of Colombo resembles the Trumpeter Paint Guide more closely, but not the Wright book pattern. But Malcolm Wright has painstakingly done his homework on each ship and colors used. For Colombo, the stated hull colors in 1943 were white (actually an off-white like Antique White paints, definitely NOT a light grey as Trumpeter Paint Guide advocates), medium olive-grey (MS2) and dark blue grey (B5). Decks were very dark grey (507A). Wright’s Colombo looked white with medium grey but the B5 color was depicted wrongly as a light grey on the hull but correct for the funnels. Photos helped to clear up the B5 areas.
Trumpeter paint choices are non-Admiralty standards, and are not accurate. The lightest color was not a Light Grey – it’s too dark, especially on a small 1/700 scale ship model. Trumpeter’s paint choice for B5 color was too dark, and almost impossible to tell a difference from the dark grey hull color. Wright’s colors were a much better match for Colombo than the Trumpeter Paint Guide. I had all those accurate paint colors except for MS2. Checking the color chip comparisons from Wright, MS2 was a close match for 507B. I used the Lifecolor 507A instead of 507B, and also not the Tru-Color 507B, because Lifecolor 507A looked right (greenish tint) for the darkest hull and superstructure paint. Also used Lifecolor White and Dark Blue-grey B5. However, the deck color was listed as 507A by Wright and looked a dark blue on the Trumpeter Paint Guide, which meant Tru-Color 507A was the perfect choice – it’s a very dark blue as 507A was in 1943 (unlike the Lifecolor 507A, which was not bluish or dark enough). Finally, I did not add the black waterline which would not be visible when Colombo was fully loaded (most of her photos are from fitting out, and thus, not fully loaded).
Trumpeter Paint Guide is somewhat difficult to determine exactly where B5 blue was applied and missed some obvious B5 areas. Thus, I mostly stayed with the Trumpeter Paint Guide pattern but followed the color from photos. I used the following paints:
Lifecolor White (UA640) for lightest hull color & sides plus undersides of superstructure parts and platforms, funnels, bridge vertical surfaces, one 4inx2 shield, 20mm mounts, masts, raft edges – (I previously used Lifecolor White for Royal Navy destroyers and it looked right instead of light gray – that applies here too). And be sure to use Lifecolor White on all shaded, under-platform horizontal and vertical surfaces;
- Lifecolor Admiralty Dark Grey 507A (UA631) for the darkest hull and superstructure color, radars, one pair of 20mm mounts, lifeboat davits, 40mmx2 mounts
- Lifecolor Dark Blue-grey B5 (UA636) for the intermediate blue color on hull and vertical superstructure areas
- Model Master Flat Black 37038 (enamel) for blast bags for the 4inx2 mounts, funnel insides (yes, that’s right!), funnel top rings and grilles, and 20mm mount barrels
- Tamiya Buff XF-57 for insides of boats, rafts and spars on hull for wood color
- Tru-Color Admiralty 507A TCP-1066 for the horizontal decks (decks and platform decks) – its deep blue color is a good match for actual 507A which according to Wright had a very dark blueish tint. Dries semi-gloss so needs clear matte overspray (which I do all the time anyway in 1/700 scale).
Trumpeter’s HMS Colombo finishes to an attractive, colorful naval warship that is detailed well by the minimal PE parts, which greatly help the look.
Value
Although the price is rather steep for a smallish 1/700 warship, the quality of the kit, ease and speed of assembly and need for more examples of WW II Royal Navy light cruiser models make the price worthwhile. The quality of this kit and its minimal PE set limit the need for aftermarket parts that helps reduce overall cost and time spent building, and improved the overall look. By replacing the 20mmx1 & 20mmx2 Boffins with PE parts would be the first thing to change for this model. Of course, adding railings would be the second-best change, and this model would take superdetailing very nicely.
Summary
Even with a lot of pieces to remove from sprues, sand and paint, this kit was simple and easy to build. The numerous pieces gave HMS Colombo the busy look of a warship, and the detail is decent. All that’s missing are 1/700 RN sailors, ladders here and there and Type 281B radar aerial. Trumpeter has done a long-needed service for starting to bring to light the myriad classes and appearances of Royal Navy cruisers in WWII in a quality way. Highly recommended for 1/700 scale warship buffs, but not the best kit for beginners because of all those tiny parts and complicated painting strategies.
Pros
- Well-done model of an interesting and unusual ship – fills a colorful gap in availability of the numerous WW II Royal Navy light cruisers
- Trumpeter did their homework – the 1943 appearance of HMS Colombo model is close to photos and other source materials
- Packaging of parts was first-class and spared breakage
- Excellent detail of most parts, especially the decks with curvature and tiny deck fittings such as ammo boxes and lockers, and main gun barrells
- PE set, even though sparse, had those little fine details (lattice supports, Type 285 radar aerial) that give an advanced look to the finished model
- Waterline hull with no separate baseplate to add with its ugly seam to fill or paint;
- Good deck details and wood planking
- Kit sprues and delicate superstructure pieces were well-packed to prevent breakage and scratching
- Fit of pieces was excellent
- Ease of assembly and order of build from clear and detailed instructions
- Finished model has the scale look for 1/700 (except for 20mm guns)
Cons
- Warning! Tiny parts ahead! This kit is difficult for beginners or poorly equipped modelers
- For small parts, test fit to make sure the stubs are not too large for guide holes – too many needed trimming down after removal from the sprue
- Attachment of parts to sprues needed careful cleanup/sanding to remove stubs, meaning significant repainting and a longer build time
- Choose your painting strategy carefully to expedite assembly
- The paint color recommendations are not ideal for accuracy, but the pattern is accurate enough
- Type 281B radar aerial on top of mainmast is not supplied or mentioned (Tom’s Modelworks 1/700 RN Radar set has Type 281)
- The 20mmx2 mounts really need replacing with aftermarket parts (Lion Roar, White Ensign, for example) – they detract from the entire look
- Many parts are so tiny some people might need magnification and small, pointy tweezers;
- I miss the heft of weighted models which do not move when adding small pieces – next time I’ll add heavy ballast before building
- Do not add the flagstaffs (E1, E2) at bow and stern!


Reviewer Bio
Luke R. Bucci, PhD

Luke built all kinds of models starting in the early '60s, but school, wife Naniece, and work (PhD Clinical Nutritionist) caused the usual absence from building. Picked up modeling to decompress from grad school, joined IPMSUSA in 1994 and focused on solely 1/700 warships (waterline!) and still do. I like to upgrade and kitbash the old kits and semi-accurize them, and even scratchbuild a few. Joined the Reviewer Corps to expand my horizon, especially the books nobody wants to review - have learned a lot that way. Shout out to Salt Lake and Reno IPMSUSA clubs - they're both fine, fun groups and better modelers than I, which is another way to learn. Other hobbies are: yes, dear; playing electric bass and playing with the canine kids.
Comments
Add new comment
This site is protected by reCAPTCHA and the Google Privacy Policy and Terms of Service apply.
Similar Reviews