
Spitfire Mk.IX - Big Sin Advanced Set
Having built the Royal Class Spitfire kits, I had an idea of what to expect from Eduard’s 1/48 scale Spitfire Mk.IXc: a perfect fitting kit from a maker at the pinnacle of their craft. The Spitfire Mk.IX kits are literally perfect models of the real thing. Building the kit out of the box, there is no need for filler anywhere. However, I wondered what would happen if I added some of the many available Eduard Brassin items to this baby?
Big Sin
Eduard’s 1/48 scale Big Sin Spitfire Mk. IX Advanced set has given me just the opportunity I was looking for. The Advanced Big Sin set includes a collection of four Eduard Brassin items: engine, gun bay, radio compartment, and photo-etch flaps.
Packaged in a sturdy cardboard box, the sets are wrapped securely inside bubble wrap. The four sets are also individually packaged in ziplock bags. The associated photo-etch parts are packaged on cardboard to keep them flat. The landing flaps are packaged exactly as they are when sold separately, so you can be certain they’ll arrive safely. The instruction sheets are two pieces of A4 paper printed on both sides. They are easy to understand.
All of these Brassin items would need a home, so I selected Eduard’s 1/48 scale Spitfire Mk.IXc early version ProfiPACK kit. As I’ve mentioned, the Spitfire kit is already an amazing model. I have written a brief review of the kit itself.
In addition to the Advanced set’s Brassin, I chose to use the available Brassin cockpit. The Brassin cockpit can be purchased individually, or as part of the Spitfire Mk. IX Essential Big Sin set. The Essential set also includes five-spoke wheels, fishtail style exhausts, a color photo-etch set with exterior and interior details, and fabric RAF-style seat belts.
Starting Construction – Cockpit
With my Brassin parts in hand, I was excited to find out how well Eduard’s accessories would work with their already amazing kit. The first thing to do in any build project with this scope of construction is to review the instructions and figure out where and when certain parts go on. Since I was going to use the Brassin cockpit, comparing the kit and Brassin instructions showed that the cockpit would be a good place to start. The Brassin cockpit is a piece of art merging the best attributes of resin, pre-painted photo-etch, and clear acetate film. Building the Brassin set is very straight forward, and it fits together beautifully. Don’t forget to remove the bump for the lower light.
I painted mine with Polly-S British Interior Green and Lifecolor Satin Black. Some burnt umber artist oils were used to pick out the details. Once complete, the subassembly was set aside. The kit cockpit is nice right out of the box, but the Brassin takes the cockpit to the next level. If you didn’t have the cash to buy the Brassin cockpit, I’d say you’d be okay without it, however, if you can afford it, the Brassin cockpit is a perfect addition. I’ll be buying more.
Radio Compartment & Fuselage Assembly
The next stage is to prepare the fuselage for its Brassin pieces. You will have to cut off the nose to install the engine latter, but it is easy enough. The first item to be added from the Big Sin set was the radio compartment. This small set consists of four pieces of resin: two sidewalls, the battery, and the access door. In addition, a small photo-etch fret is included. This set is quite interesting, as the hardest part of assembly is folding the PE. Initially, I had some questions on how to form the photo-etch parts, but after carefully looking at the instructions, it became clear. However, I had other problems. I lost my carefully folded PE battery tray, so I had to scratchbuild a plastic replacement.
Installation of the radio compartment requires the fuselage hatch on the left fuselage panel to be cut open. This looks easy enough; however, I discovered something. You would think that you should remove the entire hatch, out to the panel line—DO NOT! The photo-etch part for the hatch frame is a little smaller than the panel on the kit. Thus, if you open it all the way up you will have to do what I did: support the photo-etch opening from the backside with sprue and then fill the area. If you can avoid this, the rest of the radio compartment installation is easy enough. I also recommend that you thin the back and bottom of the resin inserts; this will prevent some slight interference with the wing later.
I painted the radio compartment like the cockpit, with Polly-S British Interior Green. In the end, the radio compartment is nearly invisible behind the battery. The inserts fit perfectly inside the fuselage halves as the kit is designed to accept the parts. The set is nicely formed, and I didn’t have any issues other than my lost part.
With the cockpit ready and the radio compartment built up, it was time to bring the fuselage halves together. Would it fit? Not quite. I had to sand some of the radio compartment halves to make them thinner. Thinning complete, the fuselage went together with some clamping, but nothing drastic. Clamping is already my typical method of assembly on any other model.
Wings, Gun Bay & Flaps
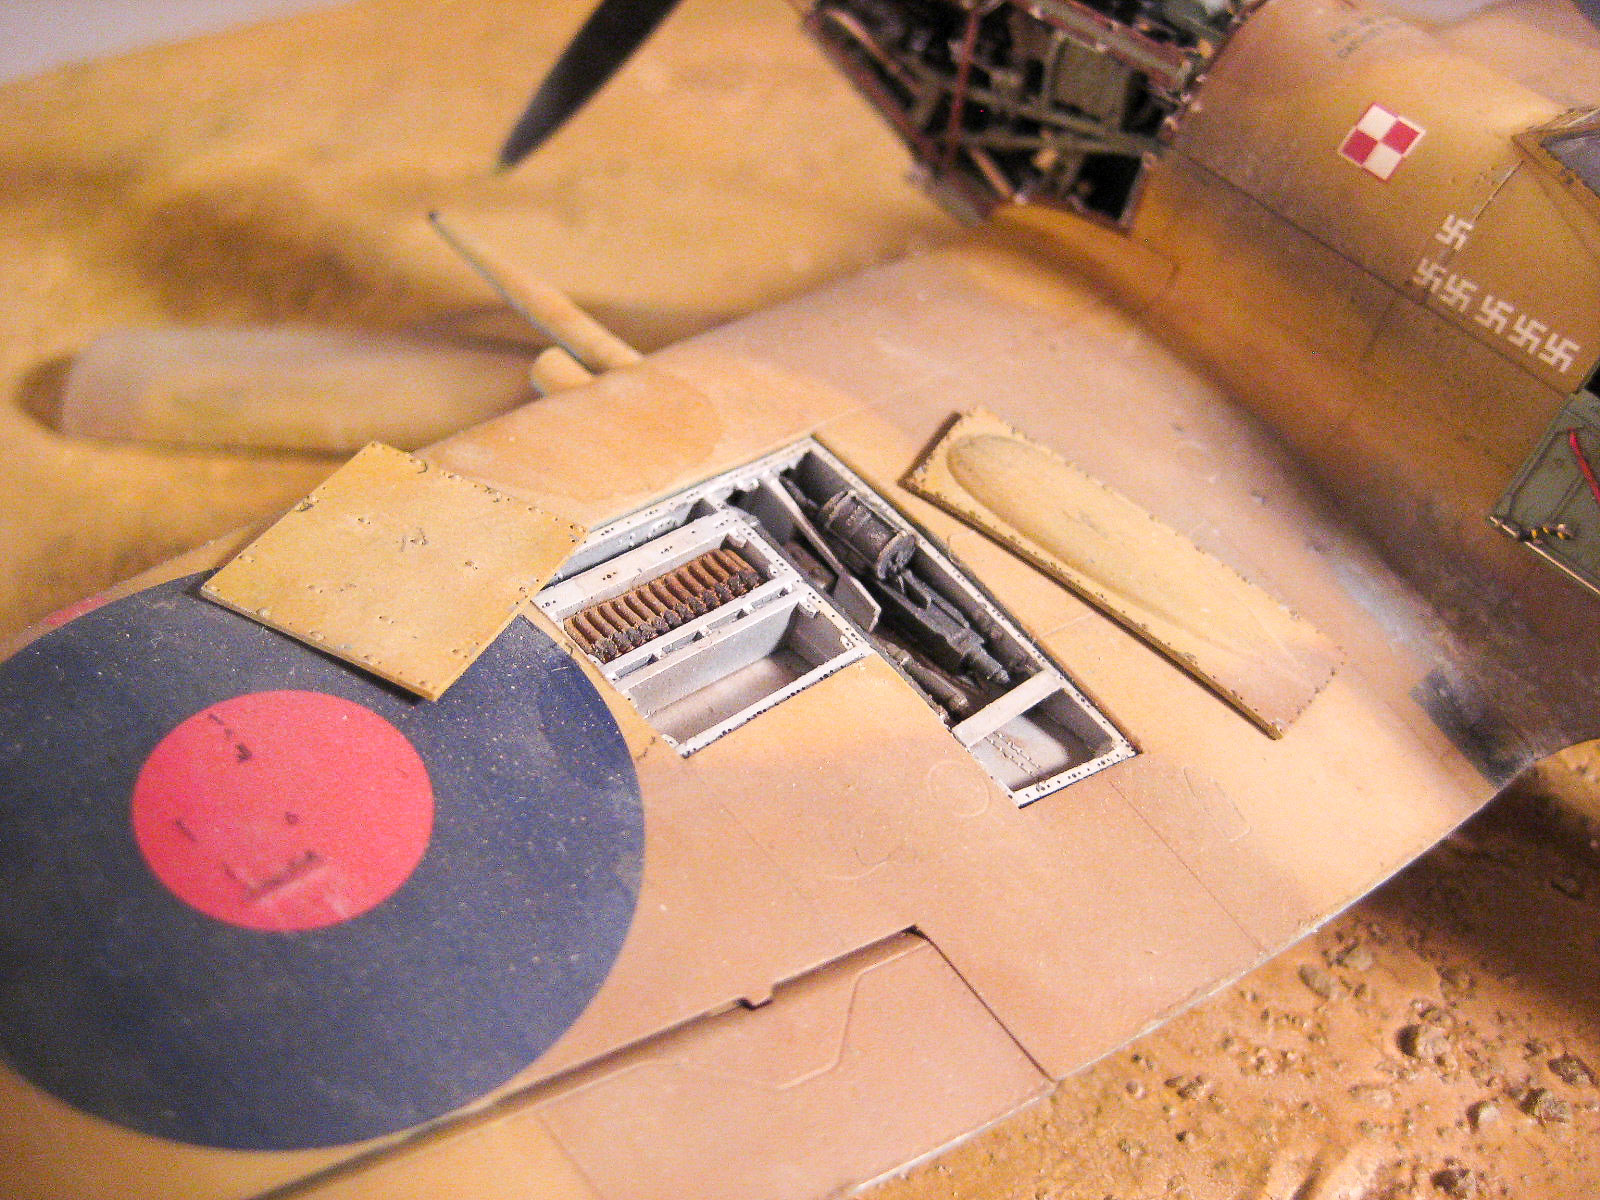
While the halves were drying, it was time to work on the wings. The Brassin gun bay, a 17-piece set with an additional photo-etch fret, allows the left-wing gun bay to be depicted open. The set will fit in the C or E wing option, but make sure you select the right parts for your particular model of Spitfire. I needed to use the Mk.IXc early armament parts for the C wing. The instructions are quite easy to understand and are illustrated clearly enough for the modeler to reproduce a beautiful gun bay with some careful painting.
Some cutting of the wing is required to install the gun bay, although I didn’t have any big issues with this. The resin pieces fit perfectly to the photo-etch and the kit’s lower wing. There was no thinning required. There was nothing out of the ordinary in the construction, but the effect on the finished model is gorgeous. After some research, I decided not to use the photo-etch flaps, as the Spitfire’s flaps are only down during landing and are retracted afterwards. However, if I was going to add the flaps, this is when I would have added them.
Wing Fitting
Mating the fuselage to the wings presented an issue. Did it fit? Well, yes it did, but it also required some thinning of the bottom of the cockpit and radio compartment. Again, nothing overly dramatic, but it is worth mentioning. I also had to sand the wings and fuselage joint slightly, as the fuselage spread and flattened the dihedral of the wings. I didn’t detect this on my previous kits, so I can only attribute this to the Brassin sets. Once again, it was nothing dramatic, and a perfect fit was achieved easily by sanding the surfaces. Joining the wings and fuselage did require some clamping to hold things together while the glue set. The assembly was allowed to dry overnight, and there was a little filler required at the aft end of the wings.
The fit of the tail surfaces was immaculate. Once they wings and fuselage were together, it was time to start adding the wing tips, ailerons, and oil coolers. Since I was building a desert Spitfire, I opted to have my oil coolers opened.
Painting
Strangely, at least to me, it was time to paint. I seemed to arrive at this stage very quickly. This is a testament to Eduard’s engineering of the kit and the fit of the Brassin sets. Before painting, the cockpit masks were applied. This time, the masks weren’t cut as crisply as previous masks sets. I had issues getting them off the backing material. That said, they worked really well once applied to the model. As designed, some Mr. Maskol was added to the area of the canopy that needed it. I also prepared the resin pieces that would need to be painted in the fuselage colors. Although these parts would be set aside once painted, it was important to me that they were paint at the same time as the rest of the model to maintain consistency with the camouflage pattern and colors.
Finally, before painting, the model was wiped down with Plastic Prep. After drying, the cockpit and canopy area were masked off and painted Interior Green. Then, the entire model was primed with Alclad Grey Primer and Microfiller. One or two areas were cleaned up and another coat was applied.
The model was pre-shaded with Tamiya NATO Black to break up the monotone look of the bottom and start the weathering on the topside. I don’t just pre-shade the panel lines I also vary the intensity of the panels with the black. This will help the weathering process later. The bottom was painted with Vallejo Azure Blue. I thought it looked a little too blue, so I broke out my Polly-S Azure Blue. These two colors are not the same. Adding the Polly-S broke up the monotone look of the bottom and hid the overly blue Vallejo color. I then lightened up the Polly-S with some flat white to add some highlights.
The bottom was masked off, and then the Mid Stone color was added to the top. I used Vallejo color this time. This was weathered with some highly thinned Tamiya Desert Yellow. Using the instructions for the camouflage pattern, Gunze Dark Earth was added free-hand with my Iwata airbrush in a nice tight pattern that still yielded a softer edge.
Everything was sealed by a mixture of Future with a couple of drops of Gunze Mr. Color Thinner. This is a trick taught to me by Rafe Morrissey. The thinned Future applied perfectly. The decals were added the next day. I elected to use the kit decals as they provided plenty of marking options. They were printed by Cartograf, and they worked perfectly. There were some decals that had to be cut to fit the radio compartment. This was daunting but not terribly hard.
After another coat of Future was applied over the decals to seal them, Alclad Klear Flat was applied over everything. The application of the acrylic undercoats would allow for the upcoming weathering. The model was set aside while I concentrated on the engine assembly.
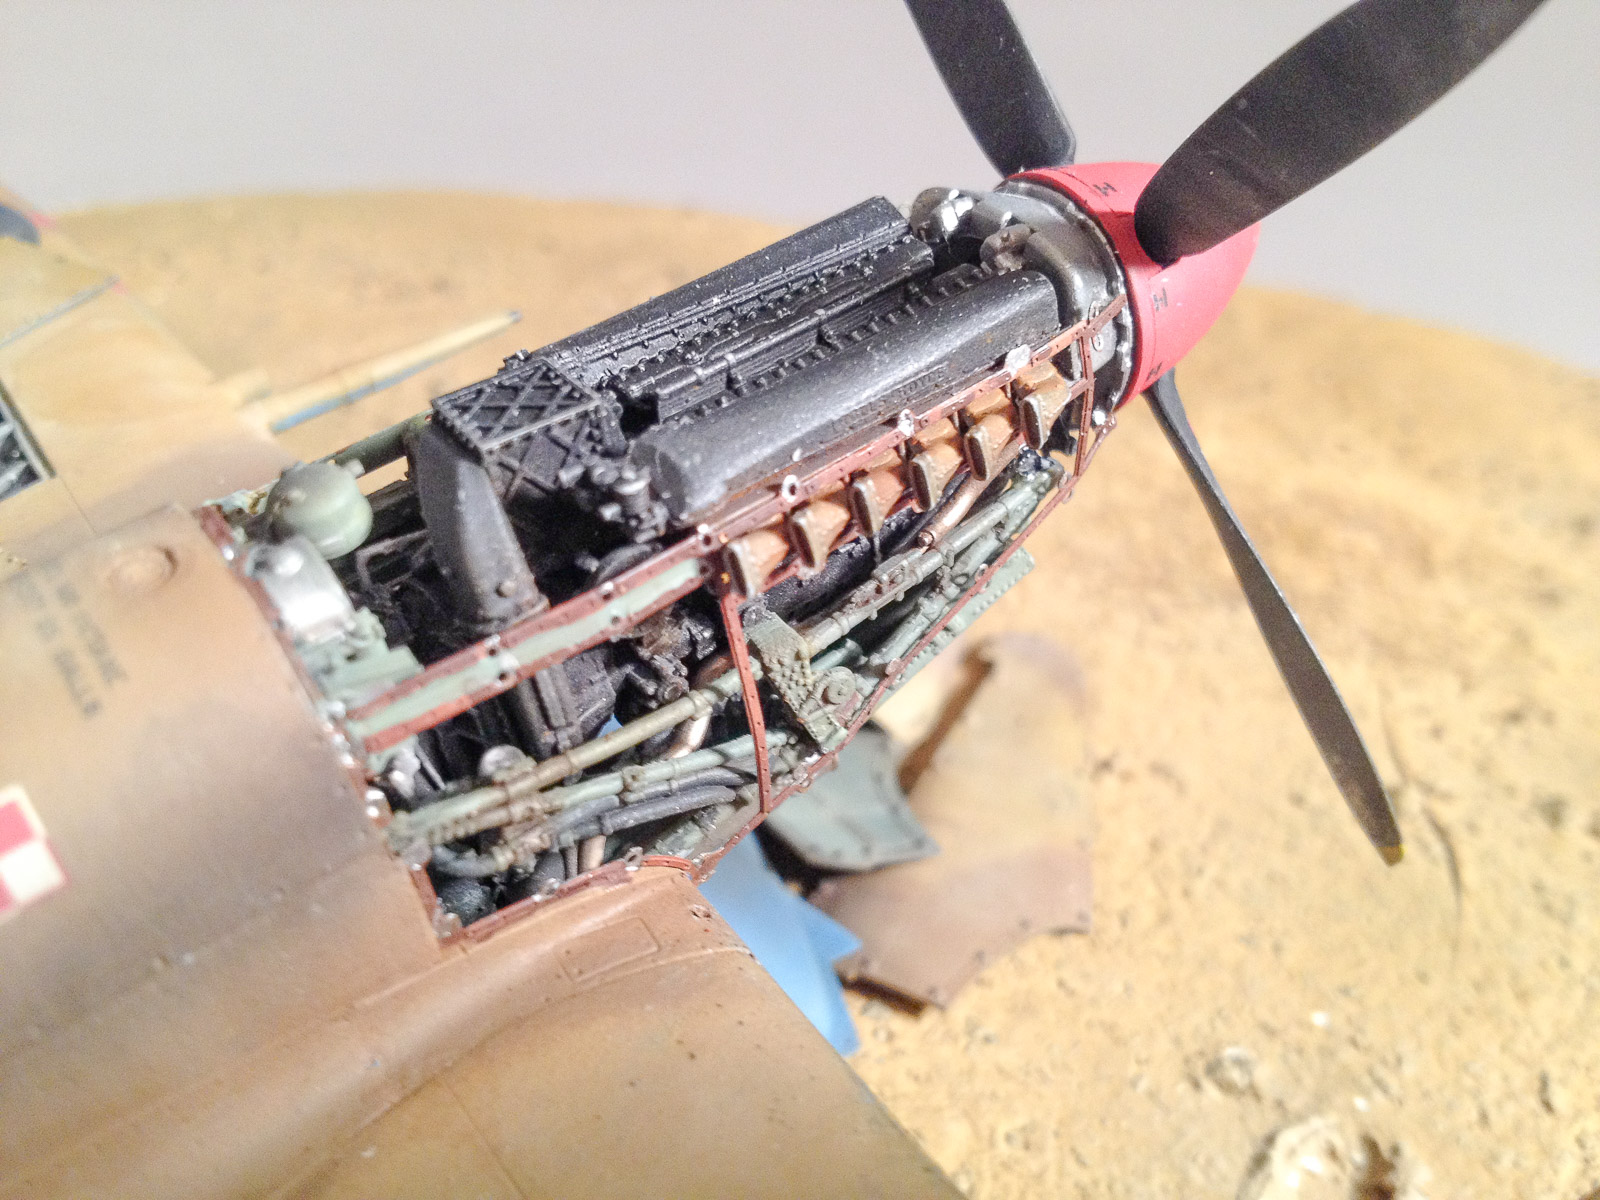
The Brassin Engine
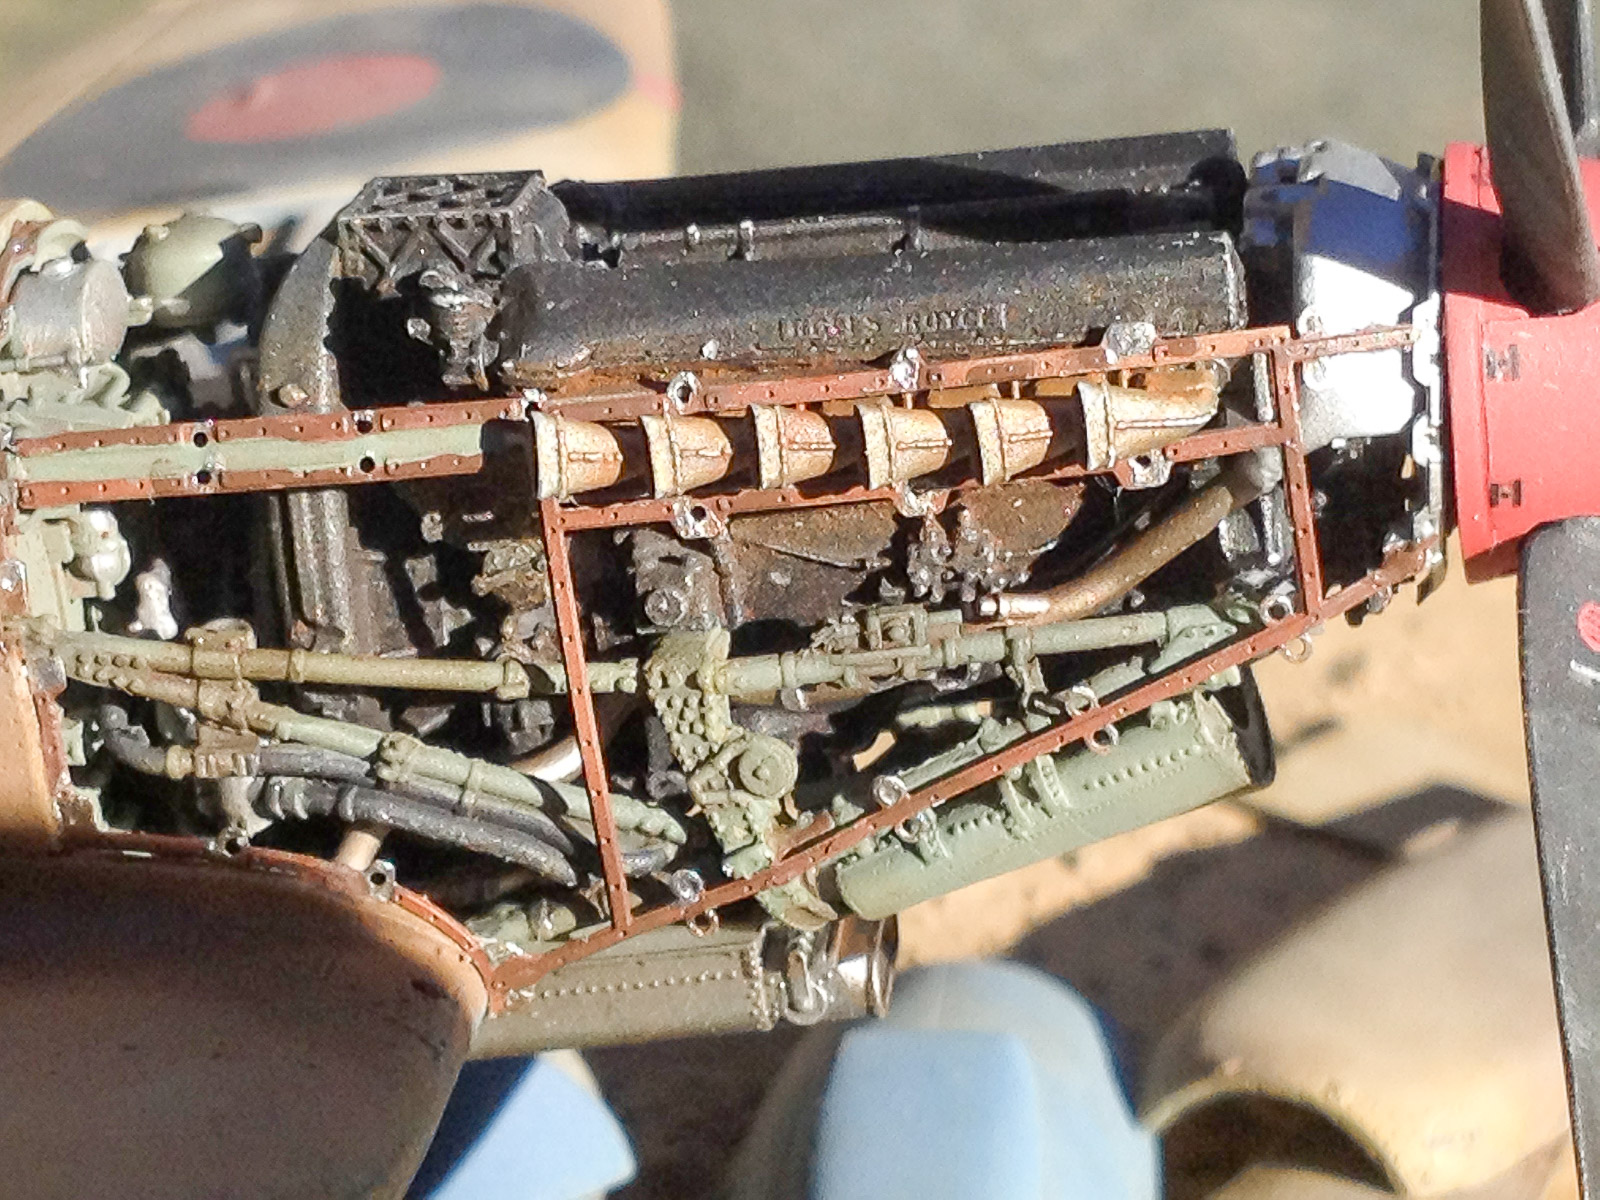
Eduard’s Brassin engine is a spectacular mini-model that contains 56 beautifully cast resin pieces. In addition to the resin, there is a fret of photo-etch. The level of detail on the resin is awe inspiring. It is a perfect miniature Merlin. The one-piece cowling covers also have some very nice detail, and include one of the most daunting parts of the build: the photo-etch engine cowling mounts. I was more than a little nervous about the engine; certainly more than I should have been.
The engine assembly actually went together like a dream. In fact, there were only two areas that will warrant extra care. First, be sure to add parts G55/56 and G75/58 prior to adding the engine firewall. This is the key to achieving a good fit for the fairing. If you wait until after you’ve add the firewall, it is difficult to get the faring in place without having to whittling it down. Trust me, it was a pain, and you can learn from my experience. The second caution is to pay attention to the location of the exhaust stacks. I didn’t, and it was a pain to correct. It will also help if you leave them off until after you’ve add the cowling bearers. Finally, the only other thing that could have helped the installation would have been a better drawing of the PE actuator rods and their attachment points.
Once again, I found that it was an amazingly fast construction process while building engine assembly. I was amazed at the level of detail on the engine and its associated plumbing. It is everything that Tamiya did in 1/32 scale, but reduced to 1/48. Simply beautiful. I added the partial engine assembly to the airframe, and it fit perfectly.
Weathering
It was time to start the weathering. I started with a sponge and some Model Master Metalizer Steel and Aluminum to simulate the wear patterns of the desert. The desert is harsh on paint, so I went a little further than normal. I used a Sin Industries filter, Grey for Dark Yellow, over the entire airframe, working from front to back so that the streaks were in the direction of airflow. After drying overnight, I added dot filters of white and buff to the entire surface, with more dots on the top. Some burnt umber was added to the shadow areas, as well as near places that would be dirtier due to the ground crews’ work. These dots were then blended in with turpenoid. This process faded the decals and the paint work; ultimately, it made the model appear as if it was “attached” to the dusty environment the real aircraft operated in.
A wash of burnt umber artist oils was added to the panel lines. Little dots of the artist oils were added around the airframe to dirty it up a little bit. AK Interactive African Dust pigments were added to the upper surface to make them appear dusty and dirty. A light overspray of highly thinned Tamiya Buff was applied over the upper surface. I thought I might have overdone it a little, so I followed this with a light misting of Alclad Flat to blend it all together. This produced an effect that looked exactly like what I was after.
Tamiya weathering powders were used to add the exhaust stains. I started with the black and added vertical streaks of Tamiya Light Grey. The vertical streaks were very thin. Once I had an application that I liked, I used a brush with turpenoid to vertically streak the exhaust stains. The results looked exactly like the staining I observed in the color photos I used as a reference.
Finally, I added oil stains to the bottom side. I used burnt umber and burnt sienna artist oils along with AK Interactive oil and streaking grime. These were applied to panel lines on the belly. These applications were then dragged to the rear with turpenoid. Desert aircraft are notoriously filthy and faded!
Finishing Touches
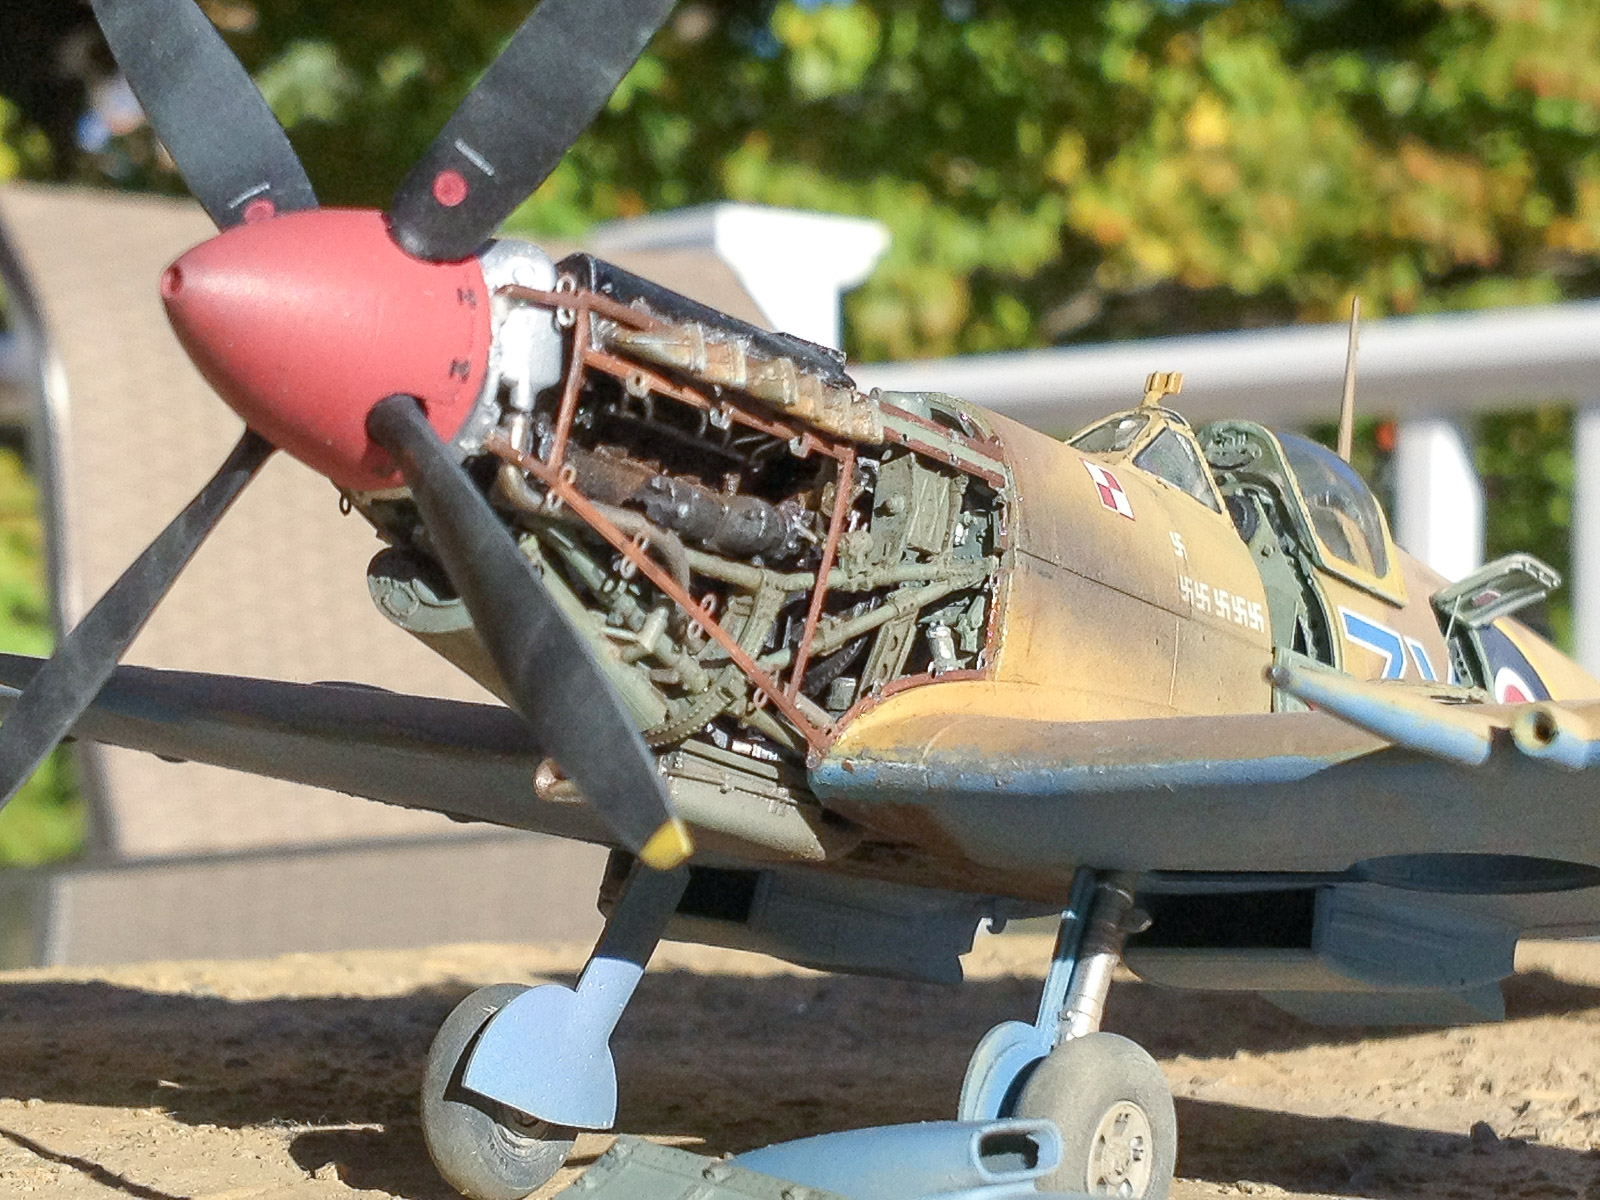
Now that all the weathering was done, it was time to finish this Spitfire. I was really worried about the photo-etch cowling support. There was some bending that I had to do in the nose area, but it really worked out well. Another worrisome part was the radio compartment door. This proved to be a non-issue as well. The door fit perfectly and the markings also lined up perfectly. I did lose the prop rod, and I had to make a replacement from .002ʺ steel rod.
All that remained was to add the tiny kit items: the antennas, rear view mirror, props, sliding canopy, and the cockpit access door. Two pieces of EZ Line were attached to the fuselage sides and tail to finish up the model.
Amazing Results
I thoroughly enjoyed building this model with all the Brassin additions offered by the Big Sin set. I found that there were no issues with the Brassin that I didn’t cause myself; the components were beautifully engineered to fit the kit. Certainly, some trimming was required but nothing drastic. Basically, the Brassin items were perfect. The engine assembly should have been a pain in the butt; however, once again, the engineering was flawless and perfect. If you’ve ever wanted to try resin and photo-etch, I would recommend the Eduard Spitfire Mk.IXc along with a Big Sin set. It really is the best kit I’ve ever built. I look forward to building many more!
The Big Sin Advanced set lives up to its calling by providing a great set of components for your Spitfire at a reduced price. The gun bay adds dramatic impact to the model. The radio compartment is nice, even if it is hidden behind the huge battery. And of course, the pièce de résistance is the amazing engine assembly. Even though I didn’t use the flaps (although, I’ll eventually use them in another build), the set is a well worth the money; you save 30% over the price of the individual sets!
I think Eduard is on to something by offering various editions of each kit. The Weekend Editions are ideal for the budget minded modeler, the ProfiPACKs appeal to the more experienced modeler, and the Big Sin sets, featuring a collection of individual Brassin add-ons, appeal to the die-hard modelers. There really is something for every budget.
Highly Recommended
I can’t say enough good things about Eduard’s 1/48 scale Spitfire. The whole assembly is perfect. I will, build more of these Spitfires, and I’ll certainly use the Brassin engine and cockpit again. Both the model and the Big Sin set are highly recommended! The Spitfire and Brassin accessories represent the pinnacle of Eduard’s model-making artistry. Keep up the great work Eduard!
Thanks to Eduard and IPMS/USA for the review copy.

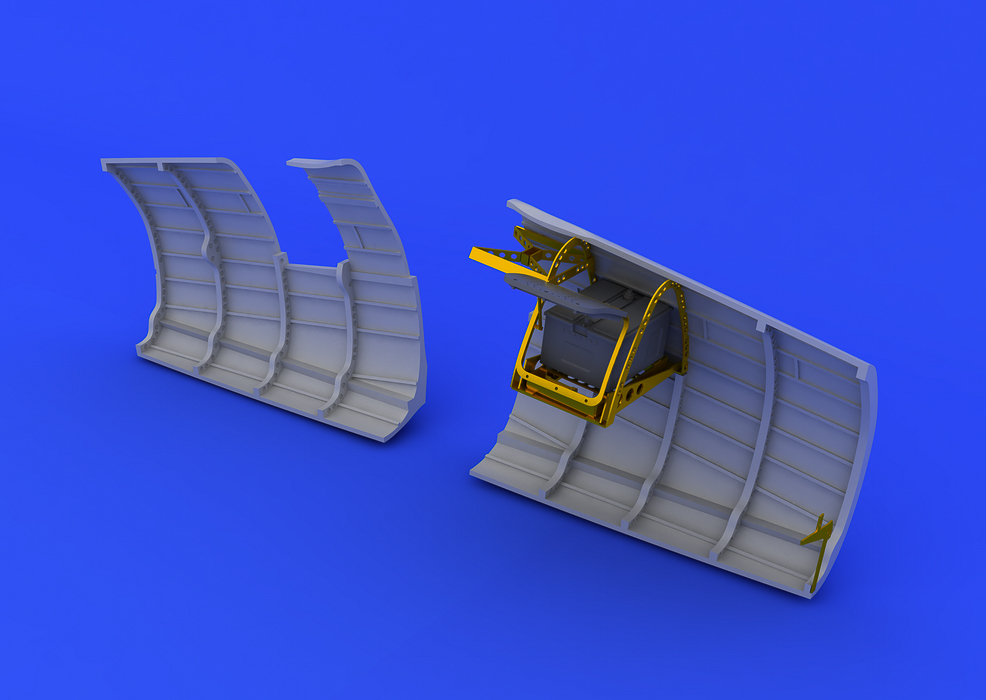
Radio Compartment - Manufacturer's Photo
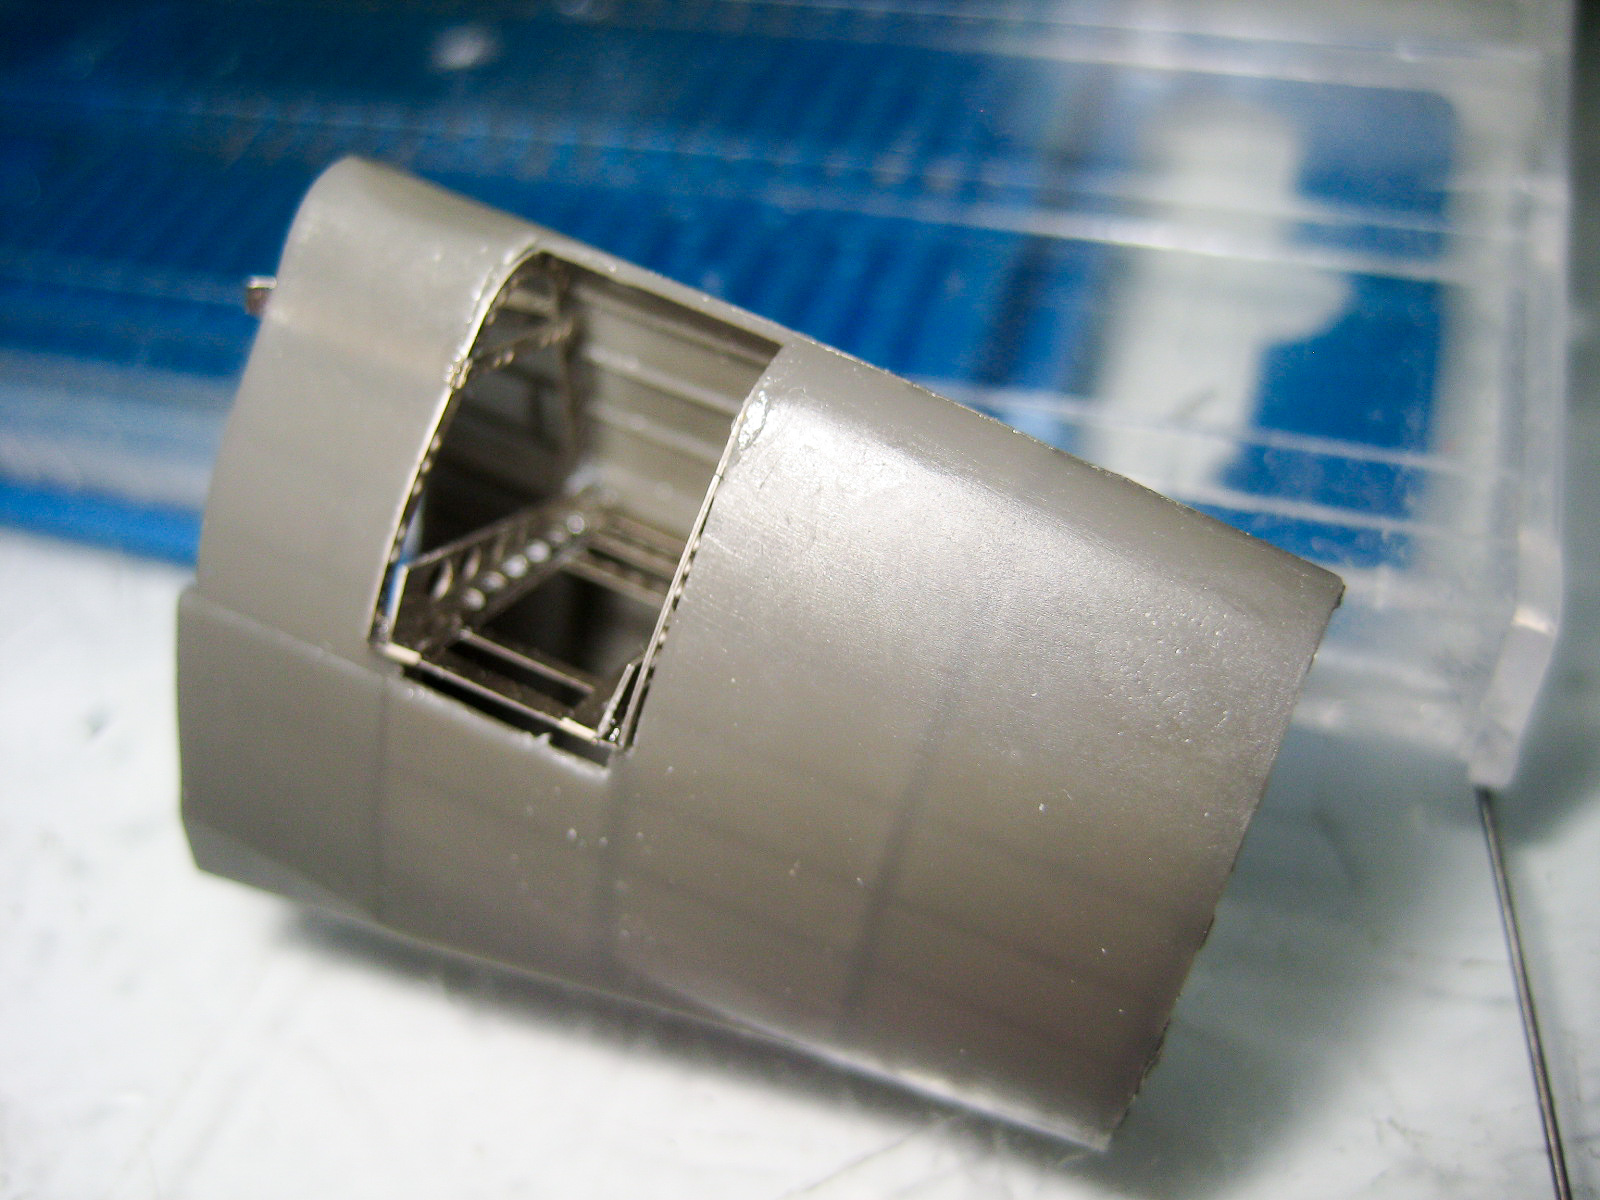
Radio Compartment Inner Structure
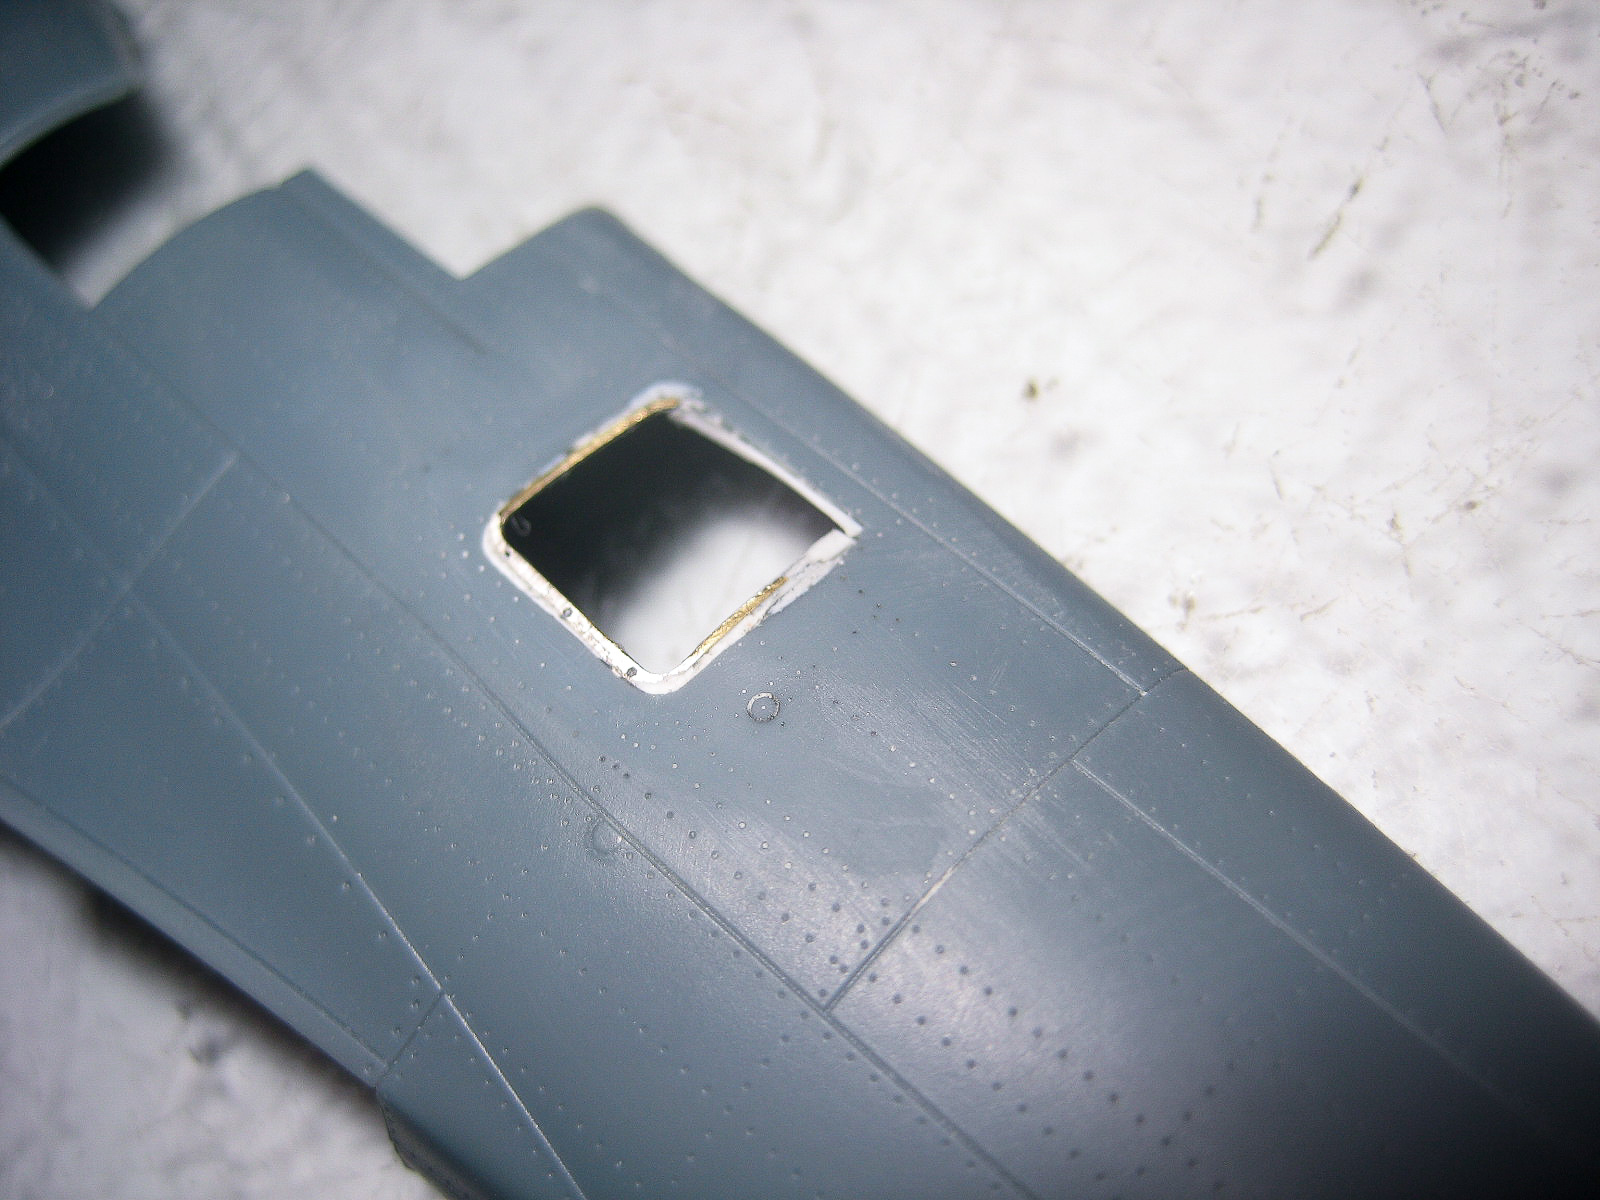
Radio Compartment Hatch
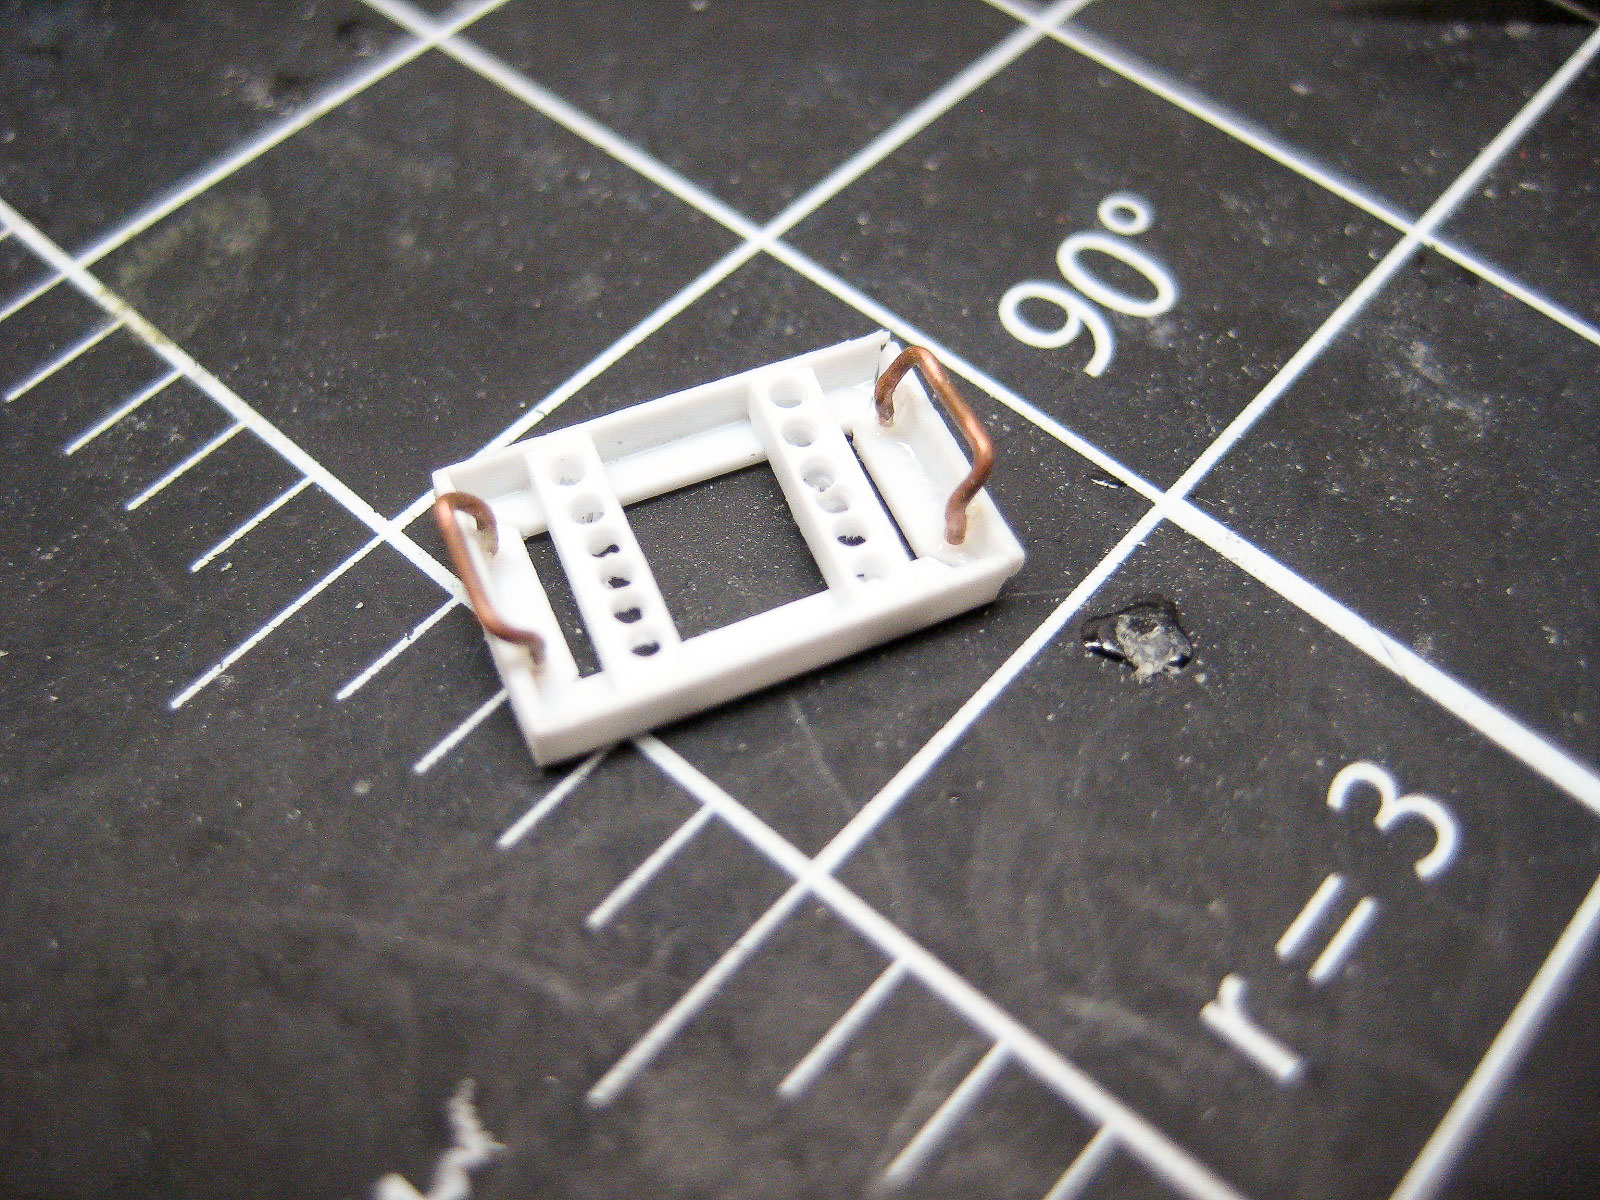
Scratchbuilt Replacement for Lost BatteryTray
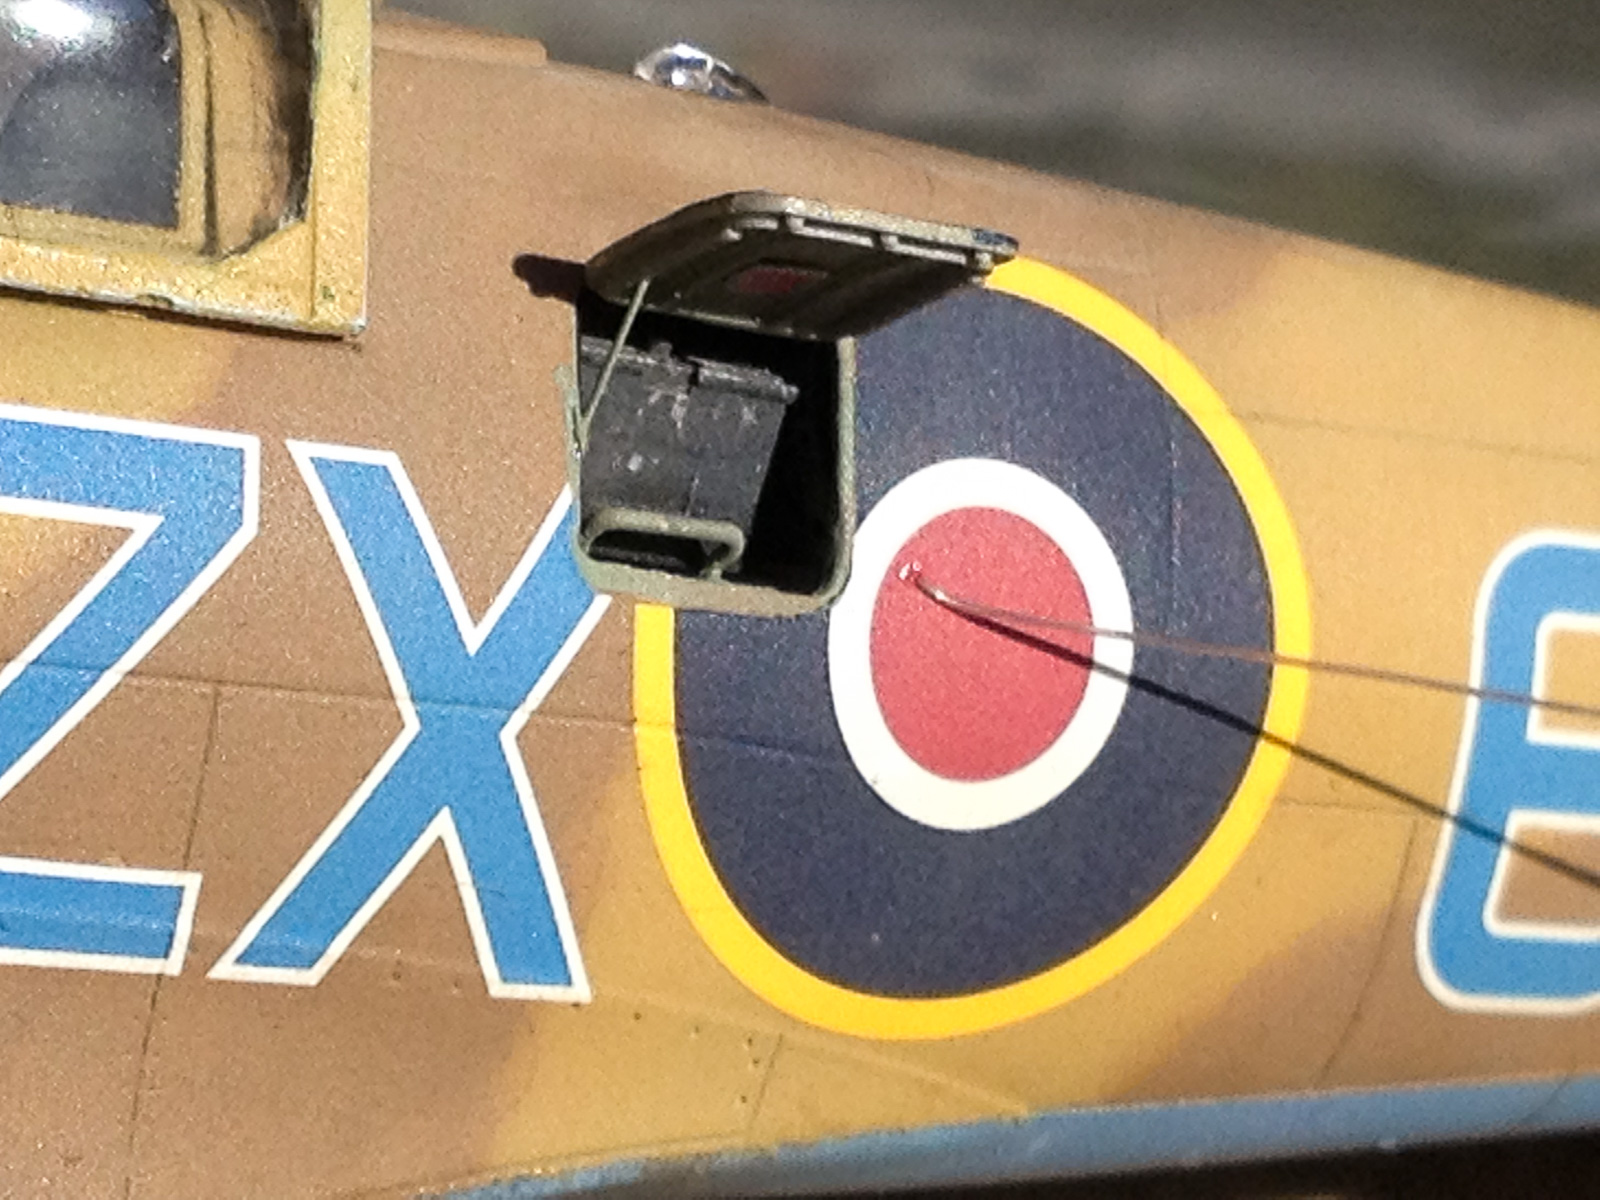
Radio Compartment on Finished Model
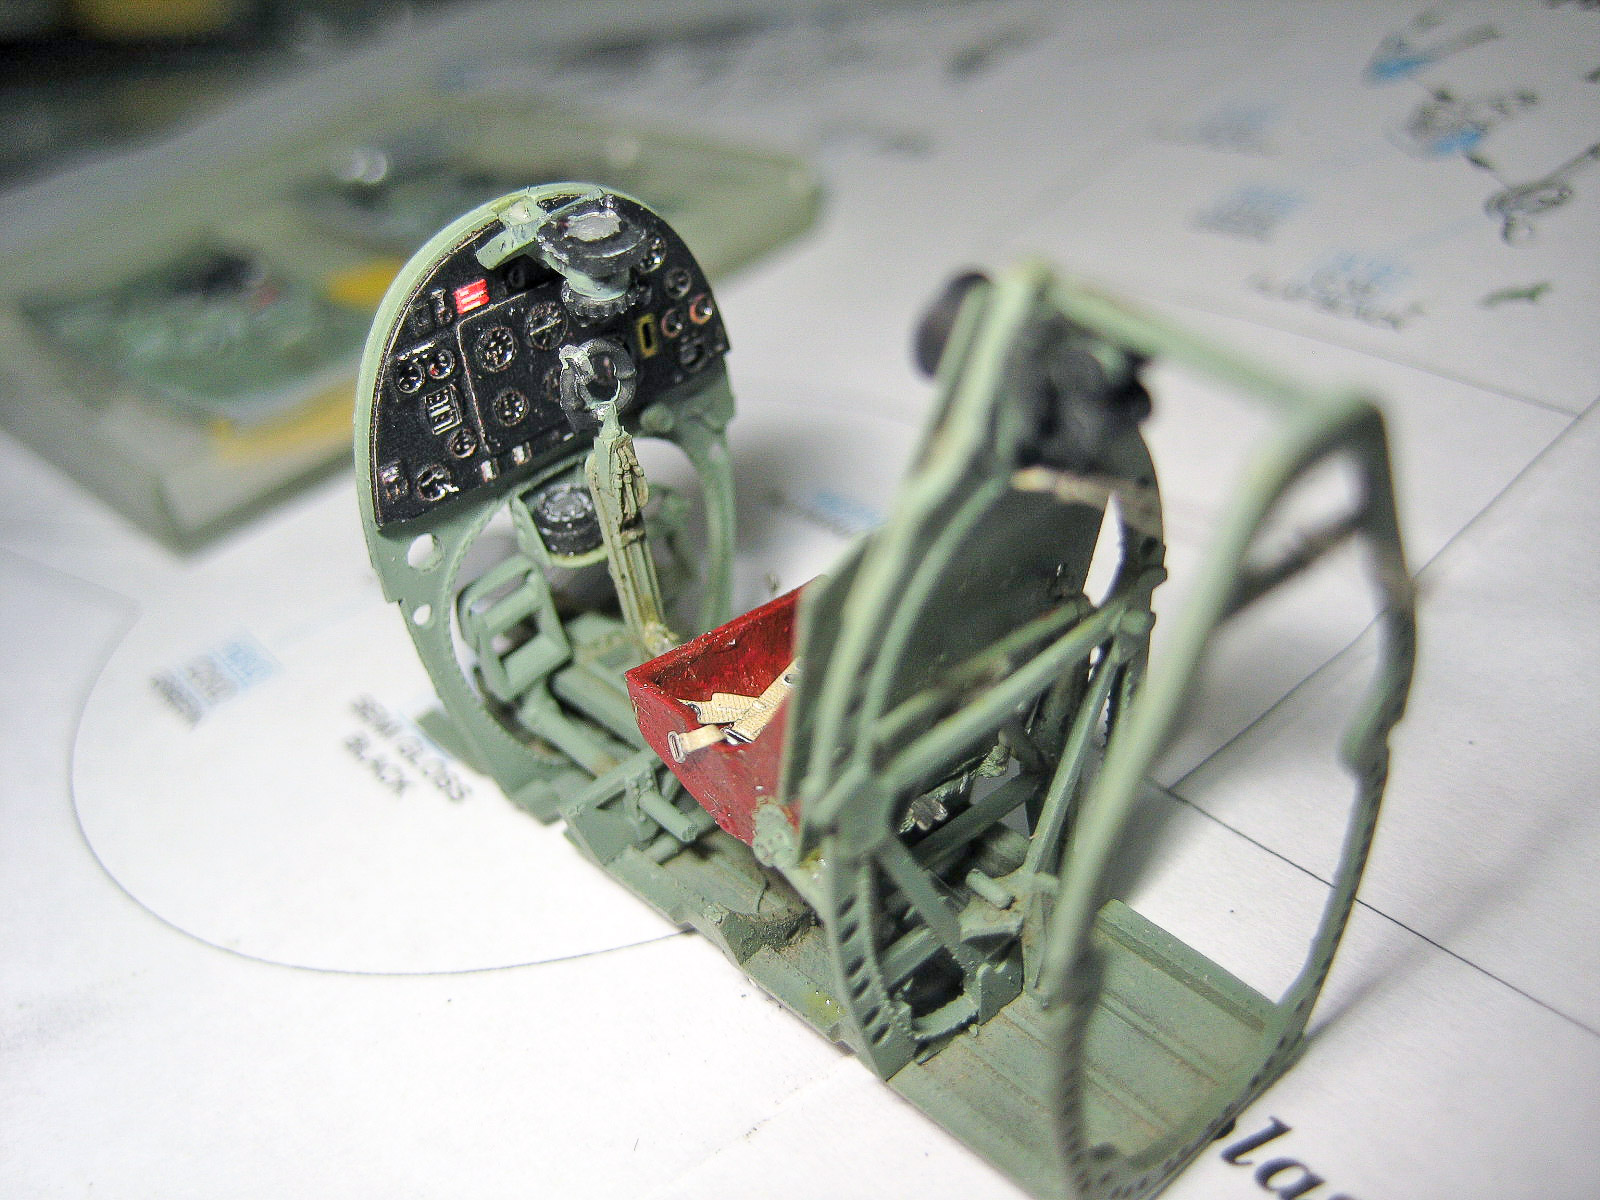
Cockpit Completed (Not Included with Advanced Big Sin Set)
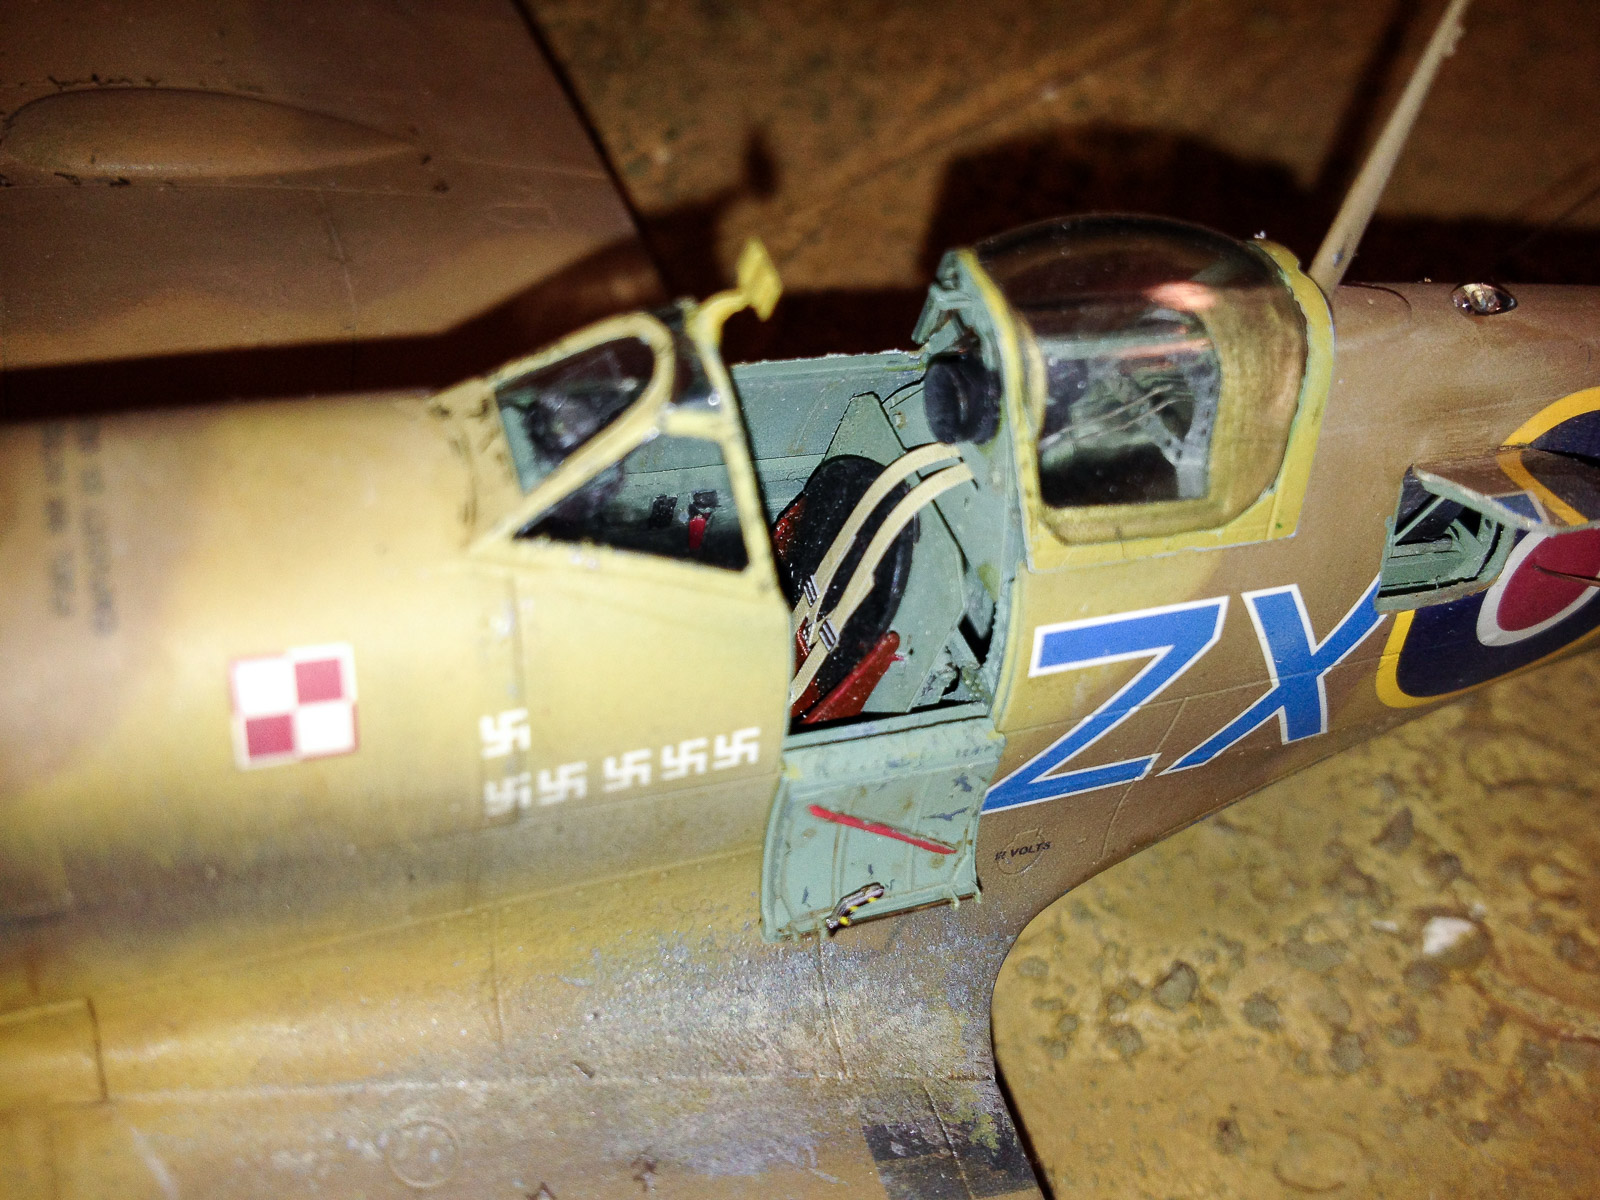
Cockpit Installed in Finished Model (Cockpit Not Included with Advanced Big Sin Set)
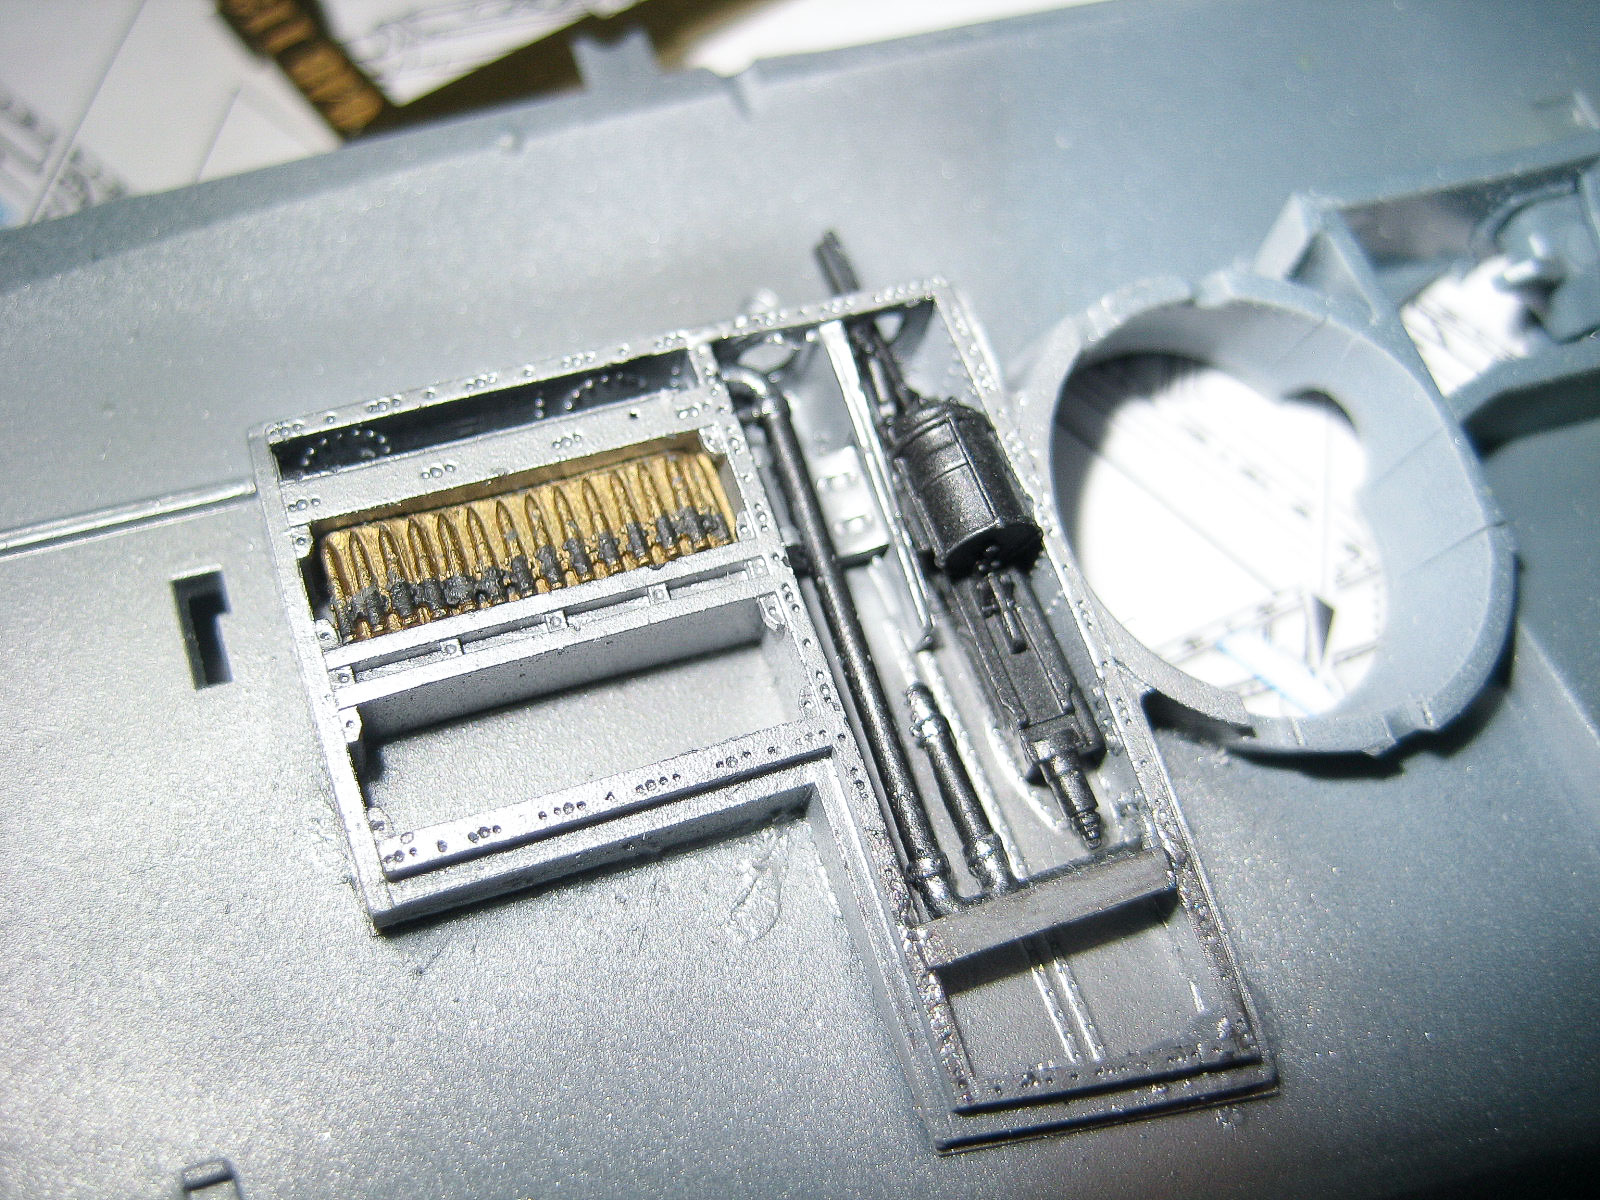
Gun Bay Installed
Gun Bay Installed in Finished Model
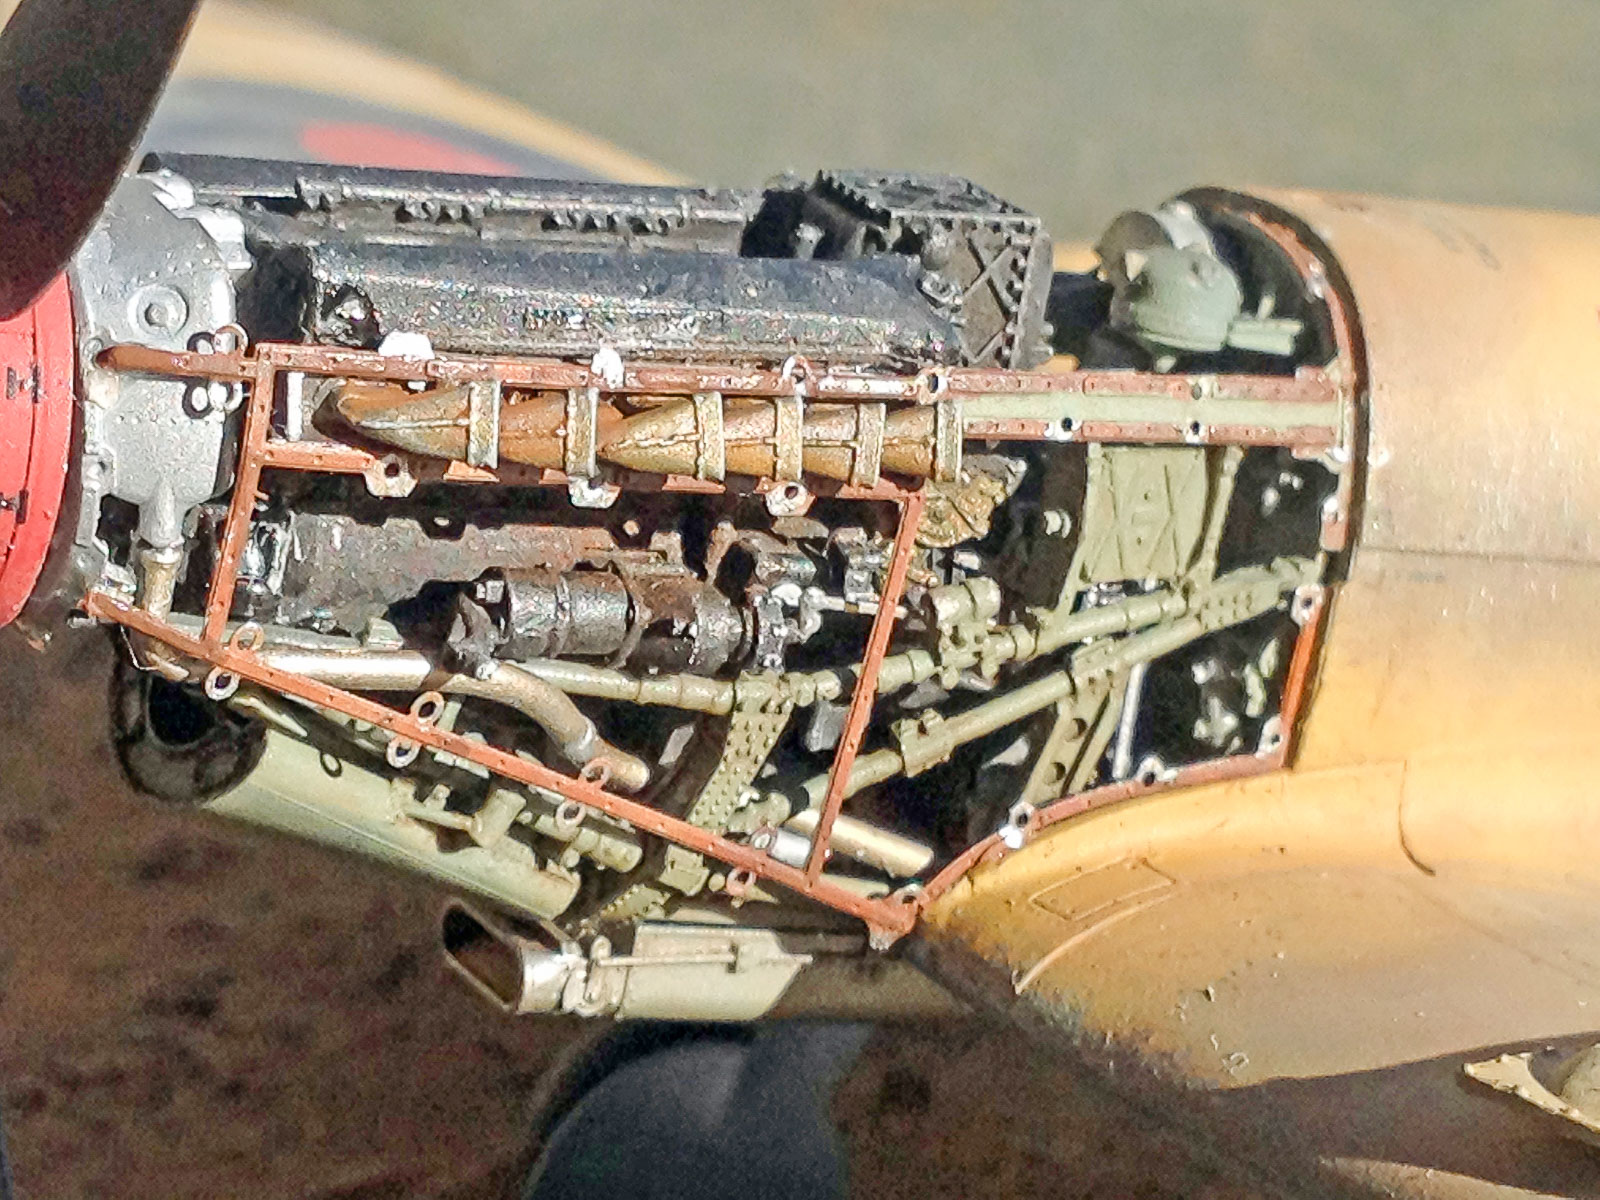
Completed Engine in Finished Model - Upper Left Side
Completed Engine in Finished Model - Right Side
Completed Engine in Finished Model - Lower Left Side
Completed Engine in Finished Model - Right Rear
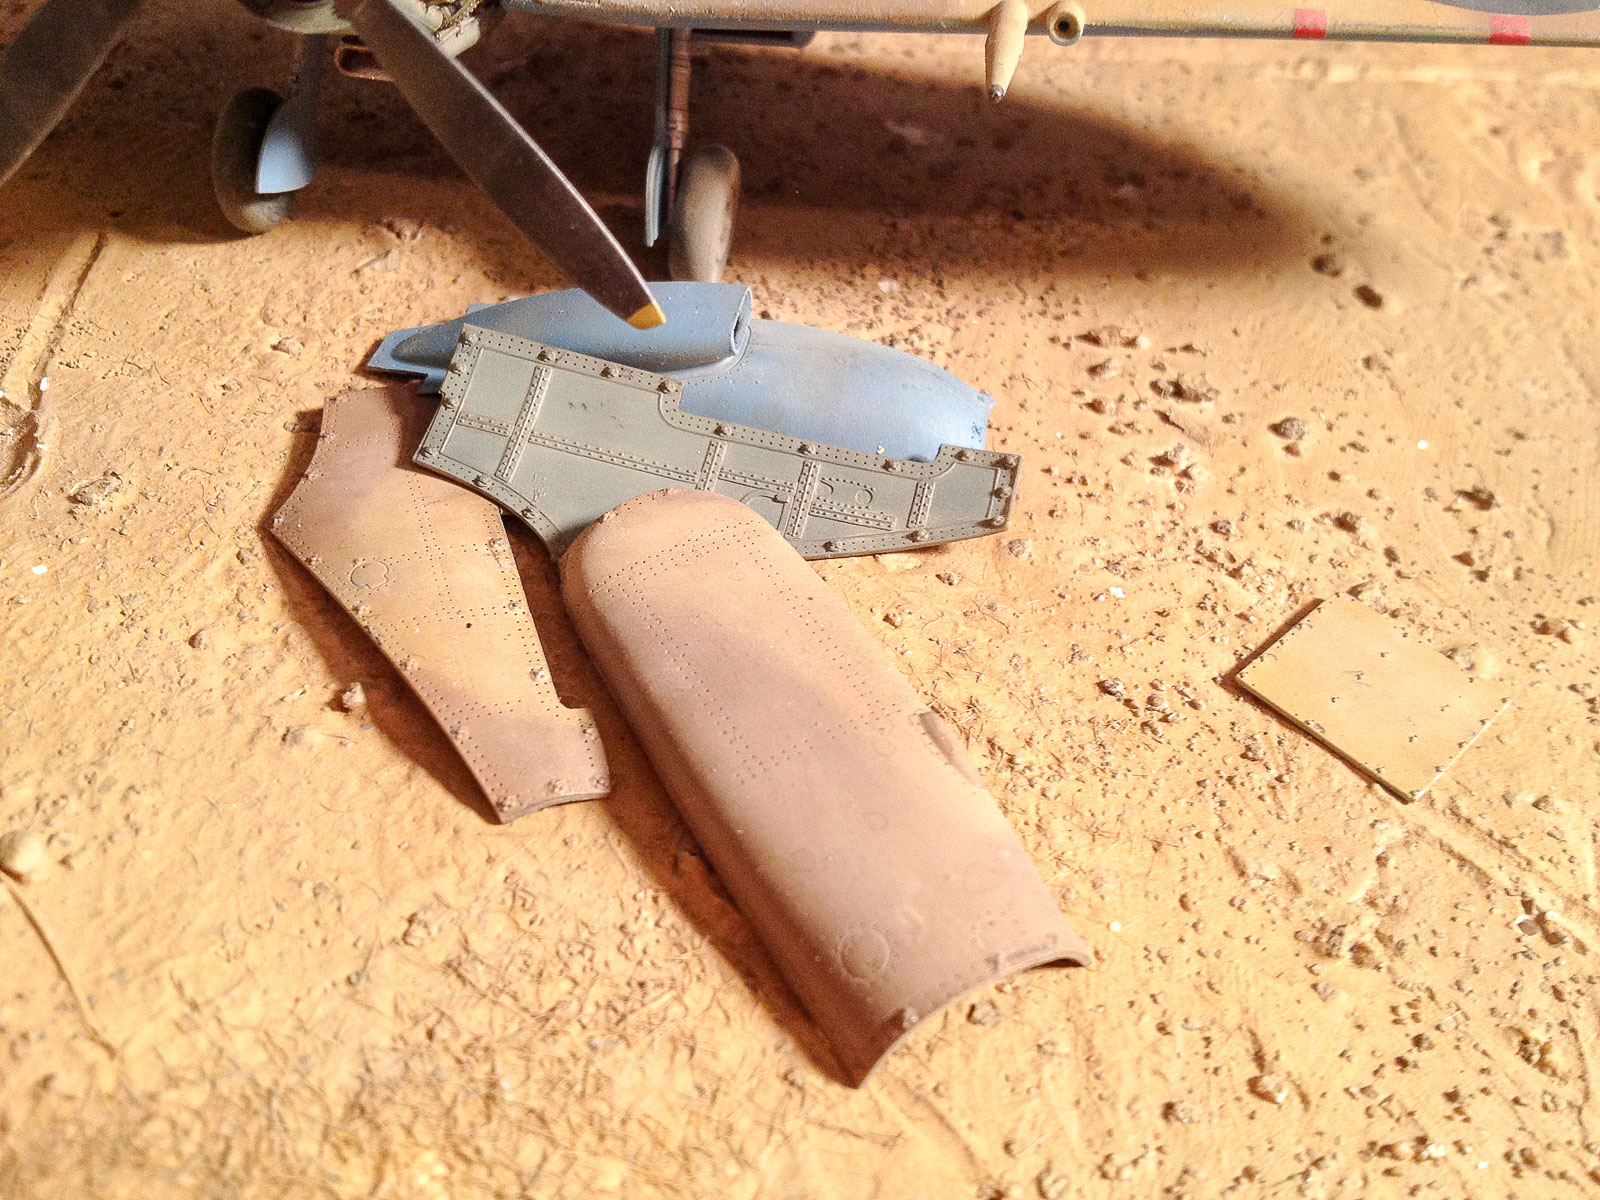
Engine Cowlings
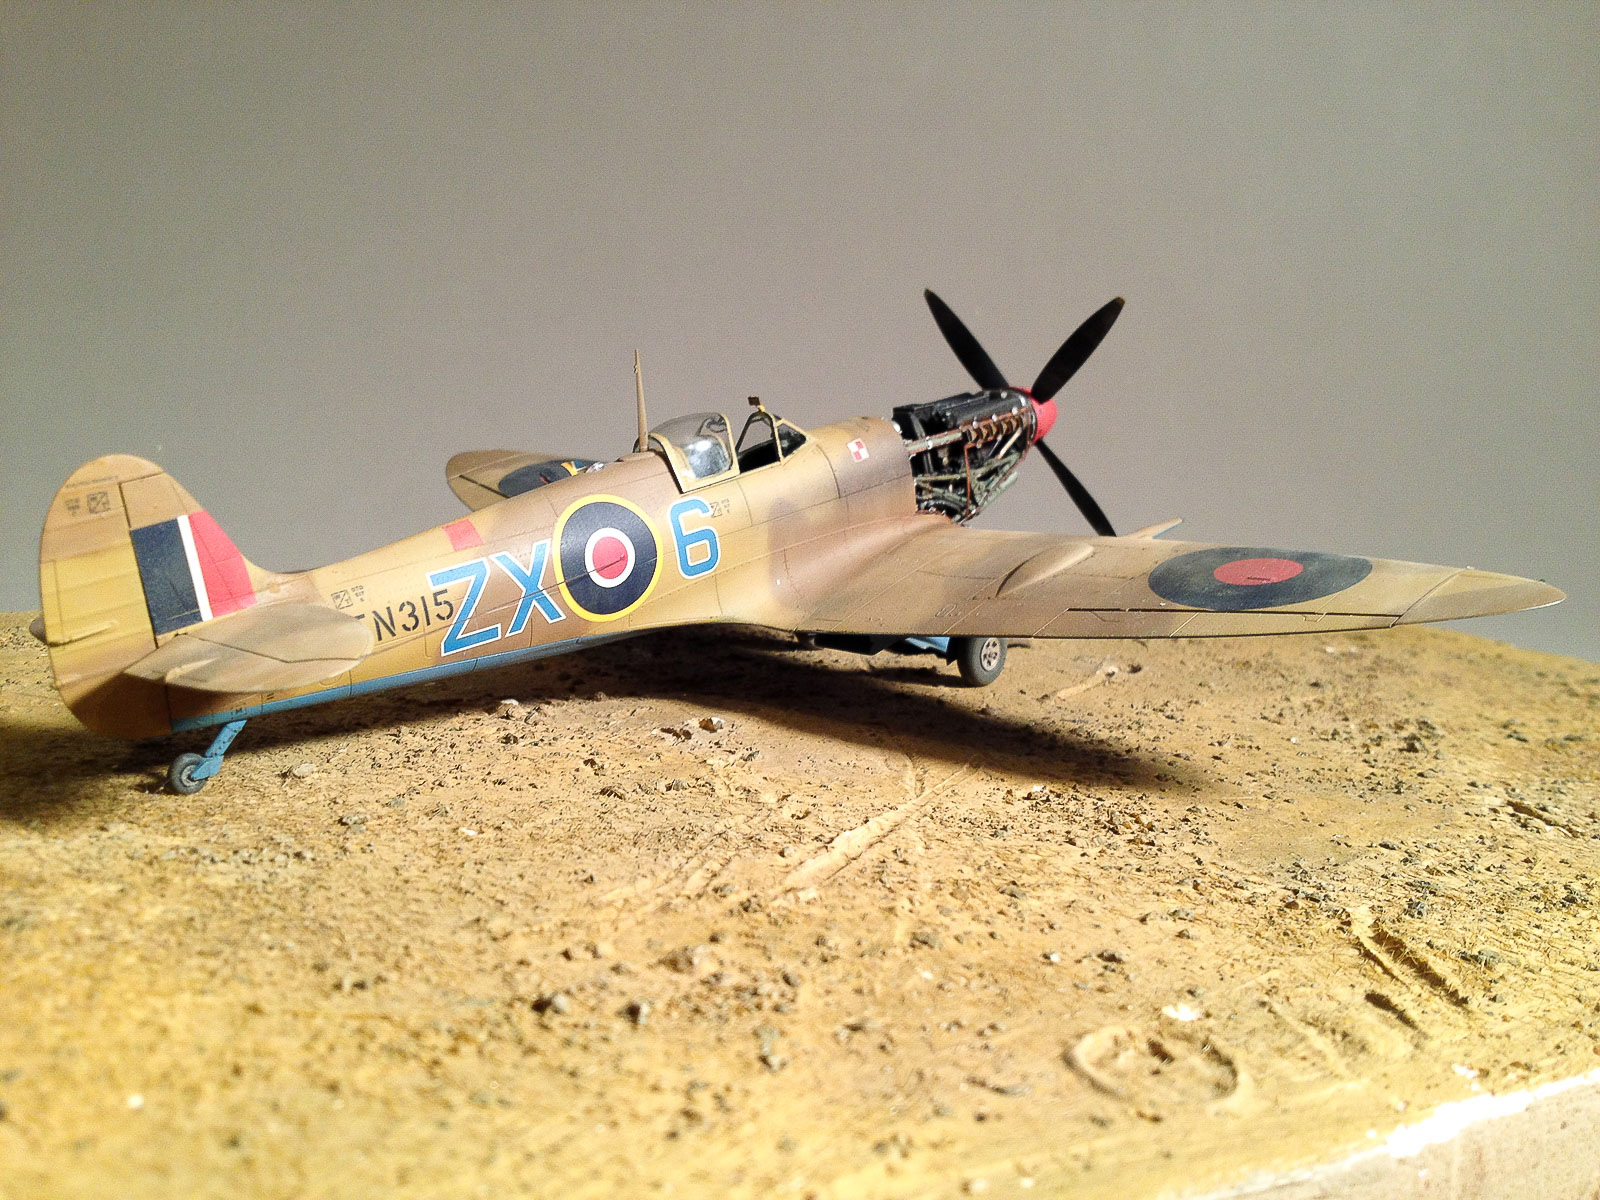
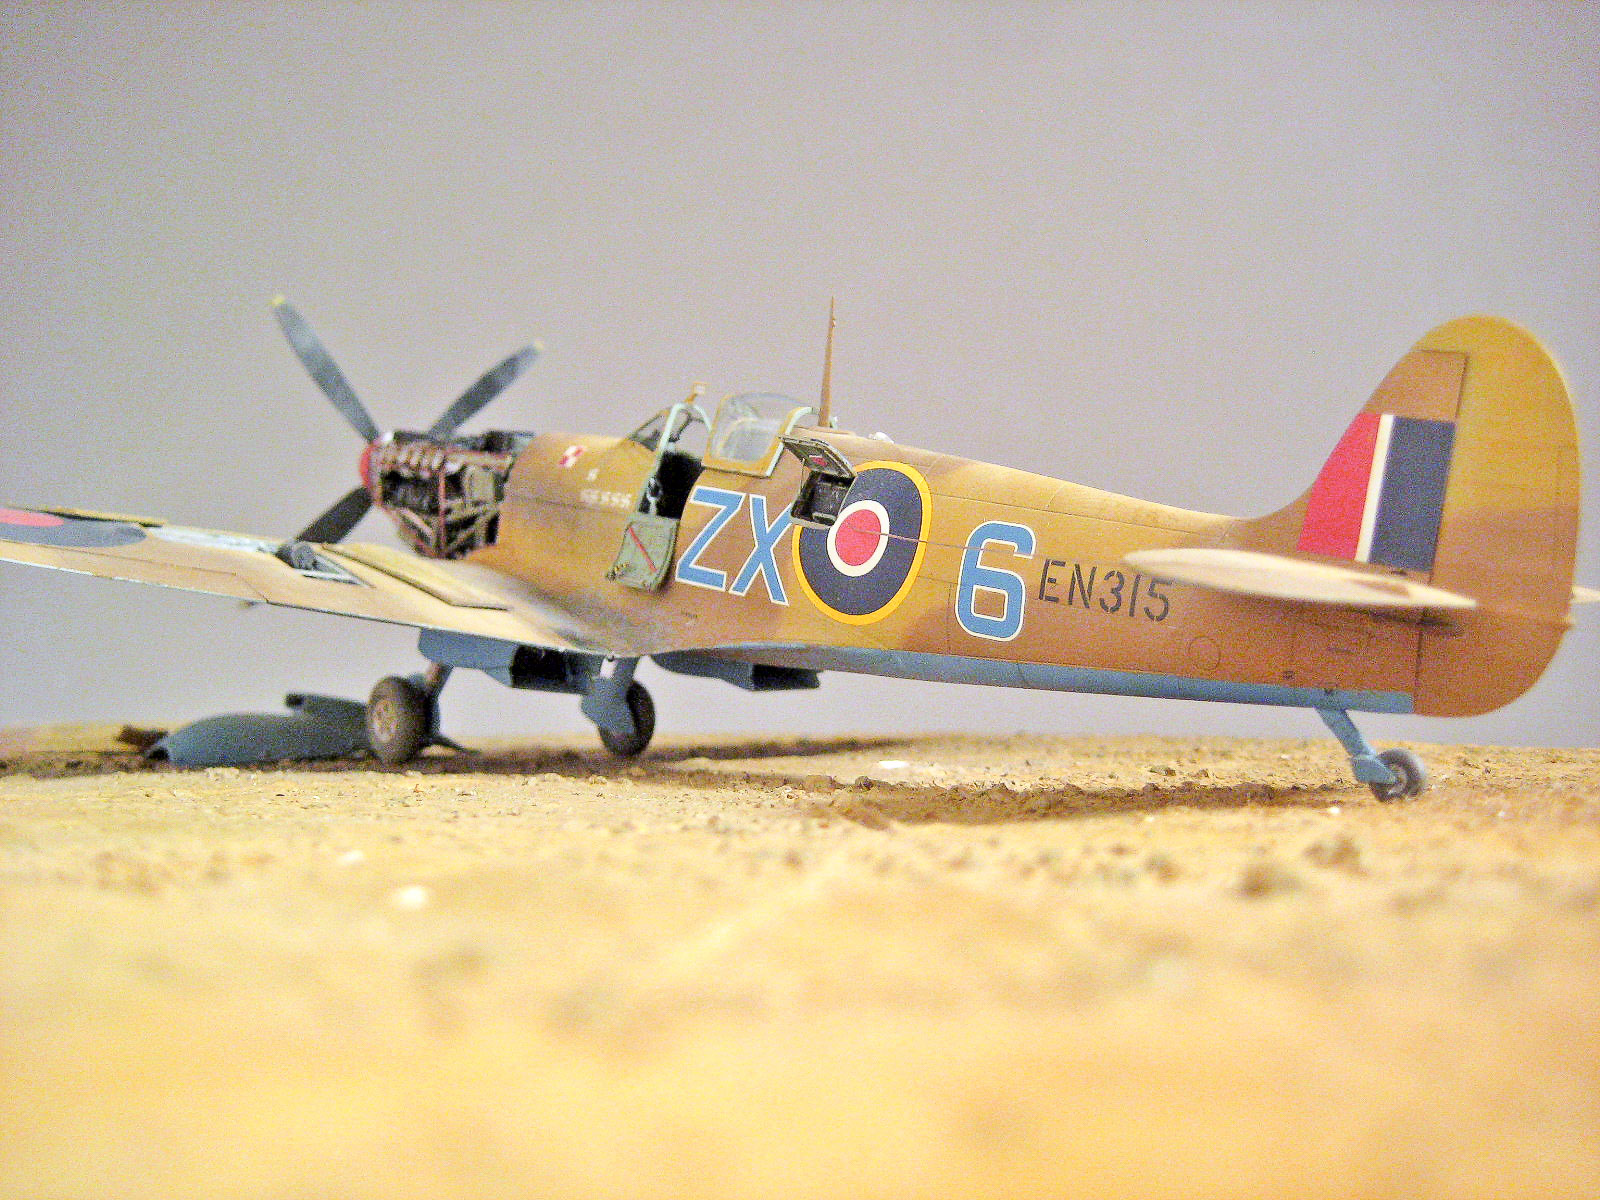
Finished Model - Right Rear
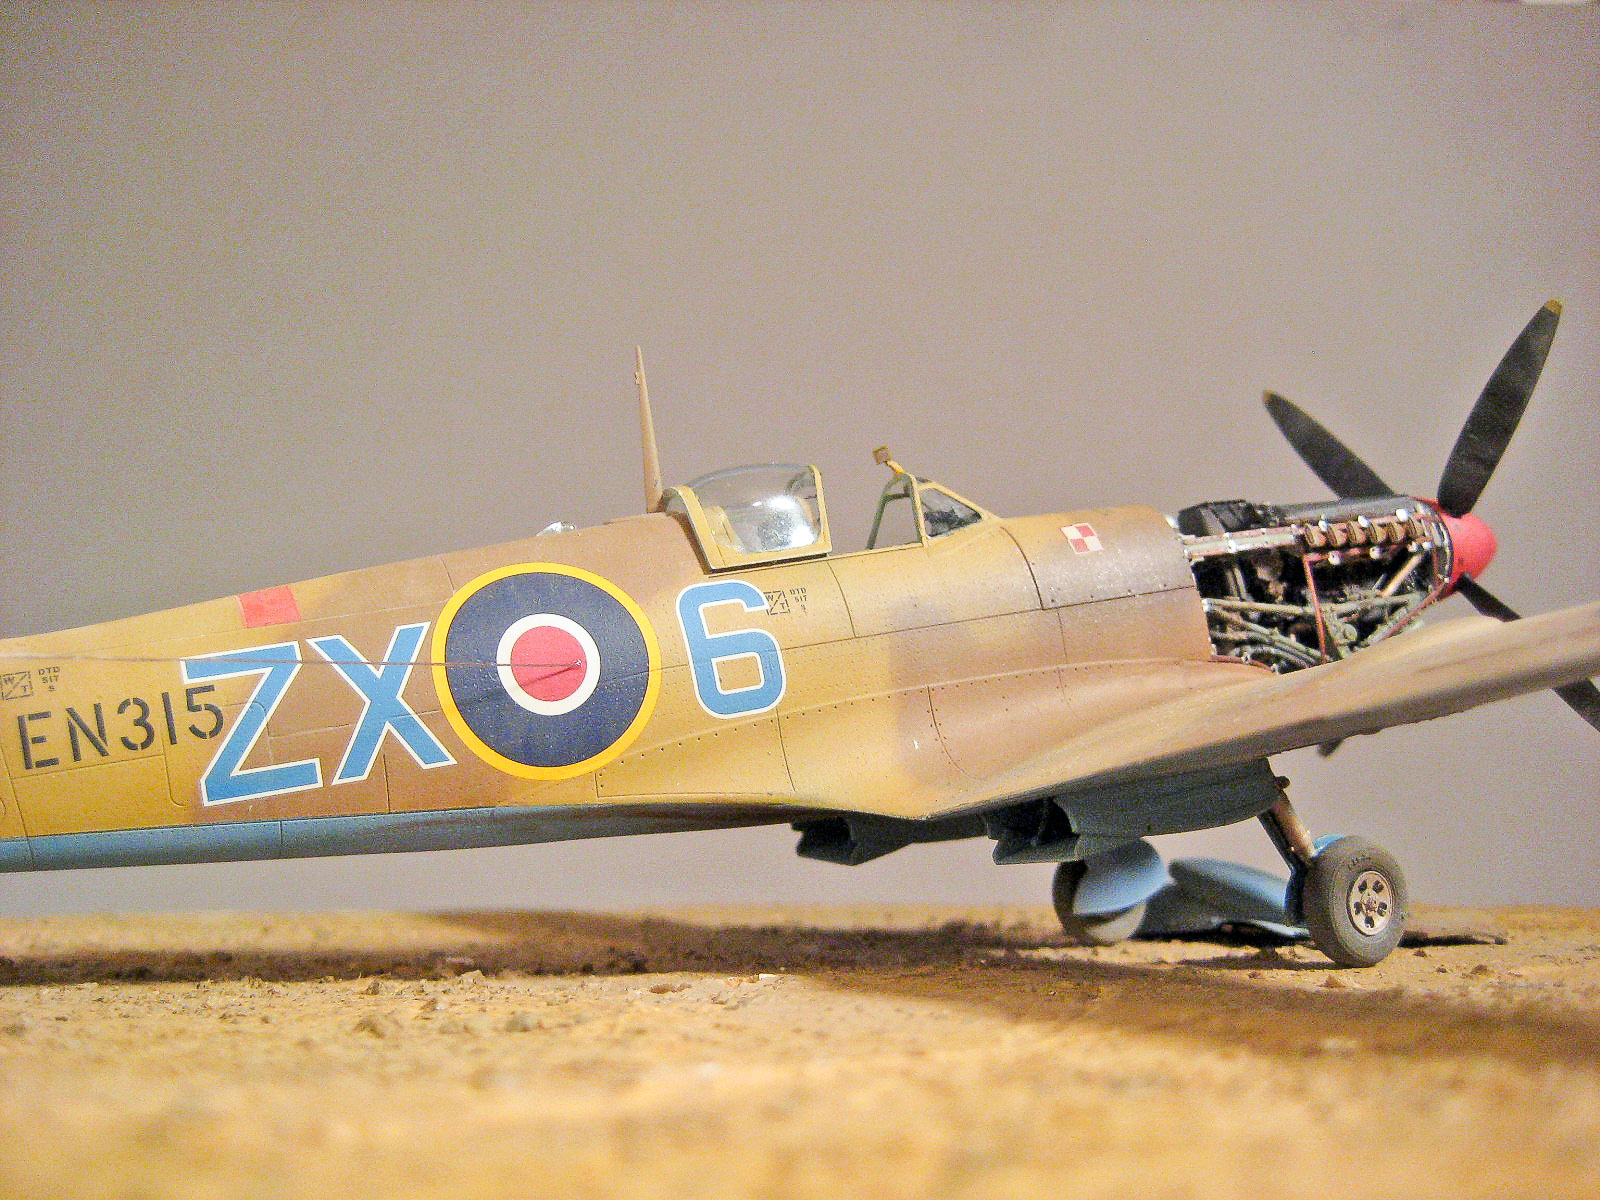
Finished Model - Right Side Closeup
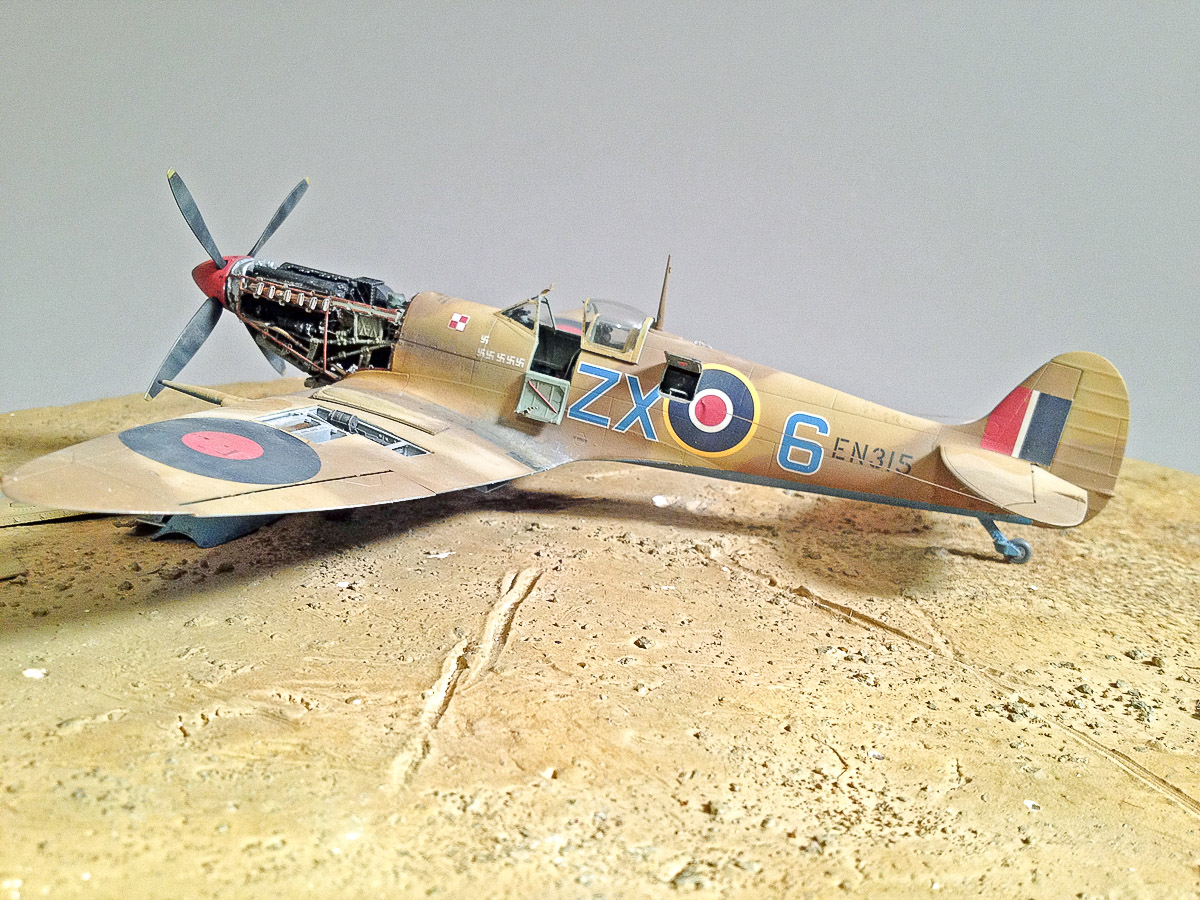
Finished Model - Left Side
Finished Model - Left Rear
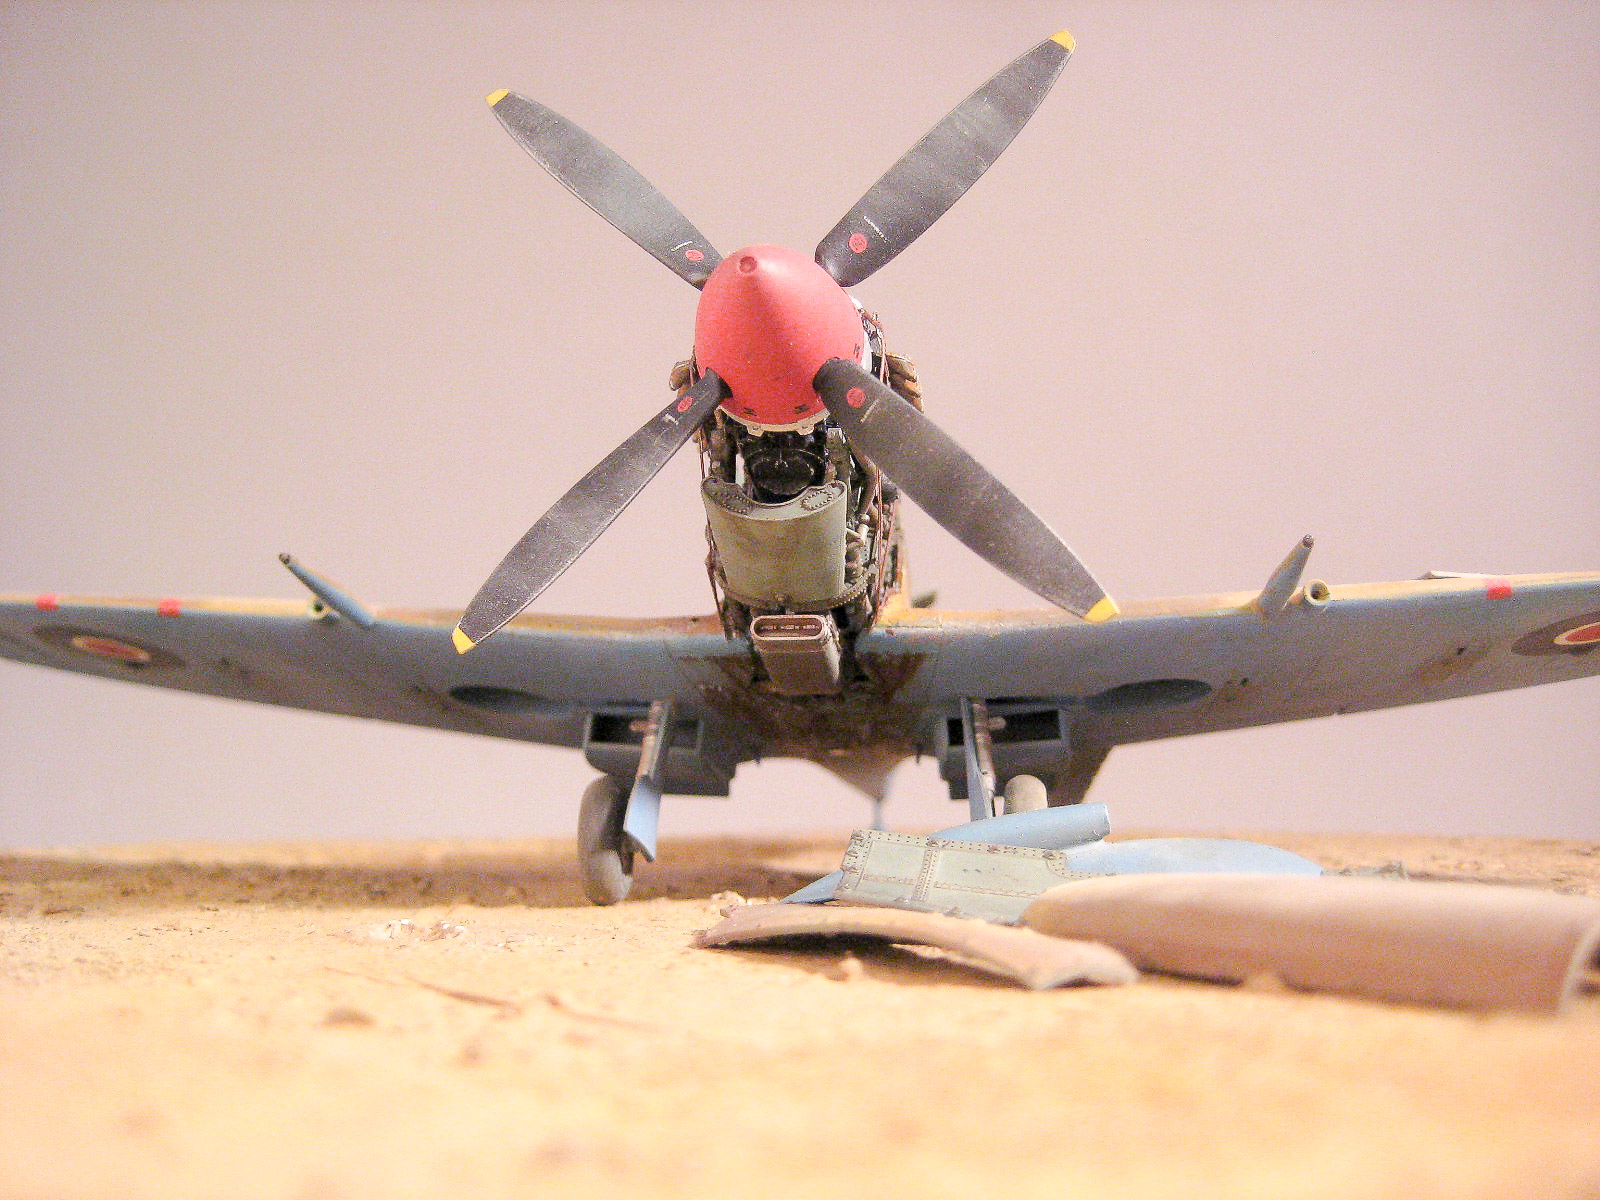
Finished Model - Front
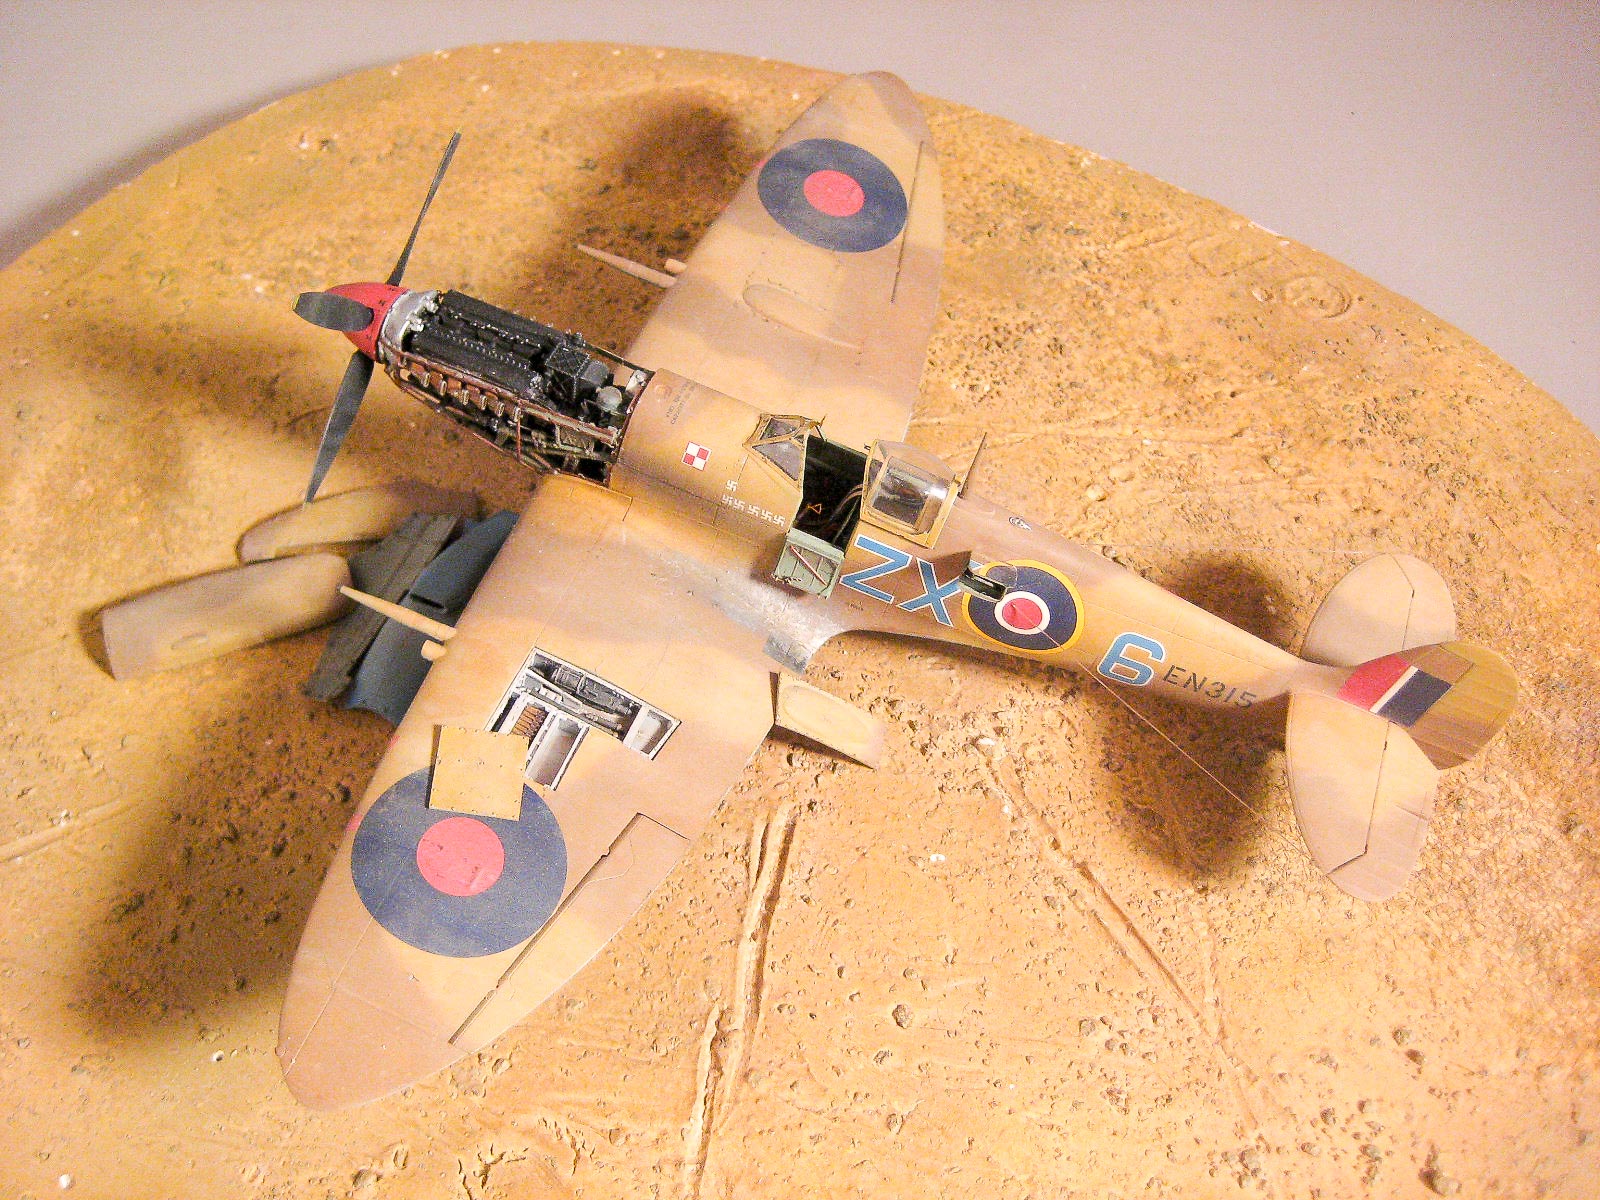
Finished Model - Top
Reviewer Bio
Floyd S. Werner Jr.

Building models since the age of 7, I’ve become known for my Bf-109s and helicopters. I currently run Werner’s Wings. I was previously the ‘star’ of the Master Class Model Building Video series. I’ve been published numerous times on various website, including Hyperscale and ARC. My work has been in FSM and Great Scale Modeling 2001, as well as, numerous other model magazines. I’m a published author with my Squadron/Signal Walkaround book on the Kiowa Warrior. My models have continuously won many regional and national awards. My unique model photography gives my models instant recognition for their historical perspective.
I’m a retired from the Army after 21 years of flying Cobras and Kiowa Warriors, including tours in Iraq, Bosnia, Korea, and Germany. I’m also a retired Flight Officer for the Baltimore City Police and flew their helicopters chasing bad guys. I’m currently flying Cobras and Hueys with the Army Aviation Heritage Foundation.
I’ve been married to my high school sweetheart, Yvonne, for 42 years. Our daughters have blessed us with six grandchildren. My passions continue to be his family, friends, helicopters, models and airplanes, especially the Bf-109 and my beloved AH-1 Cobra. My motto has always been - MODELING IS FUN!
Comments
Add new comment
This site is protected by reCAPTCHA and the Google Privacy Policy and Terms of Service apply.
Similar Reviews