
Stranger Things: Billy Hargrove’s ’79 Camaro Z28
The Netflix show “Stranger Things” has taken the country by storm. In the early seasons, one of the major characters, Billy Hargrove, drove a Camaro that figured prominently as part of his image and of his downfall. Revell has recently released a kit to recreate this car. Let’s take a look.
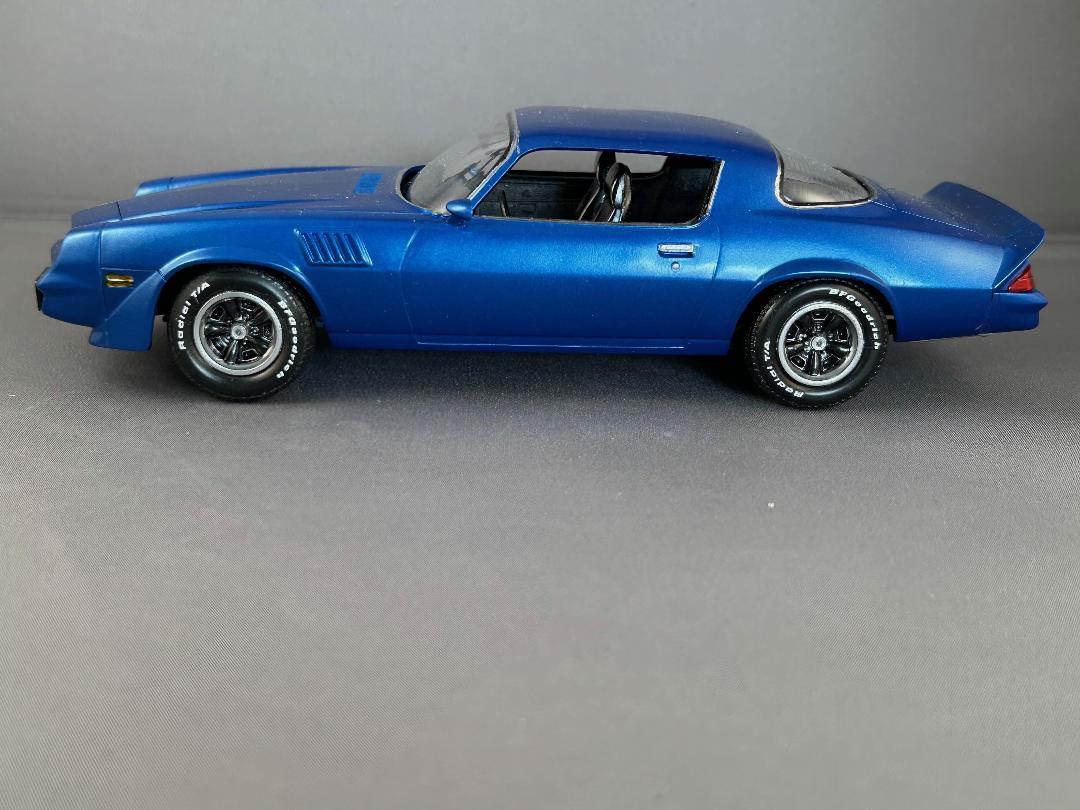
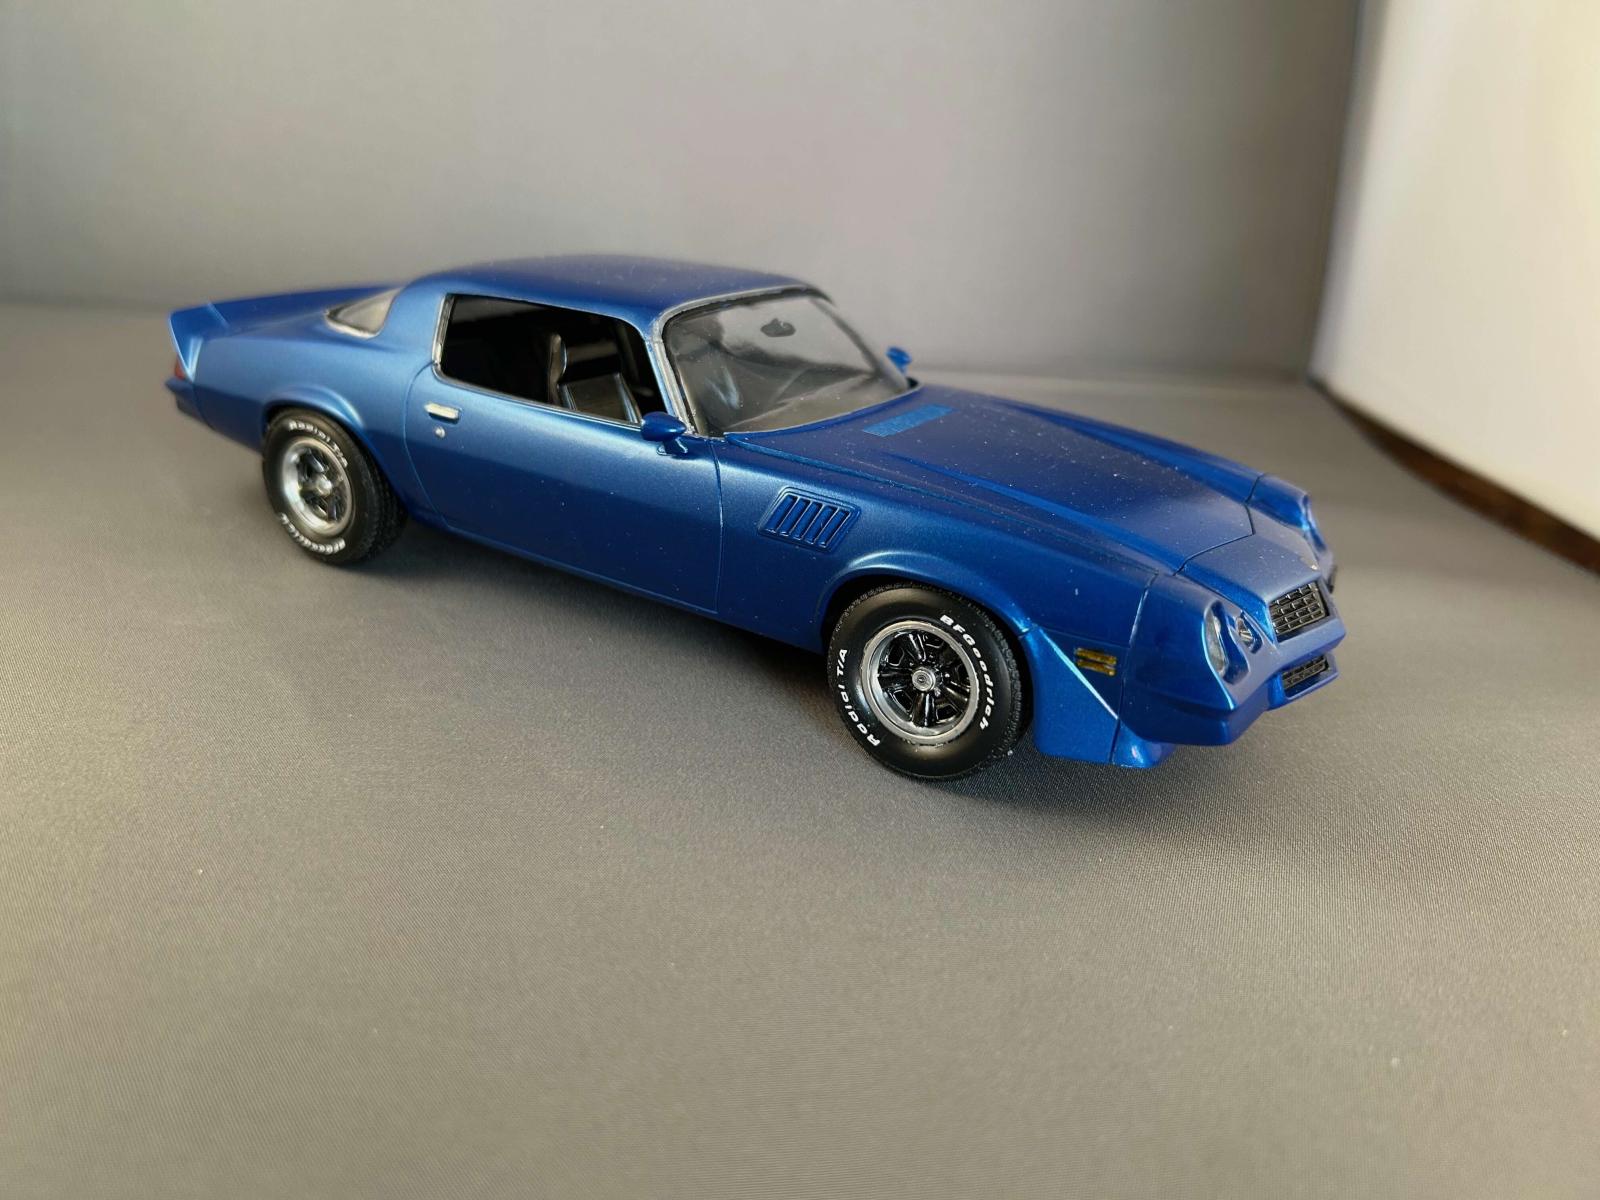
The car in question is a 1979 Chevrolet Camaro Z28. 1979 was the second year of a facelift that saw the big, heavy 5MPH bumpers that appeared in 1974 replaced by stylish, body-colored urethane assemblies that greatly improved the look of the car. Billy’s car, specifically, has seen better days, but it was what his character would have been able to afford at the time and was still very “cool”. The actual car used in the show appears to be a Rally Sport model with the Z28’s chin spoiler, fender vents, and wheels added. It has a plain hood rather than the Z28’s hood with a scoop, it lacks the Z28 decals, and the window and headlight trim is chrome versus being blacked out on the Z28. The wheel centers are also a dark gray, while on the Z28 they would have been painted the same color as the car’s body.
The kit consists of 89 pieces molded in white and clear, with 4 no-name vinyl tires. There are no chromed parts, although it aappears that one of the parts trees was originally intended to be chromed. The original kit could be built as either a stock Z28, a “street” version, or a “race” version (think dragster). Many of parts for the street and race versions are still in the kit, including the supercharged engine and 2 hoods (Z28 and street/race). This release adds a third hood (base version), while deleting some of the other bits. Sadly, only one set of wheels and tires are provided, so attempting a full race version will require a bit of kit-bashing to get an appropriate wheel/tire setup. The original kit also appears to have had T-tops; the glass panels for these are provided on the clear tree, but the roof has been filled in and there are no provisions for opening it up.
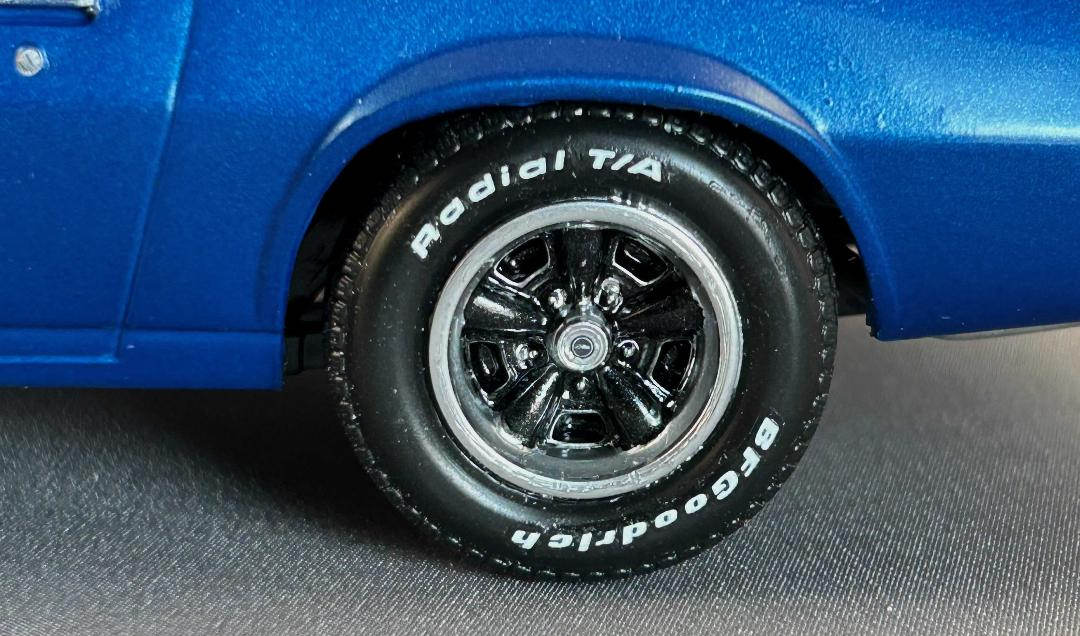
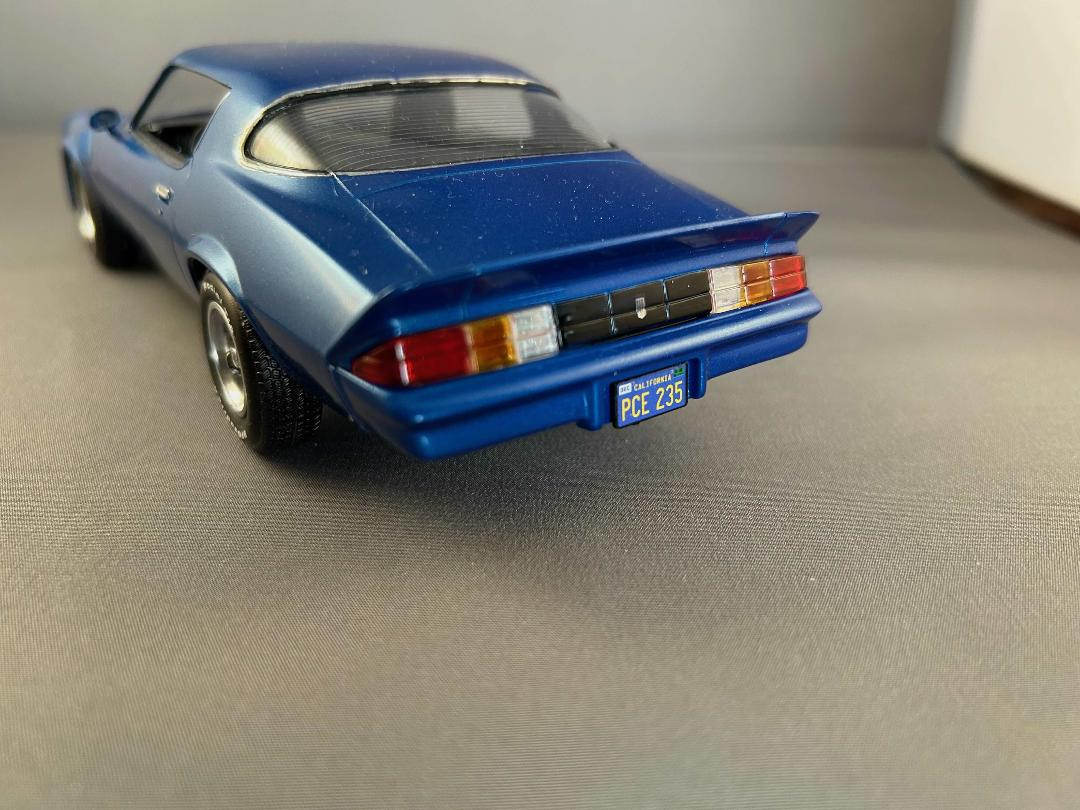
An extensive decal sheet provides two sets of Z28 decals (orange and blue), all the dash gauges, engine compartment labels, hood and trunk badges, door locks, wheel center caps, and Billy Hargrove’s California license plates from the show car. There are also white “B F Goodrich” and “Radial T/A” decals for the tires. The decals go on smoothly and respond well to Micro Set and Micro Sol.
The instruction sheet is a glossy, full-color, 20-page booklet that includes detailed painting instructions and build options for all four versions of the kit, plus depictions of each of the parts trees, building tips, and a listing of all the parts by number with their names. The build tips and list of paint colors are printed in 21 different languages, but most of the instructions rely on pictograms (described in the build tips) to indicate what needs to be done. For the most part, the instructions do a good job of showing how the parts assemble. When there are options for the different versions, each option is shown as its own step, clearly marked as to which version it is for.
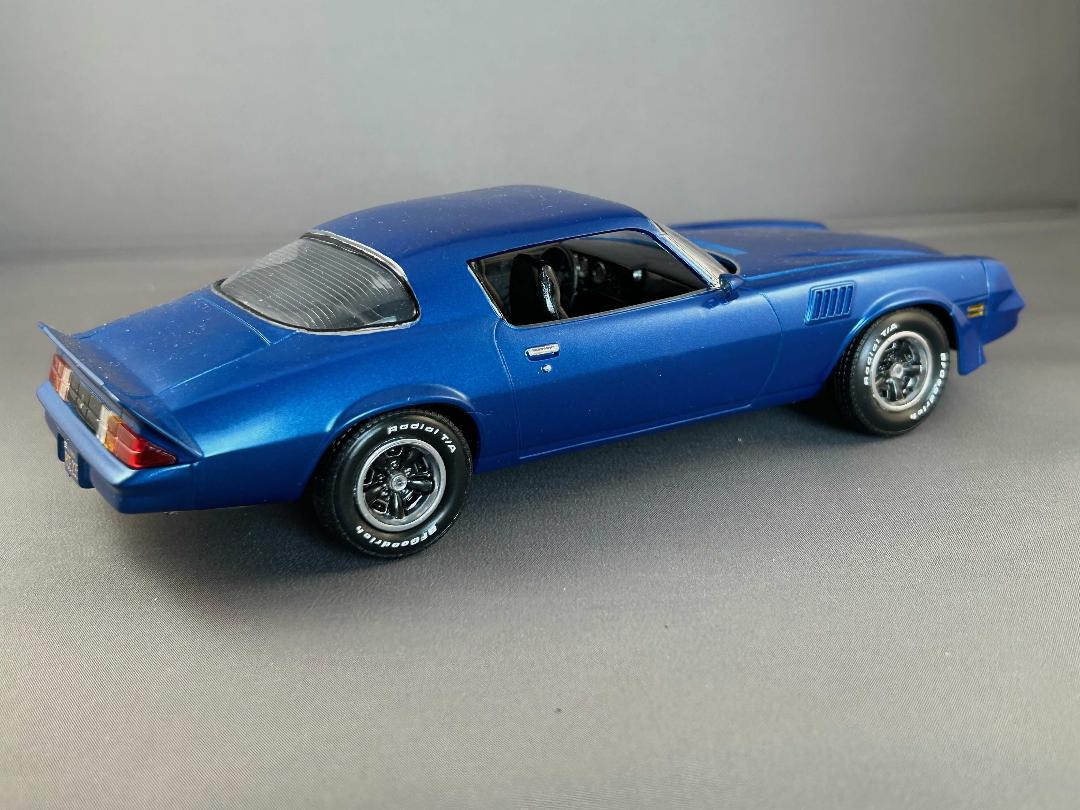
For my build, I opted to go with the Stranger Things version, since that is what this release is all about. The parts had limited flash except on some of the tinier parts; so while cleanup was minimal, it was a bit tedious. The body had some light mold lines on the roof and along the tops of the front fenders, all of which sanded down easily. Engraving of the door openings and hood vents seemed a bit shallow, so I used a scribing tool to deepen them slightly. I used Tamiya Mica Blue for the body color, and Tamiya Gun Metal for the inner parts of the wheels. Rust-Oleum Metallic Silver was used for most of the “chrome” parts, with Molotow Liquid Chrome pens for the chrome details. The rest of the parts were painted with a mixture of Rust-Oleum, Tamiya, Testors, and craft paints. Be forewarned that the tolerances on this kit don’t really allow for much paint thickness, especially when it comes to pins fitting into holes, so test fit and be prepared to remove paint at times.
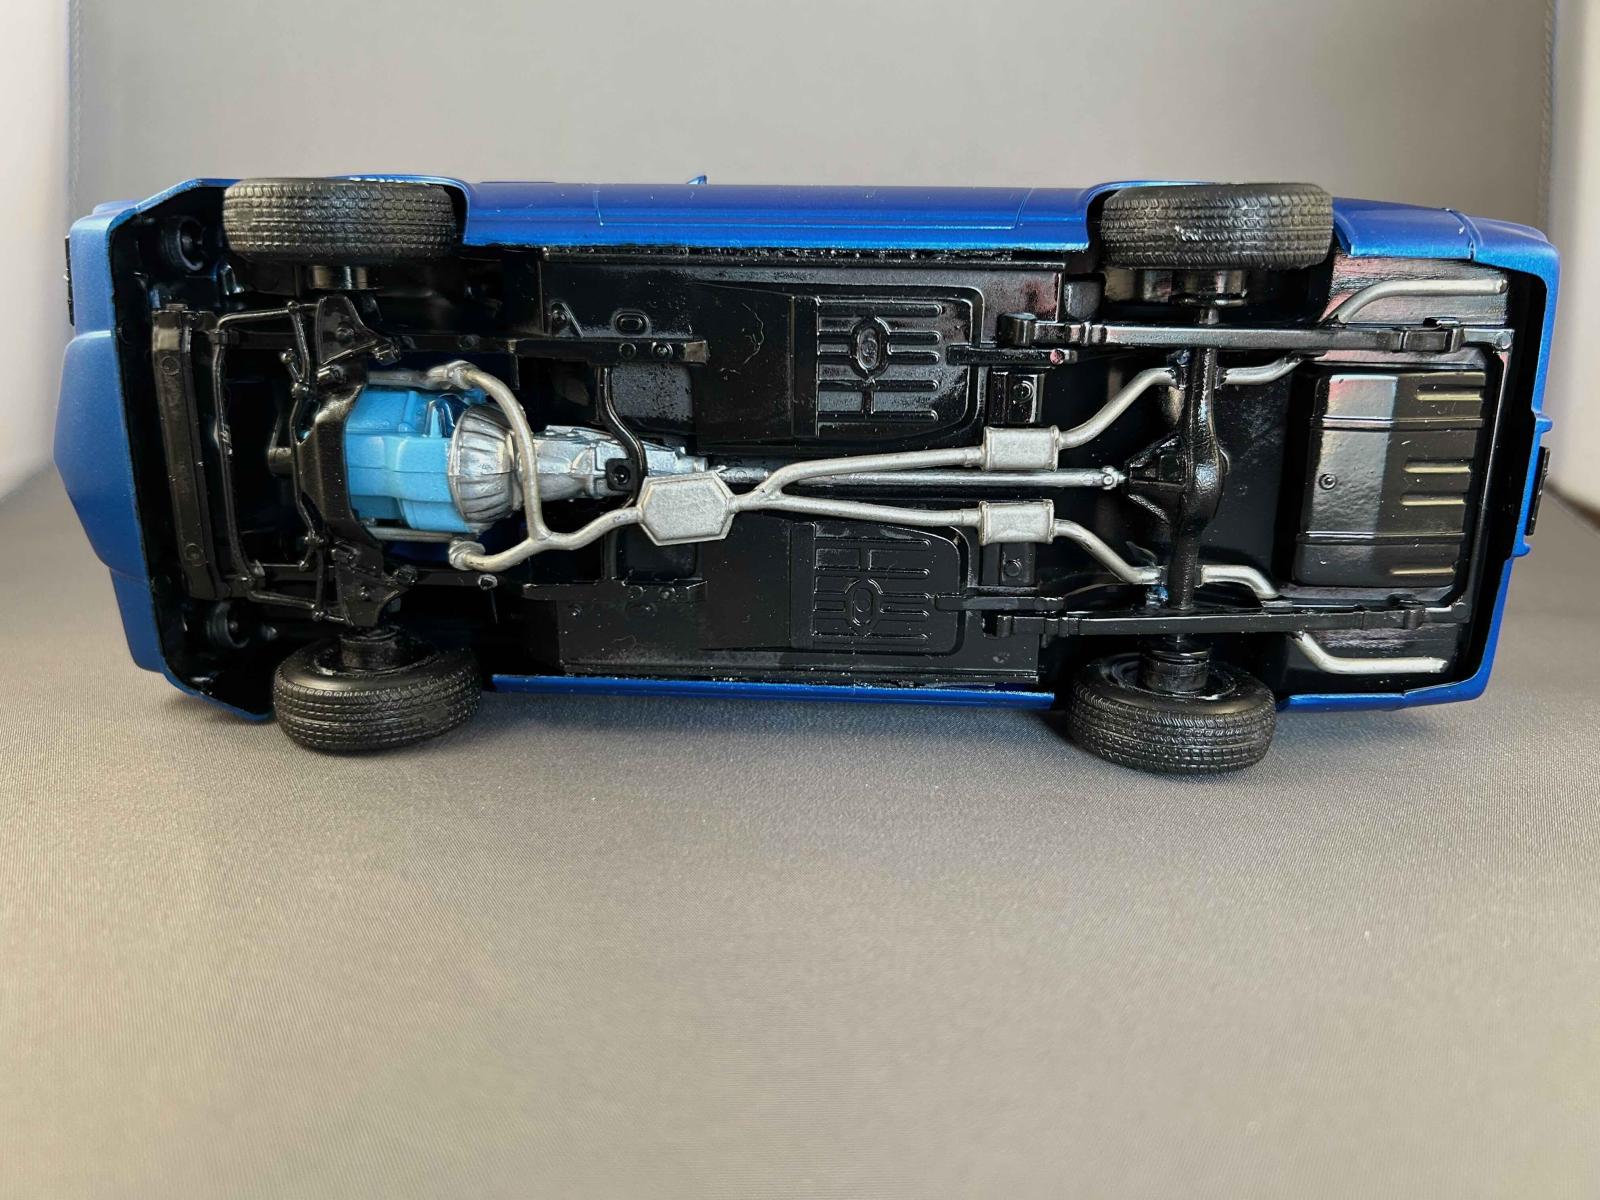
The instructions begin with the chassis and tires. My only real issue here was with the aforementioned paint thicknesses: I had to file paint off of the axle stubs, the wheel retainers, and the inner wheels to get everything to fit. But once I did, the wheels fit snugly and were able to rotate. I also had to drill out the holes on the rear shocks to fit onto their pins on the rear suspension, again because of the paint. The chassis was straight, and all four tires sat firmly on the ground. The decals for the tire lettering went on easily and look great. The decals for the wheel center caps were so tiny that I had trouble getting them in place; I think I folded a couple of them over, but I really can’t tell for sure. It might be better to just use a drop or two of black wash in the wheel caps to get the desired effect.
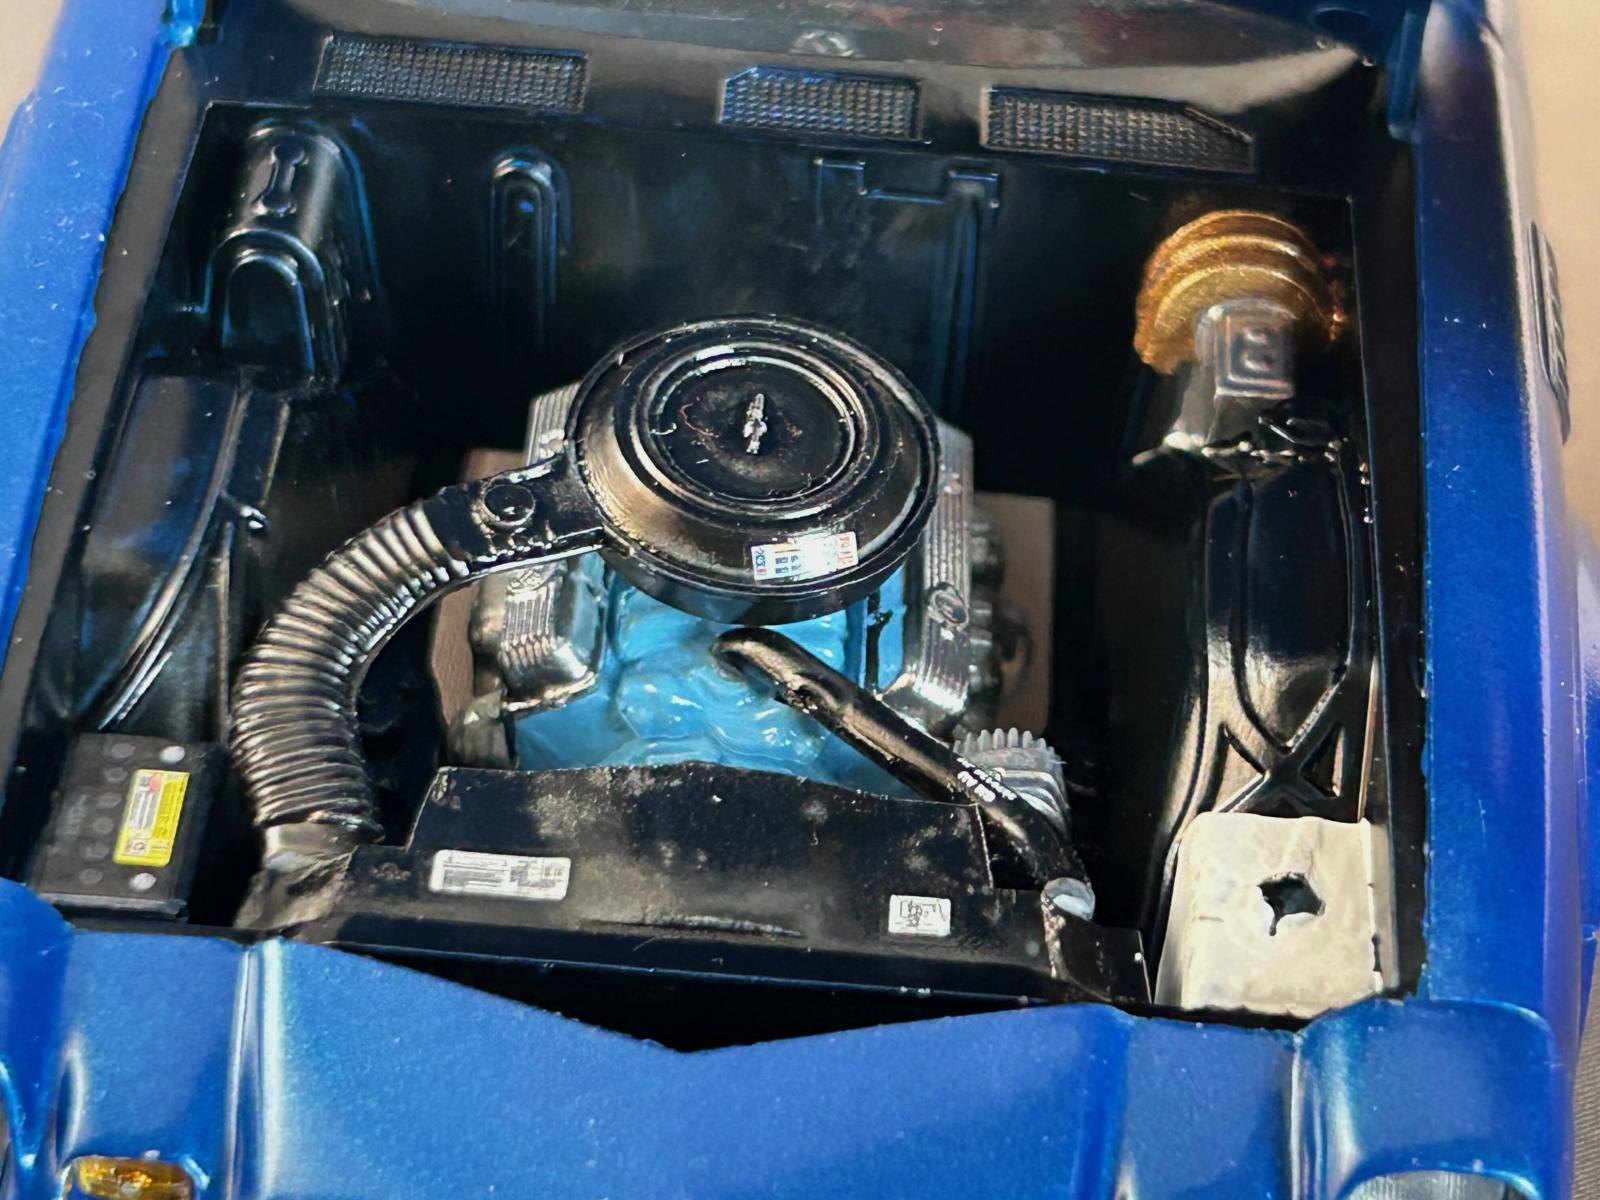
The engine came next. While Chevy engines are traditionally an orange-red color, the instructions call for the block to be light blue. My online research verified the blue to be correct; my guess would be that GM was putting the same engines in both the Firebird and the Camaro and painting them in Pontiac’s traditional blue. Assembly went well, although I would highly recommend mounting the engine in the chassis before the glue on the exhaust manifolds has dried so you can make sure that they line up with the exhaust pipes.
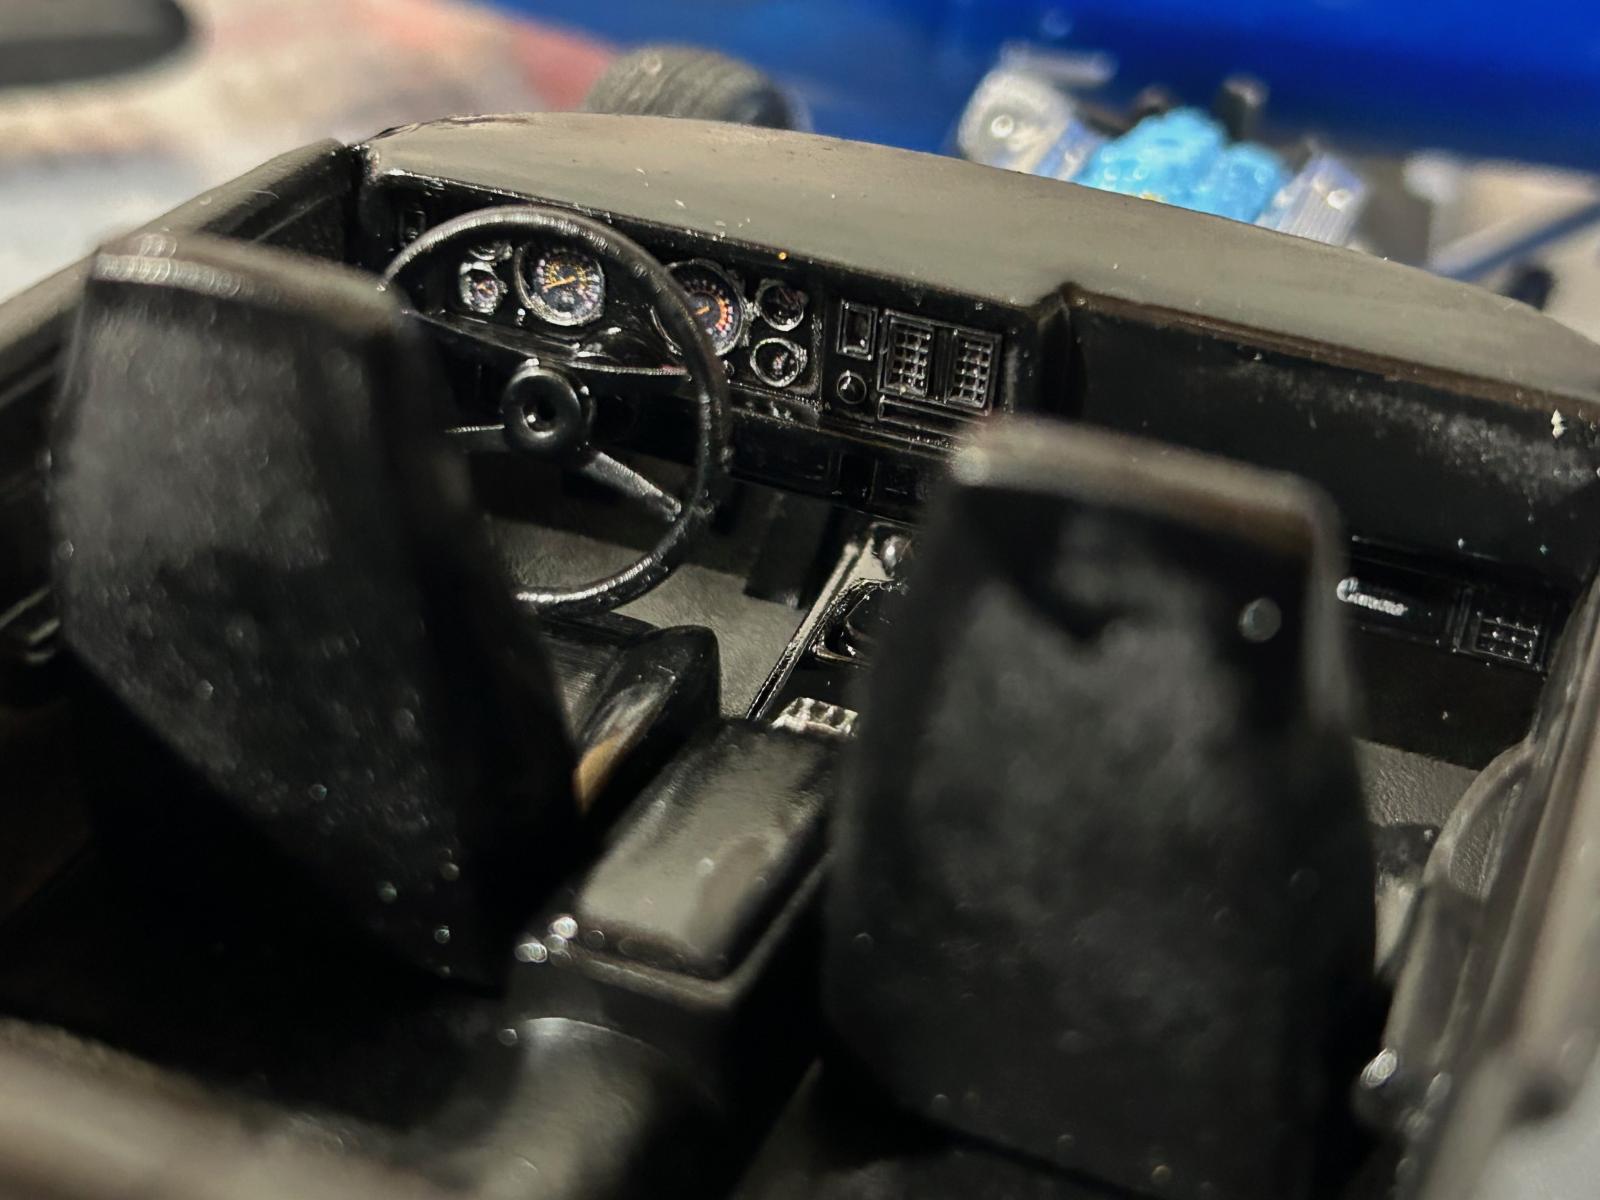
With the engine built and installed in the chassis, the interior was next on the list. I attached the door handles before painting the interior so I could see what I was doing; there are no indicators in the interior to show how they should be placed, so I relied on reference photos to get them roughly where they belonged. After detailing the dashboard with some chrome around the gauge edges, I applied the decals. Again, most of these are tiny, but they did at least go on more easily than the wheel cap decals. These responded very well to Micro Set/Micro Sol, especially the radio face decal which had to snuggle down over the radio buttons. The decals for the glove box button and “Camaro” script are much appreciated and look great here. There was also a decal for the center of the steering wheel, but that area was so deeply sunken in that there was really no way for the decal to fit there. It should be pointed out here that the instructions call for the steering wheel spokes to be painted silver, but all the reference photos I found show them to be the same color as the rest of the wheel. Once the painting and decals were done, the interior went together without a hitch.
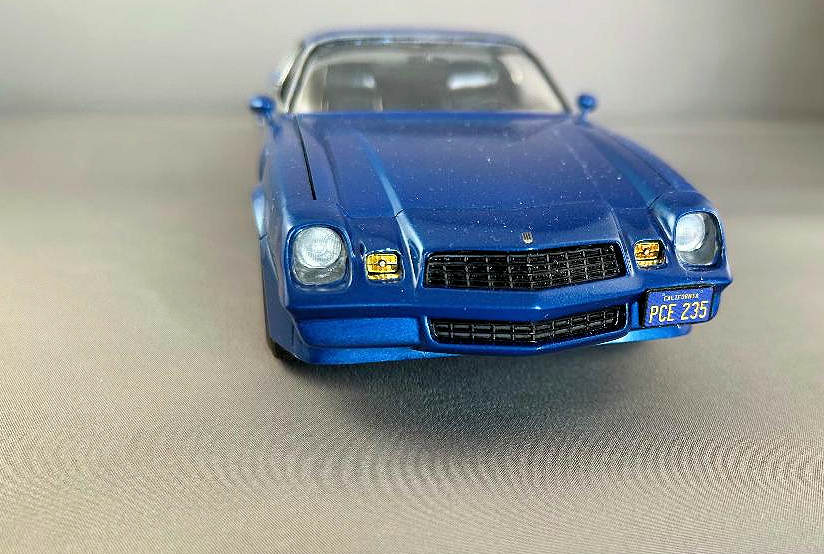
For the body, I opted to assemble the outside mirror housings and mirror inserts and install them on the body before painting. There are very faint markings on the body to indicate where the mirrors are to go, and I was afraid those would get lost under the paint. I also felt that the mirrors would stay attached to the body better using plastic cement than white glue. I think this strategy paid off well. I used a 1mm Molotow pen to chrome the mirror surfaces after painting. I also attached the rear bumper to the body before painting, but left the front bumper separate as the headlights, turn signals, and grill needed to be installed from the back side of the part. The window trim, door handles, and side marker lights were picked out with a Molotow pen, as was the chrome trim around the headlights and turn signals. The hood and rear emblem decals add quite a nice touch.
Installing the windshield and rear window was a bit difficult, as there are no positive locating points for either and precious little gluing surface. Thankfully, they are well-designed and fit into the body with no gaps, so I was able to get them installed properly. I highly recommend installing the rear-view mirror onto the windshield before installing the windshield into the body. Also, the instructions call for the mirror to be silver, but it should actually be black; only the mirror surface itself should be silver.
When assembling the interior and chassis to the body, the instructions show the interior being mounted on the chassis first, and then that whole assembly being installed into the body. There are two very nice mounting pins on the chassis that fit into holes in the interior, so that works very nicely. However, the only mounting points for the chassis to the body are two very small bumps on the body that fit into equally small holes on tabs on the rear of the interior, and two more small pins at the front of the body that fit into the chassis. While I followed the instructions and it all came out fine, it might be less nerve-wracking to install the interior into the body first, while you can see those bumps and holes, and then attach the chassis to that assembly. I also put a little glue along the edges of the chassis and then clamped the body sides tightly against it using masking tape. I did the same with the pins at the front of the chassis. The end result was a solid connection between the two assemblies.
Once the body and chassis are mated, the engine compartment can be completed. The radiator has no positive locating points, but it wants to snuggle up tightly against the radiator support molded into the body, so that’s where it went. There is a radiator hose that runs from a hole on the top of the engine to a hole in the left side of the radiator, but mine wouldn’t line up with the radiator hole. I ended up cutting off the pin on that end and just using a big dab of white glue to secure it where it wanted to go. The air cleaner has a similar arrangement going to the right side of the radiator, but it attached snugly with no issues. The under-hood decals are nice, but the battery has no molded-in detail so it just ends up looking kind of flat. Also, the painting instructions neglect to indicate that the reservoir on the front left side of the engine bay should be painted white.
Once that was all done, the front bumper could be assembled and installed. The headlight reflectors and turn signals had been sprayed chrome earlier, and the turn signals also received a coat of clear amber. The lights and the grill went into the bumper without a hitch. The front bumper (like the rear bumper) lined up perfectly with the front edge of the body, and two tiny pins at the bottom forced the bottom of the body to spread apart just enough to firmly sandwich the part in place and keep everything neatly aligned. Interestingly, the instructions (and photos from the TV show) place the front license plate on the left side of the bumper, while reference photos of actual Camaros show the plate on the opposite side; I decided to stay true to the TV version. Lastly, the hood hinges required a small amount of body stretching to fit into their slots at the back of the engine compartment. The snug fit keeps the hood in place while allowing it to open easily.
Overall, I would highly recommend this kit to anyone who is a fan of the show or who just wants a nice kit of the 1979 Camaro Z28. The supercharged engine with the optional hood provides the potential for even more interesting variations. No kit is perfect, but this one goes to together with very little drama and provides a very satisfying result. Many thanks to the folks at Carrera – Revell for bringing us this kit!

Comments
Add new comment
This site is protected by reCAPTCHA and the Google Privacy Policy and Terms of Service apply.
Similar Reviews