
Mission Models Paint Part 2 (Clear Coats)
This part 2 of a three-part review of Mission Models paints.The Clear Coats
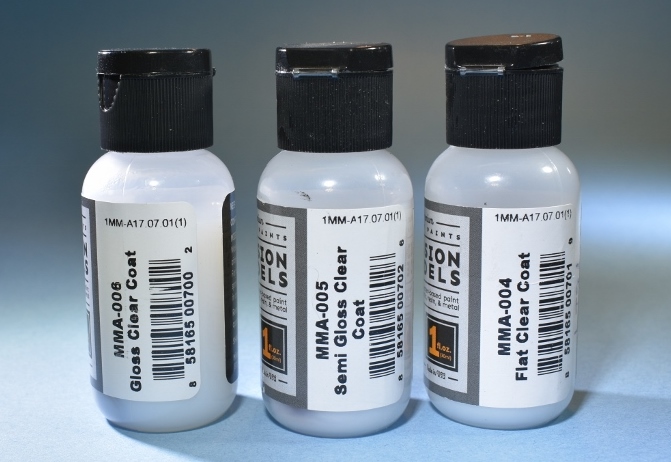
Shortly after releasing their second round of paint colors Mission Models released three clear coat products to protect the paint once it has been applied to a model. The Clear coatings are Flat Clear, Semi-Gloss Clear and Gloss Clear.
All clear coats are mixed with the Mission Models thinner and depending what you use the clears coats for, the thinner proportions mix is varied, I found 30% thinner to the clear worked best for me. The Polyurethane may be used with the clear coat as it is with the paint products. Let the clear coats dry for minimum 3 hours and they are ready for applications of any masking material.
Spraying the clears are done by setting your airbrush air pressure to 10 to 15 psi and applying the clear coats in light multiple coats.
The clear coats are compatible with all the decal settings solutions that you would normally use on your projects.
Thinner
Mission Models has their own proprietary thinner solution that is used with their paints, clear coats and primers, as suggested on the Mission Models website missionmodelsus.com
I have found a good baseline starting point for diluting a clear coat is 30% thinner to 70% clear coat (30:70).
When the clear coat has been thinned to the 30-70 mix it will look thicker than other clear’s you may have used, nonetheless, the clear sprays fine through an airbrush. Once you get the basic thinner/clear mix down, you can start experimenting with different thinning ratios.
Flat Clear Coat
When you spray the Flat Clear make sure you spray in light thin dry coats. Multiple light coats are better than trying to spray one complete coverage coat. Spraying too much at one time you will not allow you to gauge the flatness of the applications. Holding your project at arms-length from the airbrush it is best to make multiple passes, if you spray too much at one time, the flat will turn to a semi-gloss and you will need to adjust your technique. Experiment with the clear coats before you apply them to your projects.
I used the flat clear on the P-40 pictured and it did a nice job of giving a flat finish.
Semi-Gloss Clear Coat
Semi-gloss clear coating is the best for me when applying to most aircraft projects. This coating would cover most of the subjects I have built so far. Spray this coating with light multiple wet coats building up the finish you are looking for. Experiment with the clear coats thinning before you apply them to your projects.
I chose this coating to finish the Spitfire pictured and was pleased with the results.
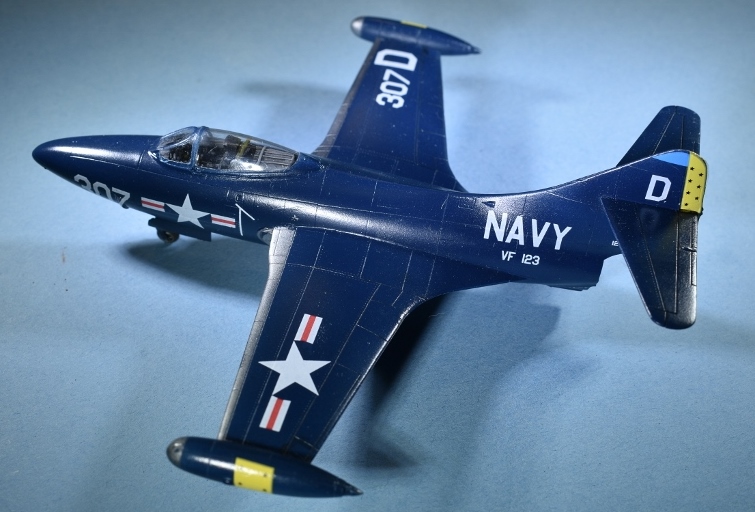
Gloss Clear Coat
The gloss clear is a very durable coating that resists scratches and dings on the exterior of the model. As with the other Mission coatings multiple light coats should be used to build the finish you are looking for.
The Gloss Clear works very well to cover your project to protect the paint and if you are inclined, to provide a base for your weathering products.
I used the gloss finish on the F9F pictured before and after decal application and got excellent results. Experiment with the clear coats before you apply them to your projects.
Airbrush Cleaning
After spraying the clear coats make sure that you completely clean your airbrush. I start with cleaning by spraying water to remove any clear in the airbrush, I will run a minimum of 4 airbrush paint cups of water through it. The next step is adding Mission Models thinner to make sure all the clear coat has been flushed from your airbrush. Once the airbrush has had some straight thinner through it, I will add a few drops more of thinner and let it soak in the airbrush for about 10min, then spray out the thinner.
The clears are so resilient and plastic like, if the airbrush is not cleaned properly the residual clear coat will cause the needle to stick to the nozzle in your airbrush.
Canopy Dipping Gloss Clear
For those of you who wish to dip your canopies, the Gloss is a great way to achieve a crystal-clear finish.
I found that the Clear Gloss for dipping needs to have a different thinning ratio than the other Clear Coats. With the standard mixing ratio, a slight milky discoloration could be seen in the clear plastic of the canopy. By reducing the amount of clear to 20% and 80% thinner it provides the clear finish I am looking for.
Once the canopy is dipped you wick off any excess off the canopy like any other dipping clears. At the 20% ratio the clear flows well and will not accumulate in the corner of the canopy frames. Let the canopy dry for at least 6 hours. Experiment with the mixing ratios before applying to your product.
I found a big benefit of using the Gloss Clear for your canopies is that the Clear is very durable against scuffs and resists the cutting of the canopy from an x-acto type blade if you choose to cut the canopy masks while the tape is on the canopy.
Summary
I have had no problems with thinning and spraying Mission Clear coats. After drying, the clear coat has an extremely hard surface and is resistant to weathering products you put on your projects. The clear coats are easy to use, clean up and do not have any detectable order making them a good choice in small confined areas with little ventilation.
If you are looking to try an Acrylic Clear Coat product, then I highly recommend trying Mission Models clears.
I want to thank Mission Models and IPMS USA for the ability to review this product.
Part 3 will be Metallics.


Comments
Difficulty with clear coats
I have found that when mixing clear coat with thinner, (at 70/30 ratio), the mix is not uniform but has small lumps in it even with much stirring. This leads immediately to clogging of the airbrush nozzle, requiring strip-down and cleaning.
My workaround is to filter the mix through a stocking that removes pretty much all the lumps and then I can get a good application.
I do wonder why this is happening since I am using fresh materials only by Mission Models. The thinner seems fine since the color painting went fine. Perhaps there is something wrong with the clear-coats, flat,semi & gloss. I wonder if they have been subject to freezing conditions during shipping this winter.
Any comments?
Add new comment
This site is protected by reCAPTCHA and the Google Privacy Policy and Terms of Service apply.
Similar Reviews