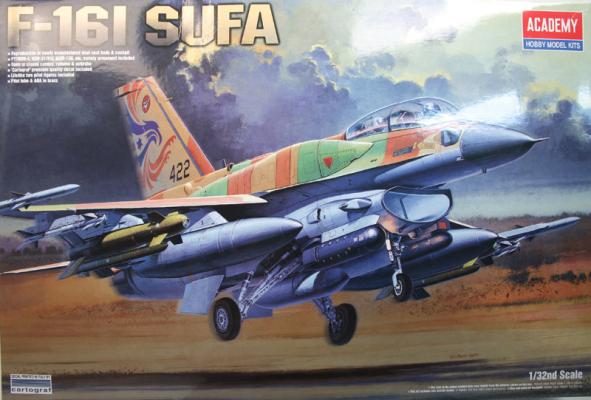
This has been a long time coming and that fault lies with me. First, like a lot of modelers, I couldn't leave well enough alone and decided to add Aires 1/32nd scale wheel well to the kit and also the Wolfpack 1/32nd scale F-16I Exterior Set (Part 32031) which includes two corrected pylons and the front fairings. I elected to use the wheel well set as the kit part has lots of ejector pin marks and the Aires set has even more detail. I placed the part in and had to do a little spacing with strip but it fit well and looks great. The exterior set is much less necessary but does have some slight shape corrections to the pylons. I also elected to add intake and exhaust covers to the kit. There is nothing wrong with the intake trunk (it is fully complete) or the exhaust- I just liked the way it looked.
What's New
The B-13L rocket launcher was developed out of the Soviet experience in Afghanistan because the existing rocket systems lacked the punch to take-down stone houses, rock walls or cave openings. The ubiquitous 122mm rocket had the requisite explosive weight to do the job. So necessity being the mother of invention, the B-13L was developed to air launch to the 122mm rocket. The system was fielded in 1988, the final year of the conflict and it remains in the inventories of Russia and its current and former patron states.
The FAB-250 is a general purpose dumb bomb with is widely manufactured and exported, similar to the US 500lb bomb. The have been widely used in the conflicts along the Russian (Soviet) border in Afghanistan, Chechnya, Nagarno-Kharabak and Georgia. You frequently see them carried on Russian multiple ejector racks. While they are available in numerous kits, Aires had release their version in an aftermarket package.
This set is crisply patterned and cast with very this fin detail in durable resin. The bombs have a nice shape, but lack some lug detail found on injection molded bombs included by OEZ/KOPRO in their kits. Since I don’t know the purpose of these lugs I can’t comment on their presence, but I have seen them in photos. The fit of the bomb to the fin is perfect, but some care will be needed to endure the fins are straight upon attachment. The set also includes a comprehensive decal set of stencils.
One of the more impressive Soviet/Russian weapon systems is the SPPU-22 gun pod. With two twin 23mm cannons it is used to strafe ground targets and can be adjusted from the cockpit to fire horizontal or up to 30 degrees down angle. Typically two are carried on an aircraft. A tactic peculiar to the Russian way of war is to mount the pods so that one faces forward and one aft. The aircraft can then fly down a line hitting targets coming and going – it has to be demoralizing to the recipients.;
Up to now the only source for these gun pods was the KOPRO (ex-OEZ) Su-25. The kit supplied pods are actually pretty detailed, but the gun system itself is very weak and would need to be scratchbuilt. Aires in their new Aerobonus line has released a new series of Soviet/Russian aftermarket weapons/weapon systems. First in line is the SPPU-22.
This is Revell's original Fletcher-class destroyer in “box scale” of 1/306. The first Fletcher to enter service, USS Nicholas, was commissioned on June 4, 1942, and was the first of 175 of the class to be built by war’s end.
Revell's kit features the square bridge version, but gives the modeler the parts to update it with rocket launchers for a later version. The kit instructions are simple and easy to understand, and best of all---each part has a number and an identifying name as well. As a kid, this was how I learned a great deal about the ships and airplanes which I built. In fact, I built many of these kits in my youth, which was the inspiration to do this review.
In this review, we have the sister kit to Revell’s other Kurtis Kraft Midget racer, the V8-60. The Ford V8-60 Kurtis Kraft model and trailer is reviewed by Jim Stratton elsewhere on the IPMS website. This subject review is the same Kurtis Kraft race car fitted with an Offenhauser 4 slug motor. Jim did a great job telling the history of Frank Kurtis and the racing success of his Kurtis Kraft cars. I will give you a little background on the Offenhauser engine part of the story.
Construction
This kit contains 56 photo etched parts. There were 3 extra parts, namely an extra hold down shackle.
The photo etched parts were in perfect condition. These details were used in the 3 wheel well areas. They all fit well except one area. A notch was made in one corner item -- as shown in the photo. The area modified was in the main landing gear tie into the deck. The instructions were good, except for where the extra hold down was located. A bend brake tool would be helpful.
Comments
This kit is recommended for the experienced modeler, due to the numerous tiny parts.
Conclusion
I wish to thank Eduard & IPMS for allowing me to review this aftermarket kit.
Construction
This kit contains two photo etched sheets with 33 parts. The photo etched parts were in perfect condition. The details were used in the aft electronics bay. The unit folds down and is called the birdcage. This unit will be placed in the down position. The assembly is straight forward and fairly simple to assemble. I did not use the bend brake for this project.
Comments
This kit can be assembled by any good modeler. Skill level is medium in my opinion. There are several miniature parts.
Conclusion
I wish to thank Eduard and IPMS/USA for allowing me to review this aftermarket kit.
Packaged in a oversized poly zip lock bag you find sandwiched between two sheets of cardstock one 2 X 5 ¼ inch yellow precut mask set along with a folded one sided placement sheet. The set covers the canopy and wheels, or should I say canopies when you consider the greenhouse that is the Bf 110G-2. Simple is the word that comes to mind when using these Eduard mask sets; however this set could be a little confusing if you do not carefully reference the placement guide. I always do a light pencil rubbing to reveal the cuts. Remember patients will be your reward. Eduard has a knack for doing these things very well and this one is no different.
The price my be a little had to swallow for the budget minded modeler while others won’t mind a bit shelling out 13 bucks to do the Bf 110 canopy nightmare. I highly recommend this set to anyone building the Eduard Bf110G-2. My thanks go to Eduard and IPMS/USA.
Thanks once again to Quickboost for providing IPMS/USA me these review items; these little things make a big difference, and we appreciate it!
OK, this is about as simple a review as you can get. These four vents are replacements for the kit items; the new QB vents are already hollowed out, and make a big difference in the appearance of the final product. These vents face backwards, and dump heat overboard. See the scan of the instruction sheet for Items 7F, 8F, 39A and 40A on the upper back of the aircraft.
Most of us old school guys use #11 Exacto blades and twirl away, occasionally stabbing ourselves in the fingers, to get hollow intake/exhaust vents.
Enter Quickboost! As we have come to expect, a fast one-for-one replacement for the kit items (See the photos!). The gray ones are the Quickboost; the white blob is one of the kit items.
These items are true “Even a monkey could… “ replacements. Worth the cash and acquisition time.