My latest kit for review is the new Revell’s '72 Oldsmobile Cutlass Supreme. Upon opening the box, the first thing I noticed was the very clean molds. The mold seams on the body were scarce and very easy to clean up. Moving on, the kit gives a few different options to build the car. First off is the choice of an automatic or manual transmission (I'll be building the manual version) which also includes an extra set of floor pedals, different center consoles and shifter options.
Reviews
Eagle Editions is synonymous with Luftwaffe research designed for the model builder. Their latest release is for any 1/32nd scale Friedrich. As always with EagleCals, the quality is felt right from opening up the packaging.
You are presented with markings for four Freidrichs. These are quite colorful aircraft. All of them start out with base colors of RLM 78/79, but that is where they commonality ends.
The instructions are printed in color on four 8x10 pages. The front page contains the profile and plan views. The profile views are printed larger on the second page. These profiles are absolutely beautiful. I don’t know for sure but I’m fairly certain they are done by Tom Tullis. The third page is a written description of each aircraft. The fourth page contains the stencil diagram.
The folks at Quickboost continue to add superb detail sets to their growing catalog of items. For this review I will be looking at the Undercarriage Covers detail set for the 1/48 Hasegawa Ki-61 family of kits.
This superb detail set is designed to work with the 1/48 Hasegawa Ki-61 I Hein “Tony”. The Hein was a WWII Japanese fighter with an inline engine. When Allied pilots first encountered the Hein, they thought they were flying against German Bf 109 fighters because of the similar nose shape. They quickly discovered that this was in fact a Japanese design, and it was given the code name “Tony”.
The Quickboost Undercarriage Covers (Landing gear doors) are finely molded, and are very easily removed from the casting block. I find that using a razor saw is the easiest method, and after a little sanding, these great detail parts are ready to glue in place.
The folks at Quickboost continue to add superb detail sets to their growing catalog of items. For this review I will be looking at two sets for the 1/48 Hasegawa Ki-43-II Hayabusa “Oscar” Japanese WWII Fighter.
Both sets are designed to fit any number of the Hasegawa kits, as every boxing of the Hayabusa share the same fuselage – either set will work for Hasegawa’s entire series of Ki-43 aircraft.
Before you run out and purchase one of these sets, check your reference material to decide if you would like to build an early model Ki-43-II or a Late model Ki-43-II. Quickboost set 48-295 is labeled “Type A” and represents the later style exhaust pipes (pointing toward the tail). Set 48-294 is labeled “Type B” and is for the early models with the exhaust stack pointing outward. For this review, the kit shown is a Ki-43-II Early type with the exhaust stack pointing outward.
The folks at Quickboost continue to add superb detail sets to their growing catalog of items. For this review I will be looking at the exhaust detail set for the 1/48 Hasegawa Ki-44 II “Tojo” family of kits.
Hasegawa has released many different boxings of the Japanese WWII Shoki Fighter, and from what I see in my collection, this Quickboost set will work with any of the Ki-44 II kits.
The Quickboost exhaust stacks themselves are finely molded, and are very easily removed from the casting block. I find that using a razor saw is the easiest method, and after a little sanding, these great detail parts are ready to glue in place.
As you can see from the photo, the detail is far above the kit part that these replace. The exhaust well is deeper and more defined on the Quickboost replacement parts than the original kit part.
The folks at Quickboost continue to add superb detail sets to their growing catalog of items. For this review I will be looking at the Exhaust detail set for the 1/48 Hasegawa F1M2 “Pete” family of kits.
This superb detail set is designed to work with the 1/48 Hasegawa Mitsubishi F1M2 “Pete”. The “Pete” was a WWII Japanese reconnaissance floatplane. This biplane was inititally designed for reconnaissance, but was used as a bomber and fighter as well.
The Quickboost Exhaust parts are finely molded, and are very easily removed from the casting block. I find that using a razor saw is the easiest method, and after a little sanding, these great detail parts are ready to glue in place.
The Mitsubishi T-2 was a supersonic trainer for the Japanese Air Self Defense Force (JASDF). Like the T-38 and F-5 in the US, it was used as an aggressor aircraft and demonstration team mount as well as the original trainer mission. The T-2 used the same engine as the SEPECAT Jaguar, the Rolls Royce Turbomeca Adour, built in Japan by Ishikawajima – Harima Heavy Industries. The Jaguar T.2 and the Mitsubishi T-2 look similar, but they’re definitely not the same aircraft. It’s a case of engineers with the same problem coming up with similar solutions.
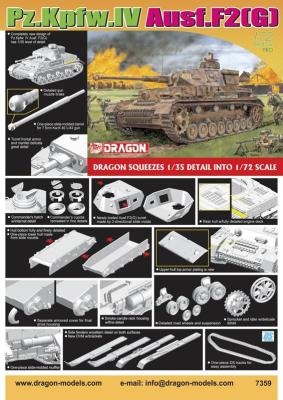
If you have read my previous review on Dragon’s 1/72 scale Panther with Zimmerit, you will see some similarities in this review, but whether it was reviews like mine that made a difference (as I am hoping), there are improvements that have been made. If you are like me, and have the 1/35 scale variant of this kit in your stash, I will let you know that this is essentially the same kit, along with the same markings as that release. This is another very nice release from the folks at Dragon, and the level of detail for this small scale is again impressive.
Dragon advertises that they squeeze 1/35th detail into 1/72nd scale – and I can testify that they do indeed! The Pz IV F2 was the first of the series to mount a long 75mm gun. Originally designed to carry the short 75mm in an infantry support role, the gun versus armor race in early WWII found the Germans up-gunning the Pz IV to meet the threat posed by heavier Allied tanks. The first Pz IV F2’s, called Mark IV Specials by the British, appeared in March 1942.
(Editor’s note: The reviewed publication, published in 2008, has been superseded by “Frequently Asked Questions about Techniques used for Painting Aircraft”. Published in 2010 under the same ISBN Number 978-84-96658-18-9. Despite the slight change in title there is little or no difference according to Casemate.)
Continuing with the now familiar and highly respected F.A.Q series of how-to modeling books from Andrea Press, comes JM. Villalba’s “Frequently Asked Questions about Techniques Used for Constructing & Painting Aircraft”. The 159 page book comes to us in a perfect-bound soft cover, printed in full color (except for the chapter cover pages) in an 11 3/4” x 8 1/4” format.


