
Vietnam USAF Airfield
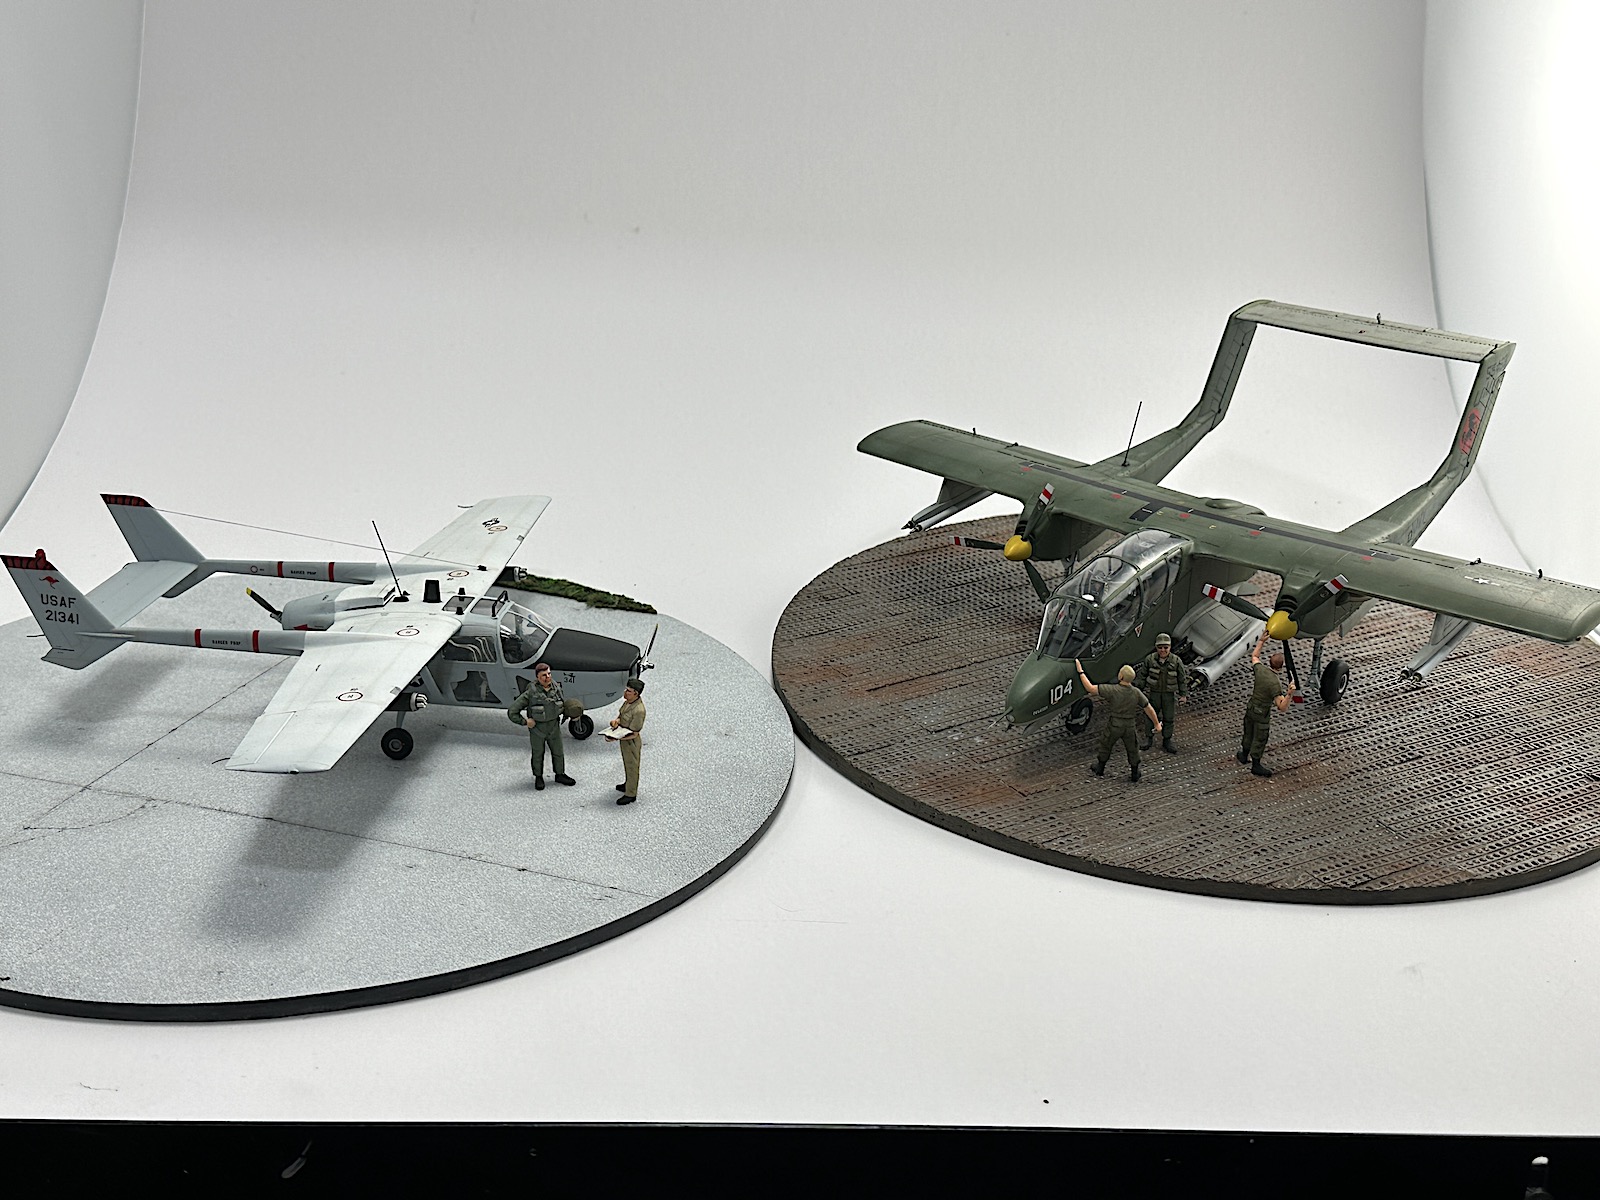
Boxing up multiple kits into a single boxing and offering a discount is not a new concept, however, it has yet to be as effective as what ICM currently offers in their product range. This offering offers two great aircraft and a set of figures to compliment them. A diorama waiting to be put together.
As there are three kits in this boxing, the O-2A Skymaster and the OV-10A Bronco along with USAF Personnel in Vietnam, I’ll offer three reviews in one as well.
Pilots & Technicians
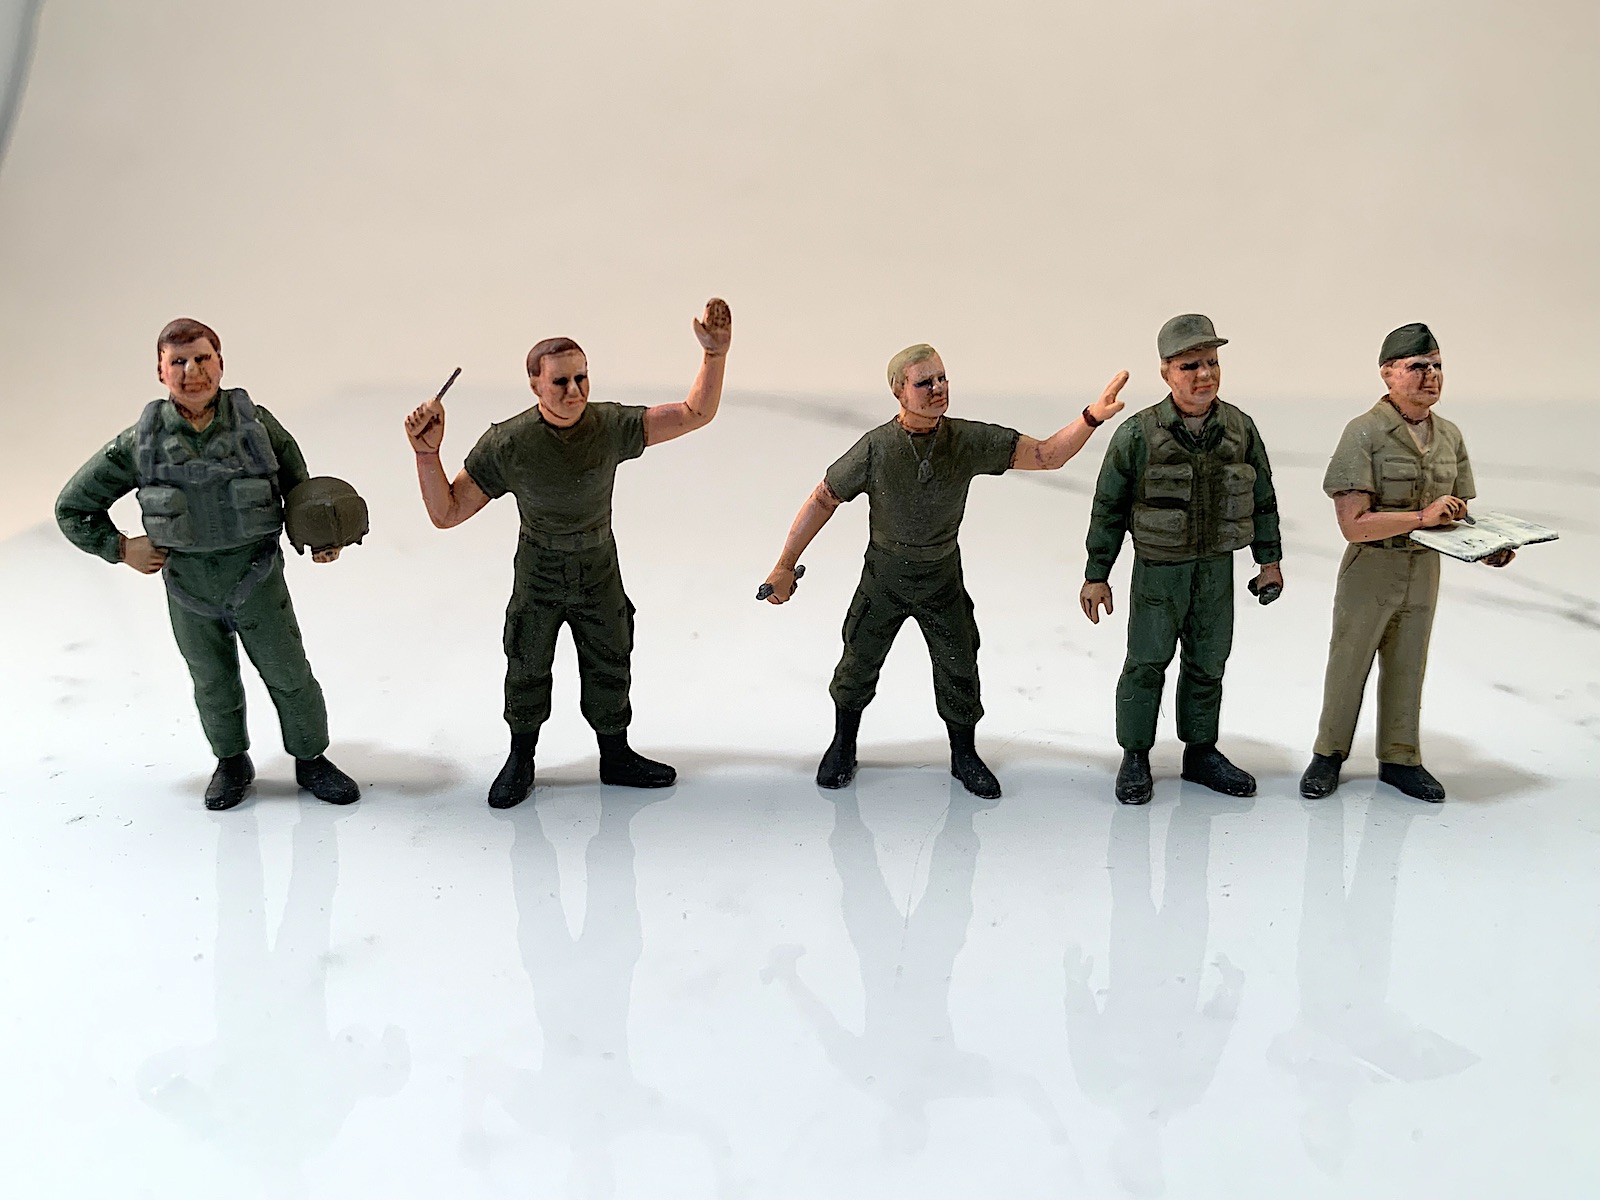
First off, the personnel. This single sprue contains the parts for five figures found on a USAF flight line.
Finding figures in 1/48th scale for Vietnam is a pretty hard chore. Whether you want to depict USAF or Army helicopter pilots your choices in the past have been pretty slim. Well thanks to ICM there is at least a new option.
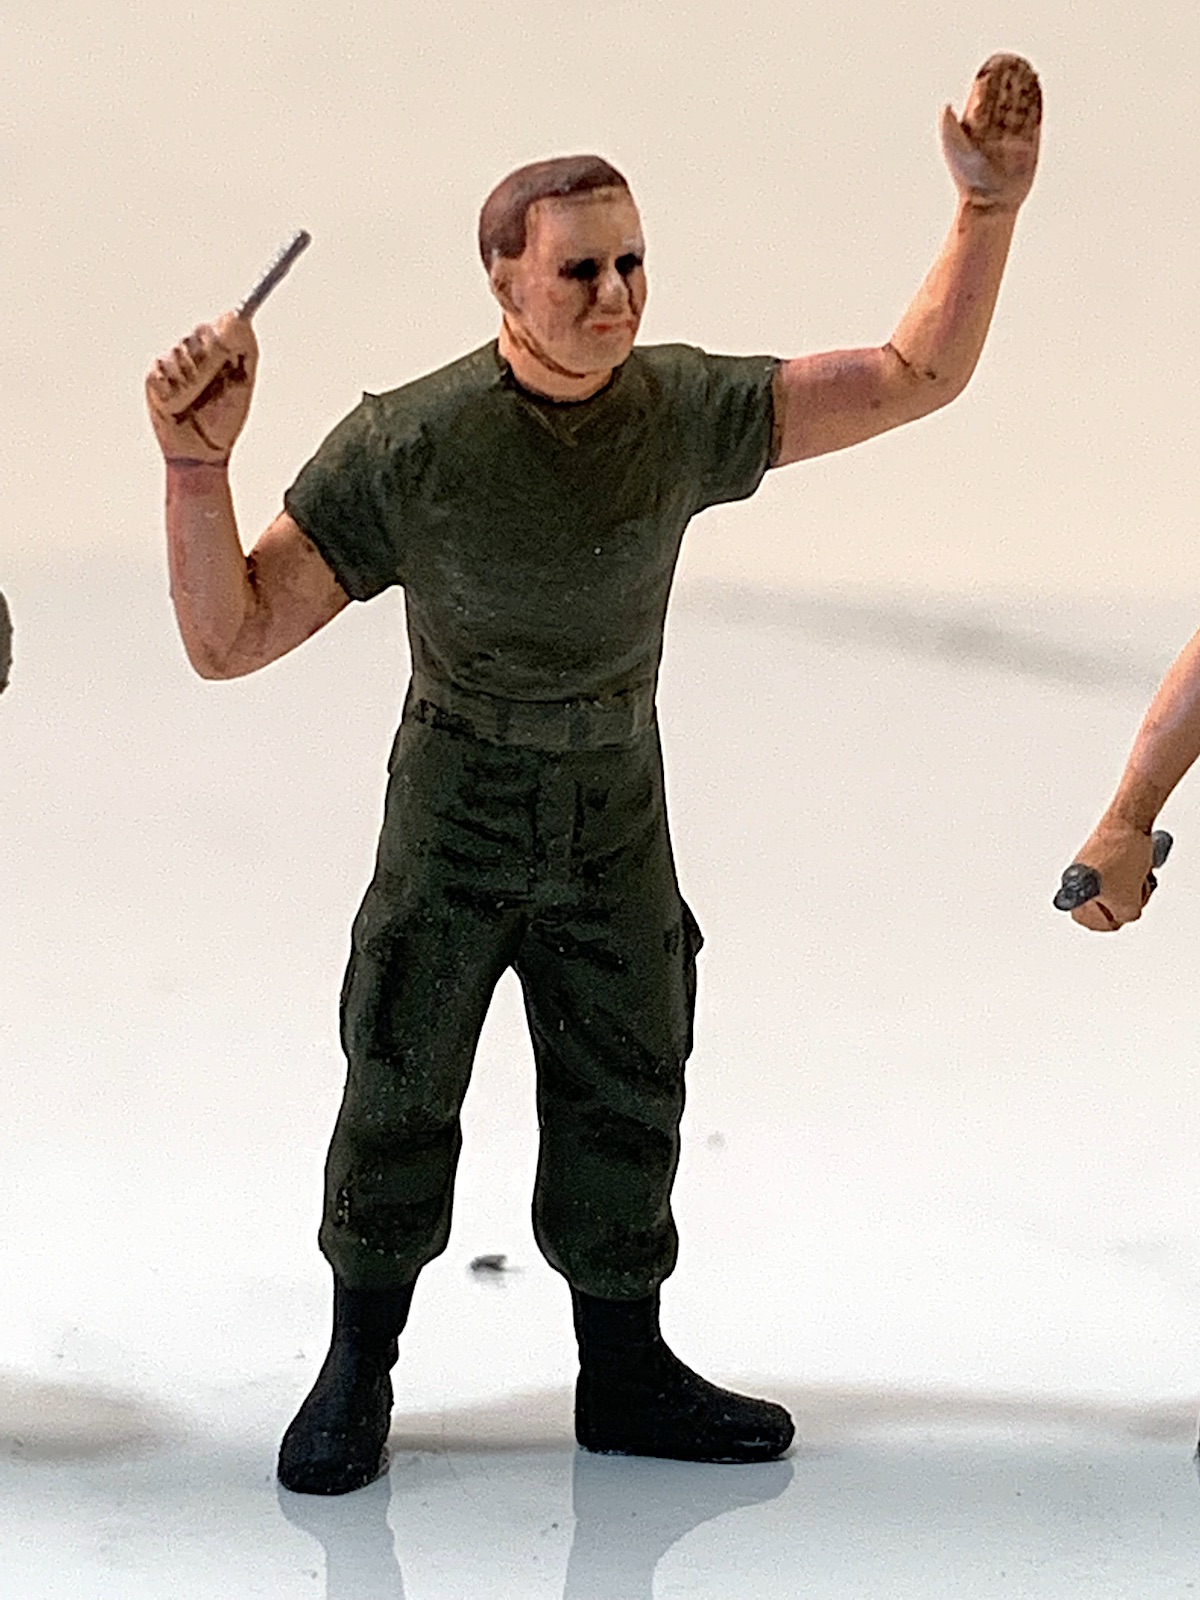
Inside of the sturdy cardboard box is a single sprue of individually wrapped light grey plastic and a single page of full color instructions. The plastic is blemish free with parts for five personnel. It has two pilots, two mechanics, and one admin line chief. The poses are very good. The detail is very crisp, including the faces which is sometimes hard to get right in plastic, but ICM has nailed it. The relief of the clothing also appears very good. Each figure must be assembled with anywhere from five to 11 pieces. This may sound like a lot, especially for a 1/48th scale figure, however, this breakdown allows ICM to get good detail all around the figure. You’ll have to clean up the attachment points for the sprue gates. I did have a hard time detecting the mold seam line on the parts, so clean up was real easy. They are that beautifully molded. Clean-up was quick.
The two mechanics appear to be doing maintenance. They both are in T-shirts and pants. While the box top would have you believe they are USAF personnel, they could easily pass for Army helicopter mechanics. There is nothing that ‘makes’ them Air Force. Very versatile. T-shirts could be white or olive drab.
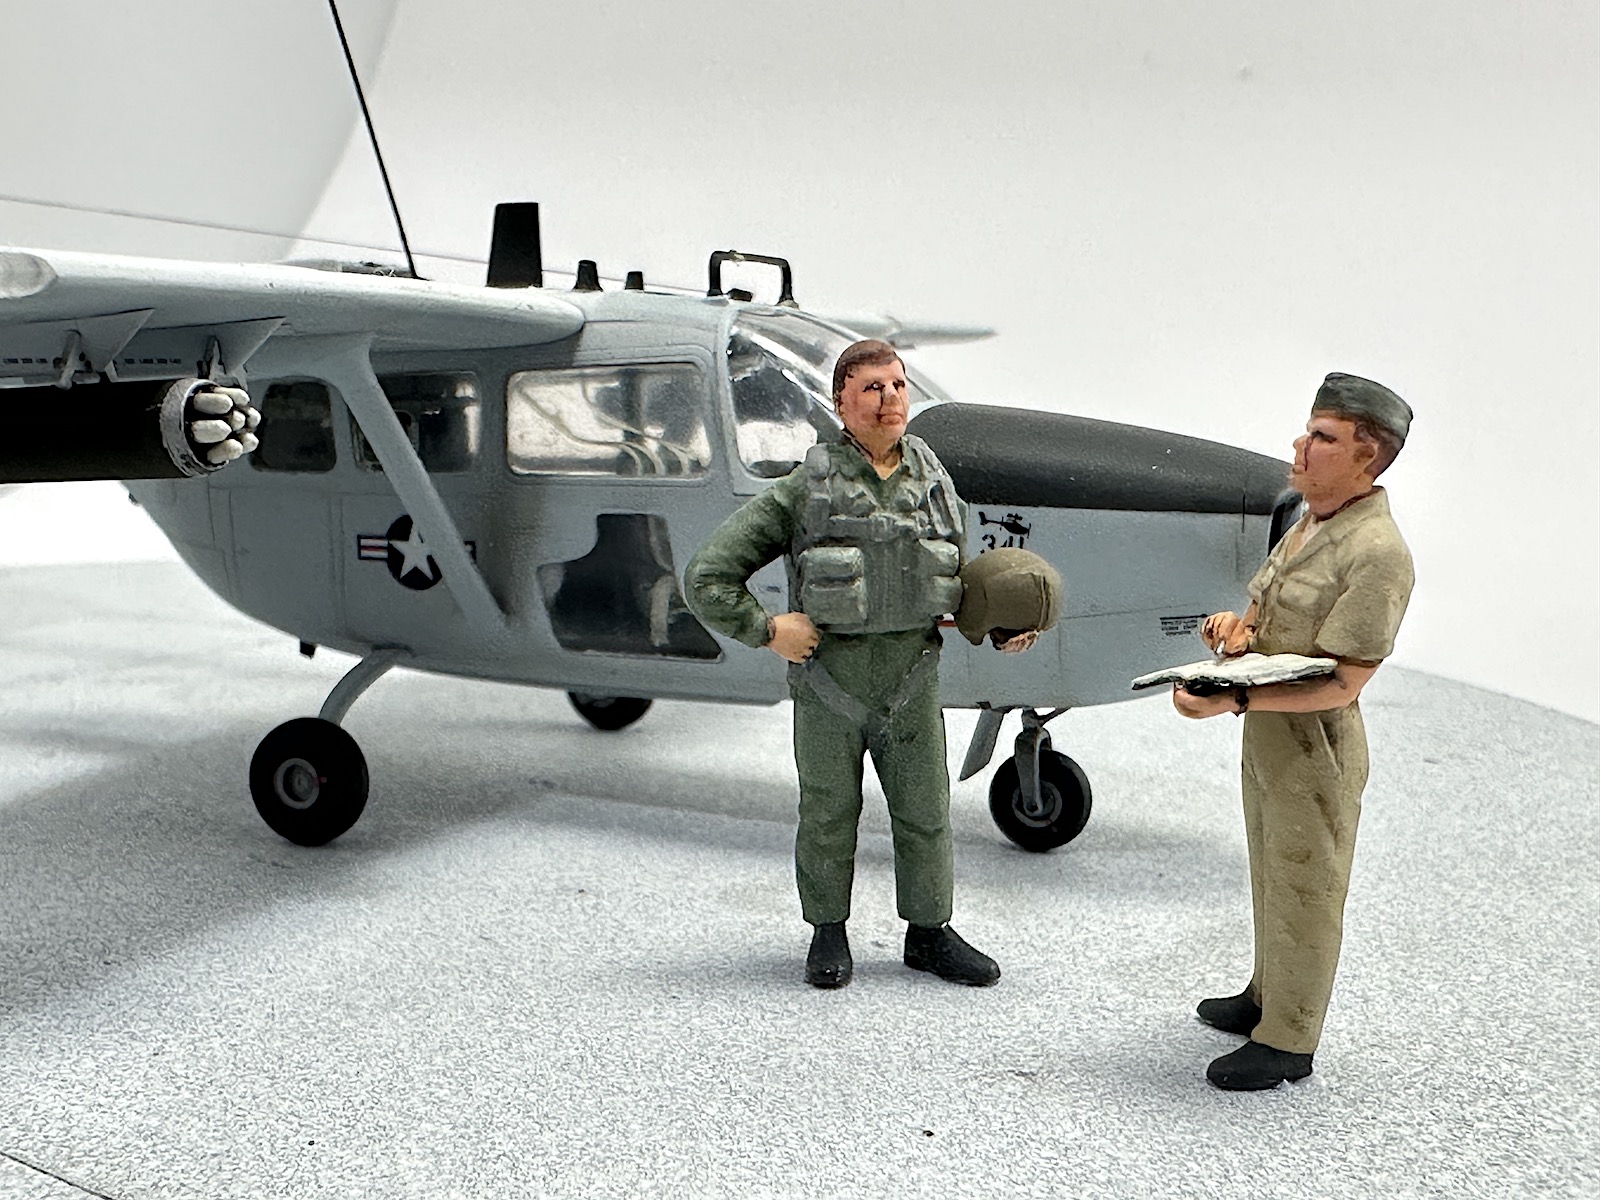
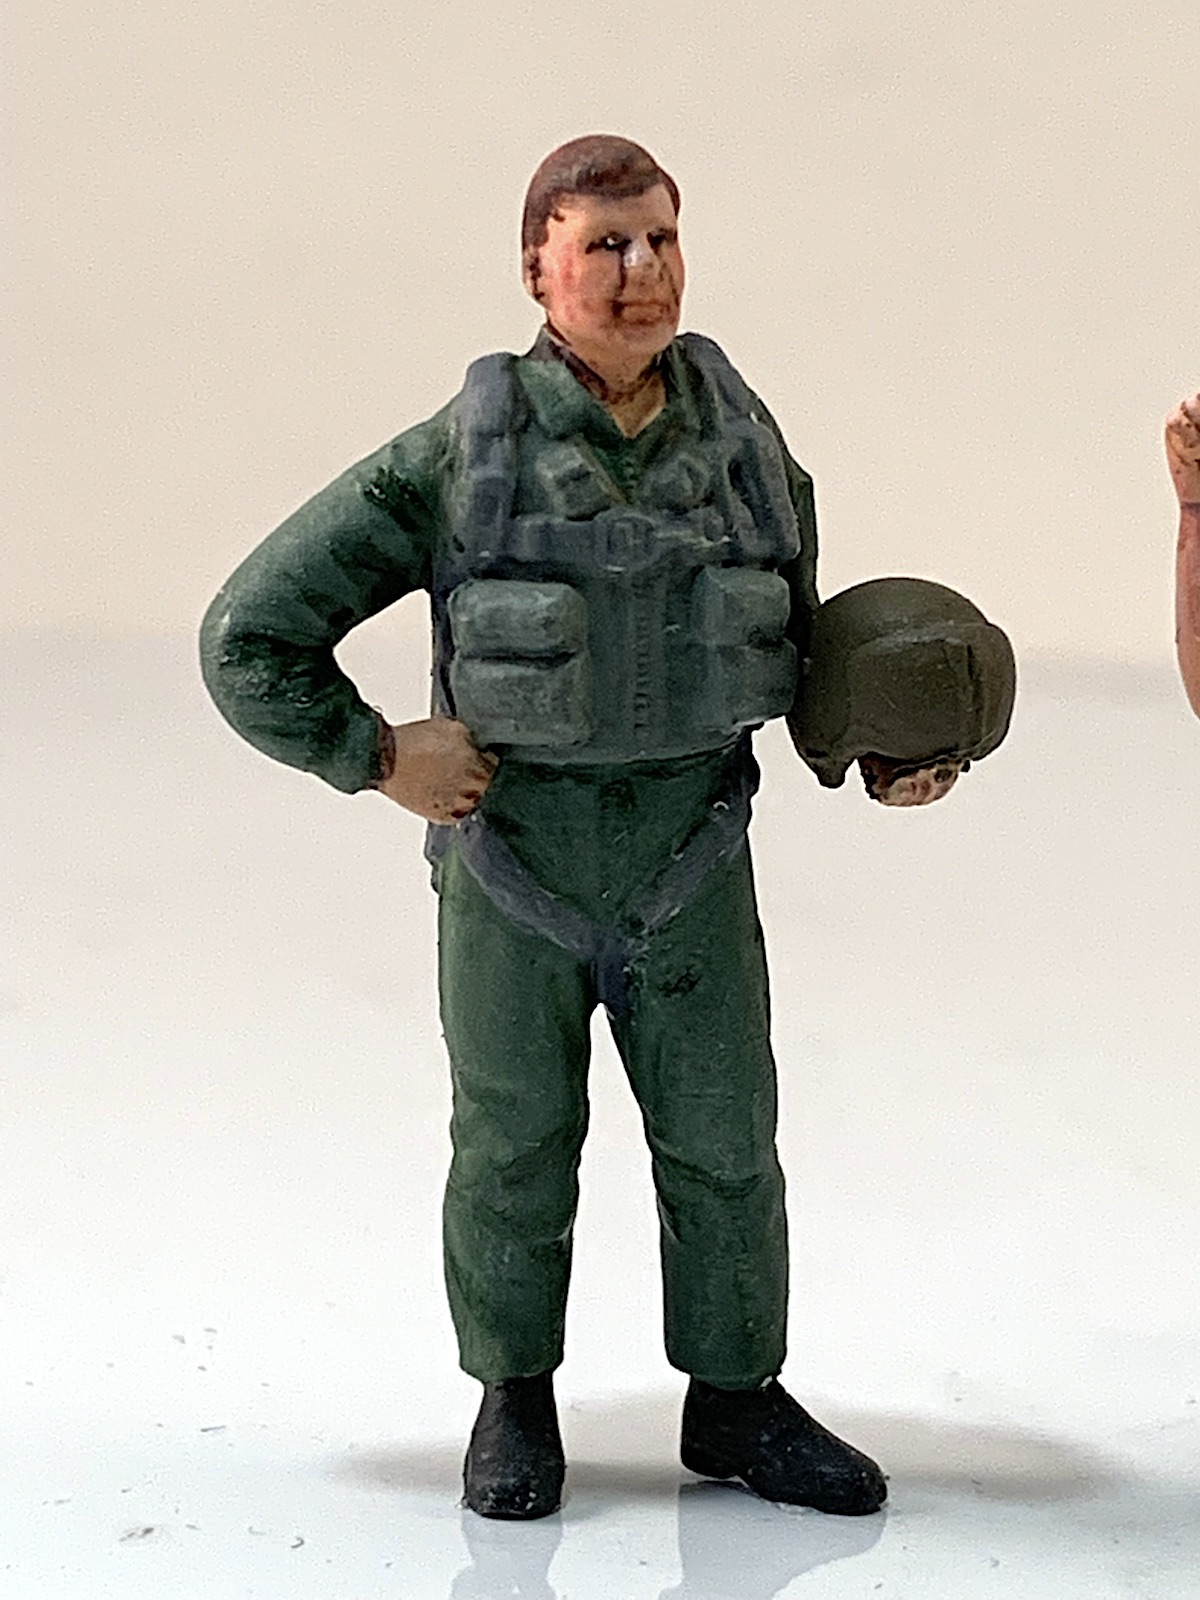
The two pilots are talking or debriefing each other. One pilot has a parachute pack on his back while the other one does not. They both feature the one-piece flight suits that were used by the USAF and the US Army all the way up into the 1990s. The one pilot without the parachute can be a very good representation of a 1980s-1990s Army helicopter pilot with an SRU-21/P with an extraction harness. There is a nice hollow helmet included as well in two parts that the one pilot is holding.
The line chief has a khaki uniform on with a clip board taking notes. He is a good filler person. I prefer to call him an admin weenie. He is holding a notebook which adds visual interest.
The instructions are useful in painting these figures up. The color chart includes ICM, Revell, and Tamiya color callouts. A picture of the sprue is attached.
Overall, these figures are super. Adding them to your Skymaster or Bronco would be easily done. ICM continues to add diorama possibilities to their line of products and I for one, love it. Buy this set for either your USAF or US Army 1/48thscale models. I can’t wait to see what is next. Great job ICM
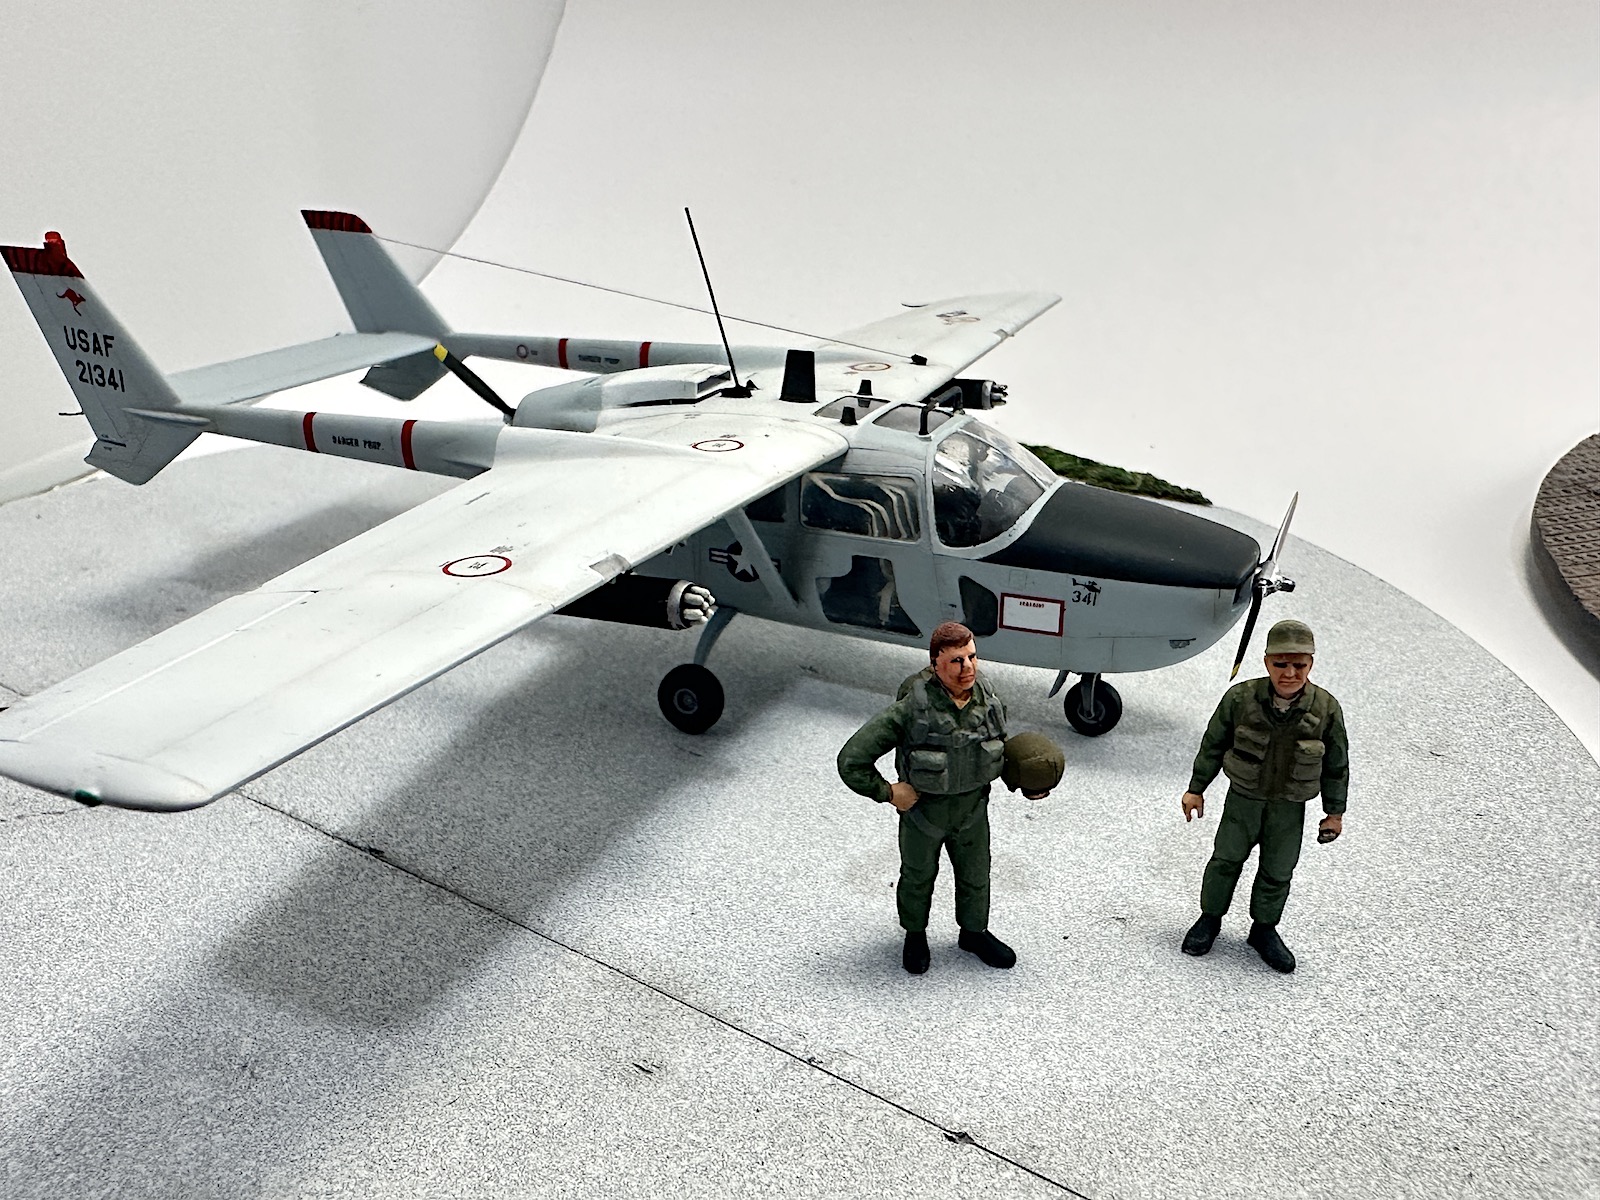
O-2A Skymaster
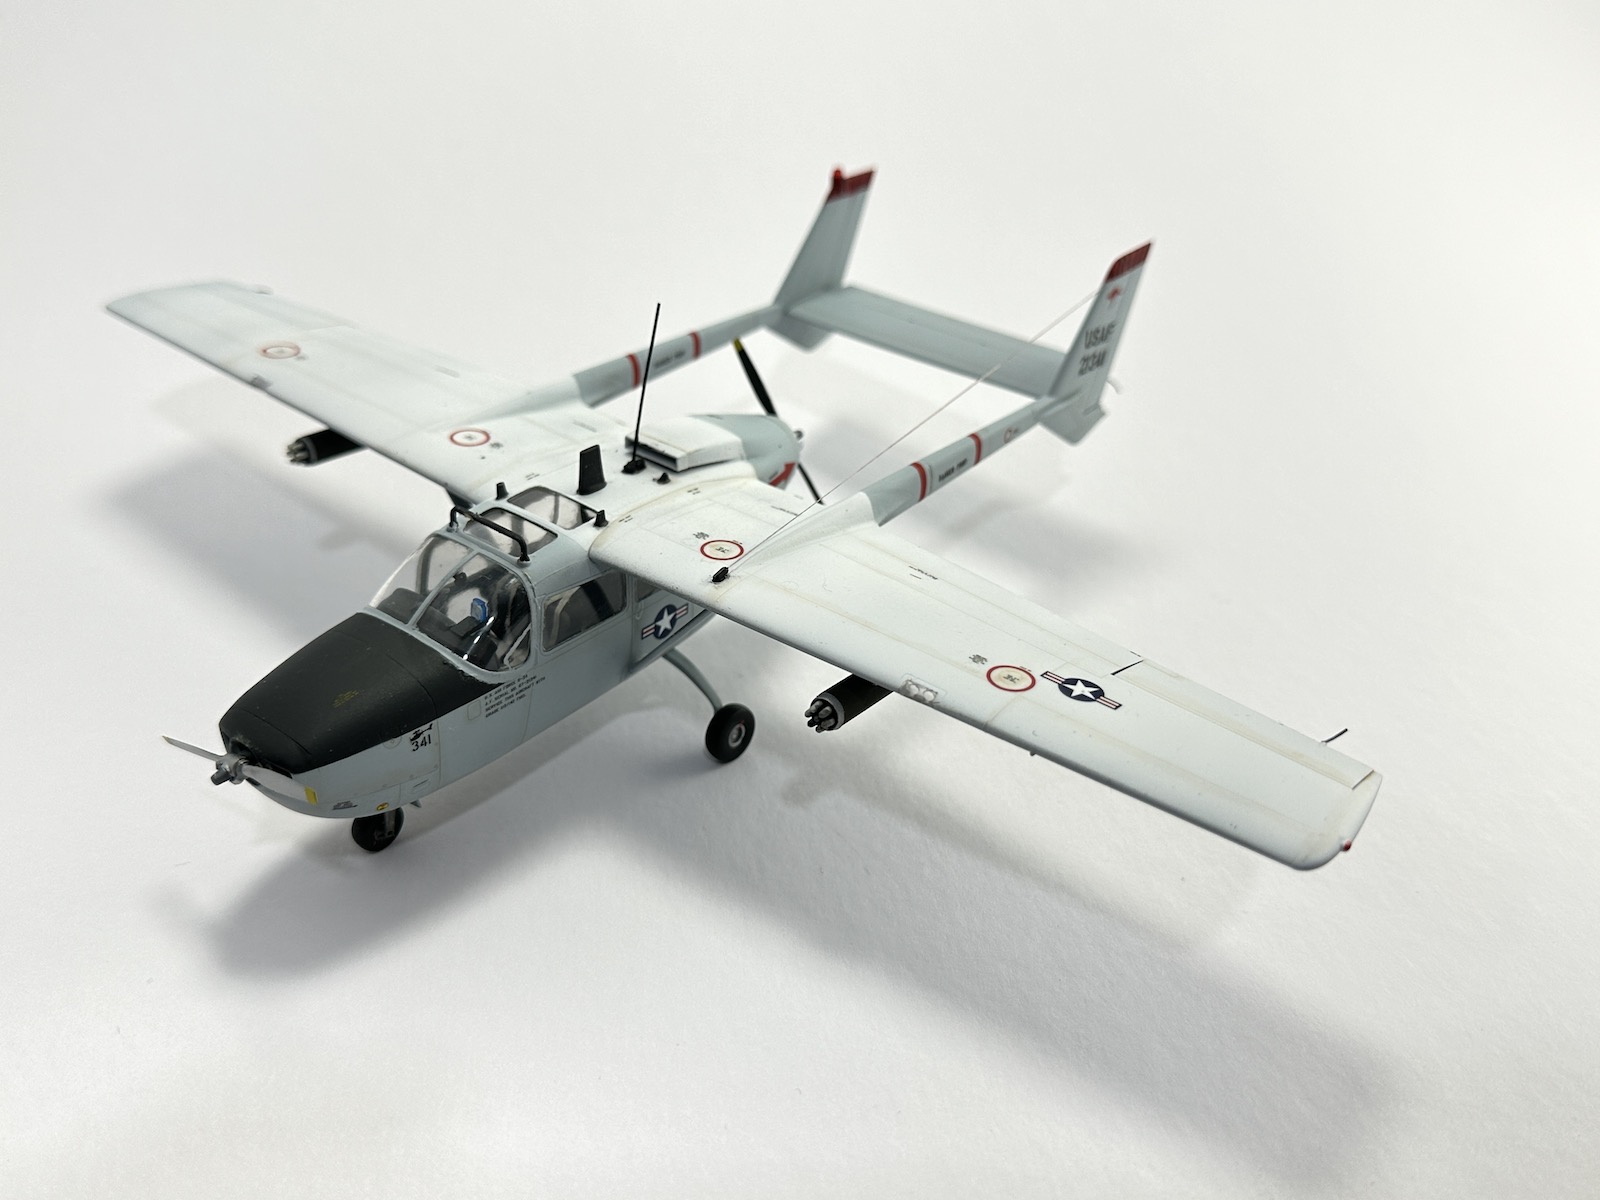
The second part of the review will be the O-2A Skymaster. ICM offers three versions of this airplane in its current line, Early, Late and US Navy. This box has all the parts to do any version plus decals for two airplanes.
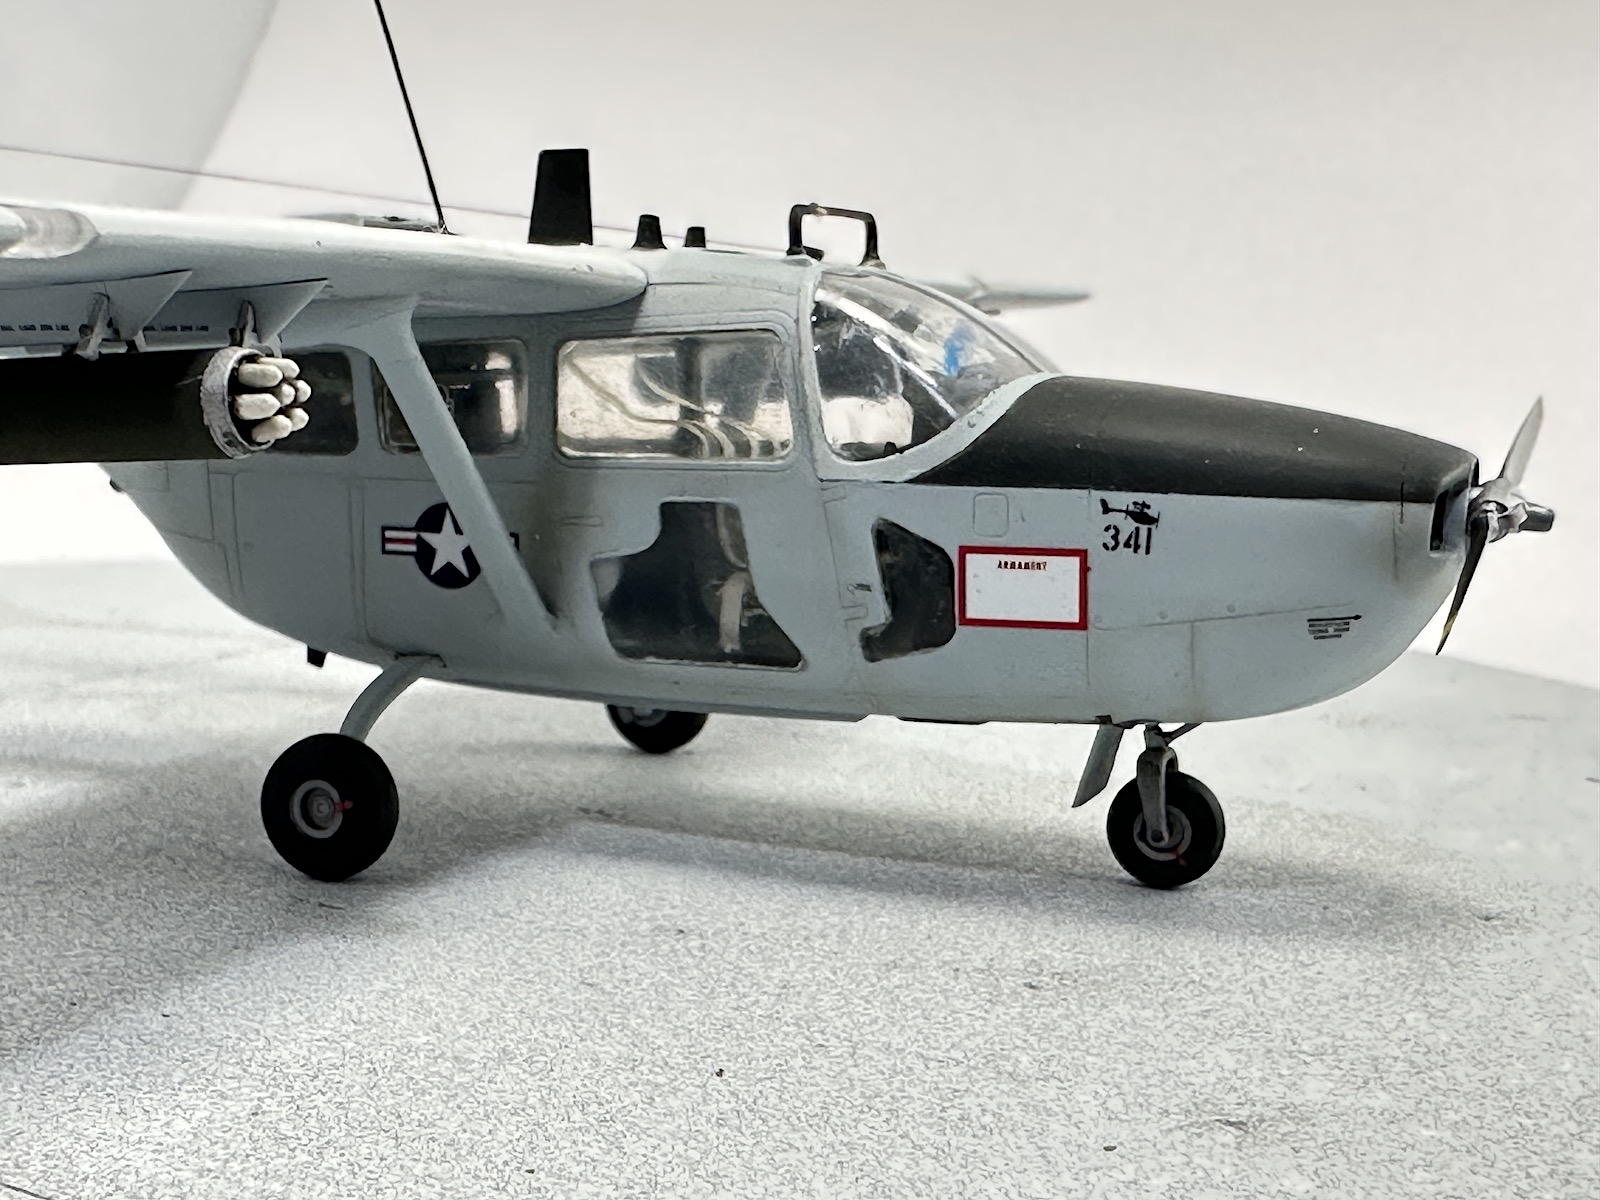
One thing about the Skymaster is that the rear landing gear are pretty flimsy, so I elected to replace them with brass landing gear from Aerocraft Models. I also had some great decals from AOA to try out so why not use them as well? Some Eduard seatbelts were added to the interior as they are missing from the kit.
There are two light grey sprues packaged in a self-sealing wrapper, along with a clear sprue. Decals are included for four airplanes, three grey and white and one overall black. The decals looked nice but since I had the AOA decals I would use those. The instructions are pretty typical for ICM written in Ukrainian and English. A little history, followed by some suggested colors, and an overview of the kit sprues before you get into the build.
Once you start building the fun begins. The mission equipment for the cockpit is the first order of business. I was leery of the color callouts but ICM is correct. The interior was not grey but dark green. Pay attention when adding the ‘black’ boxes to the supports. Some don’t fit flush and shouldn’t. When you orient them into the interior it is all explained. I was impressed with the look of the mission equipment, for out-of-the box with just some detail painting they were very convincing.
Before you know it, ICM has you adding windows. DO IT! I elected to paint my interior first then add the windows. This caused me some issues. Just add the windows and mask them up before assembly. I painted first then added the windows, thinking this would be better. Well it was and it wasn’t. Yes, I didn’t have to mask the windows, but what happened to me at least, was that flowing the liquid cement under the windows ledge with paint on it made for a poor attachment and I got some glue smudges on the windows. Not happy. It required me to polish the windows inside and out and I was never completely happy with the way they turned out. So glue them first, let dry, then mask and paint. Maybe some Eduard T-Masks would be helpful.
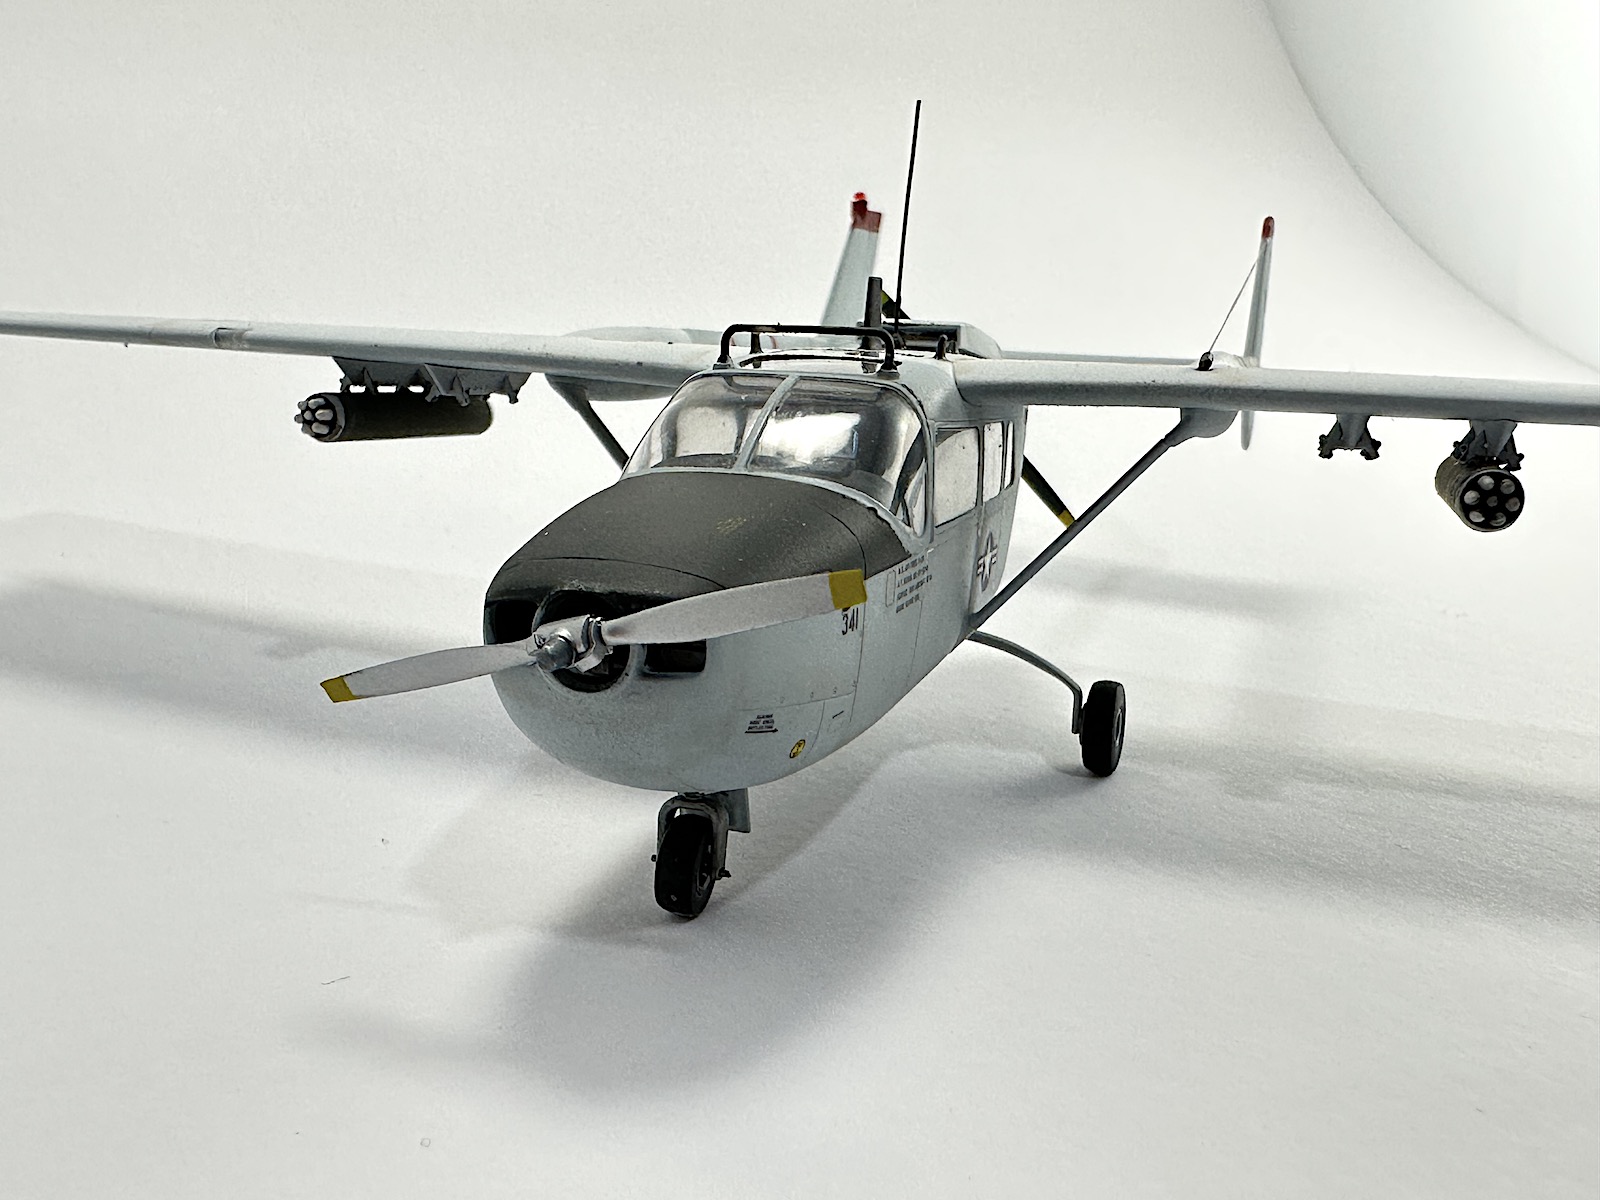
Parts A-28 and A-27 fit at the front and side but do not touch the back. This is correct. Don’t stress it. The engine assembly is next. It is quite nice as well. Assemble it and allow it to set up correctly. You also have to install the front landing gear now. The Aeroclub set fit perfectly.
Next up is the cockpit floor and seats. These fit perfectly as well. ICM gives you individual decals for the instruments and they work flawlessly. There is some room for improvement in the cockpit, but I only added the Eduard seatbelts and shoulder harnesses because they reach up to the ceiling.
Allow that entire forward section to set up properly, because the kit will be a tail sitter if you don’t add weight. ICM calls out for 10 gms of weight to be added. That is quite a bit and you don’t have a lot of room. You have the area under the engine and that is about it. I used some AK Tungsten putty to fill in every available gap that I could put weight it and joined the fuselage halves. The fit was perfect and no putty was required.
Work on the fuselage continued with a perfect fit everywhere. It builds up into a nice center section.
The upper wing is next which fit perfectly to the center section. Remarkably the wing was perfectly aligned and straight. There are various antennas that must be added. I added them a little later in the build to prevent damage in handling.
The two side booms are up next. I removed the molded-on static wicks. Those are the little pieces that hang off the end of the rudder, wings, and elevator. I would replace them later with some EZ Line that looks more realistic. There were no surprises with the booms. I did add them first to the center section and then added the horizontal tail. I thought this made more sense to get a good fit at the root and then add the horizontal. It worked out well with just a smidge of putty being required on one side of the boom at the horizontal join.
Don’t forget to open up the holes on the bottom of the wings prior to adding them to the upper wing. Again, the fit was perfect and no filler was required. This was going together quickly. Other bits and bobs were added to the wings. The support struts did need a little filler because the join was not on the fairing panel line. This was easy though and the struts fit perfectly fine.
Various parts were added to the fuselage belly and the pylons for the wings and just like that the kit was ready for painting. Eduard paint masks were used over the windows. The entire model was primed with Alclad Grey Primer and Microfiller. One or two places were touched up and primer reapplied. I liked the grey of the primer so I just painted the top of the wing Alclad White Primer and glossed the entire model with Tamiya Clear thinned 50/50 with Mr. Leveling Thinner.
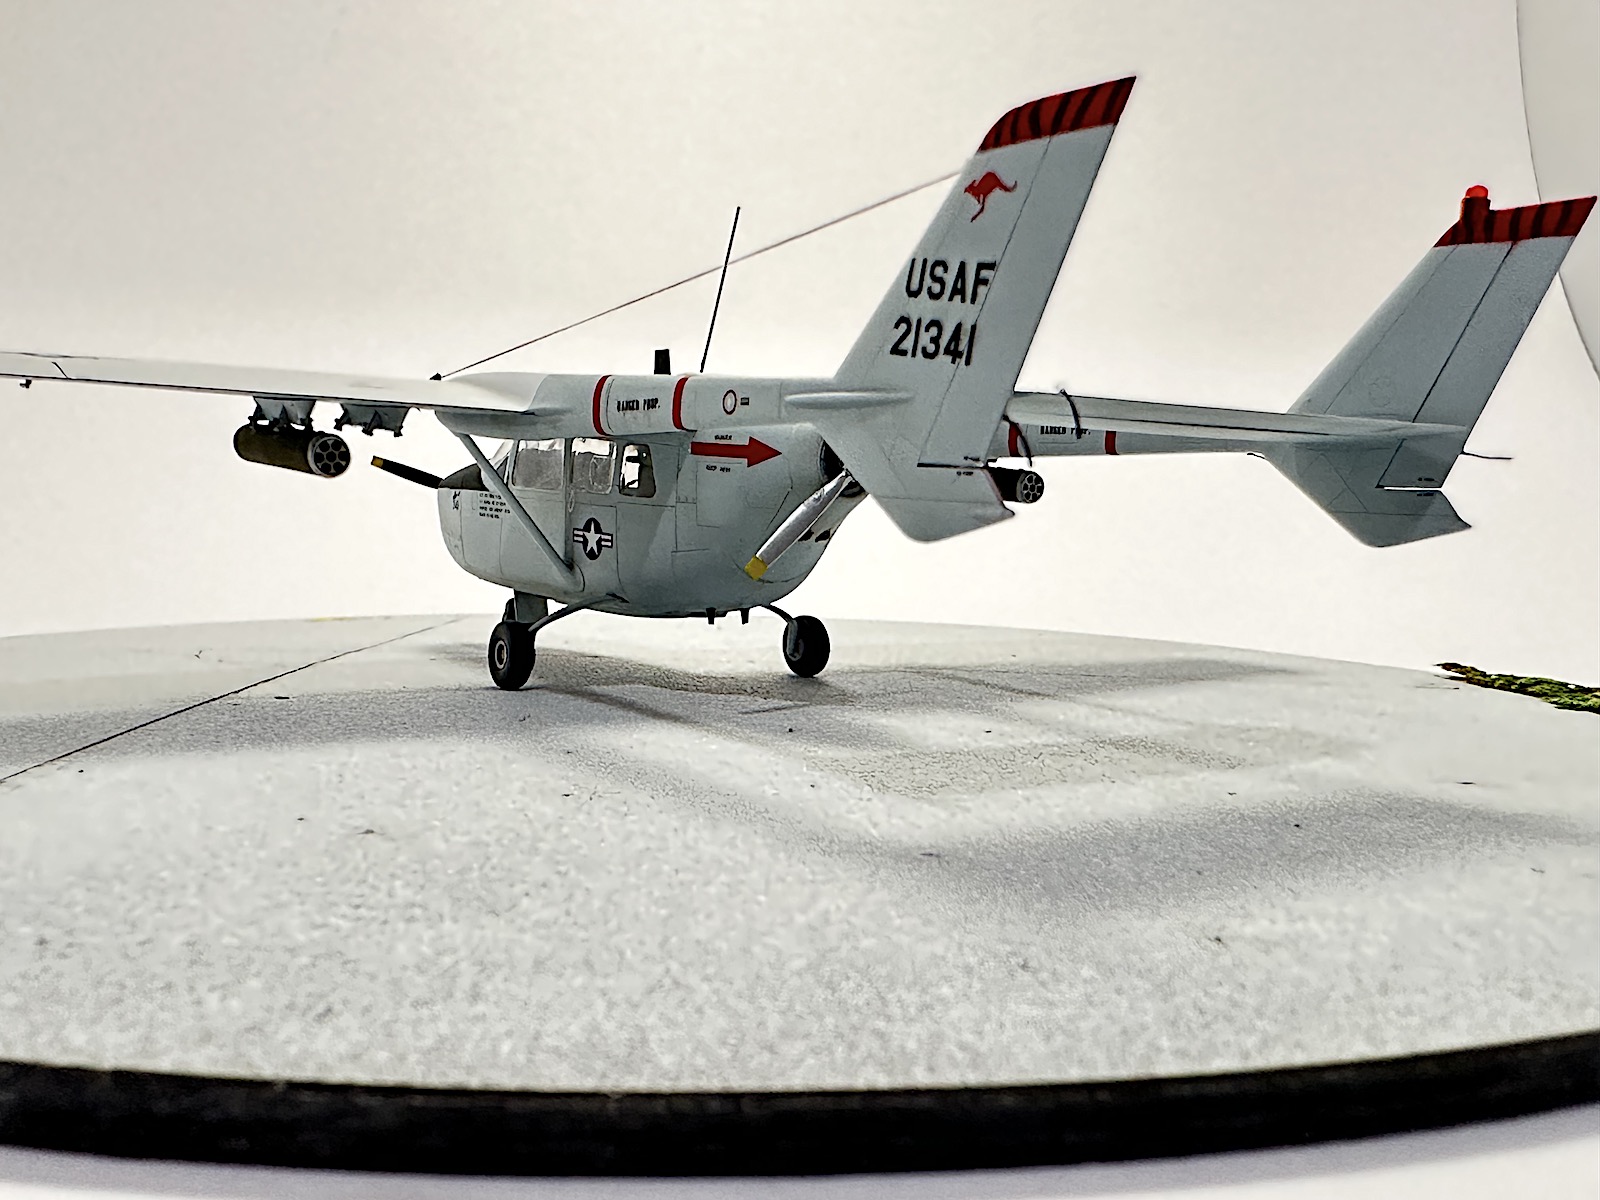
I looked over the AOA sheet and finally settled for a FAC that was an Australian exchange pilot and who was shot down and killed. I like to pay homage to the those who sacrificed. The kangaroo and the red/black tiger stripe on the tail would be interesting.
The AOA decals performed flawlessly. Printed by Cartograf and researched by AOA they were perfect.
Once dried they were sealed with another coat of Tamiya Clear and allowed to dry for a week. Not because they needed to but because I was out of town. Then a coat of Alclad Flat was added over everything.
Weathering was next. I kept this very light. A wash of burnt umber artist oils heavily thinned with turpenoid gave the model a dirty used look. Some heavier streaking and light exhaust staining were added to the belly per some photos of TheAirfield.net.
Adding the rocket pods under the wings and removing the canopy masks was next. Some antennas were added to the top and the model was done.
Is it perfect? No and that is all my fault. The kit fit exceptionally well and looks the part. The Aeroclub landing gear are essential in my opinion. The Eduard seatbelts also add to the look of the kit. The AOA Decals performed flawlessly as expected. I thoroughly enjoyed the build and will start on the OV-10A next.
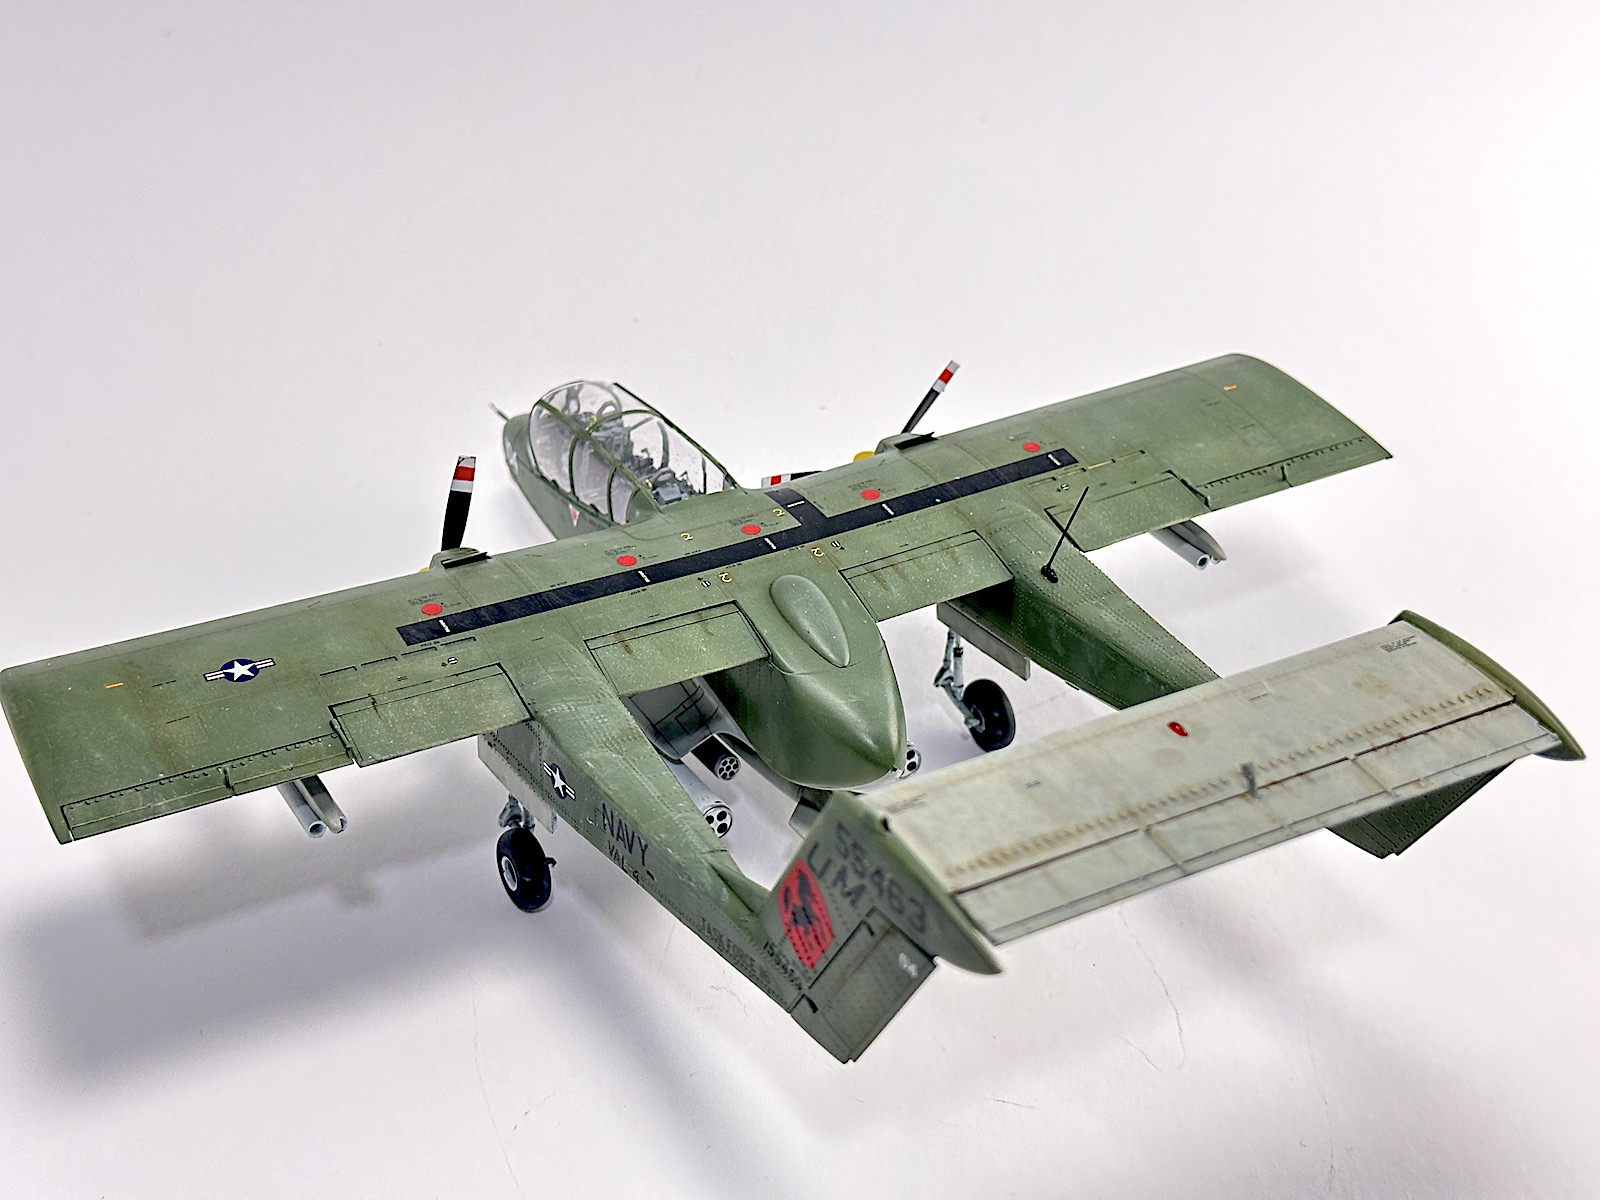
OV-10A
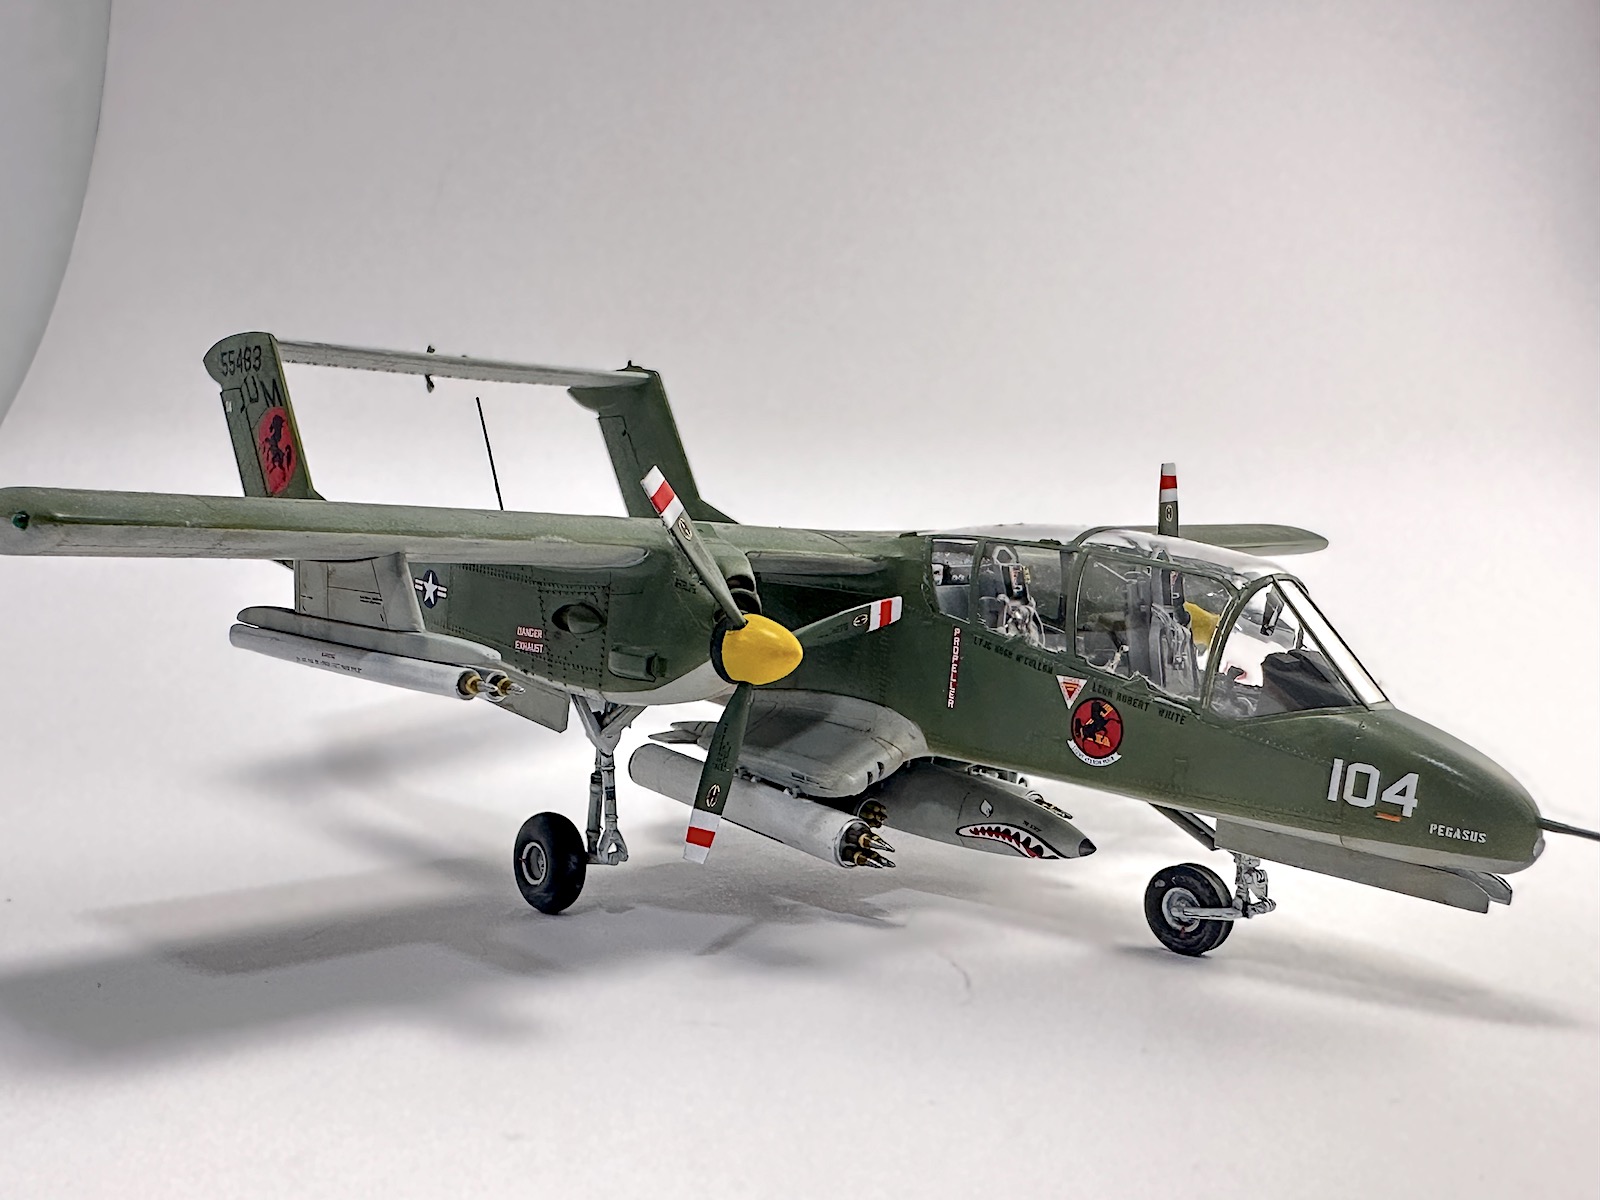
The OV-10 was designed for the tri-services, eventually purchased by the US Air Force, Navy and Marines. The Navy used it to support the Brown Water Navy patrolling the Mekong Delta. It was used for Forward Air Control, light attack, and reconnaissance. The Navy employed it with VAL-4, The Black Ponies, as a light attack aircraft.
In model form the only way to get a 1/48 Bronco was the old Testor’s/Hawk kit. It was a product of its time and lacked detail and the fit was marginal. Fast forward to October 2021, enter ICM. The ICM kit has 242 parts molded flawlessly on 10 sprues of light grey and one clear plastic. The detail is fabulous. For fans of raised rivets this airplane has a lot of them. I thought they were marginally oversized, but they looked the part under a coat of paint. The canopy was molded in three pieces, so you get an accurate bulge on the sides. Armament covers almost every option that the Bronco carried. I think the only thing not covered was a minigun pod. The decals are good, but there are aftermarket ones available as well. The instructions are easy to understand, but unlike the O-2A instructions, this one makes no mention of adding weight to the nose.
I was building this for a review and had other aftermarket items to review as well. In addition to the AOA Decals, I used Aerocraft brass landing gear and horizontal stabilizer. I also had some Quinta Studios parts. Eduard Space and masks were available as well. I used a Master Barrel Pitot tube. Quickboost provided the exhausts. Did I need all those things to make this model? No, but some of them did make my life easier and they did up the finished model and I would use them again.
Before I started with all the aftermarket stuff, I went through the instructions and made notes of what had to be added where. This saved me trouble in the long run.
As usual construction begins in the cockpit, in particular the rear ejection seat. Right out of the box it is quite nice. I didn’t, but if I had been smart, I would have used Uschi van Rosten moldable weighted putty on every nook and cranny right from the beginning. I didn’t and had to pay the price later. The seats benefited from Quinta and Eduard Space parts. There was duplication but I normally chose Quinta over the Eduard for ease of use and look, particularly the seat belts and shoulder harnesses. They just look better draped than the steel ones from Eduard. Now there were some parts that Quinta didn’t include that Eduard did so these were used where needed. One thing I didn’t notice until much later was that AOA provides decals for the seats as well. ICM includes the main one, but the AOA did it better and had more. All you really need to do is careful painting and a good seat is ready to install. The front seat is different than the back but there is enough difference that you shouldn’t mix them up.
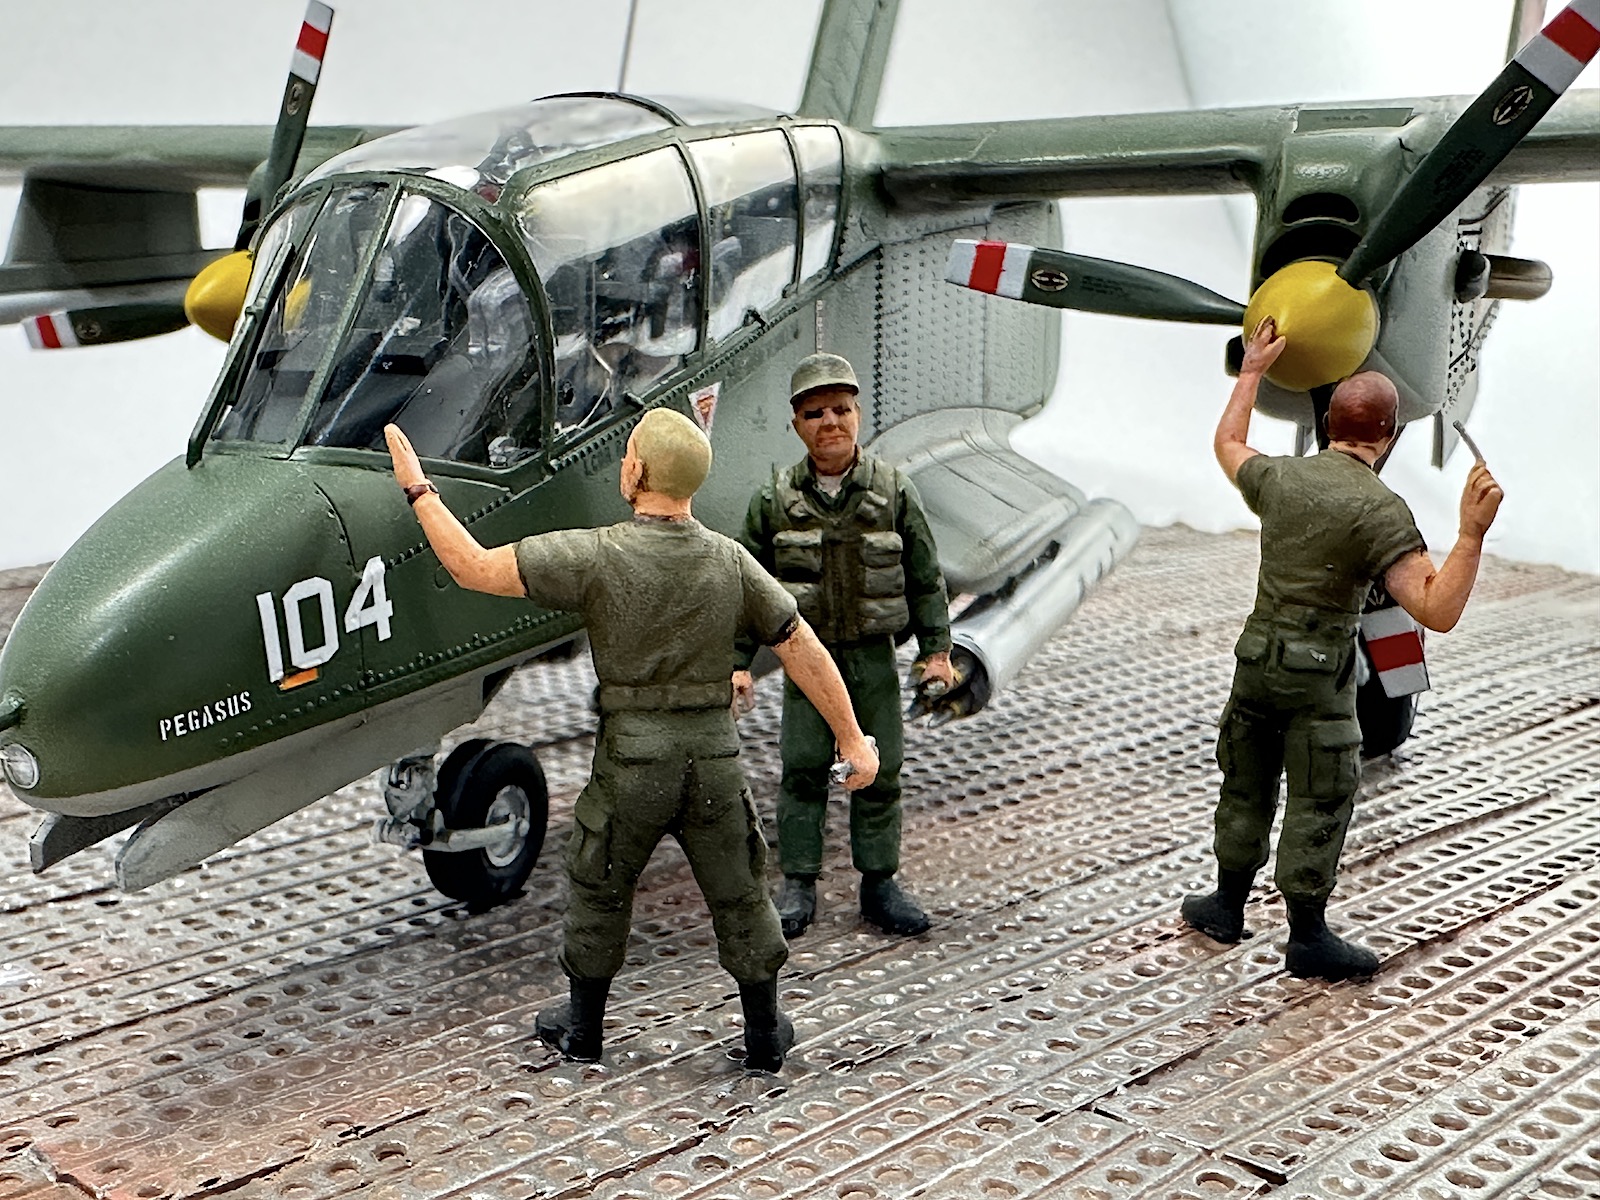
Let me start by saying the fit is perfect throughout. Building up the cockpit floor and bulkheads and things start to take shape. Make sure you remove all sprue attachment points; the fit is that perfect. I know this was supposed to be a USAF airfield set but I loved the Black Ponies of the Navy. This is important because there are different cockpit set ups based off the service using it. The kit instructions point this out but so do the AOA decal instructions. I found it easier to make the external corrections that were required for a Navy airplane now.
Cockpit construction is very easy. I painted the entire interior FS36231, Dark Gull Grey. A wash of Mig Cool Grey wash added depth to the interior. Detail painting was done with Apple Barrel acrylic paints. Don’t add the Quinta or Eduard parts until after you’re done painting, but they just make the whole interior pop.
Add the fuselage halves together along with the cockpit assembly and again add as much weight as you can where you can. Don’t forget to remove the molded-on pitot tube in preparation for the Master tube later. I did leave off Parts D62 and D63, which are canopy internal supports, until later.
Interestingly, the forward wheel well is added now along with the landing gear. I used the kit landing gear to set the angle with the plan to remove it later and add the Aerocraft one. Well, that went well until I tried to remove the strut and couldn’t. So, I stayed with the kit nose gear. The bottom fairing was added. Fit was perfect and just took careful gluing to get a good result. The side sponsons are built up next and added to the side. The fit again was near perfect. Don’t forget to open the holes for the armament if you are going to add any. I wanted mine to be a heavily armed aircraft. This looked like a good plan, but if I were to do it again, I would have pinned my armament.
The wings are the next construction step. Again, don’t forget to open the outer holes if you are using the Zuni launcher out there. Again, the fit of the upper to the lower portions of the wings were perfect. The flaps and ailerons are separate pieces and slot very well into the wing with positive pins on them. Before you know it, it is time to add the wings to the forward fuselage. The fit was perfect. No putty required.
ICM would have you add the canopy at this time. I waited until just prior to paint. I used the Aerocraft landing gear for the mains. They are surprisingly robust when attached to the plastic parts. You must build up the individual wheel wells. Then they are offered up to the tailbooms. Again, pay attention if you must open the antenna mounts. The Navy didn’t have the VOR antennas so that I didn’t open them. The tailbooms consist of the top portion of the wing, the side halves, and a separate bottom. This could have proven problematic, but it wasn’t. The fit is perfect with careful gluing.
Adding the booms to the center section reveals a really good fit with minor seams that were easily taken care of with Tamiya putty, and removed with Gunze thinner to save the raised detail.
The Aerocraft horizontal stabilizer required just a little cleanup to fit properly, but the added details on the part make it worthwhile. It was attached with superglue and accelerator. The entire model was now quite robust.
While at this stage some other parts were removed or added in accordance with the AOA Decals instructions. The biggest hurdle was to fill a hole on the top of the left boom. I used Apoxy Sculpt and Tamiya putty to fill the hole and smooth it out. This required sanding and the accompanying loss of the raised rivet detail. I used a MicroMark rivet sheet to restore the lost detail.
It was now that I realized my mistake, the aircraft was a tail sitter. I used the Uschi von Rosten moldable weighted putty. I didn’t have a whole lot of options at this point. So, I decided to add the putty to the nose wheel well and mold it to look like the area where the wheel retracts. I used superglue to ensure it stayed in place. I should have known better.
Now I added the canopy taped up with the Eduard masks set. Inside the side canopies I added some Eduard Space details for the door handles. I attached them with H&S Canopy cement so no frosting.
Time to prime with Alclad Primer. Before that the canopy was sprayed the interior color. Once the Alclad was sprayed, there were a couple of spots that needed touch up with Plastic Putty and cleaned up with water. Once happy it was time to add a worn look. I wanted to try something different. I first painted Tamiya NATO Black along the panel lines and then in a squiggle pattern. I used some paint masks to get a splatter pattern. Then I repeated the process with white. I wasn’t sure it would work, but it looked cool.
I love Mr. Paint, or MRP. I started on the bottom, FS34440 Light Grey. My particular aircraft had a replacement horizontal stabilizer, so it got the same color on the top and bottom. This was allowed to dry and then masked with Tamiya tape. Then FS34097 Field Green or often called Marine Green was added. The MRP is translucent enough that I was able to build up the color as I needed to and I had a well-worn aircraft, minus decals.
Now I read more of the AOA Decals instructions, which I should have done before I started, and found out a bunch more details about my subject aircraft. A coat of Tamiya Clear thinned with Gunze Mr. Leveling Thinner brought about a very shiny finish for the decals.
While that was drying, I turned my attention to the armament. I didn’t need all of it, but I built it all anyway. Like the rest of the model, they all fit beautifully. Some of the warheads were a pain to remove and clean up but they all looked great. AOA Decals had a shark mouth decal for a Black Pony belly tank, so I had to use it, whether it was accurate for the time period or not. I love shark mouths. Artistic license, prove me wrong. AOA provides decals for all the rocket launchers as well as, the drop tank. The kit decals are not as nice, but they would work in a pinch.
Back to the airplane. The AOA Decals performed flawlessly under a coat of Solvaset. There was some silvering around a rivet or two but slicing with a new knife blade and reapplying the Solvaset solved that problem real quick.
The decals were sealed with another coat of Tamiya clear then the entire airframe was coated with Alclad Semi-flat Clear. I normally would have painted it flat but thought that a Navy airplane should have a little shine to it. I love the way it turned out. Slightly sun-bleached. Under the wings and lower part, I didn’t apply it so heavily to simulate those parts being in the shade and fading less with a little more shine.
I used a wash of burnt umber artist oils along the panel lines to dirty up the airplane from its service. Then a dot filter of buff artist oils was blended here and there with a brush moistened in White Spirits. I swirl it and then drag it to the rear and down. This imparts rain streaks and airflow. Some Mig pigments were added to the exhaust area, and I was done weathering.
The masks were removed from the canopy and lo and behold, smuts on the inside. Luckily for me the one side was not attached as securely and was able to be popped off and the inside repolished and canopy put back on.
Adding the drop tank was problematic as the contact area was very small. If I were to do it again, I would put pin in place of the plastic sway braces and drill holes in the tank. Might not be as accurate but it would be strong. I should have pinned all the armament for security. Only the outer pylons and Zuni launcher were secure. The rest are tentative at best.
Clear parts were added such as the landing light in the nose and anti-collision lights. The wingtip lights were first painted chrome then the appropriate clear green and red.
The wheels and the Quickboost exhausts were added, along with the sponson machine guns and windshield wiper and the model was finished.
All the aftermarket parts were phenomenal. The AOA decals were great, and the instructions alone were worth the price of admission. I can’t say enough good about them. The Quinta set and to a lesser extent the Eduard Space added a lot of detail to the cockpit. If I didn’t have the Quinta set, the Eduard Space would have been perfect as well. The Master barrel was essential. I still managed to bend the tip a few times but if it was plastic, it would be broken. The Aerocraft horizontal and landing gear were really nice and add to the look of the model. The Quickboost exhaust were perfect.
Overall, I loved the model. I wish I had added the weight where I could before I realized it was too late. Assembly was easy enough. Clean up, especially around the rivets is a pain but doable. The weak attachment points for the armament are a pain but easily overcome. I really enjoyed the model. It is outside my normal build era, but I like the way it looks. Again, because of the weight I added to the front wheel well it won’t win any contest, but it doesn’t have to for me. Another Vietnam era aircraft for my collection.
As a set from ICM this combo boxing is a remarkable value. For a few dollars more than one kit, you get two airplanes and ground crew. The possibilities are endless. A great value and the way I would buy more of them. I enjoyed building all three kits and look forward to doing it again. Great job ICM.
Highly recommended
Thanks to ICM and IPMS/USA for the review copy.

Reviewer Bio
Floyd S. Werner Jr.

Building models since the age of 7, I’ve become known for my Bf-109s and helicopters. I currently run Werner’s Wings. I was previously the ‘star’ of the Master Class Model Building Video series. I’ve been published numerous times on various website, including Hyperscale and ARC. My work has been in FSM and Great Scale Modeling 2001, as well as, numerous other model magazines. I’m a published author with my Squadron/Signal Walkaround book on the Kiowa Warrior. My models have continuously won many regional and national awards. My unique model photography gives my models instant recognition for their historical perspective.
I’m a retired from the Army after 21 years of flying Cobras and Kiowa Warriors, including tours in Iraq, Bosnia, Korea, and Germany. I’m also a retired Flight Officer for the Baltimore City Police and flew their helicopters chasing bad guys. I’m currently flying Cobras and Hueys with the Army Aviation Heritage Foundation.
I’ve been married to my high school sweetheart, Yvonne, for 42 years. Our daughters have blessed us with six grandchildren. My passions continue to be his family, friends, helicopters, models and airplanes, especially the Bf-109 and my beloved AH-1 Cobra. My motto has always been - MODELING IS FUN!
Comments
Vietnam USAF Airfield review
Thanks for covering this kit. Glad to hear the figures are well done, since they would be one of the reasons for my purchase. The references to the AOA sheets and the use of moldable weighted putty was new to me. Overall, an excellent review of the aircraft kits and figures. Thanks for calling out specific colors and the areas to watch out for during assembly!
Chris Luevano
Merritt Island, FL
Add new comment
This site is protected by reCAPTCHA and the Google Privacy Policy and Terms of Service apply.
Similar Reviews