
Tiran 5 Israeli Tank
Summary
Tamiya has enhanced their venerable T-55A Main Battle Tank kit yet again with all the parts needed to convert it into an Israeli Tiran 5, which is not surprising when you consider the mileage they got out of the same kit last year when they released the T-55 Iraqi “Enigma”. One thing is for sure – the kit these new versions are based on is one of the finest armor models ever produced by Tamiya. I never get tired of building these tanks, so keep them coming!
The Tiran 5 was used by the Israeli Defense Force (IDF) from the late 1960s until the mid-1980s. Constantly modified throughout its service life, many were fitted with the 105mm M68 gun. Even after it was retired from IDF service, the Tiran 5 continued to see action in various guises in a number of countries around the world.
Opening the Box
This is a Tamiya armor kit – which means it can be described in five words: not many parts, perfect fit. As always, there is something for every kind of modeler in here. For those new to modeling, Tamiya kits are a snap to assemble and come with excellent instructions and sprues that are laid out and numbered logically. For those who enjoy the painting and weathering part of building a model, Tamiya kits quickly and painlessly become excellent canvases on which to ply one’s artistic talent. For modelers who go for accuracy, Tamiya has the industry clout that insures a variety of after-market products to enhance what they provide in the box, products that this type of modeler would most likely want to purchase anyway, no matter how accurate or inaccurate the original kit is. One thing everyone gets, however, is an enjoyable build and a perfect-fitting model.
It wouldn’t be a modern Tamiya armor kit without some oddities, however, such as nylon string tow cables, black nylon mesh in lieu of photo etch, figures (!), and rubber-band track. Each of these has its benefits and downsides, but they come together just fine to produce a stunning AFV.
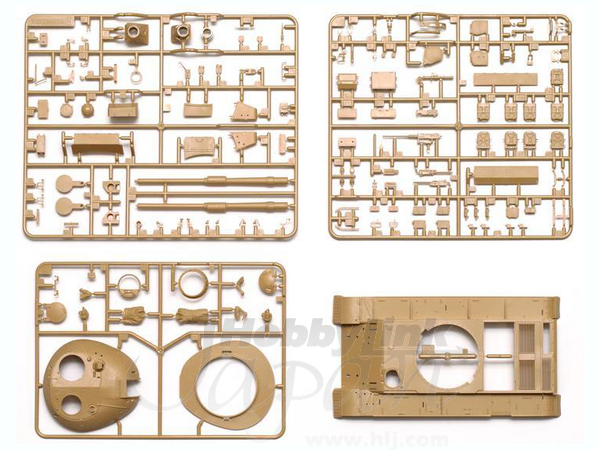
The contents of the box include:
- Lower and upper hulls packaged separately
- 6 sprues in soft, tan plastic, packaged separately
- 2 lengths of (old-style) rubber band track
- 2-ft long piece of string for use as tow cables
- 4-inch square of fine nylon mesh for exhaust covers
- 2 bags of polycaps
- 1 small sheet of Tamiya decals, good registration
- 1 16-page, black and white instruction booklet with 27 steps
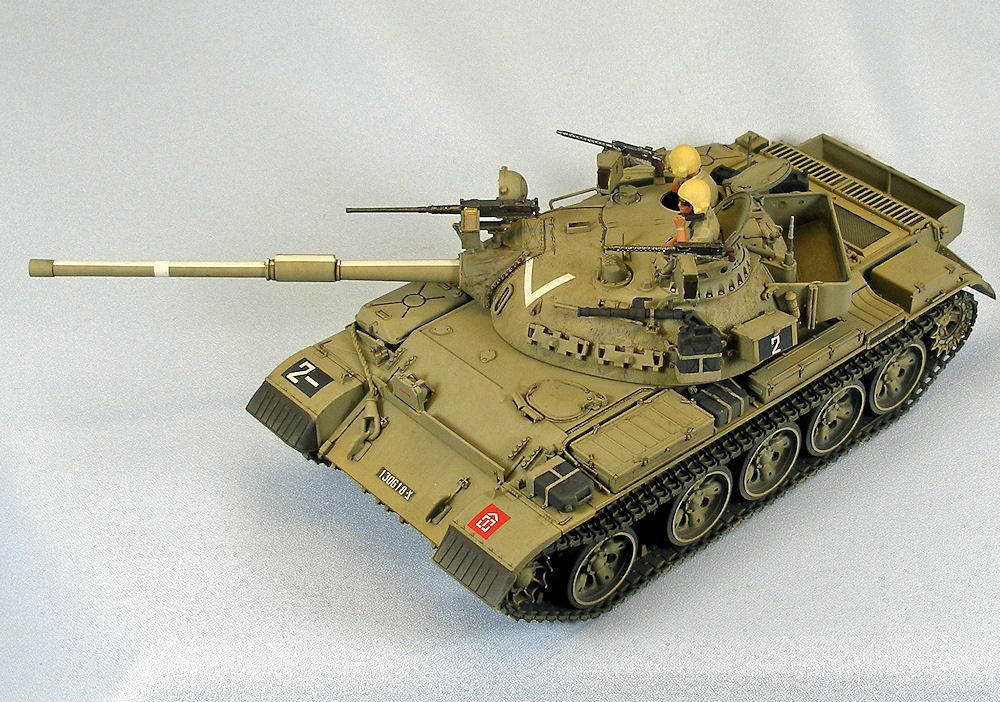
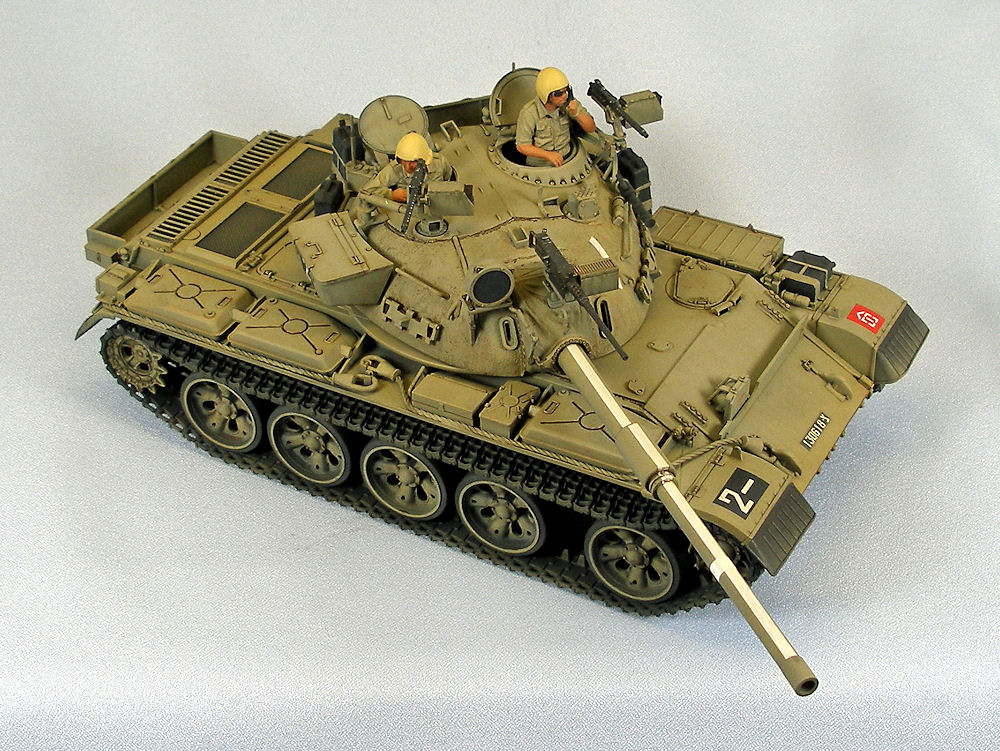
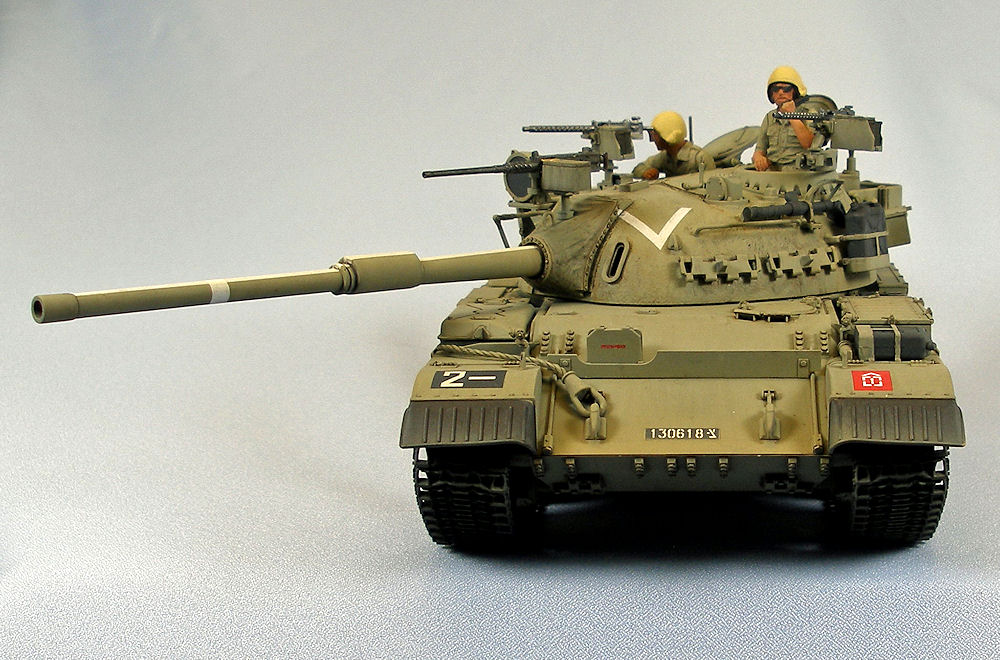
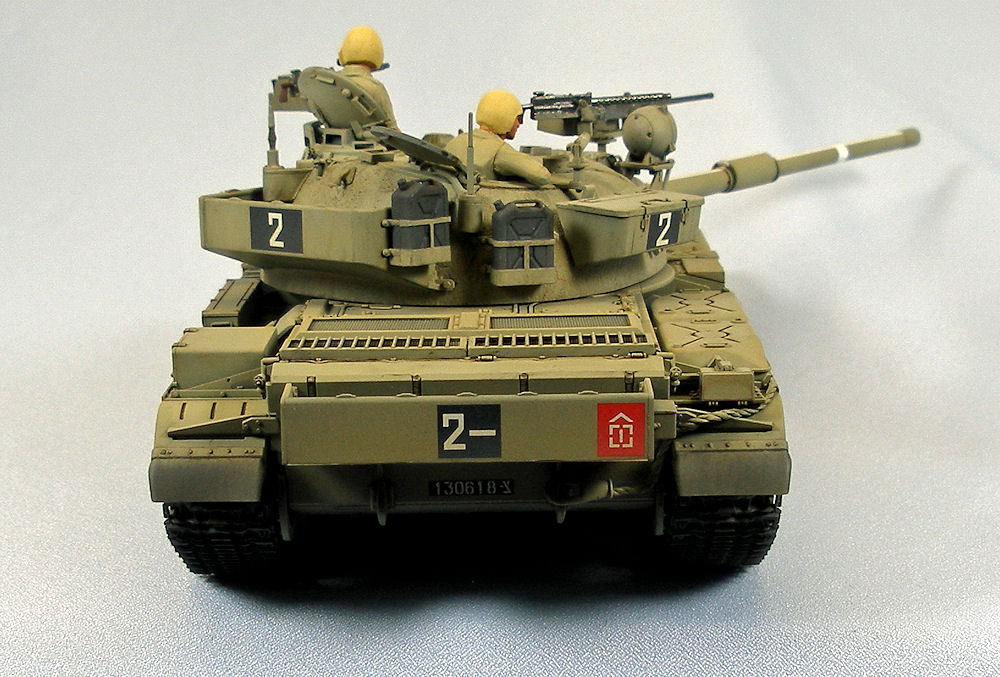
The kit comes with a single scheme, simply titled “Israel Defense Forces, the Negev, Mid-1980’s”. Paint callouts are provided for Tamiya Acrylics.
Kit Comparison
Tamiya T-55A kit (Item 35257) vs. the Tamiya Tiran 5
Instructions
Many of the same illustrations are used but the entire booklet has been reworked for the Tiran 5.
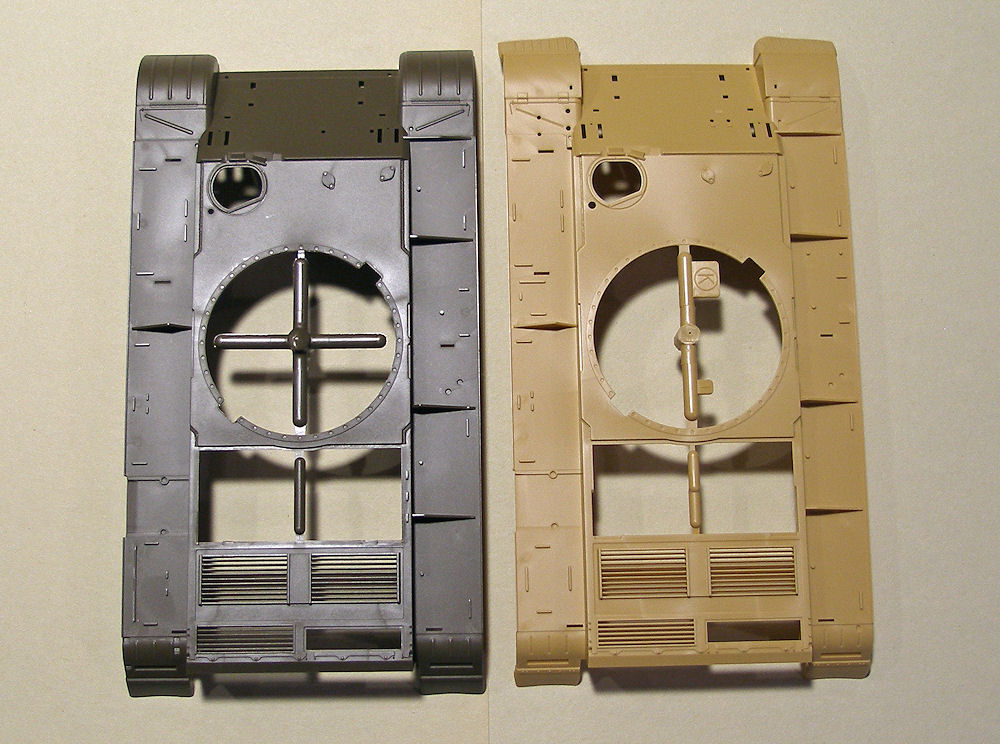
Plastic
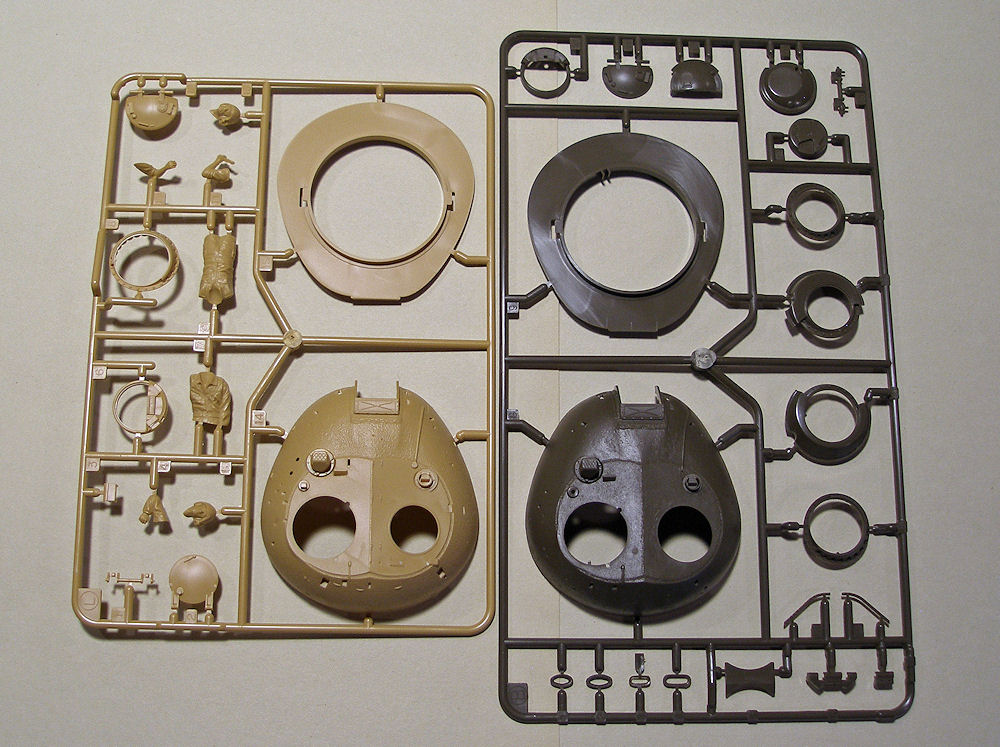
The T-55A is molded in dark olive-green plastic, the Tiran 5 in light tan.
Sprues
(Nearly) all sprues are different between the two kits, so even though some of the same molding has been used, the original T-55A has been reworked from the ground up.
These differences are:
- Turret – the Tiran 5 turret is brand new, containing the same fine surface texture as the T-55A, but has a few more bumps and attachment points. The single Soviet machine gun has been replaced by three machine guns, a 60mm mortar, and a searchlight, among other details.
- Running Gear – the sprues of the Tiran 5 and the T-55A are identical here, save the headlights and reactive armor left off the Tiran sprues.
- Track – Identical between the two kits – the old-style, slimy Tamiya rubber-band track.
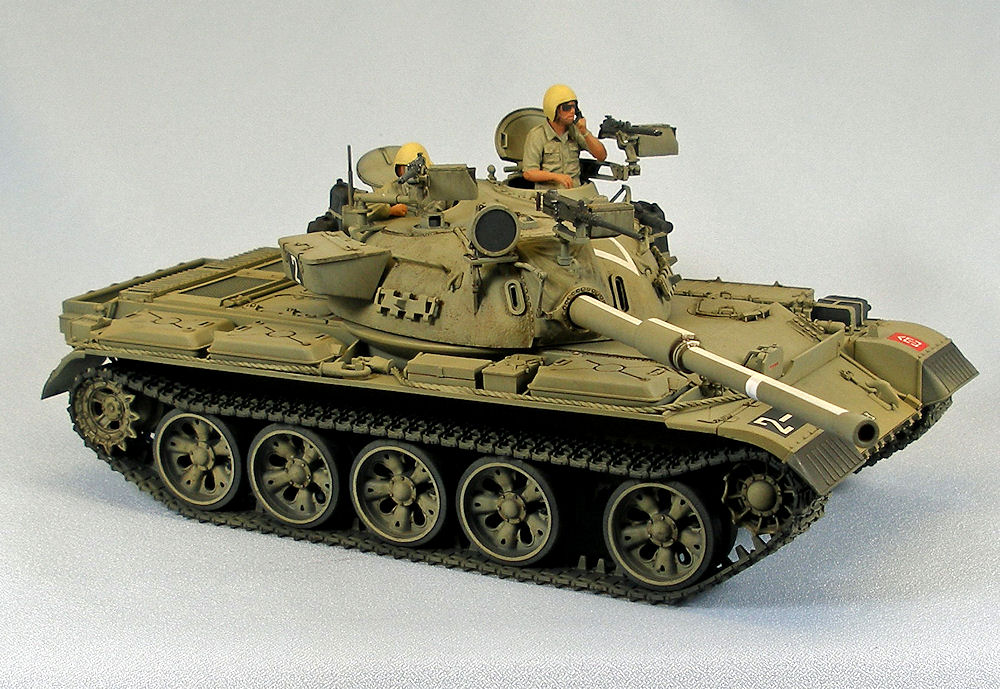
- Main Weapon – the main weapon is different between the two kits, and the sprue that holds the barrel halves contains many of the same parts but has been re-arranged.
- Lower Hull – Identical between the two kits.
- Upper Hull – Very similar, but clearly a new mold for the Tiran, with reworked fenders and crisper detail.
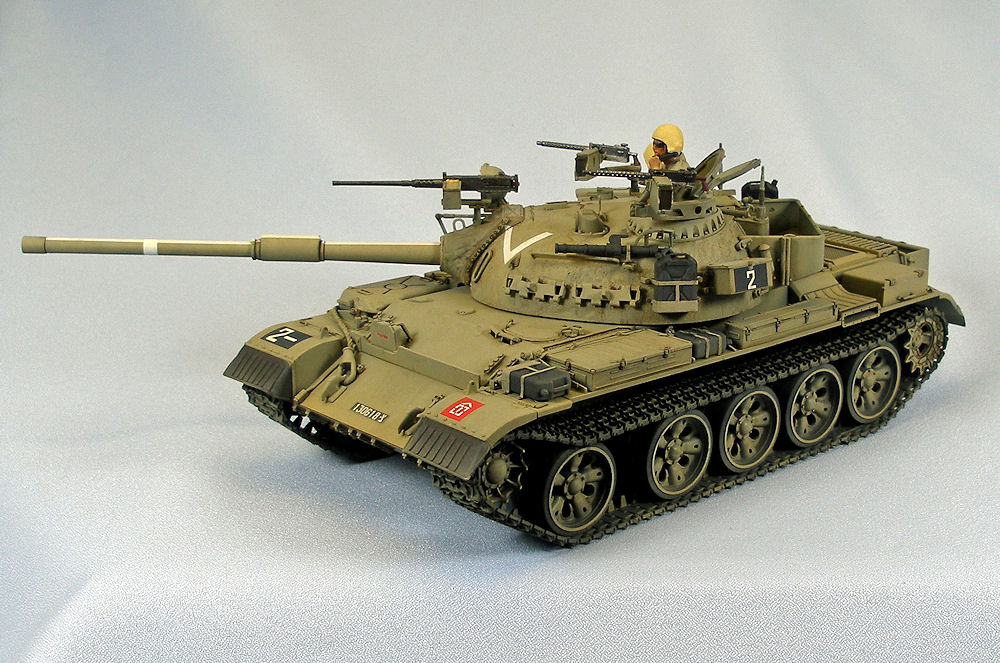
- Figures – Both kits contain an identical figure, presumably the commander in Russian garb, on an identical sprue that contains the fuel tanks, hatches, and miscellaneous detail. The Tiran 5 kit contains two new figures from the waist up in Israeli uniforms and helmets on a new sprue.
- Version Specific – The Tiran 5 has a completely new sprue that contains the additional turret-top firepower, jerry cans, and assorted bumps and boxes unique to this version.
The Instructions
Are excellent. Beginners will find the pages full of quick hints and images showing where to trim, cut, use tweezers for small parts, etc. A ten-year old could build a nice model from this kit.
The Build
Looking through the instructions for my notes I find that there is very little written besides the occasional “Cool!” and “Nice!”. The build simply goes right along without a hitch.
Make sure to open several holes in the main hull with a drill, as shown, before assembling the major parts. Use a new blade to slice the nylon screen mesh, it is very fine.
In Step 13, when you assemble the cables, measure the string exactly as shown in the diagram; you will find that it fits precisely and can be tightened on the surface of the model by swiveling either Tow Cable ring slightly before gluing. Tamiya receives criticism for using string instead of wire, and some of this is justified, especially on WWII vehicles when the cables are modified to show use. But on modern vehicles, the cable is wrapped and laid out like a string, all around a variety of corners and bumps, and you just can’t do that very easily with twisted wire.
In Step 18, Part J3 must be glued at almost a vertical angle to make room for the grenade launcher which is attached later in Step 21. I suggest you test-fit both pieces before attaching them. That’s about all I can add about the general build steps.
The Track
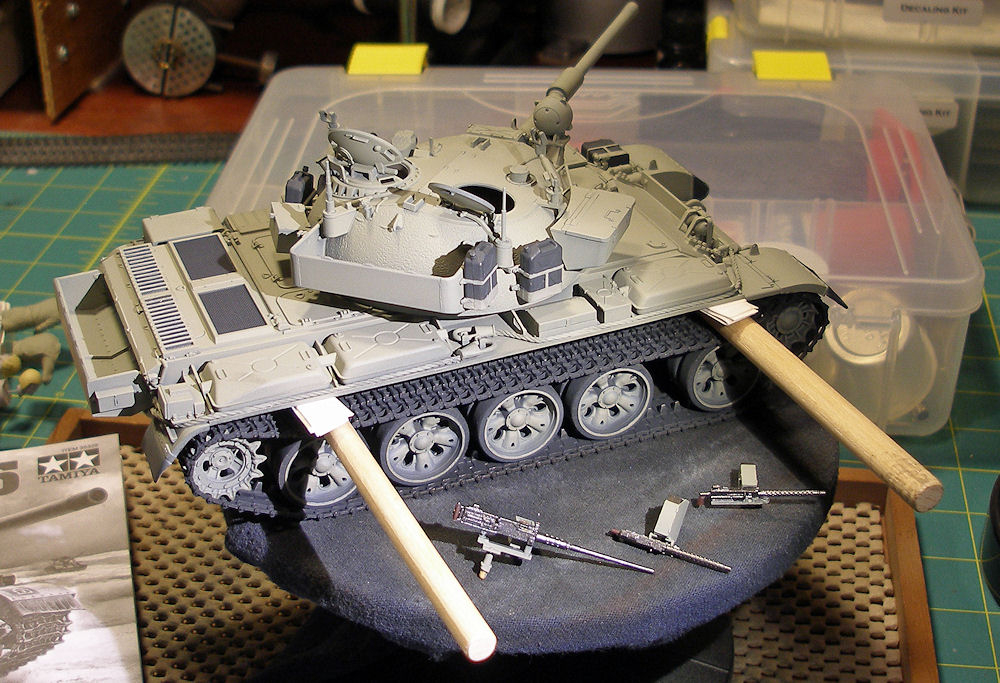
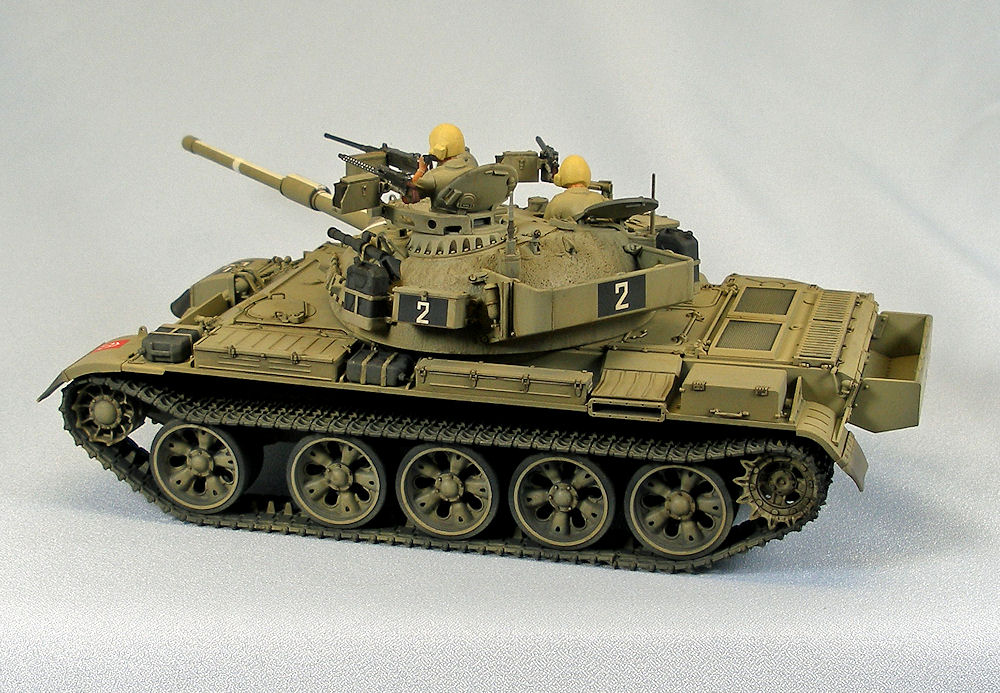
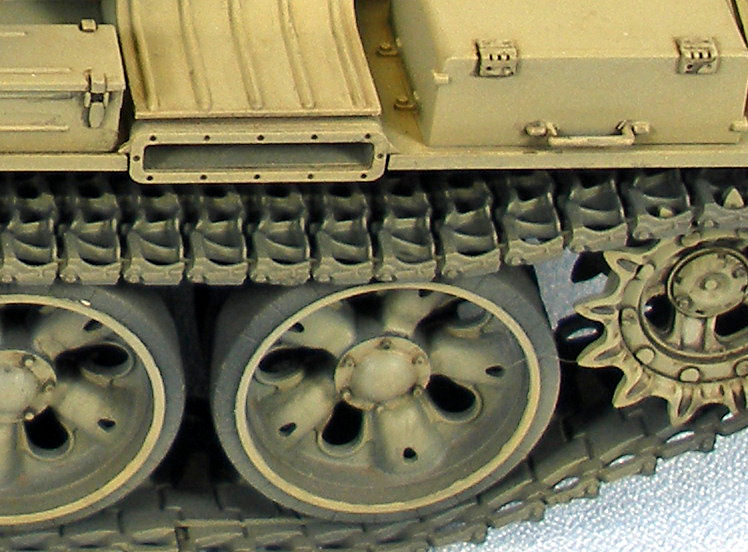
Tamiya has included the same track as in the T-55A kit; somewhat slimy rubber-band track. The detail is excellent, however, and properly finished will do nicely.
Half-way through painting, I connected the ends of the track using Tamiya Thin green-top liquid cement, which worked fine, and fit them over the wheels, the drive sprockets, and return rollers. Right away, I could see that the track was not going to work – the rubber-band material was tight as a drum and left a huge gap above the wheels. They would need to be glued down to the tops of the first and last wheels on each side. Luckily, the track responds well to heavy-duty Testor’s black-bottle liquid cement. I found two dowels that fit into the appropriate places, and, with a couple paper shims, got the job done (see photograph).
The Figures
I am not a figure painter (yet), even though I have all the materials and the motivation. I just haven’t yet found the time to devote to learning the craft. Consequently, my faces look like blobs of paint covering other blobs. Fortunately, at least one of the figures in the kit sports a large pair of sunglasses and a beard – thank you Tamiya.
I airbrushed the figure torsos and heads with Gunze Mr. Surfacer 1200 and then painted them with the base mixture (see below). Next, I hand-painted the shadows and highlights on the figure torsos with the appropriate shades (see below), the belts and watches on the figures with Tamiya XF-55 Deck Tan, and their helmets Tamiya XF-57 Buff. I used Windsor Newton Oil paints for the skin (Flesh Hue, Cadmium Orange, Ultramarine Blue), highlights (Burnt Sienna), and shadows (Burnt Umber), and used Tamiya paints for everything else.
Painting and Finishing the AFV
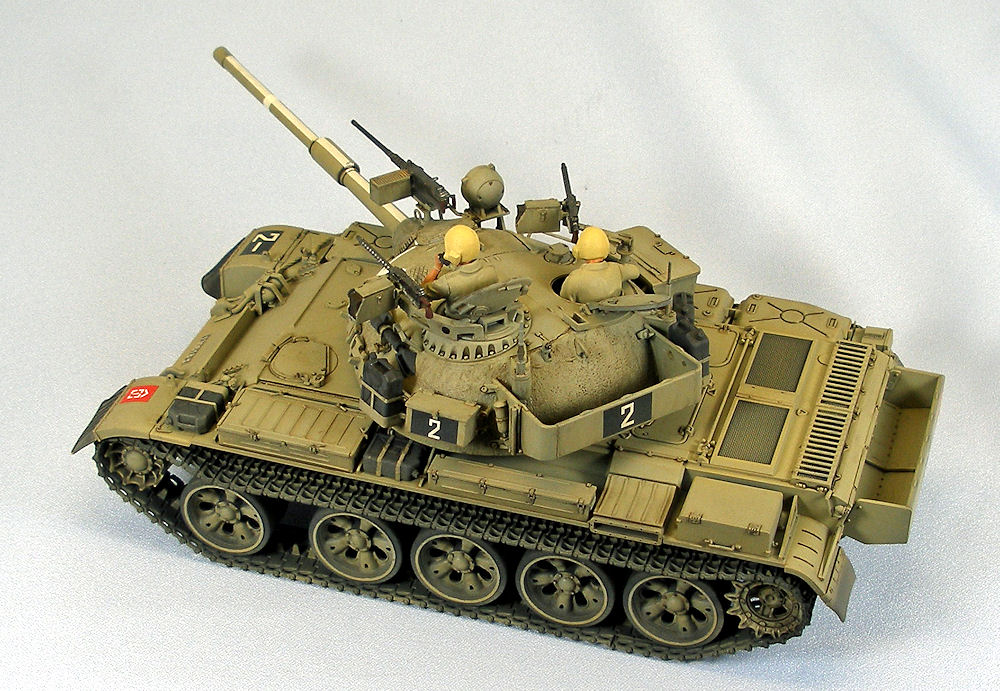
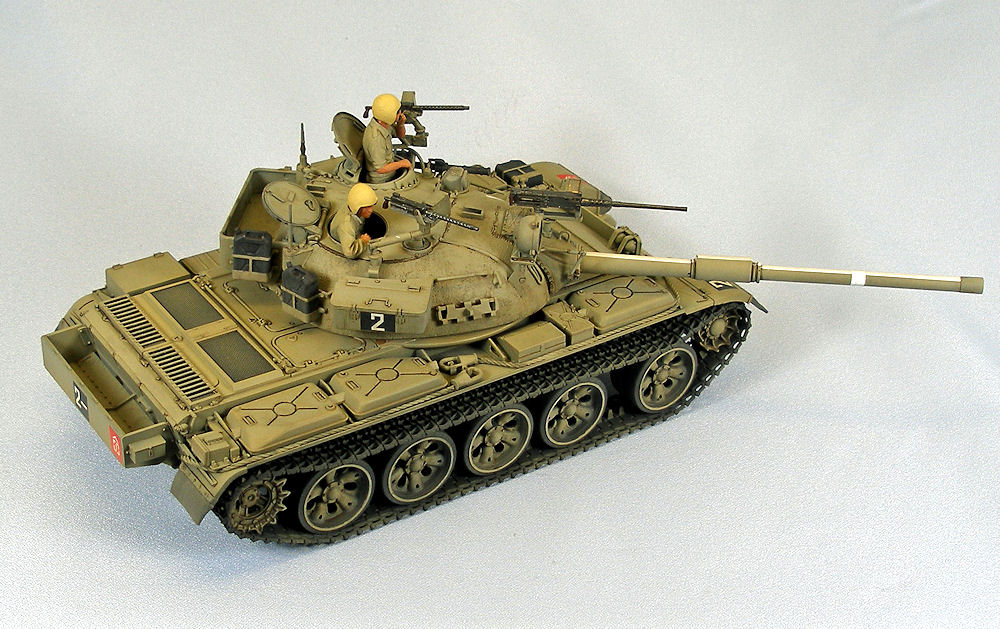
The Tiran 5 is a challenge to paint. On the good side, Tamiya provides a combination of poly-inserts and single-piece track that allows you to paint and weather the wheels separately. Once finished, they can be pushed on later when needed. The interior that can be seen around the figures is the same base color as the outer surfaces, making even the hatch-painting a snap. But the jerry cans with molded-on racks, the grenade launcher and machine guns, and the rear exhaust intakes/vents will require some detail painting, and even some masking. You won’t be able to call it in with an airbrush this time.
I thin all Tamiya paint and primer products 50/50 with Gunze Mr. Color Leveling Thinner, which has its own retarder for airbrushing. If you haven’t tried it, you should. I use a Pasche-H Single-Action airbrush, Number #3 tip, at 20 lbs. pressure for everything. I use the same thinner for hand-brushing Tamiya paints.
I first created two stick-boards to hold the some of the parts for painting. The first stick-board would be painted the base color (see below). It held 20 wheels, 2 drive sprockets, and 3 (mg) ammo cases. The second stick-board would remain black and have the detail hand-painted using the base color. It held the three machine guns, 5 jerry cans, the grenade launcher, and the track.
Everything else was painted as assembled, which followed these steps:
- I started with airbrushing a pre-shade coat of Tamiya German Grey (XF-63), including all of the parts on the stick-boards and the track. There is no PE in the kit, so I didn’t feel it necessary to apply a primer first.
- I then masked the fenders, the four vents on the rear deck, and hand-brushed Micro-Mask on the searchlight lens.
- Next came the first camouflage coat. I love Tamiya paints, but they don’t offer the same variety of paints as other paint manufacturers. I’ve tried the LifeColor and Model Master lines, which produce special Israeli colors, but I’ve never been satisfied with the process and/or finish produced, at least not for armor models, which left me with the task of rolling my own. Looking to the internet for ideas and making several color chips, I arrived at mixture that easily allowed me to create (and re-create) the three shades I needed (base, highlight, shadow) for both the tank and the figures.
Tamiya XF-49 Khaki ; Tamiya XF-66 Light Grey ; Tamiya XF-2 Flat White
(Shadow – Figure uniforms, main weapon fabric housing) Ratio 1:1:1
(Base – Overall vehicle and figure uniforms) Ratio 1:1:3
(Highlight – Figure uniform highlights) Ratio 1:1:5
When the base color first dries, it will seem light, but subsequent weathering will tone things down just fine.
I painted the entire vehicle, the first stick-board (with the wheels), and the figure torsos using the base mixture. - I removed the masks and inspected my work. Everything looked good. I sprayed a light coat of Future acrylic over the outer wheels on the first stick-board and all over the parts on the second stick-board (with the jerry cans) to create a barrier coat for hand-painting. This isn’t necessary, but I like having the ability to recover easily from screw-ups, and the acrylic layer helps with that.
- I hand-brushed the thin band on the wheel rims, the jerry can racks, and the detail around the grenade launcher with the base color, and the machine guns with Tamiya X10 Gun Metal. I painted the machine gun handles Tamiya XF-10 Flat Brown.
- I used a Q-tip to apply Model Master Dark Anodonic Gray Buffing Metalizer to the centerline posts of the tracks and rubbed the outside detail of the track with Mig Gun Metal pigment using my finger. Once satisfied, I glued the track together using Tamiya Liquid green-top cement without any problems.
- Once everything was dry, I attached the track, jerry cans, wheels, and the grenade launcher. I had to break here to glue the track to the tops of the wheels (see the Track section above).
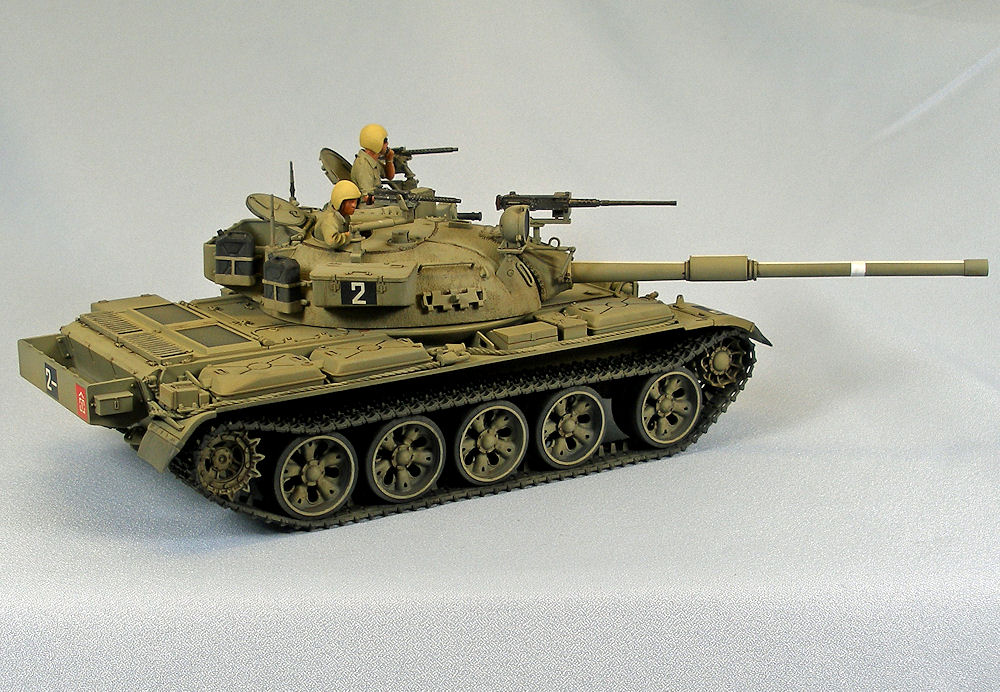
- Once the track had been secured, I created a filter using Mig Wash Brown Oil paint, heavily thinned with Mona Lisa Odorless thinner. I first brushed clean thinner over the entire vehicle, followed by a single brushed coat of the filter. The thin brown filter over the background green started to bring the model life, giving it depth.
- Once the filter was dry, I hand-brushed the areas that would receive decals with Future acrylic and let it dry. I applied the decals using the Red and Blue Micro Sol/Set system without any problems. The decals along the main gun barrel are tricky to align properly. I suggest you apply the #3 piece that covers the bore evacuator first, and then cut the fore and aft sections to fit. I did just the opposite and ended with more problems than I needed.
- Once the decals were set, I shot the whole vehicle with a liberal coat of Future Acrylic to seal the decals and prepare the surface for washes.
- Next, I gave the entire vehicle a pin wash using Mig Dark Wash (aka Raw Umber) straight from the bottle. This wash goes on very dark but, on the shiny, acrylic surface, it stays wet and workable for a long time. Using a clean brush, Mona Lisa thinner, and a paper towel, I worked the wash around until I had it just the way I wanted it.
- I let this dry overnight and then gave the model a road-dusting coat of Vallejo Model Air Light Brown, paying special attention to the wheels and track. This very fine paint literally whispers on when thinned 50/50 with Vallejo’s Airbrush Thinner. Great stuff.
- Next, I shot the whole vehicle and figures with Vallejo Flat Varnish to kill any remaining shine, again thinned 50/50 with Vallejo Airbrush Thinner to improve flow.
- Finally, I added the figures and attached the guns with a little spot of Testors black-bottle cement and… this little guy was done.
Conclusion
What more can I say about Tamiya kits? There is something for every kind of modeler in each kit, the fit is perfect, and the instructions are excellent. I felt they could have used link-and-length track for this kit to represent the sag found on the T-55 better, but short of that, I have no complaints.
I recommend this kit for all modelers, beginners to advanced. This is one fun model to build.
I would like to thank Tamiya USA for providing this kit for review, and IPMS USA for giving me the opportunity to build it.


Reviewer Bio
Eric Christianson

Eric Christianson is a father to two boys (Reed and Dean), the President of the Seattle Chapter of IPMS, and a long-time Little League umpire. He is also a devoted husband and companion to a wonderful woman named Jackie who enthusiastically supports his passions. Recently retired as a programmer, his home office has been scratch-built into ‘a perfect model room’. Modeling since he was a boy, Eric mostly builds armor these days, but still dabbles in 1/32nd aircraft and other types of models from time to time. He also enjoys presenting seminars on weathering and technique at local shows. Many of Eric’s kit reviews can be found on the IPMS USA website.
Comments
Add new comment
This site is protected by reCAPTCHA and the Google Privacy Policy and Terms of Service apply.
Similar Reviews