
TF-9J Cougar
First, thank you to the wonderful folks at KittyHawk Model for providing a welcome addition to early US Navy jet modelers, the TF-9J Cougar. This new release from KittyHawk fills a long-standing gap in 1/48 scale USN jets. KittyHawk subjects are starting to fill out my collection more and more!
Presentation (how the kit looks in the box)
The kit arrived in a stout 14 x 10 x 2.5 inch cardboard box with a colorful lid showing a TF-9J of H&MS-13 on a mission over Vietnam. The five gray sprue trees, as well as the single clear sprue, were enclosed in separate, loosely stapled poly bags. The photoetch fret was well protected, and the decal sheets were protected in plastic. The decals included options for four different aircraft in a variety of configurations and markings. Two of the sprue trees were thicker than usual giving excellent support to the parts. No mold release agent was observed. Some parts had very thin flash edges that were easily removed with a fingernail.
Instructions and Other Materials
The instruction sheet is printed predominantly in black and white, with the title page, sprue maps, decal overview, painting schemes, and decal placement guide printed in color. The illustrations and schematics are crisp and well printed. The instructions consist of 17 steps covering all assembly options and end with a tankage and ordnance load-out diagram. The suggested assembly sequence shows three or four full-completed subassemblies, including the landing gear, wheel bay doors, folded wings, and so on, before final assembly. There are many “little-box” assemblies. Callouts are used effectively, and there is plenty of room around the illustrations for notes. I found the instructions to be easy to read for pre-build planning purposes.
Decals
Two decal sheets provide markings for one of four aircraft: Blue Angels #7, a VT-10 trainer, an Argentine Navy Cougar, and the US Marine Corps box-art subject. There are also an abundance of stencils. Registration is very good on the decals, with the exception of a couple of the stencils that seem a little out of alignment. However, all the decals I used look great on the model. They are thin, and good results were achieved with Microscale solutions. If you chose the VT-10 version, be sure to paint the white panels under the wing numbers, as the white-printed background for the wing number decals allowed the orange of the underlying wing to show through a bit.
Supplemental Reference
I found the recent Detail & Scale digital book, F9F Cougar in Detail & Scale to be very helpful while planning my build before construction began. Author Bert Kinzey reviewed a number of kits in the “Modeler’s Section” of the Cougar volume. While he did not feature a buildup of the KittyHawk kit, he examined preproduction sprues and listed a number of cautions and corrections. I chose to build the VT-10 trainer version with the wings folded, and I was able to find a great deal of information on this trainer version in the book.
I developed a checklist for my VT-10 build from his suggestions:
- No ordnance or tankage will be used, so the holes in the wing bottoms will need to be filled.
- The joint between the elevator and the horizontal stabilizer will need to be enhanced with a little scribing.
- The photoetch material looks great, so there should not be a need for much extra detailing.
- The correct fold angle will need to be set. There is no specific angle, other than an obvious outward tilt.
- A simple fix, removing and filling extra formation and approach lights, is required.
- Only the starboard fuel-dump drain next to the tail pipe will need to be mounted.
- The upper beacon should be mounted correctly, tapering aft.
- Only the starboard side has a small scoop below and aft of the rear ejection seat. The port side indentation for the scoop should be filled and smoothed.
- Some light sanding may be needed to bring raised nose details into scale.
- Look over the various pitot probe types and their placement from the kit parts.
Construction Summary
I think I should have spent more time reviewing the instructions before jumping into building. I may have avoided some uncertainty and errors in later construction steps. My instructions are thoroughly marked up with notes and check marks!
I varied somewhat from the assembly order suggested in the instructions. I built the entire nose section first, leaving off the doors, gear, and other small parts. I completed the two tail sections together, also leaving off the doors, struts and wings for final assembly. I did have some trouble fitting the nose to the rear fuselage section, but gentle flexing of the parts did help. Once I was able to tweak and adjust the fit, the assembled fuselage was very solid. The tolerances of the kit parts were very close, and the problems I had were likely from poor planning and incomplete dry fitting. Overall, while the parts were complex, the seams and joins were mostly located in accessible places that are easy to clean up and smooth.
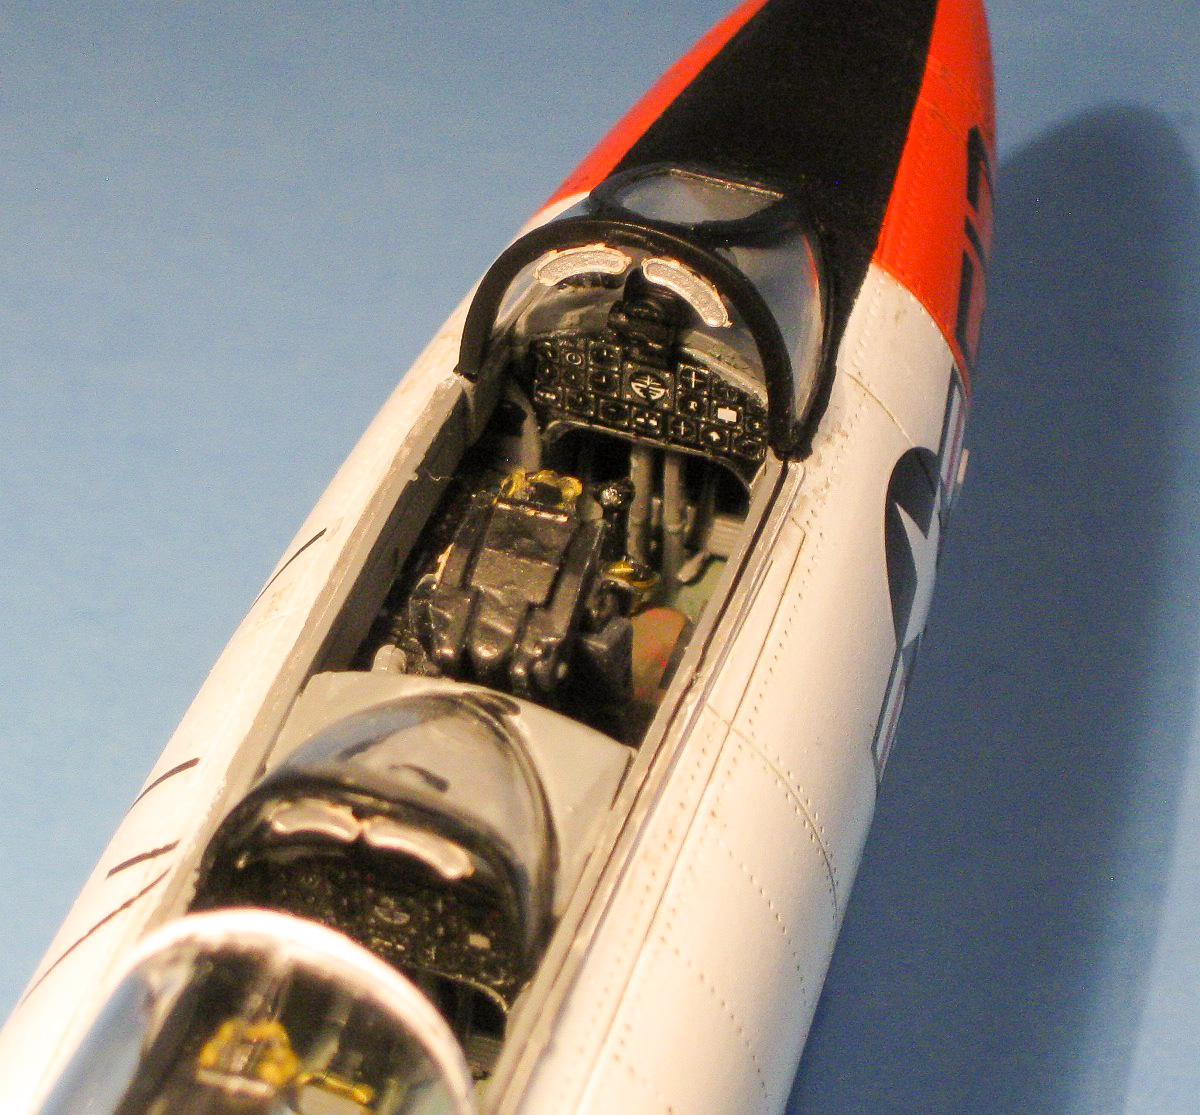
The nose section went together well. Two styles of ejection seats were provided, representing the early Grumman seat and the later Martin-Baker seat. I used the Martin-Baker seat, as that type was present in all examples of VT-10 aircraft I found. If the overhead ejection handles on the headrest are visible in photos, it is likely that the Martin Baker seat is present. The cockpit was not a simple tub; it had a few small assemblies. The cockpit walls (parts A33 and A8) provided a very solid joint with the fuselage halves. The photoetch instrument panels were very well etched with good details provided by decals. The ejector pin marks in the cockpit were completely covered up by the PE panels. Rudder pedals, oxygen hoses, and PE belts all contributed to a very nice presentation. The outside details were a bit too prominent, but those were easily sanded down. Oddly, there were no step hatches on the port side that matched the black guide lines. In photos, many of the VT-10 aircraft did not have a refueling probe, so I elected to trim off the probe and contour it into the nose shape. Reference photos suggest that the kit’s nose strut is too short.
A 5 g metal weight is included for holding the nose down. After the fuselage was assembled, I found the included nose weight was not heavy enough. I was able to spring the seam on the nose well enough to allow 7 g of #9 lead-shot pellets to be funneled in, followed by white glue to secure the pellets. Be sure to add enough weight beforehand so you can avoid the intravenous correction technique.
The two tail assemblies consisted of a broad wing root section and the empennage proper. The fit was very good on both subassemblies, but there were a few places to watch. Locator pins and holes were not always paired and the locator pins sometimes tended to be a little long. Be sure to lightly sand the locator tabs and clean out the receiving slots. The final fit was very secure and the tab joins made for a very solid seam. There were no intake structures, and the inside of the wing was visible through the intake openings. The wing fences fit into engraved channels in the wings, and the PE control surfaces fit into recessed openings.
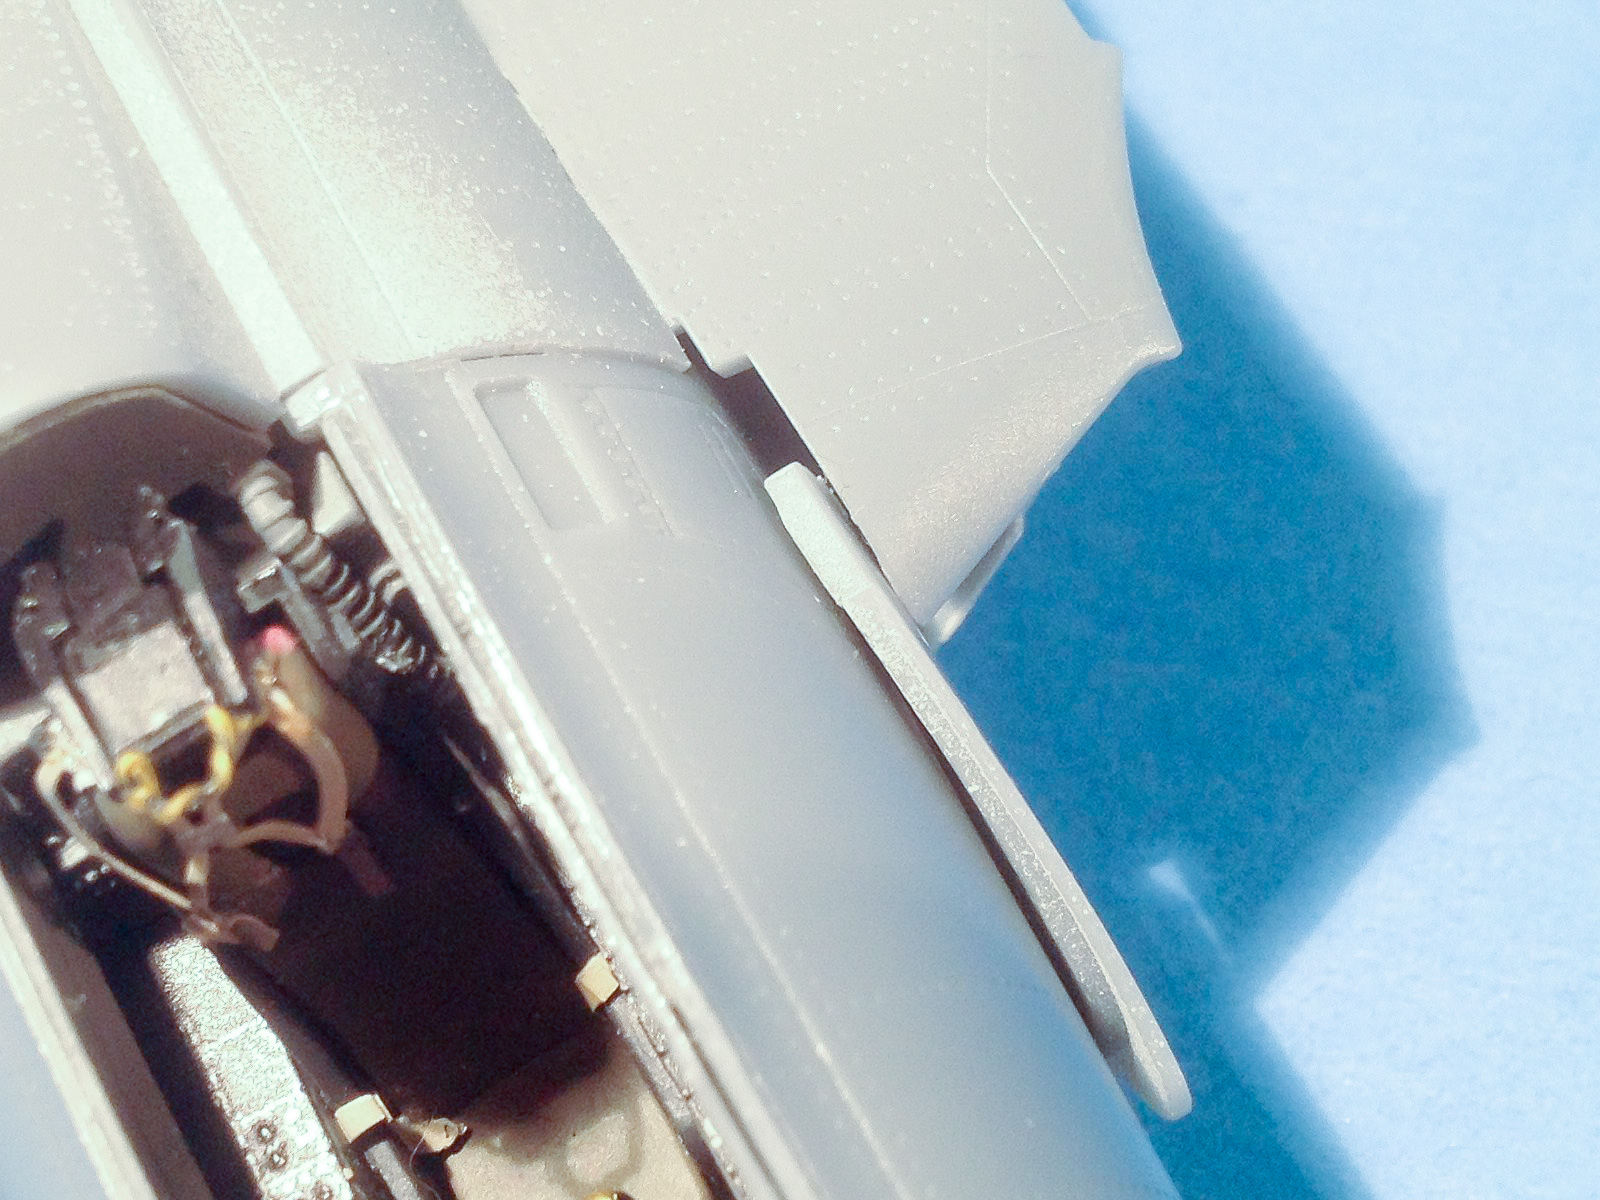
I had the most assembly trouble matching the nose to the assembled tail. This step was perhaps the most challenging part of the entire kit. The fit problems were solved with a little bit of flexing and twisting to get a good alignment. The attached photos show some of the fit issues that were solved by this careful flexing. I trimmed the locator pins from the splitter plates and slid the plates in, rather than gluing them to the nose as suggested in the instructions. This allowed more wiggle room.
The tab-and-slot construction was an excellent and well-engineered approach. The forward windscreen had small tabs that fit firmly into the fuselage. The same tab concept was applied in the folded wing configuration, making a very solid, yet flexible wing join. I set the folded wing angle to about six degrees outward, which looked close to photo references. Modifying parts to get the correct angle was a simple fix.
I did not find any pitot tubes or similar parts on the sprues. I did not add aftermarket or scratch-built pitots for this review, but the wing and ventral pitot tube locations will allow an easy retrofit later. The kit’s sliding canopy was not permanently attached, as it sat firmly in place with no need for glue.
My overall impression of the final assembly was very good. Many of the negatives were from poor test fitting and planning on my part. On the positive side, the sprue attachment points were mainly in seam or joint areas on the part. The attachment points were thick in some cases, providing good part support, but were best sawn off. Sinkholes were rare, ejector marks were mainly in hidden areas, and surface engraving was sharp. The plastic seemed a little softer than most, but presented no problems.
Finishing
I used a combination of Tamiya, Model Master, and Vallejo acrylics for the main colors. I weathered the model slightly with diluted brown poster paint, wiped off after drying. KittyHawk’s paint callouts indicated red hydraulics in some places. I believe this suggestion was based on research of the F9F on display at the National Naval Aviation Museum. The beautifully restored Cougar has red locking sleeves on the hydraulics to provide some protection from pressure-loss gear collapse. The kit decals went on without any trouble at all, responding well to Microscale solutions.
Available Aftermarket Upgrades
Scale Aircraft Conversions offers a landing gear correction set (Link to IPMS Review) and Steel Beach recently released a brace and intake FOD plug set for the rear fuselage. Furball Aero-Design, in collaboration with Detail & Scale, has released two decal sheets of trainer versions and one Blue Angels sheet for this kit.
Conclusion
I highly recommend this Cougar. My overall experience with the kit was excellent, and I am very pleased with the result! This is definitely a kit for experienced modelers and requires some care and patience, but you’ll be rewarded, as I have, with a USN jet that is a real eye-catcher.
Thank you again to the wonderful folks at KittyHawk Model for providing IPMS/USA with this review kit. I value your support of the scale modeling community. Thank you also to the Reviewers’ Corps for providing me with opportunities to build exciting new kits like this one!

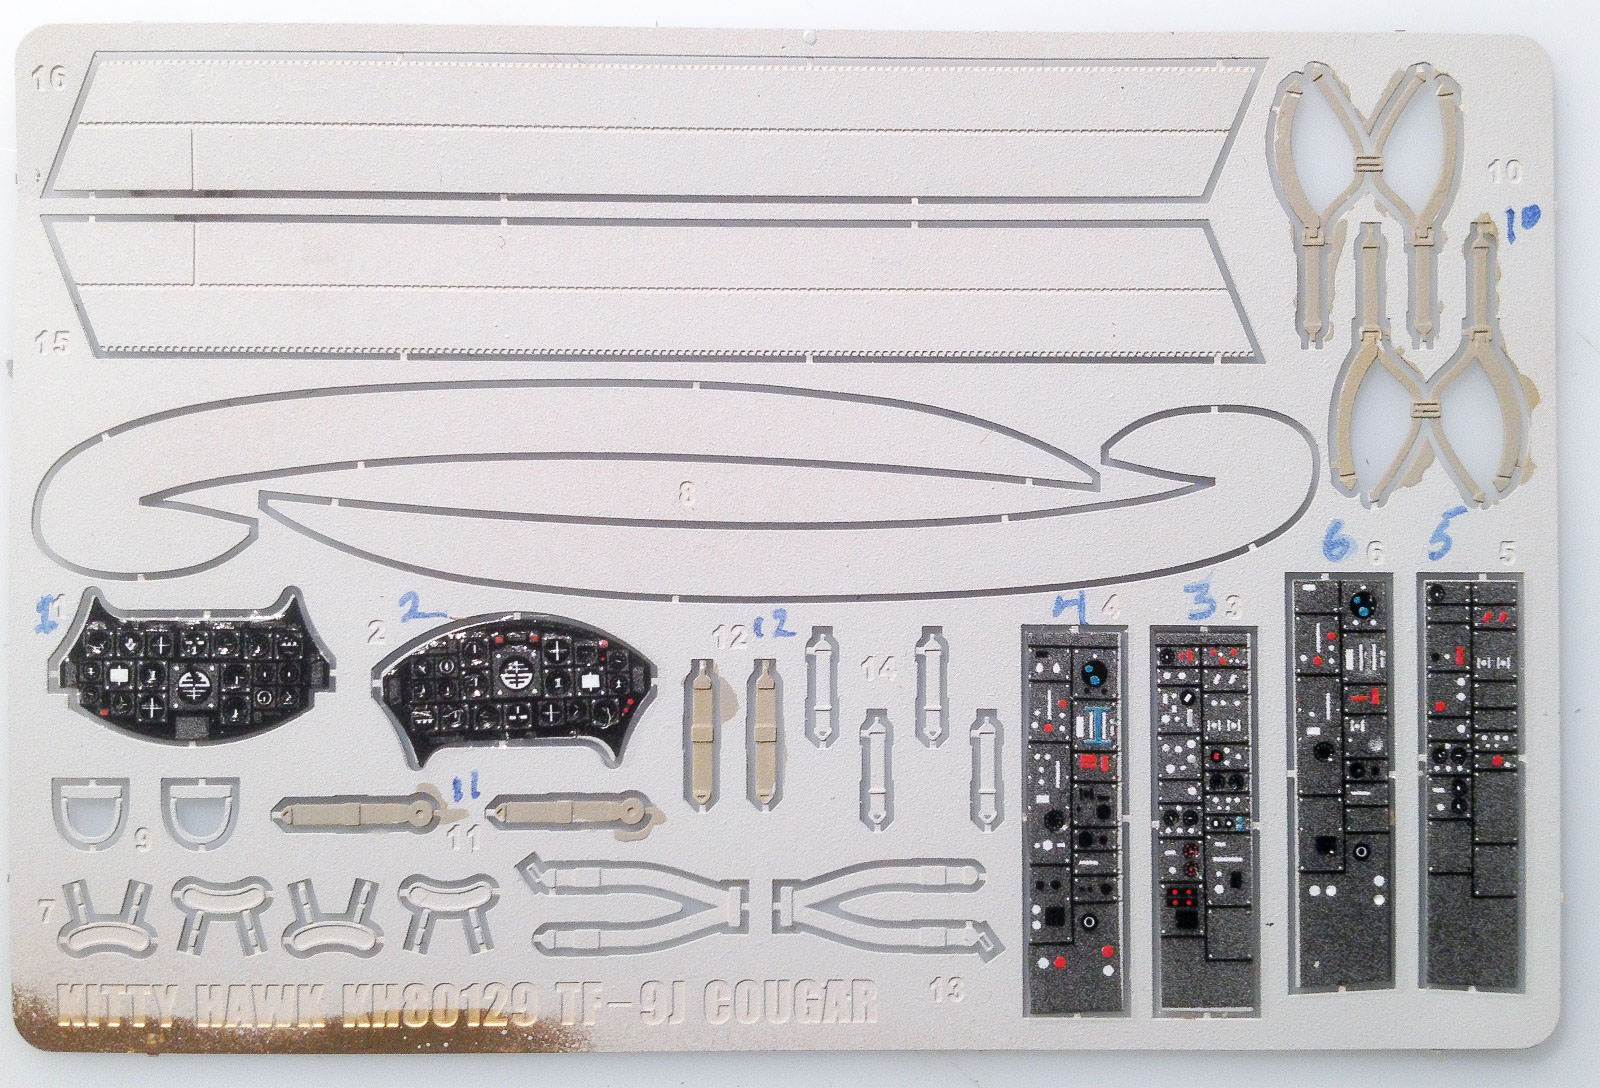
Photoetch Fret
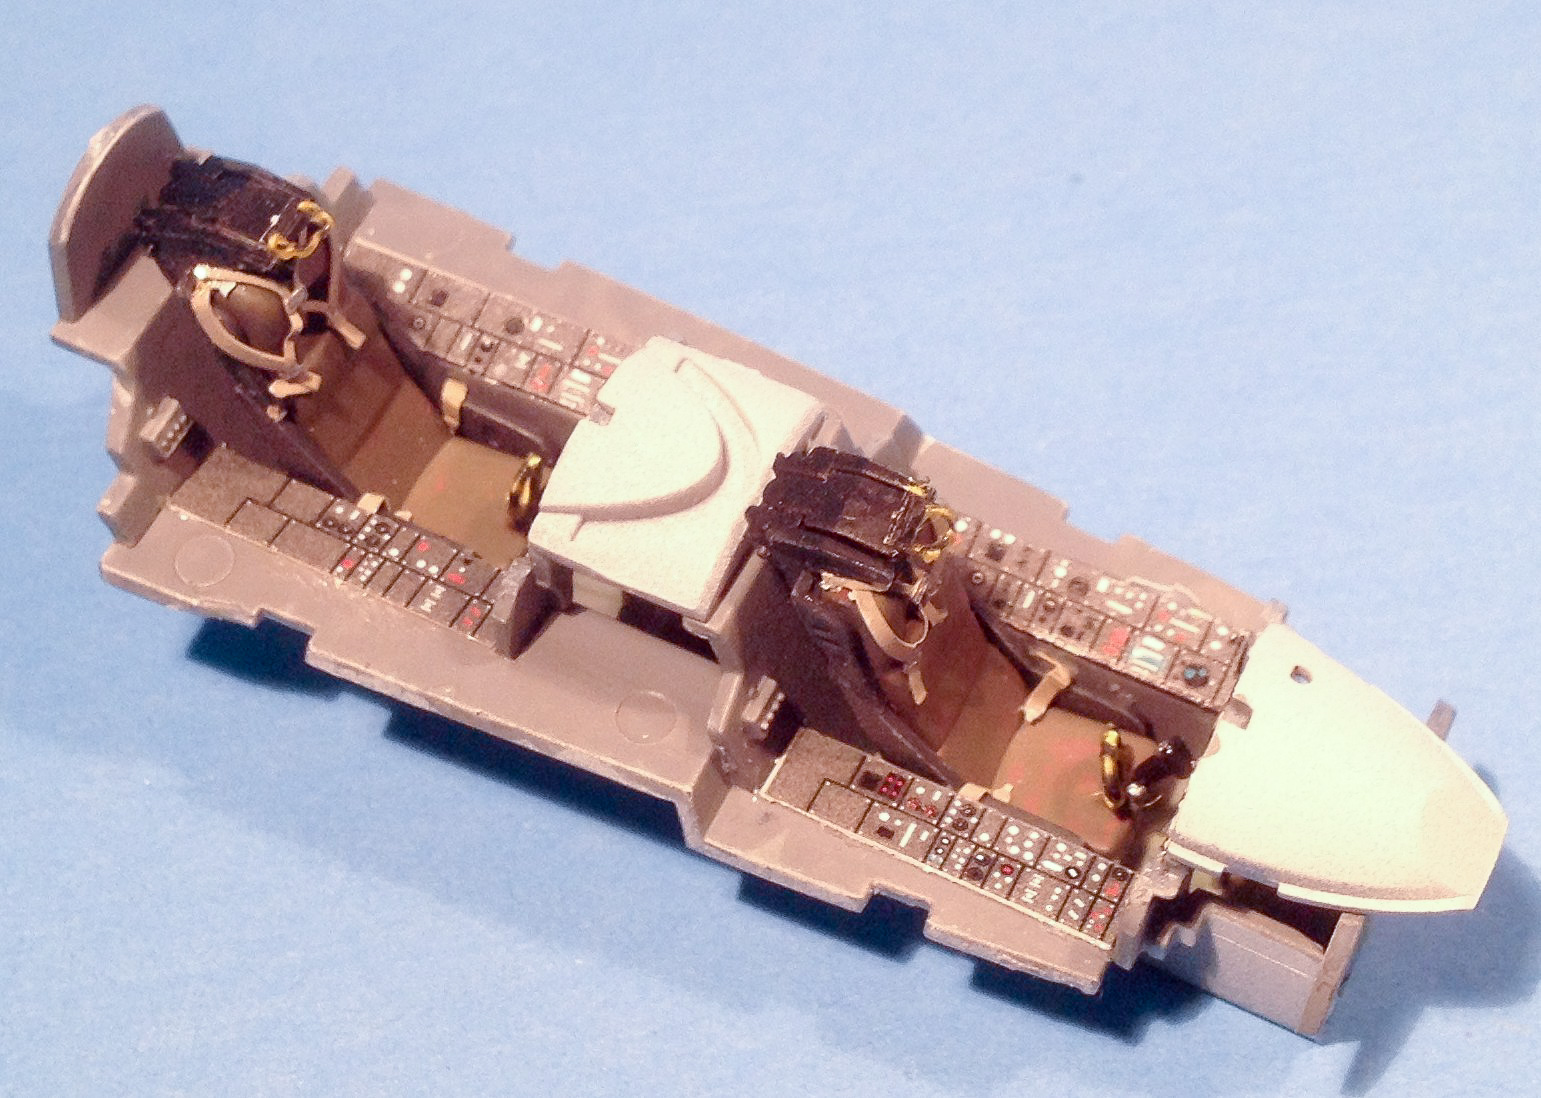
Cockpit Detail - Top View
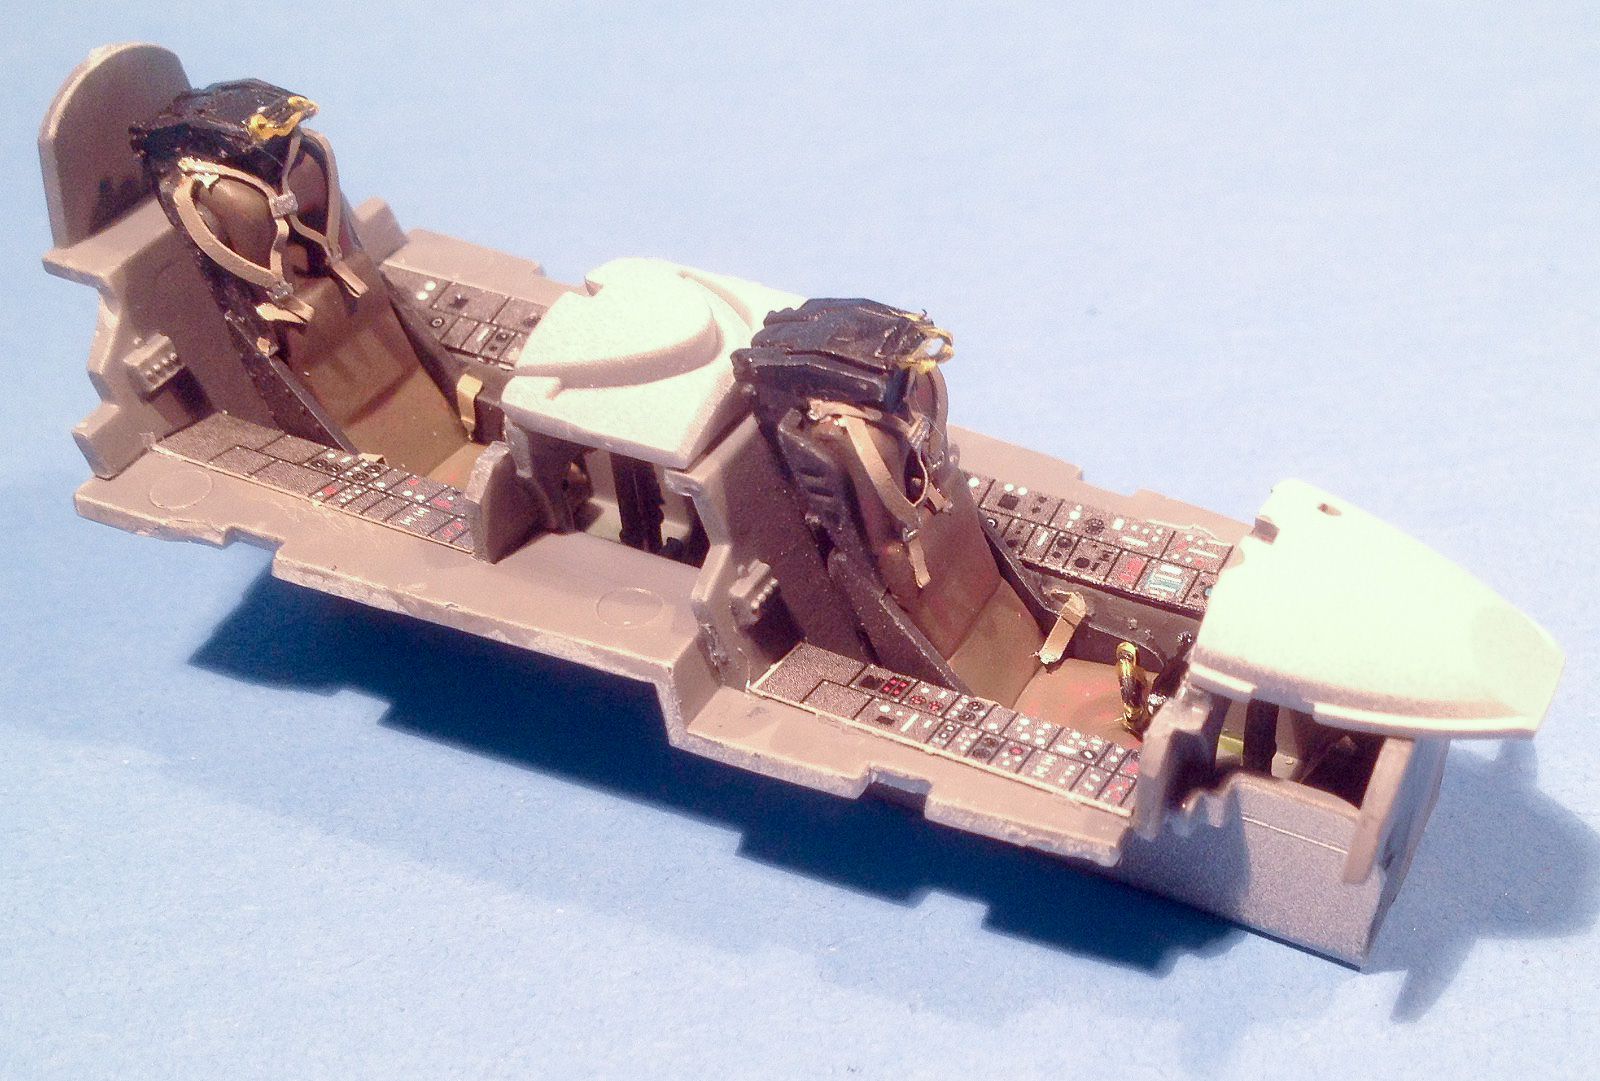
Cockpit Detail - Side View
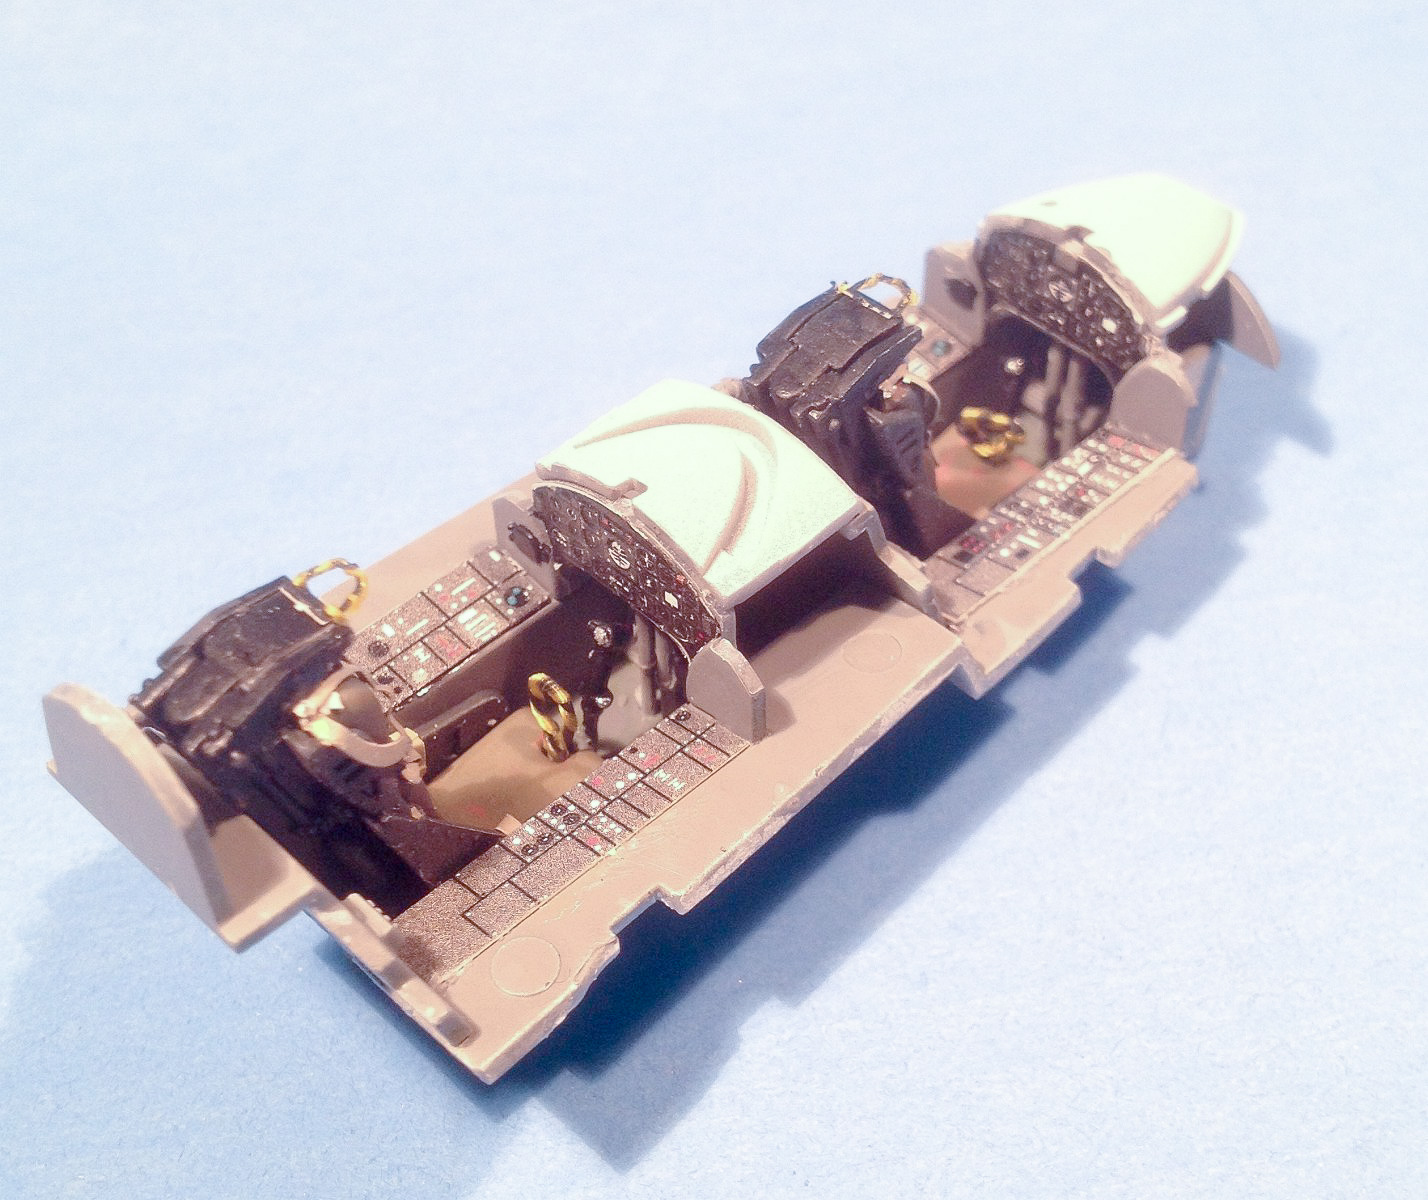
Cockpit Detail - Rear View
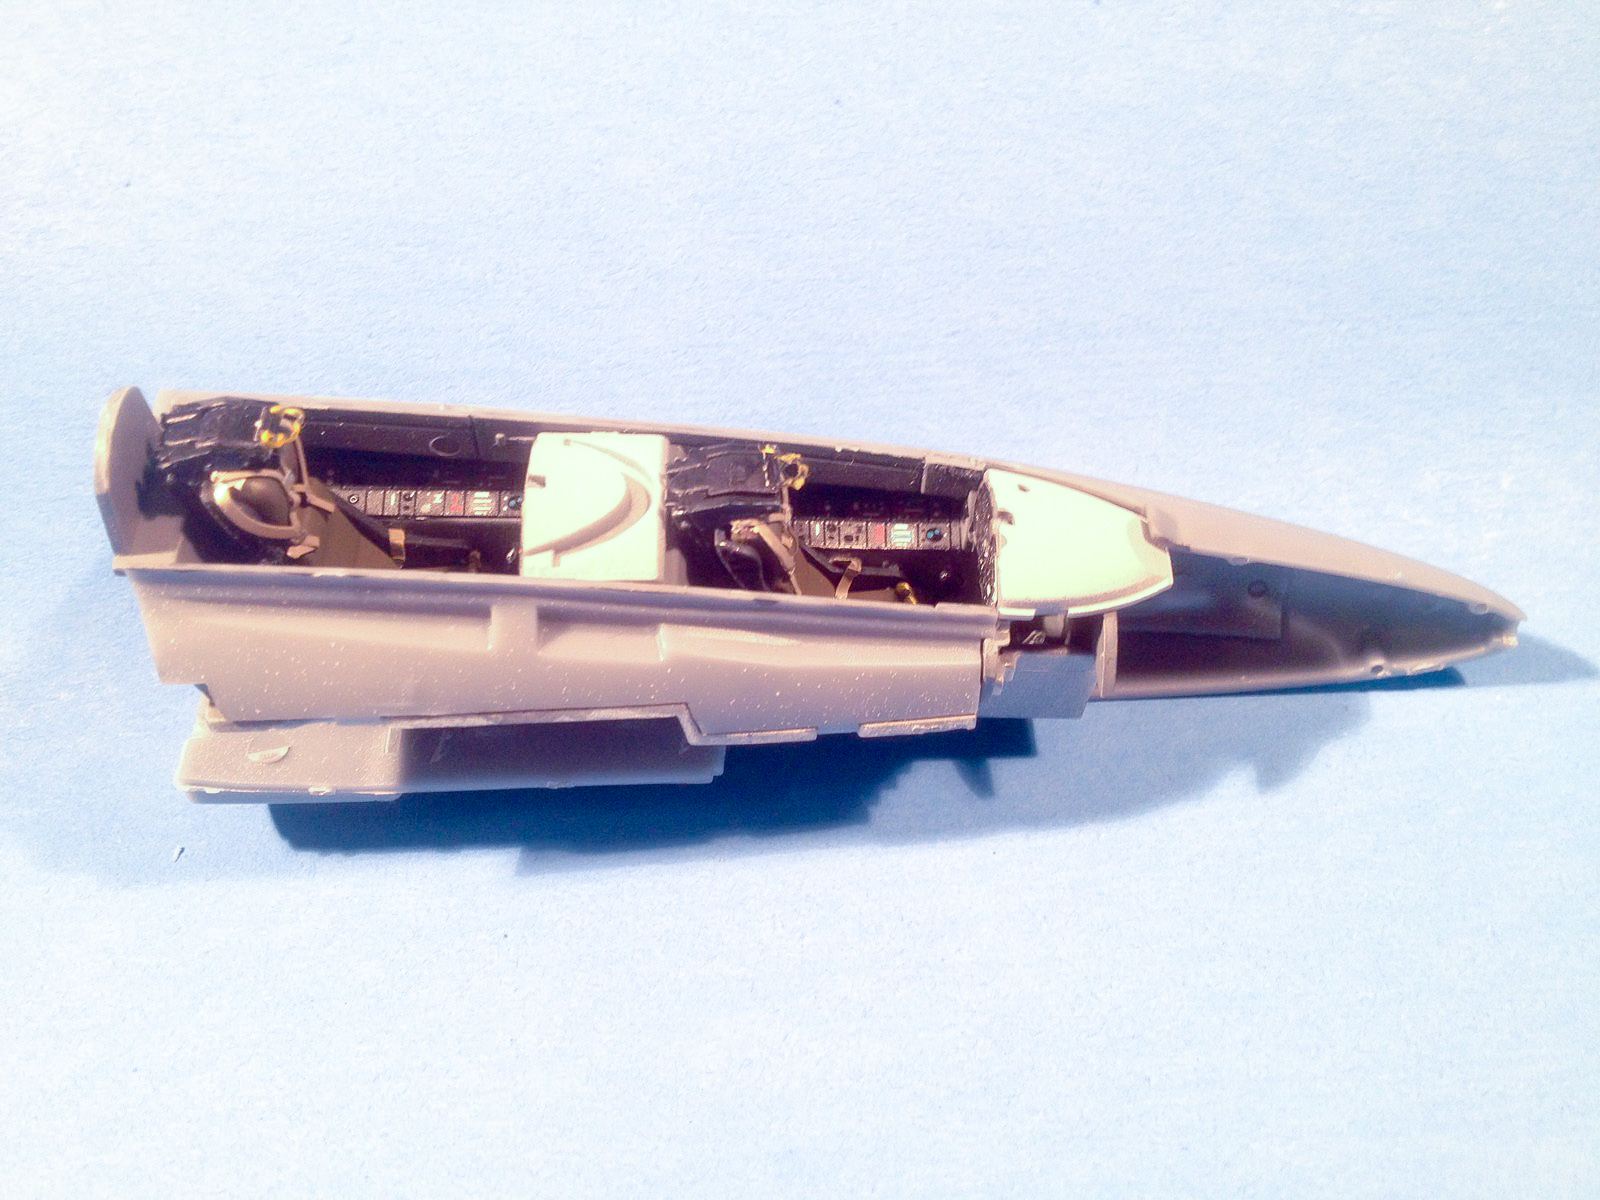
Cockpit Installed
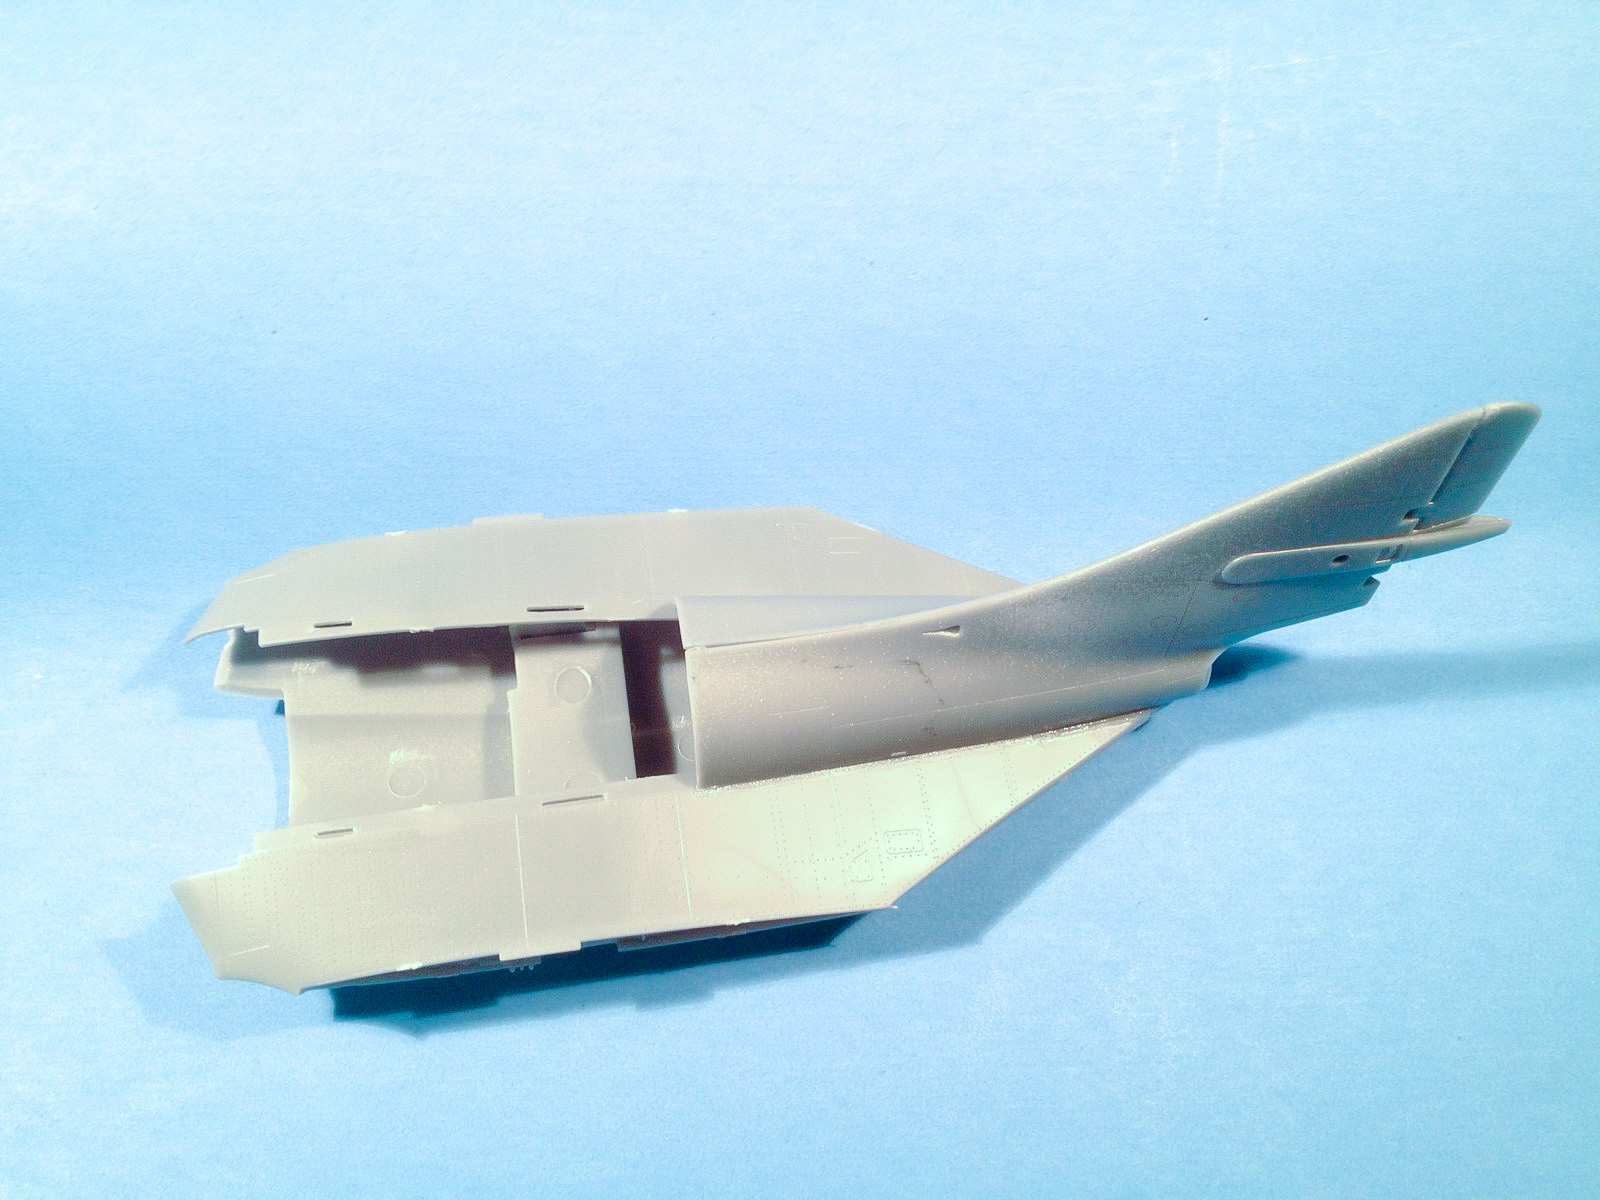
Mid-Section Subassembly

Nose to Fuselage Fit Issue
Intake Splitter Plate Installation - Top
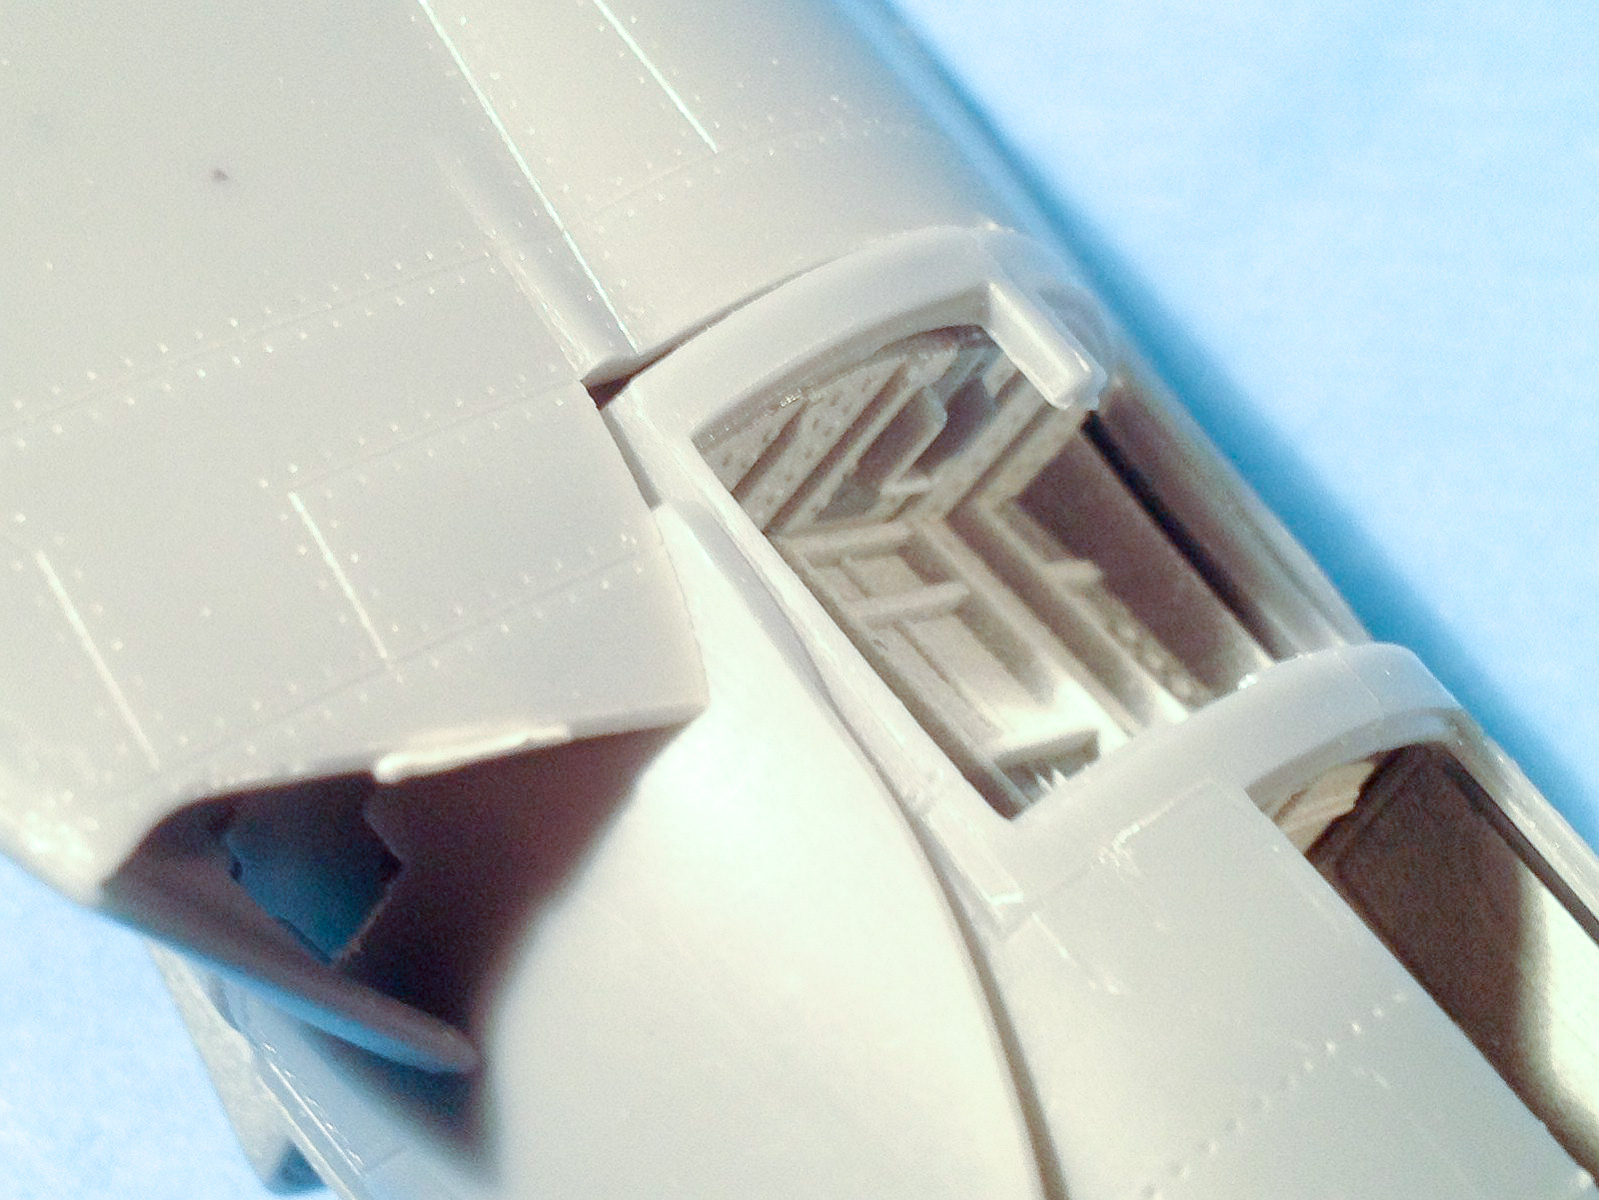
Intake Splitter Plate Installation - Bottom

Intake Splitter Plate Hiding Nose Fit Issue
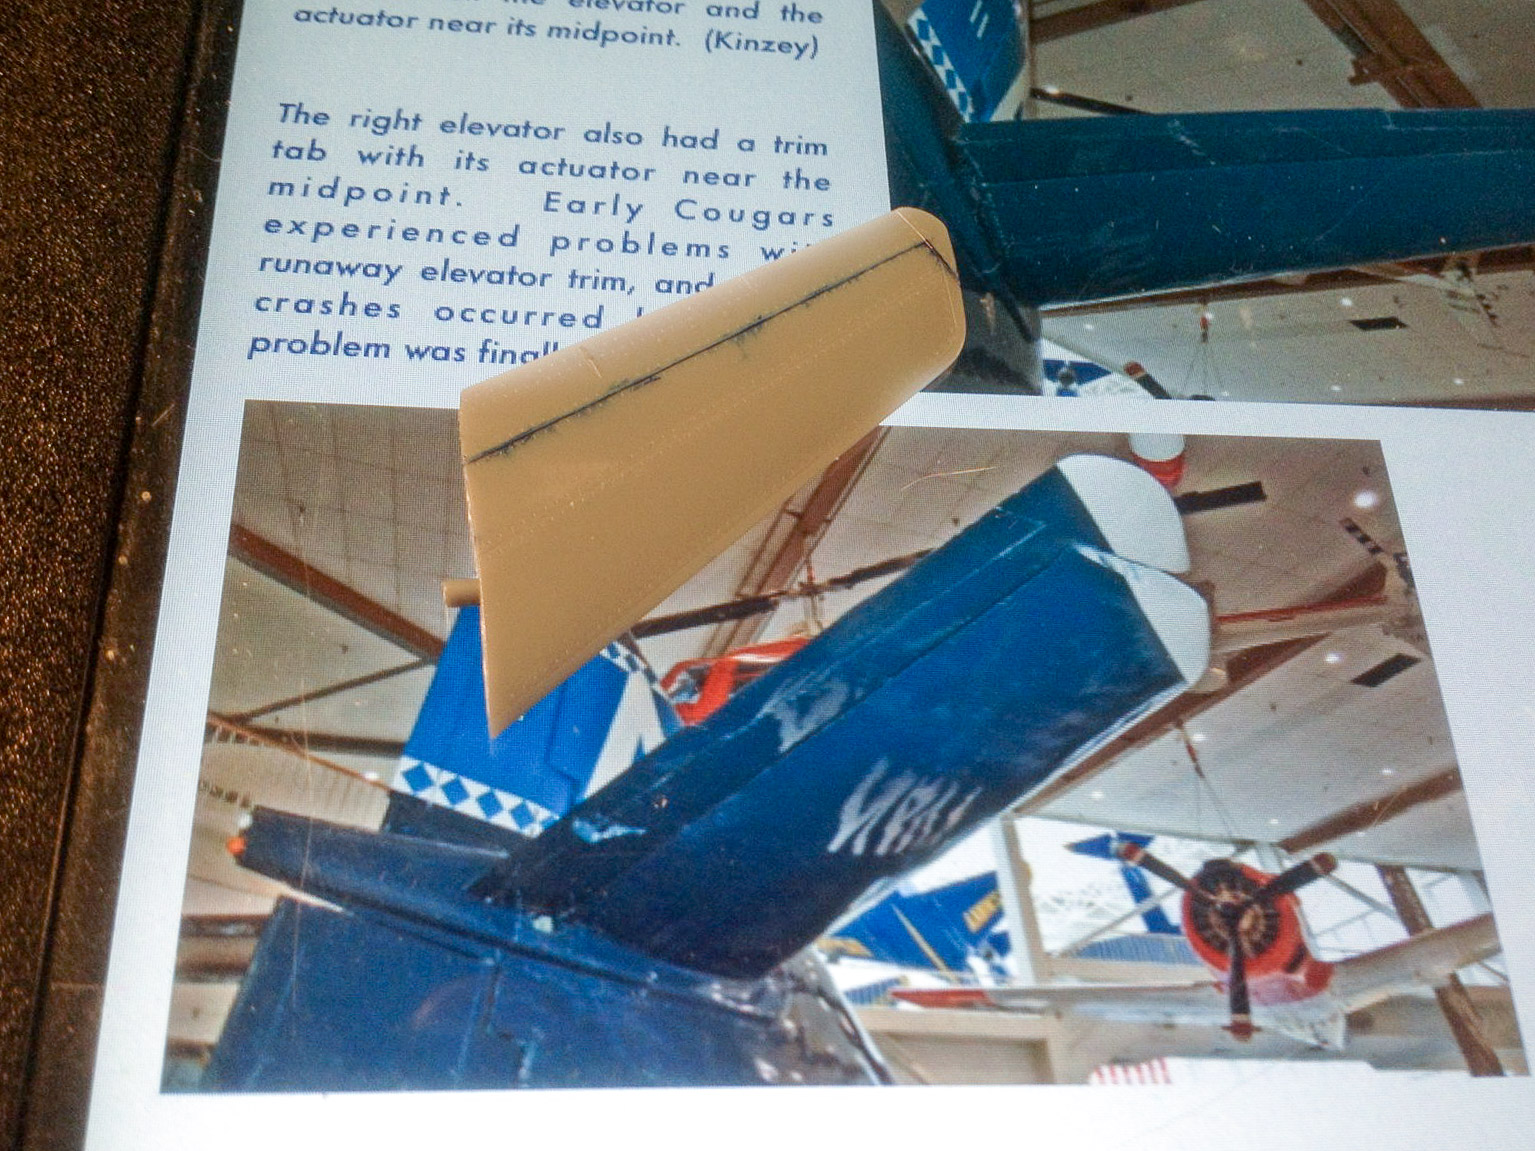
Recommended Elevator Improvement
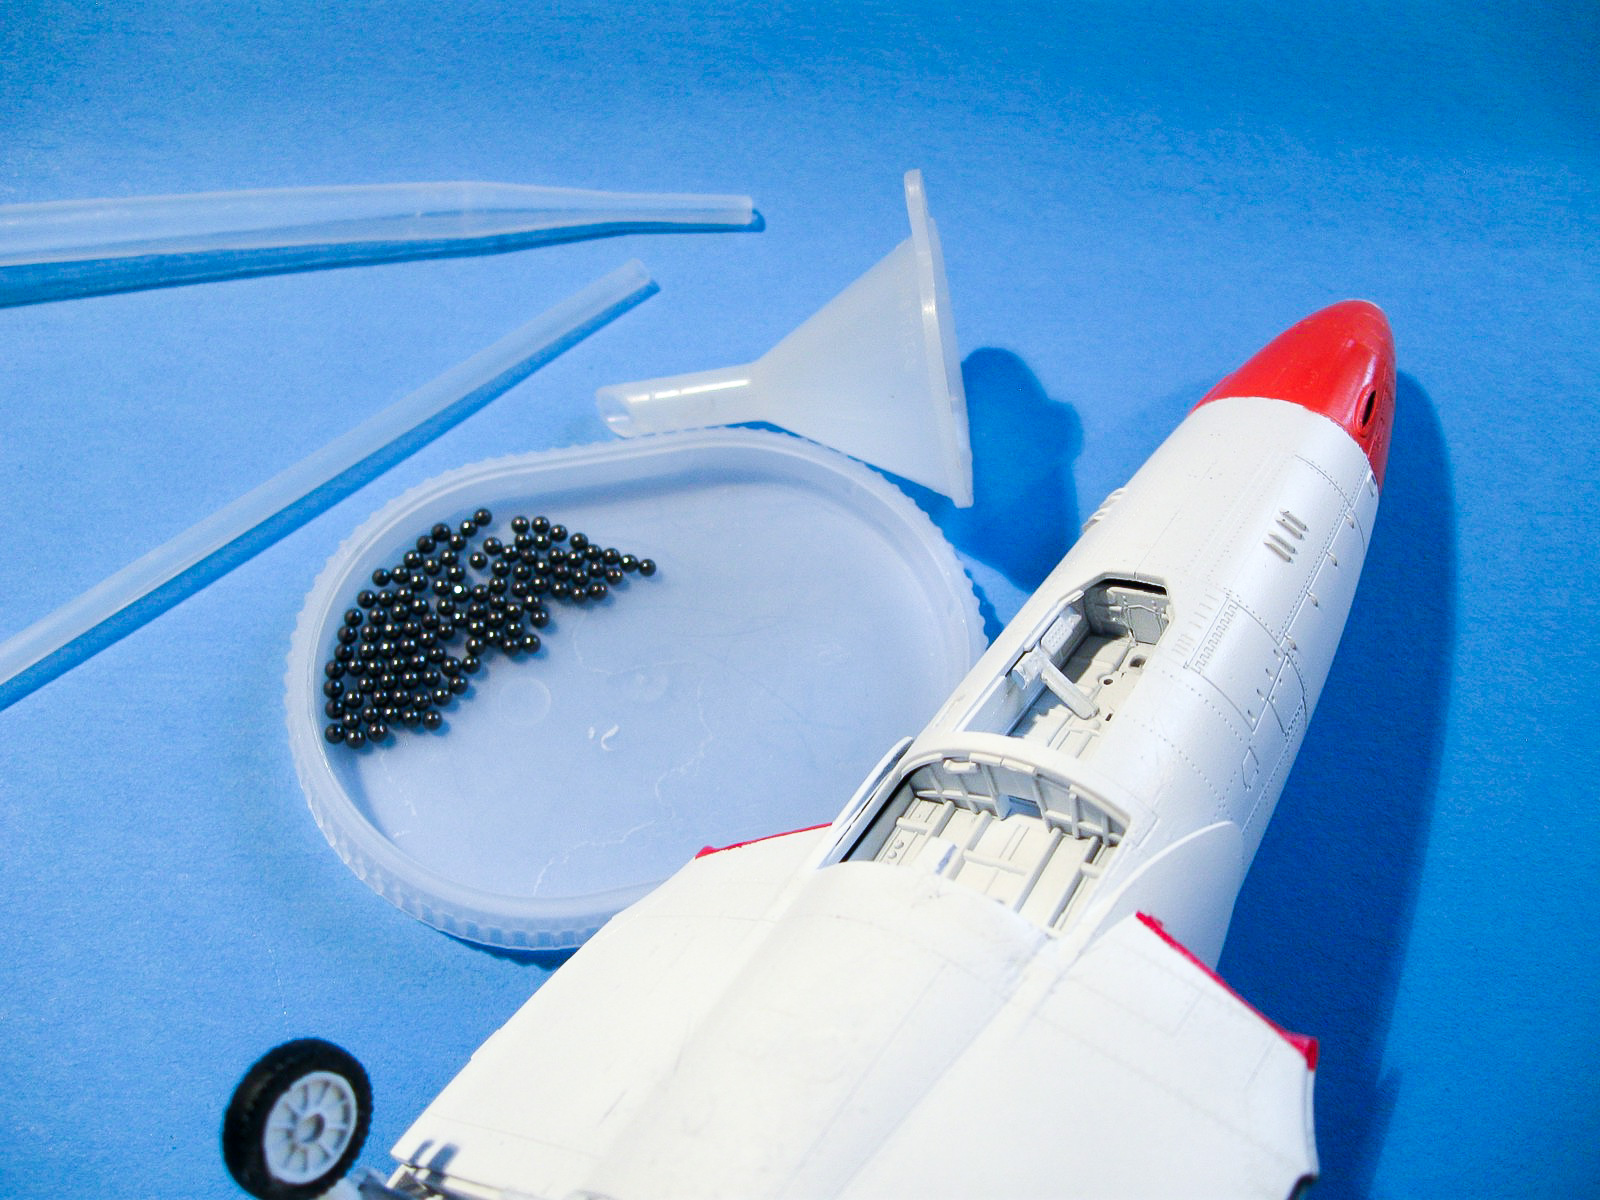
Additional Lead-Shot Nose Weight to Correct Tail Sitting
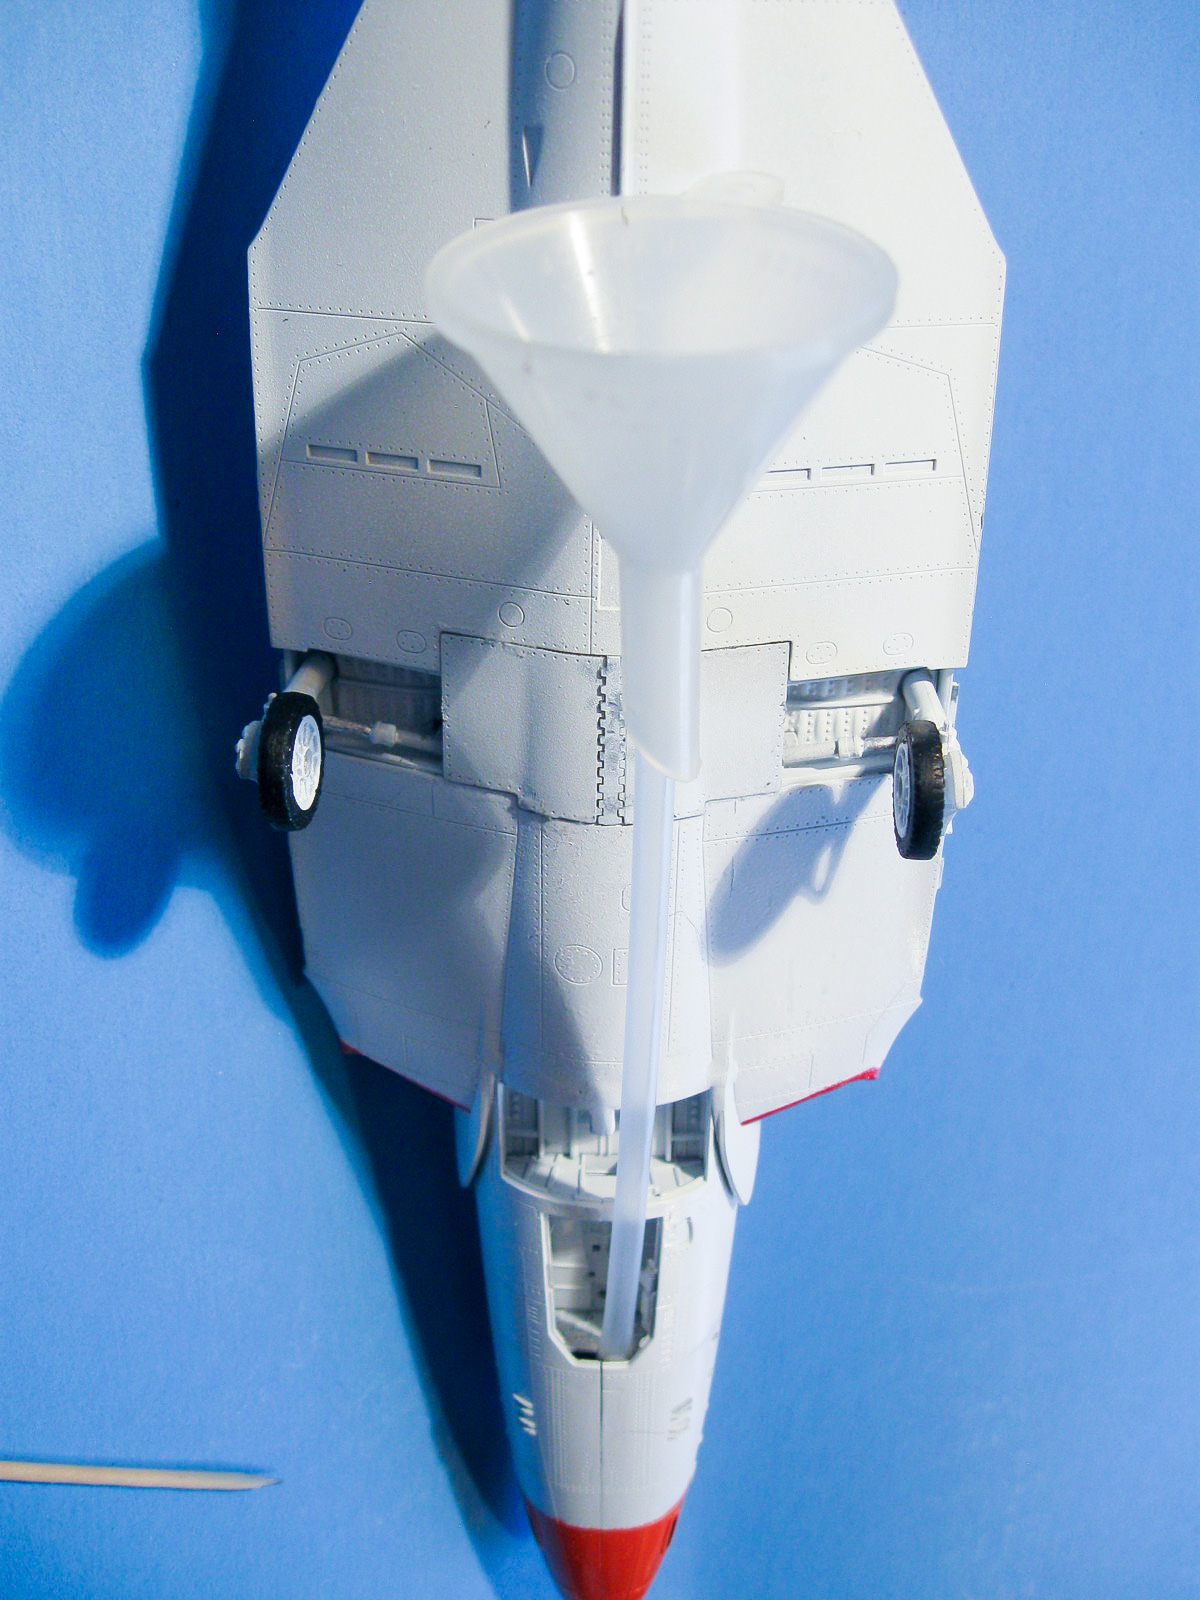
IV Tubing and Funnel Used to Insert Additional Nose Weight
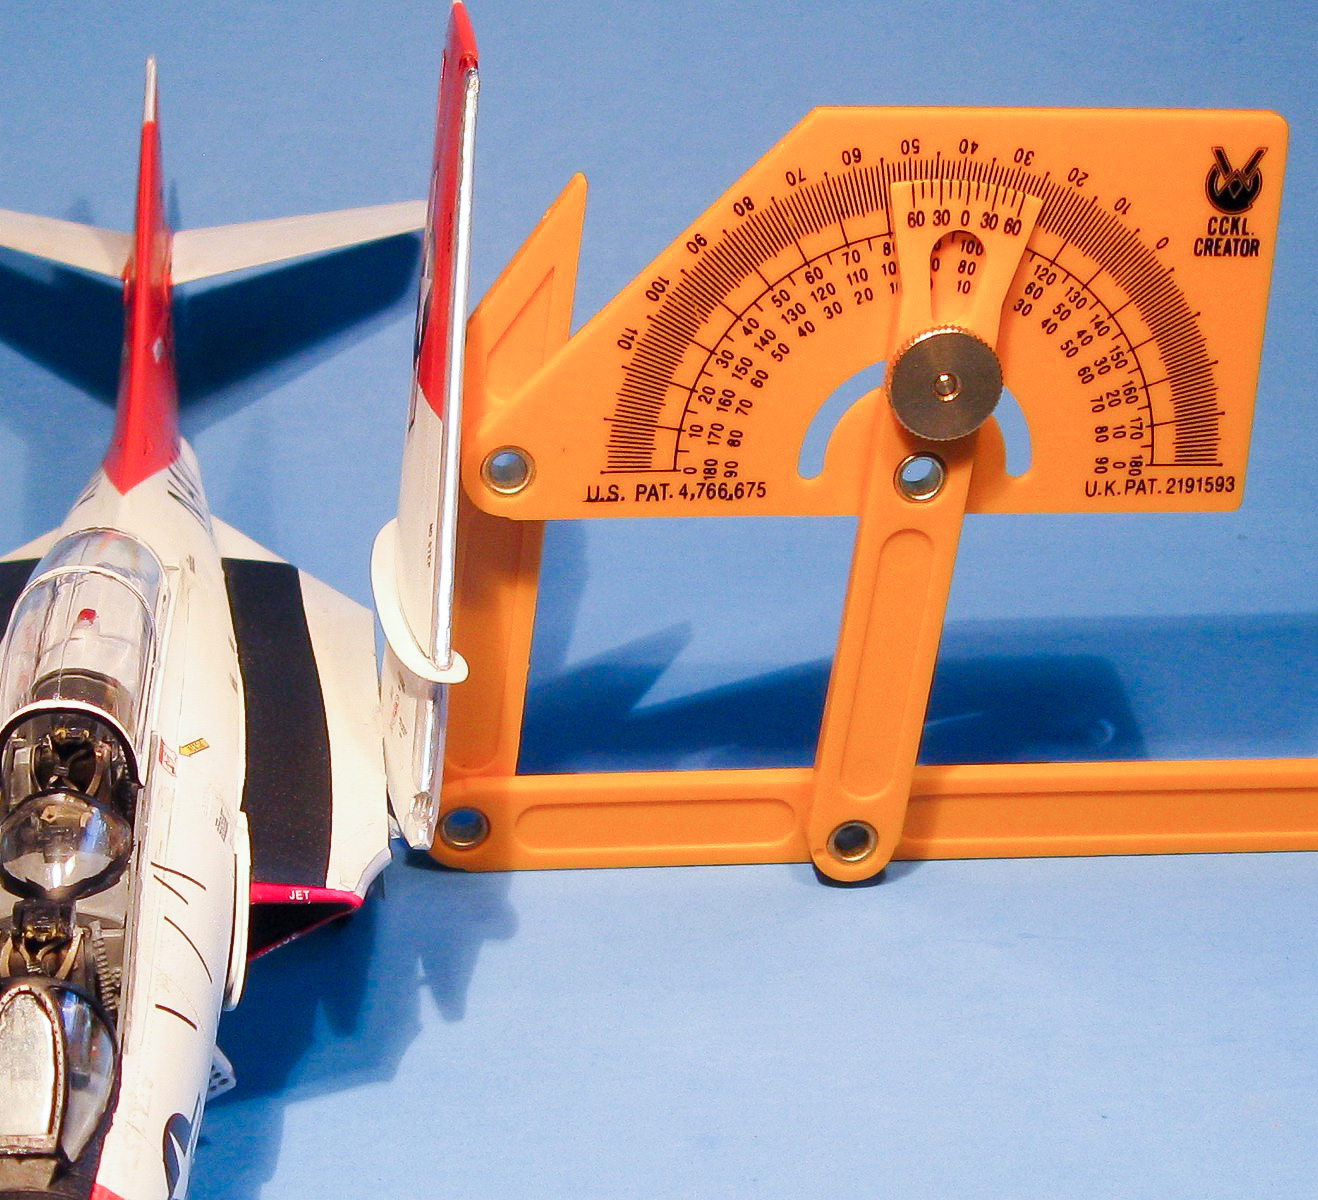
Wing-Fold Angle Set
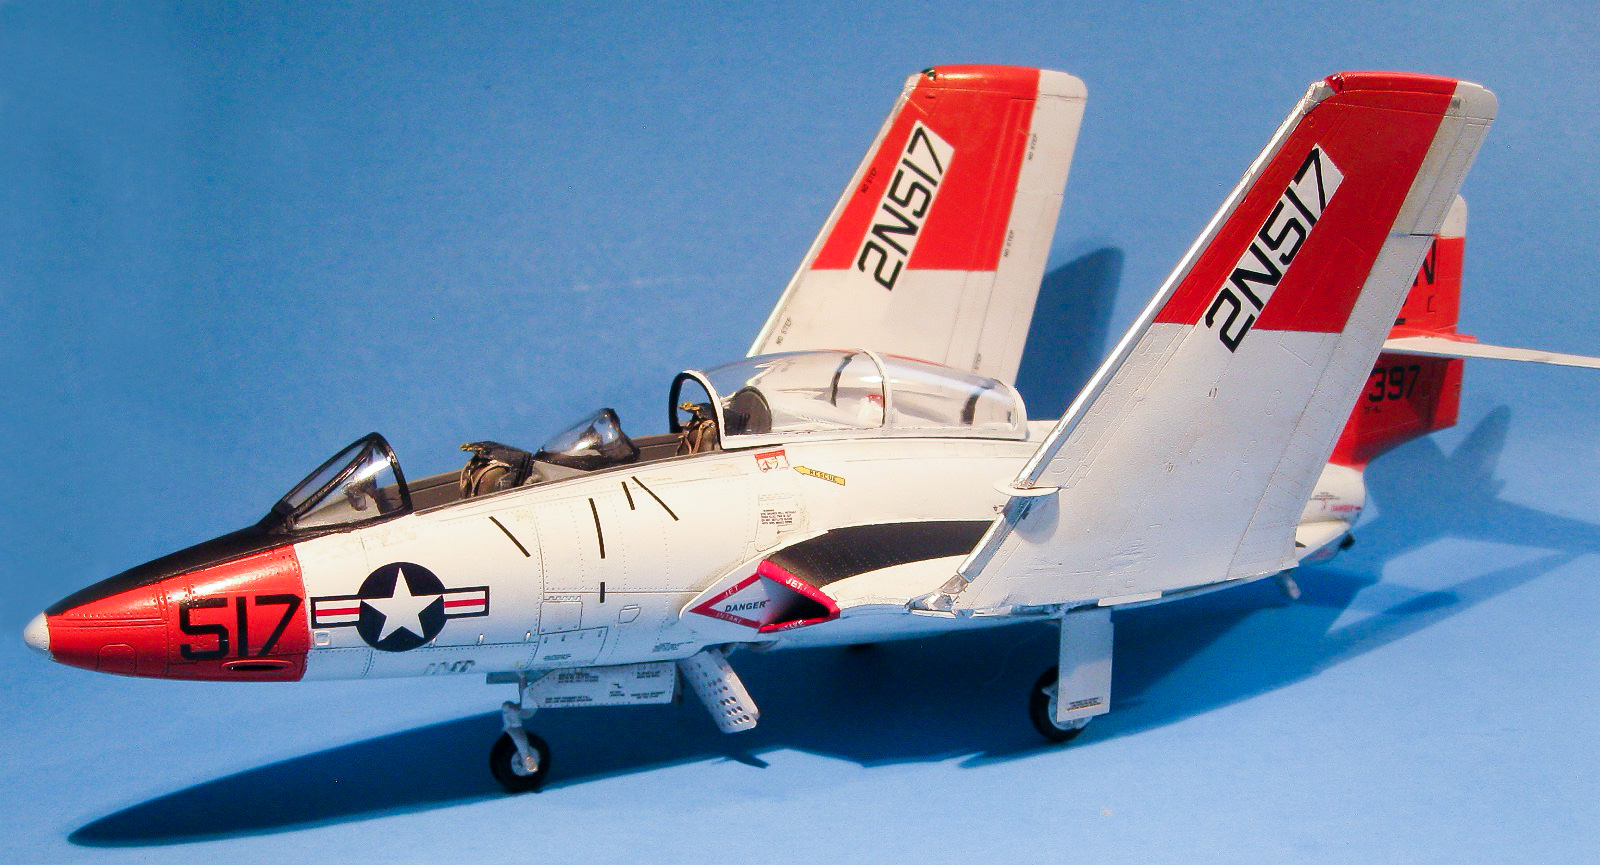
Finished Model - Left Side
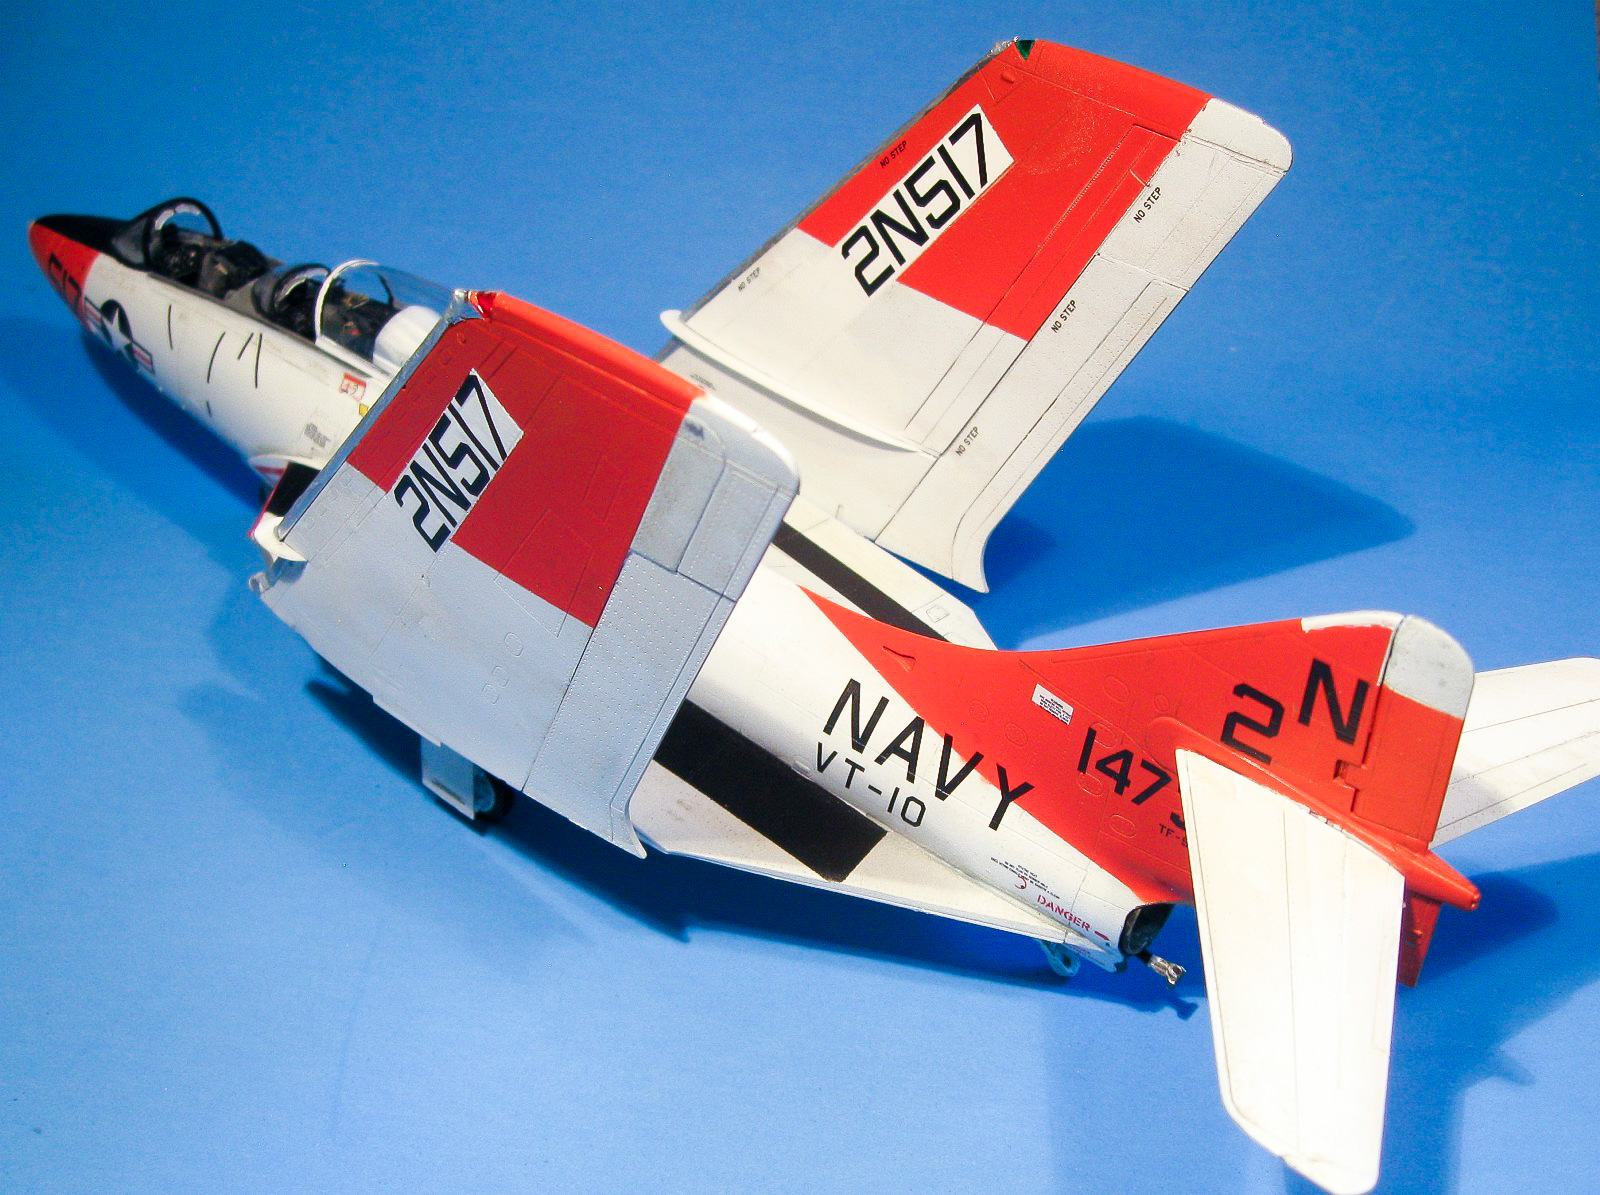
Finished Model - Left Rear
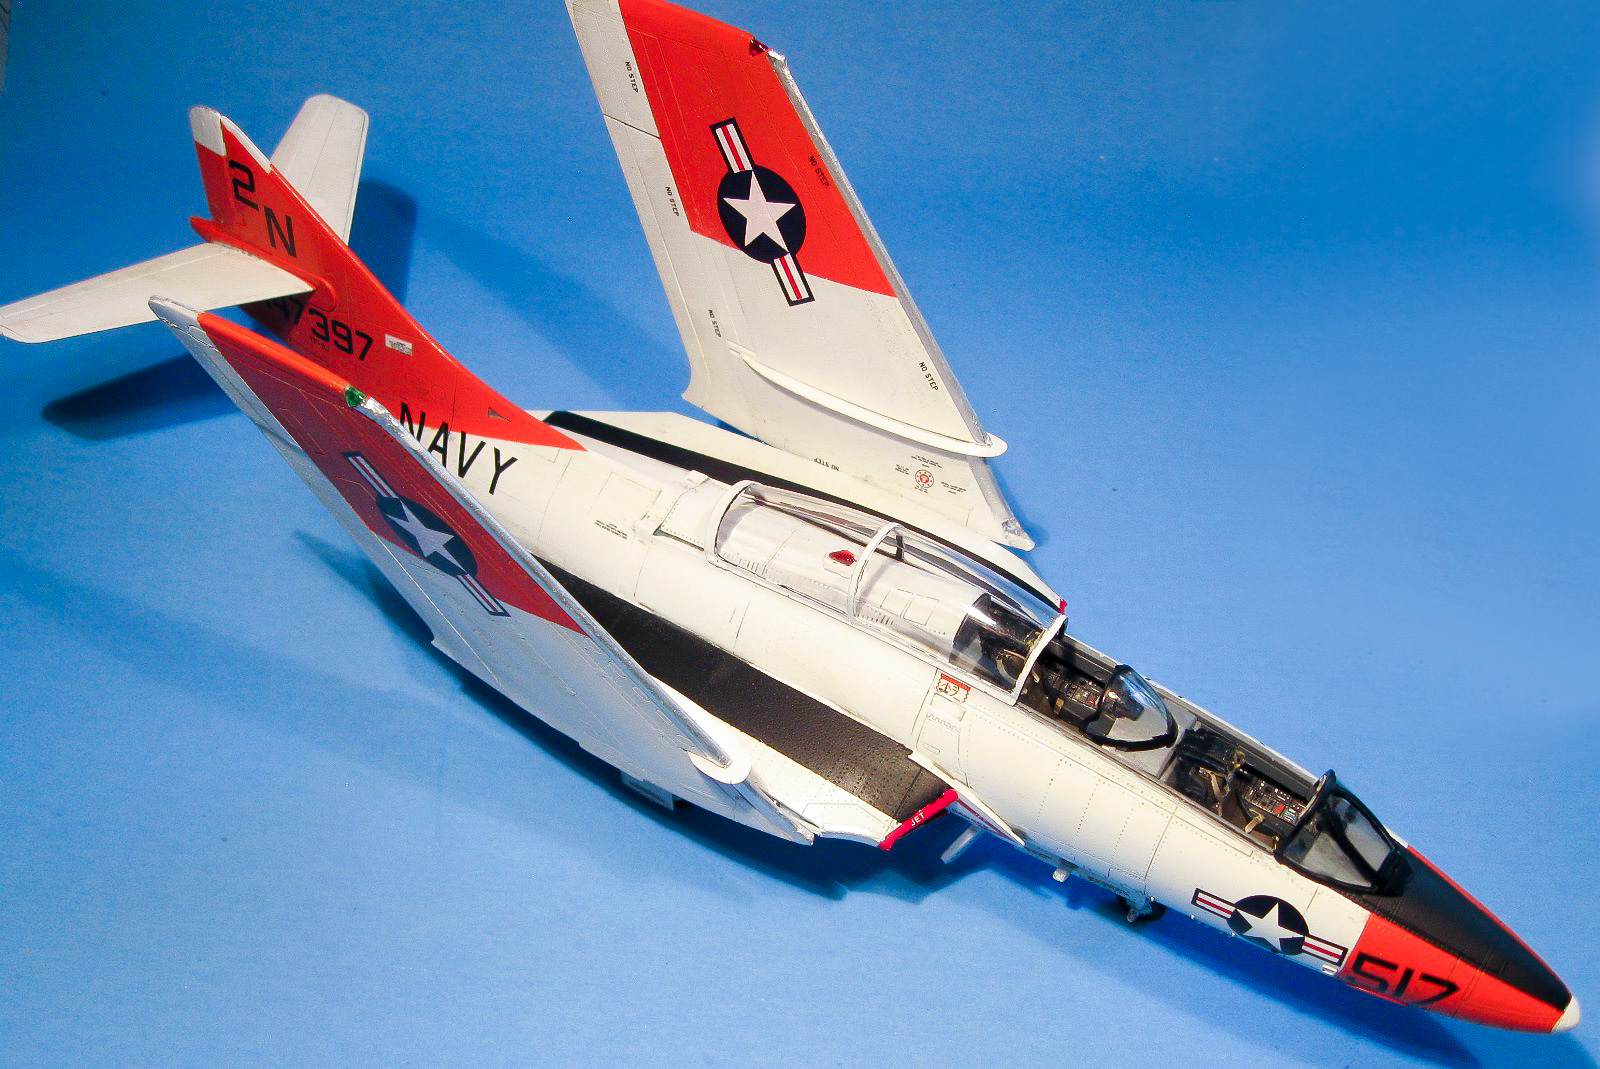
Finished Model - Right Front

Finished Model - Nose Closeup
Comments
Add new comment
This site is protected by reCAPTCHA and the Google Privacy Policy and Terms of Service apply.
Similar Reviews