
Sukhoi Su-25 Frogfoot A
First comment
Thanks to Stevens once again for providing yet another superlative Trumpeter kit for IPMS to review. The best we can do for appreciation is to buy kits they offer; and this one is worth every dime! I’ll go on record as saying this was the best Trumpeter kit I’ve built.
On the porch
“Hey, that’s a big box”. It’s also a heavy box. Postman is rolling around on the lawn in pain kind of heavy. I go out and do a clean-and-jerk lift…. And it’s off to the workbench!
First impression
Open the top-opening box and revel in the plastic manufacturer’s art at its finest. The fuselage halves are separately packed and fit almost in a “click together “manner. Bags and bags full of parts await the next level; airframe, landing gear, and eventually you find yourself face to face with ordinance; lots of it. I would say it’s at least half the kit. Every basic weapon load which the Frogfoot could carry is here, in the box; 22 munitions types, 6 types of launch rails, and MER’s... Except for one thing; the furthest outboard underwing pylons. I understand Zactoman (look him up on the net), the consummate manufacturer of correcting both minor (and sometimes major) flaws on 1/32 Soviet aircraft kits, is working some up. I’ll wait! The remainder of the box contains metal landing gear, rubber tires, flawless clear parts, and several fragile bits packed in foam inside the plastic bags. Two HUGE decal sheets, one for the aircraft marking options, one for the munitions, and addendum sheets with unit markings and “pretty young lady sitting in flowers in a field “ nose art. Two full-color diagrams with paint callouts; all stuffed into this suitcase size box.
On to the rest of the kit
Cockpit assembly is easy; the decals look almost like a certain manufacturer’s PE instrument panels when complete. I only had one decal for the interior that would not behave; it curled up and ended up being a ball, and that was the port side where all the switches are located. I ended up removing it, painting, and doing some careful detail brushwork here, so it is ok to my eye. The K-36 Ejection seat is excellent straight out of the box; and the PE harnesses look like they belong there, so no extras to buy here. All in all, no fictional cockpit; someone did their homework, including the trademark throttle quadrant that slides on rails.
There is provision to leave several panels open on the model; both sides of the nose avionics section have alternate ‘really detailed interior and exterior” panels for those who leave them off, and regular “fit into place closed” panels otherwise. The black boxes are generic and I have no detail shots of that area, so I left them out. Instead, I put a couple of fishing sinkers in the nose to help keep the “tail-sitter” option away. I used about 2 oz. of lead and the “that feels about right” balance between the fingers method of checking if it was enough.
The cannon assembly was built up and installed into the nose; if you intend to close the panels as I did, you will need to leave off the recoil buffers, as they interfere with the door fitting flush.
These doors fit perfectly; I noted these access doors and the under fuselage engine access panels are almost paper thin and extremely well detailed; shades of Tamiya’s Spitfire cowls, they even cement into place with no filler. The gun gas vents are hyper-delicate and fit the overall presentation nicely.
The Laser seeker at the extreme forward nose assembly has no details inside; I used one of the seeker heads from an unused missile attached to a length of sprue to represent the targeting designator. Probably inaccurate, but it looks cool behind the clear sighting window.
The fuselage closed up nicely; then it was on to the engine “pods”. I assembled the intake trunking first, and tried the latex paint seamless intake method. It was messy but worked…
I then constructed the engines, and decided to leave one accessible for review purposes.
That meant I spent an evening detailing out the engine controls and accessory drive section; once all was complete, both engines were installed in the pods, and offered up to the fuselage. Exhaust turbines are well detailed…The wheel wells were also constructed at this time.
Fit throughout is superlative!
The wings were assembled, and the choice of up/down flaps is to be made. Be forewarned; the leading edge slats and main flaps are not designed to be installed in the retracted position. They look cool down, and are extremely robust. Stabilizer and fin assemblies are simple multiple-piece affairs which fit into place with no problem or fuss. You want to show them deflected, they will be. Nice, tight fit, too.
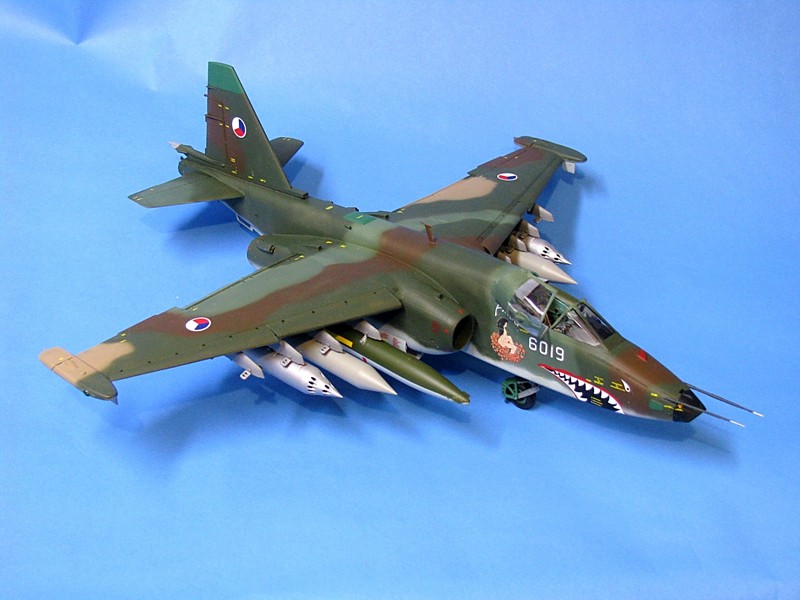
I opted to do the Czech Frogfoot with the nose art; it was a cool scheme and had visual interest.
Underside colors were Tamiya German light blue (RLM 76 close match) from a rattle can, Testors “Fabric tan” lacquer for the light tan, and a mix almost the same as SAC light Green as seen on Vietnam B-52’s for the lighter green. I mixed up some chocolate brown for the countershade camo, and finished off with Aeromaster RLM 72 for the final dark green shade. I also sacrificed some of my Aeromaster Russian Radome Green for the fin tip and dielectric panels on the nose.
Glosscoat and decals next; I only had one problem and that was the white Bort “# on the starboard forward fuselage. It folded up on itself, and balled into a glue mess when I tried to straighten it under warm water. Since this was the second decal to do this, BE CAREFUL, because the decals are excellent and adhere very well, particularly to themselves. I used most of the stencils, and only required a bit of MicroSol for a few places. The rest of the decals snuggled down nicely. Time to dullcoat and install the landing gear.
I used the metal gear because a model that weighs as much as this one does will splay the gear out over time if you used pure plastic parts. The wheels were painted more Aeromaster green, and when dry the rubber tires were installed. (I don’t believe these are vinyl; the feel, smell and non-reactive with styrene nature point to them being real rubber). Everything fit very well; I did a basic attempt at making brake lines from jewelry wire and some aluminum adhesive tape for retention bands, and later found the details were off… but the basic model has what is necessary and I wasn’t going to superdetail this time around. Normally the forward main gear doors are closed on the ground but I left them open to show wheel well details.
Little bits finish up; navigation lights, taxi lights, and basic canopy frame are all there. The armor plate that fits over the ejection seat is not forgotten! Boarding ladder, a few antennas, and last: The air data probes on the nose. These are later versions without the vanes on them. I’ll break them off eventually, but it’s either that or stab yourself or a viewer in the eye with needles. Not this time. The boarding ladder is also an interesting touch.
External stores
I opted for a medium load; two external fuel tanks, two KMGU-2 Cluster bomb dispensers, and two UB-8MI rocket launcher pods. Just assemble, prime, and paint. Decals are available in the kit; I did not use them on the CBU dispensers as I don’t recall seeing stenciling on the ones I viewed oh-so-long ago. (Has it really been 20 years?). The sway braces are not needed for the external tanks, as they are molded integrally with the tanks. The others, well, they need them.
Final words
Rating, 9 1/2 of 10, only degraded by the missing outboard pylons; Trumpeter, you have arrived. The aircraft needs NOTHING extra to turn out a fantastic basic model; superdetailers will go to town and have a great time. Fit: Perfect. Shape: Spot on. Subject matter: I am a Soviet Freak, so I’m biased. Go out and buy one; you won’t be disappointed.


Comments
Add new comment
This site is protected by reCAPTCHA and the Google Privacy Policy and Terms of Service apply.
Similar Reviews