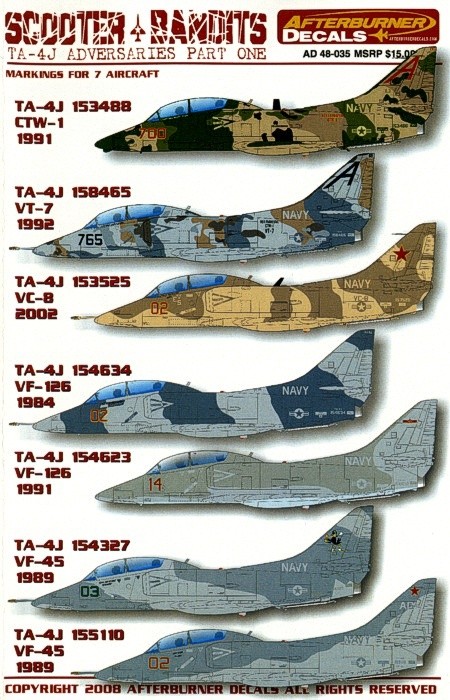
Scooter Bandits TA-4J Adversaries Part 1
Classic Airframes created quite a stir when they released their TA-4J in 1/48 scale. At long last, decal manufactures had a great excuse to make some of the very colorful markings found on the two-seat Skyhawk! Afterburner Decals wasted no time, and quickly released this sheet. Now, we all know that Hasegawa very soon after released their version of the TA-4J, but fear not as even though this sheet was printed for the Classic Airframes kit, they fit the Hasegawa kit just fine. For those that have noticed, the Classic Airframes kit looks to be a modification of the Hasegawa A-4 kit, thus both TA-4J kits are virtually identical in size and shape. In fact, for this review, I used a Hasegawa kit.
Opening the package, you will be confronted with three beautifully printed; full color, front and back instruction sheets with four-view profiles of each aircraft represented. Colorful is an understatement, as there is a couple that would be a challenge to even the best airbrush master. Out of the bag, you get markings for:
- TA-4J, BuNo 153488, 700, CTW-1, 1991
- TA-4J, BuNo 158465, 765, VT-7, 1992
- TA-4J, BuNo 153525, 02, VC-8, 2002
- TA-4J, BuNo 154634, 02, VF-126, 1984
- TA-4J, BuNo 154623, 14, VF-126, 1991
- TA-4J, BuNo 154327, 03, VF-45, 1989
- TA-4J, BuNo 155110, 02, VF-45, 1989
The decals themselves are printed by Cartograf, and are in perfect register. Also, I discovered that they are opaque enough to decal right over the camouflage with no loss of color or “see-through” effect. They respond well to setting solution, and snuggled right down over the details.
A few minor errors…
As for errors, there are a couple of minor ones. First, for scheme #3, TA-4J 153525 of VC-8, the instructions should point out that there is also red inside the leading edge slat wells. Also on scheme #4, Cunningham’s TA-4J of VA-126, there should be light grey colored walkways, which are not shown on the instructions. Just use the same pattern shown on the other schemes as a template. Lastly, on scheme #1, TA-4J 700 of CTW-1, portions of the rescue arrow and the warning text box, plus the ejection seat triangle on the starboard side of the nose have the tan portions printed in the “dark tan” when they should be the lighter tan color.
Painting and using the decals
Using the markings for scheme #1, the TA-4J BuNo 153488 from CTW-1, I found the most challenging part is to line up the camouflage with the multicolor markings. This is extremely important when doing these kinds of schemes because if the camouflage colors are not aligned properly, then neither will the decals when placed on the model. For instance, the NAVY found on either side of the tail, both of which are two colors, has to not only be aligned with the camouflage, but also with each other so they are placed evenly across the fuselage from each other.
To accomplish this, I spent a lot of time in the painting and masking stage… A LOT of time! Using a combination of Blu-Tack and paper masks, I masked off the camouflage colors one at a time, spraying each color in a separate session. To get the initial alignment, I cut out the decals from the sheet, held them in the correct position, and marked the edge of where the camouflage color would need to pass through the marking on the model itself with a pencil. Only a very small mark was needed to align the Blu-Tack or paper mask.
When using masks in this fashion, it is very important to spray the paint in one angle only! The less passes with the airbrush, the better! Any subsequent pass at a slightly different angle across the mask will create a “shadow” effect along the edge of the color, which is very difficult to correct. This of course does not apply to sharp edge masking, but only for raised masks where a feathered edge is desired. Speaking of painting brings me to a very important item concerning colors. When doing schemes like this, save extra of the colors you used! Errors and touchups will be needed and it will be much easier to not have to match a custom mix you did for the initial painting.
For colors, I used un-lightened Model Master enamels. This is because Afterburner had Cartograf match the colors used on the sheet to Model Master enamels, so the greens and dark tan matched the decals perfectly. The light tan was mixed using Radome Tan with a few drops of Military Brown until the paint matched the light tan printed on the decals. Extra was made for later touch ups and correcting errors.
When all the painting was complete, I applied the decals in the usual fashion using Future and setting solution. Overall, the paper and Blu-Tack masking paid off and the decals aligned extremely well with the camouflage, however there was a few that were slightly off. Luckily I saved the light tan I mixed so a very fine brush was used to paint over the decal and make it match the camouflage. Once clear coated, weathered, and a final flat coat was applied one cannot tell that there is paint-over-decals in those areas.
Conclusions
This is a great decal sheet with enough options and interesting schemes to make it worth having. Plus the quality is up to Afterburners usual high standards. Depending on the mood you are in you can choose one of the more challenging schemes to paint or go with a simpler one, and will end up with a great looking model regardless!
Thank-you to Afterburner Decals and IPMS/USA for this set to review.


Comments
Add new comment
This site is protected by reCAPTCHA and the Google Privacy Policy and Terms of Service apply.
Similar Reviews