
Phantom P-51D Mustang
Thanks to one of our steadfast supporters, Revell, for providing us a copy of this vintage kit… and to IPMS leadership for providing it to me for review. Talk about a time capsule…
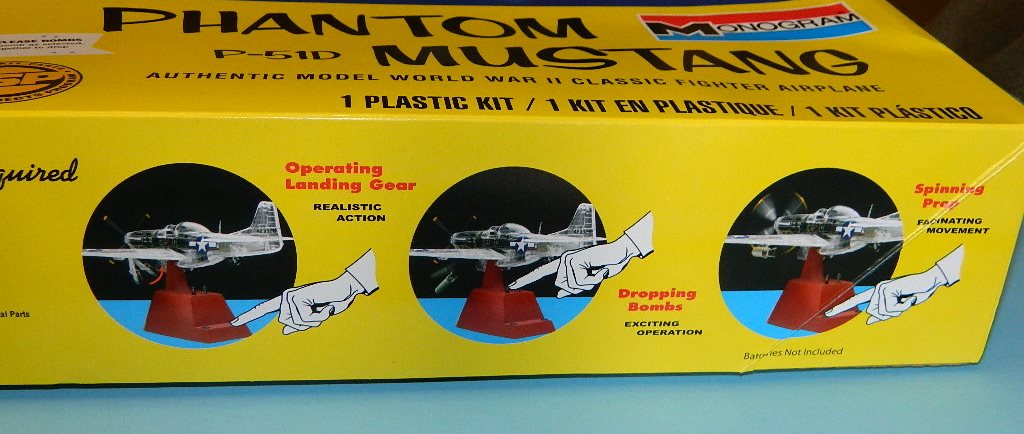
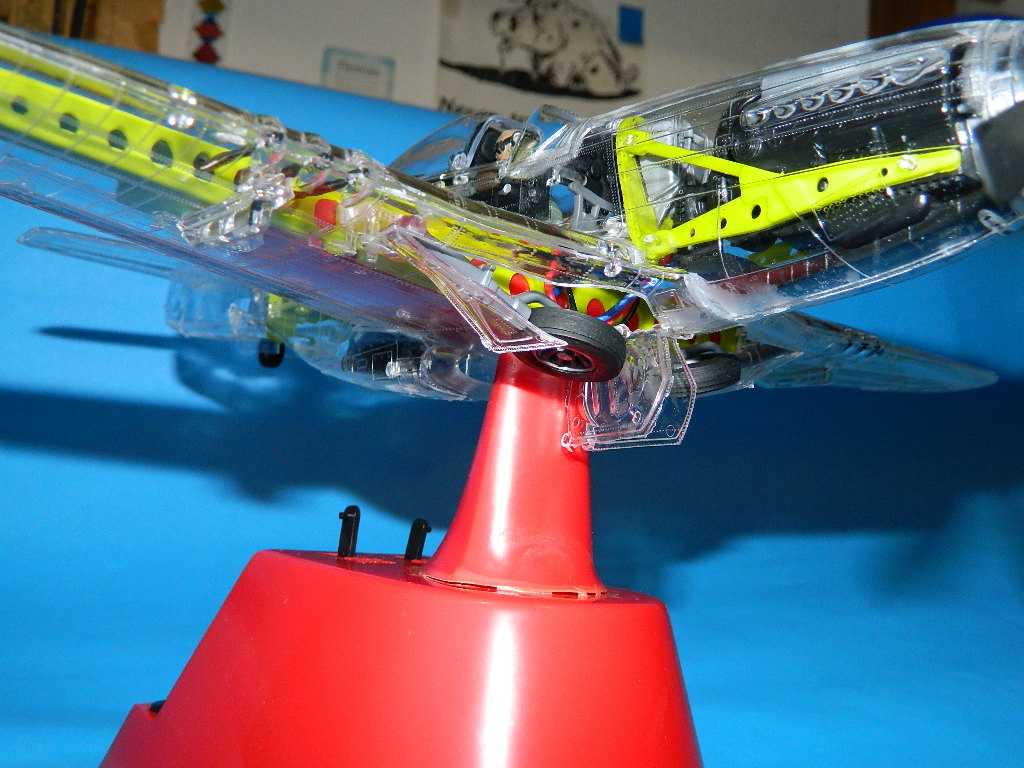
This kit was first released by Monogram models back in 1961. A groundbreaking effort at the time, it was the best of all modeling worlds; an accurately shaped P-51D in clear plastic, with plenty of detail and operating features. Retractable landing gear, spinning propeller, sliding canopy, bombs which could be dropped… what else could one ask for? All at the princely sum of $4.98! This model has stood the test of time; the molds have a little bit of flash, but the parts pretty well fit together as designed.
Released several times since then, this model epitomizes what can be done with engineering. If you take your time with the build, everything works! The model was so successful it was later released in silver plastic with black and clear parts without the motors or stand to cater to those who were more interested in building a standard, large-scale plastic model. The landing gear was to be operated by a knob verses the motor assembly, and bomb drop was still a part of the kit. Without the motors, you had to walk into the wind to get the prop to operate….
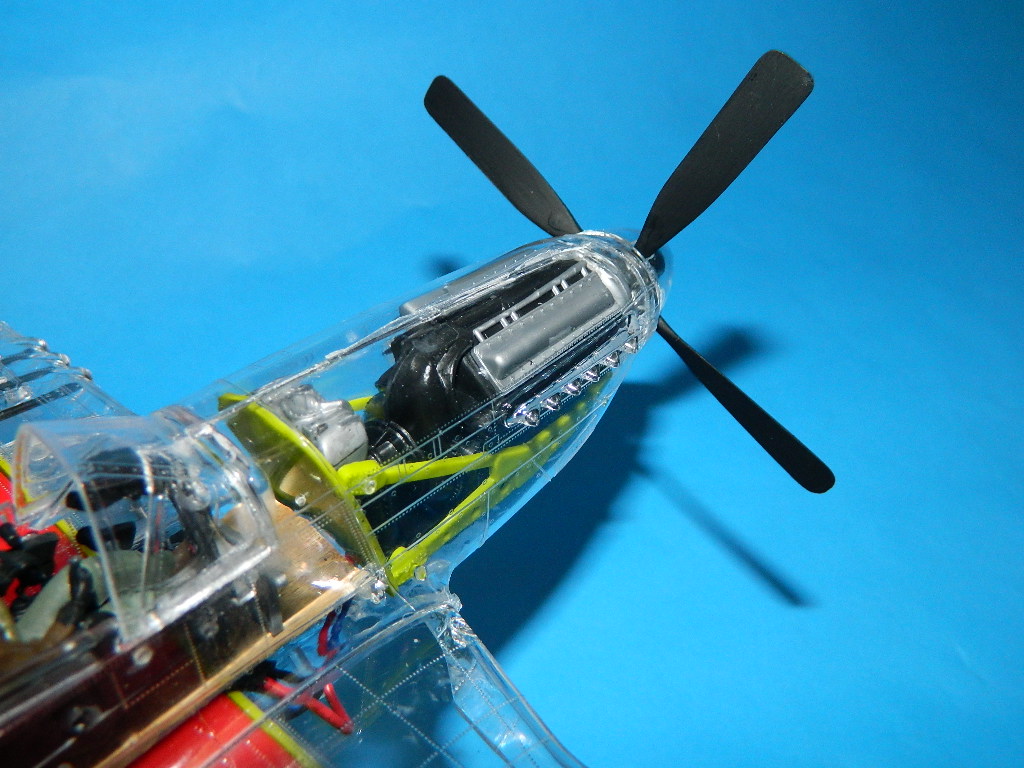
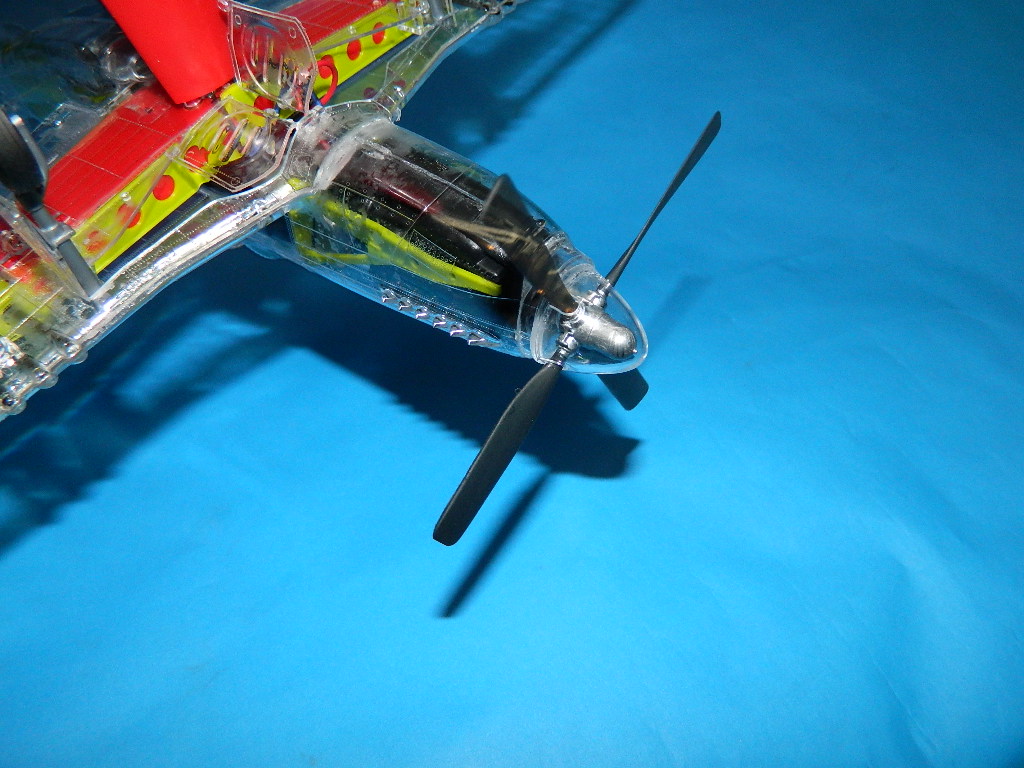
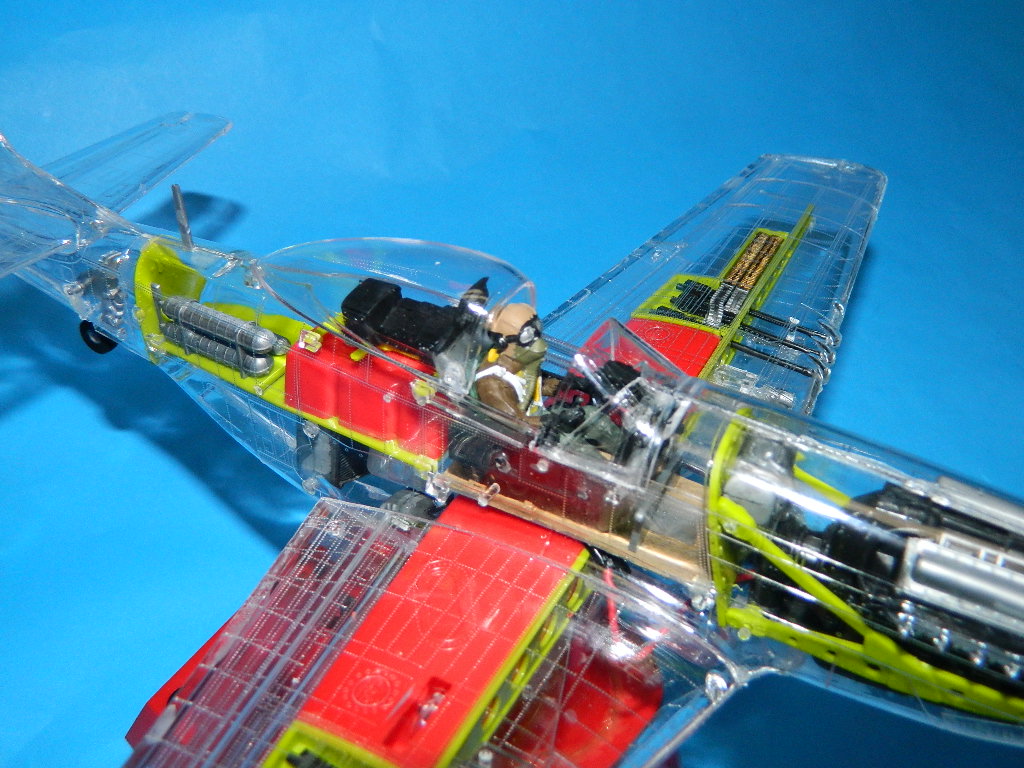
On to the build… Enclosed are the same parts as the original; major airframe and operating cogs, cams, and bracket parts in clear styrene, fuel tanks and stand parts in red, internal structure in light apple green, detail, gun and engine parts in black, bombs, gear struts, pilot and more details in silver. Two springs are included for operating the bomb drop function, and a “v” shaped wire to close the tail gear doors, two motors and associated wiring/metal contacts to operate the three landing gear struts and the propeller, a two-part red stand, and a decal sheet. The V-wire, previously mentioned, decided to depart to parts unknown during installation… I shall surely be met with complaint by the Haus-Frau, when she finds in with the vacuum cleaner. Ah, modeling….
The instruction sheet in this release mimics the original release only in parts; the instruction sheet is multi-lingual, and written with step-by-step guidance. As I peruse the original 1969 instruction sheet as a reference for “history”, the diagrams were more detailed, with pictures of the model, the steps, and exploded views of the required installation. Of course, the new instruction sheet has abbreviated drawings to serve the same purpose… but in many cases is confusing due to the order of assembly. This is a by-product of the requirement to be “all things to all people”… but that is just my opinion. Your mileage may vary… caveat emptor.
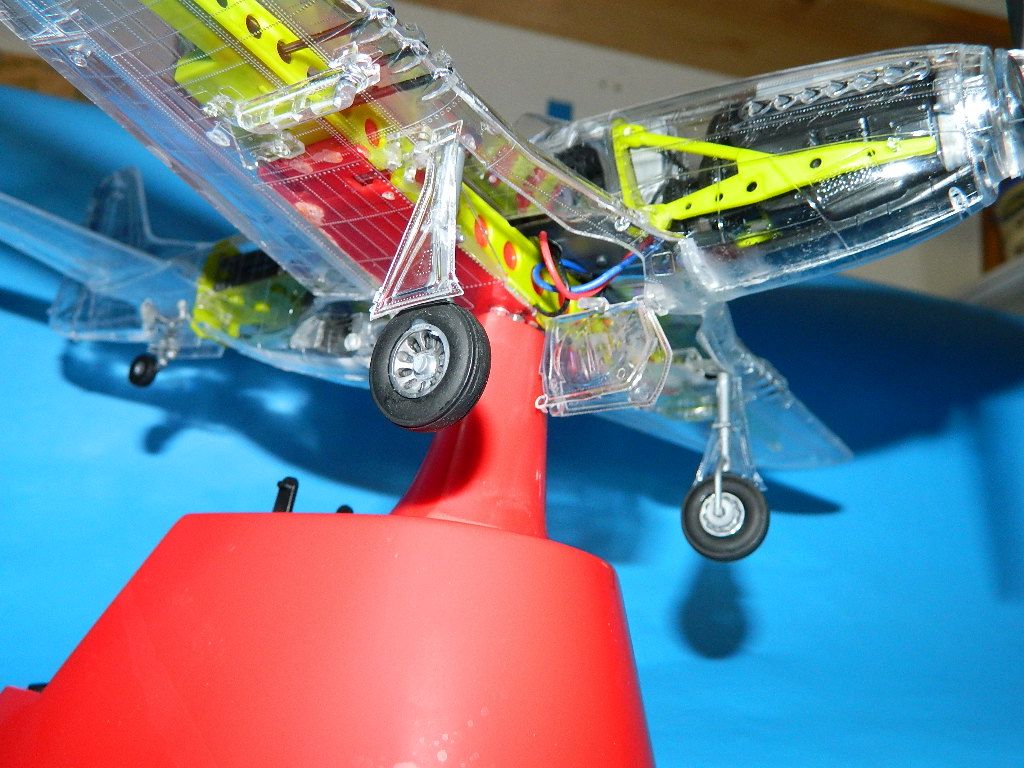
Begin construction with the lower wing preparation; this is a make/break part of the build, as the rest of the model sits on this assembly. On to the stand, where you incorporate one motor and a gearing stack for stepping down the rotational speed of the landing gear drive shaft; make sure any flashing or injection stubs are cleaned off. And when it says “lubricate” they mean with petroleum jelly. This will not attack the plastic, and provides sufficient clear lubrication to make sure everything works well.
Installation of metal battery contacts and wiring, bomb release levers and rods, etc., are all next. Again, take your time and do it correctly! This is all not accessible after you cement the parts into place, and it’s frightfully easy to have parts installed incorrectly if you aren’t paying attention. The instructions are helpful here…but once again, the wiring diagram is a bit confusing. Extra wiring is noted where none is supplied or needed… hmmm. And the wiring provided is very fragile. Don’t overdo the stripping steps, as the wire will break or otherwise be a royal pain. I mean it!
Thoughtfully the new instructions would have you test the operation of the landing gear and bomb release before final assembly. Word to the wise; the inner main gear follow-up doors are gravity operated with actuator arms; if you have the model even slightly tilted or are busy playing sky-pilot with the model, you WILL break off the actuator arms or the doors. Operation on a level table, please…
Weapons consist of the six .50-caliber guns in the wing mount and ammunition feed trays, which are used to hold the bomb release springs and levers in place. If there is one place where things can go into the carpet monster, this is it… these springs will fly off into space if given the opportunity, and you will not have a return capability for the release cams. Watch your eyes as well…
The fuselage: once you have installed the engine and motor assembly, along with all the internal detail parts, you will have the opportunity to offer it all up and assemble it. I broke down and painted the pilot, the floorboard, and the seat, as they are always a focal point. For those who pay attention to such things, the pilot figure is the same one as used in the Revell X-1 kit which was released in 1989; fun fact.
For assembling the clear airframe, I used Tamiya extra-thin cement, to lower the chances of having a “Finger-print canopy” moment on the kit, while providing a solid bond. Since the airframe is essentially all clear parts, this is a real concern. How to achieve a good cement weld without really messing it all up… keep your fingers clear and use the cement sparingly! And since it’s noted on the instructions, I don’t recommend using rubber bands; these provide a capillary-action liquid cement vector which will mar the final product surface. I chose to hold the parts in place, apply a bit of cement, and let it wick into the join while holding the parts together. After about two minutes, a small piece of masking tape can be successfully used without marring the exterior surfaces.
Wiring all the control wires into place, I noted the propeller button did not work; this was my fault, as I put the contact wiring on the wrong side of the plastic part. The landing gear, however, DID! The same for one bomb drop mechanism; the other side was a victim of ham-fisted cement application.
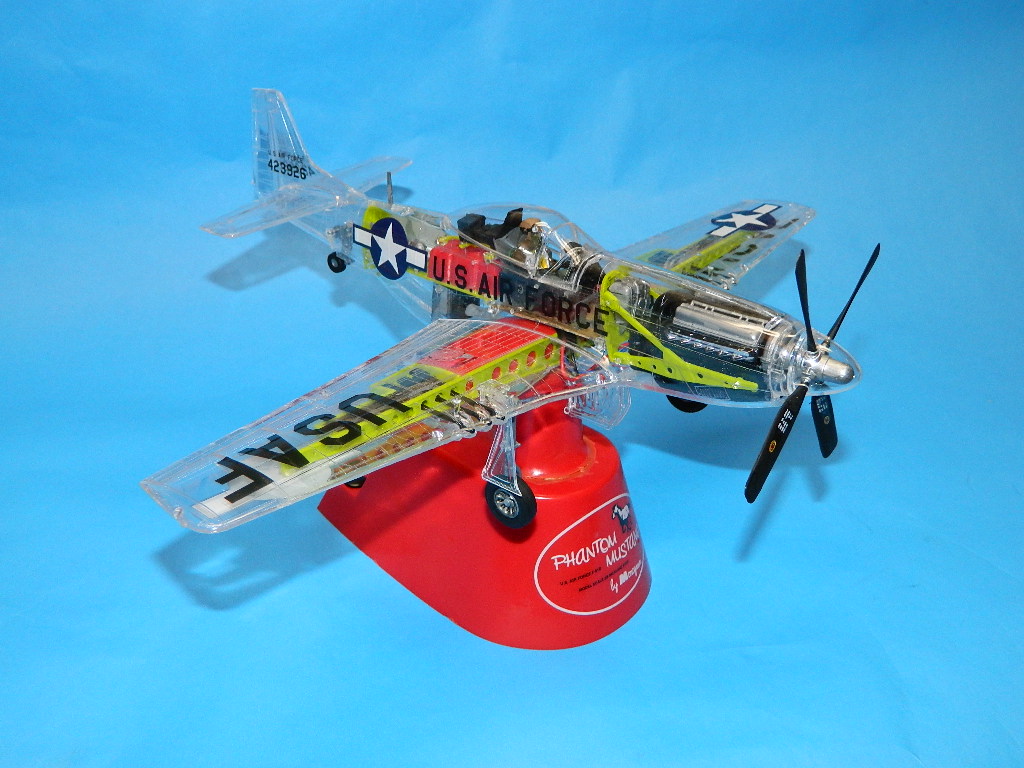
Decals worked GREAT and mimic the original markings; as I remember them, there were red-striped U.S. National insignia, in keeping with the 1947 USAF change to markings; This kit does not have those. The U.S. Air Force markings and decals go on flawlessly, as does the stand decal, which is part of the attraction of this nostalgia build. There are also appropriate stencils for the kit; but I left most of them off as they (in my opinion) detract from the visible portion of the model.
I won’t go into too many other details here; the final model pictures tell the tale. A great, fun build, and once again proving to myself that I’m not flawless in construction. Thanks again to Revell for re-releasing this kit; go buy one and have a fun time!


Comments
Interior parts paint suggestion?
Hello,
I remember building this in the early 60s! Neat toy for a 12 year-old!. My "inner child" is once again building this model-copyrighted materials are from 1979.
I'm wondering if you might have some painting suggestions for additional interior parts-pumps, tanks, cockpit, etc.? Nice photos-enjoyed your narrative just as much.
Thanks for your reply,
Regards,
William
Do you by chance have a pdf file of the original instructions?
I built one as a 14 year old and like you, decided to do it again and get it perfect this time. But the current instructions aren’t as clear as what I recall and your comment confirms this. Thanks.
Add new comment
This site is protected by reCAPTCHA and the Google Privacy Policy and Terms of Service apply.
Similar Reviews