
North American P-51D Mustang
Aircraft History
Airfix has presented us with a newly-tooled 1/72 P-51D Mustang. Nearly everyone will be familiar with the venerable P-51 Mustang, the long-range WWII fighter that finally allowed US bombers to be escorted deep into the heart of Germany. Over 8000 of the “D” model variant were produced. Armed with 2 additional .50 caliber machine guns (for 6 total) and a bubbletop canopy for enhanced visibility, it represents the ultimate wartime expression of the Mustang.
Kit Contents
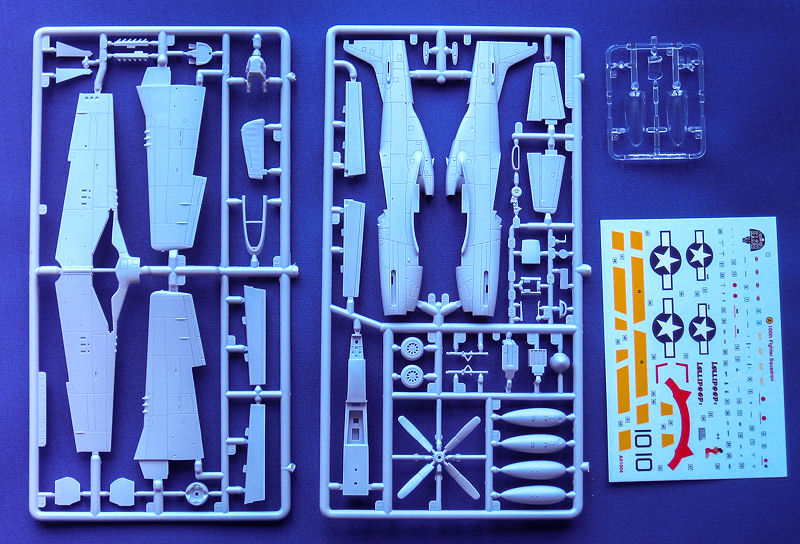
Inside the box you’ll find 53 parts across three sprues, two in Airfix’s familiar blue-gray and one in clear, along with decals and instructions. The instructions are generally very clearly illustrated. However, the painting callouts are made using Humbrol-specific numbers only, and there is no key provided for matching color names to the numbers. I found this need of looking up a cross-reference for the paint colors to be perhaps the most frustrating part of the build.
Decals are provided for a red tail Tuskegee Airmen P-51D paint scheme, the “Lollipoop II,” flown by 1st Lieutenant Spurgeon Ellington of the 100th Fighter Squadron out of Italy. The decal placement guide is split between two locations, with the stencils common to all P-51Ds being covered on the final page of the instructions. The aircraft-specific markings and paint colors are then called out in color on the bottom of the box. Helpfully, this portion of the decal guide does provide both the Humbrol paint numbers and the color name for those appearing on the outside of the aircraft.
Construction
As with most kits, your build adventure starts in the cockpit. Airfix has done a quality job with nicely molded sidewall details in addition to nice seat and rear radio compartment equipment. The exception here is the flat instrument panel with gauges represented by a decal. But it works as a fine solution and has been nicely done, especially considering how deeply the panel sits under the cockpit cowling. This was still a surprising find, given the level of molded detail in the rest of the cockpit.
The cockpit is built upon an internal spine that also serves as the upper housing of the radiator’s rear vent, and part of the lower fuselage. A helpful deviation from the printed instructions is to decide at this point if you’d like the rear radiator vent open or closed before assembling the fuselage halves, removing the appropriate locating pins as necessary. You may also want to take this opportunity to open up the locating hole for a display stand (sold-separately) if you’re planning on building your P-51D with the gear up.
I also found myself deviating from the instructions regarding the prop. If you’re keen on having it spin, you’ll need to assemble at least the propeller, rear cover, and a retaining collar before the halves come together. Seeing as this would only complicate painting later, I chose to sacrifice the spinning prop for ease of construction. The prop’s shaft on my example fit very tightly into the opening afterwards, even without the retaining collar, allowing it to be press-fit in without glue and removed for transport.
While assembling the halves, you’ll want to pay special attention to the joint between the fuselage and inner spine. As mentioned, the spine forms part of the fuselage between the radiator’s exit and the rear wheel well. You’ll want to be careful to ensure a smooth and even mating.
The wings feature a nearly full-span underside topped by the upper surface on each side. The wingtips and main gear wheel wells are molded as part of the upper surfaces as well. Don’t forget to open up the recessed holes in the lower wing if you’re planning to mount the provided drop tanks. Once the wings are assembled, you’ll reach the most difficult construction step – mating the full span to the body of your Mustang. A bit of pressure and patience are required as you maneuver the wing between the radiator scoop and main fuselage. Once wiggled into place, you’re rewarded with a fantastic fit. However, for very young (or inexperienced) modelers, this step may prove a bit challenging. The horizontal stabilizers have a wide attachment tab, mounting easily and securely with limited play, making your dihedral easy to set.
A highlight of the Airfix P-51D is that the flaps are molded as separate pieces from the wing. You’re provided with two sets, one retracted and the other extended. Each flap is molded as a single piece, and has robust, tight-fitting tabs. I chose the extended flaps to highlight this feature in my build and found them easy to press-fit into place (and remove). This aided in painting and decaling before I permanently glued the flaps in place at the end. The flap options are both well executed and a surprising feature for such a bargain offering!
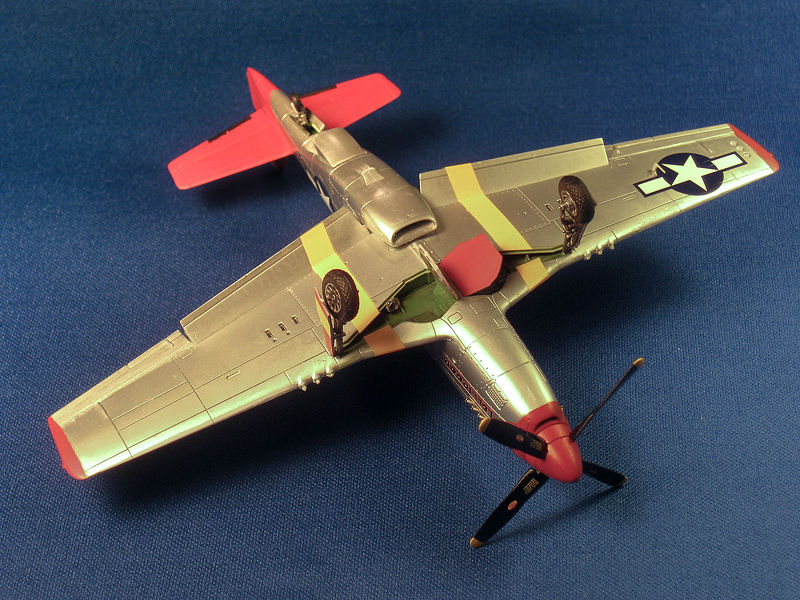
Another option Airfix offers is an easy way to build your Mustang with the gear up. To that end, there is a slight lip around the main landing gear bay to aid in placing the doors in their closed position, as well as a one-piece door for the tail wheel bay. If you’re building your Mustang gear down (as I did), you’ll need to fit two rather fiddly tail wheel doors instead. The tail wheel and strut are provided as one piece, which also proved a bit of a challenge to mount into the depths of the recessed bay. A bit of sanding on the mounting pin and a bright lamp will certainly help the process! The main landing gear is composed of a strut and separate one-piece wheel. The smaller door attaches to the strut, while the larger attaches on the wheel bay lip next to the center spar. If I was building the kit again with the gear down, I would have removed the remainder of the lip around the bays. It’s exaggerated and detracts from the finished look.
There was some slight warping on the main landing gear struts, primarily at the wheel attachment point. This left my Mustang pigeon toed, but I was able to correct this after instillation with a bit of careful bending. It would be much easier to correct before attachment, so be sure to test fit! Also pay attention to your main wheels; they are molded with a bulge and flat spot on the bottom of the wheel, so make sure it ends up flat on the ground.
After painting was complete, final assembly focused on adding all of the various small bits – antennas, pitot tube, exhaust manifolds (only a shrouded version is provided), windscreen and canopy, as well as a pilot figure if you desire. The canopy is mounted separately from the lower frame, although a small portion of the frame is molded into the canopy. You’re provided with two canopies, likely the Inglewood and Dallas production-line versions, although in 1/72 scale I can see almost no difference between the two.
Painting
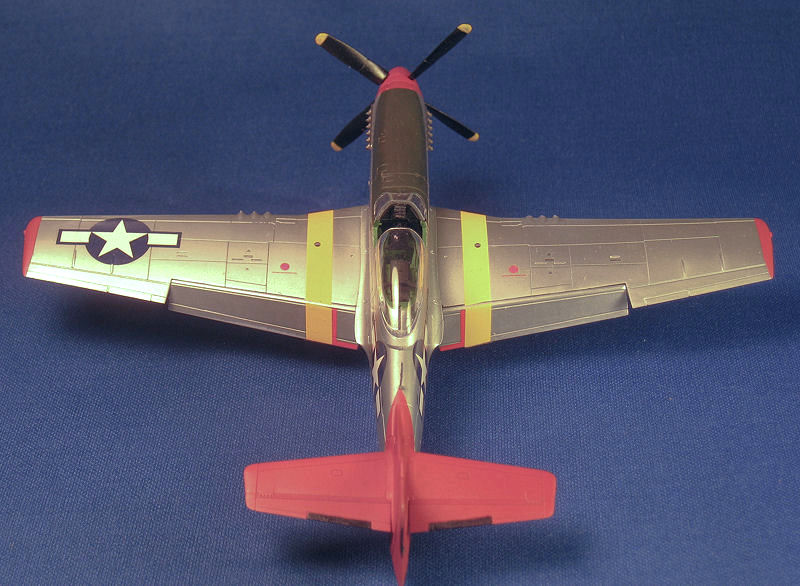
As mentioned, interior painting was slightly frustrating due to the lack of color names provided with the Humbrol paint callouts. The P-51D depicted with the kit decals is an overall natural metal finish with red ID markings. I choose Model Master Metalizer Aluminum Plate for the overall color, as I had good luck with it 15 years ago when I built my last Mustang!
Although it looks fantastic, it creates a very fragile finish. Despite applying two coats and sealing it with a light coat of Future before proceeding, the paint still managed to wear off on sharp edges and scratch easily. I’ll most likely try Alclad II on my next natural metal finish kit and limit the use of Model Master Metalizer to small parts or areas.
You’re required to paint the tail, spinner, and wingtips Insignia Red. However, Airfix does provide the Insignia Red nose band and triangles as a decal. To me, it seemed an extremely difficult endeavor to ensure a color match and/or adhere the decal over the complex curves of the nose. As such, I chose to mask and paint this area as well. The final painting touch was masking and painting the Olive Drab anti-glare panel above the nose.
Decals
I wasn’t sure what to expect from the Airfix decals, but I was very pleasantly surprised. They proved easy to work with and responded well to MicroSol. I tried a technique recommended to me to ensure that the decal carrier film was as transparent as possible on the natural metal finish by clear-coating the kit with Future and allowing it dry overnight.
My decal process was then to wet a decal and, while waiting for it to free up, place a small amount of Future on the Mustang where the decal was to be located, using a clean brush. I would then slide the decal into the Future “puddle” on the kit. Once it was positioned, I wicked up any excess water or Future and then brushed the decal with MicroSol. It didn’t look particularly promising at first, but after 5-10 minutes of dry time had passed, the decal sank into the recessed panel lines and looked nearly painted on. Even on complicated surfaces, like the national insignia on the wing, I was able to get the decal to conform to both the panel lines and the raised surface strakes...although in these more complex areas, it did take 2-3 MicroSol applications for each decal. Once the decals had dried overnight, I sprayed the Mustang in Future one last time to seal the decals and complete the painted-on look.
The only major issues I had with the decals were the yellow ID bands on the wings. These are produced in 6 pieces for each wing to aid in placement over the dropped flaps and open landing gear doors. However, they did not fit well at all, and I found them to be overly long on every surface. Additionally, the decal placement guide failed to number all of the 6 pieces and incorrectly numbered those identified. You’ll have to check the positioning, alignment, and correct wing for each decal very carefully. It proved quite the puzzle to solve!
If I was building the kit again, I’d skip the decals and paint the yellow ID bands on. However, in making this choice, you will be missing a small black stencil on each wing that is incorporated into the ID band decal. To me, it is worth the sacrifice because of the better finish painting will provide.
Conclusion
Airfix has created a fantastic kit of the P-51D Mustang. It assembles well and looks great when done. A few minor tweaks to the provided instructions and decal guide would do wonders to help young or new builders have a better experience, but isn’t a problem for anyone with a bit of build knowledge under his belt.
What really elevates this kit is the phenomenal price point. Comparing Airfix to the current gold standard 1/72 Mustang, Tamiya’s P-51D, reveals its amazing value. The Airfix Mustang stickers at a mere 40% of the retail price of Tamiya’s. A comparison of the two reveals a bit more fine detail from Tamiya (raised instrument panel, finer cockpit detail, optional unshrouded exhaust manifolds, arguably finer engraving of the panel lines), but Airfix strikes back with its own list of extras like the optional dropped flaps, the option for extended or retracted gear (Tamiya’s D would require some surgery for a gear-up build – the tailwheel doors are molded onto the body), and a pilot figure. You can look at this kit two ways: you’re getting a near-Tamiya quality kit for a fraction of the price, or you’re getting an amazing model kit with great features – no comparison necessary.
Bottom line, Airfix has a winner! It’s impressive the job they have done straddling the line between an appealing model for kids and a scale model for adults. Frankly, I must say that I’m jealous of today’s 10-year-old who will get such a nice kit for so little cash. So go ahead and pull out your stash of Mustang decals! Airfix has provided you with the perfect canvas to start building a few of the ones you might not get to otherwise.
I’d like to thank Hornby-America for providing the kit and IPMS/USA for the chance to review it.


Comments
Add new comment
This site is protected by reCAPTCHA and the Google Privacy Policy and Terms of Service apply.
Similar Reviews