
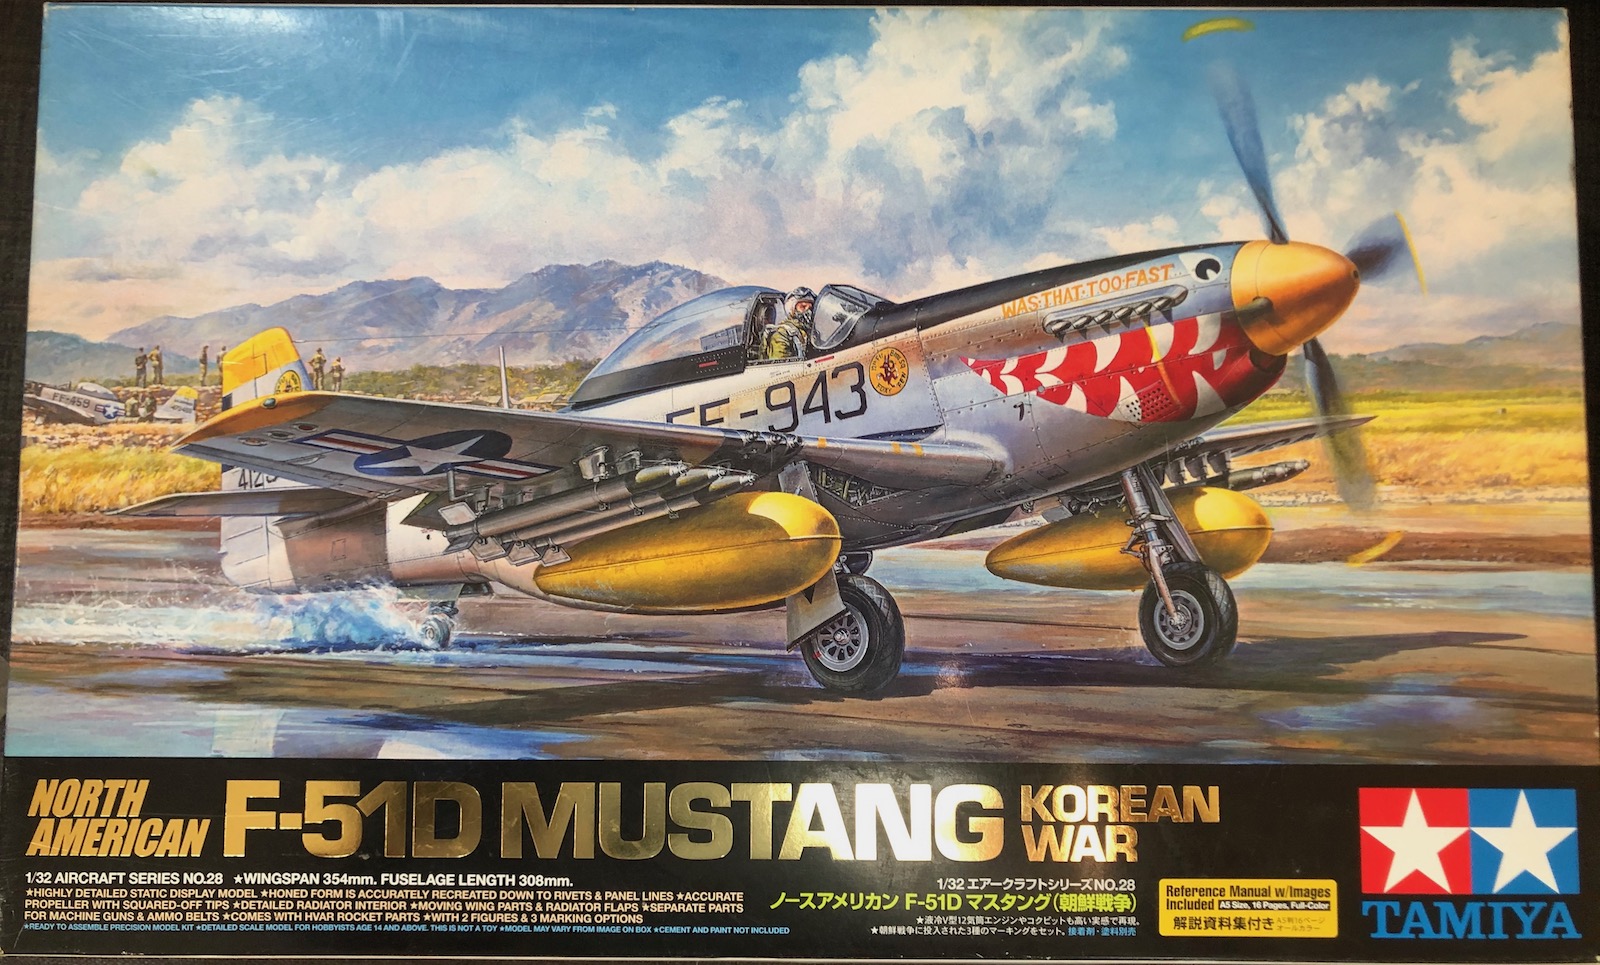
North American F-51D Mustang Korean War
The P-51 is often viewed as the most successful aircraft designed in WWII. It was originally developed in 1940 by North American Aviation for the Royal Air Force prior to being adopted by the U.S. Army Air Force. After WWII ended, all variants of the P-51 were retired except the P-51D, which was kept in service for the Air National Guard. In 1948, with the separation of the U.S. Air Force from the U.S. Army, the designation was changed from P-51 to F-51. At the outbreak of the Korean war in 1950, most of the airfields on the Korean peninsula were ill suited for jet aircraft. So the F-51D was called back into service. This new release from Tamiya captures an F-51D from the Korean War and is their newest release of their highly regarded kit, last released in 2016.
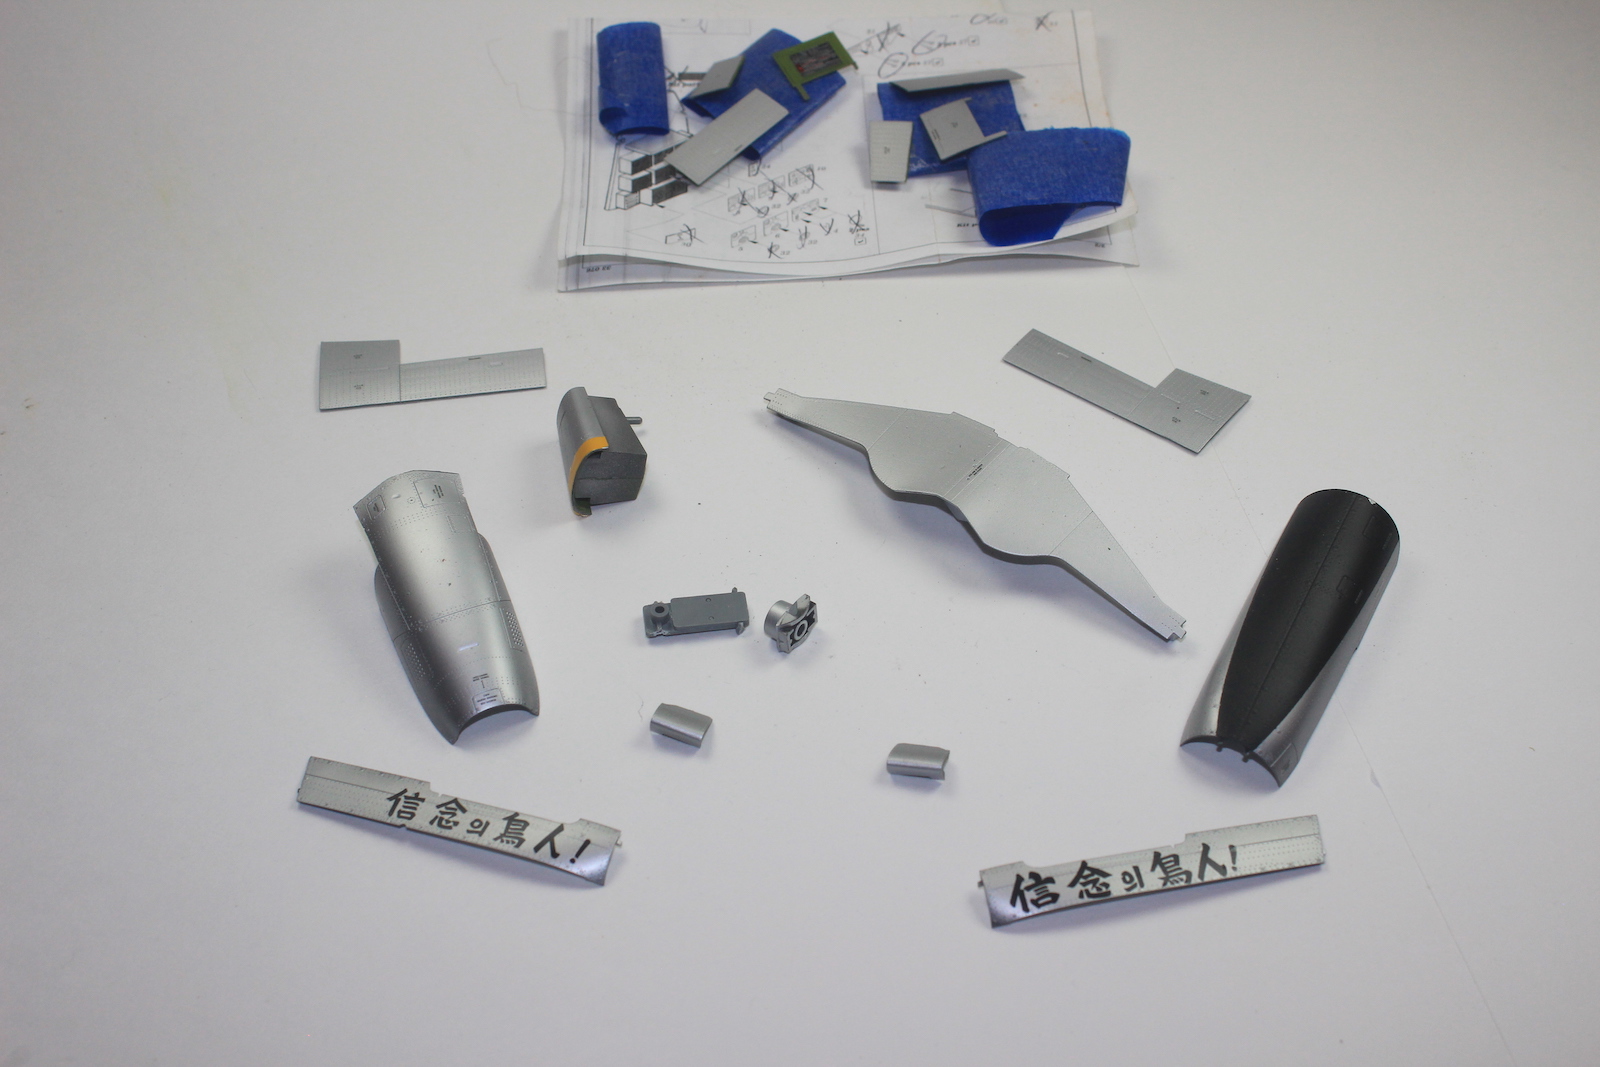
The kit comes packaged in a huge box with a colorful print of the aircraft “Was That Too Fast” on the box top. In the box are 17 sprues of light grey plastic, 1 black plastic sprue, 2 PE sheets, a clear sprue, two large decal sheets, 3 canopies and a small cardboard box. Inside the cardboard box is the sticker for the nameplate, two large rubber tires, a bag of shafts, a bag of poly caps, a bag of screws/nuts, a screwdriver, magnets and 4 special parts for the engine cowling. The special parts for the cowling are packaged in a special tray for protection and are molded extremely thin to allow the engine to be displayed. The parts are well detailed and are flawlessly molded. There were no molding or flash issues noted. The instructions are great, very clear, well designed, and when paint, extra parts, or decals are required the callouts are very clear. Also, there are very helpful sections that clearly display when and how to remove tabs from parts.
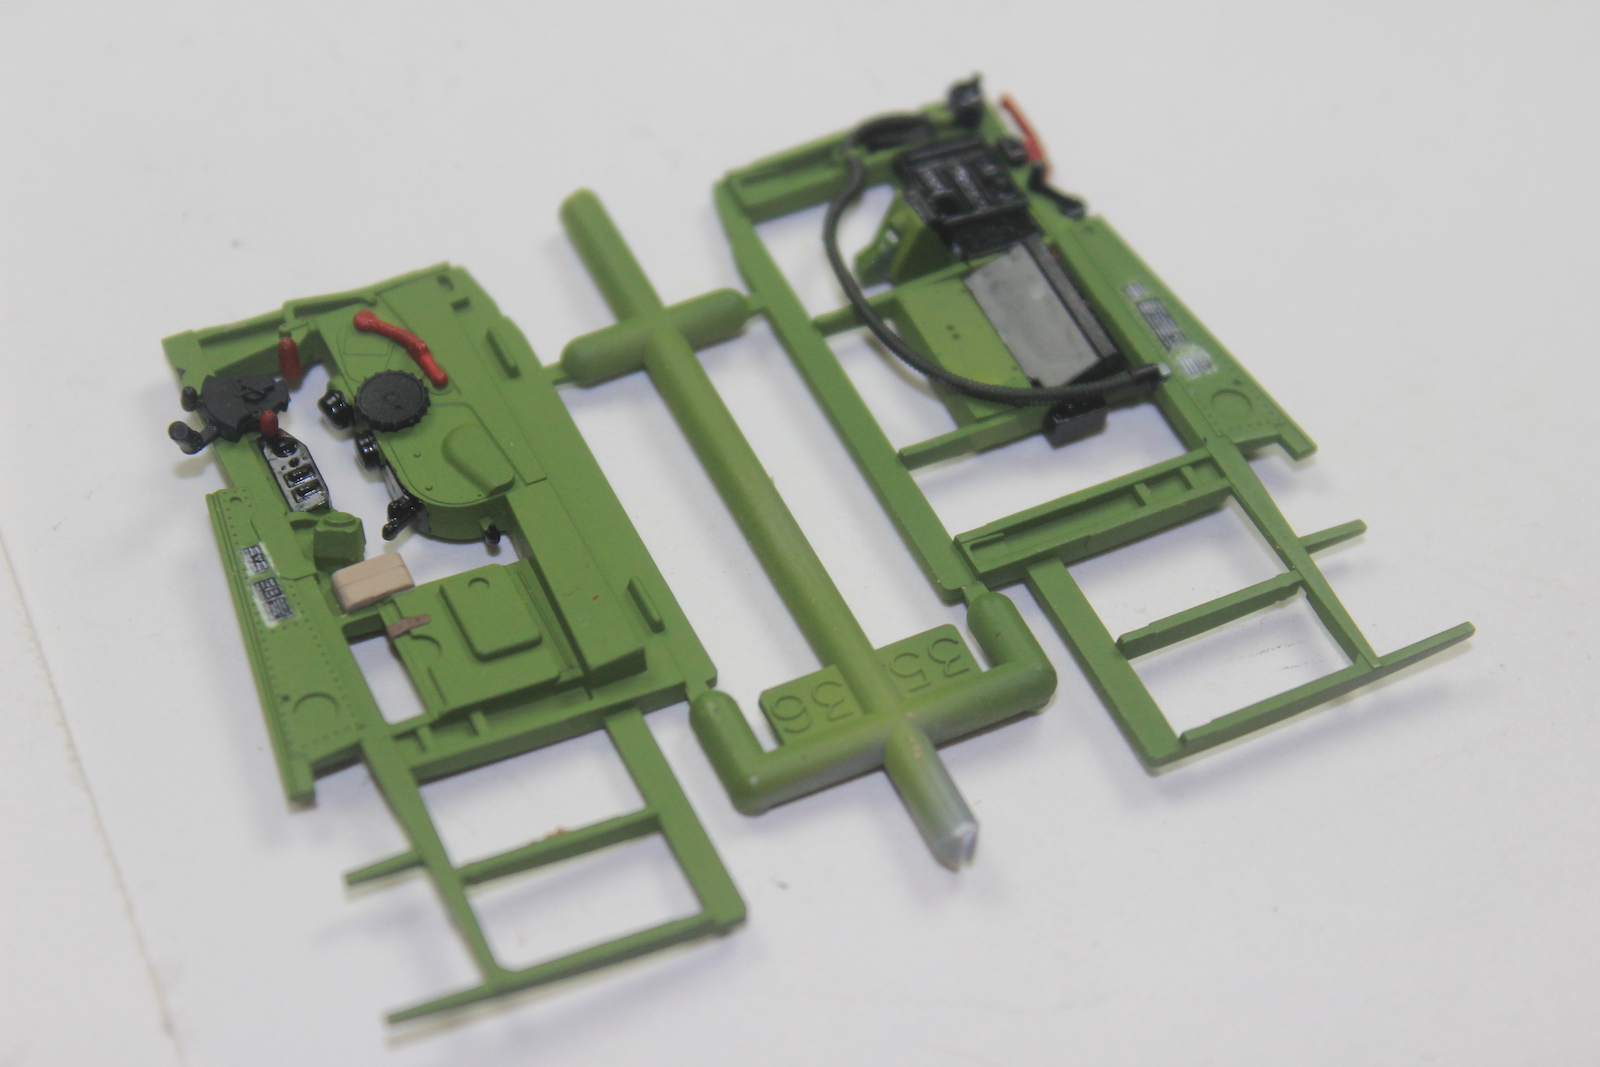
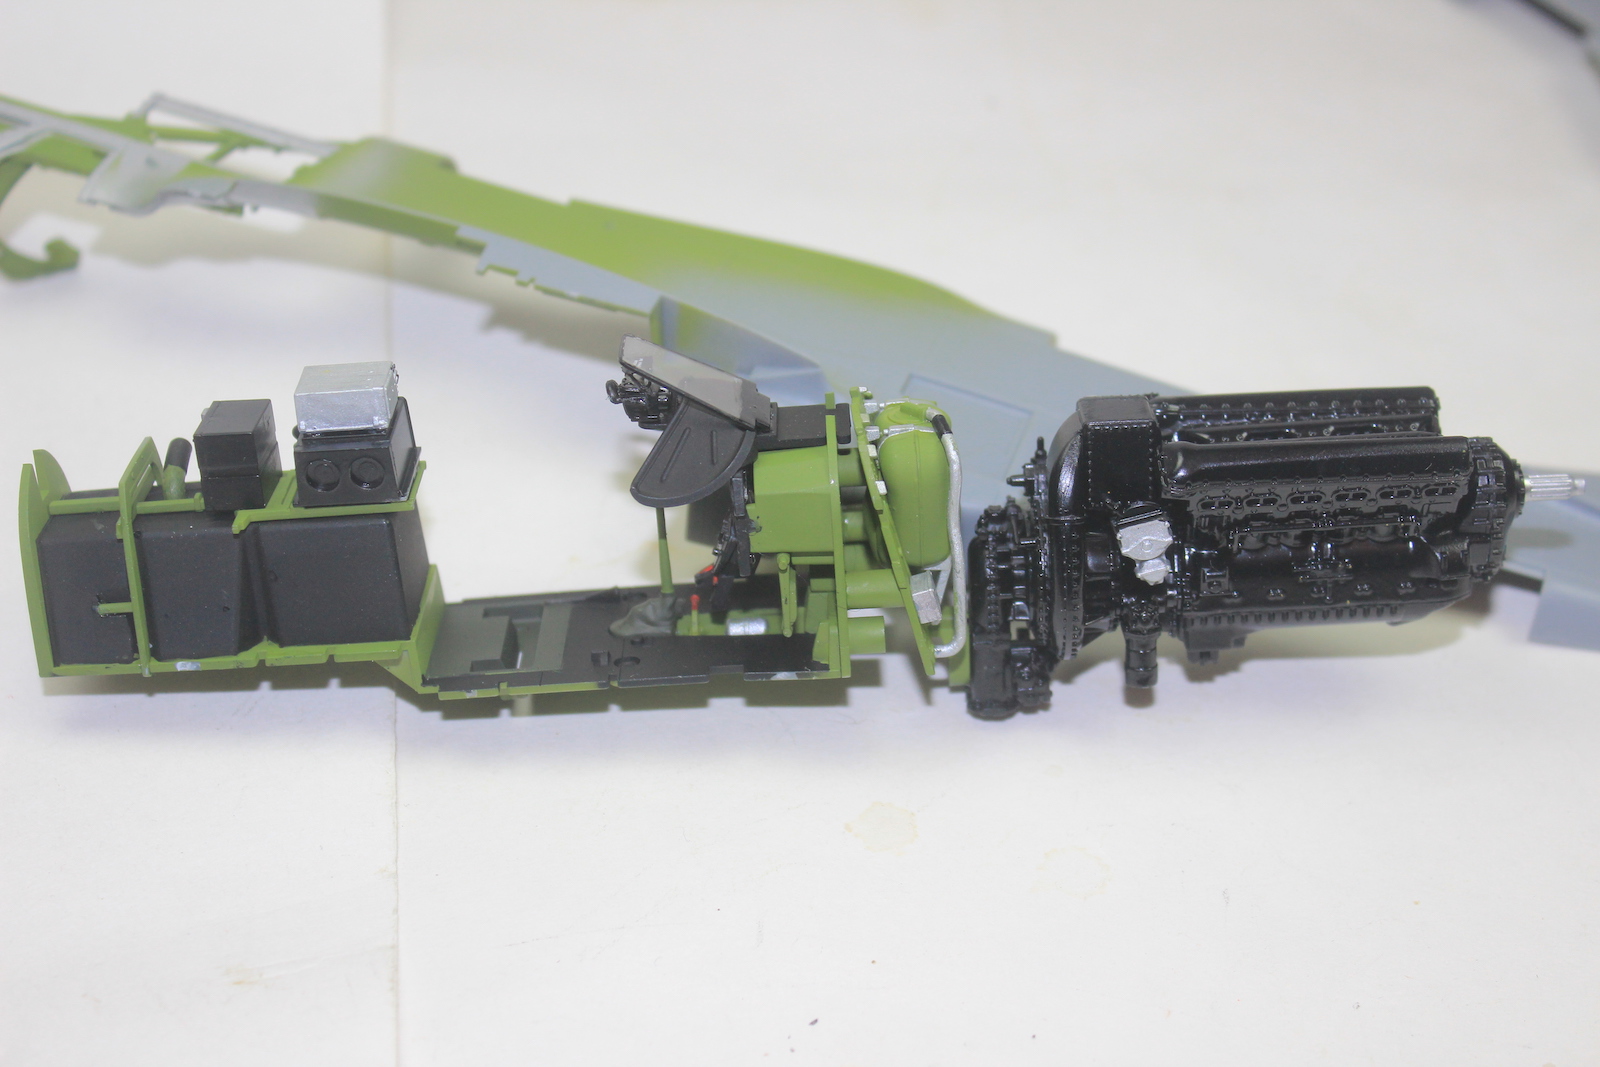
The base kit has been reviewed a number of times, including on IPMS USA but I will do my best to highlight this new release. The build starts with the engine, which forms the front of the center section of the build. The parts are all well molded and I had no major fit issues, but as I intended to display the aircraft with the engine cowling off I spent some extra time sanding the subassemblies from the first three steps. I did leave H22, H24, and H23 off until after the engine was completely painted to allow me to chrome H24 easily.
In step 5, the first set of screws and poly caps are called for. The nice thing about this kit is that it calls out the required part in the top of the step and it has a full-size drawing of the part that is required. This allows you to easily compare the part to the drawing and ensure that you have the correct one. I also left H30 and H31 off until after the engine was painted to allow for easier painting of the silver. I had no issues with any of the other parts in Steps 7-8. All of the fits were great and the paint call outs were very helpful. In Step 8, the buildup of the engine is completed by attaching it to the fire wall.
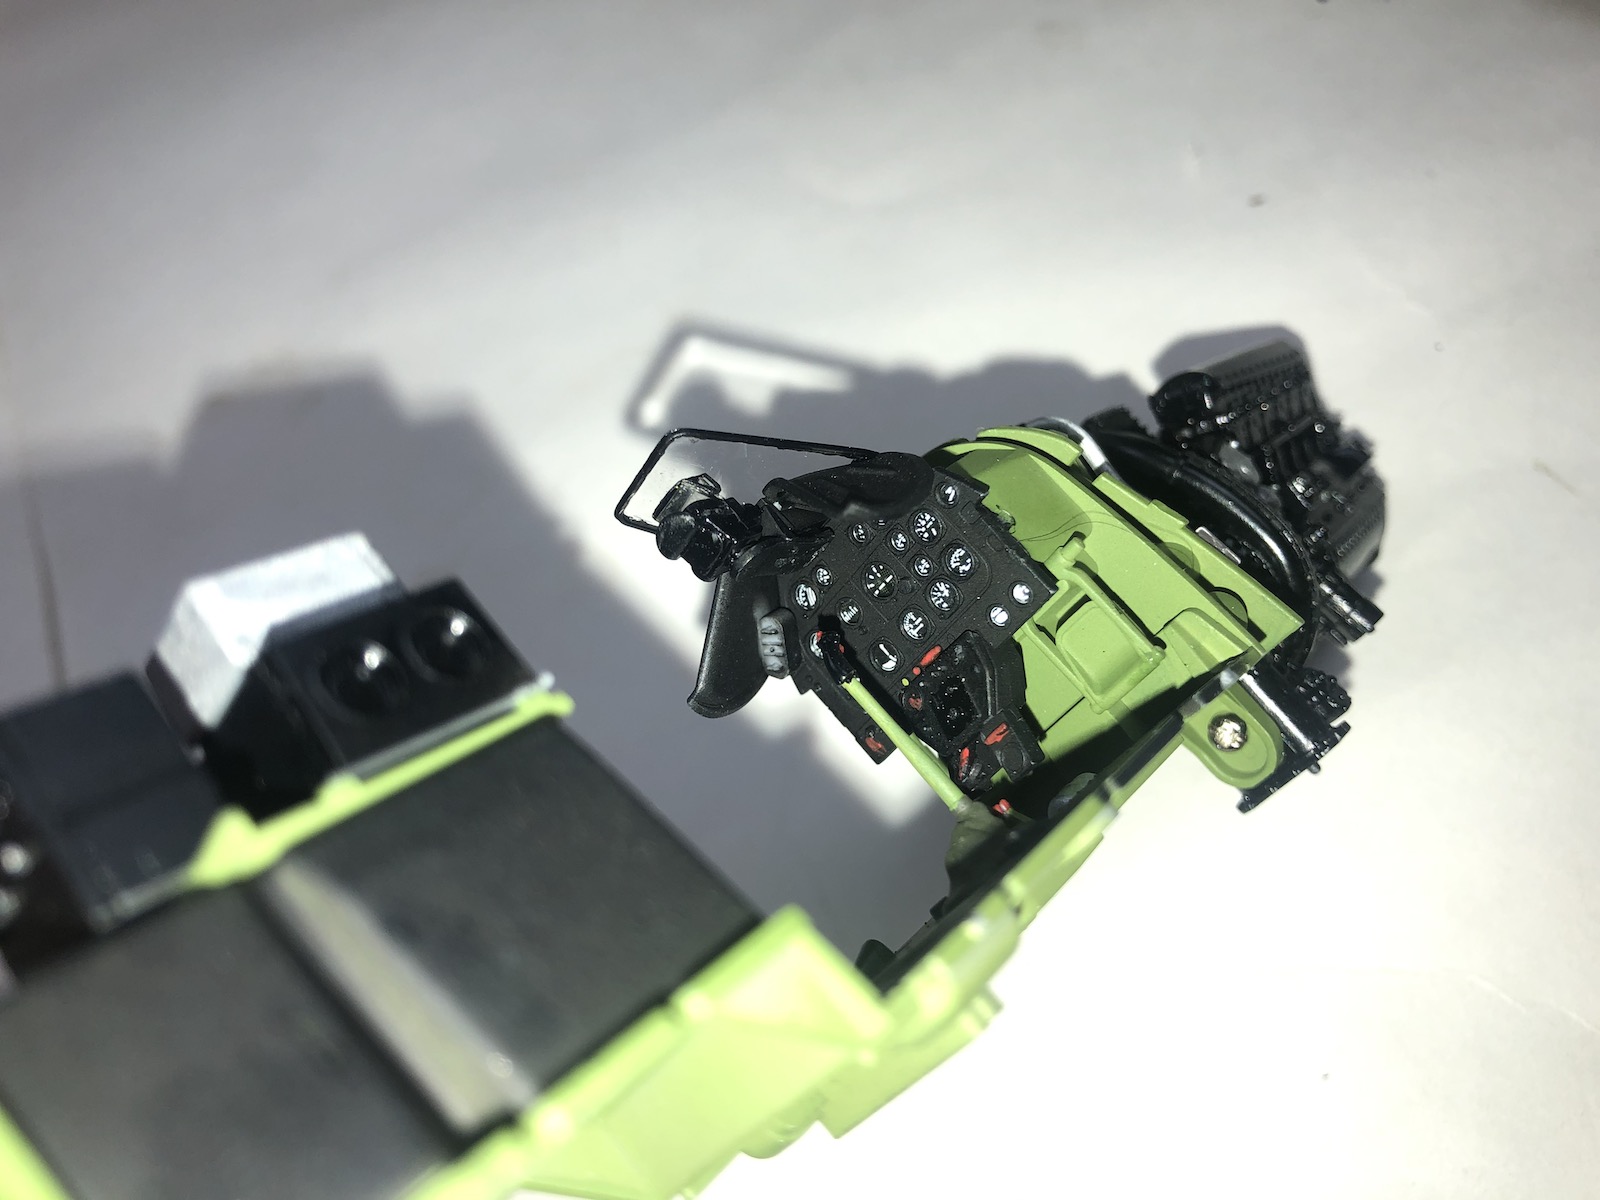
In Step 9, we move on to the assembly of the cockpit. The first part of the cockpit to be assembled is the instrument panel. This is probably the best instrument panel that I’ve seen included in a kit as standard. The front is molded in normal styrene, there is a clear piece for the gauge fronts and there is decal that is printed in reverse to allow it to be applied to back of the clear part. It really looks great once it is complete. Next is the seat and seat belts. The seat looks great and I had no major issues with it, but I did leave it out until the cockpit was complete. There are two different options included for the seat belts and both are unpainted photoetch. One is for use with the included pilot figure and one is for the empty cockpit. The photoetch is a little thick, not thick enough to require it to be annealed but definitely thick enough that you will need to carefully bend it into the required shape prior to installation.
In Step 13, we have the first instance of different parts needing to be selected for different decal options. Airframes A and C require a different radio setup than B, I had no issues with the parts used and the paint callouts are clear. The rest of the cockpit assembly is very smooth and I only encountered a couple of issues. There was a small seam on the gunsight between D26 and D25 that required some sanding. Also, there is a tiny decal on top of PE a-29 that is easy to miss. Step 16 finishes the assembly of the cockpit section. Take care to attach in the order and manner shown.
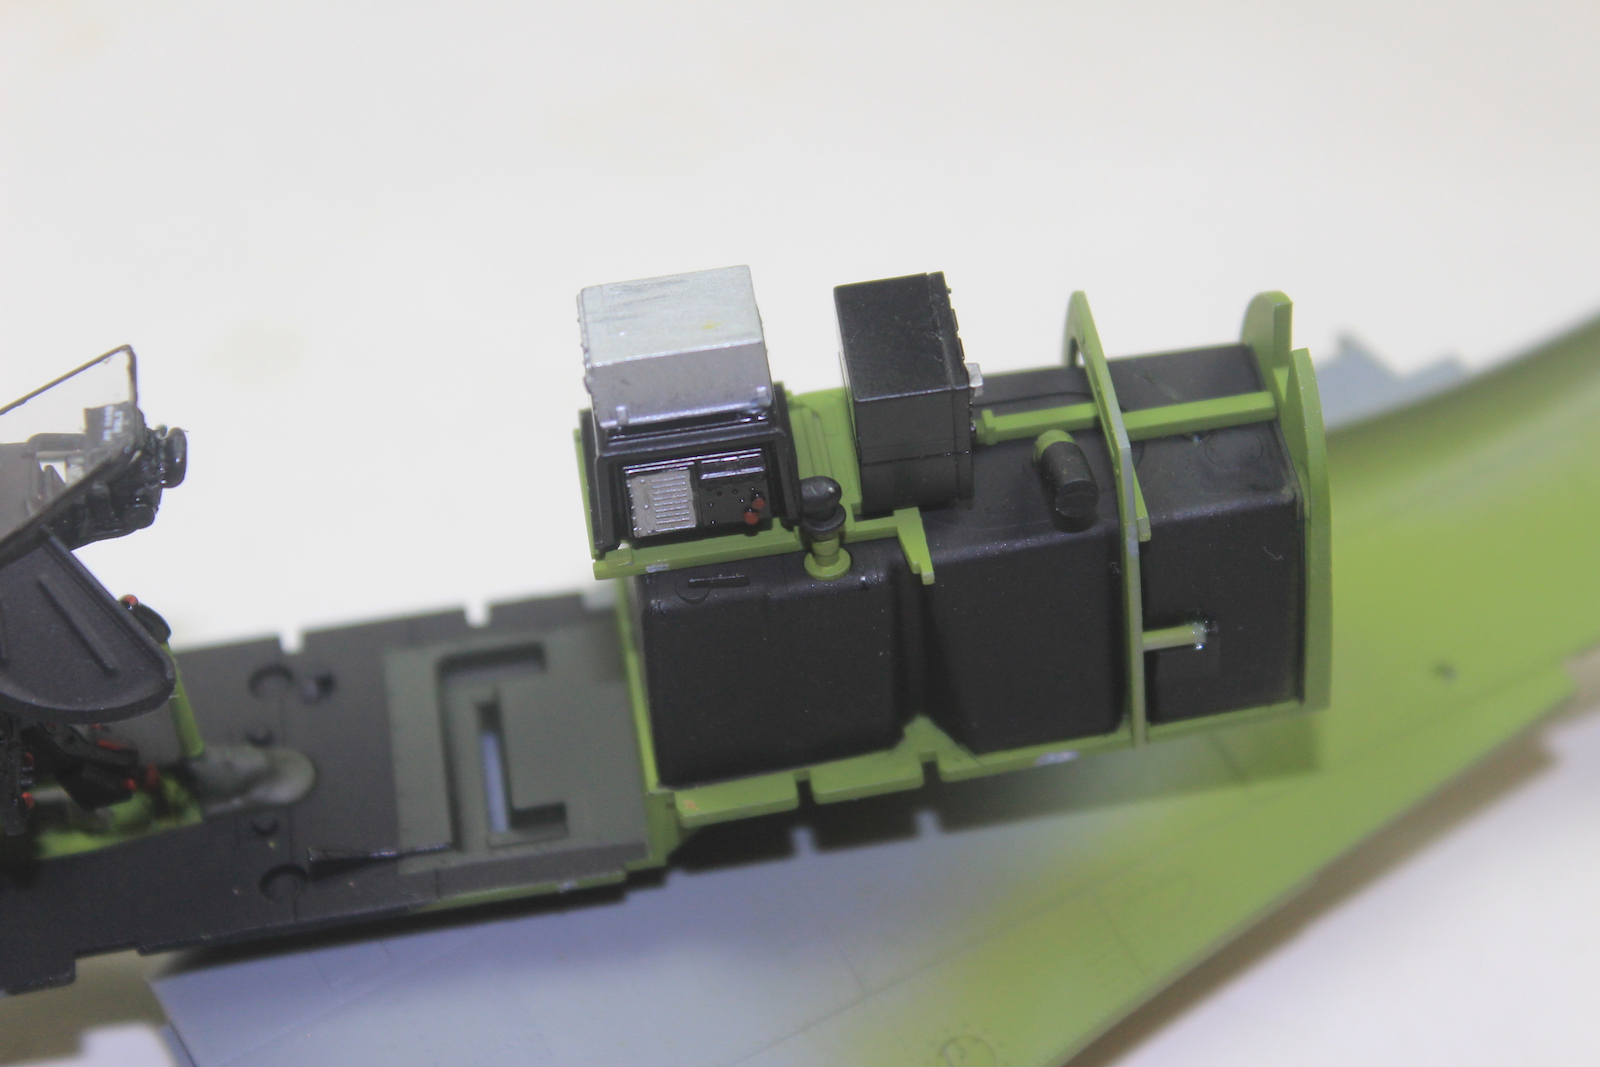
Steps 17 through 20 complete the assembly of the aircraft interior. The kit includes some parts to add extra detail to the interior of the sidewalls. Parts D35 and D36 add a huge amount of detail to the interior of the cockpit. There are a lot of small parts and details here that will need to be painted, so refer to your references and make sure you pay close attention to the color call outs. The only issue I had with these steps was with the small decals, once added they were very difficult to move around without tearing so care is needed to get them as close as possible before pressing them to the surface. The last issue I had here was with the two halves of the main fuselage. Some of the engine mounts are supposed to be painted the same as the exterior metal color. This requires some very careful and complicated masking to accomplish.
With the interior completed it is time to install it into the fuselage and close the fuselage halves. Step 21 deals with the assembly of the radiator interiors, I had no real issues with these parts but this is the first instance of the addition of the magnets. When working with these magnets pay attention to the polarity and attach everything with superglue. In most cases the magnets are there to attract a flat piece of photo etch, so the direction of the polarity is not super important, but to avoid any issues try to install all of the magnets in the same direction.
In Steps 22-23 installation of the radiator and interior subassemblies is completed. The first issue that I had here was with part V28/V26 assembly. This is the backstop for the rear wheel well and for the wheel up option the fit was perfect. When I went to install the wheels down version after final painting the fit was not great and I ended up cutting the assembly out to improve the fit. The intent of this assembly is to allow switching out the parts for wheels up and down. But as with the rest of the parts intended to allow for the multiple display options, the inclusion of this in the final build compromises the fit of one of the options. You would be better off picking which display option that you want early in the build and removing the parts not required for the multiple options.
Once the radiators and cockpit are installed in the left half of the fuselage it is time to close the fuselage. Take care not to forget the poly cap added in Step 23, as it is critical for the addition of the horizontal stabilizers in Step 35. After the fuselage halves had cured I noticed the first of the very few fit issues. For the most part the fit of the fuselage is remarkable, but I had some trouble removing the seams on the underside from the outside of the radiator housing to the tail. Filling and sanding helped but it was difficult to accomplish without loosing rivet detail.
In Step 25 I left the exhausts off until after final painting and I also deviated from the color call outs here. I chose to paint the exhausts Model Master Metalizer Burnt Iron rather than the paint mix shown in the instructions. The location points for the battery on the engine frame are a little vague/weak, the battery broke loose several times while I was handling the kit. I also left part R21 off until after final painting as on the A and C options it is painted red. Lastly the fit of V13/V14 is a little rough in Step 27, the seam needed a bit of clean up prior to painting.
In Step 28 and 29 it is unclear if the straps on the pipe insulators are required to be painted silver, so refer to the reference book for further details. In Step 30 take care not to miss the two paint callouts for white and red, as these are easiest to complete after initial painting but prior to final decaling. I had no issues with the fit of the rudder or the stabilizers. The leading edges needed a little filler and sanding but nothing more than normal. The same can be said for the elevators and second part of the stabilizers in Steps 32 and 33. The inclusion of the shafts and PE parts for the hinges is a great addition. With care in the application of super glue you will get a very strong hinge that is completely workable.
Next up is the assembly of the rear landing gear and bay. You will need to paint all of the parts in Step 34 prior to assembly as the gear will not fit into the bay if the bay sides are already assembled. I left the tire, V19, off until final assembly. The kit thankfully includes shafts that are used in construction of the landing gear that strengthen the gear significantly to the point that metal landing gear may not be necessary. The detail and fit of the landing gear parts is great. They required a little sanding after assembly but nothing serious. There are two options for the rear landing gear bay in Step 34, gear up or down, and the kit includes duplicate parts so that you can build both options.
In Step 35, the horizontal stabilizers are attached and the rear landing gear bay is finished. I had no major issues with the fit of the stabilizers which is superb. To finish the gear bay it needs to be attached to the exterior part. Again, this is designed to be removable so there are multiple parts provided. The option for the landing gear up fit much better than the gear down option, both to the exterior parts and to the fuselage itself. I used the gear up option as a convenient way to mask the bay for painting. Unfortunately, this created some issues later in the build. Once I pulled the closed landing gear bay in final assembly, some fit issues with the open bay were noted and I had to remove the backing plate added in Step 22 to improve the fit.
Next up is the assembly of the main landing gear bay and the start of the main wing assembly. In Step 36 start by assembling the main structure of the main landing gear bay. In this step you add the nuts that the landing gear screw into, take care as these nuts are tiny and nearly impossible to replace. Parts J6 and J7 are very fragile and some of mine were broken on the sprue. There are some sink marks on part F14 between the cross braces. They could stand to be eliminated but I noticed them late in the build and I can say that once the gear bay is painted/installed they are nearly invisible.
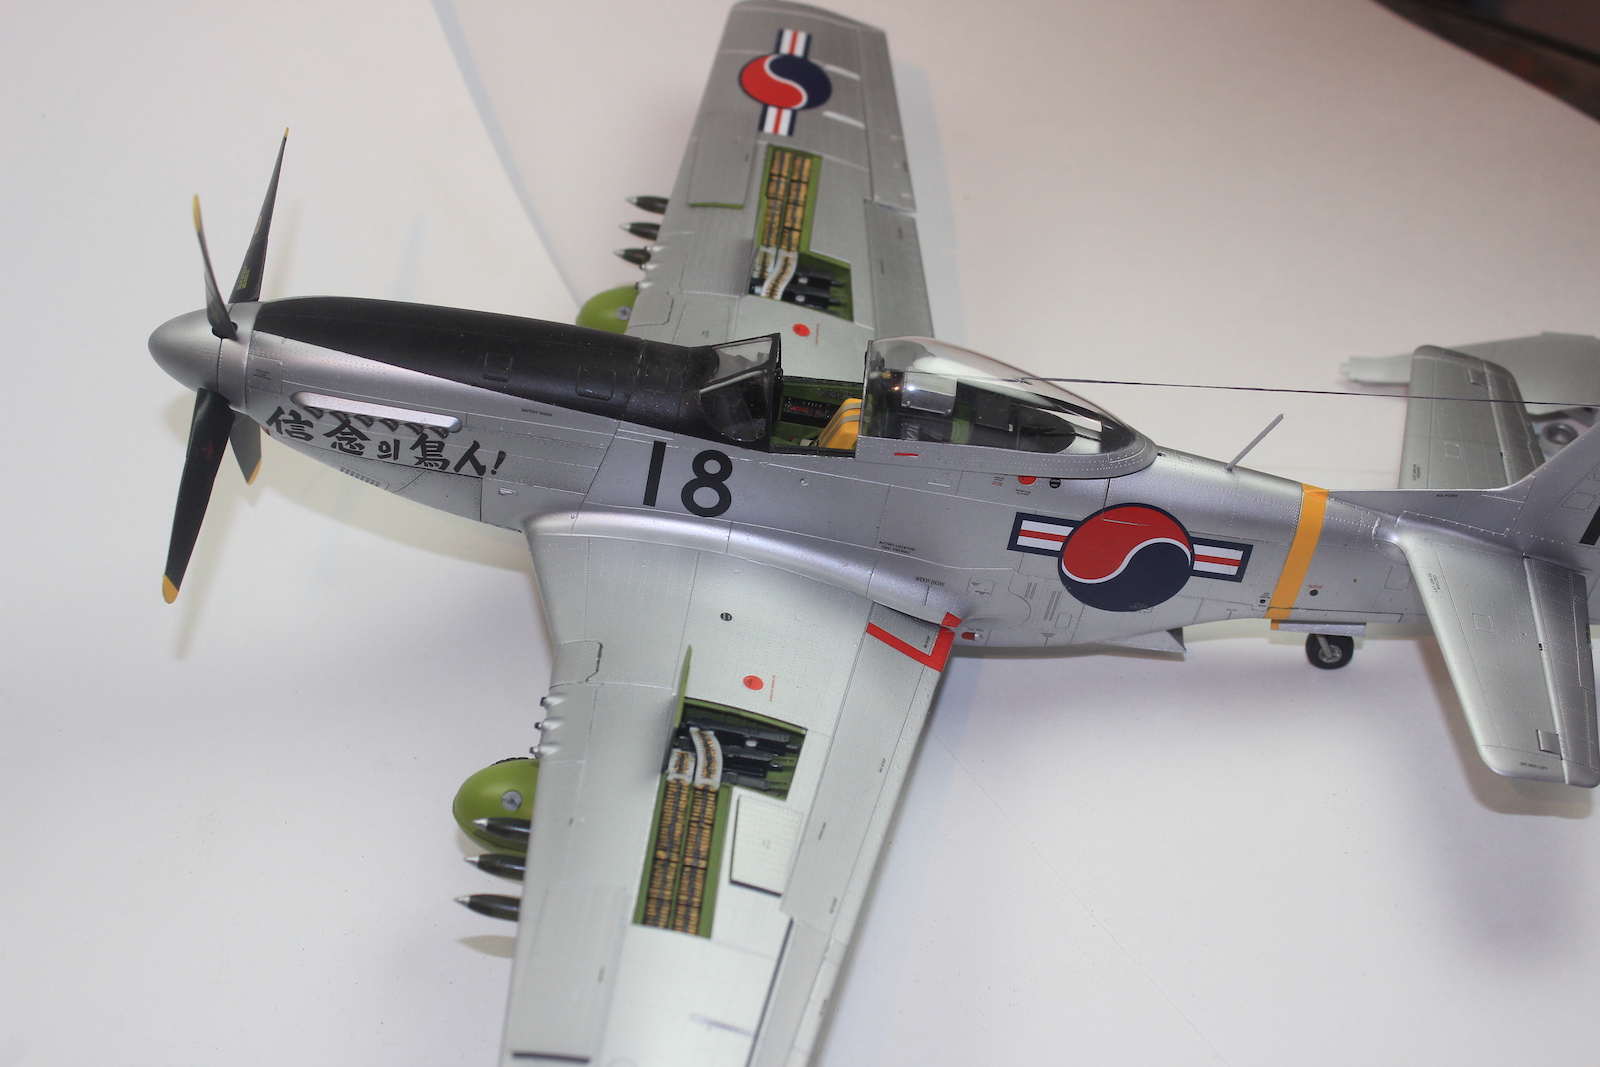
I had no issues with any of the parts used in Step 37. Step 38 starts the process for one of the kits cooler options, the open gun bays. You do have the option to display these as open or closed. If you opt for closed you can leave out the lions share of the parts and painting in the next three steps. I would just include the structural parts like W11 to support the structure of the wings and doors. I chose to display the gun bays as open, so I followed the steps as written. I had no issues with the parts or the fits but I did swap out a couple paint colors. For gunmetal I used Model Master Metalizer Gunmetal and for the brass on the shells I used Vallejo Brass.
The rest of Step 41 and the following four steps cover the completion of the main wings. I had no issues with the fits of the wing tops or the ailerons. The edges of these parts did require some filling and sanding but nothing more than normal to hide some small seams. In Step 43 take care to not forget the small decals for the flaps after the final painting. I left the landing lights off until after the final clear coat but the fit of the clear parts was awesome. The worst of the leading edge fits issues were with part A8. In Step 45 it attaches to the wings and the main landing gear bay. It had some larger seams here that required multiple passes with filler to eliminate. Step 46 finishes the wings by attaching them to the fuselage and the fit around the wing roots was awesome. No real sanding or filler was required. I did run some Mr. Surfacer 1000 along the wing roots to ensure that there were no inconsistencies.
In Step 47, I had some fit issues with R26/R27 for the radiator intake. There were seams on the interior of these parts that were difficult to remove. Luckily due to the size of the kit, the seams aren’t too difficult to reach for sanding and filling. I also had some fit issues with R12/13 in the same step. There was a nasty seam on the exterior of this assembly that I never completely got rid of. The fit of this subassembly in Step 48 to the main fuselage is decent but it did require some filling and sanding. The fit of parts A9/10 to the leading edge was great.
There are two options for the landing gear bays doors, retracted or down, and Step 49 covers the open doors. I had no real issues with the parts in this step, just take care to not forget the tiny deal added here. Also, the PE plates here are to attach the subassembly by magnets. The fit of this assembly into the wheel well is very tight so take care when installing it after final painting. Again, I used the gears up option as a convenient way to mask the gear bay for painting.
Next is the assembly of the main landing gear itself. The kit includes some extremely nice detail for the landing gear like some very finely molded brake lines. Again, there are metal shafts buried in the gear assemblies to strengthen the gear. The kit includes some very nice rubber tires and the only issue with them is that there is a small molding line running down the center of the tires. I found this to be fairly easy to remove with a very sharp number 11 blade but some people may want to opt for resin replacements. The assembly of the gear is pretty smooth with no major issues. I did find that the struts did require some sanding to remove some small seams. I also left the gear doors and tires off until final assembly. Once assembly of the landing gear was complete I set them aside to install into the fuselage at the very end. Do not forget about the tiny decals shown in Steps 50-51, they add a ton of detail and handle the curve of the struts fairly well.
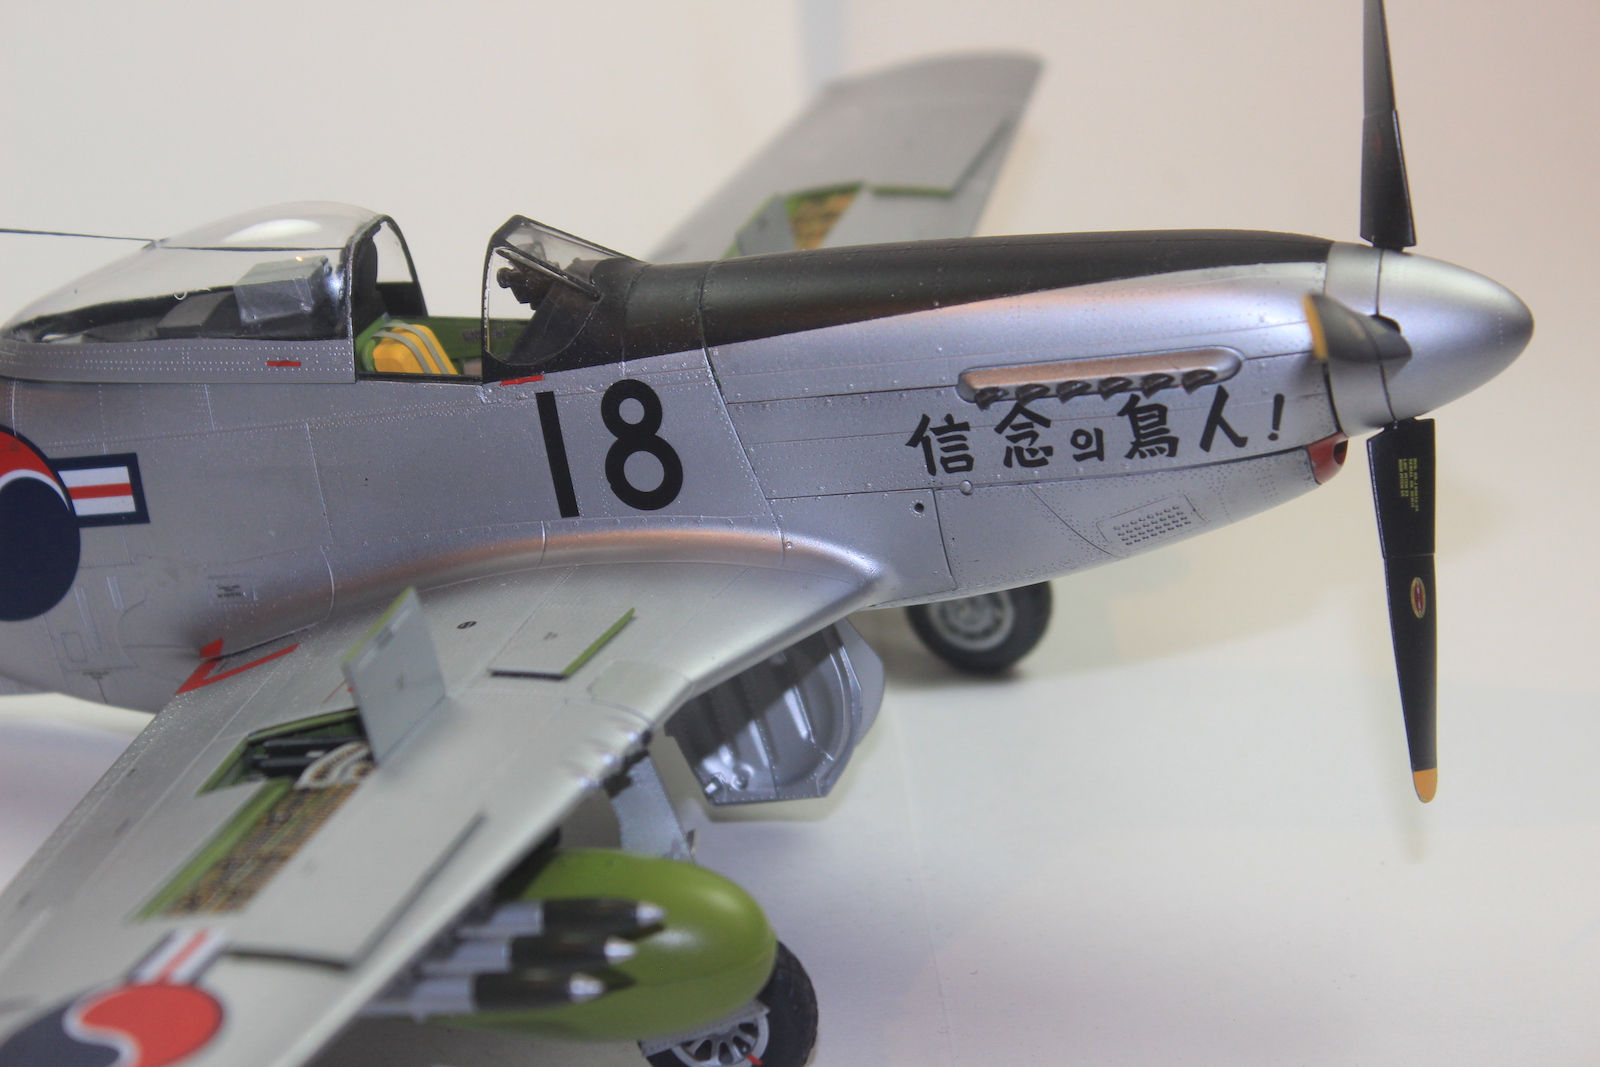
I skipped over Step 54 as I would be adding most of the parts later. I did add the magnets to parts A11/12 and I attached them to the kit temporarily with Silly Putty for masking. I skipped over the next few steps as well, moving on to the canopy. The canopy parts are extremely well molded and the only major issue I had was with the main canopy. It has a serious molding seam running down the center of the glass. This will require a serious amount of work to remove but the result is worth it. I started by sanding with 400 grit wet/dry sandpaper and then buffed the canopy with micro abrasion pads. These had grits ranging from 3200 to 12,000, the goal here is to remove all of the scratches and turn the canopy milky white and cloudy. I was then able to buff the canopy with a Turtle Wax product for plastic before sealing it with Pledge Floor Care.
After the buffing was complete I had one final task before masking the canopy. I needed to drill a small hole to run the antenna wire, which is drilled through the small hump on the main canopy. This is fragile so take your time and work slowly. The kit does include masking for the canopy but it is not precut. It is marked for the patterns that you need to cut and it is pretty easy to work with. The fit of the masking is great and it is very similar to Tamiya tape, super low tack and it didn’t leave any glue behind once it was removed. The fit of both parts of the canopy is pretty good, I did have some issues with the fit of the front canopy that required some Mr. Surfacer 1000 to fill. I did add D33 in Step 63 to the main cockpit part, this helped keep it in place during painting. Just be careful, the fit of this part into the fuselage is very tight and it is easy to damage the paint while moving the canopy around.
Also, in Step 63, I worked on the lower engine cowling. There are two pins that slide into the engine that are installed during this step. The exact location of these is a little unclear, I originally installed them as shown in the instructions but had major fit issues with the lower cowling to the airframe. I ended up having to break them off and move them slightly forward to improve the fit. Use a slow setting glue and test fit often to get the placement right. The rest of the parts for the cowling are prepared next. I started by installing the PE and painting the interior of the parts the same as the exterior color. These parts are extremely well molded and very thin so take care when working with them. For the most part the fit is incredible, but I did have a slight issue with U3, the upper cowling. I could not get it to fit flush to the back near the cockpit.
The last few things that needed to be completed prior to painting were in Steps 68-72. I used Q2 for masking but left it loose to allow for removal later. I left the wing lights off until after final painting. Next, I cut tabs off of K6/K7 to use for the masking of the gun bays. Thankfully the kit includes two sets to allow you to display the bays open or closed. I kept the doors in place using thin pieces of Silly Putty. I also prepared the closed landing gear doors to be used in masking off the gear bay. The build is simple with no noted issues. The last step before painting was to mount the aircraft on the included display stand, which is convenient and allows for touch free handling.
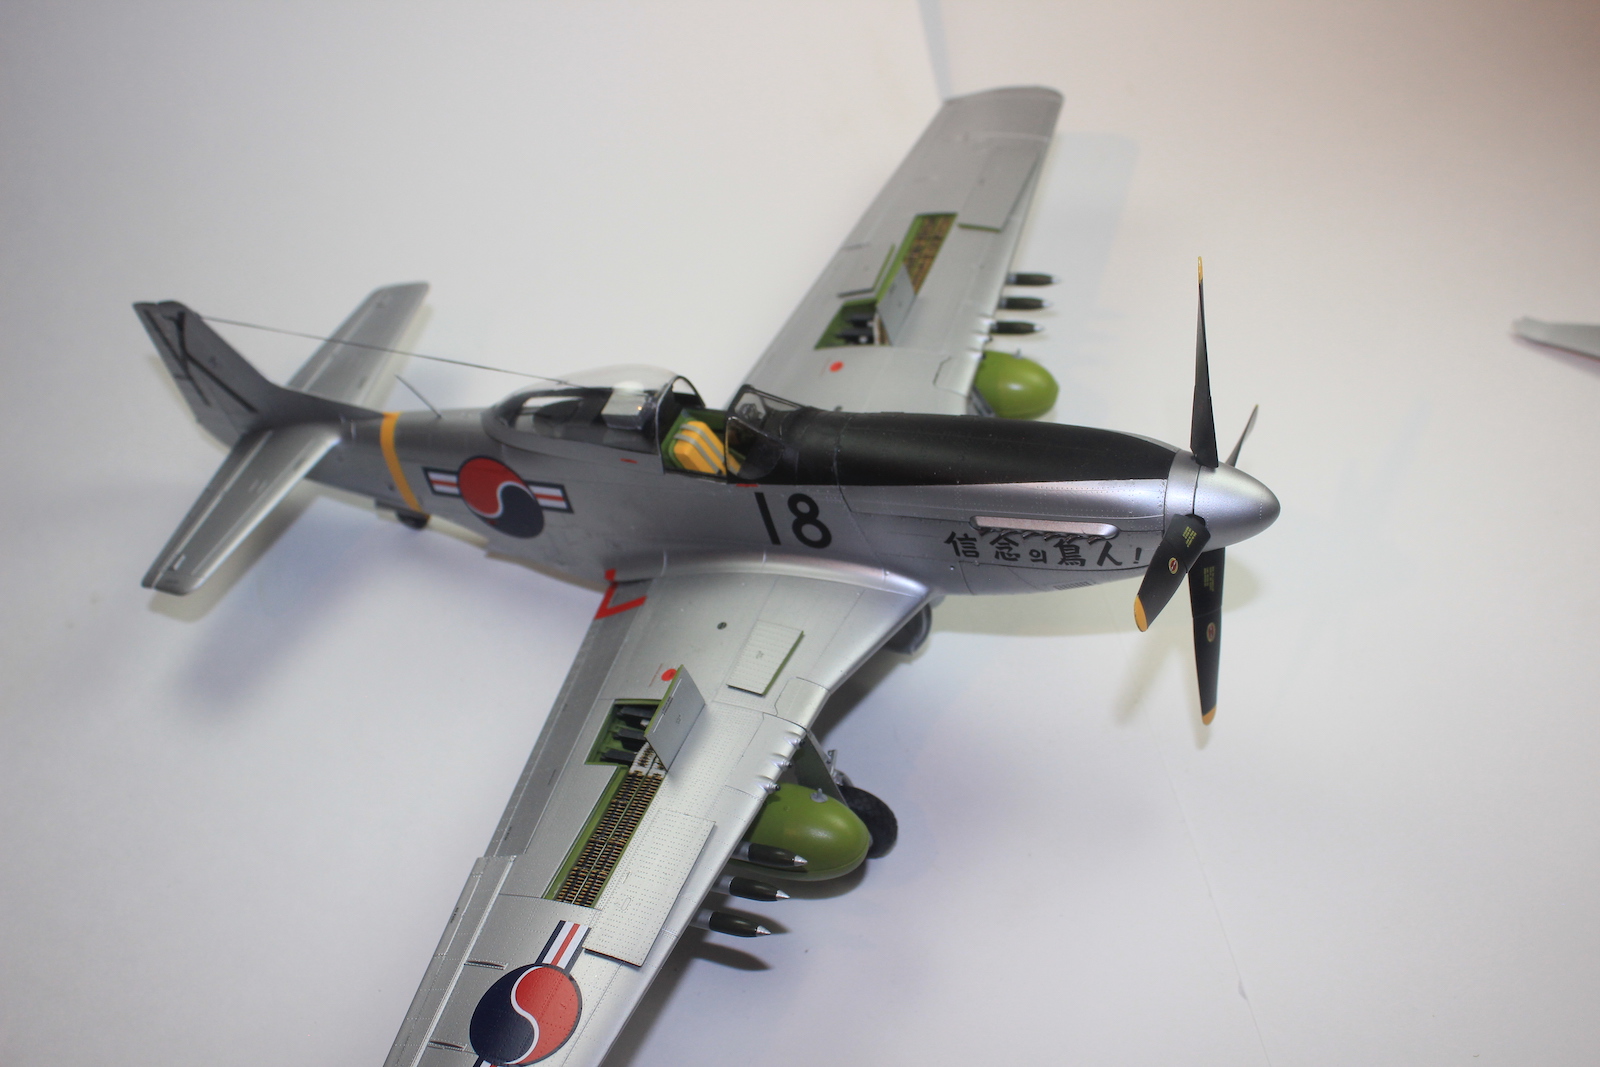
Moving on to the painting of the kit. There are three attractive schemes covered by the decals. The first is the main aircraft shown on the boxtop, “Was That Too Fast” with the shark mouth. The second is for “Karin Ann” from the 39th Fighter-Intercept Squadron and the last is an aircraft from the Republic of Korea Air Force. All paint call outs are for paints from Tamiya’s various ranges of rattle cans and acrylic and all three airframes are in overall silver. As I mostly work with Tamiya paints, I stuck to their suggested colors and color mixes. For the overall silver, I chose to use Model Master Metalizer 1418 Aluminum - Non Buff. I did use X-18 Semi-Gloss Black as a primer under the Model Master enamel to check for surface flaws. The scheme that I chose was the for the Korean aircraft and once I had the silver complete I masked the front to spray the anti-glare panel.
After a heavy coat of Alclad gloss, I moved on to the decals. This is a large kit and there are a ton of decals. I had some reservations about working with the kit decals as I had heard some mixed things about Tamiya decals. However over the coat of gloss with Micro Sol, I had very few issues with adhesion and no issues with silvering. The register of the decals is great and I had no issues working with them. The red decals for the rear part of the wing walks did have a hard time settling over the large rivets but with liberal applications of Micro Sol and Micro Set I was happy with the result.
After allowing the decals several days to dry they were coated with another gloss coat, followed by a Semi-gloss coat from Alclad’s line. The only issue I had with the decals was after I masked to spray flat on the anti-glare panel. Even with multiple protective coats I had a couple decals lift when I removed the tape. I was unable to rescue most of the decals that lifted. Some minor touch-ups completed the painting. Once dry I went back and installed all of the lights left off in previous steps.
Once the painting was complete it was time to complete the underwing stores, complete the propeller and mount the landing gear. The fit of the landing gear into the bay is tight but good. The landing gear is keyed and attached by screw, so getting the proper alignment is easy. Once the gear was installed I re-installed A11/12 parts. Unfortunately, the fit with the magnets is awful and I need to remove them and the spacers to improve the fit. This meant I had to install these parts permanently. The kit provides two options for the propeller and both are well designed/easy to work with. I would recommend painting the tips of the blades yellow prior to decaling, this will improve the register of the decals as they won’t be applied over black paint. Also, the decals will not cover the edge of the blades so this will eliminate the need for touch ups.
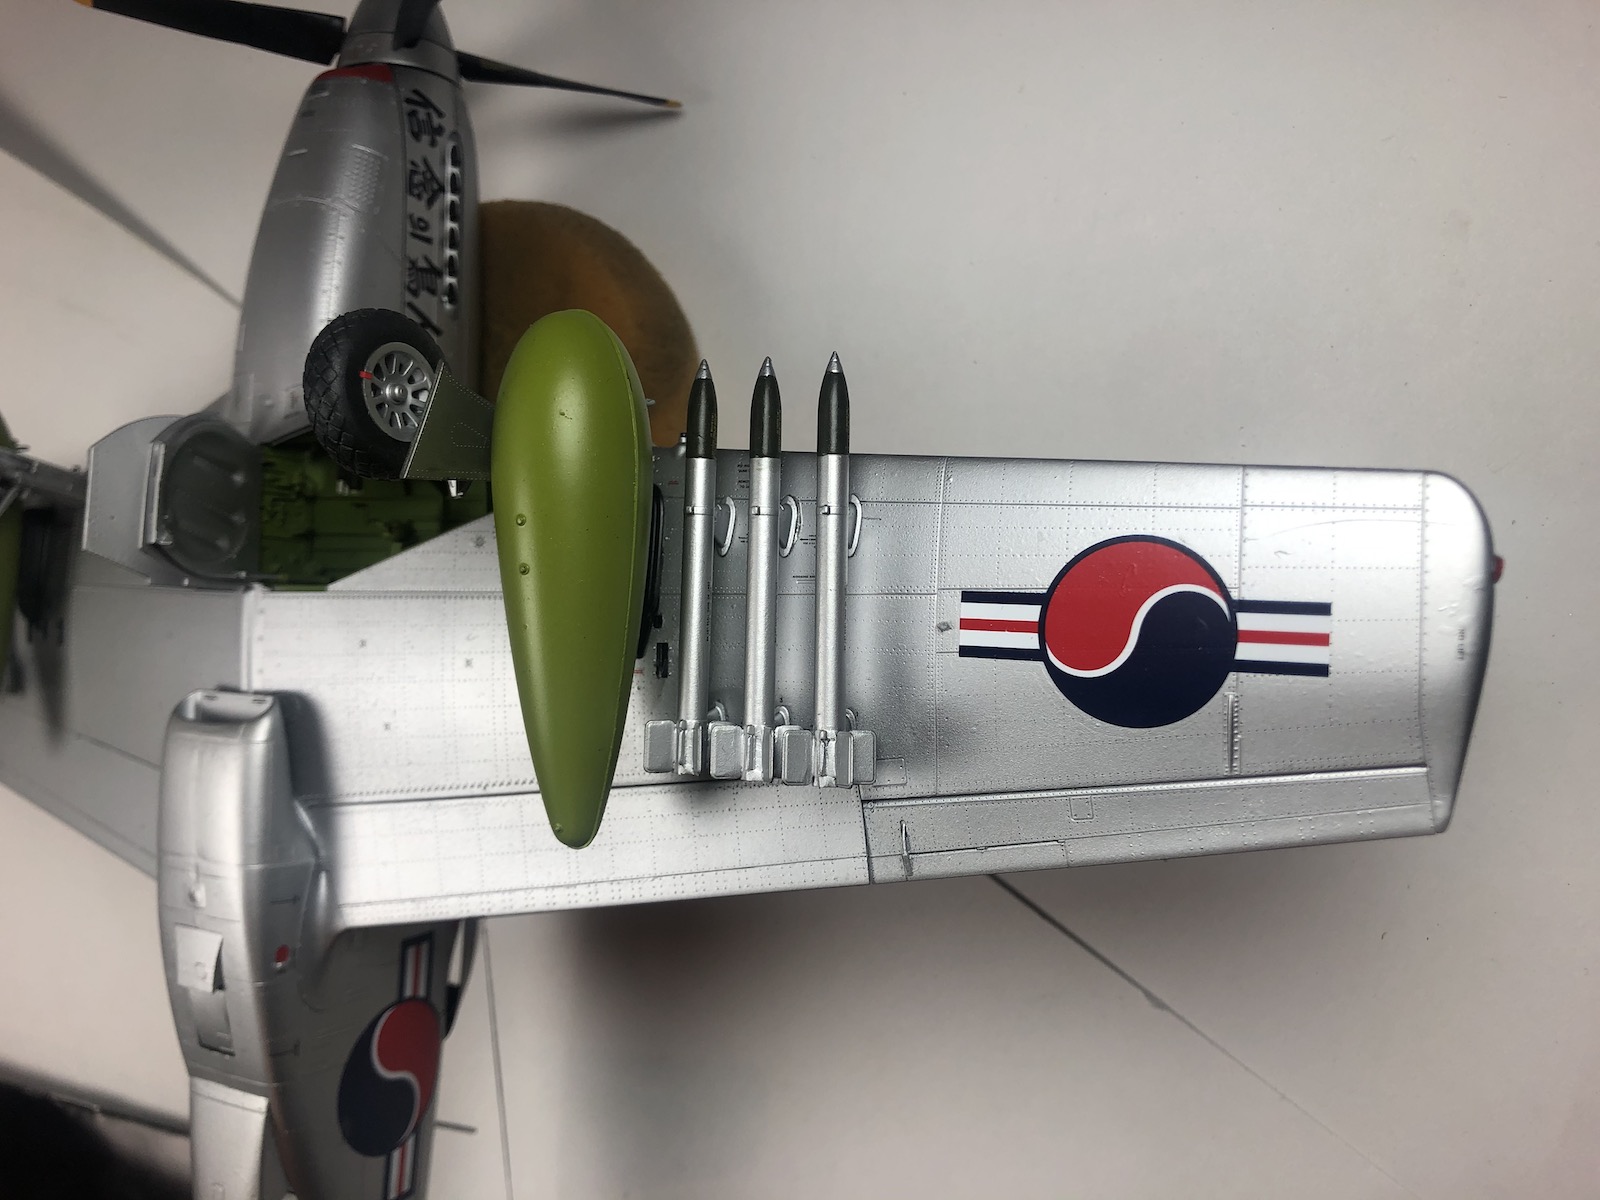
The last major part is the underwing stores. The fit provides several options for loading up the Mustang. There are 5-inch rockets, large Napalm bombs, 75-gallon drop tanks and 500lb bombs. For my build I chose the Napalm bombs and the 5-inch rockets. The Napalm bombs are really straightforward with no fit issues. The part seam is thoughtfully along a real seam on the tanks. My only issue with them is that the instructions call for the racks to be painted semi-gloss black rather than body color. This seems a bit odd and I would recommend checking your references.
The rockets were much harder to work with. First pay close attention to the instructions duding assembly. The parts for the rocket bodies are all extremely similar and it is very easy to use the incorrect one. So be careful when prepping them for assembly. Second, the fins are molded separately and they are subtly keyed to fit a specific way. Follow the guides in the instructions carefully. I found the fit of the fins to be pretty rough and opted to do a lot of sanding/filling to correct. Installation of the underwing stores is very smooth with no real issues. The last step was to run the antenna through the hole in the canopy to the tail. I used a type of line commonly used for railroad electric lines as it has some give. This and the addition of the open gun bay doors completed the build.
This is a wonderful kit. It was my first large scale aircraft in a long time and it was my first large scale Tamiya aircraft. It was surprisingly easy to build especially for its size. The engineering is also fantastic. My only real complaint is that the ability to swap from flying to on landing gear compromises some of the fits. As stated above I would recommend that you pick which option you are planning on building early and stick to it. I would highly recommend this kit to anyone that is interested in large scale propeller aircraft that is looking for a surprisingly fun build. My thanks to Tamiya USA and IMPS for giving me the opportunity to review this kit.
Cockpit panels
Cockpit assembly
Cockpit assembly

Nose assembly
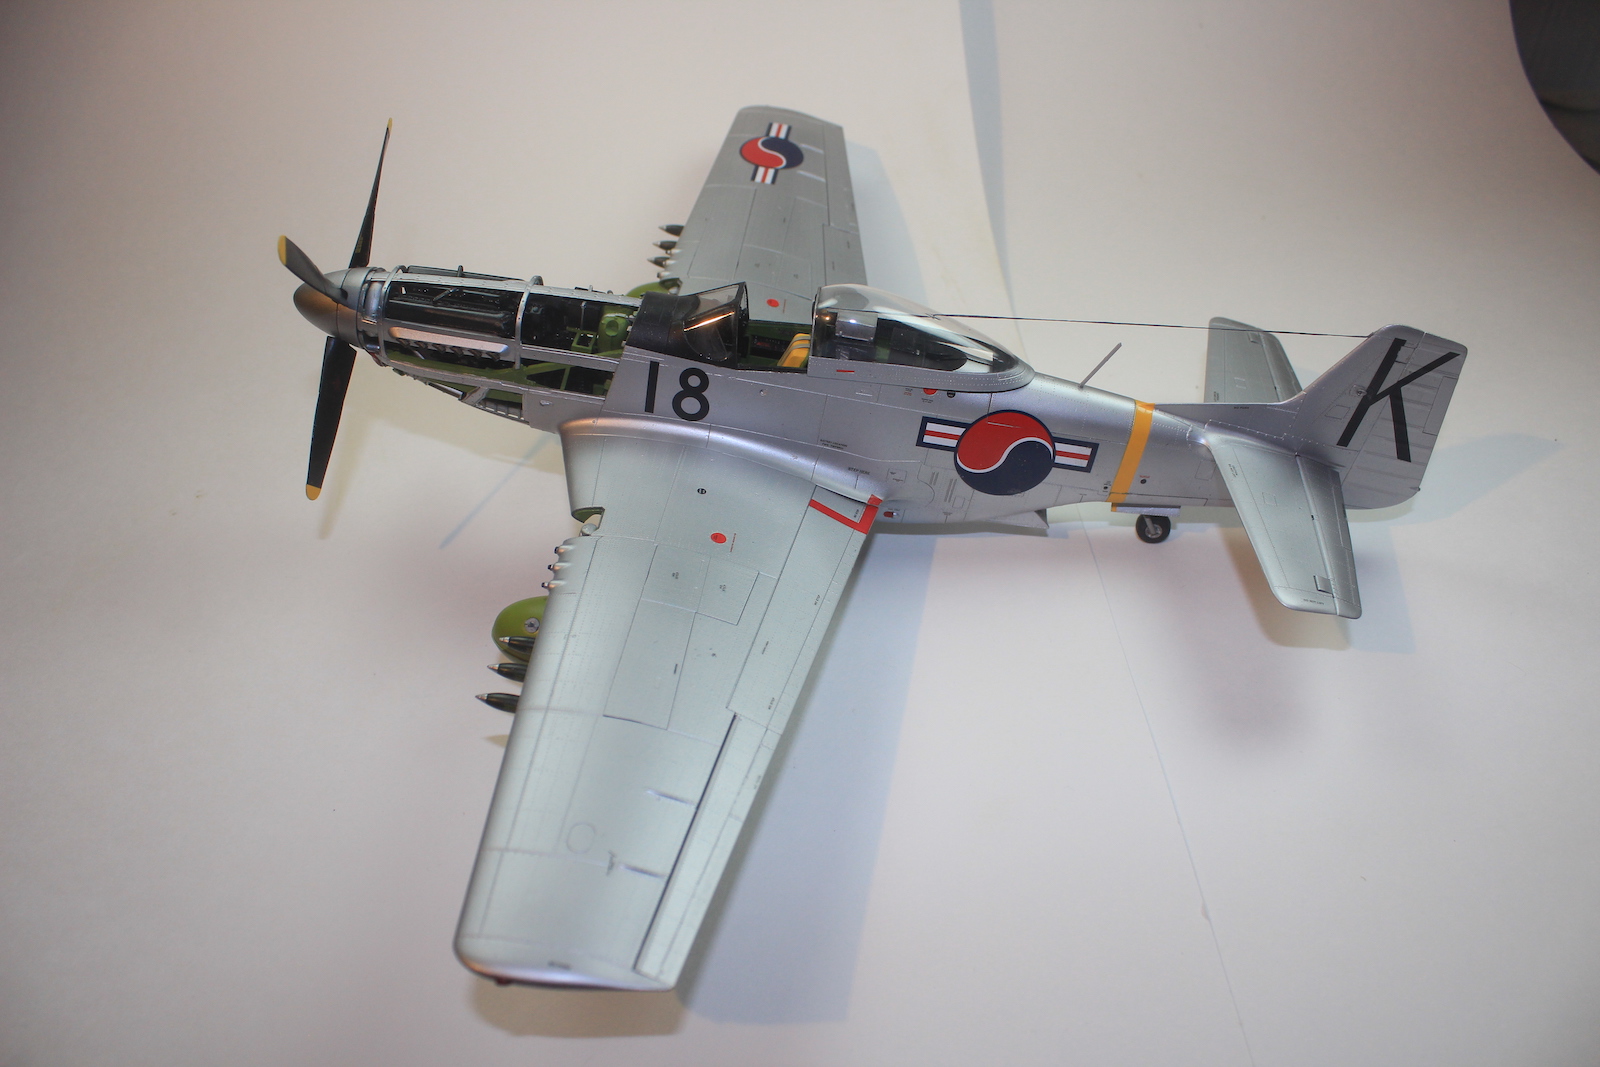
Left side
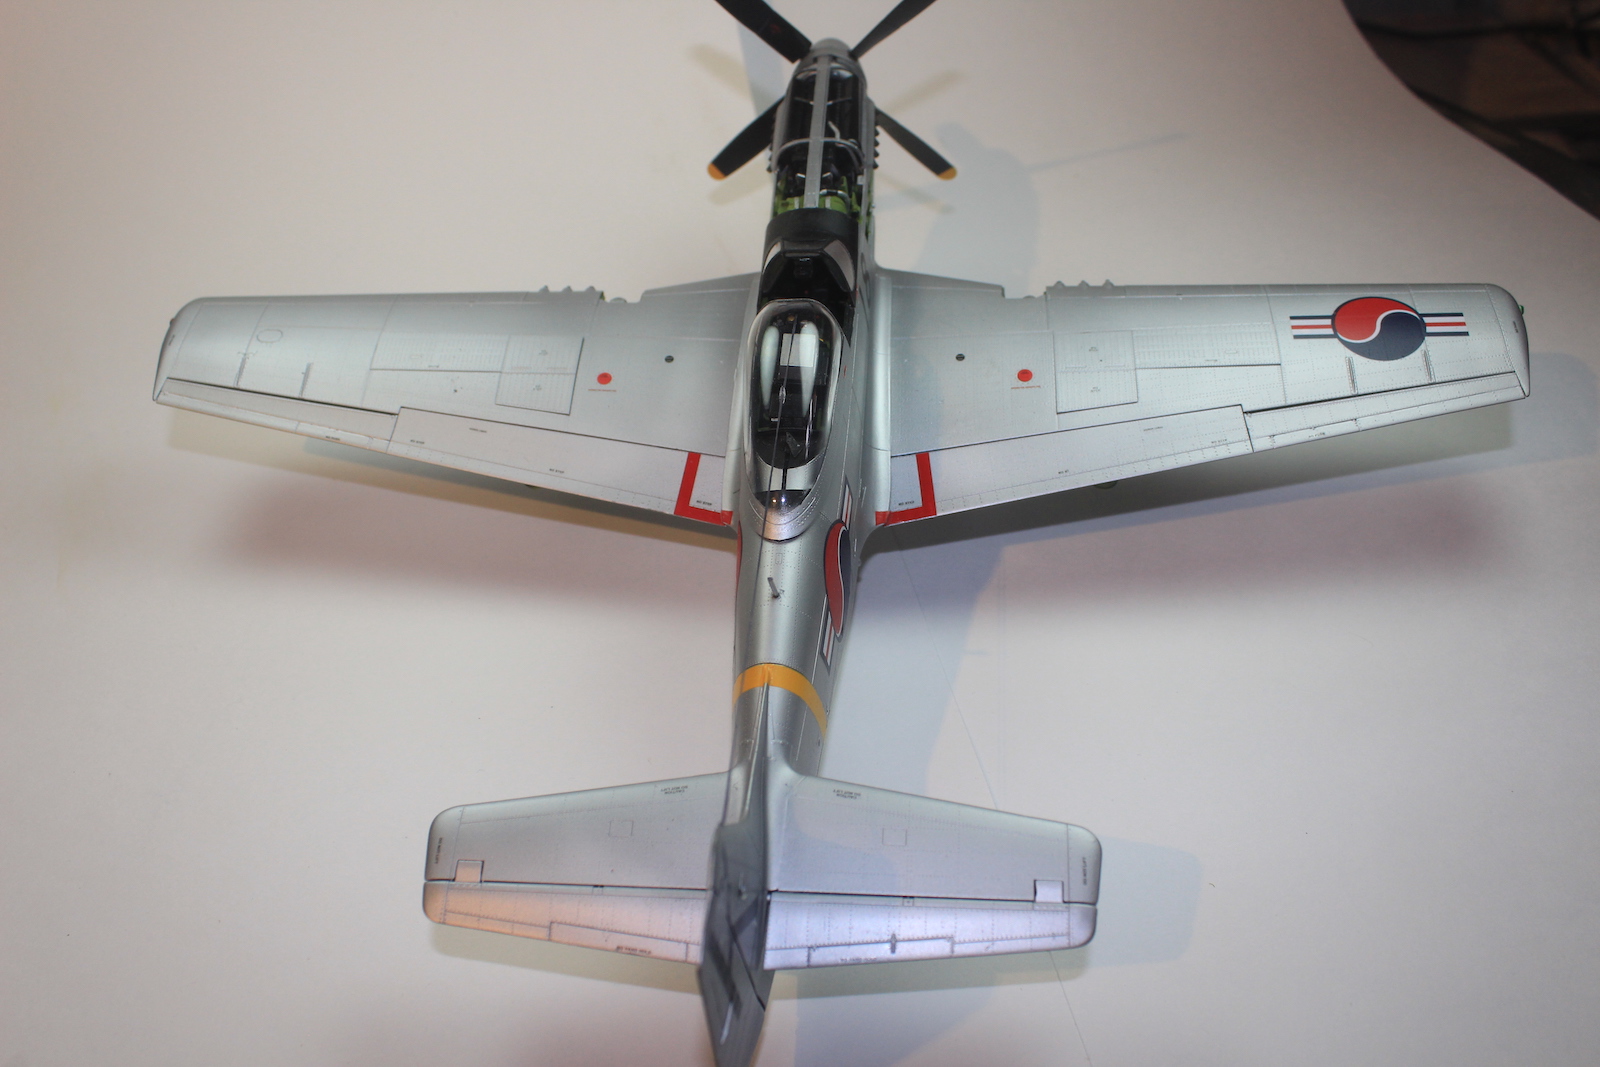
Overhead view

Right side
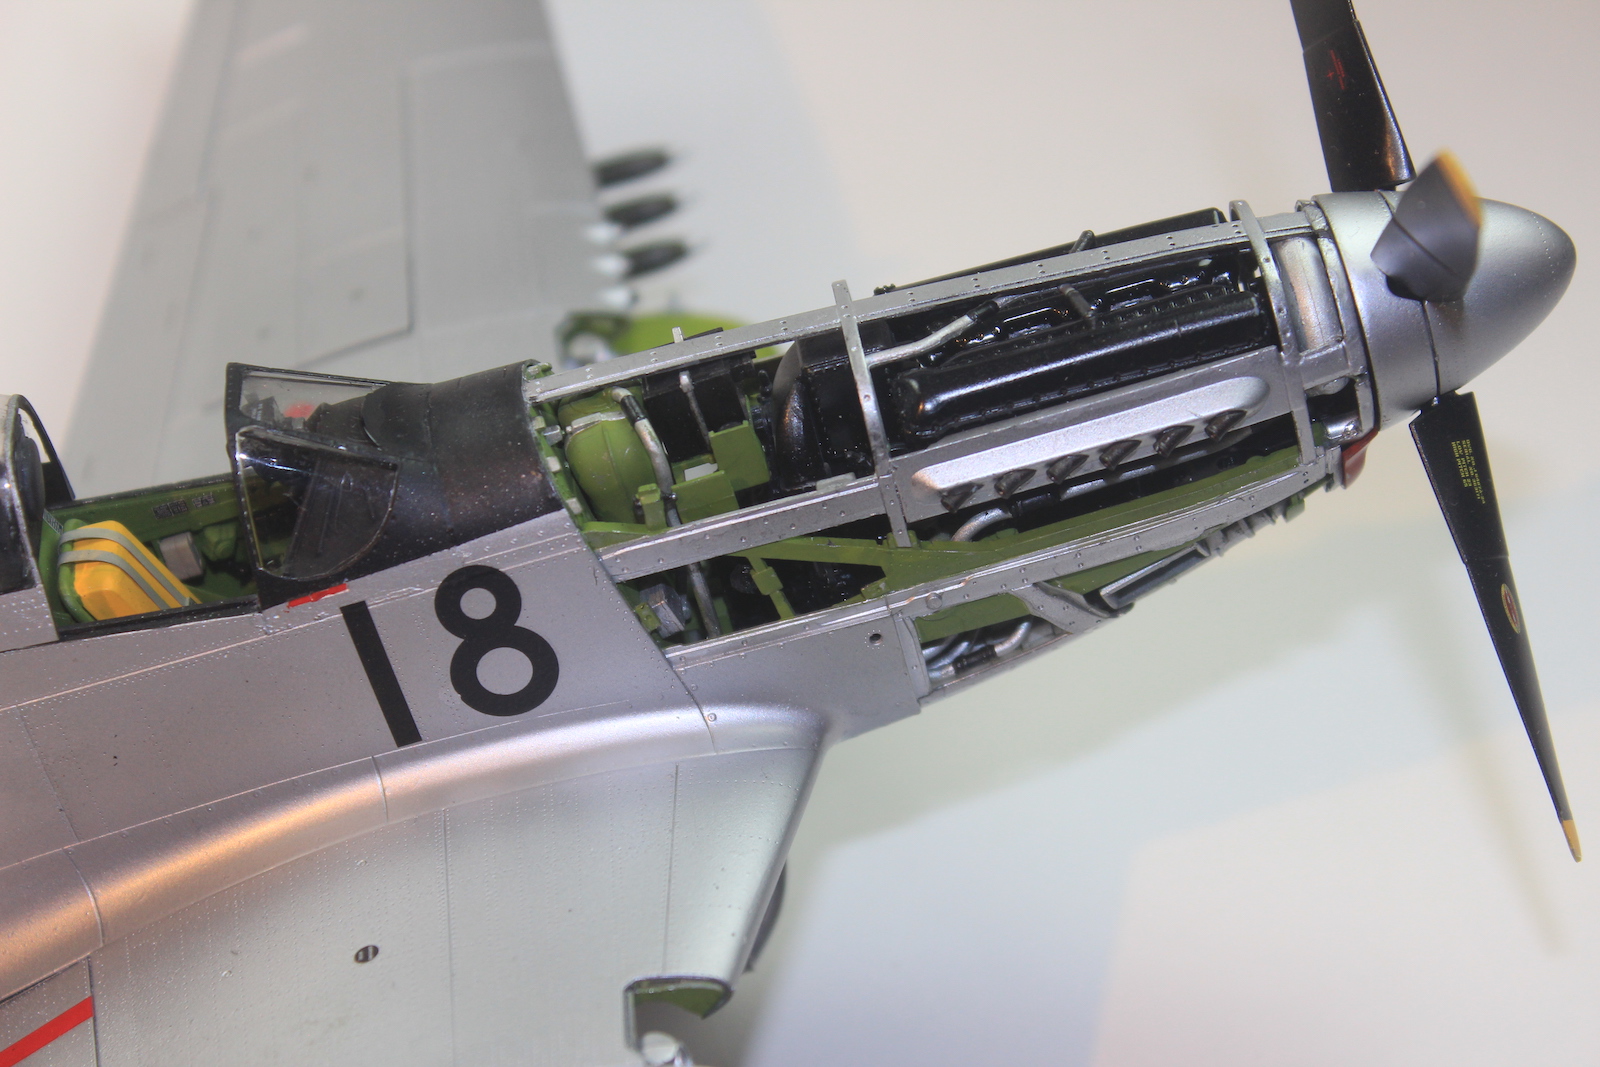
Nose assembly

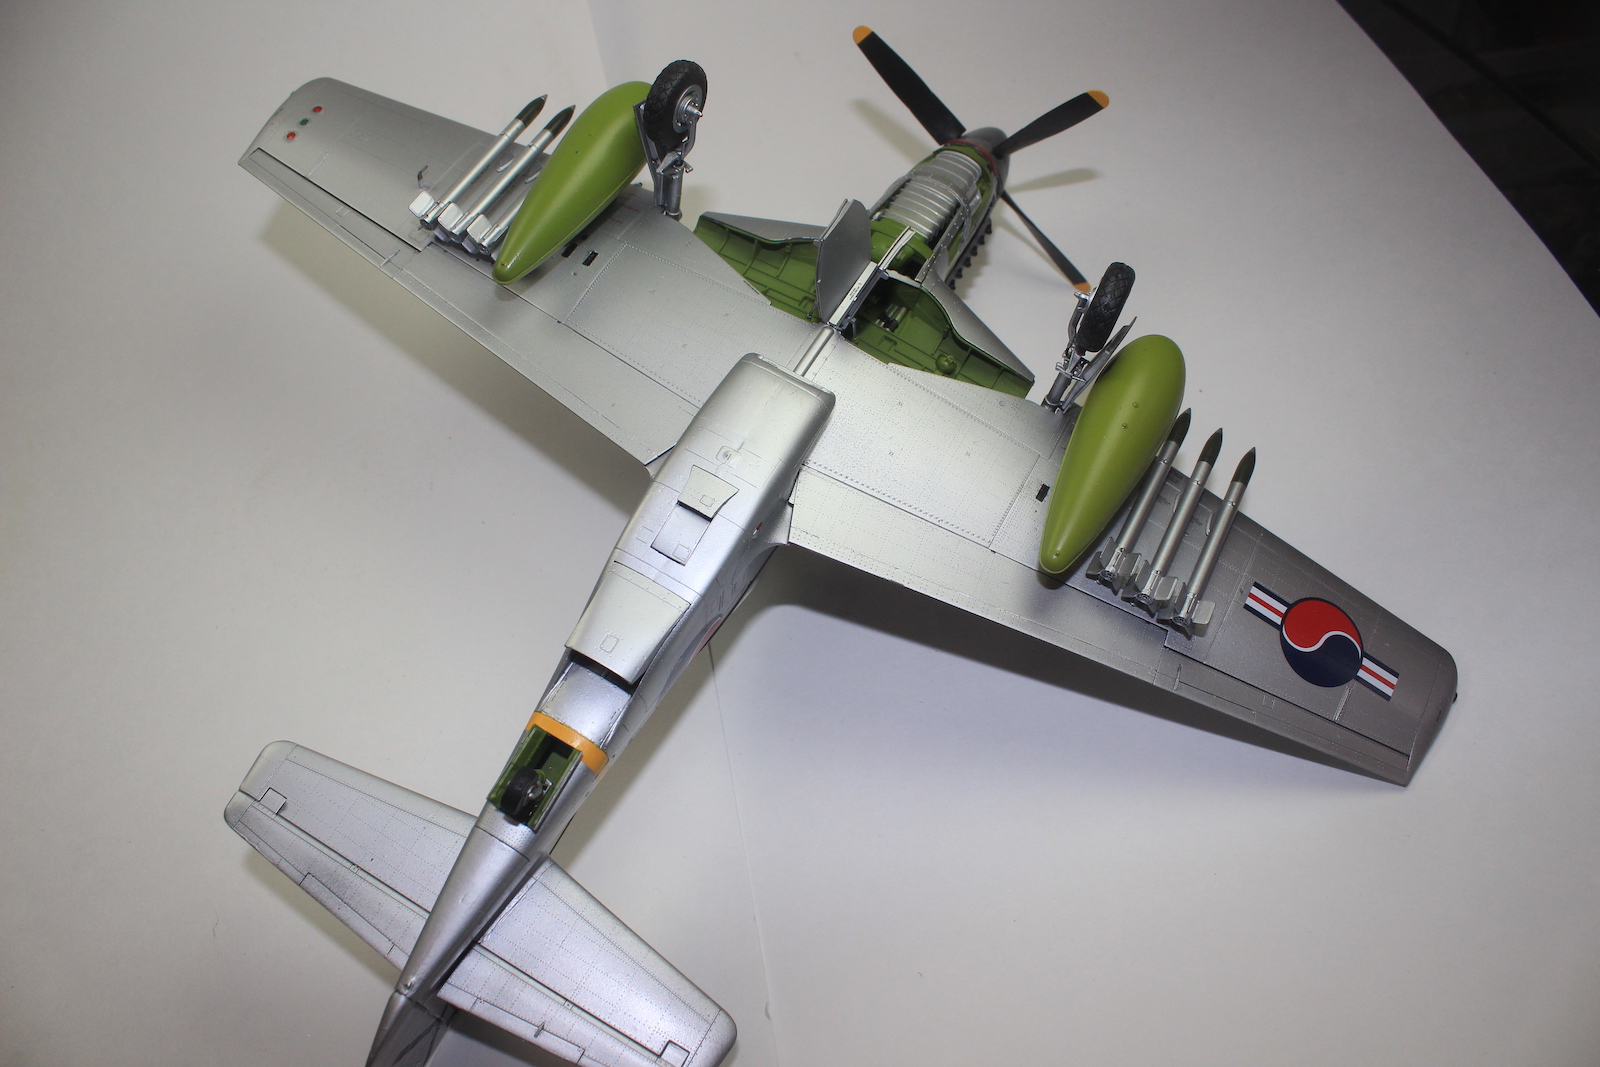
Front view with ordnance

Front view
Underside view

Wing tip underside

Nose underside
Cowling parts
Completed front view
Completed left side
Completed nose
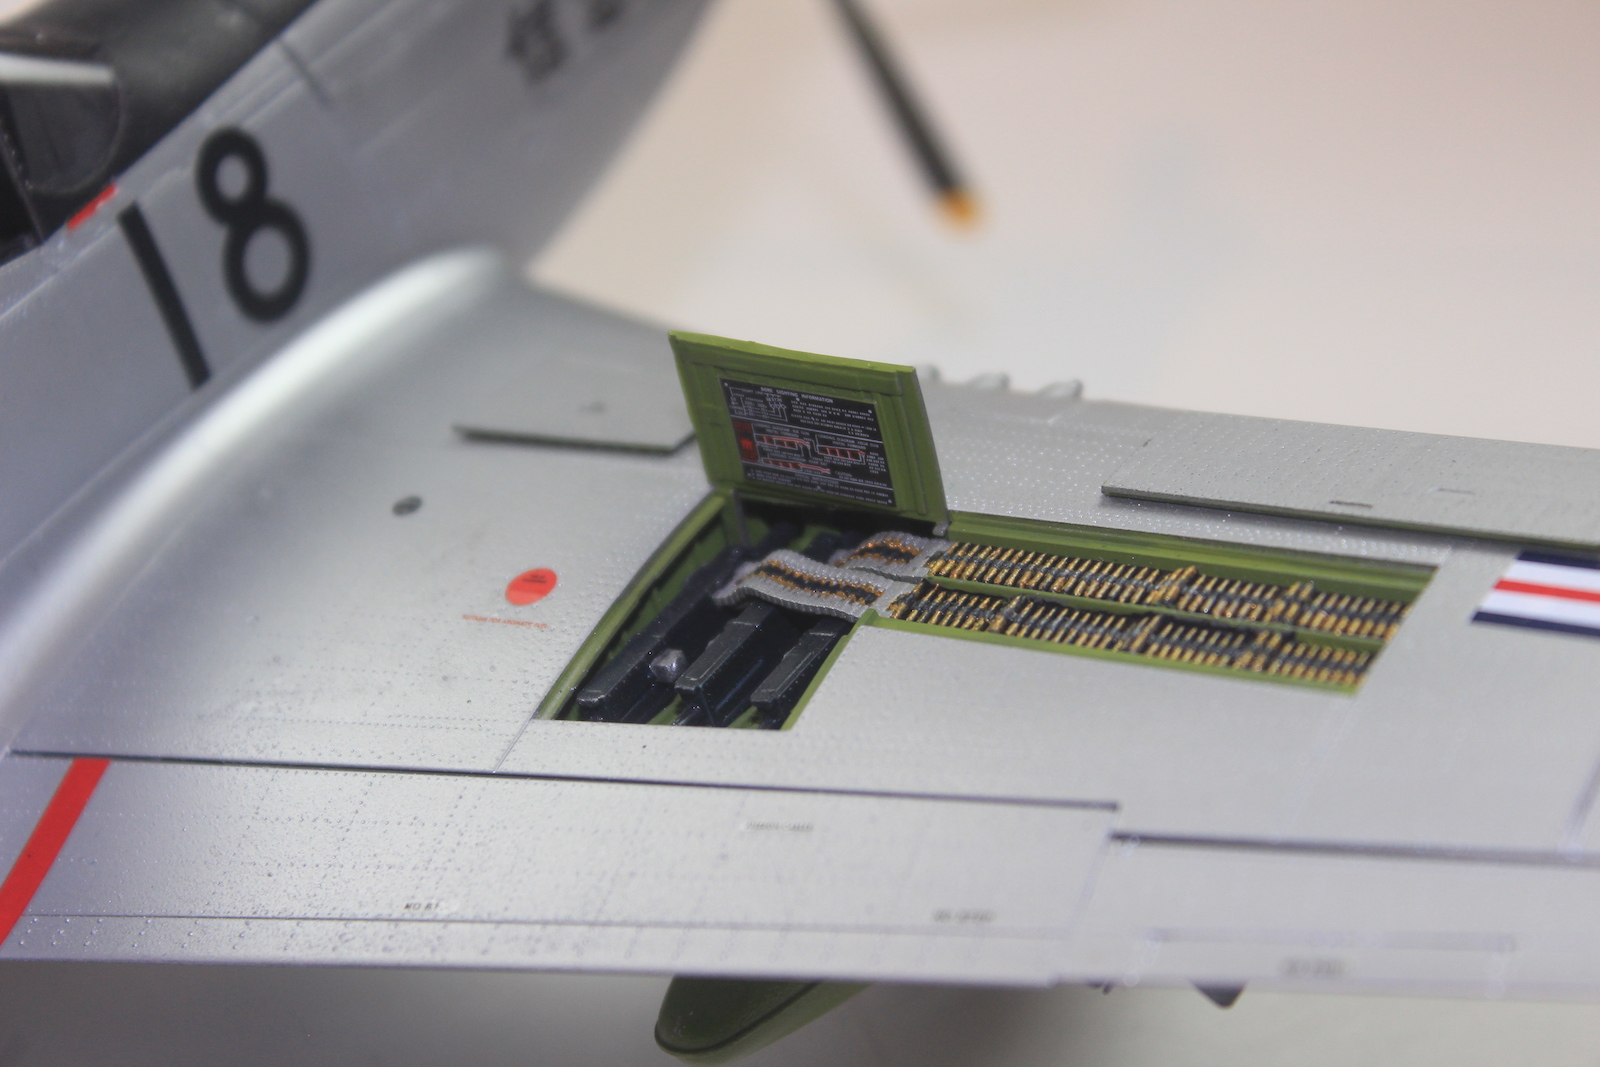
Gun bay

Gun bay
Cockpit assembly

Cockpit assembly

Instructions cover
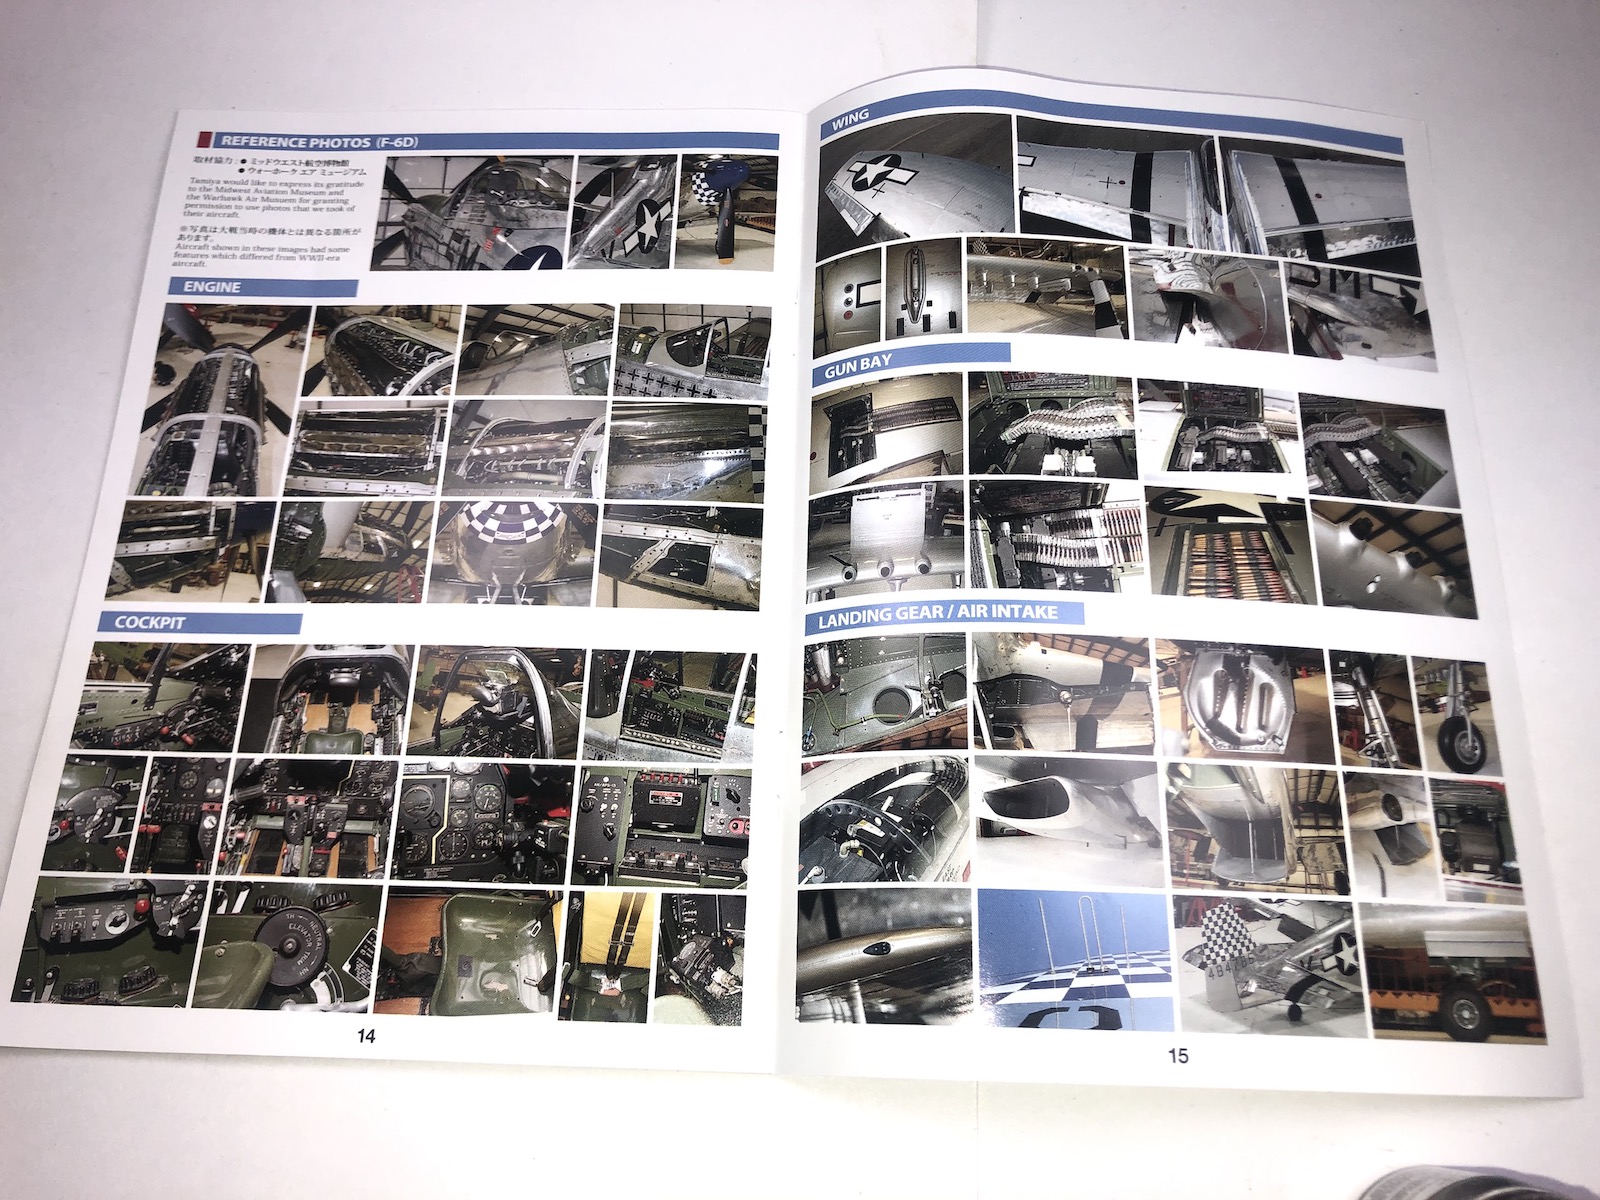
Reference photos
Comments
Add new comment
This site is protected by reCAPTCHA and the Google Privacy Policy and Terms of Service apply.
Similar Reviews