
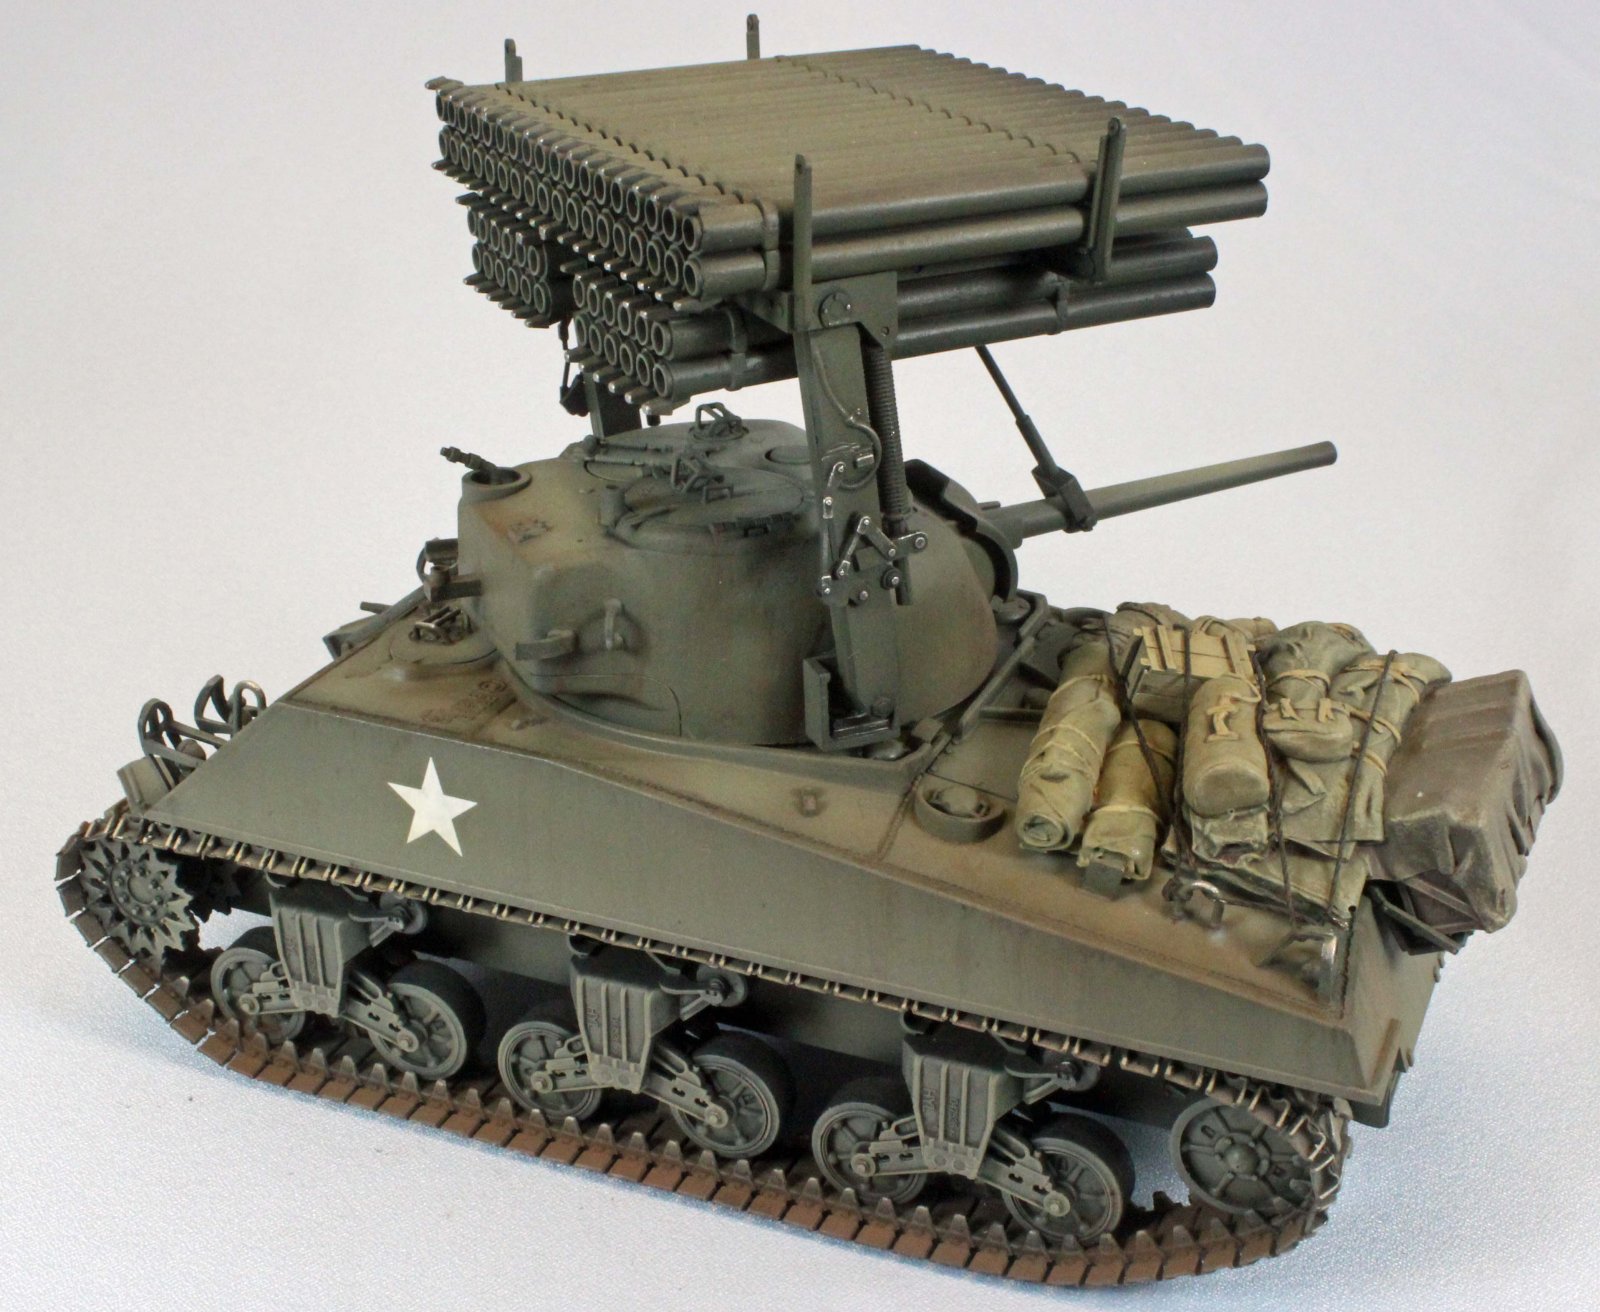
M4A3 Sherman w/T34 "Calliope"
Summary
Academy apparently has teamed with Italeri to produce one of the first ‘Calliope Shermans’ to appear in some time. The M4A3 vehicle is produced by Academy, while the T-34 multiple rocket launcher looks like it is from Italeri, based on sprue shots of the rocket launcher parts. As with all of their AFV kits, Academy provides the builder with good value based on fewer parts without sacrificing a lot of detail.
Background
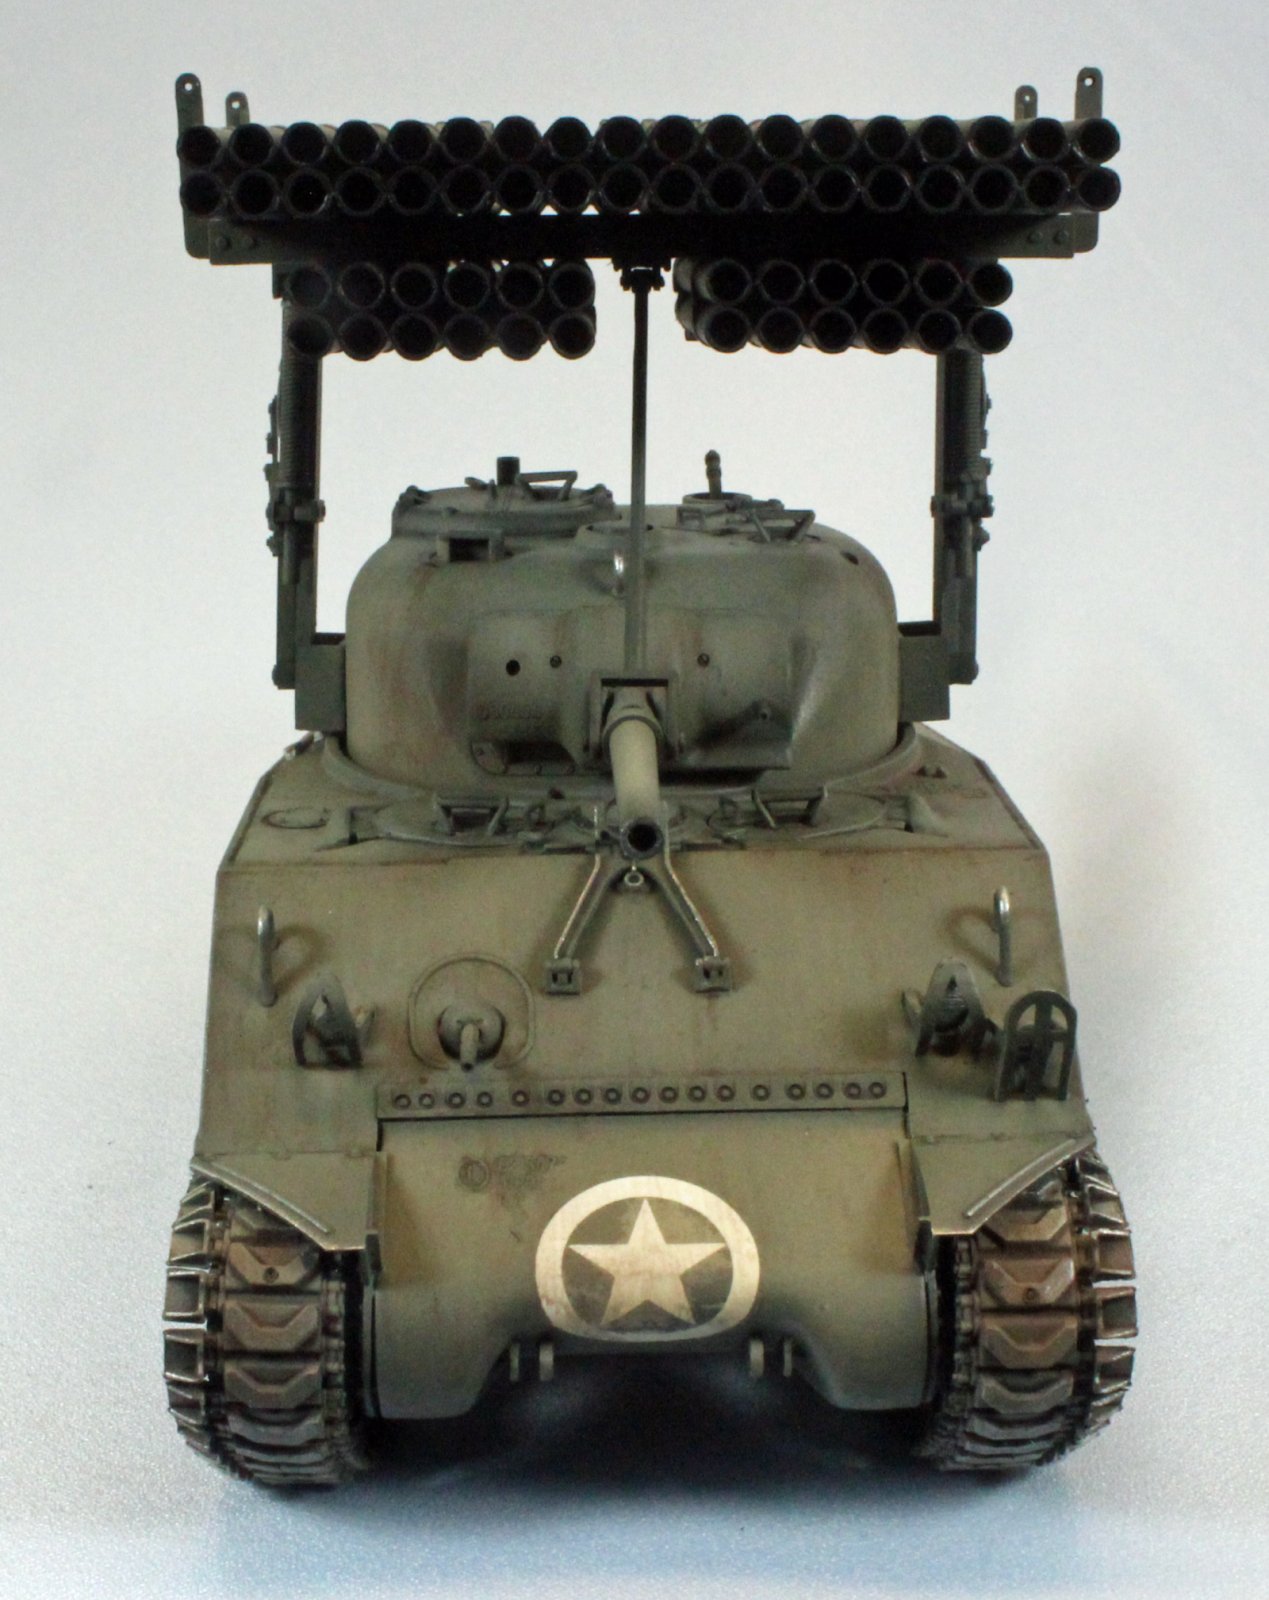
The T34 (Calliope) was a tank-mounted multiple rocket launcher used by the United States Army during World War II. The launcher was placed atop the Sherman M4 medium tank, with its prominent vertical side frames firmly anchored to the turret's sides, and fired a barrage of 4.5 in (114 mm) M8 rockets from 60 launch tubes with devastating effect. It was developed in 1943; small numbers were produced and were used by various US armor units in 1944-45. It adopts its name from the musical instrument "Calliope", also known as the steam organ, which had similarly lined pipes, and which had historically existed on steamboats of the Mississippi River in the United States.
What’s in the Box
- 9 sprues of soft, dark green plastic (Academy)
- 1 sprue of soft, olive green plastic (Italeri?)
- Lower hull packaged separately
- 2 lengths of black, one-piece ‘rubber-band’ track
- 1 piece of white twisted cotton string
- 1 medium sheet of decals
- 1 small sheet of photo-etch containing optional headlight grates
- Two separate instruction sections, totaling 12 pages with 10+ steps, printed in black and white ink.
The thin decals are printed by a company out of Korea, and are in perfect register. Three three-view drawings are included, representing three color schemes:
- U.S. 12th Armored Division, Flétrange, France, March 1945
- U.S. 14th Armored Division, Germany, Early 1945
- U.S. 95th Infantry Division, Germany, January 1945
Paint product callouts include Humbrol Enamel, GSI Creos Acrylic, GSI Mr. Color Lacquer, Lifecolor, Testor/Model Master Acrylic and Enamel, Revell Acrylic and Enamel, and Vallejo Model Color and Model Aire.
Things to Consider Before Starting
Academy provides a several wheel options, including optional drive sprockets and return rollers. I suggest you separate what you want to use and move everything else far away, otherwise things can get confusing.
Academy thoughtfully provides the rubber portion of the wheels as separate plastic parts to help with painting and finishing. If you choose to paint them separately, however, you will need to consider several painting steps before assembly, and then mask the bogies before painting the rest of the vehicle (or leave them off until the end). I did not paint the wheels and tires separately in this build.
In Step 11, you will need to cut two identical holes ‘free-hand’, one on each side of the turret, to accept the Calliope launcher. I suggest you (either) complete this task before attaching anything to the turret, or come up with an alternate plan, as I did. See the section titled ‘The T34 Rocket Rack’ for more information.
The area beneath the fenders is unobstructed, so the track can be attached at the very end of the build, as it shows in the instructions.
The Instructions
Academy is generally pretty good with their instructions, with exceptions pointed out where appropriate, below. Since this kit is a re-release and includes parts from two manufacturers, the instructions come in two parts, which is a little awkward. An excellent parts map is included, as well as a comprehensive set of paint callouts.
Construction
Lower Hull and Suspension
Construction begins with the lower hull and suspension. Academy includes two options for the wheels, return rollers and drive sprockets.
Each wheel comes in two parts to assist with painting, but, unfortunately, the design here uncovers a problem. The two parts slip together via a small nub that is supposed to fit into a slot on the companion part. It is difficult to line these two up correctly, since they are tiny and out-of-sight. I ended up scraping away the nub so that each smaller part easily sits flush inside the larger part.
The rear return rollers are attached in Step 4, (labeled ‘A’). The fit of these two wheels is very loose and they do not line up with the any of the other wheels or the drive sprockets. I had to drill out the hole in each wheel to push them in just a little farther so they would fit and line up with everything else.
Other than that, there were no other surprises here; each bogie comes together well and the fit is perfect. The bogies assemble and attach in a way that allows them to be articulated for uneven surfaces.
Main Deck
In Step 8, you can choose to use the five, over-scale plastic headlight protection baskets or photo-etch replacements. Because of the odd shape of the baskets, the PE versions are no simple affairs. I went with the original plastic versions to save time but in the end, I wish I had gone with the PE; the plastic baskets are really thick and boxy and don’t look very good.
Academy provides detail on the inside of the two front hatches, and they can be posed in the open or closed position. There is no detail provided inside the hull, however.
In Step 5, the illustration in the instructions shows Part F26, which is the wrong one. It is correctly labeled, however, as Part A2 (A2 is the one you want to use). I found that attaching Part A2 after the transmission cover (Part F34) is on place works better than what the instructions would have you do.
There are ‘cheat lines’ all over the model to assist in placement of various parts. Most are ok – the parts that fit in these areas effectively hide the lines.
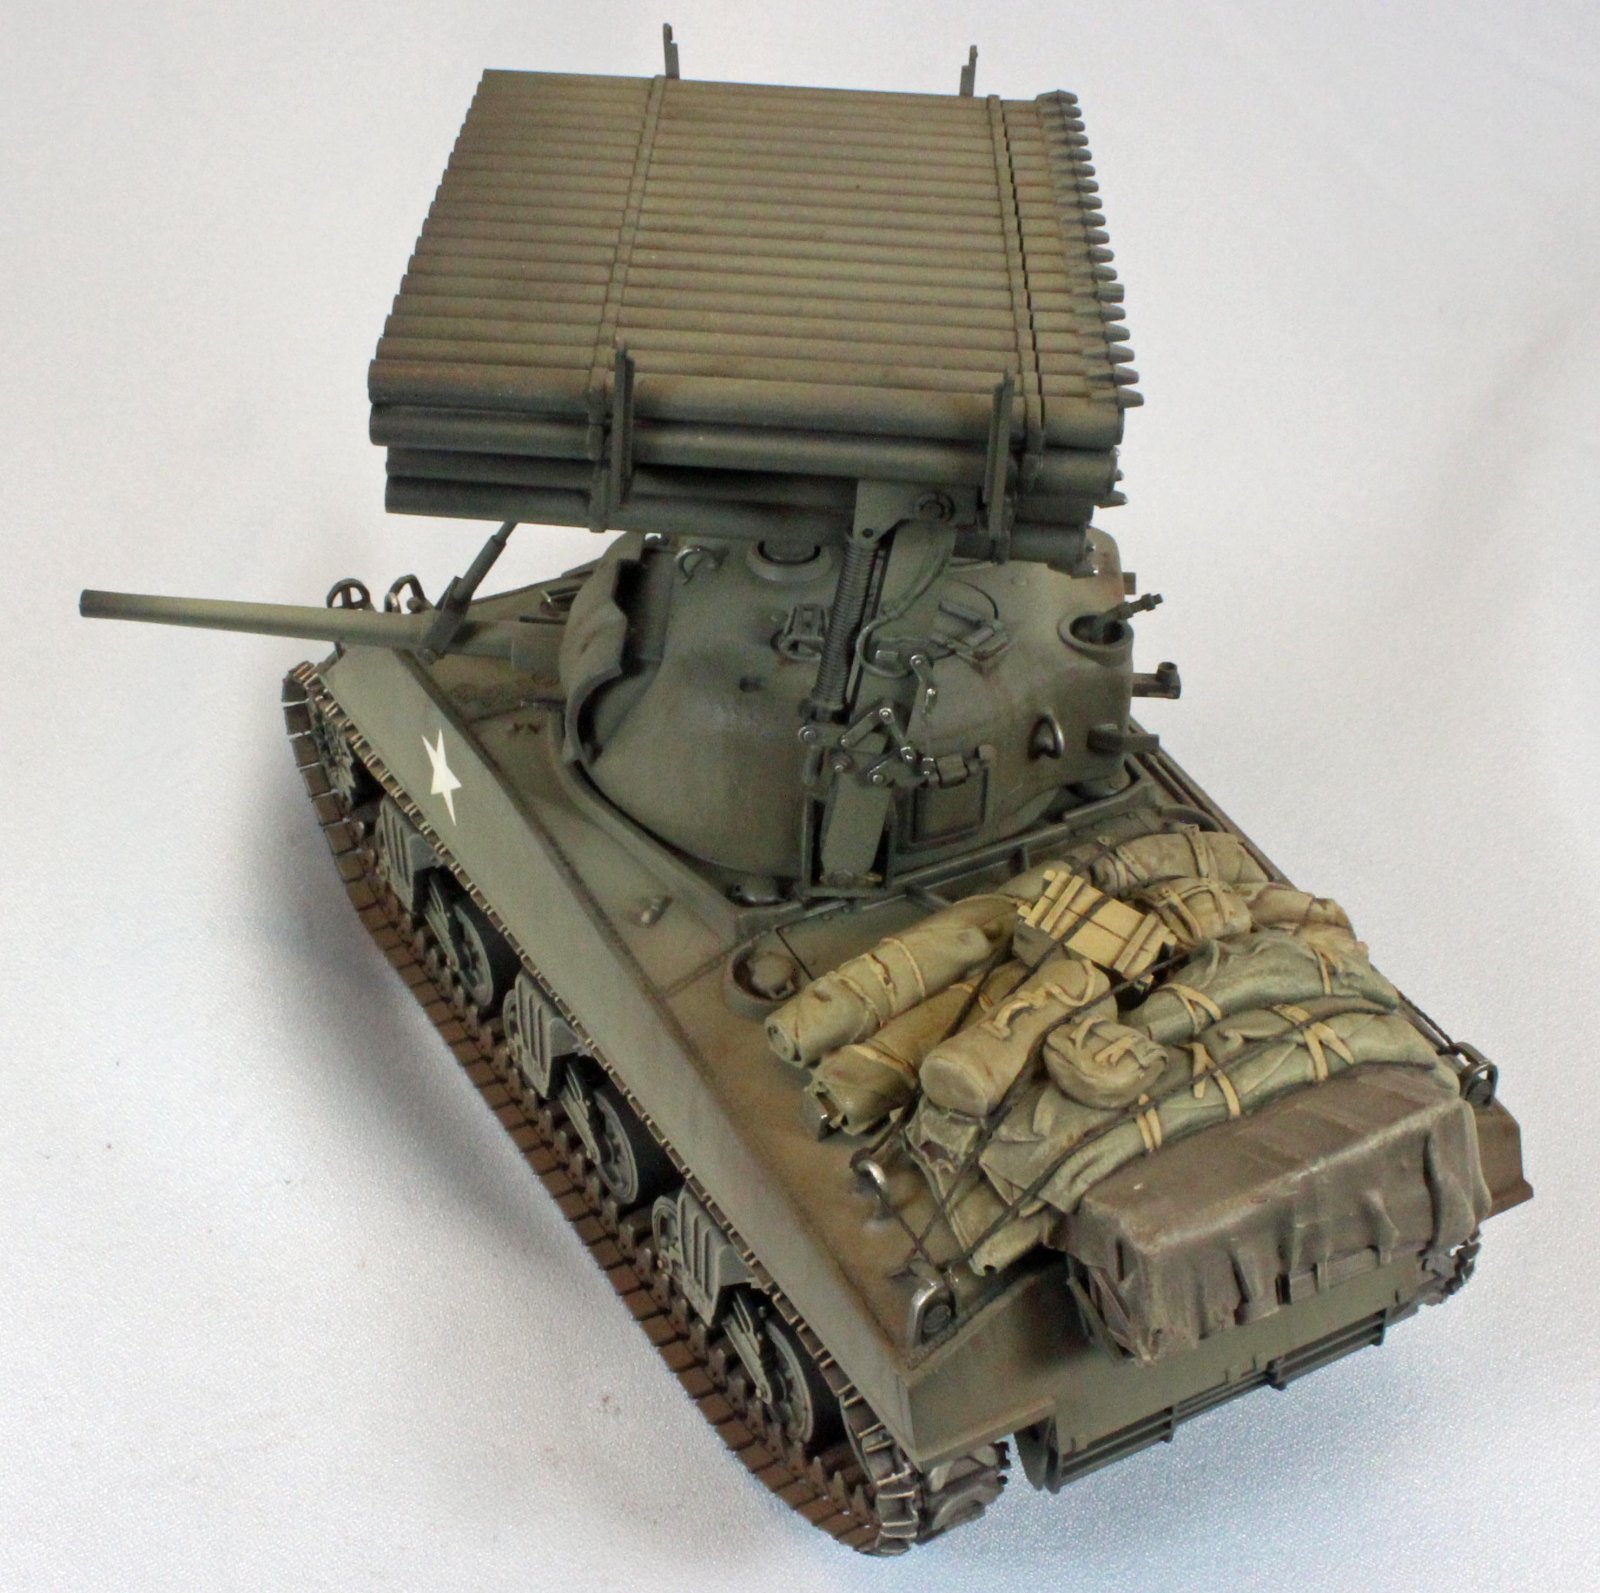
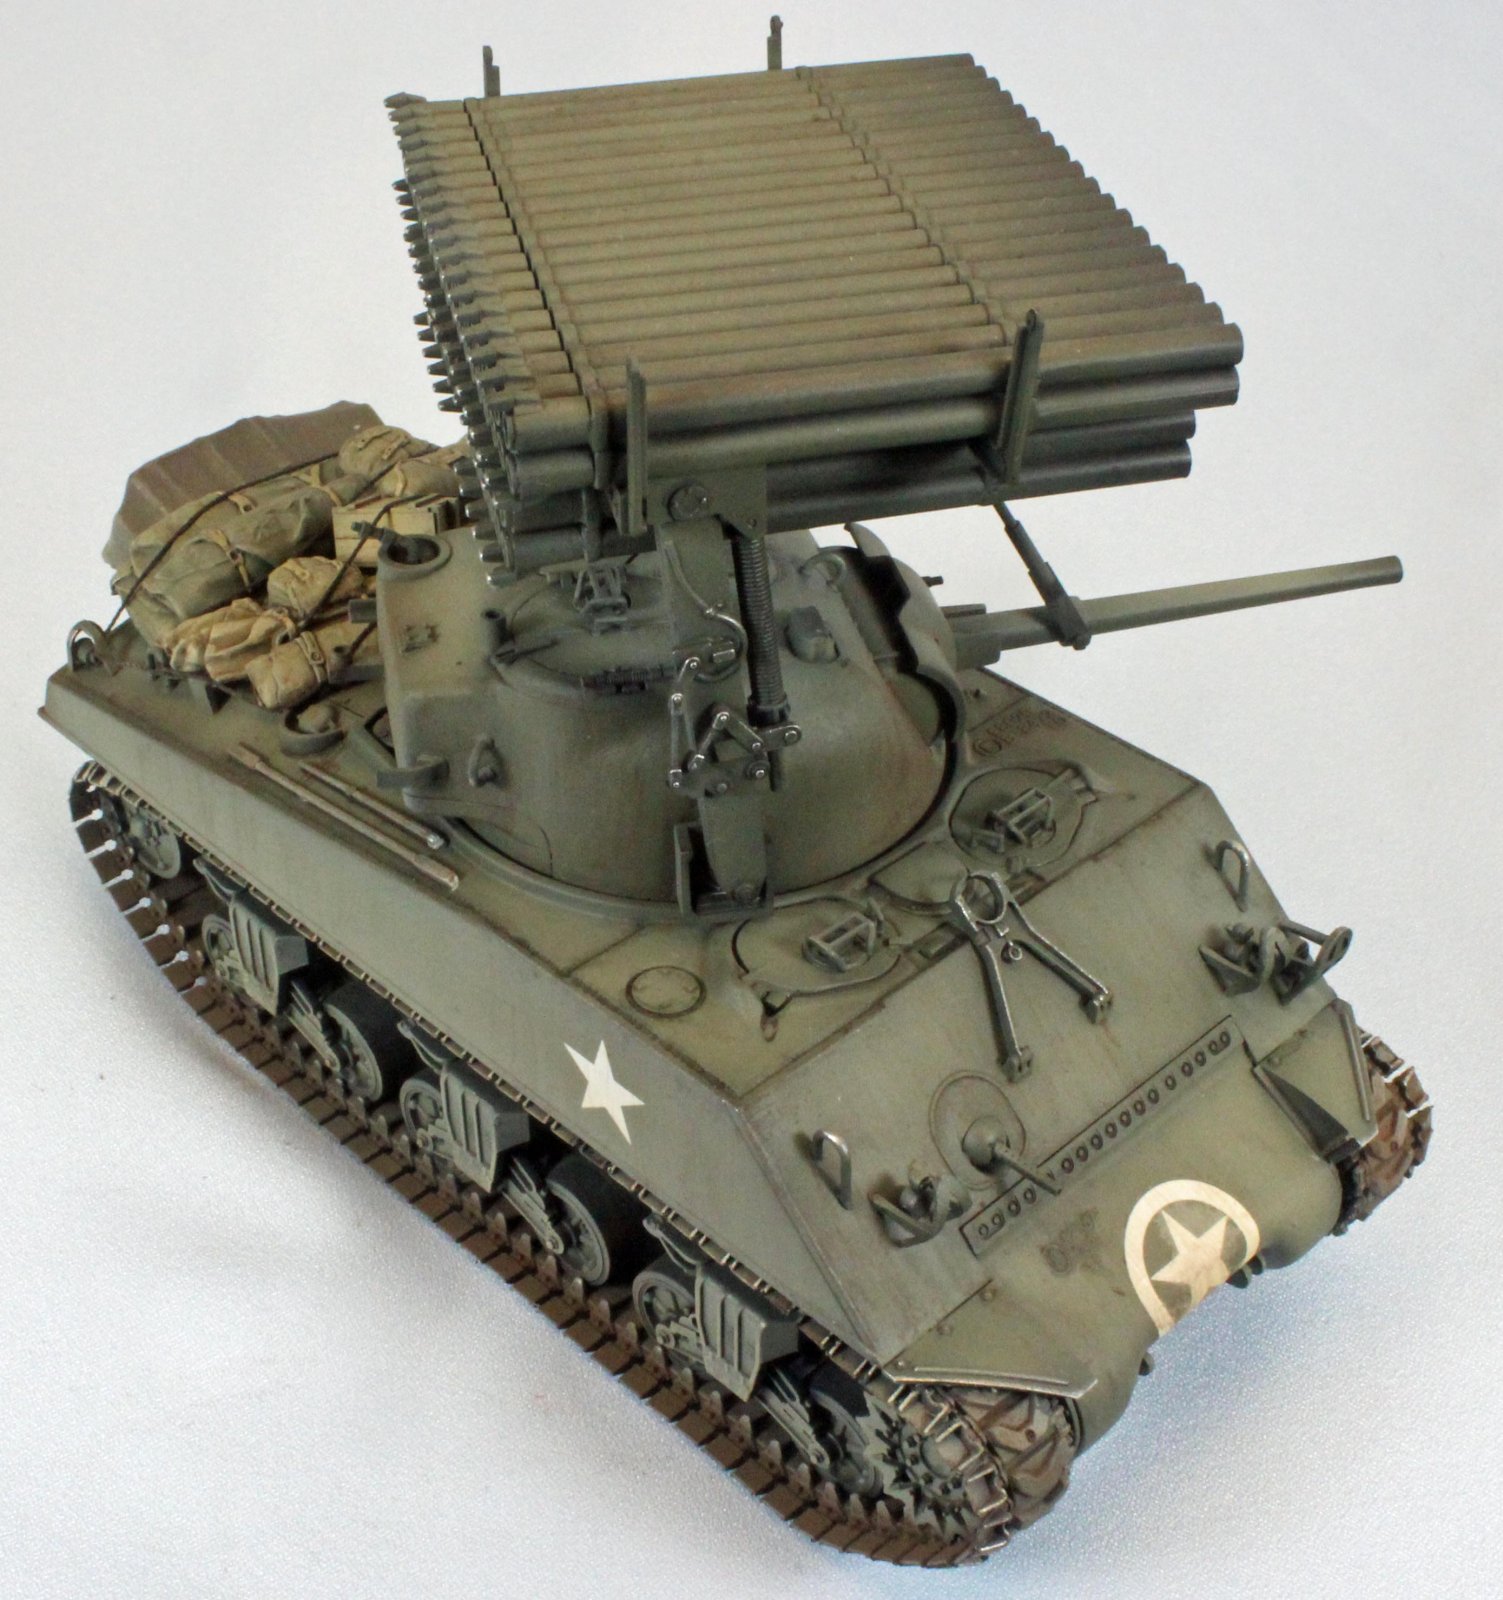
Academy ‘Accoutrement’ and the Rear-deck Combat Load from Value Gear
One thing I always like about Academy kits is that they include a variety of extras that are optional in the build, and this kit is no exception. Three different pedestal machine guns are included (two 50cal and one 30cal), four fuel cans, three water cans, at least five ammunition boxes, one crate, and a tow cable (made of twisted cotton string). Since the rocket launcher prevents the use of the guns, most of these parts went into the spare parts box. I own (too many!) after-market sets of the fabulous ‘Sherman Loads’ produced by a company called Value Gear to bypass this opportunity to load up the rear deck with combat paraphernalia. The great thing about these products is that they are made out of solid plastic (not resin) and as such, can be shaped (to some extent) and attached with regular glue. For more information on these and other sets from Value Gear, see the IPMS USA review I wrote.
Turret
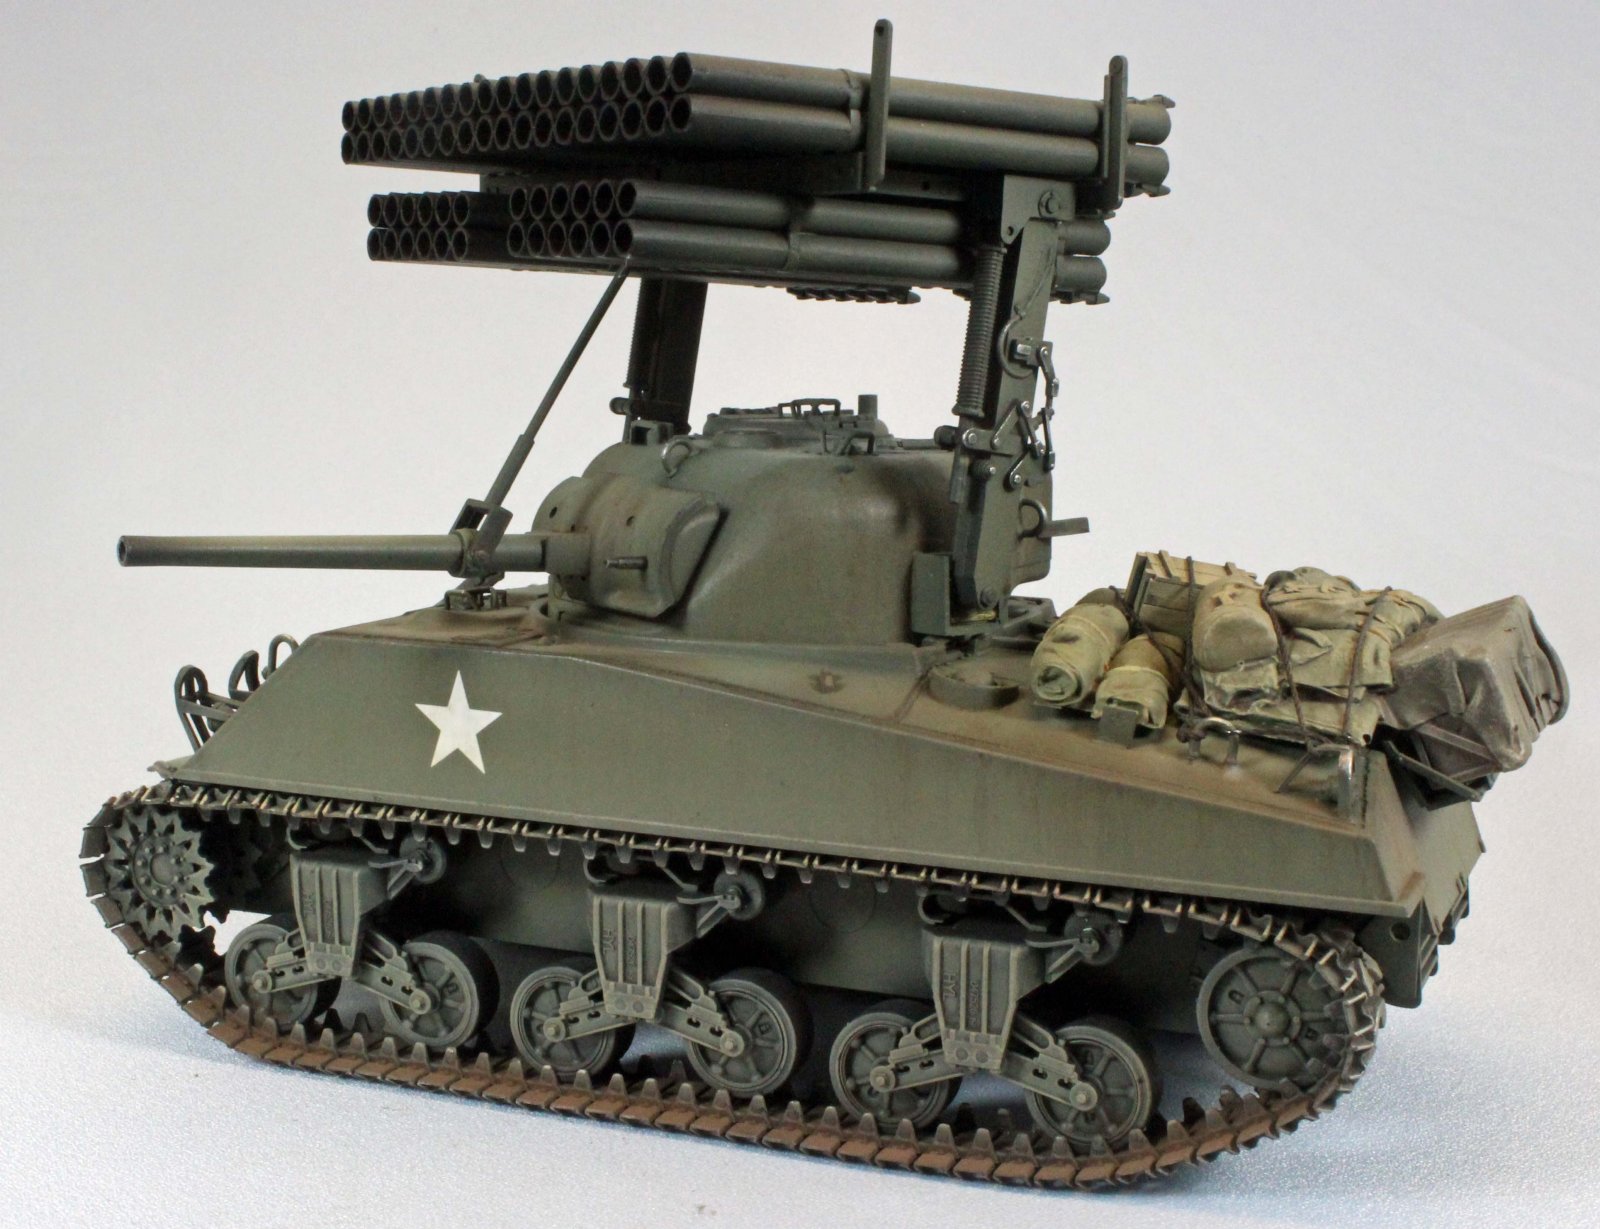
The seven-part main weapon can be assembled and left off the turret for attachment later, with the rocket launcher. If you attach it in Step 11 as shown, make sure to apply the glue carefully so it can articulate up and down. That will be important when attaching the launcher, later.
The two piece barrel has a seam line around the pointy end which is visible and difficult to fill without reshaping the end of the barrel. I replaced mine with an after-market barrel.
In Step 11, Academy includes an image of the turret ring, showing pieces to cut off and pieces to add so the turret can rotate properly. I found that following these instructions did just the opposite, unfortunately. I ended up snipping off the new parts (R1/R2) and simply setting the turret ring on the hull, relying on gravity to keep things in place.
Later on, in Step 12, attach the two turret lifting rings (Parts G11) AFTER you attach Parts G6 and G9/G10 in Step 13, otherwise, if you attach the rings as shown in the instructions they will interfere with three parts attached later.
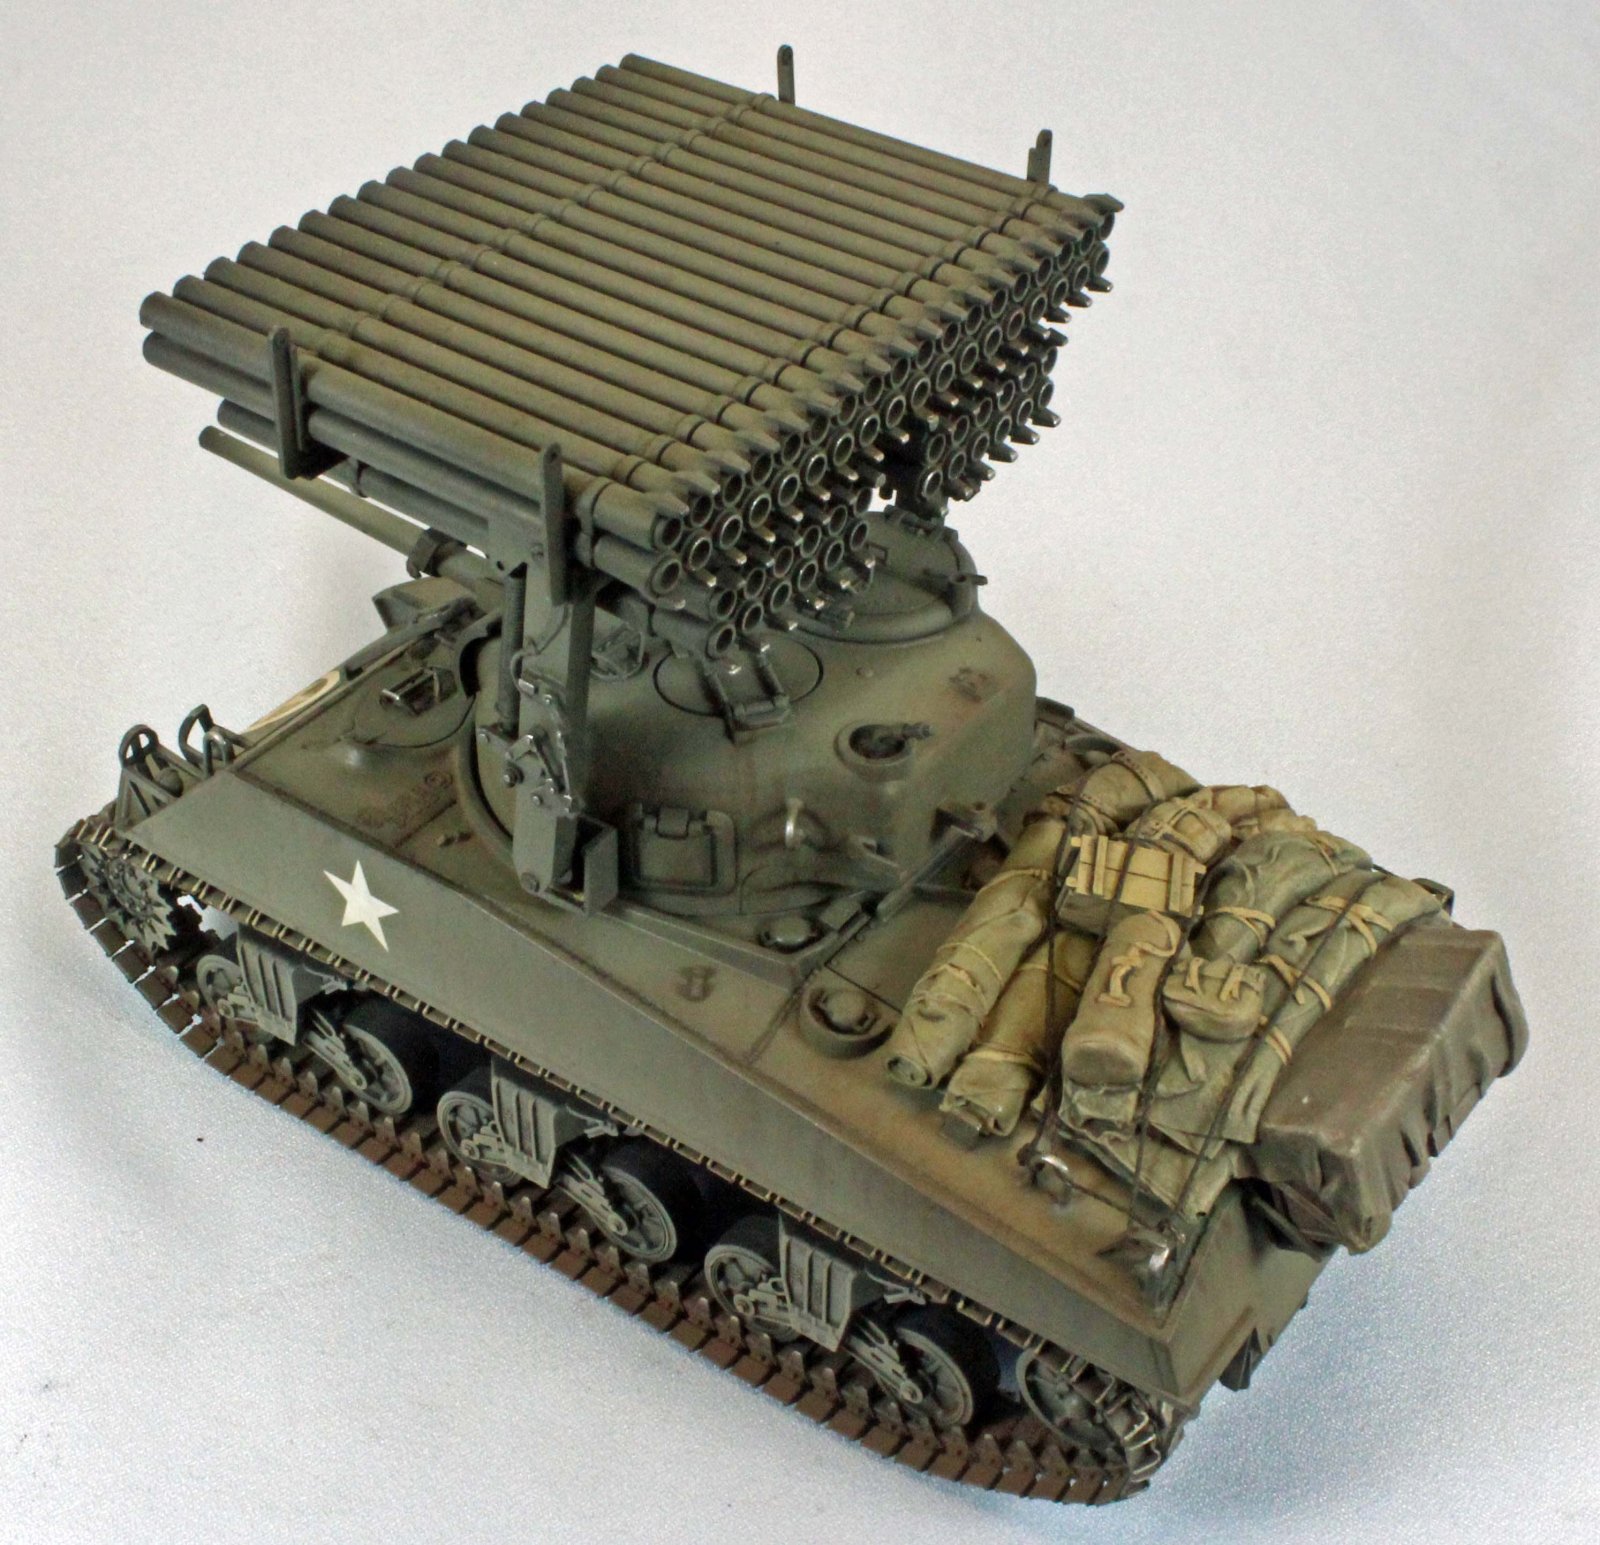
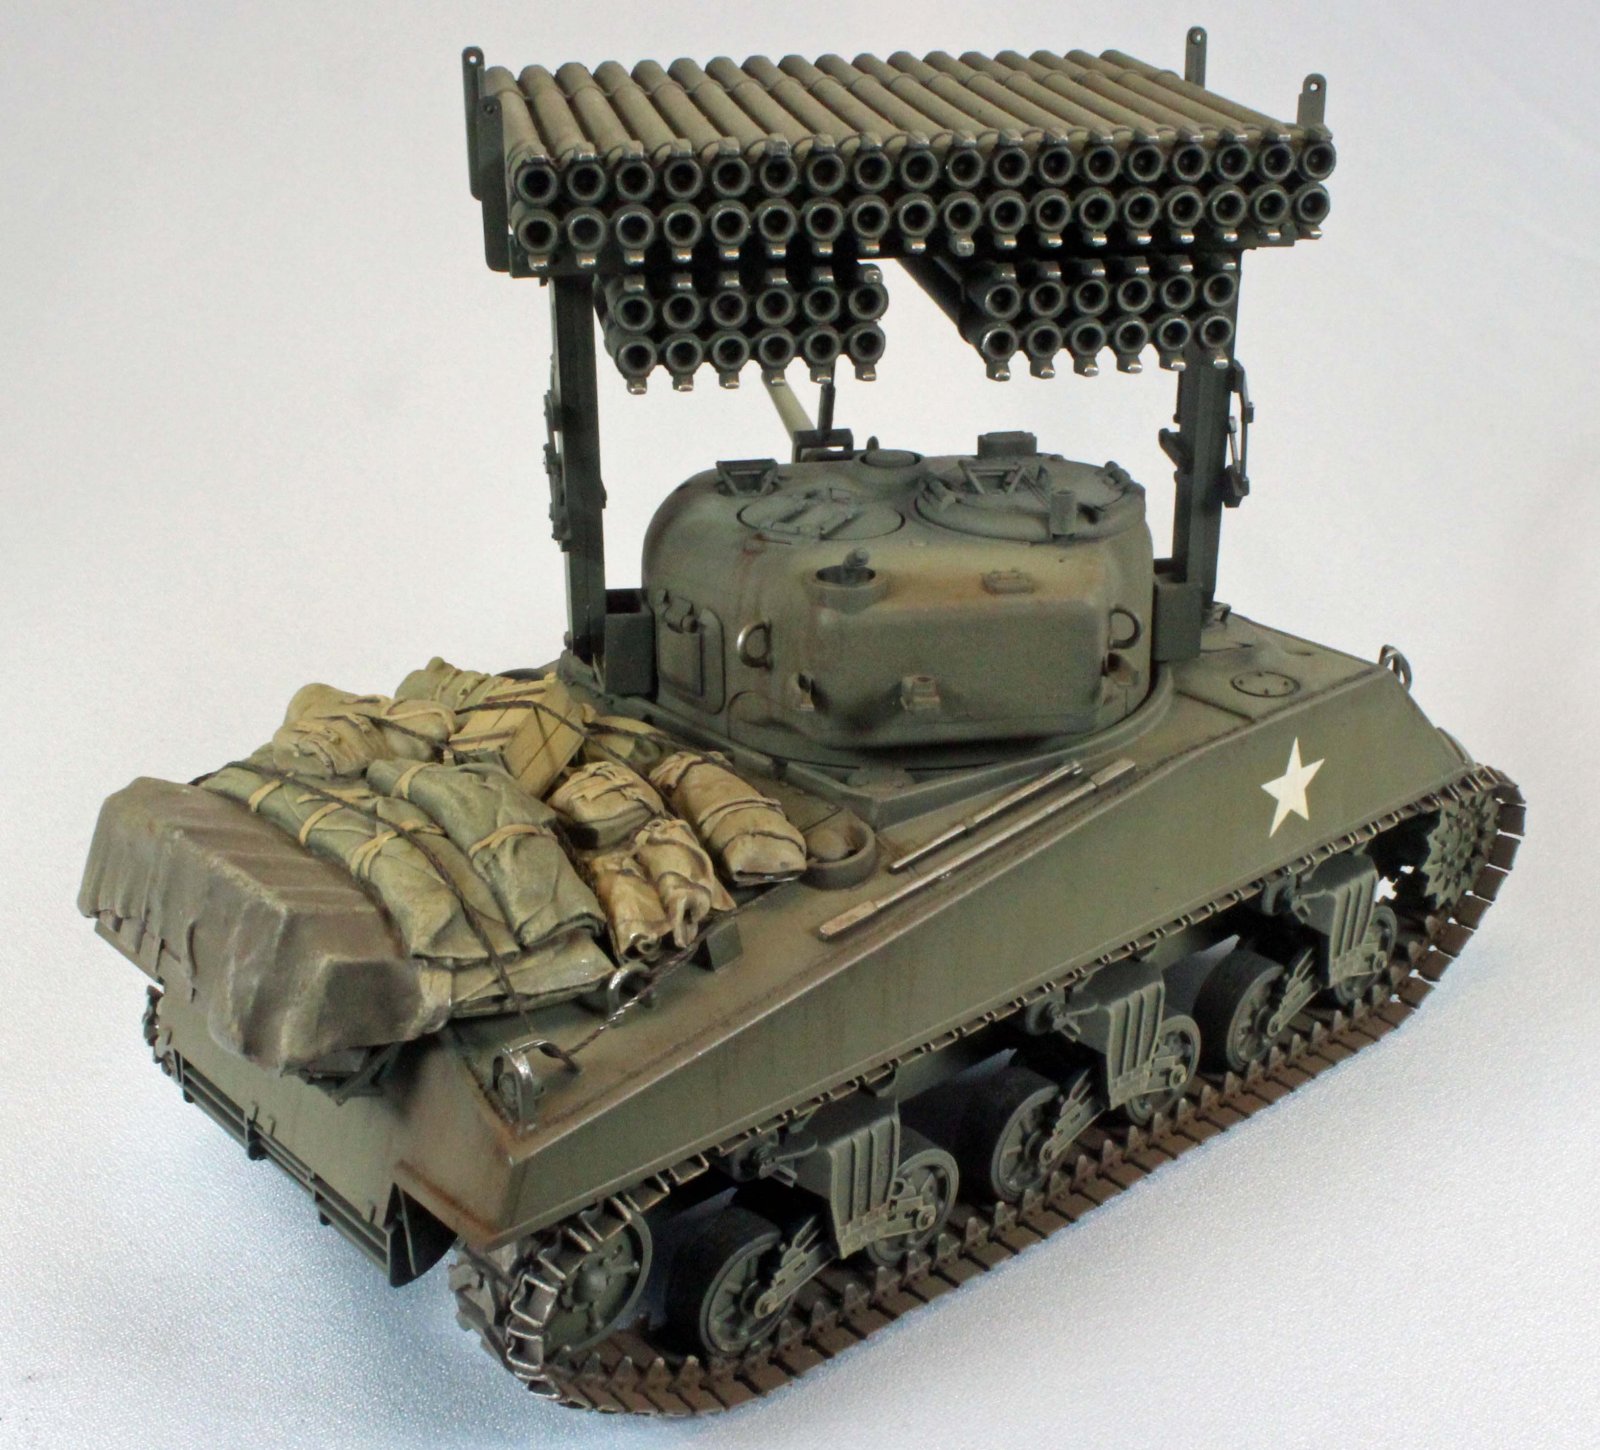
The T34 Rocket Rack
The star of the kit looks like it is actually produced by Italeri, which is both good and bad. The good part is that the design is remarkable. Italeri has taken a complex engineering problem and created a perfectly fitting solution without sacrificing any detail. The tubes are paper thin, yet strong enough to withstand sanding and pressure during assembly. The racks can be articulated, and move with the tank barrel, connected via one of two different options.
Italeri wisely chose to provide guide holes only in the back of each of the six racks, leaving the front ends free to slide back and forth until a good alignment is achieved.
It really is quite impressive. Some of the parts can fit more than one way (ex. Parts D109/D103), so it is important to go slow and remove/clean the parts as you use them.
Once the rack was solid, I turned my attention to the attachment hardware, which is where things went sideways (“the bad part”). The marriage of parts from these two companies doesn’t appear to have been thought out very well.
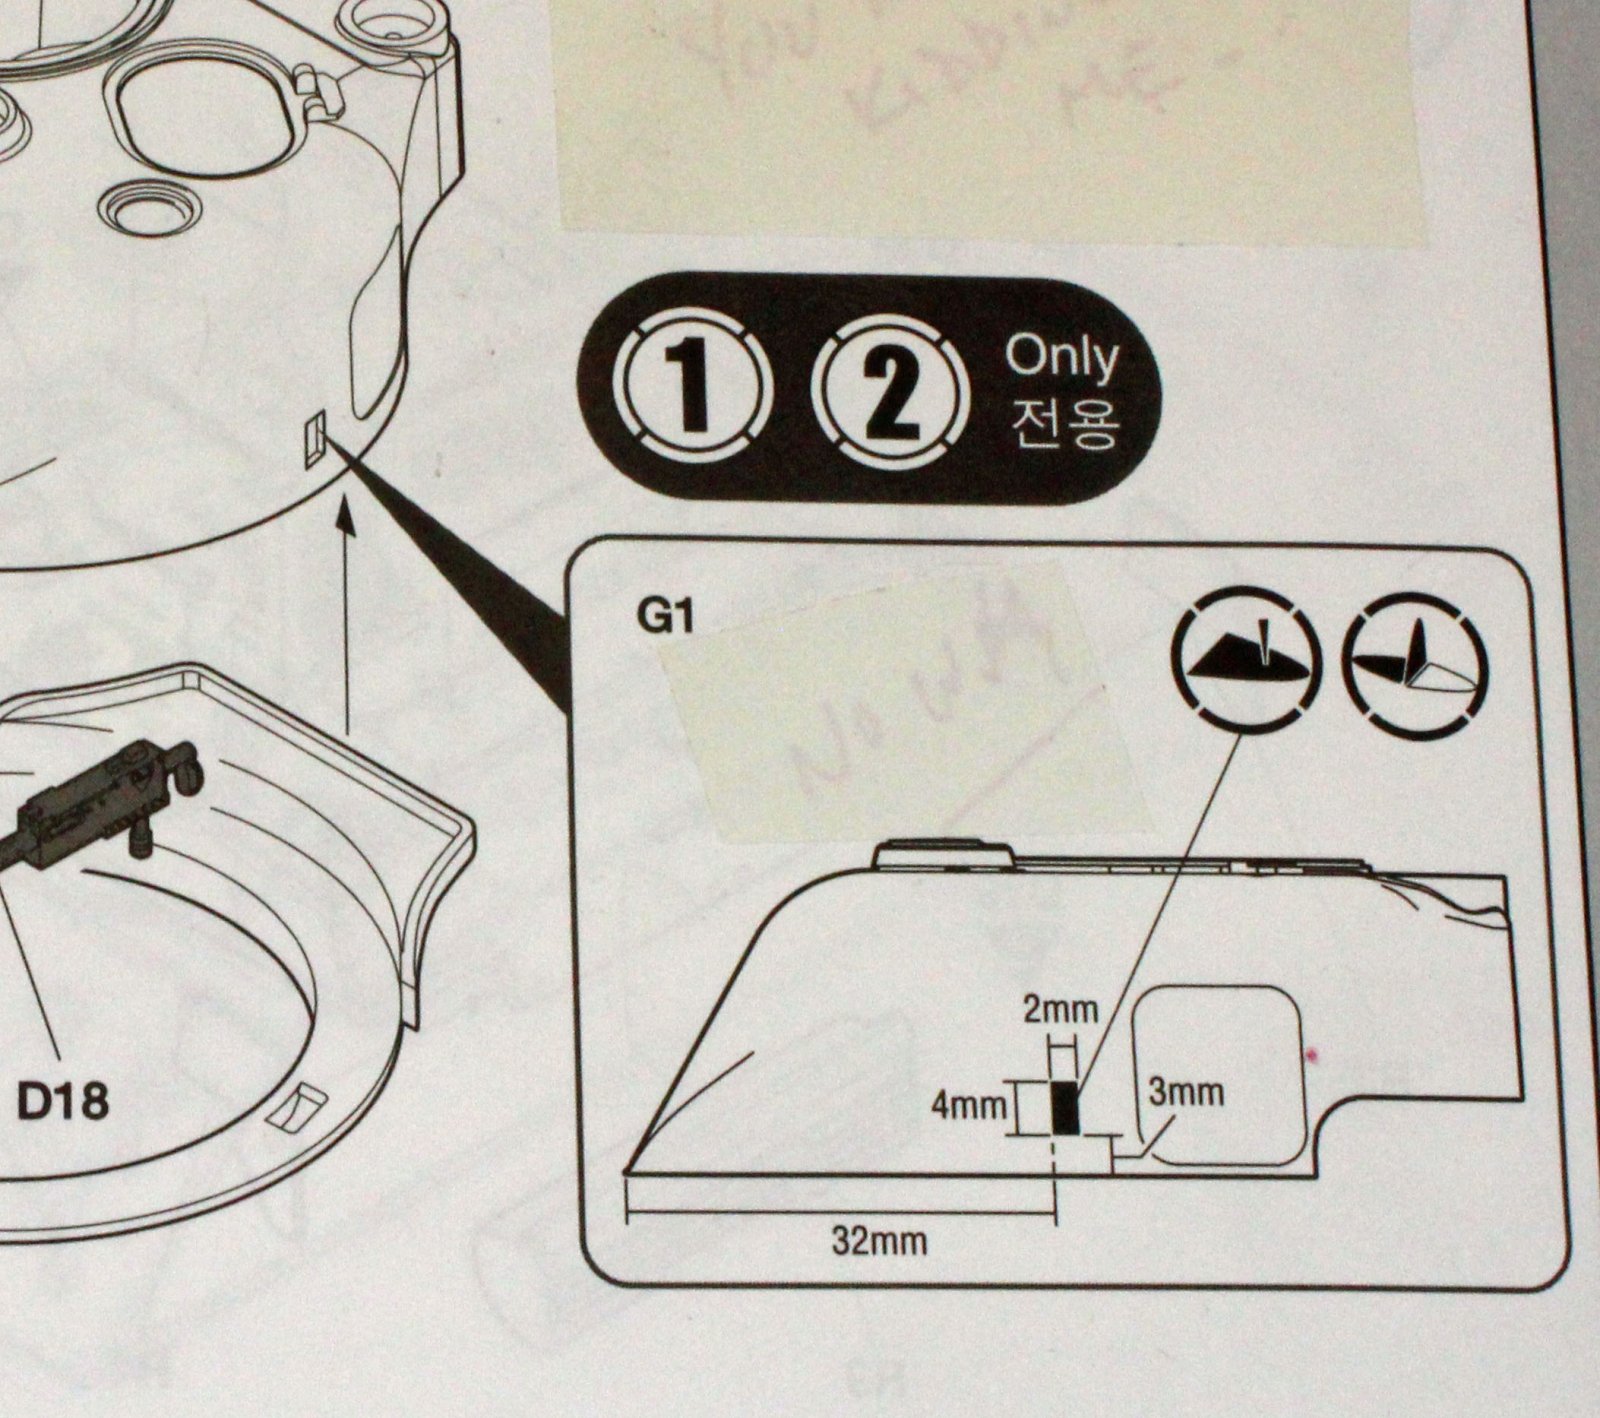
Inexplicably, Academy instructs the modeler to cut two rectangular holes in the sides of the thick turret plastic in order to mount the rocket rack. These holes must be perfectly cut into a curved, smooth surface (turret sides) and each hole must line up exactly opposite from the other one on the other side of the turret. If either hole is off by a quarter millimeter in size, shape and/or location, the whole rack will be crooked. There are no cheat lines on the surface or any other guides to assist the modeler with this task.
Personally, if I attempted to cut these holes ten times, I would fail nine times.
I use the word ‘inexplicable’ because Academy has a solid reputation in the industry for helping new modelers with tricks to ease the assembly process. They provide cheat lines to show modelers where to attach the shovel, for example, but provide nothing along those lines for attaching the rocket rack – the very star of the show.
My solution was not great. I probably should have gone with building a jig and drilling appropriate holes, then removing the square ‘male’ ends of the rack arms and replacing them with a solid tube through the turret – something like that. What I ended up doing is scrounging up two small, open ended boxes that I glued to each side of the turret, serving as a solid housing for the two arms of the rack to sit in. This worked but it added detail to the vehicle that doesn’t exist, and prevented two prominent decals from being applied. On the other hand, the rack is solid and lines up reasonably well. Moving on.
The Track
The two runs of track in this kit are made of black, rubber-band style plastic with attached outboard grousers. Every 2 inches or so on the outside of the track there is a small rubber ‘bump’, or a clearly visible hole left behind by the bump – probably due to some manufacturing issue. Some modelers will want to replace the track with an aftermarket product simply for this reason alone, since filler is not practical with this material. I decided to ‘weather’ my way to a solution and did so.
Academy track is the kind that you must melt rubber ‘pins’ with a hot knife or screwdriver to attach the two ends of the track together. The problem is, with the high track tension common to American tanks like the Sherman, the connection could invariably fail. If not when you first stretch the track around the drive sprocket, then later, when your model is sitting in the case, minding its own business. I took a chance and attached them without resorting to staples this time - we’ll see if they hold out. In my opinion, there are just too many modeling options for track these days to continue to rely on this outdated design.
Painting and Finish
This European Theater M4A3 is going to be U.S. Army green, so I had my work cut out for me to try to put a little life into all that monochromatic finish. I thought that I would take this opportunity to try painting the tank using Vallejo Acrylics instead of my normal go-to choice of Model Master drabs for American armor.
(Note: I thin all Vallejo Model Air, Model Color and Panzer Aces paints using their own thinner and an inexpensive retarder by Liquitex called Flow Aid. I work in small batches (3 drops Flow Aid + 20 drops Vallejo Airbrush Thinner + 20 drops Vallejo paint (any brand). I swish that around until it is mixed and pour it into the color cup on my Pasche-H Single-Action airbrush, Number #3 tip, set at 20 lbs. pressure.)
Track: I primed the two lengths of track using rattle-can Rustoleum Flat Black Primer, followed by a dusting of rattle-can Krylon Leather. Krylon/Rustoleum is just about the only paint that will cover track initially, in my opinion. I could have used model paint and my airbrush but that just takes too much paint and too much time. Once the Krylon paint was dry and did not exhibit any more tack, I dusted the tracks with Vallejo Model Color 70976 Buff.
Next I dampened a Q-tip with Model Master Dark Anodonic Grey Buffing Metalizer and drew it across the track pads and the insides of the track where the wheels run. I then gave everything a heavy wash using AK Interactive Track Wash, straight from the bottle. Once dry I rubbed a little Gamblin Silver Oil Paint on to my finger and drew it along the grousers to ‘pop’ the detail.
On-board Tools and Rear-deck Gear
Most of the (plentiful) on-board tools provided by Academy were left off and replaced by a ‘Sherman Load’ from ValueGear. The few tools that remained were painted using Vallejo Model Color 70865 Oily Steel. For hand-brushing Vallejo paints I mix a tiny bit of Vallejo Slow Dry and water with each color until it flows smoothly off a red sable brush.
The rear deck baggage, tents and tarps were painted using Vallejo, Model Master, and Tamiya paints (see article referenced above for specifics). I secured the equipment using tarred string of the appropriate size. This product holds its shape once set, and will resist loosening over time.
The Rest of the Model - Primer and Pre-Shade
I started by airbrushing a primer/pre-shade coat of Gunze Mr. Finisher 1500 Black to give the plastic and PE some grip for the following coats, and to fill in the recesses and create a shadow effect near the flat surface edges, adding depth for the subsequent coats to come. Once dry to the touch, I painted the rocket rack Alclad ALC-120 Gun Metal. I wanted to feather out the green paint I applied later towards the ends of the barrels to suggest worn, burnt steel.
Camouflage Coat
Next came the first camouflage coat using Vallejo Model Air 71.016 Dark Green. I airbrushed it carefully, trying to allow some of the black to show along the edges, underneath the protruding detail, etc.
I then applied a post-shading coat using Vallejo Model Air 71.044 Light Grey Green, lightening up all the panels moving from the center outwards, paying special attention to the upper surfaces exposed to sunlight, and leaving what was in shadow, darker.
I enhanced this shade with a final post-shade coat of 50/50 mix of the Light Grey Green and Vallejo Model Air 17.001 Flat White.
Decals: With painting finished, I air-brushed the surface areas that would be receiving decals with a coat of Future floor polish to give the decals a smooth surface to slide on to.
Once the Future was dry I went about applying the few decals in the kit. I used the Red and Blue MicroSol and MicroSet products without any problems. Once the decals were dry, I gave the entire vehicle a good coat of Future to seal the decals and prepare the surfaces for washes and streaking.
Washes and Streaking
I applied a dark ‘sludge’ wash using ‘Vallejo Model Wash for Olive and Green Vehicles’, a new product for me. I brushed it on, thinned slightly with Vallejo Thinner and I felt the dark color enhances the green panels effectively. I then used AK Interactive Streaking Grime to add a ‘vertical element’ to the sides of the hull and turret. I applied this product straight form the bottle in small, vertical stubs along the tops of these surfaces and let them dry (about 10 minutes). I then dampened a small, square-ended brush with Mona Lisa Thinner (letting most of that soak off on a paper towel) and drew the dried Streaking Grime downward until I had the effect I was looking for. The beauty of doing this after the surface has a shiny acrylic coat is that you can make mistakes, or even start all over again, if you want.
Metal Highlights: I then went over the vehicle with a silver quilting pencil, Uschi’s Metal Polishing Powder, and Gamblin Silver Oil Paint to bring out a metallic sheen where appropriate.
Flat Coat, Dusting and Pigments: Once satisfied, I gave the whole vehicle a coat of Vallejo Flat Varnish followed by a dusting of Vallejo Model Air Light Brown, working from the bottom up, to blend everything together. Once all the shiny spots were gone for good, I highlighted the track and road wheels with Mig pigments and stuck a fork in it – this little guy was done!
Conclusion
The Calliope version of the Sherman is a welcome addition to the excellent line of Academy American tanks. For the most part, the assembly went together without any surprises and the fit was excellent.
The approach Academy took in attaching the rocket rack to the turret is hard to explain.
Academy kits are usually a hit with beginners because of the low part counts and the little extras, such as providing very feint raised lines identifying part placement. This alone would have gone a long way in assisting modelers with this intimidating task. As a result, I fear this kit will end up on a shelf in the ‘finish someday’ closet instead of the finished model case where it belongs.
Also, the use of old-style rubber-band track which contain a number of manufacturing flaws, while minor, is hard to rationalize with so many track options available today.
On the other hand, including a PE alternative to the thick, over-scale headlight covers, is a step forward, and may sway more experienced modelers. Overall, the kit looks great, goes together well, and was fun to build.
Because of the way the Calliope launcher attaches to the turret, I can only recommend this kit to advanced modelers, which is unfortunate since the rest of the model is relatively simple to assemble. The rocket rack is the star of the kit, however - you just can’t leave it off.
I would like to thank Academy Models and MRC for providing this kit for review, and to IPMS USA for giving me the opportunity to build it.


Reviewer Bio
Eric Christianson

Eric Christianson is a father to two boys (Reed and Dean), the President of the Seattle Chapter of IPMS, and a long-time Little League umpire. He is also a devoted husband and companion to a wonderful woman named Jackie who enthusiastically supports his passions. Recently retired as a programmer, his home office has been scratch-built into ‘a perfect model room’. Modeling since he was a boy, Eric mostly builds armor these days, but still dabbles in 1/32nd aircraft and other types of models from time to time. He also enjoys presenting seminars on weathering and technique at local shows. Many of Eric’s kit reviews can be found on the IPMS USA website.
Comments
Add new comment
This site is protected by reCAPTCHA and the Google Privacy Policy and Terms of Service apply.
Similar Reviews