
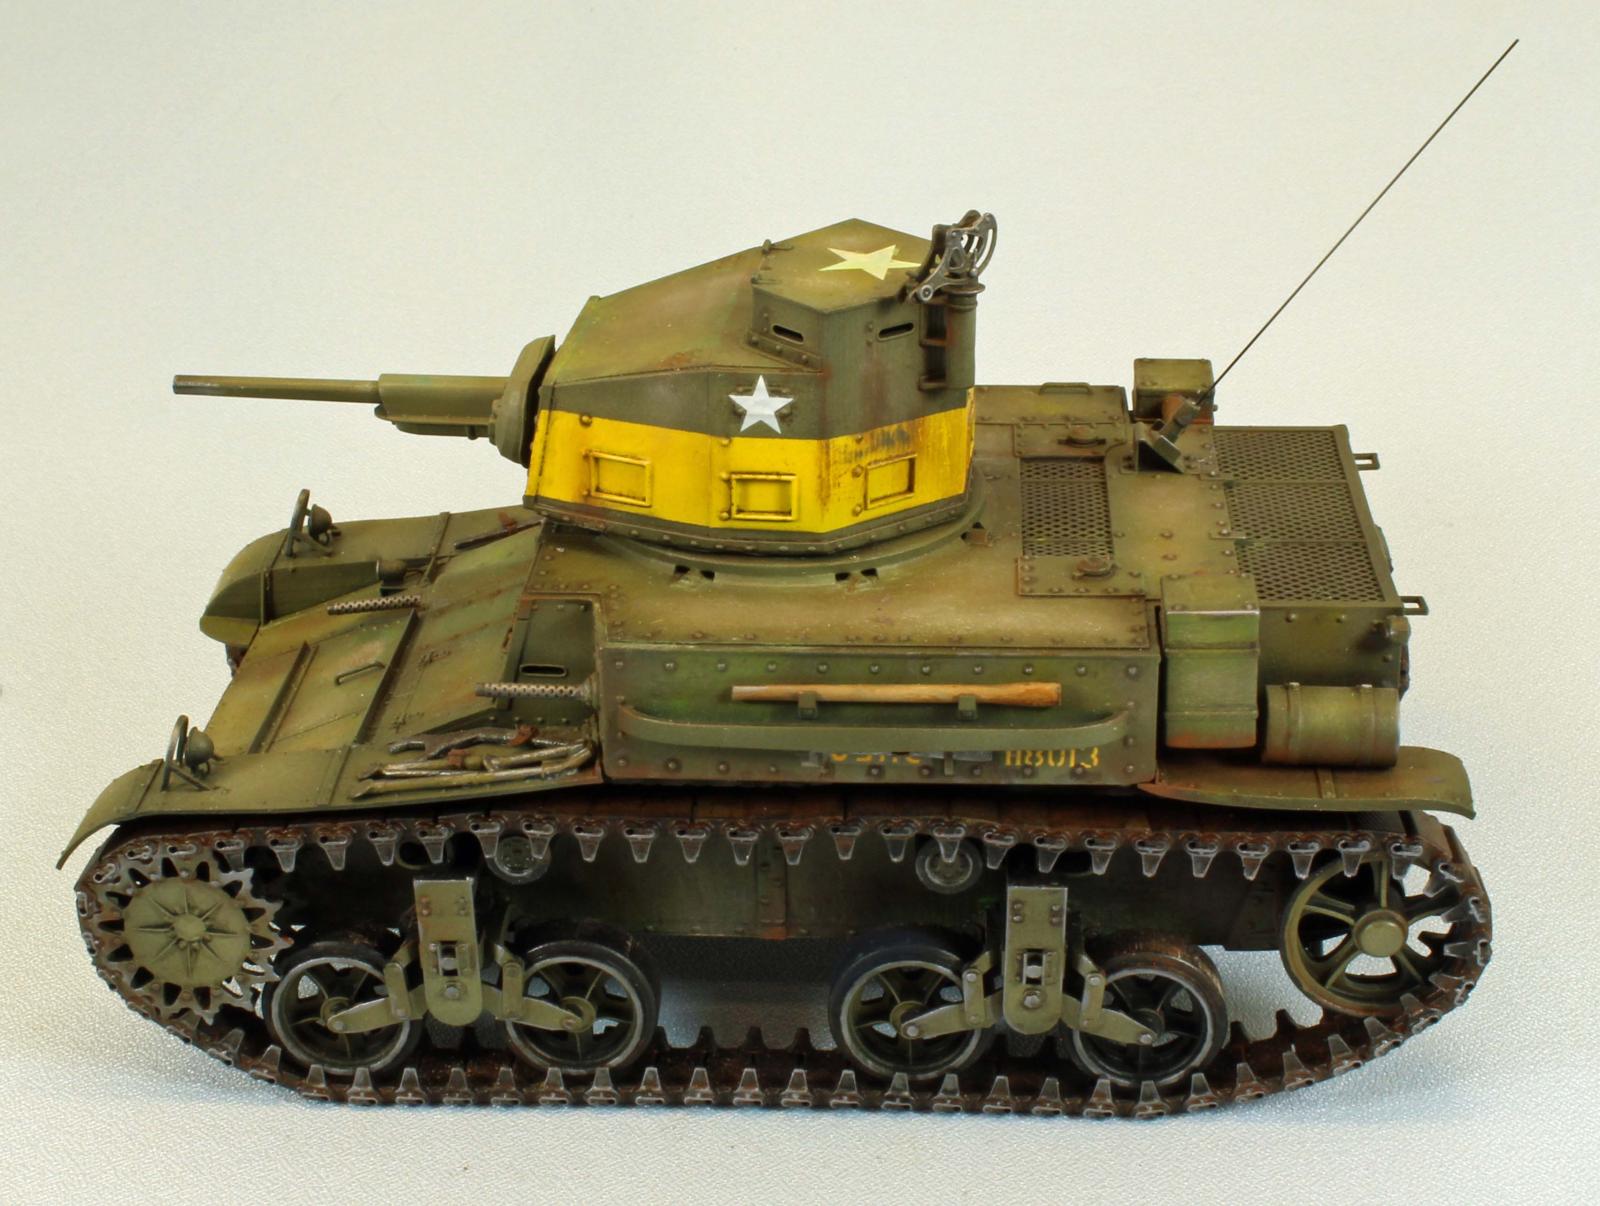
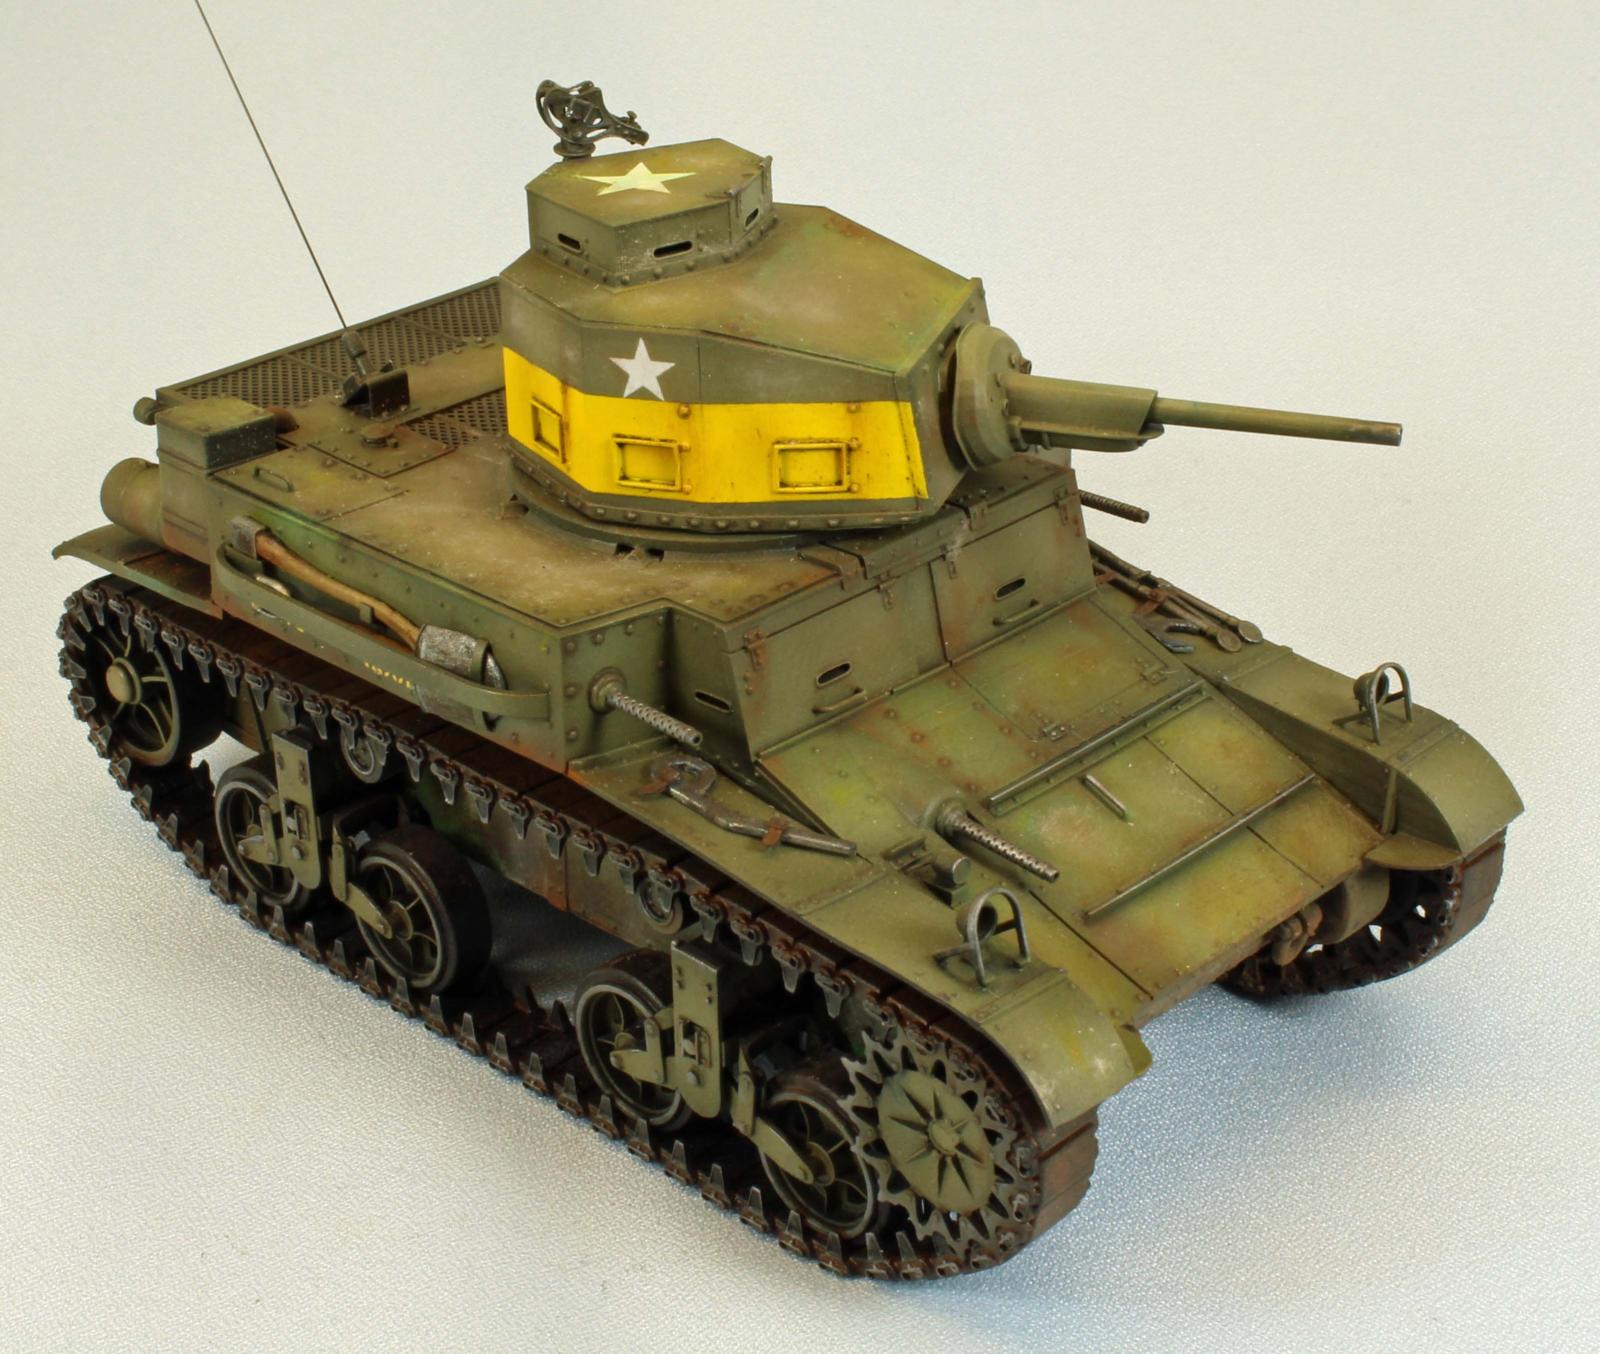
M2A4 Light Tank
I have been building 3D-printed resin kits from Vargas Models for almost two years now, and these are just getting better and better. If you are unfamiliar with this small but prolific company, Vargas Models specializes in unusual 3-D printed, limited-run armor models, and is now offering the M2A4 Light tank,the fourth variant of the M2 light tank family (formally Light Tank, M2), that served in the U.S. Army during the interwar period. A few of these vehicles went in with the Marines at Guadalcanal early in the war – it is one of these that this particular offering depicts.
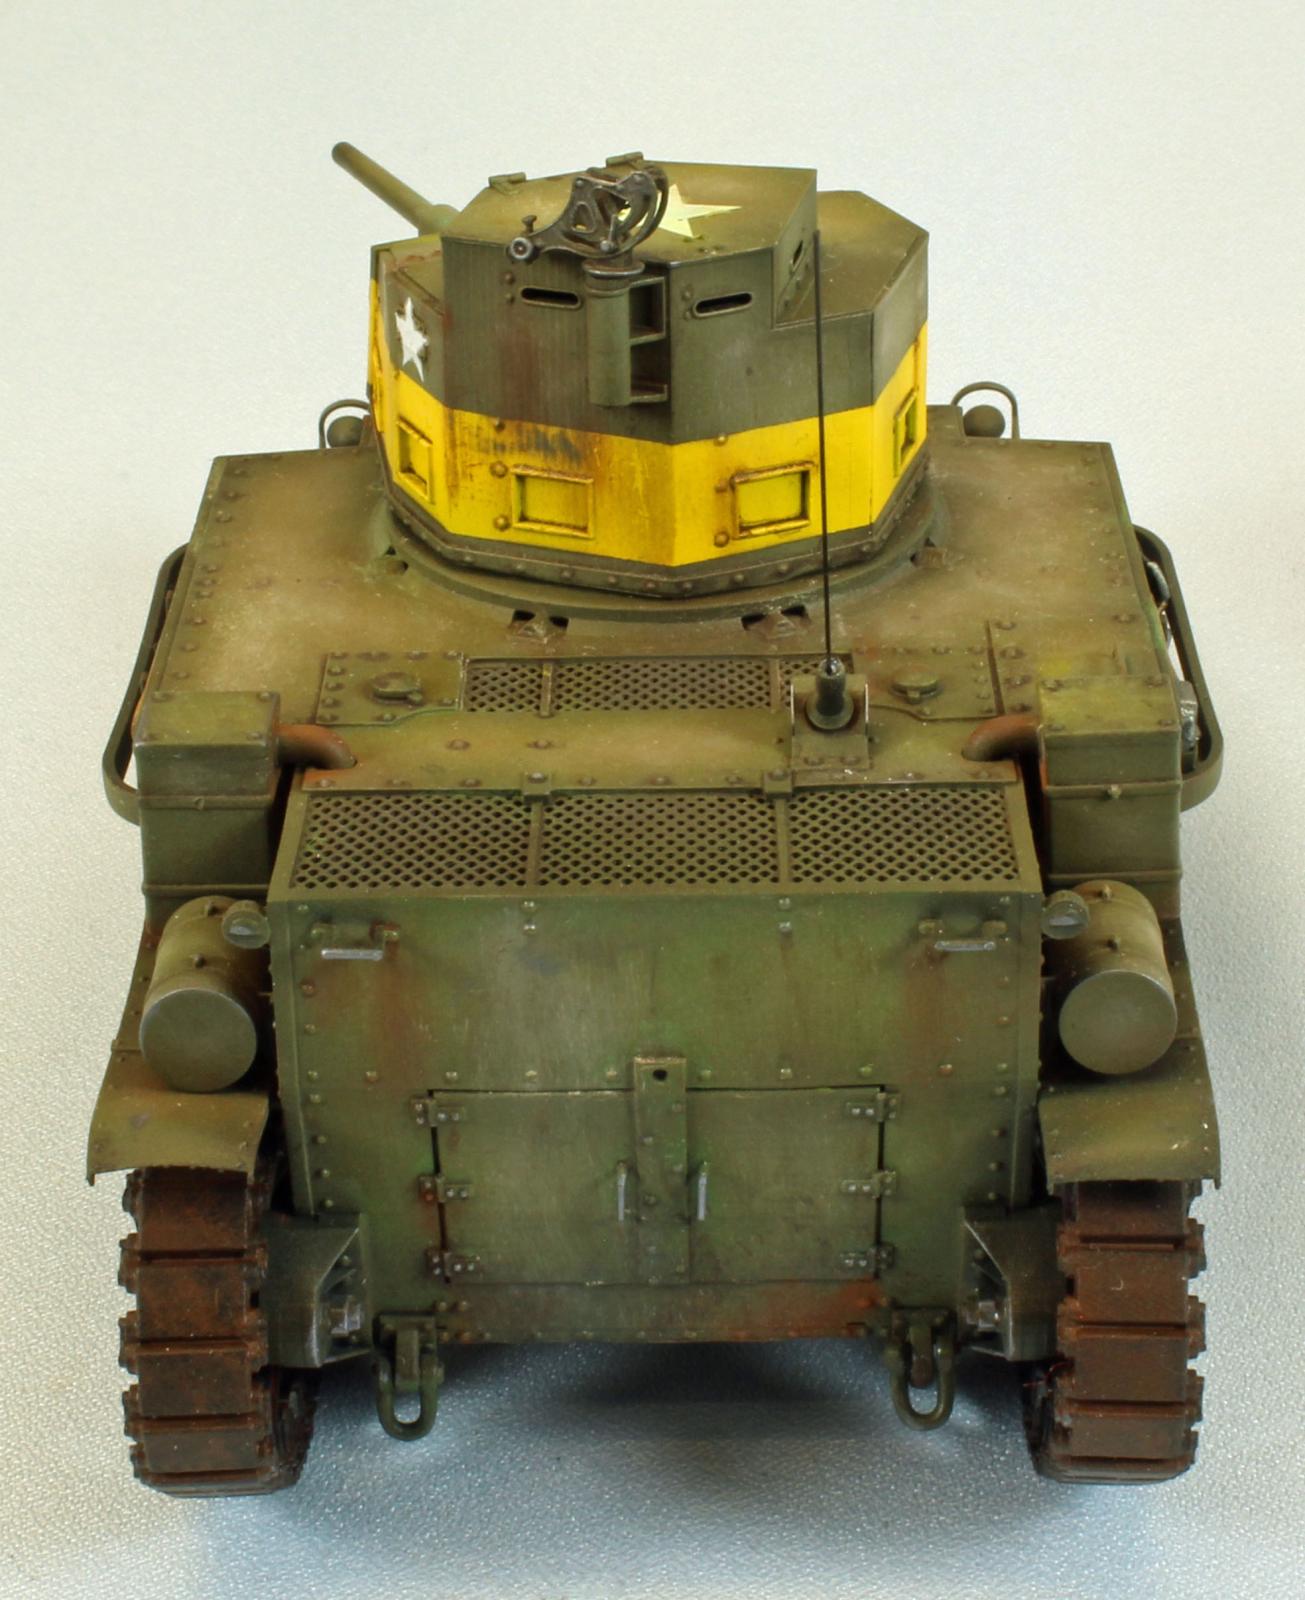
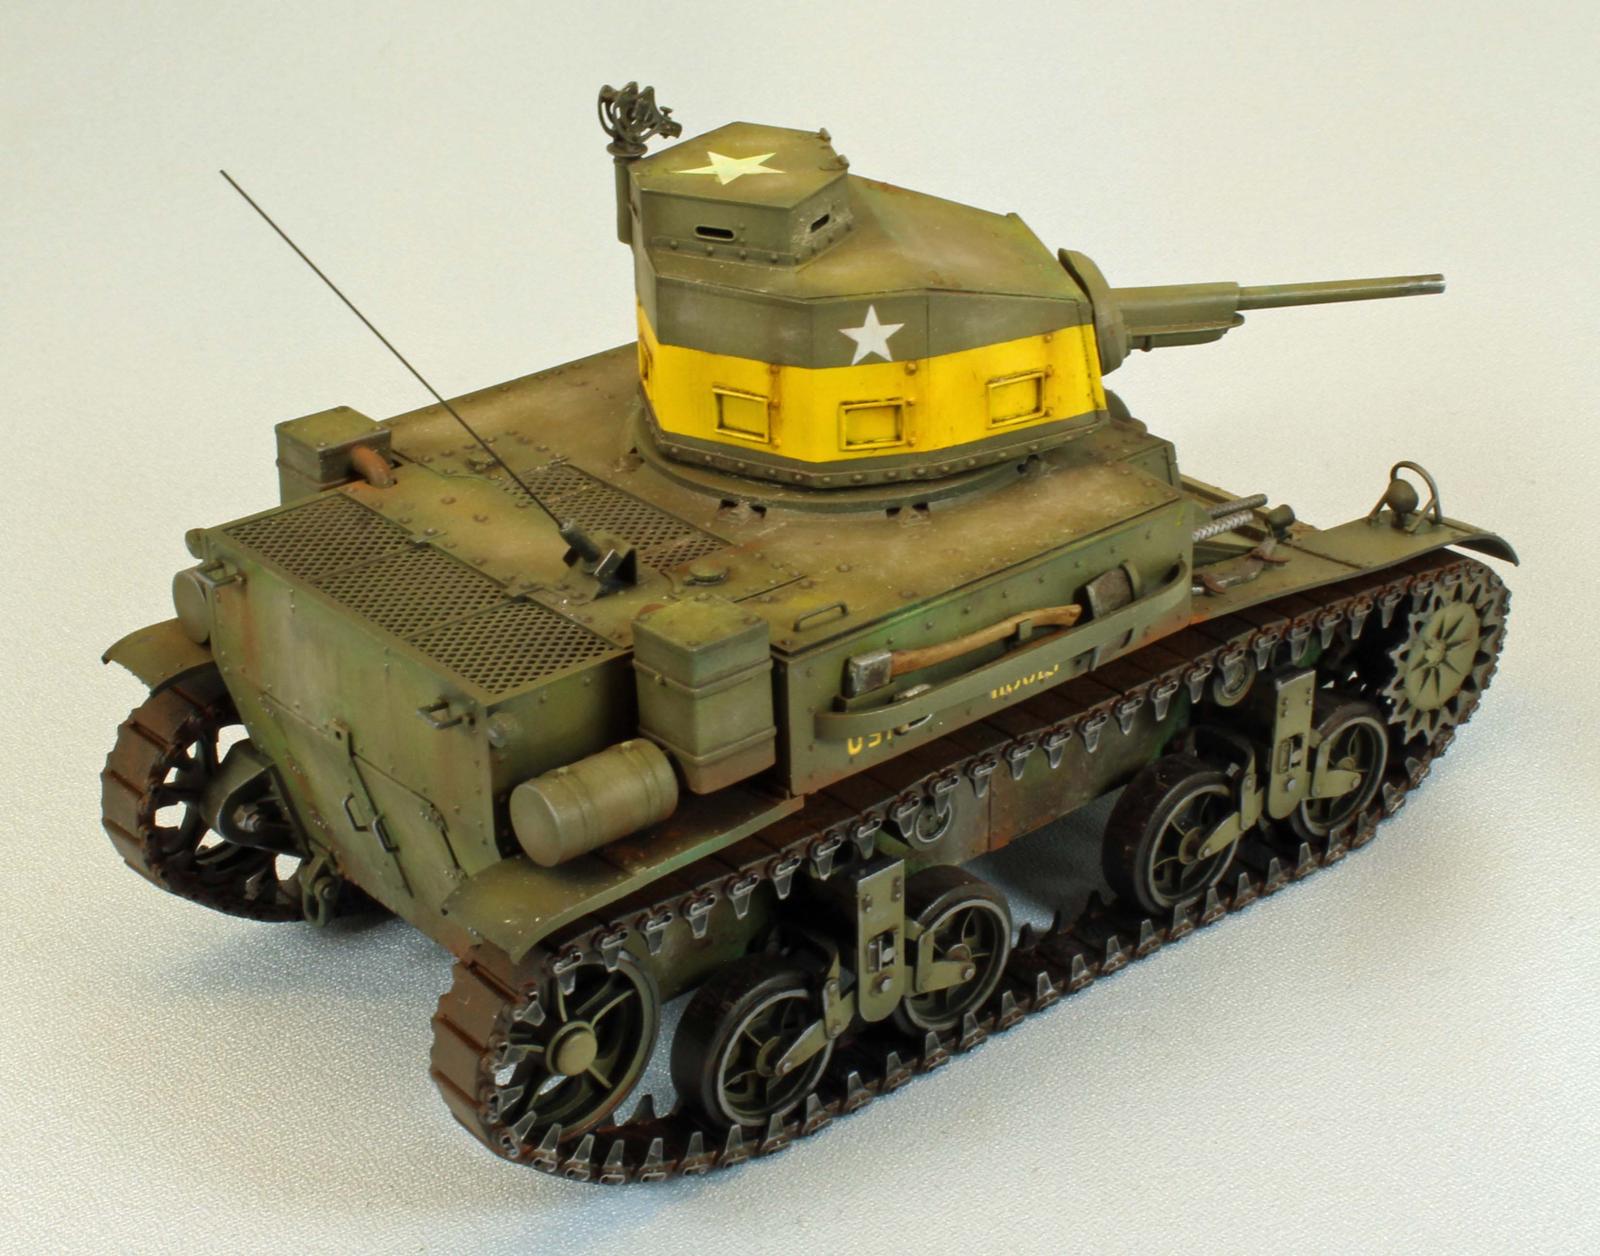
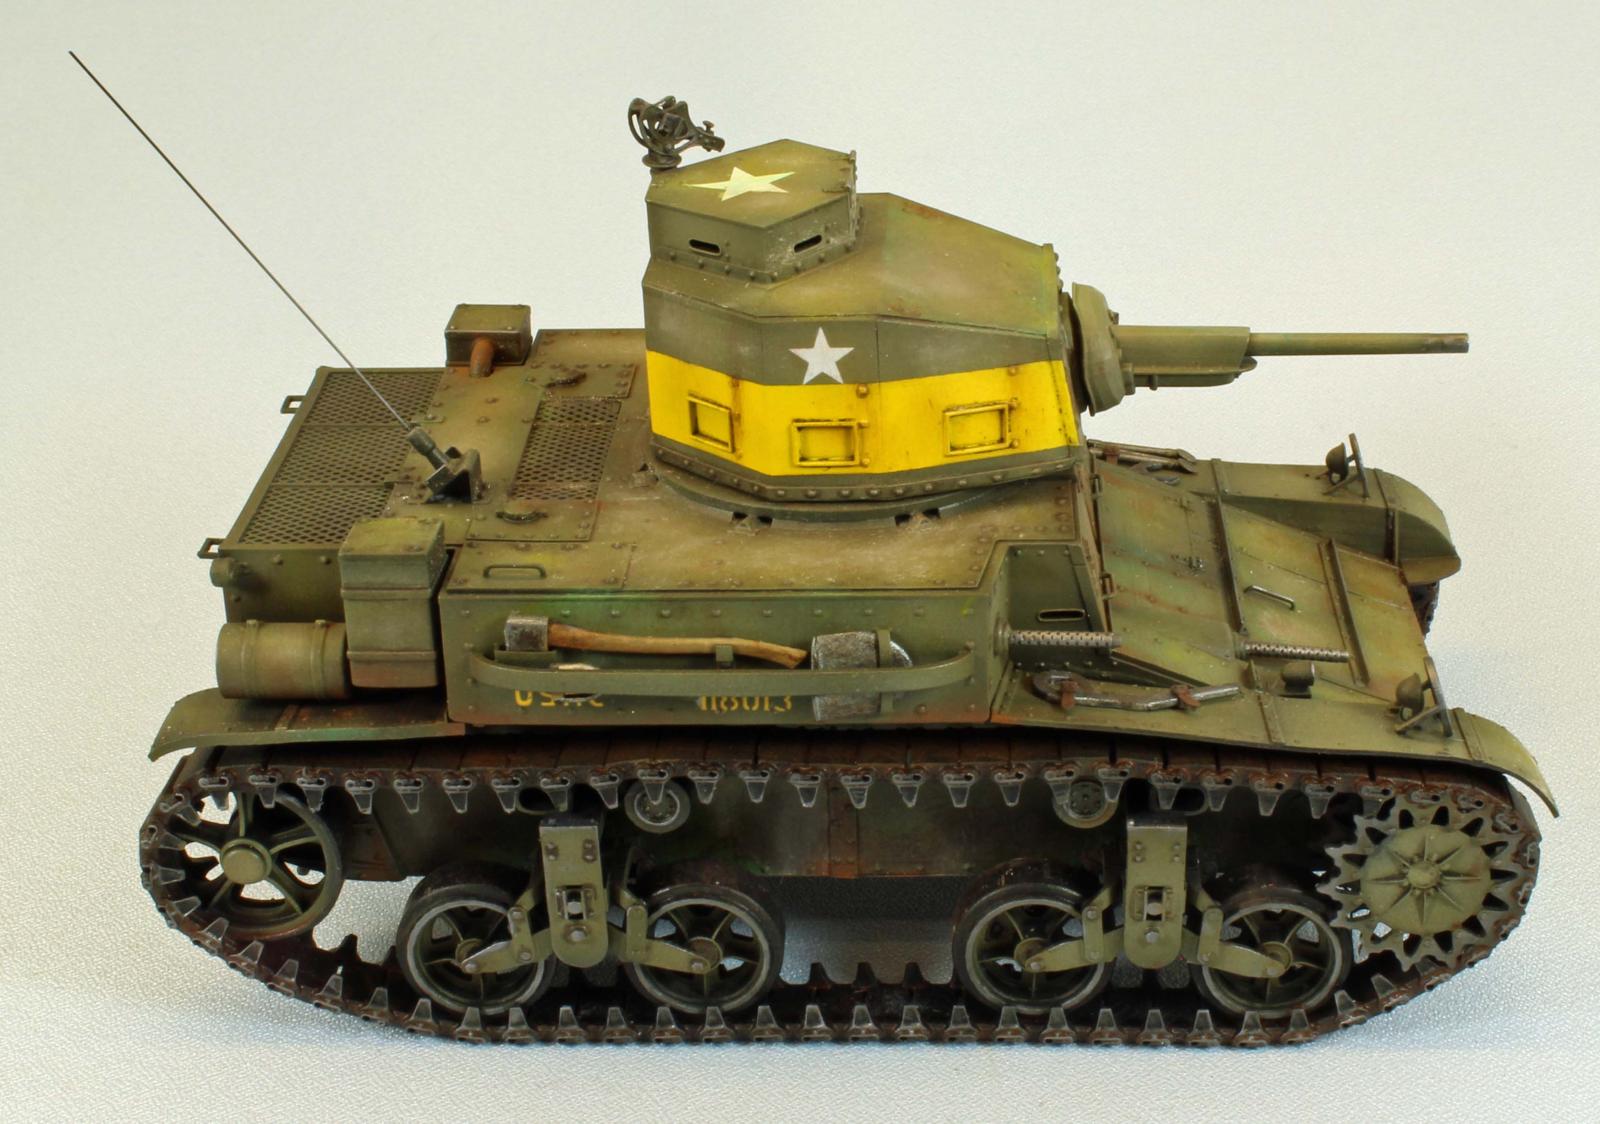
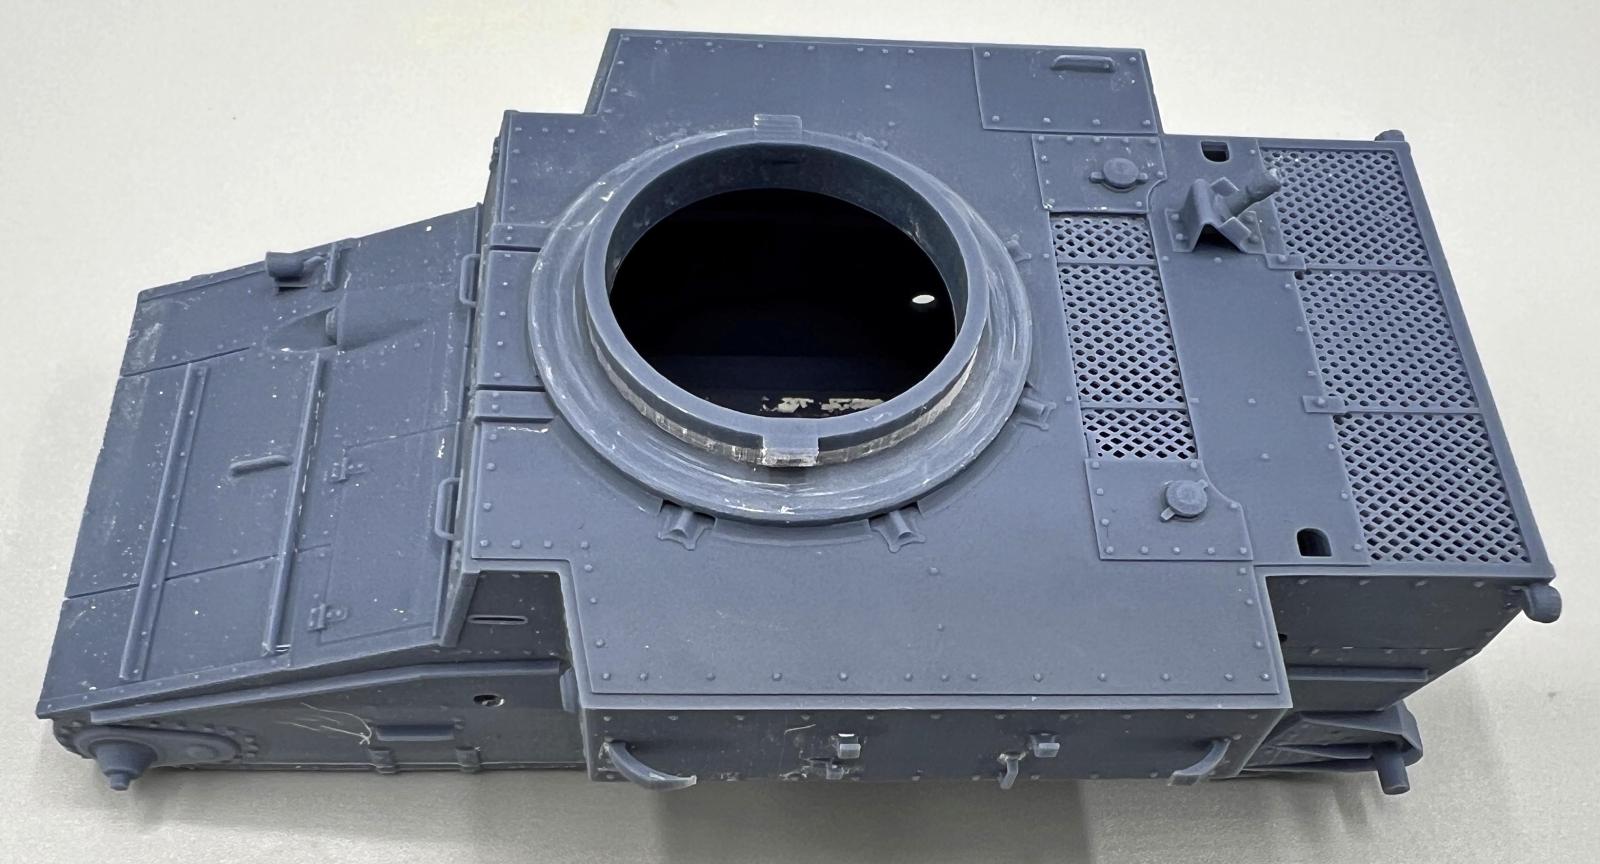
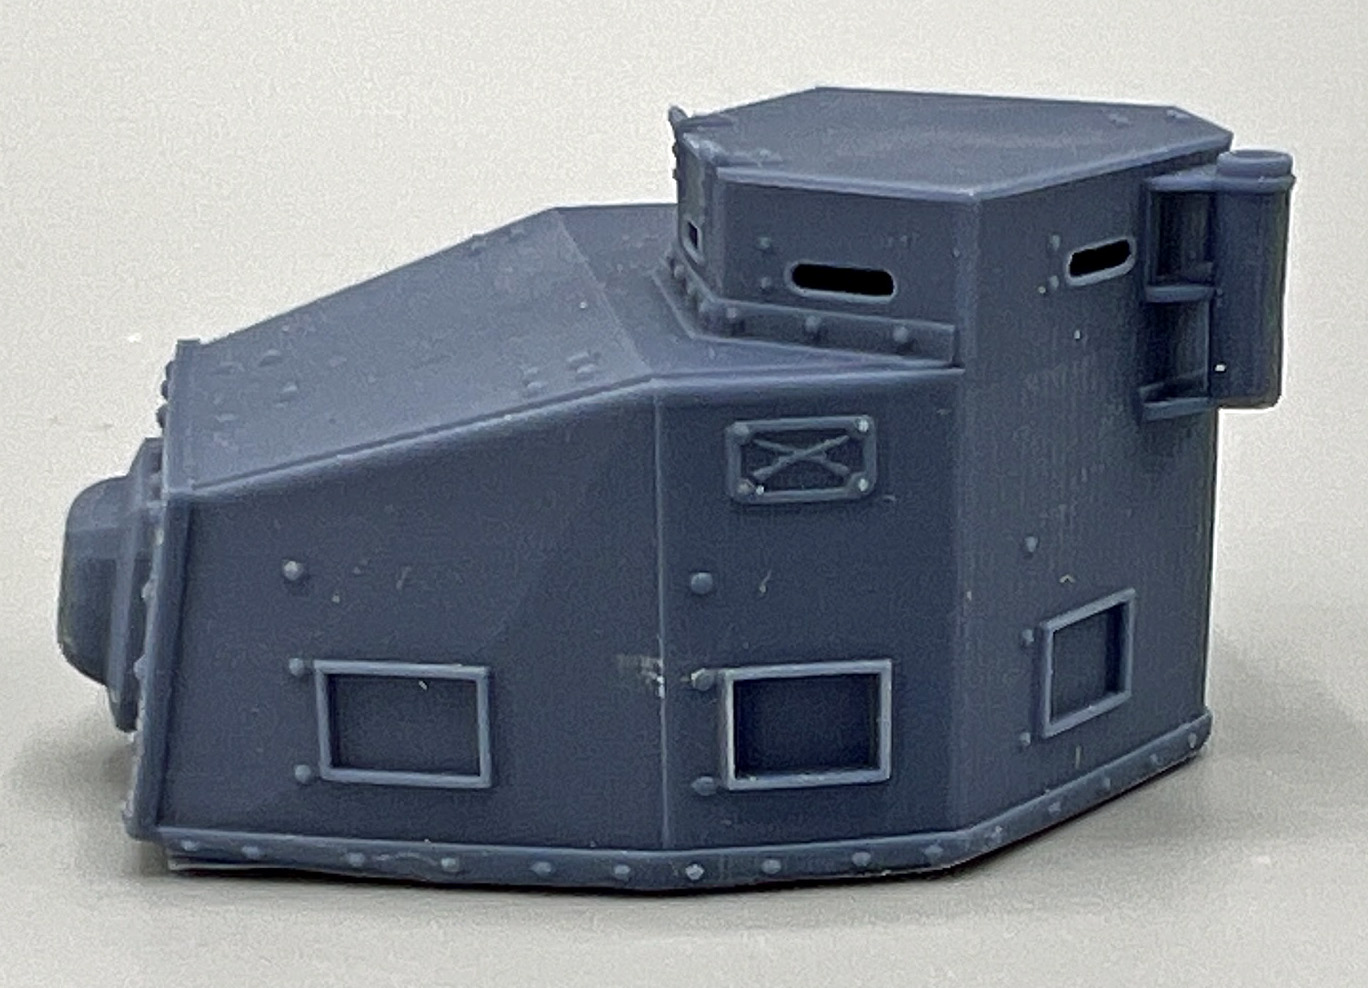
The unmistakable lines of the Stuart hull are evident in the M2A4, and the lower chassis and running gear clearly point to the venerable Allied M3 light tank yet to come. The M2A4 was armed with a 37mm main gun, and no less than five M1919A4 30-caliber machine guns; one mounted in each side sponson, one fixed in the front hull, one coaxially mounted next to the main gun, and a fifth mounted on a pintle on the top of the turret. This last gun is not included in the kit, presumably stowed inside for transport.
Ultimately the M2’s service career was doomed to a limited (but invaluable) training role, providing US tank recruits a far more modern training tank than what was used previously.
The Kit
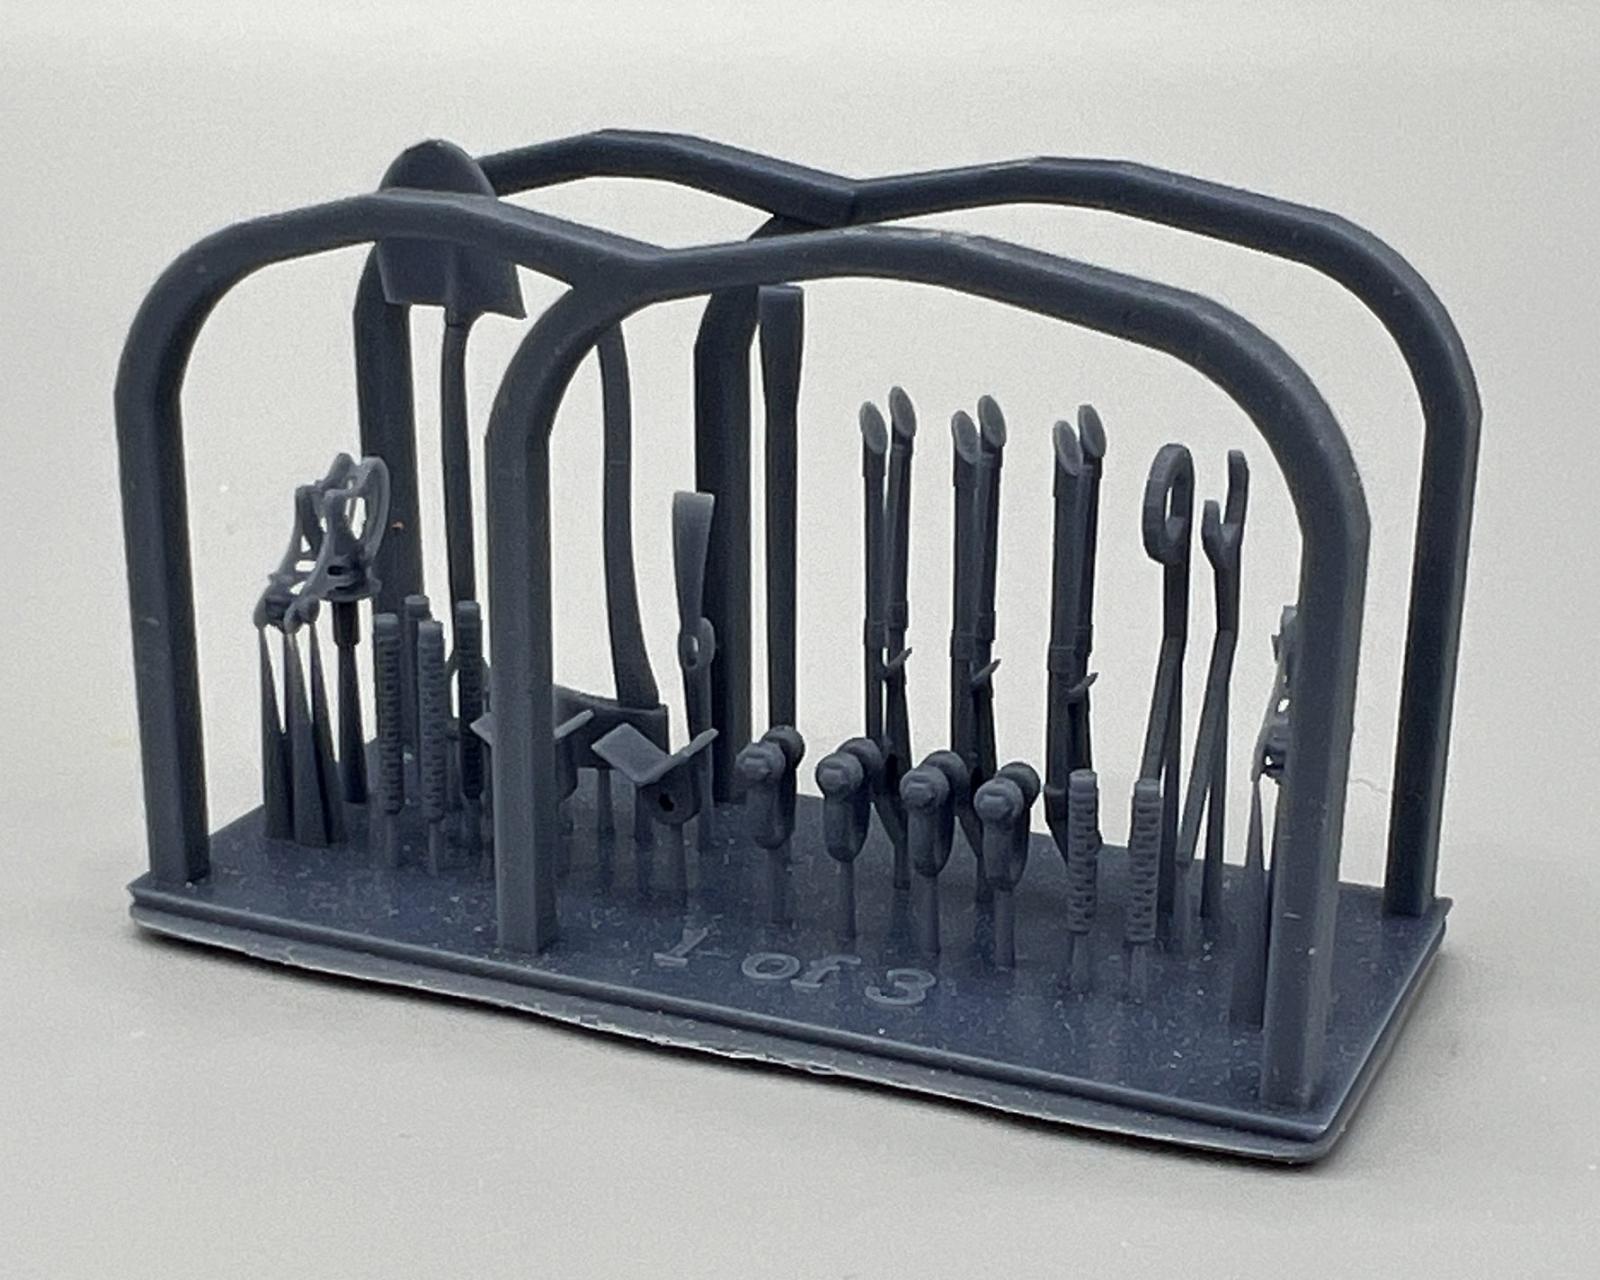
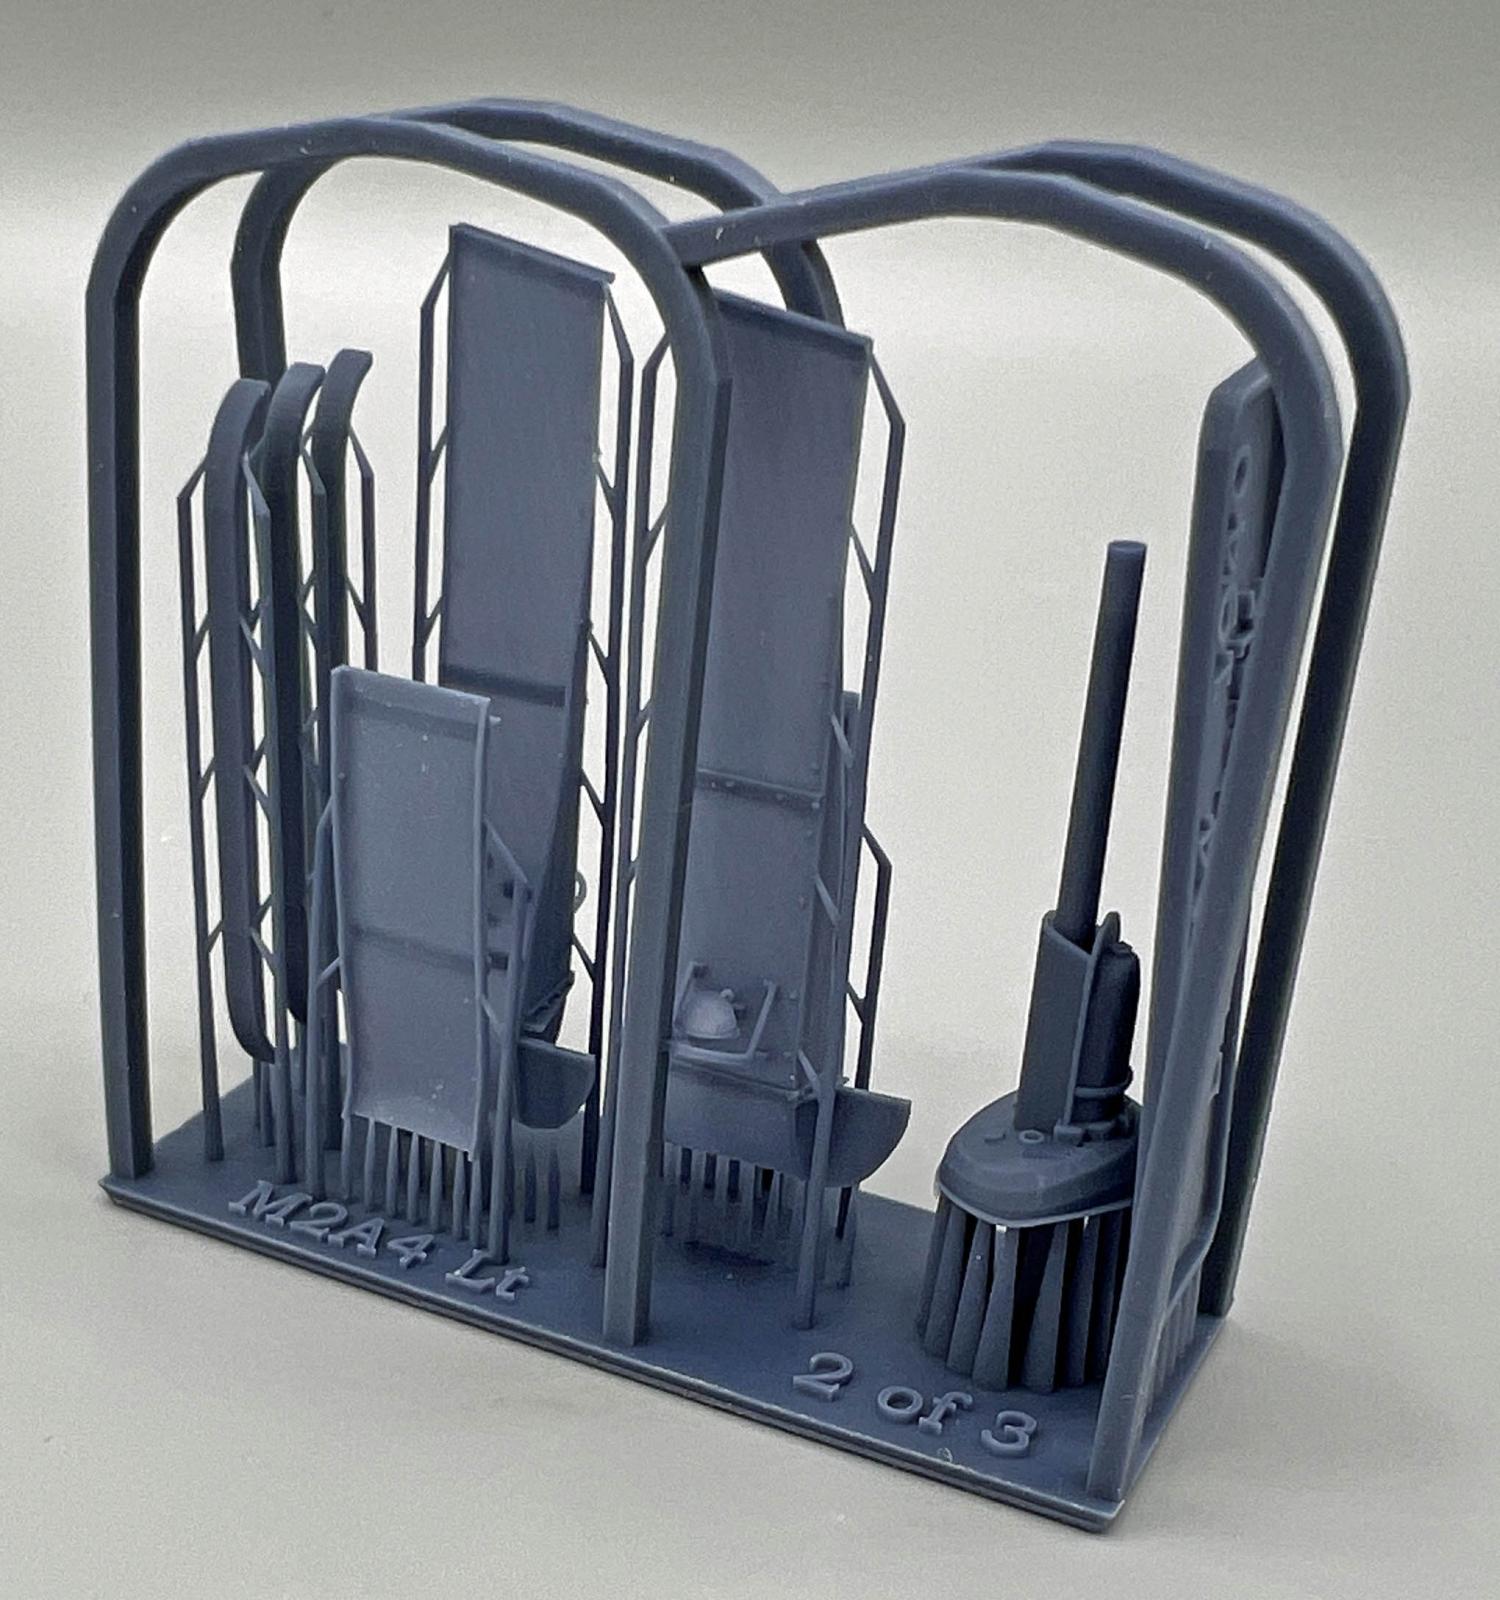
As with most 3-D printed kits, the Vargas sprues do not have any old-school poured-resin blocks to remove; instead, each sprue contains dozens (hundreds?) of very thin connecting rods that are part of the printing process.This makes the parts very simple to remove from the sprues. Most of the smaller parts are printed within a flexible, protective ‘cage’ of resin.There are very few actual parts in the box (45), and these are exquisitely detailed – some of the best work I have seen in this medium. Many of these parts are spares and optional – thrown in by Lewis as a friendly gesture – something I really like and appreciate about building models from small companies.
There is cleanup required, to be sure, but nothing like what I would normally expect for limited-run, resin subjects. A welcome addition to this kit is a nice set of ‘pioneer’ tools, although (some of) these require the modeler to fabricate some kind of attachment hardware to secure them to the vehicle. The shovel, axe, and two-part pick-axe have beautifully formed molded-on parts to hold them fast to the sides of the hull, while the wrenches and MG tripods need a little help – I used the excellent ‘WWII US Clamp Tool Set’ produced by MJ Miniatures for these [1/35 WWII US Clamp Tool Set (#MJ-EZ35002) - BNA Model World].
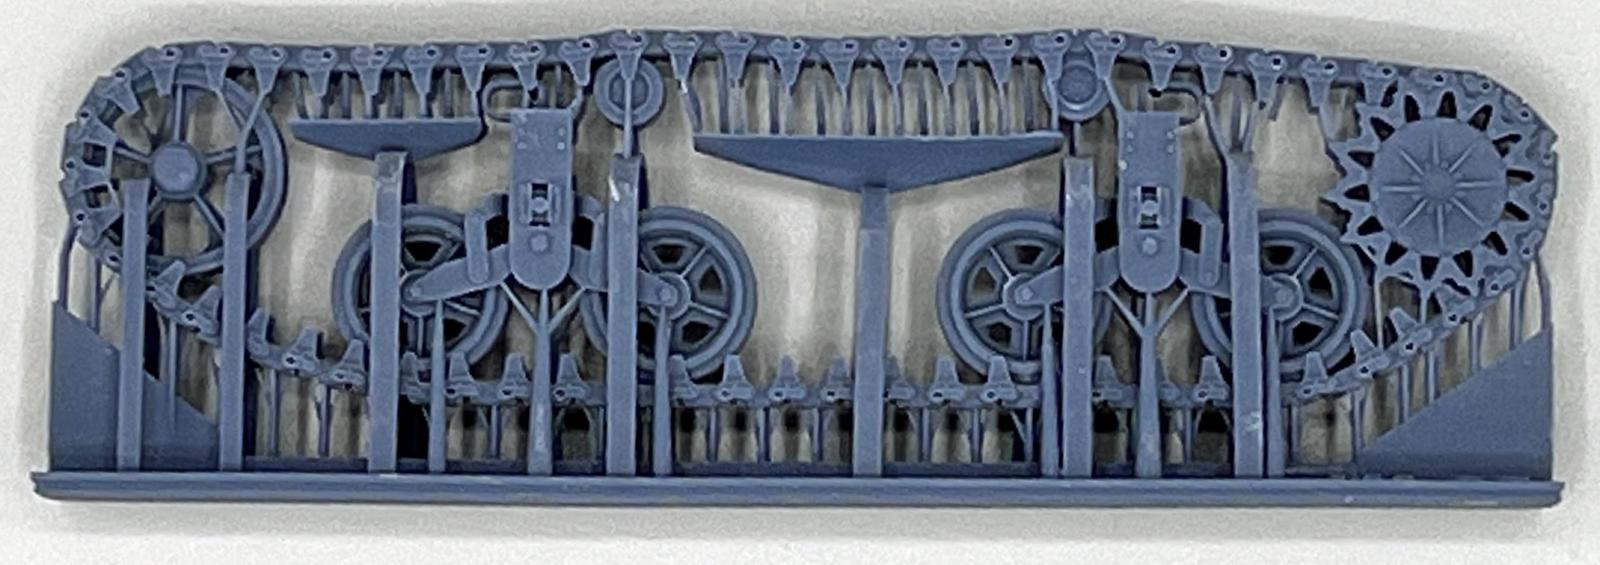
The dark-grey resin is firm, but sands easily enough, and there are some surface striations on some of the parts that require attention, making preparation more important than with typical styrene kits. Comparatively, however, this work from Vargas is pretty darn good-to-go as delivered. There are very few, if any, surface flaws and the molding is excellent with no noticeable defects. The detail overall is crisp, and while many of the parts are very delicate, Vargas pulls everything together without resorting to using photo-etch or other finicky mediums, which is a big plus (for me, at least). The two pieces that represent the full track runs, one for each side, are simply breathtaking, as is the rivet detail throughout.
The contents of the box include:
- Two single track sprues, packaged separately.
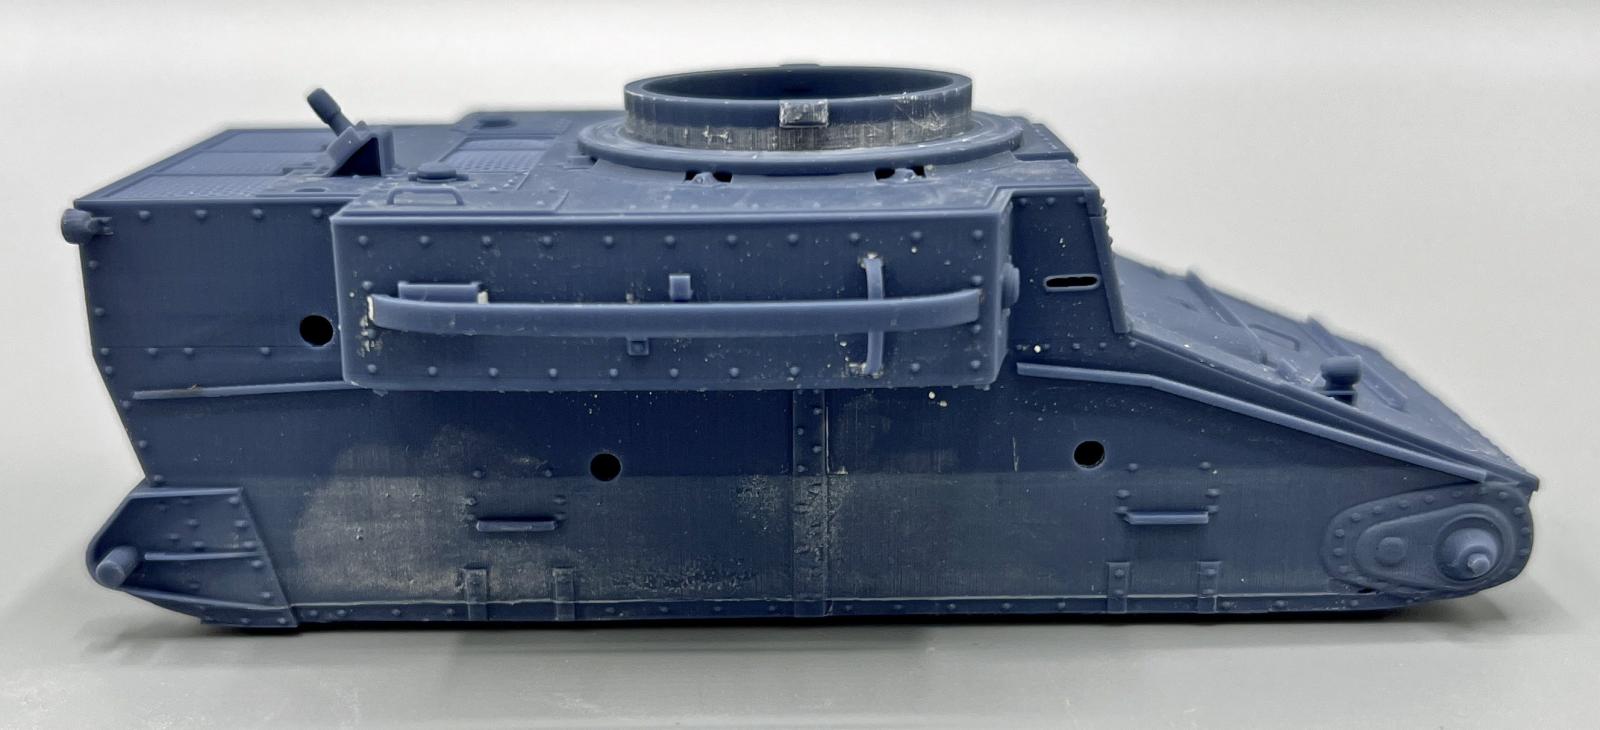
- One turret, packaged individually.
- The single main hull packaged separately.
- Three sprues of all the remaining parts, packaged separately.
- An 8-page, color instruction booklet consisting of two full-size sheets, folded in half. All text and label information are printed in English.
There are no markings included in the kit – I resorted to my spare decal stash for the markings used.
The Instructions
As with most limited run, resin kits, the instructions are brief and not always ‘enough’. Assembly requires test fitting and comparing what you have to drawings and images of the real thing, easily found on-line. In place of text, Vargas provides simple CAD images from the printing process itself for use as a rough go-by to start with. Fortunately, each piece is shown assembled and printed in a different color from the one adjoining it, which makes things a little easier to follow – but only a little. If you have built limited-run kits before, this one is typical – a lot of testing and adjusting surfaces to fit. Fortunately, the images are rendered from several angles so you are rarely forced to guess about how things go on ‘the other side’.
Clean Before You Start
Even though there are relatively few parts in this kit, a 3-D printed model requires a good amount of preparation before assembly. After unwrapping all the parts, and carefully snipping (not pulling) the parts printed inside the protective sprue ‘cages’, I carefully shaved and sanded the surfaces of everything to remove any remaining vestiges of the thin resin posts that held the parts to the sprues.
Next, I went to work smoothing out some minor (but noticeable) grooves on the surfaces of some of the parts, such as the mantlet for the 37mm main gun. The resin is not soft, but it works away with a little effort, resulting in a smooth surface relatively quickly.
Once I thought I had everything pretty well cleaned up, I gave the parts a warm bath in soapy water, rinsing them in warm water. After drying I felt the surfaces with my fingers, and, if I found anything tacky, I repeated the wash, rinse, and dry steps until all the tackiness was gone. With all the parts clean and free of defects, I was ready for assembly.
The Build
The M2A4 instructions start with some good advice – work and test-fit the two large track sections to the side of the hull, so that later, after painting, they will slip on without causing any damage to all the other prickly parts added during the build. Vargas also calls out careful handling of the extremely thin fenders – they are almost translucent! In fact, half of the instructions provided are just to warn the builder to not be ham-handed during assembly. Fortunately, assembly was straightforward and nearly hassle-free for me. I tend to use a lot of glue when I am building models, even CA glue, and the delicate parts tended to survive handling because of this. The super-thin fenders came a little warped out of the box, which is understandable due to their thinness, and was easily addressed. I simply glued them to the hull sides a little at a time, which allowed me to straighten them up as I went.
The beautifully rendered pioneer tools can be slipped into their place behind the horizontal protective bars that cover them on each side of the hull. Vargas provides no less than four spare bars in case the builder feels that the tools cannot go in without removing the outer bars. Not so – test fit things and you will find that the seemingly impossible is actually possible!
The holes receiving the two sponson machine guns will need to be drilled out a little to provide a good fit, but otherwise they look great.
The front headlights and their guards attach with the most delicate of mating surfaces, so these were the last items I put on. Somehow, I was successful in steering clear of them during painting and finishing.
And that was that – assembly complete, with the wrenches and machine gun tripods set aside for attaching at the end, along with a carbon-fiber antenna from my spares box. Vargas models are perfect for modelers like me, who enjoy the ‘finishing’ steps to those involving assembly.
Decals
Alclad Aqua Gloss acrylic (2 coats) prepared the surfaces; markings are from my spares box.
Finish
There are a surprising number of images of the M2A4 online. The standard US Army Green scheme prevails, along with a nice and satisfying school bus-yellow stripe around the turret for the Guadalcanal version. I chose to add a little weathering to break up the monochromatic finish as much as possible.
Here is a breakdown of the colors, materials, and steps I used to finish the build:
Painting
- Primer/Pre-Shade - Gunze Mr. Surfacer 1500 Black lacquer
- Camouflage - AKI Real Color 023 Olive Drab and 024 Olive Drab Faded acrylic
- Post Shade – AKI Real Color 060 Dunkle Gelb (Dark Yellow) RAL 7028 acrylic
- Turret Stripe – Testors Flat Yellow #11 enamel….. 40 year-old bottle!
- Machine Guns – Tamiya XF-84 Dark Iron acrylic buffed with MIGGun Metal Powder
- Pioneer Tools – Vallejo MC70.865 Oily Steel (metal), mix of Old and New Wood (PA 310/311) acrylics, detailed with a black oil wash
Weathering
- Pin Wash – MIG Dark Wash
- Dot/Streaking Wash – Mig Abteilung Oils and Oil Brushers
- Filters – MIG Wash Brown Oil thinned with Mona Lisa
- Pigments – A variety of MIG, AK, and Vallejo colors to lighten and darken areas
- Bling – Uschi Chrome pigment
- Finish Coat - VMS Varnish HD Satin (2 coats)
- Road Dust – Vallejo MA71.027 Light Brown
Conclusion
This is my sixth 3D printed model from Vargas and again, the build was a joy. Luis Vargas does a solid job researching each subject, and the design and engineering that goes into each kit is readily apparent. As I said with the last (and every) Vargas project – each one makes me want to build another.
As with any all-resin project, this kit has its challenges, especially when compared to injection-molded models. I think the build was straightforward enough, however, for any modeler to finish. Having a solid working knowledge of alternative adhesives (CA Glue, epoxy, and/or ‘fortified’ white glues) would certainly be a plus.
I would like to heartedly thank Luis Vargas at Vargas Scale Models for providing this kit for review, and to IPMS USA for giving me the opportunity to build it.


Reviewer Bio
Eric Christianson

Eric Christianson is a father to two boys (Reed and Dean), the President of the Seattle Chapter of IPMS, and a long-time Little League umpire. He is also a devoted husband and companion to a wonderful woman named Jackie who enthusiastically supports his passions. Recently retired as a programmer, his home office has been scratch-built into ‘a perfect model room’. Modeling since he was a boy, Eric mostly builds armor these days, but still dabbles in 1/32nd aircraft and other types of models from time to time. He also enjoys presenting seminars on weathering and technique at local shows. Many of Eric’s kit reviews can be found on the IPMS USA website.
Comments
Add new comment
This site is protected by reCAPTCHA and the Google Privacy Policy and Terms of Service apply.
Similar Reviews