
Krankenpanzerwagen Sd.Kfz. 251/8 Ausf. A WW II German Ambulance
A Very Brief History the Krankenpanzerwagen
The Krankenpanzerwagen is another lesser-known version of the Sd.Kfz. 251 and as such a lightly armored semi-tracked vehicle—in plain English, it’s an ambulance.
From the manufacturer’s webpage, this is how ICM describes this vehicle:
Sd.Kfz.251/8 Ausf.A WWII German Ambulance
The Sd.Kfz.251 semi-tracked armored personnel carrier was the main armored vehicle of the Wehrmacht. It was designed by Hanomag in 1938 and mass production started the following summer. The armored personnel carriers were in service with the German army throughout the Second World War and were used in all theatres of operations, with a total quantity of 15,252 vehicles of various series and modifications. The first modification, the Sd.Kfz.251 Ausf.A, was produced in 1939-1940. One of the versions was the Sd.Kfz.251/8 for evacuating the wounded from the battlefield.It could carry a different number of wounded, for example, two lying on a stretcher and four sitting. The stretchers were suspended on special mounts, and semicircular rails for an awning were installed on top of the body to protect it from the rain. The equipment of the transporter also included a drinking water tank, and an additional step was installed at the rear to facilitate boarding the transport compartment. Usually, armored medical transporters were part of Stabskompanie. To distinguish them from other vehicles, they had large signs with a red medical cross on their bodies.
I recommend that you initially review several online sites for a basic understanding of just what this vehicle was designed for.
- Wikipedia
- Tanks Encyclopedia (this site also provides numerous great color side views schemes including one ambulance)
- Nevington War Museum
- Another great reference is David Boyle’s book on the SD.KFZ. 251/9 -Kanonenwagen: Nuts & Bolts Volume 21
- There are two related IPMS/USA reviews to the Sd.Kfz. 251 family of vehicles, which may be of interest and provide a great reference:
This Kit
The overall engineering of this kit is excellent. There are 290 parts, 20 pages of instructions (including two full 5-view color drawings), three sprue section illustrations (which provide a guide to those parts not intended for use in this kit) with two rubber band track pieces, two rubber tires and one clear section (largely unused in the construction of this Sd.Kfz.251/8). It’s a small kit and from my Murphy’s rule, the dimensions appear to be correct. I found the plastic to be softer than that of prior ICM kits I had built.
The Build
The construction of this kit is pretty much straightforward, starting with the interior. If you are the type of modeler who wants to have a kit that almost ‘falls together straight from the box’, I suspect this might not be the kit for you. I encountered no fit issues, there is some flash requiring clean-up by sanding. I encountered a small amount of filing, where I used Vallejo Plastic Putty (#70-401) which I wiped off with tap water. This small kit was fun to build.
Back briefly to the ‘build’ itself. Initially, you construct the flooring or hull for the armored car followed by the side sections and then the front undercarriage and chassis. This is where the construction of my Sd. Kfz. ‘left the tracks.’ I chose not to fully build (nor paint) the complete engine, as I saw it would not be visible in my completed kit. However, the complete engine is included in the kit, should you be so inclined. Steps #32 and #33 are necessary and include the firewall and related parts. One aspect that initially threw me was the large steering wheel until it dawned on me that the wheel is different from those we commonly see—with the top of the steering wheel forward and the bottom pushed toward the back of the vehicle.
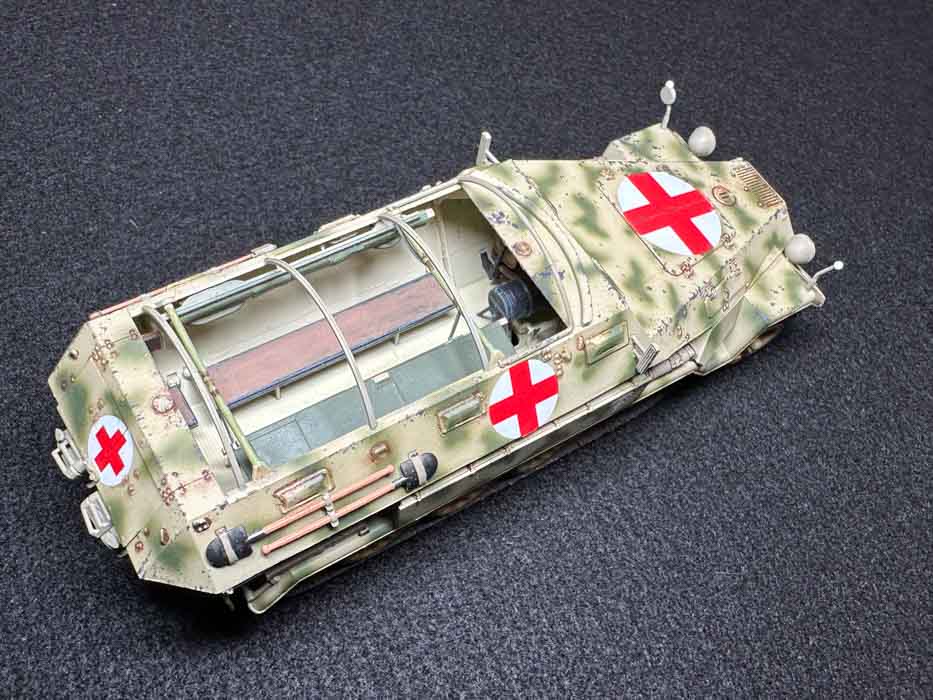
From there construction moves to the interior details including the bench seat, water barrel, then stretchers and other smaller details. In steps #53-55, you are to drill small holes in a delicate cross piece that is not even visible when fully assembled. Back to the exterior visibility (and gun ports?). Step #58 included covering the hood & engine area, thereby losing any sight of the engine. While it took time to install each of the minute interior observation ports (steps #59-64) once the upper hull structure is completed and inverted, these details are largely invisible, again.
Steps 65-69 again proved to be challenging, covering the mounting of the stretchers and the top of the armored cab roof area. I found these steps challenging due to the small delicate pieces underneath the cab roof and attaining the correct alignment of the pieces involved and dry fitting them numerous times to (hopefully) their final location.
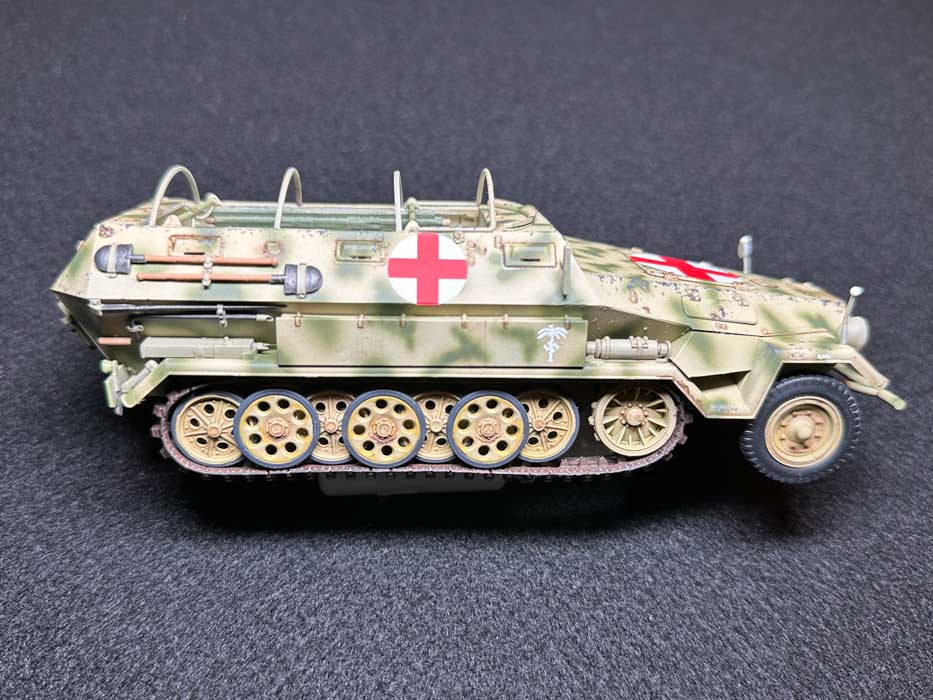
The balance of the instruction steps includes the interleaved road wheels, suspensions, rear doors, headlights and various pioneer tools.
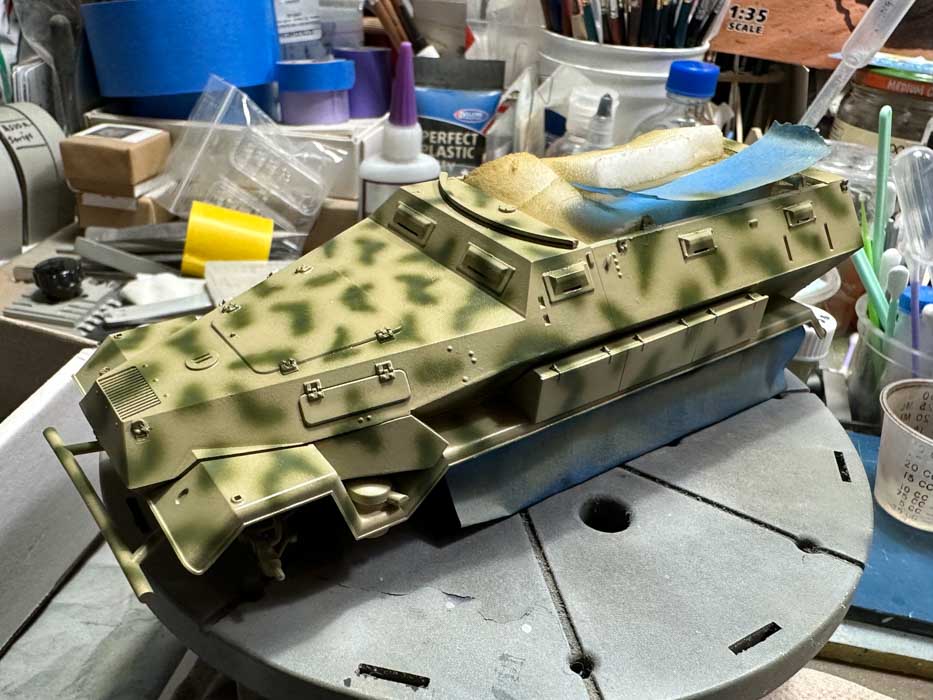
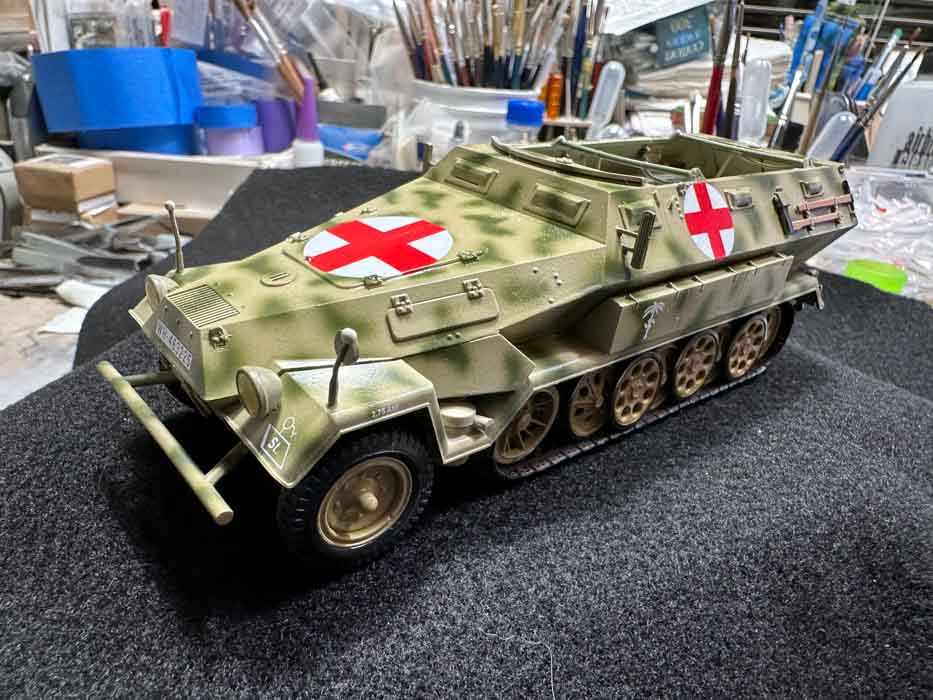
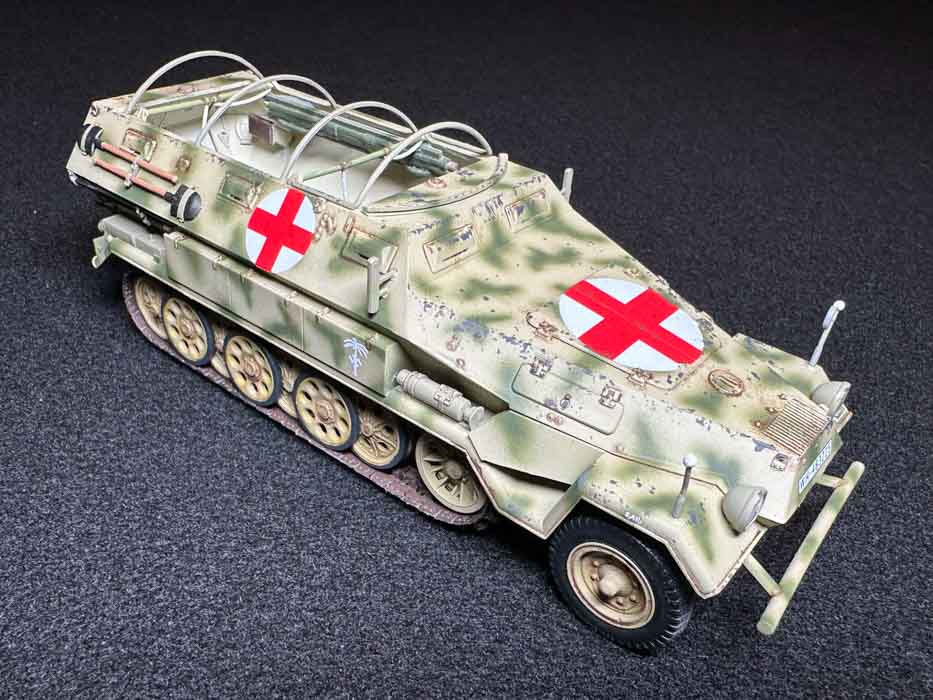
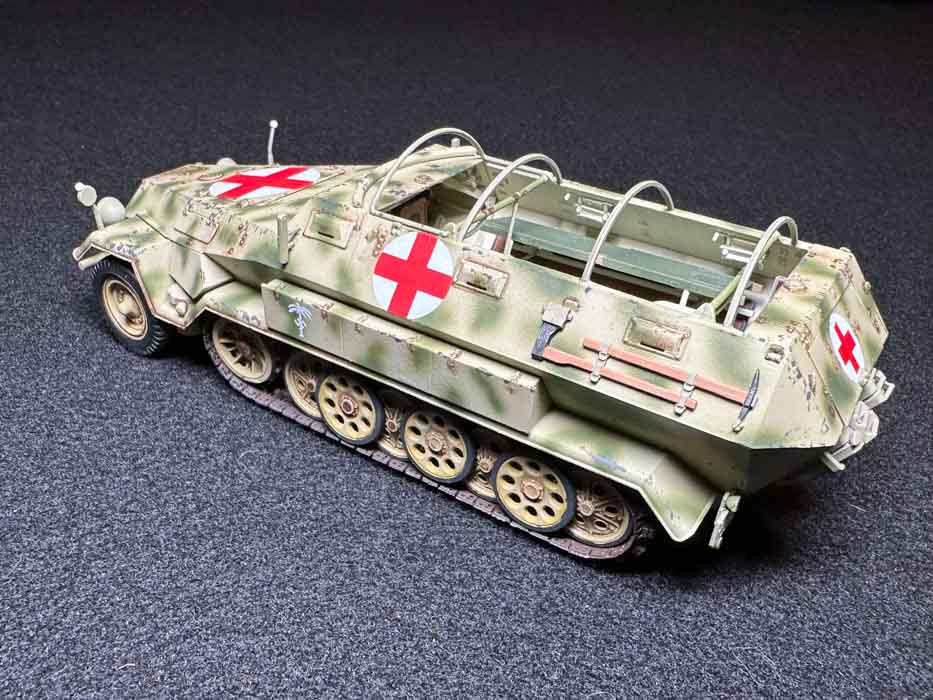
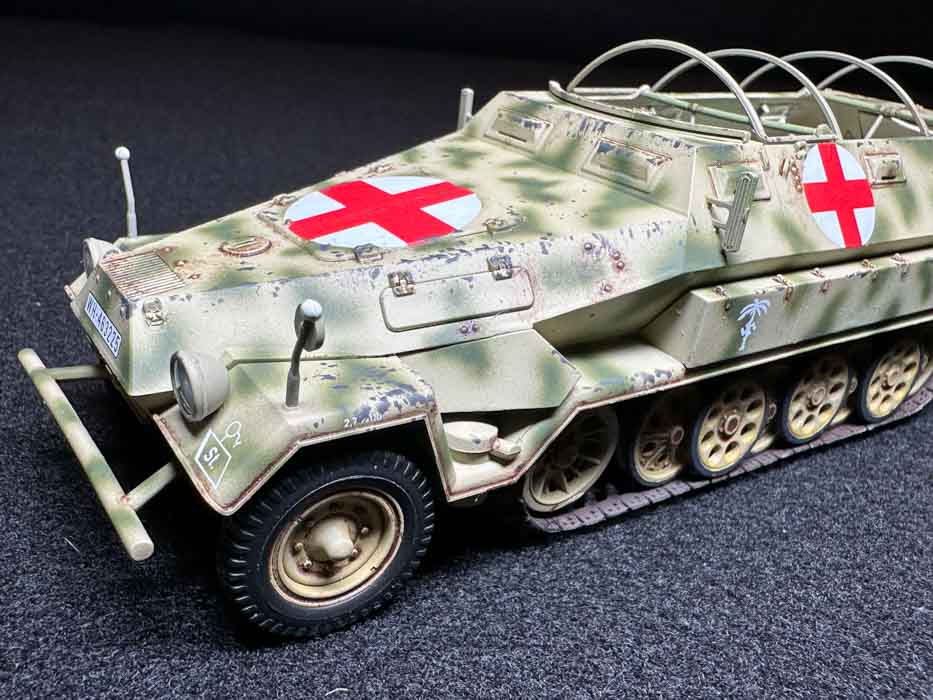
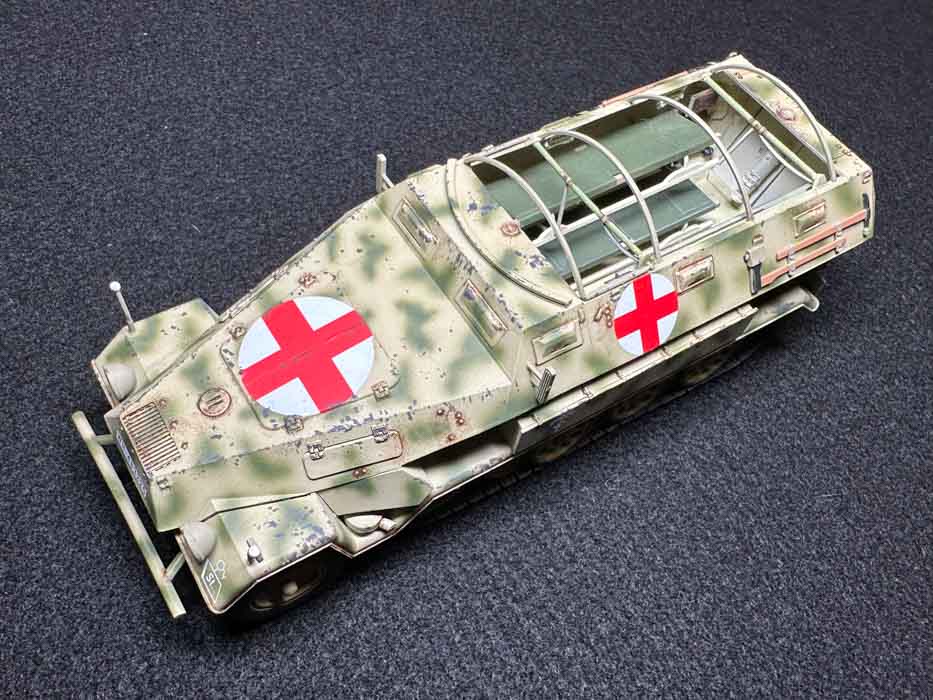
I’ve attached several images of the Krankenpanzerwagen to provide some idea of this kit.
Painting
Again, I looked for a US-based retailer selling the ICM acrylic paints without finding one, and sadly again, these are the only paint colors shown for this kit, and I am forced to make substitute paint colors for my ambulance.
One of my favorites is AK Rust color primer (Rust #AK 184) which allows me to replicate both the universal base color for all German tracks and provides a great primer coat.
I used a variety of paints to complete this Krankenpanzerwagen. Initially, I chose AK Real Color’s Dunkelgelb Ausgrabe 44 (Dark Yellow RAL 7028 ’44) #RC 061 for the overall paint, Olivgrün (Olive Green RAL 6003) #RC 047 for the green camouflage spots, and Rubber Black #RC 022 for the tires. The interior base color is German WWII Elfenbein Interior White, Mission Models #MMP-082, the seats Mission Models NATO Brown #MMP-033, most of the remaining interior details using Lifecolor Matt Black #LC 02, lights picked out with AK Extreme Metal Aluminum #AK 479, metal pioneer tools using Vallejo Metal Steel #77 772, and wooden handles with AK 3rd Generation Cork #AK11119.
I used small amounts of Walters Solvaset #904-470 and Microscales Micro Set #MI-1, which provided the decals to snuggle down and fit tighter when dry.
My painting included a small amount of pin washes, using 502 Abteilung Brown Wash #ABT080. I completed my dry brushings, using my regular Winsor & Newton’s Artist Oil color Naples Yellow Light, No. 426. I. and my overall final finish using Testors Dullcoat Lacquer (#1160).
Decal Markings Included
- Krankenpanzerwagen Sd.Kfz. 251/8 Ausf А, livery variant for North Africa, 1941-42
- Krankenpanzerwagen Sd.Kfz. 251/8 Ausf А, livery variant for the Eastern Front, 1941-42
Overall Evaluation
I highly recommend this kit of theICM Krankenpanzerwagen Sd.Kfz. 251/8 Ausf. A. The ICM kit builds into a small and beautiful representation of this vehicle and compliments this other company’s related armor and vehicles in 1/35th scale.

Comments
Add new comment
This site is protected by reCAPTCHA and the Google Privacy Policy and Terms of Service apply.
Similar Reviews