KC-97G
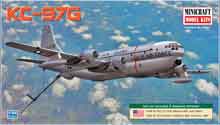
Minicraft models has issued another boxing of their KC-97G. I believe this is the second boxing of this kit and is a slight improvement over the first release. The parts are unchanged, but this new boxing includes a gorgeous decal sheet with two different options (more on this later). The kit includes five sprues of light gray plastic and one sprue containing the clear parts, which consists of boomer’s pod and the cockpit windows/part of the front fuselage. No clear parts are provided for the side fuselage windows; black decals represent these windows.
After giving the parts a once over, a small amount of flash is present. Also of note, there were a few sink marks in the fuselage halves and some rather soft detail on the wings. This would also be a good place to note that the engines have no detail what so ever and the props are very bland. Because of blank look of the engines, I ordered Cobra Company’s resin engine and white metal prop replacements. I highly recommend this simple replacement as it provides a very nice enhancement over the kit parts. The clear parts are really clear, and a dip in Future made them shine.
My build began with scratch building a representation of the cockpit. I knew not a lot would be seen, but I wanted to add something. The seats are modified seats from a 1/144th Dragon MH-60. I also robbed the instrument panel from the Dragon MH-60. I used the center control console from the same MH-60 for the side “circuit breaker board” in the cockpit. It is simple and relatively effective when you get close. The instructions tell you to add ½ oz for the nose weight; there is plenty of room, so I threw a handful of pennies in the fuselage.
I placed the scratch built cockpit in the model after the fuselage halves were together. Then I put the cockpit window/forward fuselage section on. I found that the part fit better if I cut off the little tabs. Be prepared to do some filling and sanding on the fuselage, and don’t put that filler away as you’ll need it later.
The wings and engine nacelles require a fair amount of sanding and filling, so be prepared. The Cobra Company resin engines are a simple replacement to the kit parts, and if you take your time, you can put these on without any filler. In regards to the wings, I also cut part of the tabs off the wings that insert into the fuselage; this made it easier to get the wings to fit into the recesses in the fuselage. It was also during this assembly that the instructions do not provide a clear placement location for parts 9 and 37. You may want to remove the placement tabs from part 37. Reference your photos to see the exact location of these parts.
After spending a few modeling sessions filling and sanding, I was ready for the primer. I airbrush my models with only acrylics and usually only Model Master Acrylics. However, since the KC-97G is finished in natural metal, I wanted to try my hand at Talon natural metal acrylics. These were awesome and worked quite well over a coat of primer. I even used Tamiya tape on top of the natural metal and did not encounter any problems.
The decals consist of two KC-97Gs. One is from the California ANG in Germany and is predominately natural metal with some neutral gray areas. The other, and the one I chose, is one from the Missouri ANG finished in natural metal with a small white section around the cockpit/forward fuselage. The Cartograf decals are amazingly printed and go on the model very well with the exception of the long fuselage stripes and windows. It may be easier to cut the windows apart and apply them separately. I also used a little setting solution to help the decals settle down in the panel lines and around some of the curves.
The final touches were added (landing gear, gear doors, and props) and the model then went into the display case. The forward landing gear door looks a bit off. I think the model lacks the side doors for the forward landing gear. Reference some real photos and the kit parts; you will see the difference. I spent around 14 hours on this model, most of which was dedicated to filling and sanding.
If you want a 1/144th KC-97G, I recommend picking up this newer boxing because of the fantastic decals. This was only my second model that I’ve finished in a natural metal scheme (the other being a 1/144th F-104G). Although my filling and sanding was not perfect, I have to say that the model looks very impressive sitting in the display case next to the other 1/144th models. If you want a KC-97G in a manageable scale, you can’t go wrong with this kit; just make sure you have plenty of putty on hand. Despite the amount of filling and sanding, I definitely plan on getting another one and building a KC-97L!
Overall, this is another nice addition for the 1/144th modelers. Huge thanks go out to Minicraft Models and IPMS/USA for the opportunity to review this model!


Comments
Add new comment
This site is protected by reCAPTCHA and the Google Privacy Policy and Terms of Service apply.
Similar Reviews