
IJN Nagato 1941
Bottom Line: New molding for 1/700 scale IJN Nagato as she appeared at the beginning of WW2 (1941). Excellent detail, excellent fit, accurate appearance.
IJN Nagato
Nagato was a historic ship – first battleship with 16in main guns, the most powerful weapon afloat for a few years, Japanese flagship at the start of WW2, surrendered the Japanese Navy in 1945 and sunk by an atomic bomb (it took two). On December 2, 1941, the signal to attack Pearl Harbor was transmitted from the IJN Fleet Flagship, HIJMS Nagato. Until Yamato was commissioned and made Fleet Flagship in February 1942, Nagato was the flagship and thus the most important warship in Japan for almost twenty years. During the war, Nagato shadowed the newer super battleships Yamato and Musashi waiting for the climactic decisive battle with the US Navy battleline, keeping Nagato out of any real action until October 1944 and the Battle of Leyte Gulf. Nagato fired 45 16in rounds at US escort carriers and escaped with relatively minor damage from four bomb hits and six near misses with 38 crewmen killed. This damage essentially ended her career as she was hulked after returning to Japan and most armament was moved ashore. Her mainmast and funnel were cut down and she was heavily camouflaged. She remained unsunk at war’s end and symbolically surrendered the IJN to the US Navy. Nagato was selected for nuclear weapons tests Able and Baker, the latter underwater blast slowly sinking Nagato in Bikini atoll where she remains today.
What You Get
New tooling with 17 Sprues containing 218 parts, 8-page foldout Instructions sheet, one decal sheet with flags and aircraft markings, two metal weights. Fujimi’s 1/700 scale IJN Nagato is a waterline only kit with the customary red bottom plate that holds metal weights. No photoetch or extra detail sprues. Kit is complete for 1941 fit without railings or rigging. The hull, decks and major pieces have a lot of fine detailing, and the wood deck scribing actually has perpendiculars to demarcate individual planks (this is hard to find in any 1/700 scale kit). Two clear plastic sprues contain the aircraft and searchlights – a good idea. The hull measures 737 feet, very close to the 738 feet length found in references for 1941. Beam measures 108 feet, close to the 108-113.5 feet from references, a little thin but not obvious.
The Build
The instructions leave much to be desired. There is no history of the ship or indication of what time period it fits. They are fine for letting you know which part numbers go where via exploded parts pictures, and they have a logical sequence to them with 14 sections (some with their own subsections). But they do not tell you what the parts are, so if you lose track of its part number, some will be indistinguishable from others. Also, it is educational to know if something is a trolley or practice loading gun or some other nautical term – that potential is lost with these instructions.
More importantly, I disagree with the sequence of building. I start with the hull, then the main deck, then building up from there, and then start at the center and work towards the deck edges for smaller fittings. Superstructures are built as a subassembly or on the deck, adding small pieces and armament and finishing up with masts and flag decals. Trying to glue the finished ship to the bottom plate as a last step is sure to destroy some fine pieces or at least prevent applying pressure for a good fit – and forget about trying to clean up the inevitable seam between hull and bottom plate. My order of assembly can be seen in the Figures.
Another discussion left out is when to paint what. As always, before painting anything, wash the sprues with warm water and detergent and rinse well to remove molding release agents to ensure your paints and glue stick properly. It is preferable to remove all parts and clean them up, with some minor assembly (such as adding bases and rangefinders to main turrets) as long as it does not create hidden surfaces that cannot be airbrushed or painted easily. I leave very fine or tiny pieces on the sprue since they are almost impossible to identify or keep track of, and will be easier to paint by hand than by airbrush anyway, even after assembly. Fujimi’s Nagato has a lot of virtually identical spars, yardarms and supports that are best left on the sprues so you will have the part number and proper location handy. I frequently use a No.11 blade hobby knife to remove mold seams and tabs on small pieces by scraping, since sanding is unwieldy and obliterates fine detail and changes the shape. Other parts were sanded by a variety of sanding sticks, pieces of sanding paper, Flex-i-file or metal files – whatever works. I mostly use three-part sanding sticks to give sanded areas a smooth, polished look. Fortunately, parts in this kit had almost no flash and were easy to clean up – just the usual mounting tabs, mold seams and injector pin depressions on bottoms of some pieces.
After parts are removed and cleaned up, I use double-sided tape on leftover cardboard to temporarily attach the pieces, and then airbrush them with the primary color. In the case of IJN warships, this is a dark gray color. Ignore the Instruction recommendations for paints and colors. Nowadays, several companies make very accurate shades of IJN Dark Grey specific to each of the four main naval dockyards (Kure color being the most often used). However, I was out of my favorites (White Ensign Models WEMCC IJN02 Kure Grey enamel and Model Master Acryl 4251 Kure Naval Arsenal) so I had to improvise. I finally chose Floquil Railroad Colors SP Lark Light Gray enamel. I think Floquil enamels are the best paints available for 1/700 scale since they give a thin opaque coat and apply equally well with brush or airbrush, come in larger 1 fl oz bottles, and store well after opening. After testing this paint, it has less blue/purple hue than specific Kure Grey paints, but it actually looks like weathered Kure Grey (blue tints were first to fade in real life settings). All parts were airbrushed with Floquil SP Lark Light Gray.
The hull was airbrushed more as a primer coat, since the seam between bottom plate and hull was puttied and sanded smooth. I am one of those who believe the red bottom plate on just about all 1/700 scale Japanese plastic warship kits is unrealistic and detracts from the appearance of the model. During the war, most vessels were overloaded, and the red underwater hull was never visible at rest, and only briefly during heavy seas or hard turns – in other words, not when the ship was level, as waterline kits always are. Plus, the red is not the right hull red color – much too bright. And the seam between red bottom plate and hull is obvious and ruins an otherwise good model. You have three choices: 1) keep the red bottom plate (maybe repainting the red color); 2) not using the bottom plate at all (easiest choice and looks fine but the entire ship might warp or buckle later); or 3) keep the plate, putty and sand the seam, and paint it gray (most difficult choice but I like the heft the weights give the model and it makes for a sturdier model too – no chance for hull buckling later). I chose option 3. After the puttied seam was sanded smooth (mostly), I airbrushed the hull again with SP Lark Light Gray.
After the dark gray paint is dry, I hand brush the wood deck color, in this case, Tamiya Buff XF-57. I brushed this model by hand because there are many, many tiny deck fittings and tight places. Some experts airbrush the wood color, then use a mountain of masking tape and cover the wood to reveal the tiny fittings, and then airbrush dark gray, revealing the fittings. Not me – it is easier and quicker and actually better looking to paint the wood by hand. The variability of hand brushing makes the wood deck less monotonic, giving a realistic look without resorting to painting individual planks with various shades of wood deck colors. Plus you can always touch up any overpainting. You just need a few tiny brushes for the tight areas and some patience. I also painted wood decks for superstructure pieces, which are poorly illustrated in the Instructions, and the lifeboats/cutters/motor launches. This is where I broke down and secured some very informative reference books in addition to looking at other Nagato builds on the web (which is always a secondary source for info at best). The books are listed at the end of the review, and were immensely helpful, even though they each cost as much as the kit. They have extra value by showing fittings shared among all IJN warships. Where the instructions fell short, these references set me straight. They also revealed that this new Fujimi kit is very accurate and put together very well.
The aircraft handling deck and some bridge decks were painted in my favorite IJN linoleum paint – Model Master Enamel Italian Dark Brown 2111 (not one of the many IJN Linoleum paints out there). This paint simply looks better and applies better in 1/700 scale. But before I painted the aircraft handling deck linoleum color, I painted Model Master Brass on the raised lines that indicate the brass joining strips between plates of linoleum. In 1941, these were still apparent on IJN warships. After the linoleum was painted over the brass color, I used a hobby knife to carefully scrape off the linoleum color to reveal a touch of brass – which is good enough for 1/700 scale. The brass strips were not so bright after 20 years of service in a salt water environment. The aircraft handling rails were carefully painted with SP Lark Light Gray. At this point I filled in all the portholes on all pieces with a drafting pen filled with India ink. If you do not have one of these, using the end of a fine brass or plastic rod will do fine. Brushes are too big.
Canvas bags on main gun turrets, secondary casemate guns and a couple of motor launch covers were painted with Polly Scale IJN Sky Gray 505280 acrylic, not white as the Instructions recommend. Some modelers paint the director on the bridge top white, but pictures of Nagato in 1941 did not show this (that was earlier). First, I thinned the wing strut and the rudder and horizontal stabilizer a bit since they were mighty thick. Ignore the Painting Guide in the Instructions – they are wrong for 1941 – not all white. I first painted the bottom of the aircraft Weathered Black since the aircraft are clear plastic and this will be seen through the open cockpits after painting. Aircraft were painted in a two-tone brown/green camouflage pattern, as shown in the book by Cea and seen in many builds of the Dave aircraft online (see Paints below for exact paints used – at this scale anything close is fine). No particular pattern – use creative license with large blotches. The undersides were painted with White Ensign IJN Aircraft Grey. The wings and horizontal stabilizers had deep ridges, which were sanded down partially on one aircraft. I painted the aircraft parts before assembly, and then added the decals, which were rather thick for this scale. Even so, I managed to destroy the rear gunner sight lines on the horizontal stabilizer of one aircraft, but all other decals went on just fine, and they were very fine in size too. For best results, trim the excess clear decal away from the colored part. Solvaset helped tremendously to seat the decals over the wing ridges. The aircraft pieces assembled well, and these Daves look better than previous versions from other kits. In fact, I had a spare Dave from some old kit that I had previously built and painted in a green camouflage pattern – it is added to the aircraft deck as Nagato carried three Daves sometimes, and shows the quality of the new Fujimi molds. Of course, aircraft are about the last thing to install, so they were set aside for later.
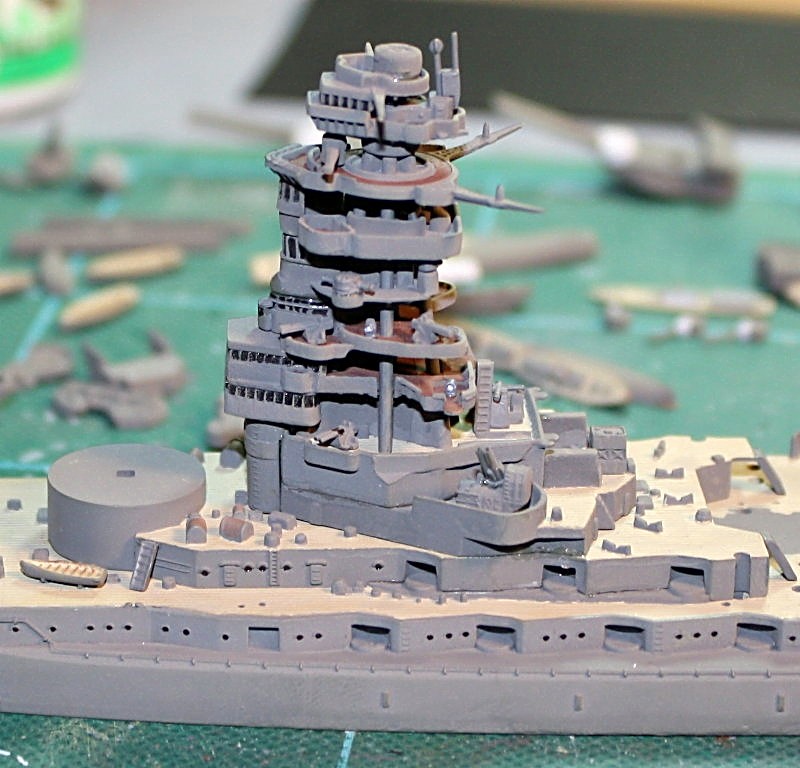
After the hull was assembled and painted, I turned to the bridge, building it on the hull (not adding it later as the Instructions indicate). First, add all the pieces on each deck level, and then start building up the bridge with the lowest deck level and work your way up, being careful to keep each layer straight and true. I was expecting the bridge to be the most difficult part of this kit. The many bridge pieces and especially the hexapodal struts went together very nicely and easily, a credit to Fujimi.
The stack was a different matter (Step 8). For some odd reason the stack gave me all sorts of problems far out of proportion to its size or complexity. I glued the two funnel halves together before airbrushing since I disdained the Instructions, but did not know a ladder piece went between the halves. Thus, the funnel did not fit on its deck assembly, and I even went through carving out the funnel to make it fit. Then I looked at the instructions and realized my hubris. Fortunately, taking the funnel apart did not injure the pieces and it was put together properly. But that was just the beginning of the fun. The Instructions show one H-pipe (J30) edge-on so it looks like a regular pipe. I had to remove a few pipes already glued on and redo them according to the reference books when I ended up with an extra H-pipe. Adding the 25mm AA gun platforms is a problem. There are nice-looking cutouts to tightly go around the pipes. In fact, it is a physical impossibility for the platforms to assemble as planned. Maybe the kit engineers did not build it themselves, but no way are those platforms going to fit flush to the funnel – the struts for the platforms will never reach their origins. I had to cut away the sections next to pipes so the platforms would fit close enough to the funnel so that the struts would go were they are supposed to be. And do not add the support struts for the platforms when the Instructions tell you to (before you add the platforms). Good luck trying to get their angles just right without the platforms positioned yet. I found it much easier to add the supports after the platforms were in place. Some struts were replaced with Evergreen rod in order to get them to fit. I built the stack as a separate subassembly since there were a lot of fragile, pesky pipes and supports, and then added it to the main deck when finished (test fits showed the subassembly fit very nicely). However, after adding the damage control piece to the front of the funnel assembly, it did not fit at all, necessitating cutting away both the funnel assembly and deck it snuggled up to. Then I decided to get fancy. The searchlight platform lattice supports were solid, as they frequently are in 1/700 scale. I carefully looked at photographs and the reference books and felt that the lattice was open, not a solid structure – most modelers have not done this and simply left the kit pieces intact. The clinching piece of evidence was the 1-500 scale Fujimi photoetch set which was clearly an open latticework. So I opened all the holes by using a pin vise for one lattice, and then a Dremel tool for the other. The Dremel tool took too much out of the lattice so I had to go back and use brass wire and plastic strip to reconstruct what I inadvertently destroyed. After opening the latticework, it looked much better on the ship. Next time I will ditch the kit pieces and make new ones from plastic and brass rod. This is the time to add the searchlight platform with searchlights, not in the last step as the Instructions show. The clear plastic searchlights look very good.
The front of the funnel deck assembly has a spot for timber used in damage control, as shown in the reference books, but not the Instructions. I used three types of plastic rod and square strips, and painted each three different tan and light brown colors. Then I cut the long pieces into the right lengths, and painted the ends. I used white glue to cement the timbers into the space – and it gives the model a more realistic touch. This is one of those easy embellishments you can do at home without photoetch or fancy tools – just Evergreen strips and rods, which any ship modeler should have anyway.
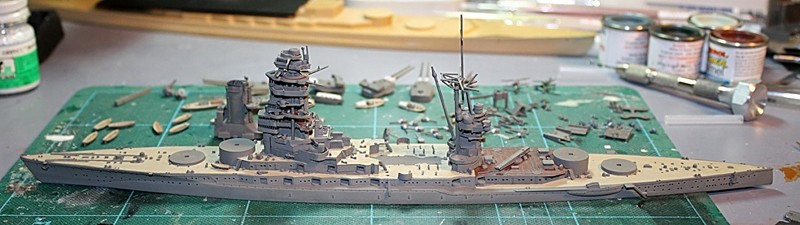
After the funnel was done, the tricky-looking mainmast went together surprisingly well, even though it is a little ambiguous where to put the platforms. Be sure to push the topmast down to the lower support – this is not well indicated. As with any injection-molded 1/700 scale kit, mast pieces are a little chunky, but Fujimi has done a better than average job. I painted the upper part Weathered Black as indicated in reference books, something else the Instructions missed! A glaring error. I decided to glue the mainmast before adding the rear tower superstructure since the superstructure had semicircular cutouts that held the mainmast – this was a wise decision. Building the rear superstructure was straightforward, but like the funnel platforms, do not install the support struts for rear superstructure deck levels (H1-H4) until the deck are already in place – they are impossible to line up otherwise.
With all the major deck assemblies on the ship, it was time to finish the assembly. This is time to add ship’s boats, accommodation ladders, anchors, anything sticking to or out of the hull, paravanes, aircraft, aircraft crane, flagstaffs (I used brass and plastic rod instead of kit pieces) and the chrysanthemum crest at the bow (I substituted the FineMolds crest from my recent IPMSUSA review – much better than the kit blob). I left off some davits without boats (since they were usually folded, not sticking up empty) and left off the smallest accommodation ladder (did not see this in photos or in references). I also did not add the wood panel for the stern which references did not show. Since this is a review kit I did not go wild and superdetail or add photoetch. I added the port (red) and starboard (green) running lights from Tamiya acrylics, based on references – these are not indicated at all in the Instructions. All ships had them even in wartime, and Dragon models of US destroyers even have them, so here is another deficiency of the Instructions. Simply add paint to the right areas – no need to add bits of plastic for the lamps – they were small anyhow. I used the drafting pen to darken the tips of all cannons. The flag decals should be added last of all, and for once the Instructions are right. They show the aft flagstaff with a flag and the kit has two – your choice of wavy or straight flag. References and photographs from 1941 agree. For weathering I used Weather System Rust & Weather Kit #FF-60 by Bragdon Enterprises, Georgetown, CA (www.bragdonent.com). Since Nagato was a proud navy’s flagship for twenty years, and home to the C-in-C (Admiral Yamamoto himself) it was going to be spotless. The decks would be scrubbed to a uniform hue (another reason not to go crazy trying to paint each plank), and there would be no rust above the hull. As usual, there is always a slight amount of rust around anchors and hull areas where water drained off the main deck, but not much since Nagato spent a lot of time in harbor, keeping its crew busy cleaning her. I tried a new acrylic flat clear paint that I thinned and airbrushed, and it sealed the model satisfactorily.
Summary
My thanks to DragonUSAonline for the review kit and to IPMS/USA. They also have accessories for this kit in case one wants photoetch or other aftermarket parts.
Pros
- Accurate, to-scale “look,” detailed hull, superstructure sides, decks and deck fittings;
- Scribed wood deck has perpendiculars;
- Clear searchlights;
- Carriage on underside of float molded on so floatplanes will stand up straight;
- 16in barrels are drilled out;
- 25mm AA guns are more to scale than other plastic kits, and have chairs;
- No seams across wood decks;
- Very good fit for all major pieces, few seams needed filling – an easy build;
Cons
- Instructions are minimal and in my opinion, show needlessly difficult choices of adding subassemblies and some sections are difficult to understand (especially the funnel);
- Inaccurate Painting Guide for aircraft;
- Paints are GSI colors not readily available in US, and many other excellent and accurate paints are easily available – ignore the Instructions paint guide;
- Parts are not named and there is no text or history in the Instructions;
- Order of assembly is destined for trouble – start at the bottom (hull) and work your way up and out.
- Main gun barrels are stuck into a zero elevation option – would be nice if they were independently elevating. Would take considerable and messy modification to elevate the barrels.
Overall, I was impressed with this kit. It is but one of 12 Nagato kits in 1/700 scale, but it is as good as injection molded kits get. I rate it equivalent to the new Aoshima molds, and far better than the original Aoshima kit, and a good match for the extinct Hi-Mold and Waveline resin kits. The accuracy is refreshing, and the detail fine and crisp. This is a busy model built OOB (Out-Of-Box), and looks fine by itself. This kit is ideal for adding photoetch and aftermarket parts – the basic structure is sound and accurate. The major parts fit very well. I ended up not gluing many parts they fit so well. The pagoda bridge structure went together well. You end up with extra searchlights and boats and even a couple of twin 25mm AA mounts – always welcome additions to the spares box. But there are a few warts too. Loved the plastic, hated the Instructions. Order of assembly is all wrong. And watch out for the funnel assembly! Fortunately these few flaws are more than counteracted by the rest of the kit, which is a joy to put together.
Fujimi also makes the Nagato with full hull for 1941 which I presume is the same kit with additional lower hull parts. If you want an up-to-date and accurate Nagato, you cannot go wrong with Fujimi’s new kit, but it helps to check references and not blindly follow the Instructions. Recommended for medium to advanced modelers because of the problems with the Instructions, many fine parts and painting tiny details.
Paints (enamels unless otherwise indicated):
- Floquil Railroad Colors SP Lark Light Gray F110131 (dark grey everywhere)
- Floquil Railroad Colors Weathered Black F110107 (for anything black)
- Humbrol Matt 113 (red-brown for camo pattern on floatplanes and deckhouse on large 17m vedettes)
- Model Master Brass 1782 (raised lines on aircraft handling deck, chrysanthemum crest)
- Model Master Italian Dark Brown 2111 (aircraft handling deck and bridge superstructure decks)
- Polly Scale IJN Sky Gray 505280 (canvas covers on guns and boats, life rings on 17m vedettes)
- Tamiya Buff XF-57 acrylic (wood decks, including insides and decks of boats)
- Tamiya Flat Earth XF-52 acrylic (boat fenders and insides of cutters – lifeboats)
- Tamiya Flat Red XF-7 acrylic (port running light on bridge)
- Tamiya Light Green X-15 acrylic (starboard running light on bridge)
- White Ensign Models WEMCC IJN02 Kure Grey (searchlights)
- White Ensign Models WEMCC ACJ01 IJN Aircraft Green (camo pattern on floatplanes)
- White Ensign Models WEMCC ACJ02 IJN Aircraft Grey (undersides of floatplanes)
References
- Cea E. Japanese Military Aircraft. The Air Force of the Japanese Imperial Navy. Carrier-based aircraft, 1922-1945 (II), AF Editores, Valaldolic, Spain, 2008. ISBN: 978-84-96935-05-1 [Catalog of floatplanes on all IJN vessels carrying them, including Nagato, and their appearances and markings]
- Delgado JP, Lenihan DJ, Murphy LE. The Archeology of the Atomic Bomb: A Submerged Cultural Resources Assessment of the Sunken Fleet of Operation Crossroads at Bikini and Kwajalein Atoll Lagoons Republic of the Marshall Islands. United States Department of the Interior, National Park Service, Southwest Cultural Resources Center Professional Papers, Number 37, Santa Fe, NM, 1991. [Traces the fate of Nagato during the nuclear bomb tests at Bikini Atoll in 1946]
- Hackett B, Kingsepp S, Ahlberg L. Senkan! IJN Nagato: Tabular Record of Movement. Revision 7, www.combinedfleet.com. [Operational history of Nagato]
- Model Art No. 769. Super Illustration Imperial Japanese Navy Battleship Nagato. Model Art Co., Ltd, 1-12-30, 1Chome, Kudankita Chiyoda-ku, Tokyo, 102-0073 Japan, 2009. (ISBN 00140-6-196313) [124 pages of super-detailed line drawings of Nagato in 1941 – the best resource yet]
- Takumi A. How to Build 1/700 Battleships. Volume 2. Model Graphix, Dainippon Kaiga Co., Ltd., Tokyo, Japan, 2010. (ISBN 978-4-499-22981-4) [Almost 90 pages on how to dramatically superdetail the retooled 1/700 Aoshima Nagato kit in 1941 fit with aftermarket and scratchbuilt pieces]


Parts list

Major parts cleaned up

Aircraft handling deck

Aircraft handling deck
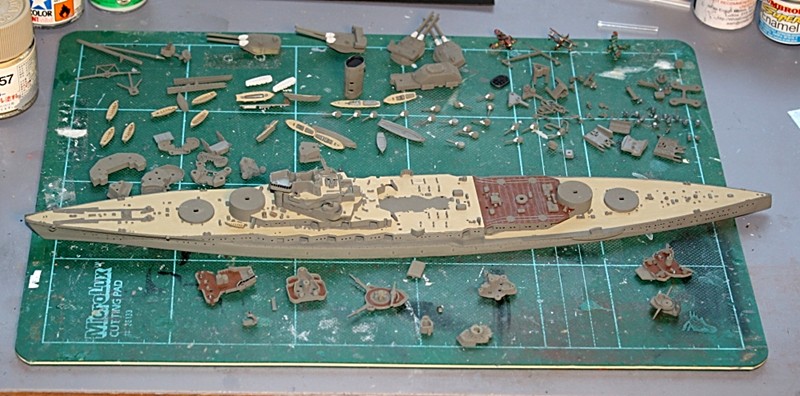
Major parts already prepared

Next stage in building the bridge
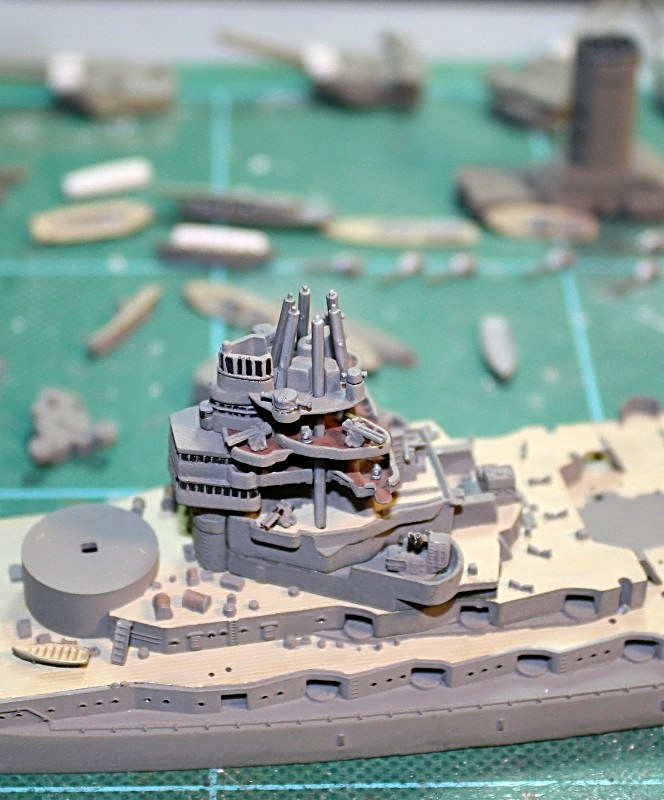
Third stage in building the bridge

Fourth stage in building the bridge
Bridge finished
Funnel lattice searchlight platform
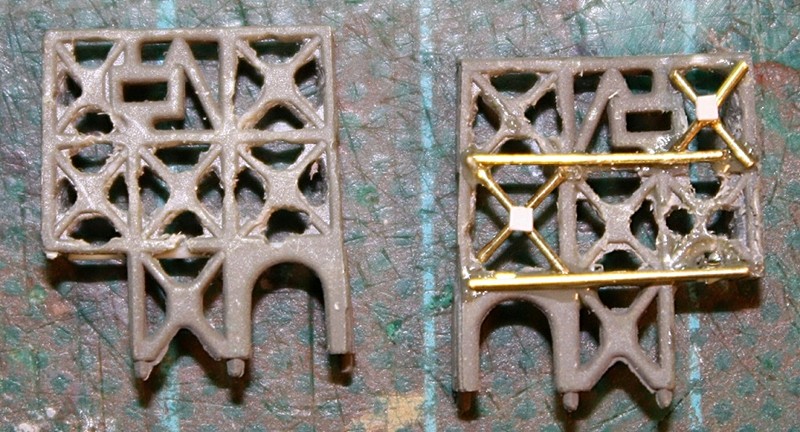
Finished lattice searchlight platform
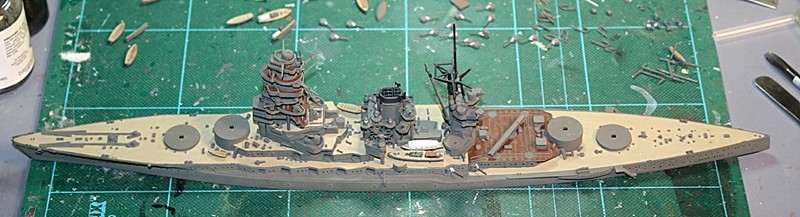
Major subassemblies
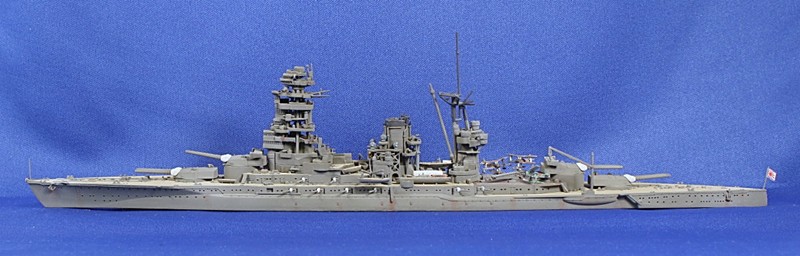
Port side waterline view
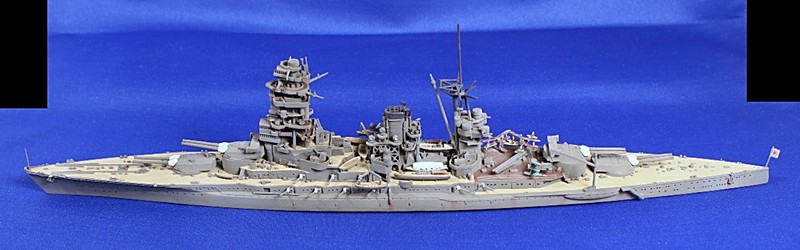
Port side view
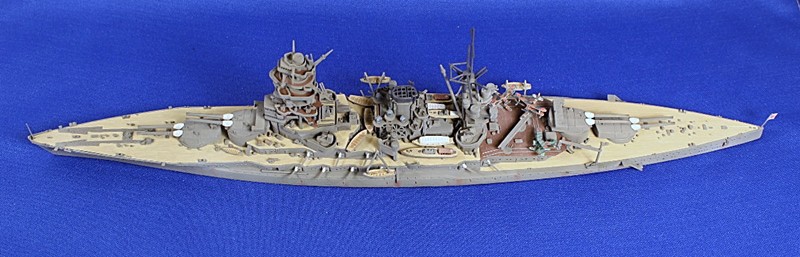
Port side overhead view
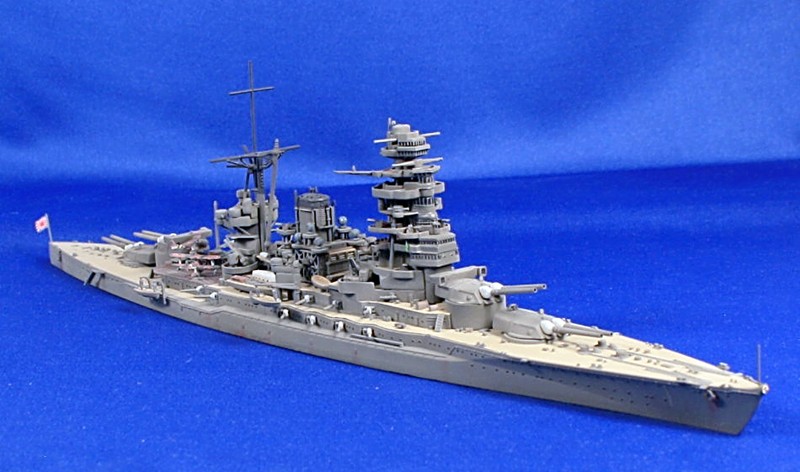
Port aft quarter view
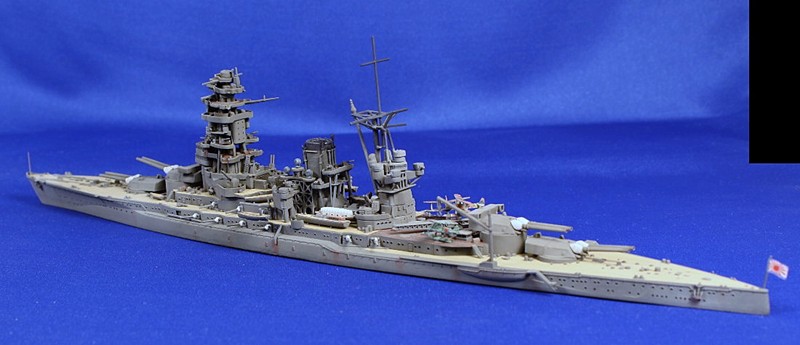
Starboard bow quarter view

oard side view

Starboard waterline view
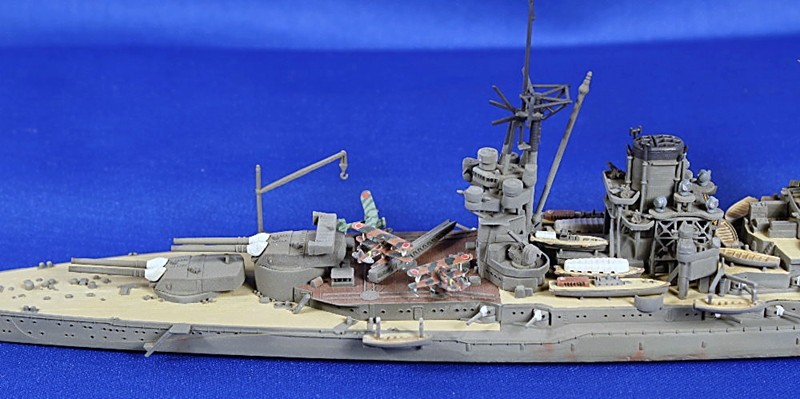
Aircraft handling deck

Close-up of amidships area
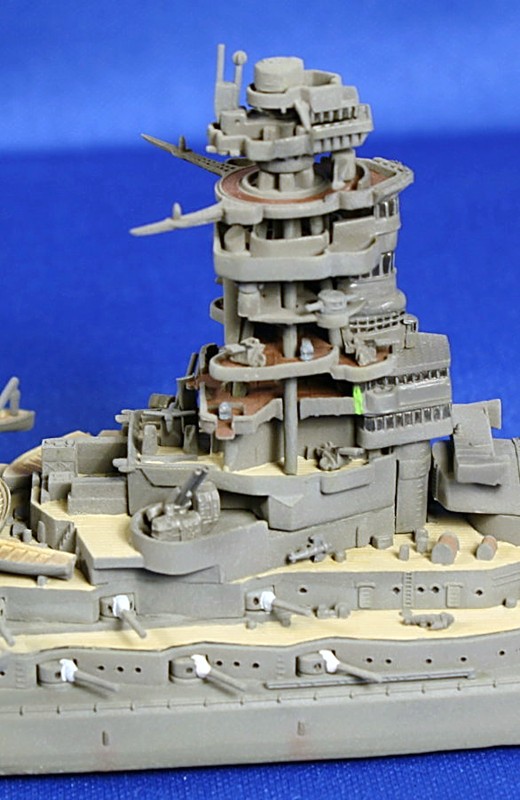
Close-up of bridge
Reviewer Bio
Luke R. Bucci, PhD

Luke built all kinds of models starting in the early '60s, but school, wife Naniece, and work (PhD Clinical Nutritionist) caused the usual absence from building. Picked up modeling to decompress from grad school, joined IPMSUSA in 1994 and focused on solely 1/700 warships (waterline!) and still do. I like to upgrade and kitbash the old kits and semi-accurize them, and even scratchbuild a few. Joined the Reviewer Corps to expand my horizon, especially the books nobody wants to review - have learned a lot that way. Shout out to Salt Lake and Reno IPMSUSA clubs - they're both fine, fun groups and better modelers than I, which is another way to learn. Other hobbies are: yes, dear; playing electric bass and playing with the canine kids.
Comments
Add new comment
This site is protected by reCAPTCHA and the Google Privacy Policy and Terms of Service apply.
Similar Reviews