
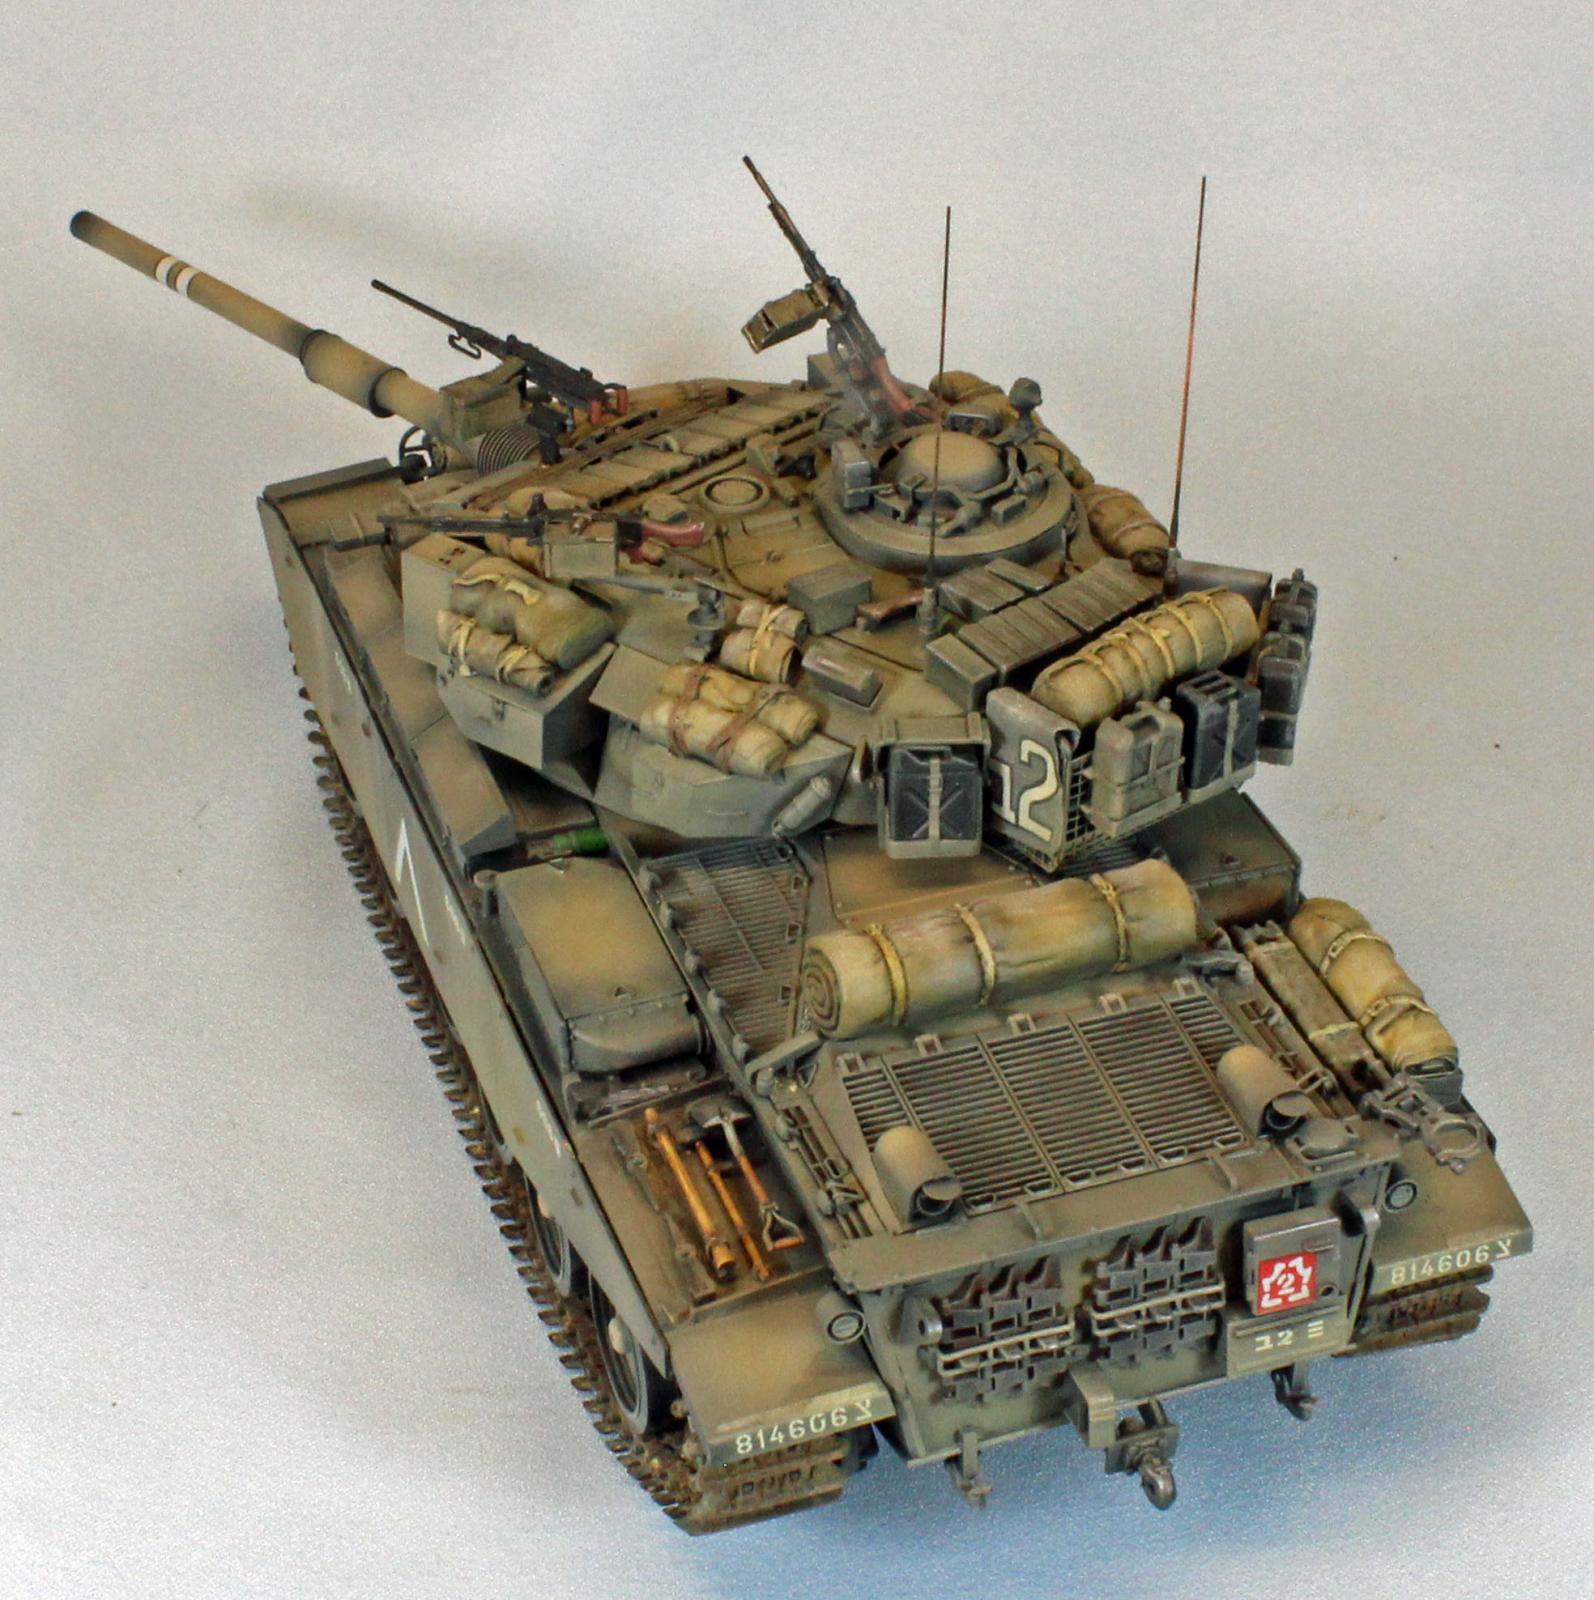
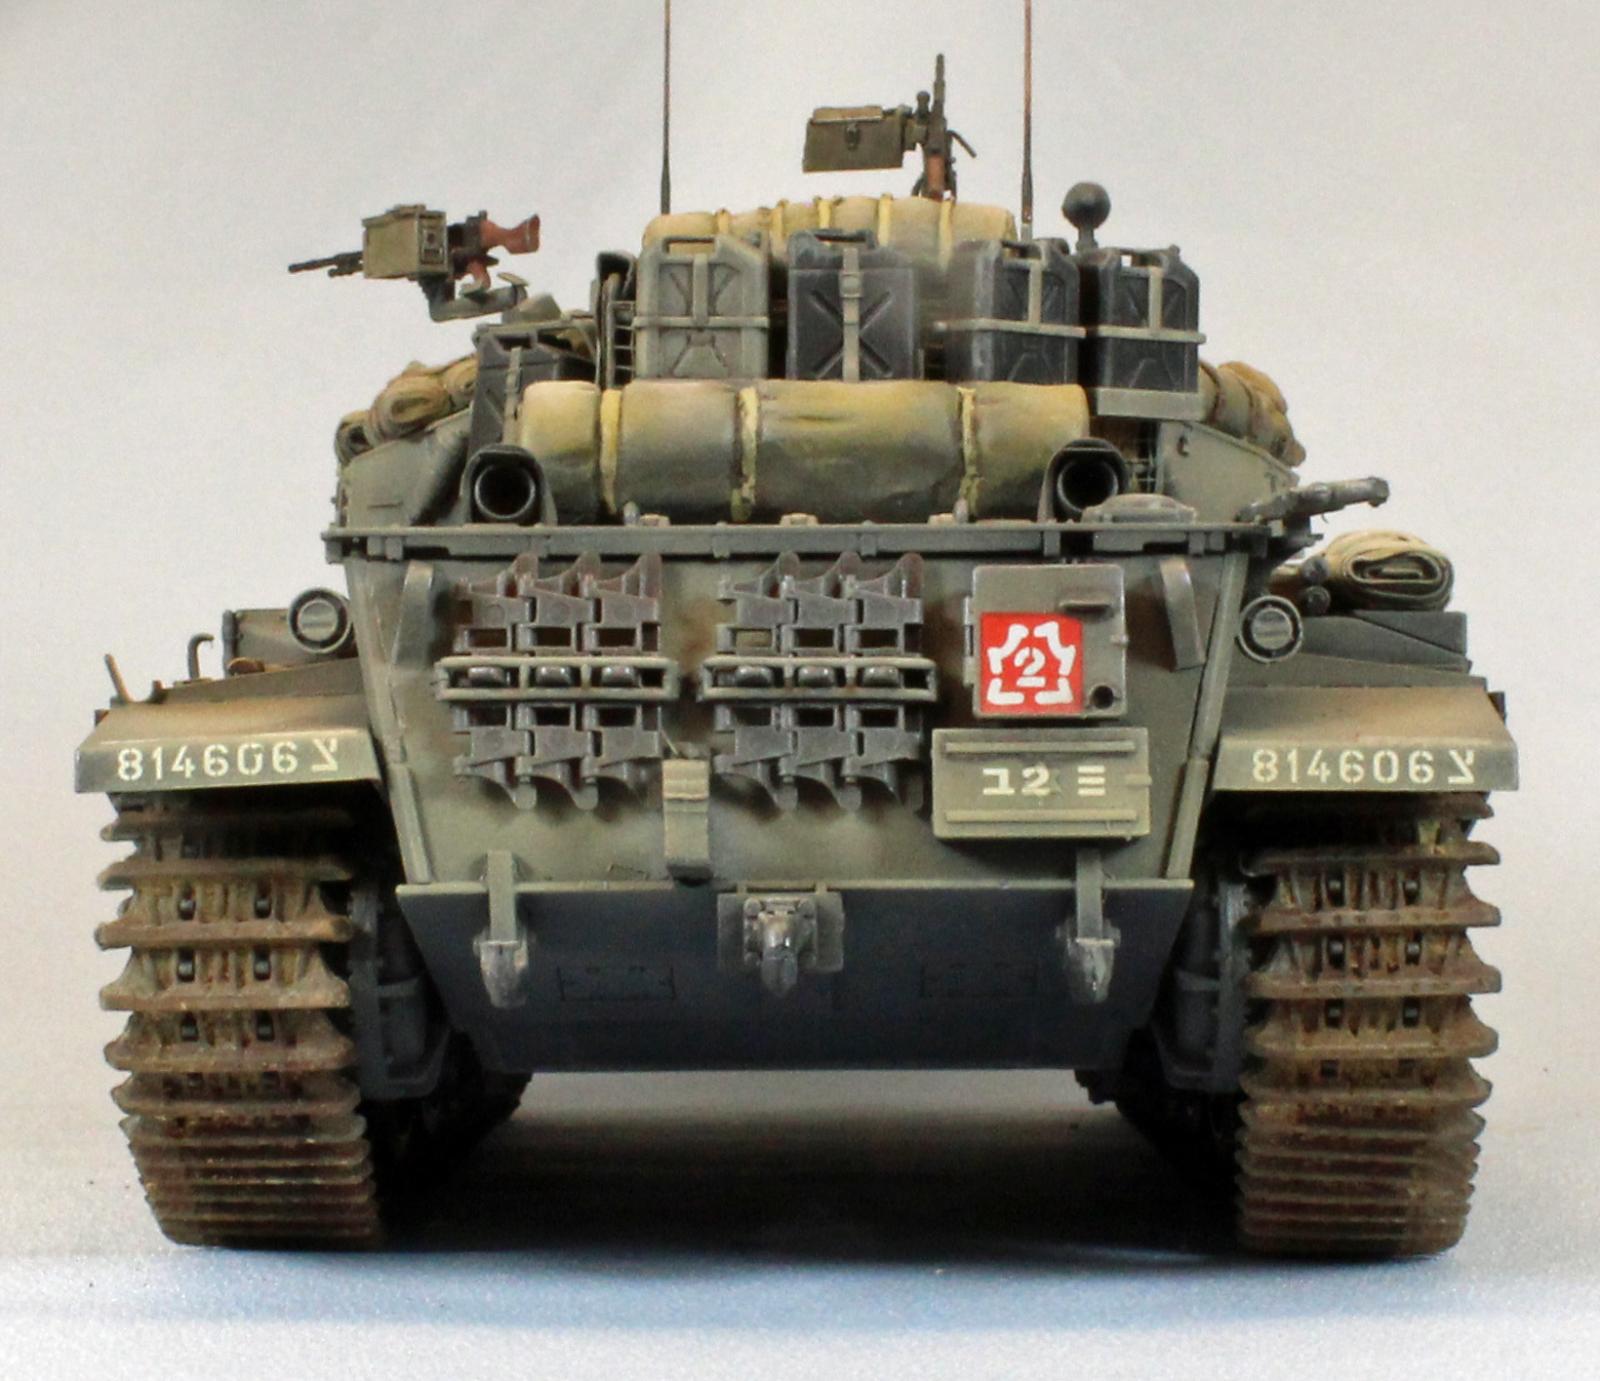
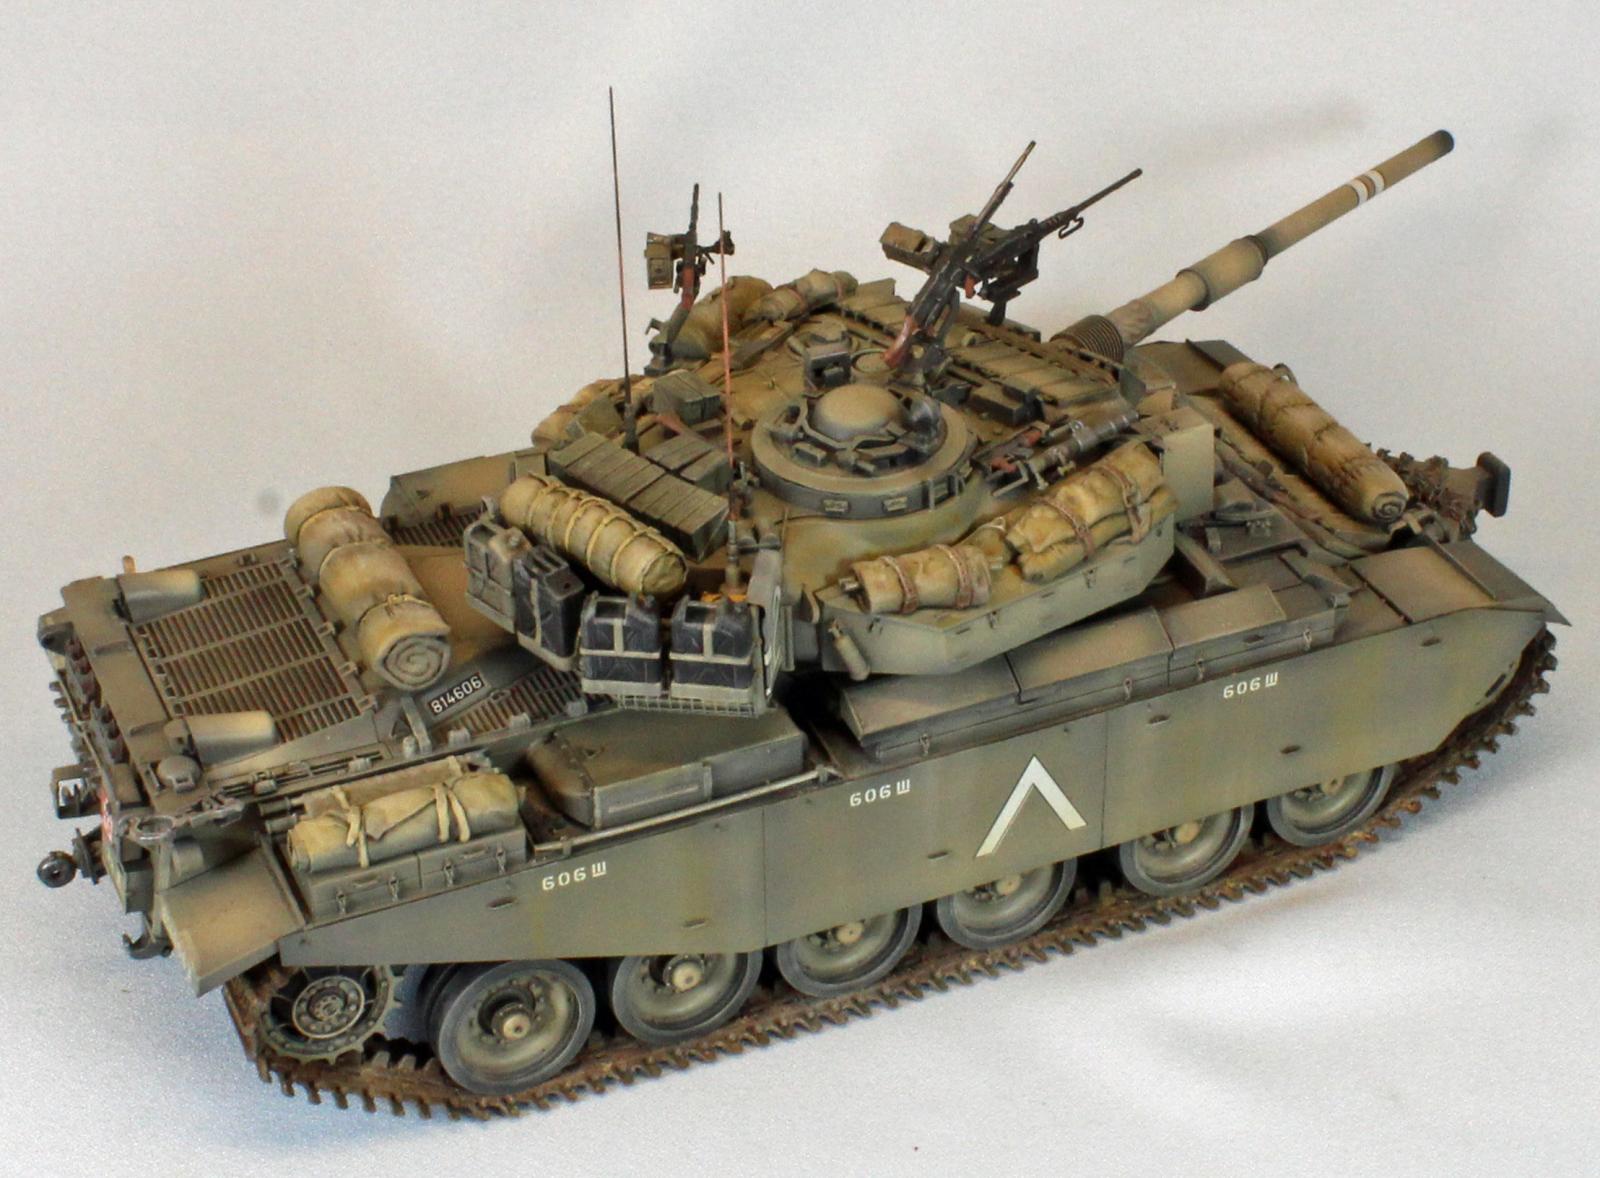
IDF Sho't Kal Gimel Type II
According to ScaleMates.com, AFV Club has released no less than sixteen different kitting’s of the venerable British Centurion, five of which depict the various Israeli Defense Force (IDF) versions. The subject of this review is the Sho’t Kal Gimel Type II, which is identified on the box top as being from the time period of the 1982 Lebanon war (“Operation Peace for Galilee”). ‘Sho’t’ translates to ‘Whip’ and Kal is an abbreviation of where the powerplant was manufactured (Continental). Each new version of the IDF Centurion was given a new afterword which comes from a letter in the Semitic abjad, the alphabet or ‘writing system’ used in the Arabic, Hebrew, Persian, and Urdu languages. In this case, ‘Gimel’ is the third letter in the abjad.
A decade earlier, during the Yom Kippur War with Syria and Egypt, Israel’s armada of over 1,000 Centurions was severely tested, losing over 200 vehicles. Following the war, the IDF went through a transformation, augmenting the remaining Centurions with US-made M60A3’s and native Merkava Mk. I’s. The Centurions were upgraded; first receiving new turret control mechanisms (Sho’t Kal Bet) and then with explosive reactive armor (ERA), emphasizing crew protection (Sho’t Kal Gimel). The first time ERA was used in battle was during the 1982 Lebanon War, when direct hits by rocket propelled grenades (RPG’s) failed to penetrate the armor, leaving the Centurions able to maintain their combat capability in the generally urban conflict. Two years later, the ERA was upgraded once again, and the vehicles were re-designated (Sho’t Kal Dalet), extending their service life into the early 1980’s. Quite an impressive resume for a tank that was initially designed during World War II!
Opening the Box
True to their reputation, AFV Club has shipped their new offering in a sturdy box filled to the brim with parts and extras. The plastic is soft and in places, very thin, but I did not find any warpage or damage due to shipping. There was some flash but nothing significant and what is there is limited to the smallest parts. The kit is replete with a variety of extras including a very nice turned aluminum barrel, separate vinyl tires for the wheels, and a host of personal weapons. The ‘rubber band’ nylon track is well molded and takes paint and glue just fine.
There is very little in the way of combat stowage included so you’ll have to go to your spare parts box to add the ubiquitous deck gear prevalent with IDF armor.
The main hull in my sample kit was significantly warped, bowing inward from the sides. The fix was easy enough (detailed below), and the warpage did not affect the build in any way.
The contents of the box include:
- 22 sprues in soft, light-green plastic, packaged separately.
- Lower Hull, packaged separately.
- Solid aluminum barrel, packaged separately.
- 1 soft nylon sprue of wheel inserts (so the wheels can be removed for painting).
- 1 soft DS-type sprue holding the gun tarp.
- 1 length of string for towing cables.
- 2 photo-etch sheets, including wrap-around basket mesh for the rear basket.
- 1 clear plastic sprue
- 1 medium-sized sheets of decals with markings for three vehicles
- 1 20-page black and white instruction booklet with 37 steps, including two pages of color, 5-view decal placement and paint guides.
The kit comes with three schemes represented using five-view drawings and a perfectly registered sheet of decals printed in Taiwan. There are no unit designations provided with the color schemes.
The Instructions
Unfortunately, the side-bounded instruction booklet does not contain a list of unused parts – an omission which is compounded by the fact that the parts map is printed on one half of one page - too small to read the part numbers, even with a magnifying glass. In addition, in many places in the instructions, the exact placement of the parts is vague, with most images shown using the same orientation.
On the plus side, the instructions contain color call-outs for Gunze Sangyo (lacquers and acrylics), Humbrol, Revell and Lifecolor paints, and the decal placement instructions are supplied in smart, five-view CAD images. Also, AFV Club thoughtfully includes a page showing the history of the IDF Sho’t Centurions in images, as fielded since 1959.
Things to Consider Before Starting
The plastic used in the kit is soft; softer than what you might find in most other model kits. If you are like me and use a scalpel as your go-to hobby knife, you will want to take extra care in cleaning the parts before assembly. This is especially true with the many parts that are small and delicate - a deft touch is the key here.
There is a lot of detail across the top and sides of the vehicle, and if you choose to add your own combat loads on the decks and in the rear bustle, you will need to carefully stage your build in order to make sure everything is painted and ready before final assembly.
The track can easily be fitted under the installed fenders, so it (and the side skirts) can be added later in the build, if desired.
The Build
The Running Gear and Lower Chassis
Assembly begins with the running gear and lower chassis. The six bogies, three to each side, are well designed and contain a metal spring allowing them to be articulated. I opted to fix mine in position so I passed on finishing them with the end of a heated pinhead, as instructed.
AFV Club provides vinyl inner and outer tires for each wheel. I was concerned about how those would be attached until I discovered that they accept all types of glues. Perfect! Since you cannot fit the inner tires to the wheels after the bogies are in place, I left the bogies (and side skirts) off until after painting.
In Step 4, the instructions curiously take great care in pointing out that you have to really twist the wheels on to the bogies. Since I attached the bogies much later, this note had passed my mind. When I did get around to attaching the wheels, I simply pushed them on and lined everything up, leaving them to dry fast. A day or two later, when I went to attach the drive sprockets and return rollers, I realized the wheels ended up standing well proud of where they were supposed to be – an alignment issue that I could not fix easily. My bad, here – this one was on me.
The attachment points between two parts of the eight return rollers (assembly ‘E’ in Step 7) were next to useless. I used Testors slow drying cement and babied the parts (E6/E7) until they were dry. Fortunately, the track is tight enough so that the rollers don’t take any load and, since I was going to cover up the area with the side skirts, it really didn’t matter anyway. But return rollers are designed a dozen better ways in other kits – why this particular approach was used by AFV Club is a mystery.
The only other problem I encountered here was the warpage in the main lower hull, bowing inward from the sides, which is not uncommon with tanks that have such a large, deep, long hull found with the Centurion. I fitted two evergreen rods down into the base of the hull to evenly spread the two sides apart enough to accept the main rear deck (Part L27), but ran into problems with the next two parts. It isn’t clear from the images in the instructions where exactly Parts C24 and C34 fall on the lower hull. Fitting Part C24 inside the hull spread everything too wide apart, yet there is significant overhang on each side that does not match the edges of the hull and/or Part C34. I chose the middle ground and simply centered everything before moving on. In the end, this decision worked out just fine.
The Fenders, Front End, Upper Deck and ERA
The fit of the fenders on each side of the hull is perfect, and I was able to make quick work of this sometimes-challenging part of the build. There is ample room under the fenders and around the drive sprocket to add the track later. The two parts (L54/L53) that guide the tow cables around the side of the deck are very, very thin and both broke almost immediately. I am not a fan of using string for cables anyway, and with these tiny parts unusable, I decided to leave the two cables off.
The placement of the multitude of reactive armor is somewhat vague in the instructions, starting with the very first pieces in Step 13. AFV Club provides a very handy top-down line-drawing showing the off-set location of Parts Q10, partially covering the fire extinguishers. But this conflicts with a photograph also provided, showing the Parts lining up, fully exposing the extinguishers. While photographs don’t lie, I went with the line drawing only because it is shown that way in subsequent drawings and I feared using the photograph for placement might create fit problems later.
Likewise, the placement of Parts P34/35 show them set just proud of a small stub off Parts L1/L2, but they are clearly formed and fitted to slide over the stubs, covering them up.
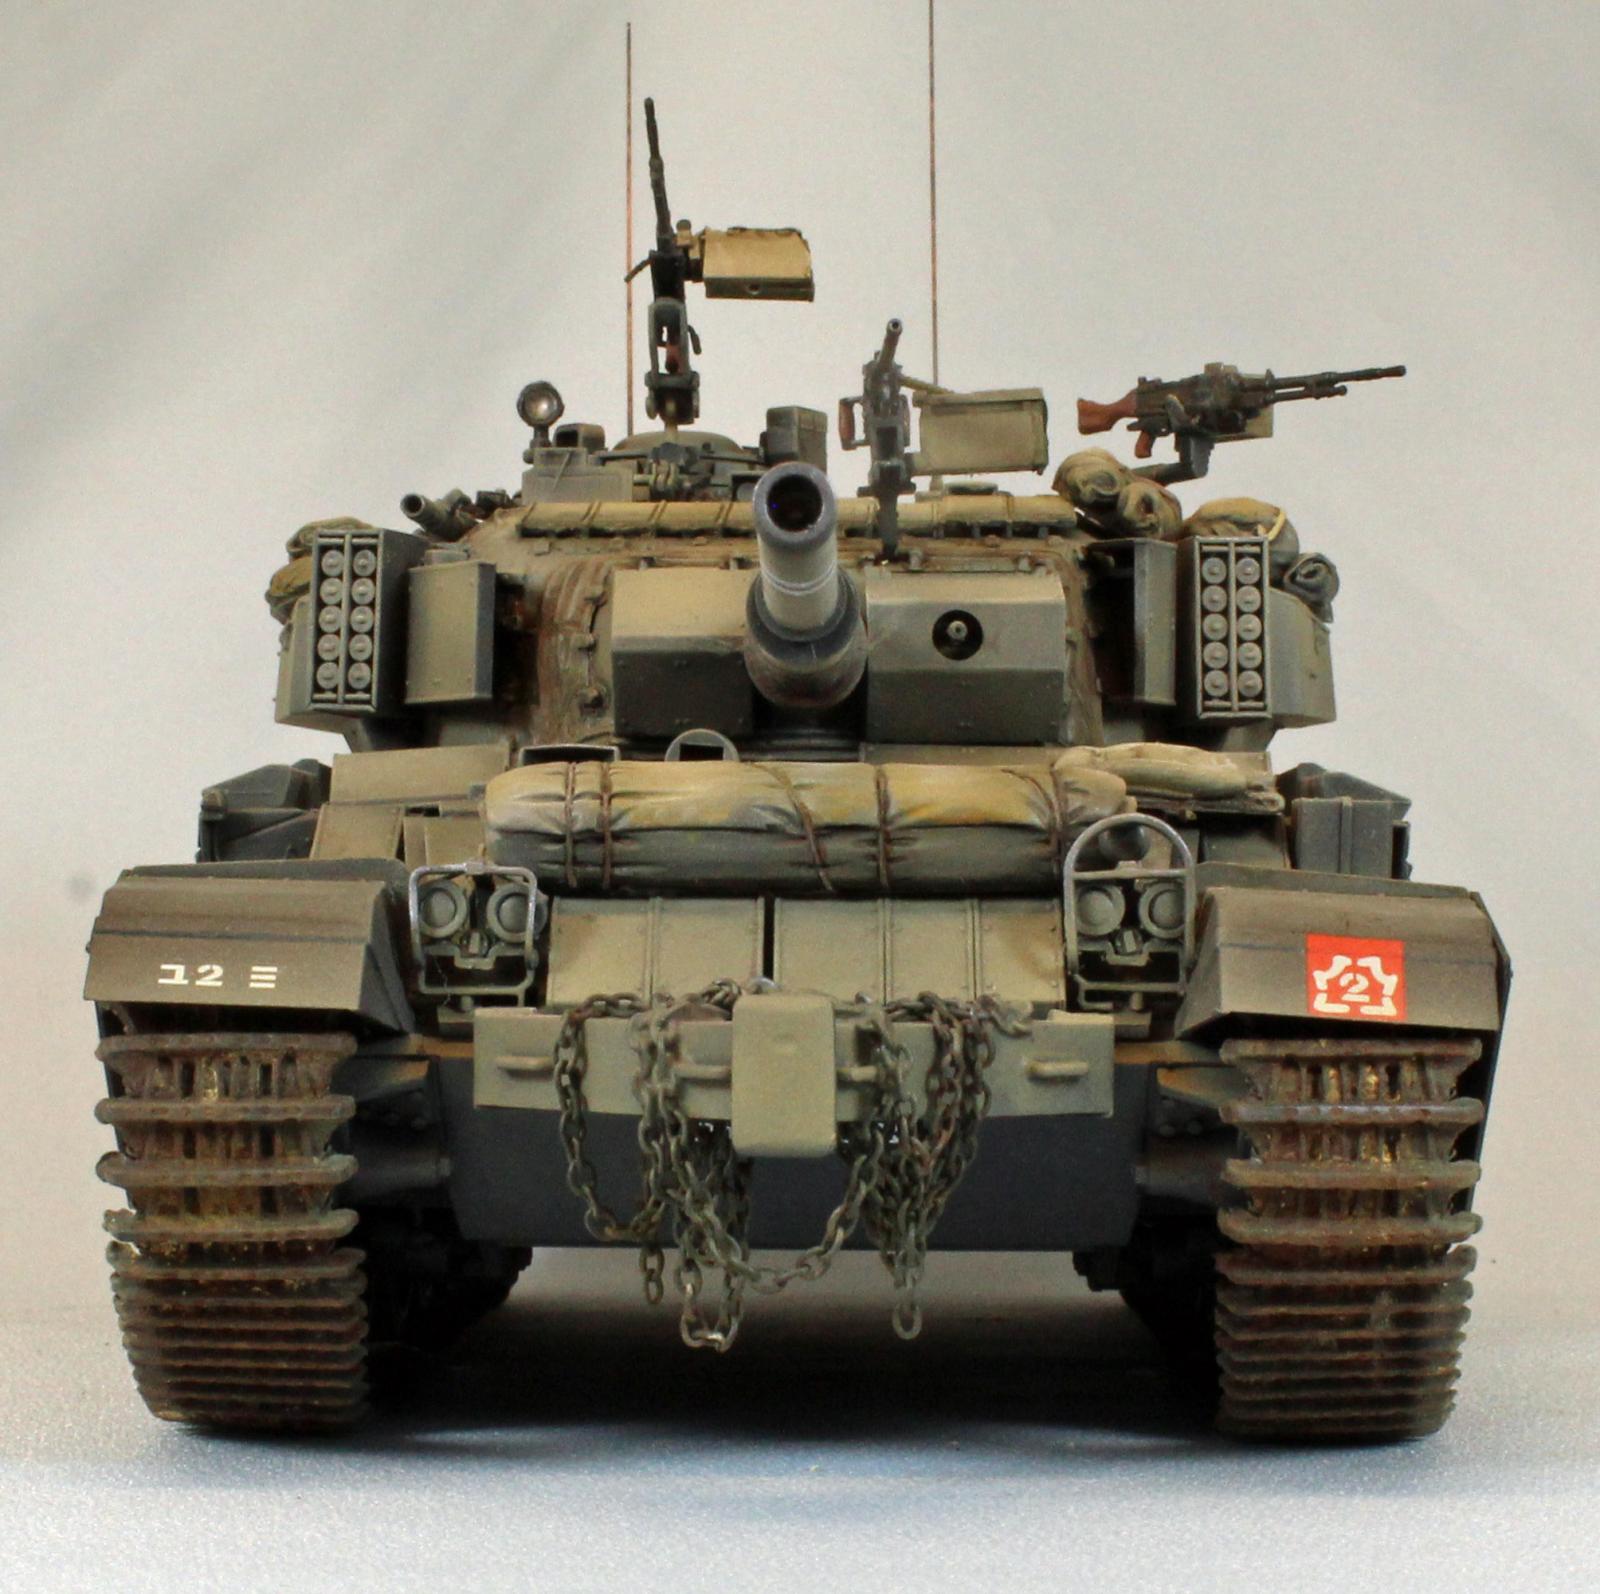
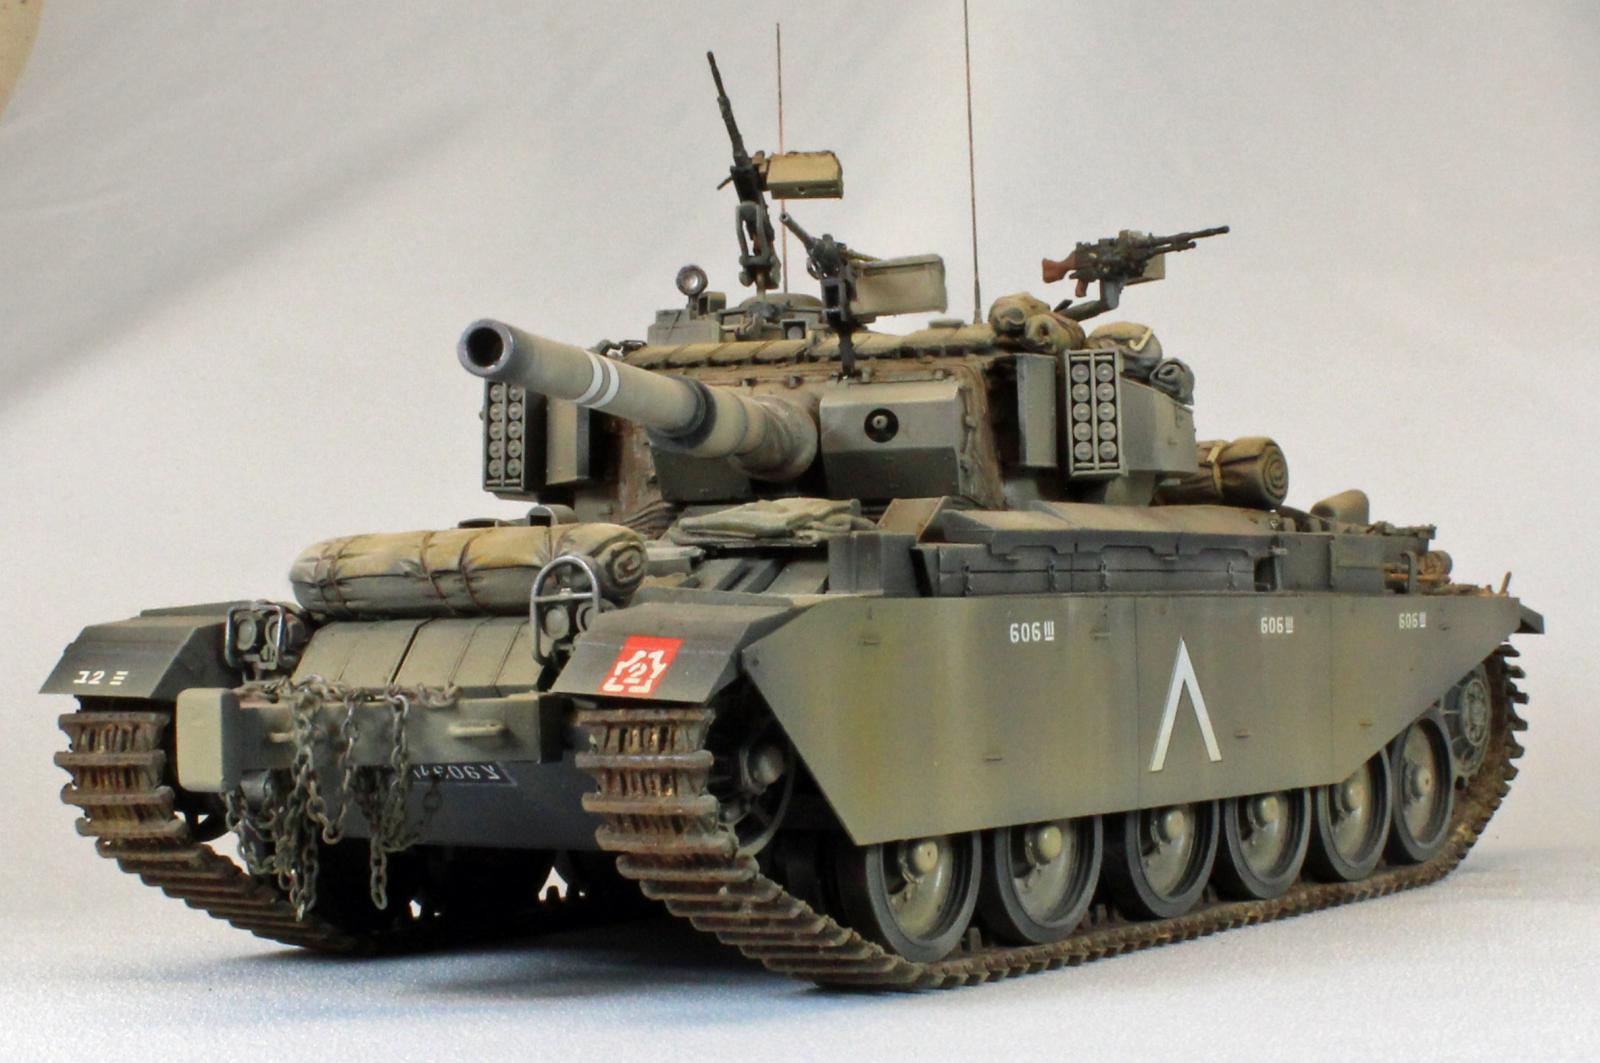
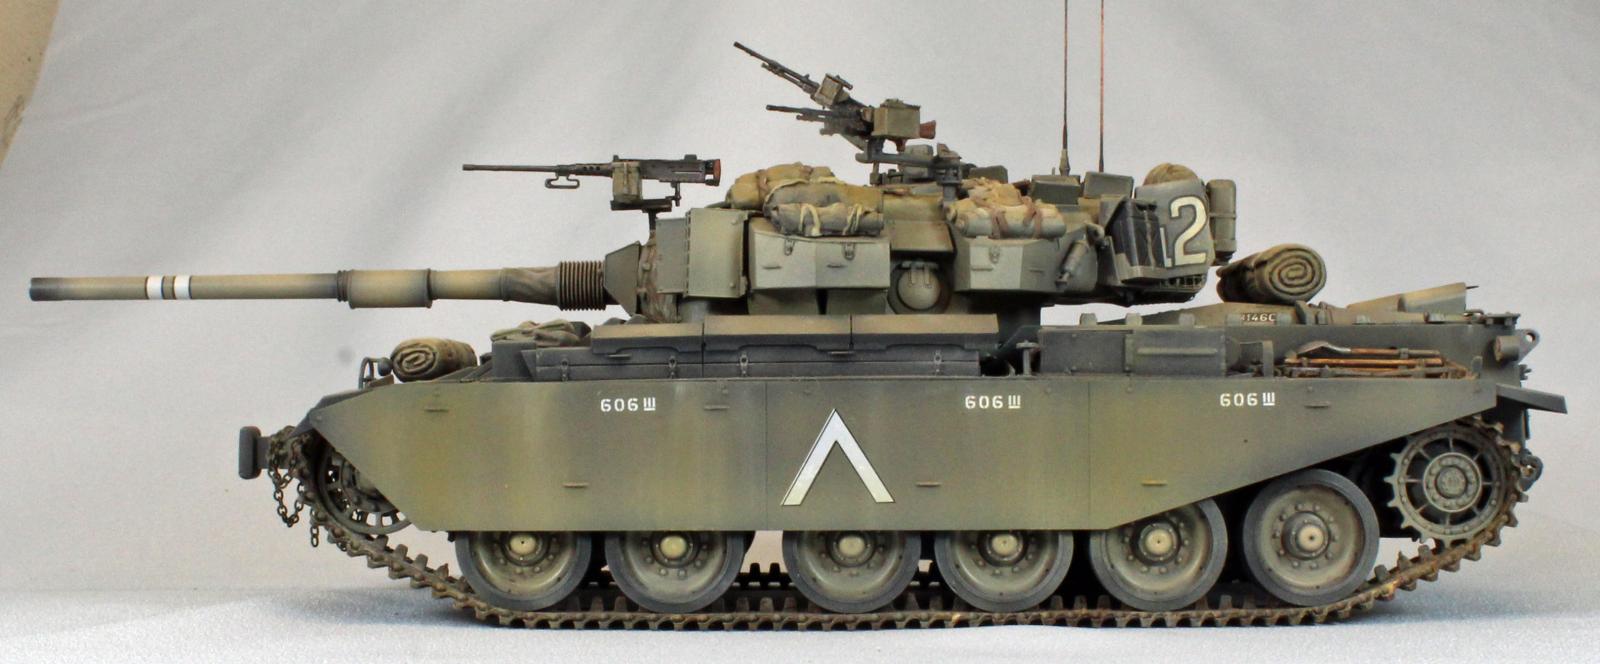
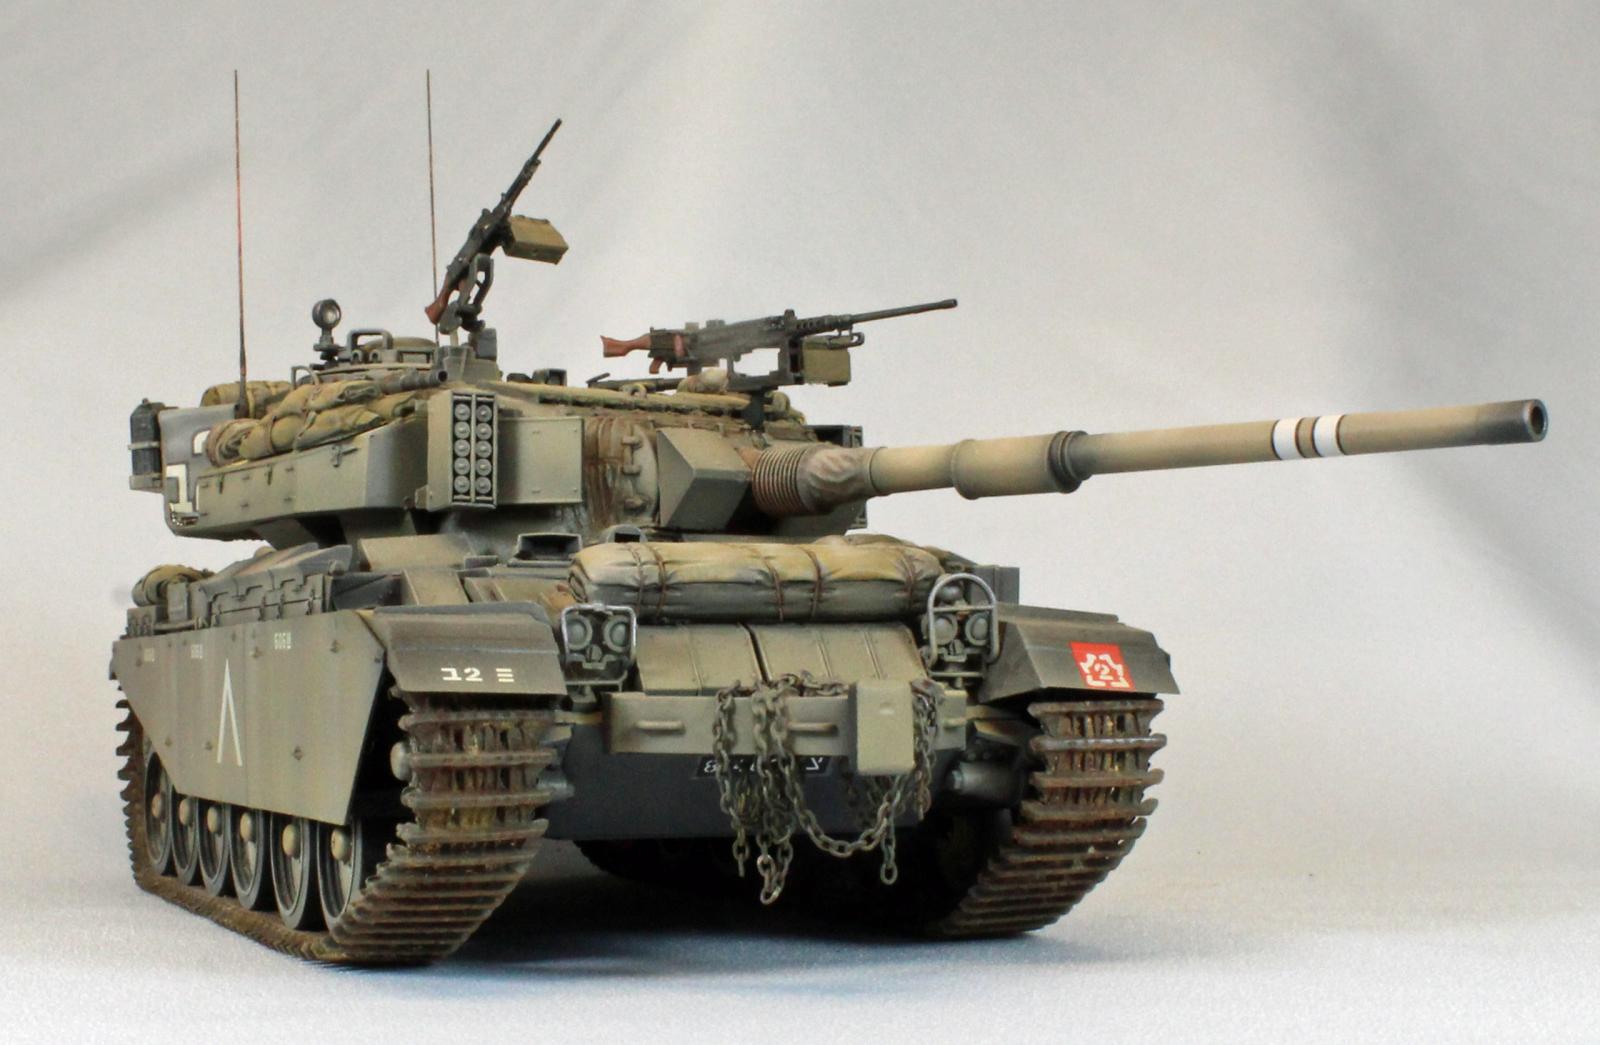
The front end of the IDF Centurion is a busy affair, even more so in the hands of AFV Club. There are nine sections of ERA blocks, and while AFV Club doesn’t provide any positive placement holes or lines, they do have a handy overhead line drawing that helps with the ERA locations. These blocks are interspaced with all kinds of hatches and lights – a lot of very small and fiddley pieces to chase around. For example; each headlight in Step 18 is made up of up to ten separate parts, and a tiny hatch cover in Step 16 is made of six parts from five different sprues. While the end-result looks terrific, getting there was quite the journey, as documented by my frequent scribbled notes in the instruction’s margins. I recommend that you go slow and take frequent breaks here.
I chose to attach the battering ram to the front of the vehicle, which exposed a large gap between the ram and the main hull. No worries, however – the gap is completely hidden by the ERA placed just above it (Parts W2/W3 in Step 17).
The last two steps for the chassis bring the tow cables, track and side skirts together. As previously mentioned, I chose to leave off the cables, and since I wanted to paint and weather the wheels separately, I did the same with the track and skirts, choosing to add them after painting was completed, but before weathering.
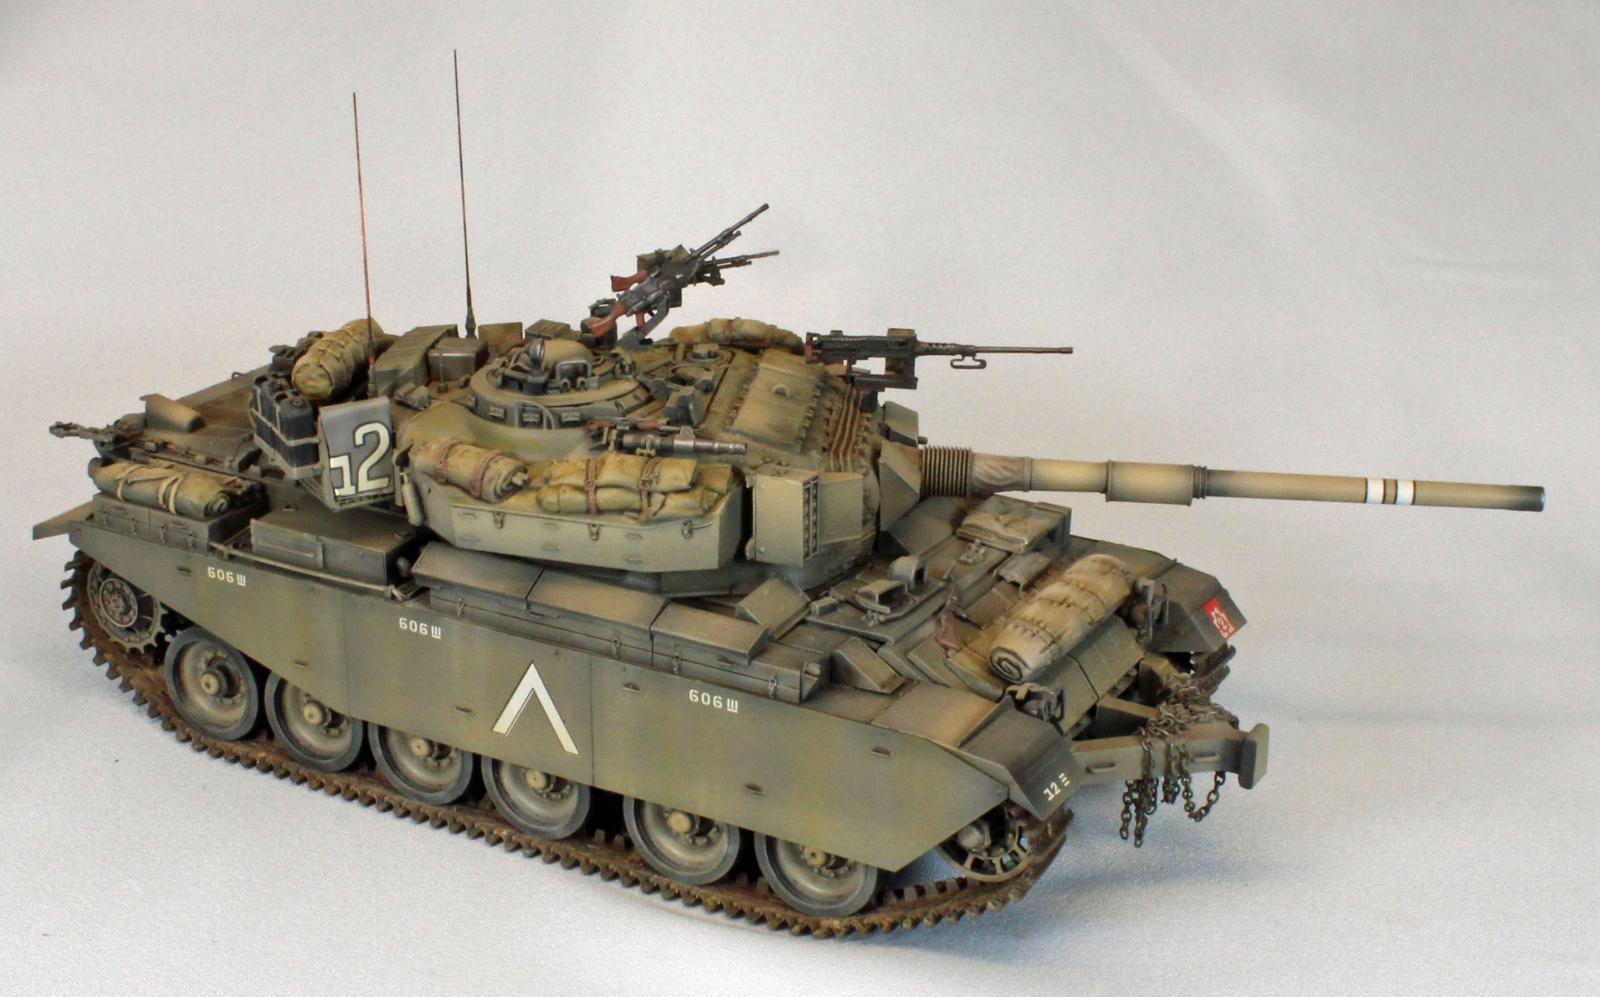
The Turret
The rest of the build (Steps 21–37) bring together the busy, and beautiful, turret. The main turret pieces; two sides, bottom, top, look like they should come together easily, but looks can be deceiving. The design here is a little unusual and I strongly recommend that you dry fit the everything carefully before applying glue. If you don’t need the main weapon to travel up and down, you might consider leaving the two polycaps off that hold it in place: their presence tends to push the two front halves of the turret apart.
There are four ERA blocks that attach underneath the turret sides (two on each side) that I had difficulty with. Even though AFV Club included special line drawings for their placement in the instructions, I still couldn’t get them to sit right on the model. I had to cut one up, and slide the others around until they looked right, at least to me.
The rear turret bustle comes together in Step 23. Having been through several other similar assembles from AFV Club, I can say that this looks harder than it actually is. The fit is perfect, there are nice male/female connections on each step, and if you go slowly things will come together just fine. Even the PE mesh that covers the bustle on the outside fits well. Choose... to take your time here and you will be rewarded with a smart looking turret bustle.
Continuing through the next half-dozen steps, you will attach a bewildering array of tiny bits and pieces that slowly build up the busy turret surface. These include a good assortment of personal weapons which will require careful painting – you might want to leave these off until later. But with few good visual cues and zero placement marks, holes, or edges, it is easy to place a part just a tiny bit off – but off enough to prevent subsequent parts from fitting. Case and point: in Step 32, AFV Club accurately represents the engineering of the two smoke dischargers on the sides of the turret. But doing so makes it a real challenge to actually model. Each discharger has four connection points, the top two (and most visible) are tipped with tiny ‘pads’ that attach along a knife-edge bar, and then to a curving turret on the other end. Without any sort of placement assistance in the form of marks or holes, getting the two dischargers to line up is a fool’s errand. I had to literally rip off a slightly misplaced piece of reactive armor (Part P45) on the port side to line up the discharger, and still the two top (visible) connection points ended up in mid-air, attached to nothing.
Once everything was dry, I replaced Part P45 (reactive armor) using sheet plastic, and replaced the two connection bars (Part P41) with longer versions that reached all the way to the hull side. Accurate: Yes. Buildable: Barely. Fun: No.
The Main Gun
The multi-media main weapon included in the kit is impressive. The main barrel is made of solid turned aluminum with a plastic base and plastic bore evacuator located about half-way up the tube. The fit of everything is perfect here and the main seam on the evacuator is nearly invisible. A tiny seam visible on the inner end of the evacuator is actually accurate, according to pictures from the internet.
AFV Club includes a soft nylon cover (Part V1) that stretches over the mantel in Step 30. At first glance, the cover looks like it is too small for where it needs to go, but with some liquid cement and a little patient prodding, it ends up fitting very well.
Machine Guns
The three turret-mounted machine guns in Steps 33-35 are very nice and give the Gimel a nice ‘business’ look once assembled and installed. But before starting on the guns, do yourself a favor and drill holes in each gun to accept Parts U22/U23 and U16 – the instructions are vague and there are no positive placement points for these parts. Likewise, I used slow-drying Testor’s ‘Black Bottle’ cement on the ammunition boxes and coaxed them into place when the time came.
The Track
AFV Club provides two lengths of relatively stiff nylon/plastic track runs in the kit. They are nicely detailed and take glue, paint and weathering products well. Even with very little sag, the track fits easily over the drive sprocket and return rollers. The only problem (for me) was the aforementioned alignment issue between the drive sprocket, return roller and the wheels on each side. The track ends up leaning outwards to fit, thereby taking this kit off the awards list unless some major surgery is performed back in Step 8.
The last sequence in the instructions guides you through assembling and dressing up the large number of personal weapons included in the kit, ostensibly to place around the turret and hull, just outside the hatches for quick access. In addition, there are instructions for creating two antennae using stretched sprue. Never being successful in that area, I added two antennae from my spare parts box.
Painting and Finish
Except for priming and pre-shade coats, I used Mission Models Paints throughout. I’ve come to really like airbrushing this acrylic paint from a health standpoint, and I appreciate the durability and ease of use in applying it. A ‘pure’ acrylic that sprays like a lacquer – you really have to try them to understand why they are becoming so popular.
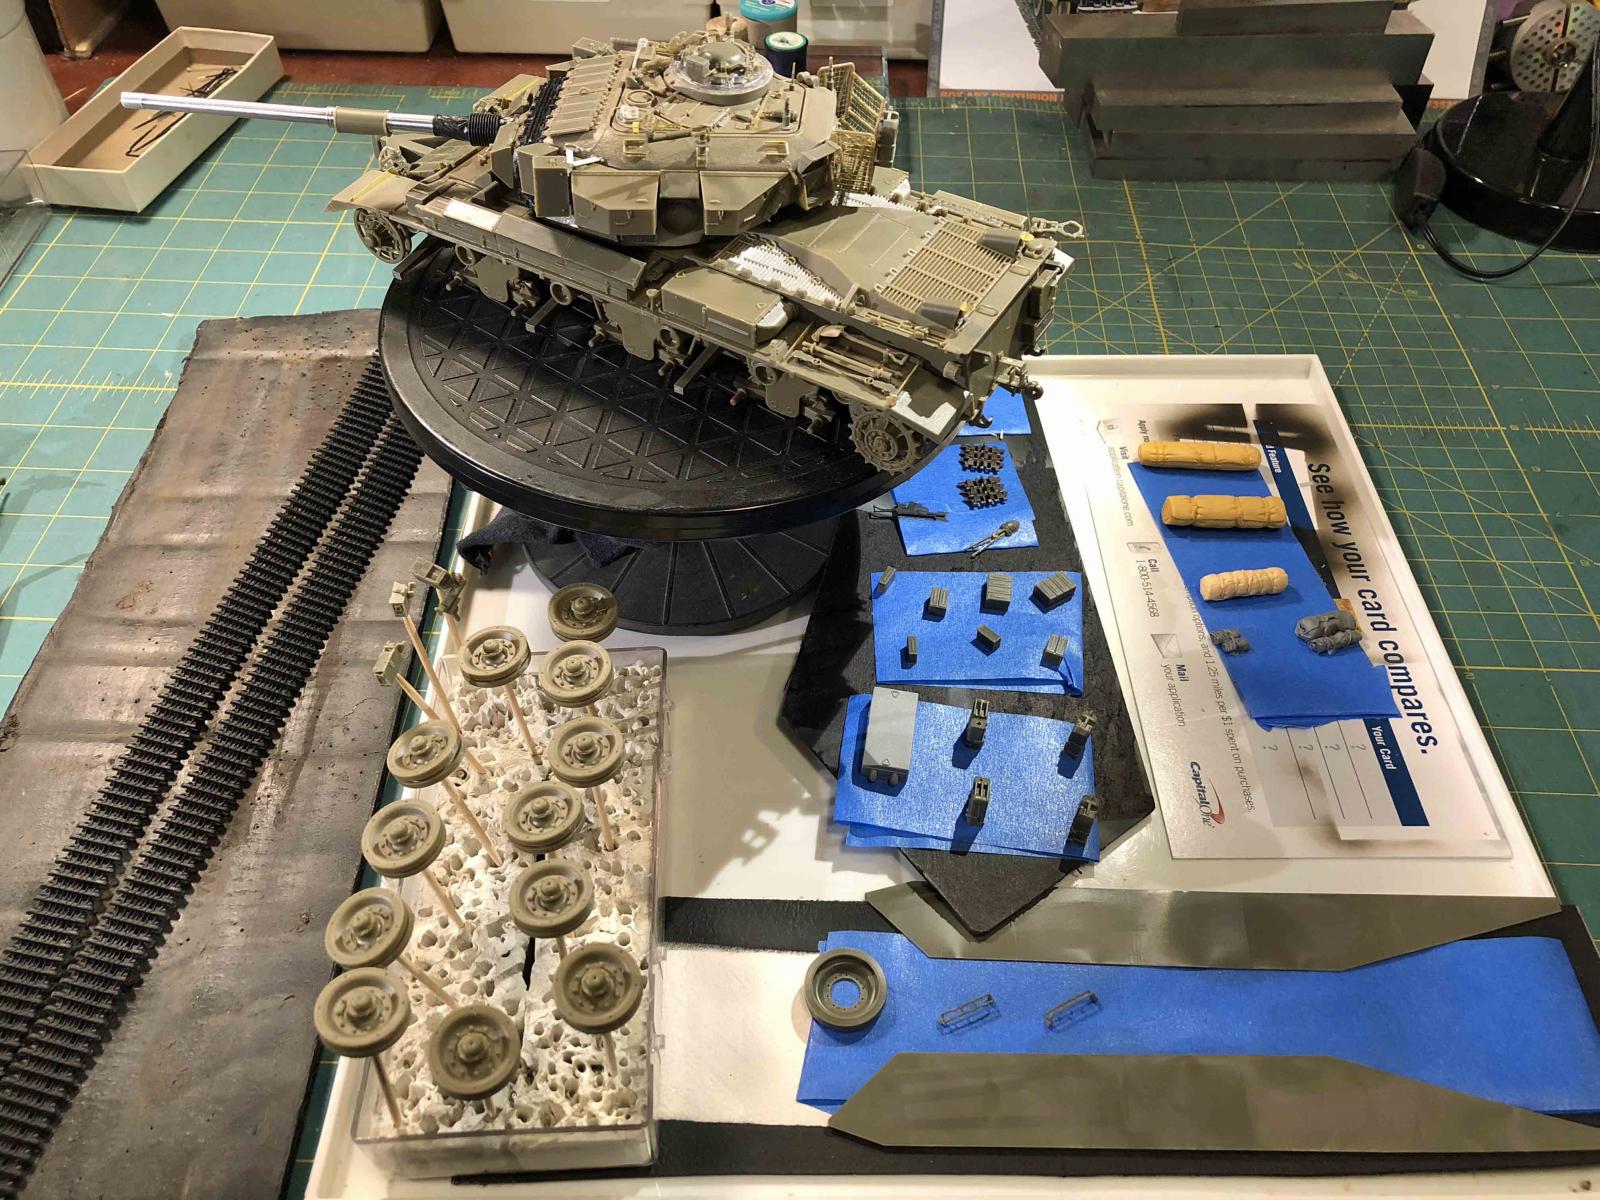
Since AFV Club included separate nylon tires for the wheels, I opted to paint the bogies and track separately, leaving these (and the side armor) off until after painting was finished. I put the wheels on toothpicks and made three sticky boards holding the fuel and water cans, personal weapons, ammunition cans, and the plethora of tents and personal baggage that would adorn my Centurion. (See Image entitled ‘Before Paint’)
Primer and Pre-shade
I started by applying a coat of (rattlecan) Krylon Flat Black Paint/Primer for my dark, primer/pre-shade coat. Surprisingly, this low-cost solution sprays on easily and dries very thin and level – replacing a time-intensive task I normally use an airbrush and more expensive paint for. I use a dark primer coat to give the plastic and PE some grip, and to fill in the recesses - creating a shadow effect near the flat surface edges and adding depth for the subsequent coats to come.
Camouflage and On-Deck Baggage and Equipment
After the primer/pre-shade coat had degassed, I laid down a coat of MMP-037 Sandgrey Version 1, followed a post-shade coat of MMP-036 Sandgrey Version 2. I then highlighted certain areas using a 50/50 mix of the (Version 2) and MMP-019 DunkelGelb Late 1944.
I painted the baggage with variations of the base and post-shade colors, choosing to highlight them with filters later on. The straps are Vallejo Panzer Aces 340 Afrika Korps Highlight. Gas cans were painted MMP 088 US Army Olive Drab Faded and Water cans are MMP 035 NATO Black.
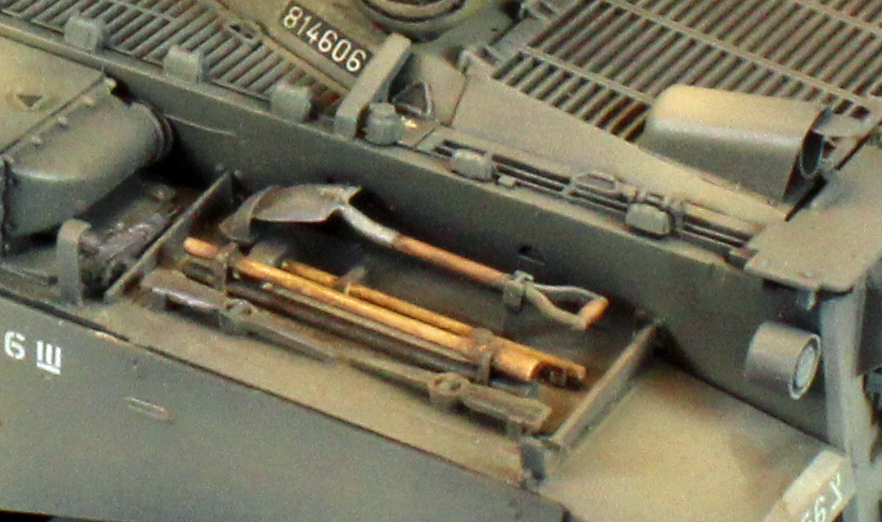
The shovel and sledge hammer heads were first painted Vallejo Oily Steel, and then detailed with Uschi Chrome powder. The shafts were painted using Tamiya XF-59 Desert Yellow, and then, when dry, covered with MIG Brown Wash Oil paint from a tube. I let this sit for a few minutes and then rubbed most of the oil off with a clean brush, leaving enough residue to simulate wood grain and dirt.
The machine guns were hand-painted flat black, and then detailed with Vallejo Saddle Brown and Uschi Chrome metallic powder. Ammunition cases were painted using MMP-037 Sandgrey Version 1 followed by a wash of Vallejo 76.519 Olive Green and detailed with Uschi Chrome pigment. The ration boxes are Tamiya paper boxes from my spare parts box. To fill the gaps in the bustles and stowage racks, I cut up small pieces of flat black fabric and poked it into place with tweezers.
I painted the inside of the turret mounted spotlight Alclad White Aluminum and then filled up the cavity with two applications of Microscale Micro Krystal Klear.
The track was first pinned to a piece of cardboard, then roughly painted with AK Interactive Track Wash, followed by Vallejo Pigments in this order: 73.104 Light Sienna, 73.121 Desert Dust, and 73.110 Burnt Umber. The pigments were then fixed with a pump spray of Mig Fixer. Once that was dry, I gave each track run a blast of Krylon Flat Varnish to even out the harsh look and sticky feel caused by the Fixer. I don’t like using Mig Fixer, but it works!
Decals and Unit Numbers
With painting finished, I hand-brushed the spots that would receive decals with Future to give the decals a smooth surface to slide on to. Once the Future was dry, I went about applying the decals using the Red and Blue MicroSol and MicroSet products. The decals were very thin and surprisingly stubborn once on the surface. Patience prevailed, however, and I was able to coax them into place.
Before I laid down a second, sealing coat of Future, I attached all the loose deck equipment and bags – anything that would need to be weathered with the rest of the vehicle. The second coat of Future would set the surface of these items up for washes and streaking.
The unit numbers were applied to small strips of lead foil painted with Krylon rattlecan Grey Primer. Once dry, these were folded over the sides of the turret bustle, and glued into place.
Finish
When the Future was dry to the touch, I went to work adding a pin wash to the entire tank and wheels, using Mig Dark Wash mixed (2:10) with Mona Lisa thinner. I used various Mig Oil Brushers (Ochre, Flesh, Brown, Starship Filth) for dot filters on the turret and main deck, as well as streaking down the side skirts. The glossy surface is key to this process. Once satisfied, I knocked down the shiny areas using Vallejo 70.520 Flat Varnish, followed by a coat of ‘road dust’ along the wheels and lower superstructure using Model Air 71.027 Light Brown. I also used this color to ‘tone down’ the decals a little.
Finally, after carefully adding the three machine guns and the two antennas to the turret, and with the surfaces flat from the varnish, I went about dusting the entire vehicle with earth-tone pigments, light colors on the baggage and darker colors on the exhaust and lower areas.
Conclusion
No doubt about it, like most AFV Club kits, this model was a challenge to build and finish. The company has a solid reputation for offering unusual, highly accurate injection-molded kits. This is especially true for the Gimel, their fifth foray into the IDF Centurion family.
That said, this kit is not for the faint of heart. You have to know what you’re doing, you have to have a lot of patience, and you need to know how to slow down. Sometimes there are no easily-defined connection points between parts, or they are absent altogether.
AFV Club chooses to focus on accuracy, and sometimes, in my opinion, this comes at the expense of buildability. Much of the detail is composed of tiny, exquisitely formed parts that would go together perfectly on a one-to-one, full-scale vehicle, but don’t necessarily translate well to a vehicle that is only seven inches long. Positive locator pins or holes would help a lot, as well as (common) assists found on other kits, such as interior ridges and/or insets that may not have existed on the real thing, but including them, out of sight, is no crime on a model kit.
Still, I was more than satisfied with the end result, and all that busy detail looks great on the finished model.
The number of small parts, the complicated assemblies and use of photoetch leads me to recommend this kit to experienced modelers only. Go slow, pre-fit everything, and above all, have fun!
I would like to sincerely thank AFV Club for providing this kit for review, and to IPMS USA for giving me the opportunity to build it.


Reviewer Bio
Eric Christianson

Eric Christianson is a father to two boys (Reed and Dean), the President of the Seattle Chapter of IPMS, and a long-time Little League umpire. He is also a devoted husband and companion to a wonderful woman named Jackie who enthusiastically supports his passions. Recently retired as a programmer, his home office has been scratch-built into ‘a perfect model room’. Modeling since he was a boy, Eric mostly builds armor these days, but still dabbles in 1/32nd aircraft and other types of models from time to time. He also enjoys presenting seminars on weathering and technique at local shows. Many of Eric’s kit reviews can be found on the IPMS USA website.
Comments
Add new comment
This site is protected by reCAPTCHA and the Google Privacy Policy and Terms of Service apply.
Similar Reviews