
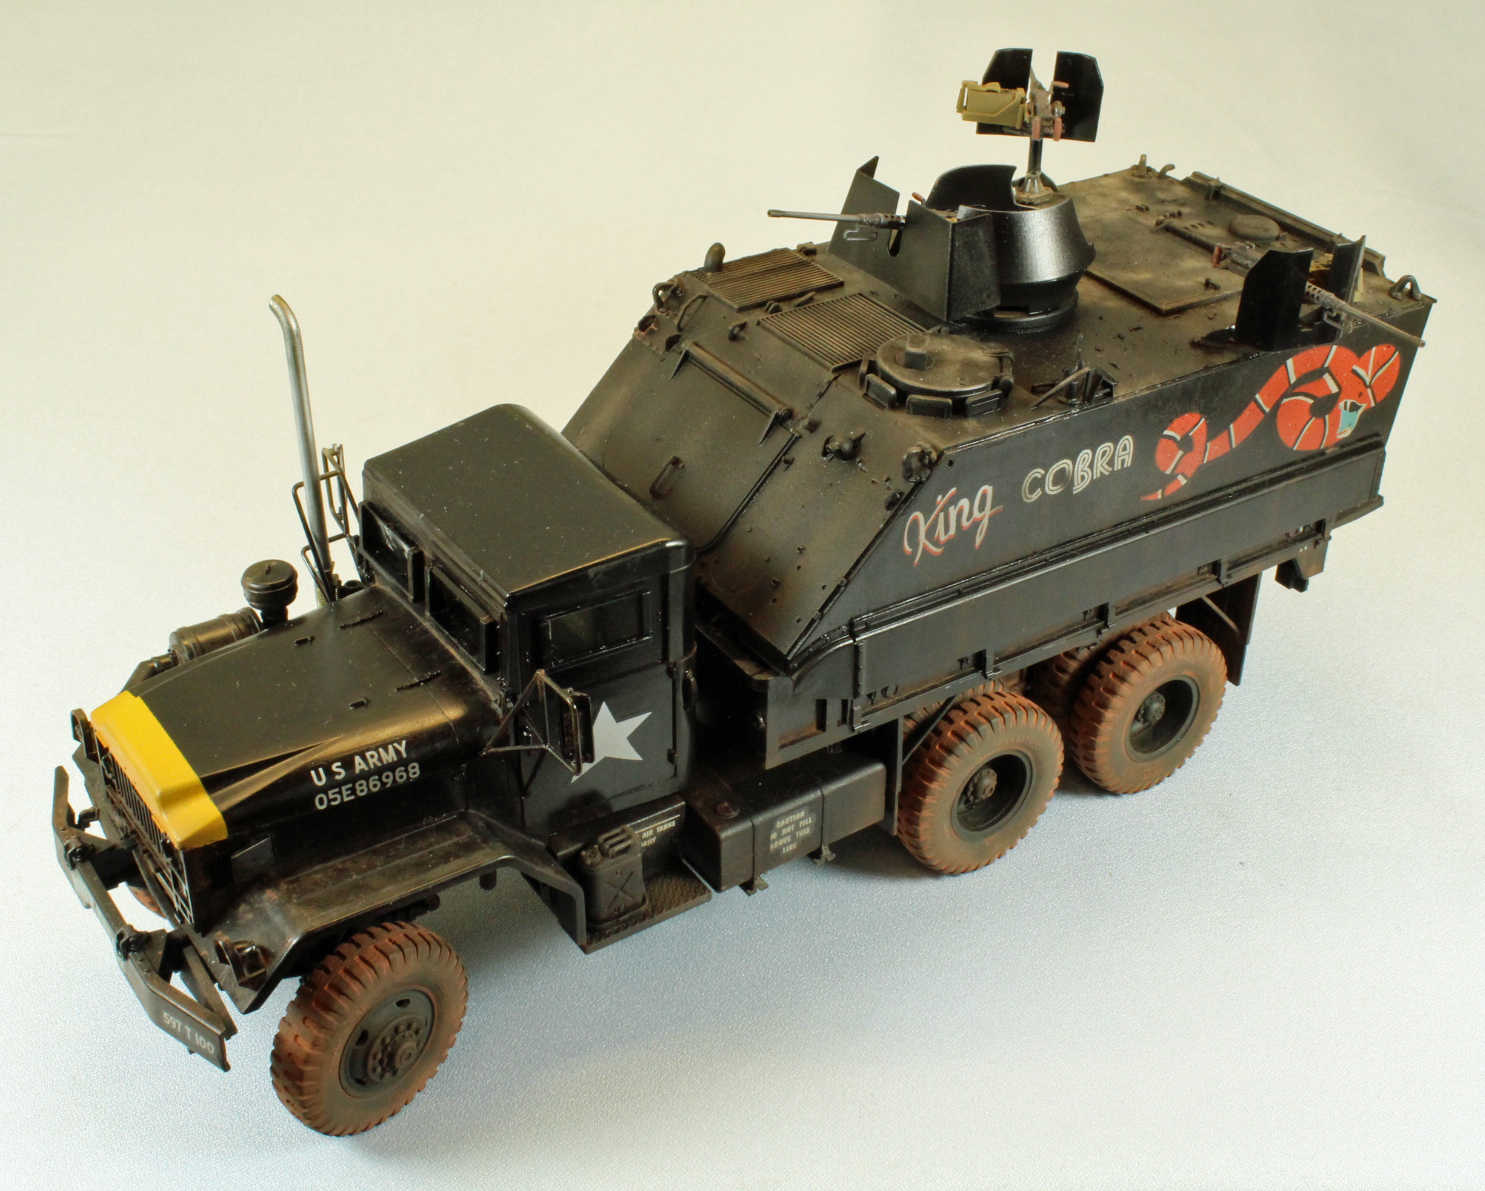
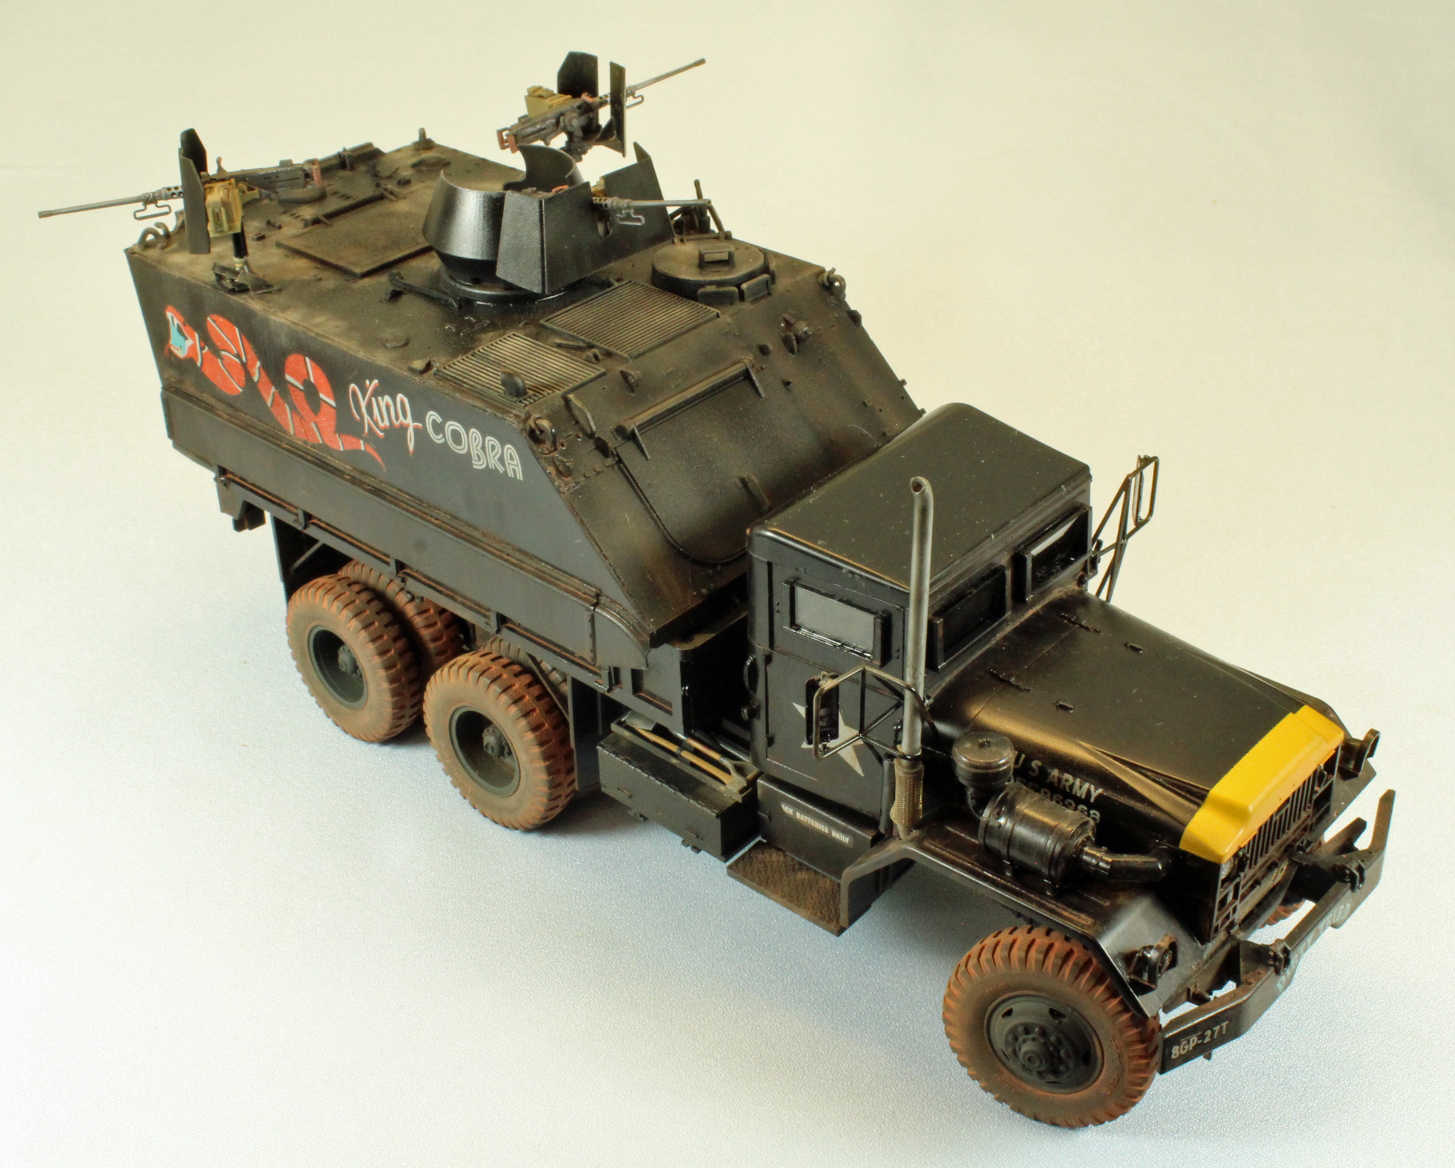
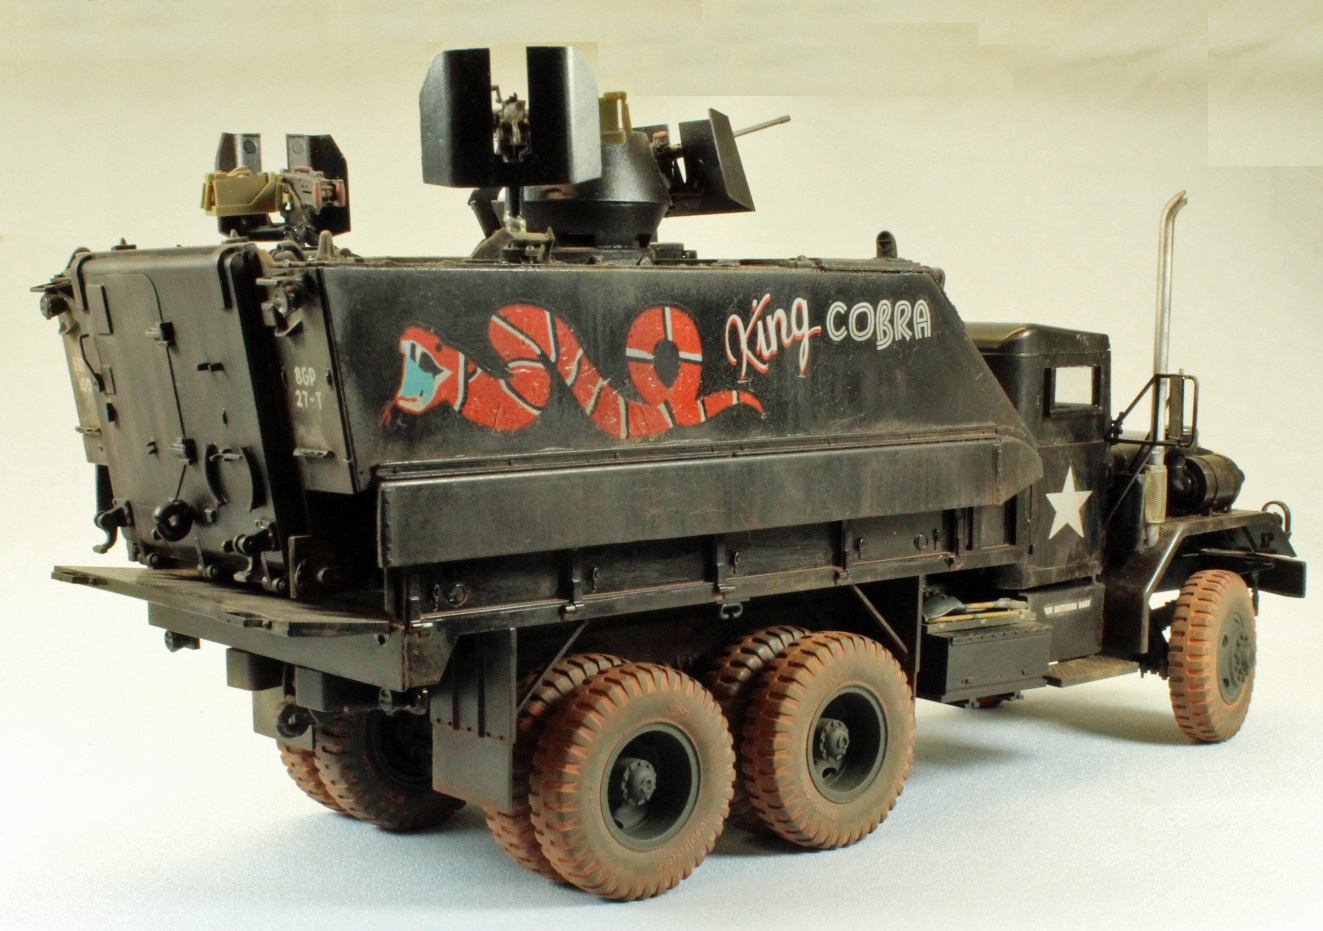
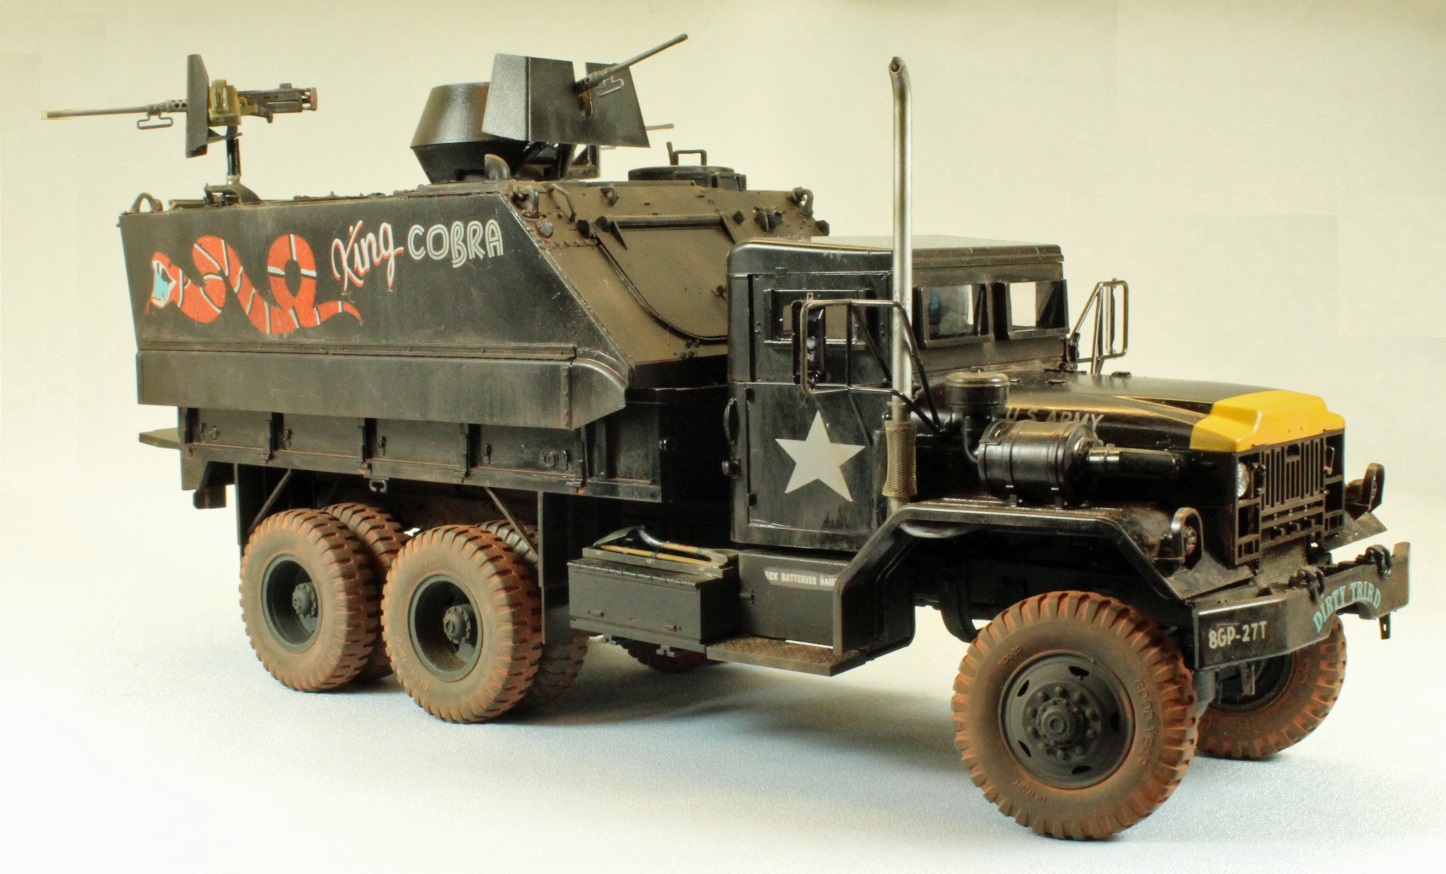
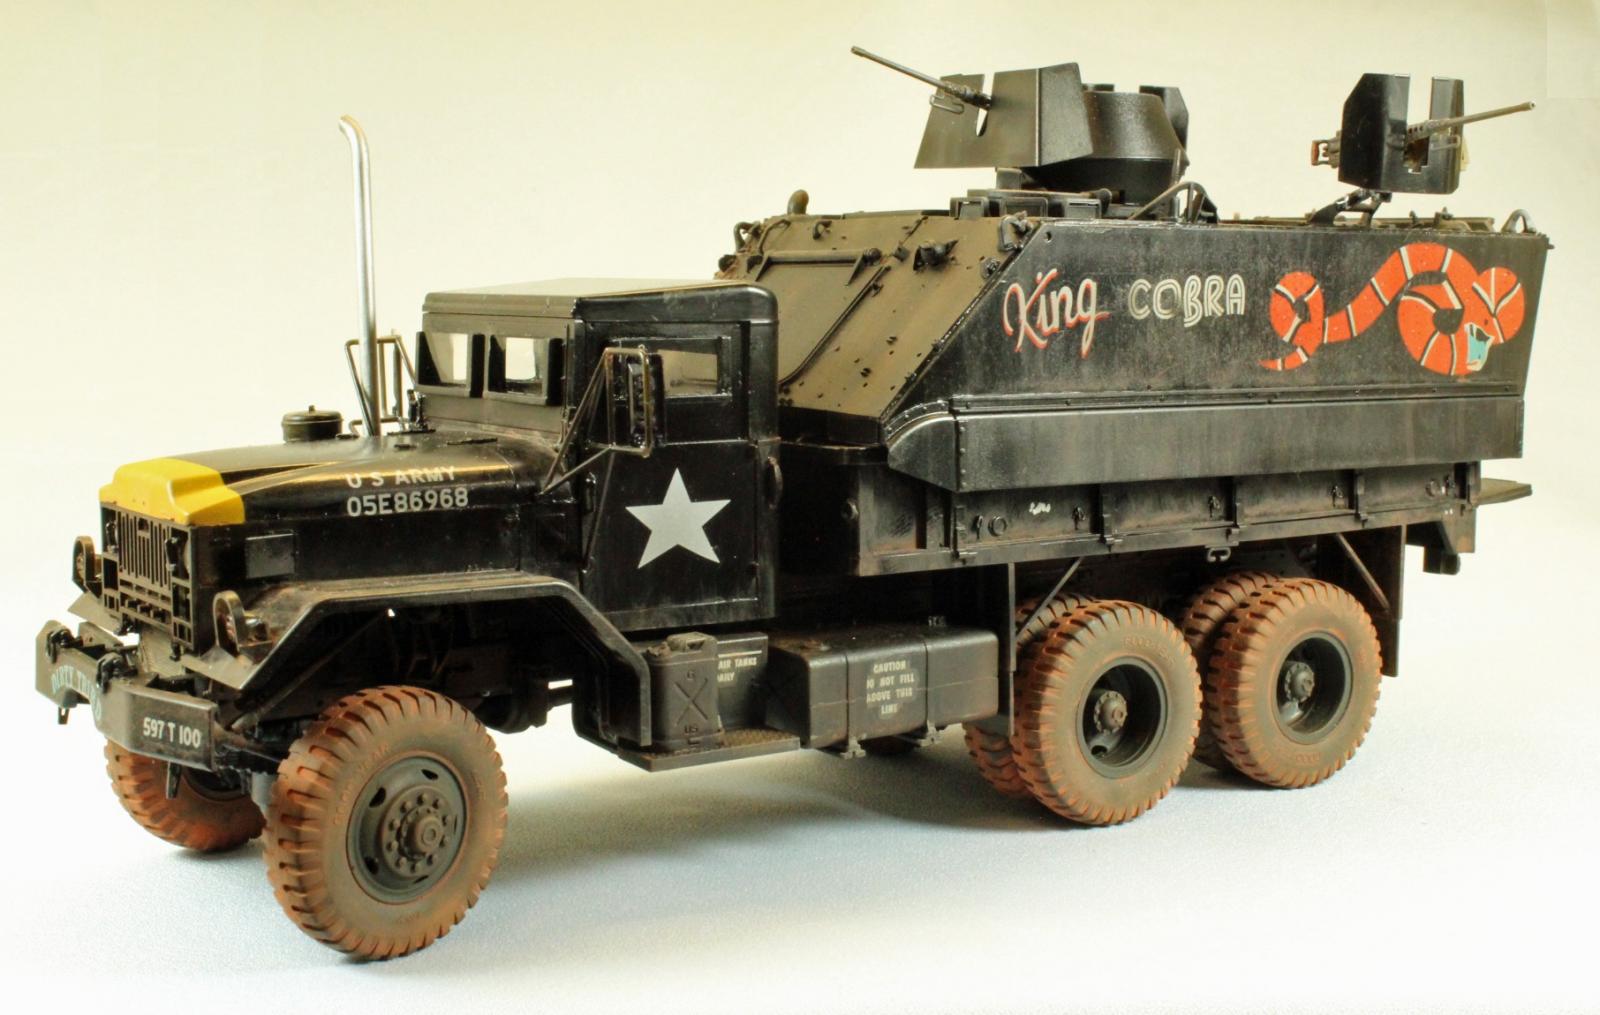
Gun Truck "King Cobra"
AFV Club has released their third version of a ‘Gun Truck’ employed by hard-pressed convoy security forces in Viet Nam. This time around we meet the ‘King Cobra’, sporting three 50cal M2 ‘Ma Deuce’ machine guns mounted on a fully equipped M113 APC hull, sans wheels and track, thrown right up into the bed of a M35 5-Ton truck, all black and bad. I took one look at the box top and I knew I had to build it.
The Viet Nam gun trucks have a fascinating history; borne of necessity, built with Southern ingenuity, and purpose-made to rain hell on its adversaries if attacked. While they were never officially sanctioned by the U.S. Army, an estimated 300 to 400 trucks were transformed in this way. Only a single gun truck, the ‘Eve of Destruction’, survives today, permanently on display at the Army Transportation Museum in Fort Eustis, VA.
Opening the Box
The enormous, and sturdy, AFV Club kit box is relatively heavy and filled to the brim with parts and extras. The plastic is soft and in places, very thin, but I did not find any warpage or damage in shipping. There was some flash but nothing significant and what is there is limited to the smallest parts. Each substantial truck tire comes in two, crisply-molded halves made of plastic – which was a pleasant surprise, actually. I would much rather clean up an easy seamline than fight trying to paint and weather poly-whatever ‘rubber’ tires.
Of note: online and box-top images of the completed model show detailed, heavy fabric striations in the driver’s compartment ‘canvas’ cover. The cover included in the kit (Part M2) lacks any such detail, reflecting a hardtop configuration for the M35 cab.
The contents of the box include:
- 24 sprues in soft, light-green plastic, packaged separately.
- APC Hull Body, packaged separately.
- 1 length of string for securing the M113 to the truck bed via two stanchions.
- 1 very small photo-etch sheets of mostly straps and belts and very small details.
- 1 small bag containing two gun mounts in dark grey resin
- 2 small sprues of clear parts containing headlights, mirrors and windows.
- 1 medium-sized sheet of decals with markings for one vehicle.
- 1 24-page black and white instruction booklet with 48 steps, including a single back color page showing a 5-view decal placement and paint guide.
The Instructions
The side-bounded instruction booklet, unfortunately, does not contain a list of unused parts – an omission which is compounded by the fact that the parts map is printed on one half of one page – far too small to read the numbers (on 24 sprues!). In fact, it is difficult to even make out the shape of many of the parts. I would humbly suggest that AFV Club either use an entire page for a legible parts map, or re-task this half-page space for a more useful purpose. In addition, in many places in the instructions, the part numbers are super-imposed directly over the main image which makes it a challenge to keep track of what has been added and what still needed to be attached. It would be better to pull the part numbers away and to the sides of the main images to help the modeler visualize the assembly steps.
On the plus side the instructions contain color call-outs for Gunze Sangyo (lacquers and acrylics), Humbrol, Revell and Lifecolor, and the decal placement instructions are supplied in a beautiful, five-view CAD image. Also, AFV Club thoughtfully includes a short, fascinating history of many of the gun trucks used in Viet Nam.
Sprues and parts are color coded in the instructions, so I was able to set aside the (13) sprues for the M113 while I focused on the truck, which greatly streamlined the assembly process – this kit has a lot of parts!
Things to Consider Before Starting
On the plus side, the pieces of armored ‘glass’ can be carefully dropped into place after assembly and painting – thank you, AFV Club – this makes things so much easier. Likewise, the plastic wheels can be painted and weathered separately, and attached at the very end.
On the negative side, inexplicably, two of the three gun mounts are provided as very thin, delicate resin parts that broke immediately – one by using too much force to open up the too-small hole required for the M2 mounting post (it shattered and was unrepairable), and the other when the top-heavy truck gently rolled onto it’s side (on to a small towel, nonetheless – a towel placed there to protect this very part in case the truck rolled over). I was able to repair that one, gluing two pieces along a razor thin edge. What surprises me is that AFV Club produces some of the finest moldings in the industry – why choose resin here? It’s a shame, since the guns up top are the heroes of the model; what everyone looks at first. My ever-supportive wife claimed, as the second stand broke again at the end of the build, that “the (cobbled-together gun mounts) gave the finished model a look of authenticity true to the vehicle’s heritage”. Bless her heart.
The Build
The Lower Chassis, Running Gear and Main Deck
Assembly begins with the lower chassis designed with two main rails that run the length of the truck and numerous other parts set at 90 degrees along the length of the rails. A nicely detailed engine and transmission sit down on top of this latticework, as well as the three articulating axles. There are a lot of parts and a lot of opportunities to get things wrong, so go slowly.
The fit of parts B23 and B24 in Step 7 is vague at best. Make sure you are holding the axle with the correct orientation and the larger image on the bottom of Step 7 should help.
In Step 9 there are several parts in the right-hand image whose placement is vague at best. I figured out what went where by attaching the two rods (Parts C19 and C50) to the triangular plate (Part C31) using slow-drying, black-bottle Testors cement. That gave me time to swivel them and the plate around to see where things fit once I attached one end of Part C19 to the chassis to anchor the assembly. In the end, everything ends up fitting fine.
I canted the front axle to turn ‘right’ before cementing it in place, and left the wheels off until the end of the build. The six brake drums work fine for supporting the heavy model during assembly.
In Step 13, a tool rack that sits on top of one of the fuel tanks can be painted and attached at the end, if desired.
AFV Club includes four water cans in the kit, I assembled and used two, putting the others in my spare parts box.
The Driving Compartment and Truck Bed
The pieces of armored ‘glass’ can be dropped into place after assembly and painting, although care must be taken to ensure that they don’t drop inside the cab – this mostly is the case with the windows in the doors. A rear-cab split window (Part N6) is not mentioned in the instructions (??), and is inaccessible after the M113 is added. I painted the edges of all the thick pieces of glass black so that light didn’t refract off the surfaces when in place.
The fit of the seven-part cab and six-part hood is flawless; each piece set into pre-engraved slots which need very little cement. AFV Club should be commended for absolutely nailing this oft-challenging task.
Separate decals are provided for each dashboard dial, etc., with a nice paint & placement image in Step 16. You might want to take a picture of your work, however, since the thick, armored glass, while transparent, limits visibility to the cab area to almost zero.
The placement (or purpose) of Part C9 in the bottom right image of Step 19 is a mystery – but if you work out the angles and fit, you will find that it can only go in one place – hopefully the right place.
Caution: the two small PE sheets are both labeled ‘G’ and contain parts that are numbered identically between the two. I was about to apply CA glue to four brackets for the cab (Parts G5 in Step 17) when I realized they were the wrong G5 parts – the correct ones were on the other PE sheet.
The truck bed is solid and, once you remove the upper wooden slats from the four sides, comes together quickly and easily, with two minor exceptions. First, the locating holes for placing the bed on the chassis, and the male parts that go into these holes do not quite fit. I suggest you simply remove the male parts and glue the bed down with some weight to keep it in place. Secondly, there are two chain runs, one on each side of the flip-down door that were simply too small for my big, meaty hand to manipulate. Since the APC forces the door to be down anyway, I left them off.
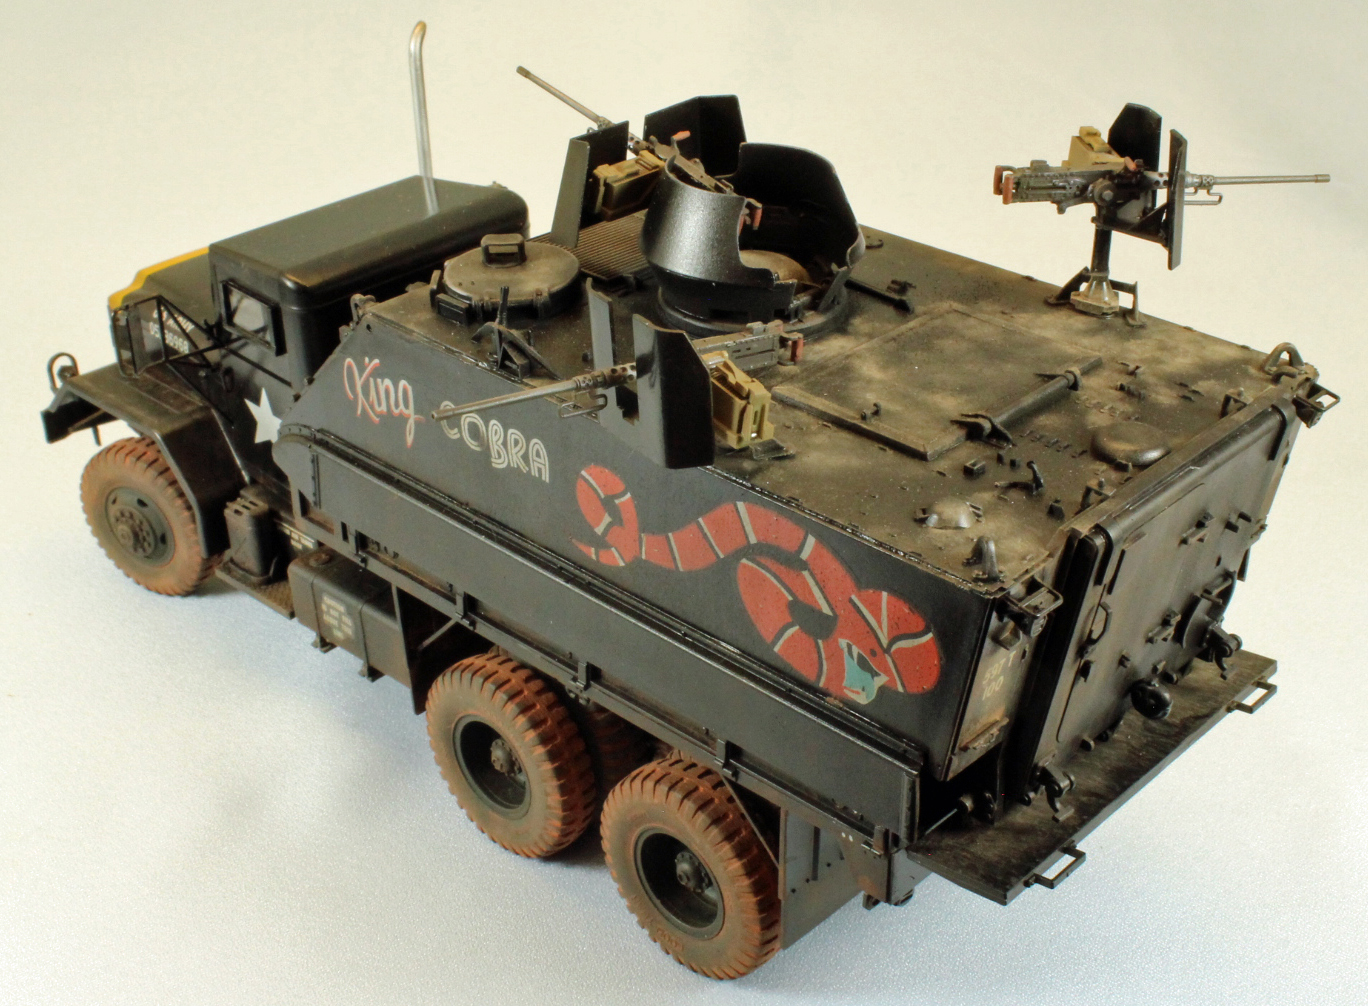
The M113 APC
The novel aspect of this version of the gun truck is that it contains a fully equipped M113 Armored Personnel Carrier. On page 10, there is a clean break between building the truck and building the APC. In fact, you can remove all truck-related stuff from your workbench – the next 12 pages are dedicated to this ‘reworked’ AFV.
Nor surprisingly, AFV Club chose to go to one of their many M113 offerings for most of the sprues needed in this kit. The final result is quite literally a fully-detailed APC minus the track and wheels, leaving the bottom of the hull placed directly on the bed of the truck, just as you might imagine happening in some backlot of a maintenance facility, sticky hot with red clay soil and an old lifting crane. Grab a bucket of black paint, some guns and ROLL.
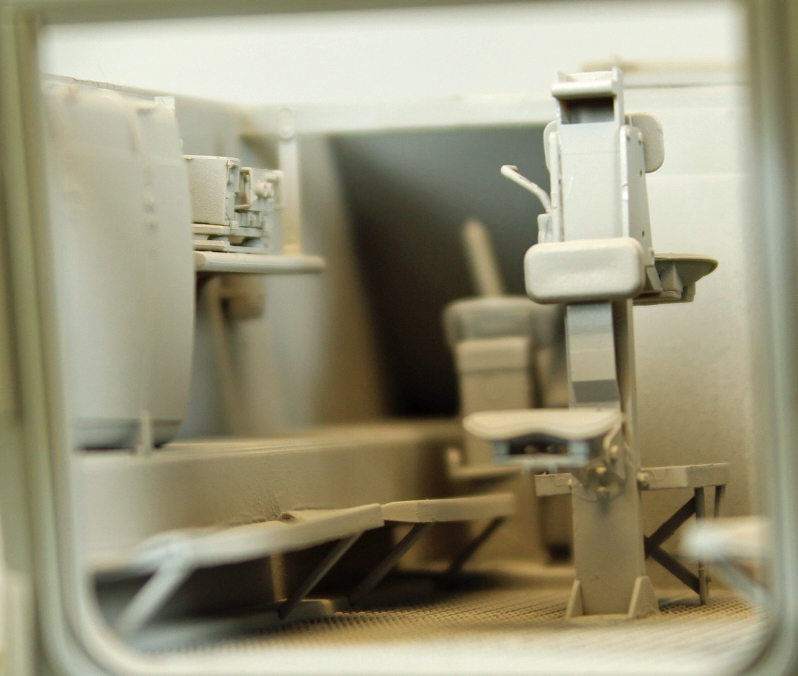
Assembly starts with the highly detailed interior. All hatches fully open, including the large rear door, so what is offered inside will go a long way for someone to super-detail this kit. Of specific interest are the three significant crew stations, complete with articulating seats that are small models in themselves. Radios, benches, stowage racks, control panels, fire extinguishers, etc., line the walls around the three stations. Stencils and decals are included, along with detailed painting instructions.
The fit of everything is superior, with the only hiccup encountered when dropping the main roof down into the various grooves and notches provided. The (now) reinforced hull was a little narrow along the sides, preventing the top to fit snugly into where it needed to go. I cut two cross members to fit tightly in between the sides to hold them slightly apart until the glue started to set, when I removed them from the interior. I attached clamps at the rear on both sides to force the corners into place.
One easy issue to address – do not attach Parts D33 to the interior of the roof (Step 38) until after the roof is in place, (Step 39).
Machine Guns and Mounts
AFV Club kits have beautifully rendered M2 50cal machine guns, but getting them together has always been a challenge for me. I don’t know if I just can’t interpret instructions, or the fit and design is poor, or what. The ammunition box connection points never seem to sit right, and when they do, they block other parts from fitting. I’ve probably built a dozen of these now and every one of them has been a ‘load-the-glue-on-and-move-the-parts-around-until-it-looks-like-a-gun’ affair. In the end, I have decent looking guns, but close inspection reveals a mess. In addition – these particular guns have shields, which, in one case, required a plastic shim to extend the gun base backwards from the shield so the ammunition box could fit in behind.
I suggest that you use slow-drying Testor’s ‘Black Bottle’ cement, which allows ample drying time for coaxing these parts into place.
The last sequence in the instructions guides you through assembling two stanchions that supposedly keep the APC from rolling backwards off the truck bed. The hasps (Parts P5) are not deep enough to allow the rings on the end of each stanchion to find purchase, and once they are attached, they barely stand off the surface of the APC hull, unlike the image in the instructions. I decided to leave them off. Sometimes you just gotta say ‘done’.
Painting and Finish
Except for priming and pre-shade coats, I used Tamiya paints throughout, thinned 50/50 with Gunze Leveling Thinner. I’ve come to really like airbrushing this paint mix and although not as healthy as the new acrylics, I can depend on the consistent results I achieve every time I pick up the airbrush.
Paint it Black
I would normally start by applying a coat of (rattlecan) Krylon Flat Black Paint/Primer for my dark, primer/pre-shade coat, but this is an unusual case – the entire model is black! Since I wanted to break up the monotone look of just plain black, I painted the cab and truck front end with Tamiya X-18 Semi-Gloss Black, the chassis and truck bed using Tamiya XF-69 NATO Black, and the M-113 using Alclad Gloss Back Primer.
Drivers Compartment and Cab
I painted the interior of the driver’s compartment, spare water cans and odds and ends using Tamiya XF-62 Olive Drab mixed with XF60 Dark Yellow 80/20. The exhaust stack received Tamiya XF-16 Flat Aluminum, and the yellow identification stripe on the hood Tamiya XF-3 Flat Yellow with a couple of drops of Tamiya X-6 Orange to deepen the bright yellow to a more ‘school-bus’ shade. I painted the inside of each headlight Molotow Liquid Chrome before pushing them into their receptacles.
On-Deck Equipment and Guns
After the primer had degassed, I attended to the pioneer tools and guns. The shovel and sledge hammer heads were first painted Tamiya NATO Black, and then detailed with Uschi Chrome powder. The shafts were painted using Tamiya XF-59 Desert Yellow, and then, when dry, covered with MIG Brown Wash Oil paint from a tube. I let this sit for a few minutes and then rubbed most of the oil off with a clean brush, leaving enough residue to simulate wood grain and dirt.
The machine guns were painted Tamiya XF-84 Dark Iron, and then detailed with Vallejo Saddle Brown and Uschi Chrome metallic powder. I painted the ammunition boxes AKI Real Color RC094 IDF Sinai Grey 1990, a somewhat faded version of my go-to-and-out-of-production Pactra Artillery Olive, the color I’ve always used for this application. Both parts then received a brown wash.
Decals and Photo Etch
With painting finished, I hand-painted a coat of Future on the (NATO Black) chasses where the various stenciling went, and relied on the glossy surfaces of the other areas to take their decals as is. Once the Future was dry, I went about applying the decals using the Red and Blue MicroSol and MicroSet products. The decals were very thin and surprisingly stubborn once on the surface. Patience prevailed, however, and I was able to coax them into place. The long (Snake) decals gave me the most trouble as they tended to fold back on themselves during application. I followed this with a second, sealing coat of Future to help hide the edges of the decals.
Finish
I weathered the wheels using a mixture of Mig African Earth, Dark Mud, and Europe Dust pigments applied as a thin slurry thinned with Mona Lisa thinner. Once dry, I brushed off the excess and worked the pigment around a little using a stiff paintbrush. Once I had those right, I attached them to the truck and attached the three gun mounts and other breakable items (rear view mirrors, tool rack, etc., to prepare for weathering.
Dark pen washes would disappear into the black background, so I mainly stayed with the same colors I used for the tires, applying them wet individually and mixed, and adjusting them after they had dried. If I put too much on, I adjusted those areas by using a thicker black wash, essentially starting over. I left the cab and hood sections shiny since these areas would have been cleaned off and shined more often by the proud crewmembers.
Conclusion
No doubt about it, this kit was a challenge to build, and to finish. AFV Club has a solid reputation for offering unusual, highly accurate injection-molded kits. There kits have a lot of parts, and sometimes dealing with that level of detail can be maddening. I have often said that AFV kits are not for the faint of heart, and I mean it. You have to know what you’re doing, you have to have a lot of patience, and you need to know how to slow down.
I have been building AFV Club kits for years, and I have often complained about the lack of positive locator pins or holes or other (common) assists found in other kits, such as interior ridges and/or insets that may not have existed on the real thing, but could be included, out of sight, and would really help modelers. Well, I’d like to think that AFV Club has finally heard my message, but more likely has simply decided to add more design features that assist in buildability. Whatever the case, the complex, multipart truck cab and front end literally fell together; each piece inserted into the other along inner edges and corners. Complex pieces could only fit a single way, etc., etc. I would like to heartedly commend the company for adding these features to their design process.
I am more than satisfied with the end result, and all that busy detail looks great on the finished model.
The number of small parts, the complicated assemblies and use of photoetch and resin leads me to recommend this kit to experienced modelers only. Go slow, pre-fit everything, and above all, have fun!
I would like to sincerely thank AFV Club for providing this kit for review, and to IPMS USA for giving me the opportunity to build it.


Reviewer Bio
Eric Christianson

Eric Christianson is a father to two boys (Reed and Dean), the President of the Seattle Chapter of IPMS, and a long-time Little League umpire. He is also a devoted husband and companion to a wonderful woman named Jackie who enthusiastically supports his passions. Recently retired as a programmer, his home office has been scratch-built into ‘a perfect model room’. Modeling since he was a boy, Eric mostly builds armor these days, but still dabbles in 1/32nd aircraft and other types of models from time to time. He also enjoys presenting seminars on weathering and technique at local shows. Many of Eric’s kit reviews can be found on the IPMS USA website.
Comments
Add new comment
This site is protected by reCAPTCHA and the Google Privacy Policy and Terms of Service apply.
Similar Reviews