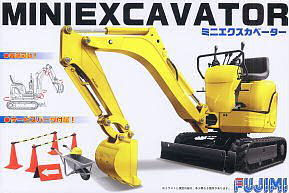
GT-24 Mini-Excavator
Being primarily an armor modeler, I was interested in this kit after seeing a fellow modeler’s build on the web. After all, it has tracks, doesn’t it?
The kit is, in a word, miniscule…really. I was a little surprised that, for a 1/32 kit, it was so small. Don’t let size fool you though, Fujimi has provided a little gem here. The kit features only three small sprues; two molded in bright yellow styrene that make up the excavator itself, and one molded in white styrene containing 13 parts that provide some general construction site supplies – wheelbarrow, cones, etc. No decals or markings of any kind are included in the kit, an unfortunate drawback in my opinion.
The mere 60 parts are crisply molded and required little, if any, clean up. A few parts may require a quick pass from a #11 blade to remove some minor mold seam, but that’s it.
The instructions are well laid out and quickly take you through the construction process. When complete, the “cab” can fully rotate around a central pillar just like the real thing. The best feature, in my opinion, is the arm and bucket. This 25 part sub-assembly builds up to fully articulate, and when mated with the rotating cab, can be put in any position the real thing would be capable of.
It literally took me about two hours to build the model. However, the fiddliest aspect of the kit was the tracks. Small construction equipment like this use a single piece rubber track and have no pins or individual links as we’d otherwise see on an armored model. The kit tracks are molded in four pieces, each one making a portion of the total track run. I found them to be difficult to fit over the drive sprockets, but after a little coaxing they did fit fine, although a minor gap did remain between two lengths. I primed the track in Tamiya NATO Black (XF-69) paint while still on the sprue. I left them off until after the major painting was done so that I could weather them together with the rest of the vehicle.
Painting the excavator was fun. Since I normally work in olive drab or Panzer dark yellow, it was fun to explore other, brighter, colors. I wanted to go for a bright green color seen on a popular line of rental equipment found in the US. Again, as no decals are included, you pretty much can do what you want with respect to painting.
I first primed the model with Gunze Mr Surfacer 1200 aerosol. Once dry, I oversprayed everything with Vallejo Camo Black-Brown (which was integral to my weathering that would come later). Once this was dry, I sprayed a light coat of hairspray over the model and dried it quickly with the help of a blow dryer. Once all that was done, I began with the color coats. For this, I used Tamiya Light Green (X-15) and Tamiya Yellow Green (XF-4). I wanted a bright green, but not necessarily so bright it looked like day-glo. I first laid down a thin coat of the Bright Green, and then followed that with two progressively lighter coats of Bright Green lightened with the Yellow Green. Once I had it where I liked it, it was set aside to dry. Tamiya Gloss Black (X-1) was used for the seats and the lower running gear.
Weathering: Although in real life many of these pieces of equipment are really beat up, I wanted to give it a “worn-in” but not “worn-out” look. Since I’d already planned to use the hairspray method to impart chips and scratches, using a small brush dipped in warm water, I began softening up the top color coat. The goal is to get this layer of paint soft enough so you can pick off small chips with the end of a 000 brush, toothpick or needle. I used both the point of a toothpick and a needle to chip and scratch off the color coat and reveal the Vallejo Black-Brown beneath. As is always true when doing chips and scratches, moderation is advised and less is more.
When I was happy with the chips and scratches, I set the model aside for the night for the paints to once again harden. When I came back, it was time to do a few pin washes and adding a little grease, oil, and rust streaks. For this, I used a variety of excellent Mig Productions and AK Interactive products.
I added on the track at this point and then turn my efforts to applying pigments to complete the weathering process. Again, I use a variety of Mig Pigments to make a nice natural dried dirt look to the track and running gear. These were finally sealed onto the model with Mig Fixer.
This is a great weekend build, and a great change of pace from the ordinary. The weathering prospects are limitless and you could really go to town banging this thing up!
Highly recommended! Thanks to Dragon USA for the review sample and to IPMS/USA for the opportunity to review it.


Comments
Add new comment
This site is protected by reCAPTCHA and the Google Privacy Policy and Terms of Service apply.
Similar Reviews