
German Sd.Kfz. 173 Jagdpanther Ausf. G1
Summary
The kit builds up into a nice replica of the Jagdpanther Ausf G1. And while it has some odd points the overall look is spot on. The model is well detailed, but one must watch for option call-outs for the different vehicles. The parts layout and build sequence is simple and straight forward.
Background
The Jagdpanther G-1 was a dedicated tank destroyer based on the chassis of the Panther Ausf A. Armed with the formidable 88mm Pak 43 anti-tank gun, it first entered service in early 1944. Serving on both the Western and Eastern fronts, the Jagdpanther was capable of disabling any tank of the period, up to and including the heavily armed and armored Soviet IS-2. However, like many German innovations, it was too little, too late. With only 415 Jagdpanthers produced by the end of the war it appeared in too few numbers to make a difference in the course of the war.
What’s in the Box
- 8 sprues of tan plastic, including 4 for just the wheels and running gear.
- 4 sprues of black plastic for the tracks (all identical)
- 1 small fret of photo-etch for engine grills and handles
- 1 small sheet of decals, with markings for four vehicles
- 1 length of string (for tow cables)
- 2 8-inch by 11.5-inch fold-out instruction booklets (Manual1 and Manual 2), each 8 pages with Manual 1 covering steps 1 through 13 (assembly of the lower and upper hulls). And Manual 2 with steps 14 through 16 covering completion of the build, instructions for applying zimmerit, and four view images for camouflage and decal placement for the four vehicles that can be modeled.
- A small single sheet flyer with cautions/warnings in Korean, English, French, German, Japanese, and Chinese.
- A small flyer with basic (modeling) tools and instructions for applying water slide decals, in Korean and English.
- A small flyer Noting to check the parts list before unsealing (opening the bagged sprues), also in Korean, English, French, German, Japanese, and Chinese.
The Instructions
The instructions consist of two fully illustrated 8.5x11 fold-out booklets. The images are sharp and show the assembly as an exploded ¾ view. The first booklet (Manual 1) is a 13-step assembly of the main vehicle. The second booklet (Manual 2) has three exterior finishing steps and four view painting guides for the four vehicle decal options provided. In lieu of any reference material in the instructions, I used TopDrawings No. 91, Sd.Kfz. 173 Jagdpanther from Kagero Publishing.
The first page of the instruction booklet has the pictorial symbol for the different callouts in the instructions. However, the text is in Korean only. This page also has the paint color callouts for Humbrol, GSI Creos (Mr. Color and Aqueous Hobby Color) Lifecolor, Testor Model Master (both enamel and acrylic), Revell (again both enamel and acrylic), Vallejo (model color and model air) and AK Interactive. Only the acrylics from Humbrol, Testors and Vallejo Model Air do not have all the necessary colors available.
The top of page 2 is a helpful direction on applying photo etched parts. The rest of the second page is construction of the main lower hull “tub” and attachment of the running gear.
Page three of the instructions is the attachment of the road wheels, idler wheel, and drive sprocket. Page four (Step 5) is the installation of the link-and-length tracks. Note that in steps 2 through 5 parts are called out as a number and a second number in parenthesis (e.g., A11(D38)). The number in the parenthesis is the part number for the opposite side of the vehicle.
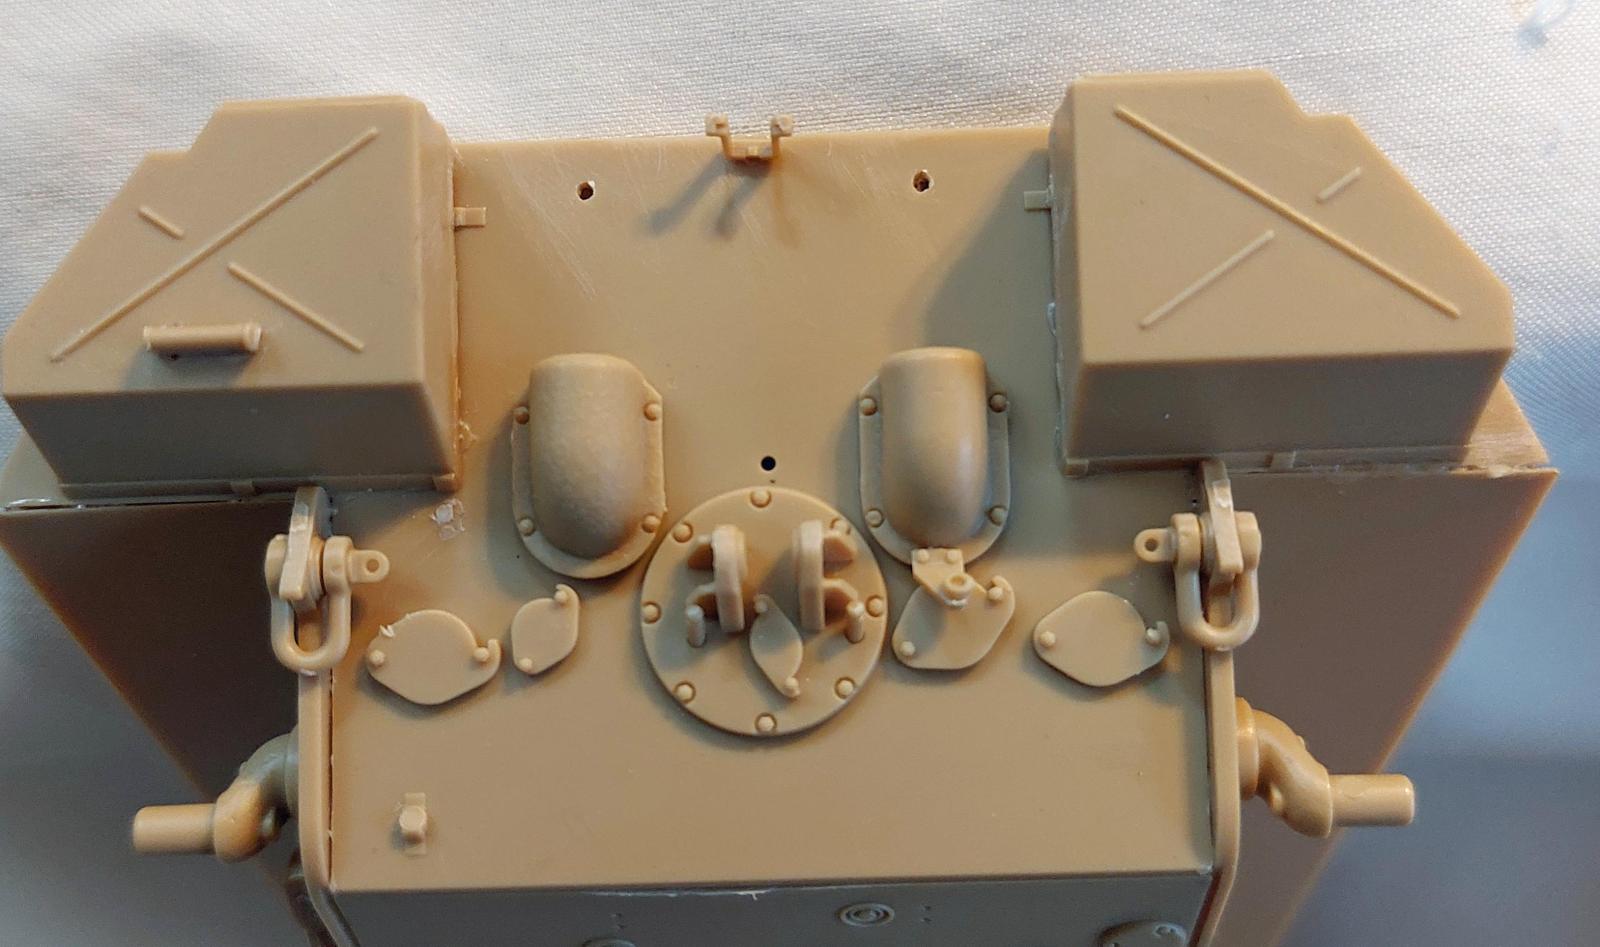
Step 6, the lower part of page four, assembles and attaches the rear of the vehicle. Page five is the assembly and attachment of top of the upper hull and the main engine hatch.
Pages six and seven are attachment of exterior details for the right and left sides, respectively. Page six also includes attachment of details to the top of the engine deck and rear of the upper hull superstructure.
Page eight is the end of Manual 1, and covers assembly and attachment of the main gun.
The first page of Manual 2 covers attachment of the upper and lower hulls, and attachment of the front fenders and side skirts.
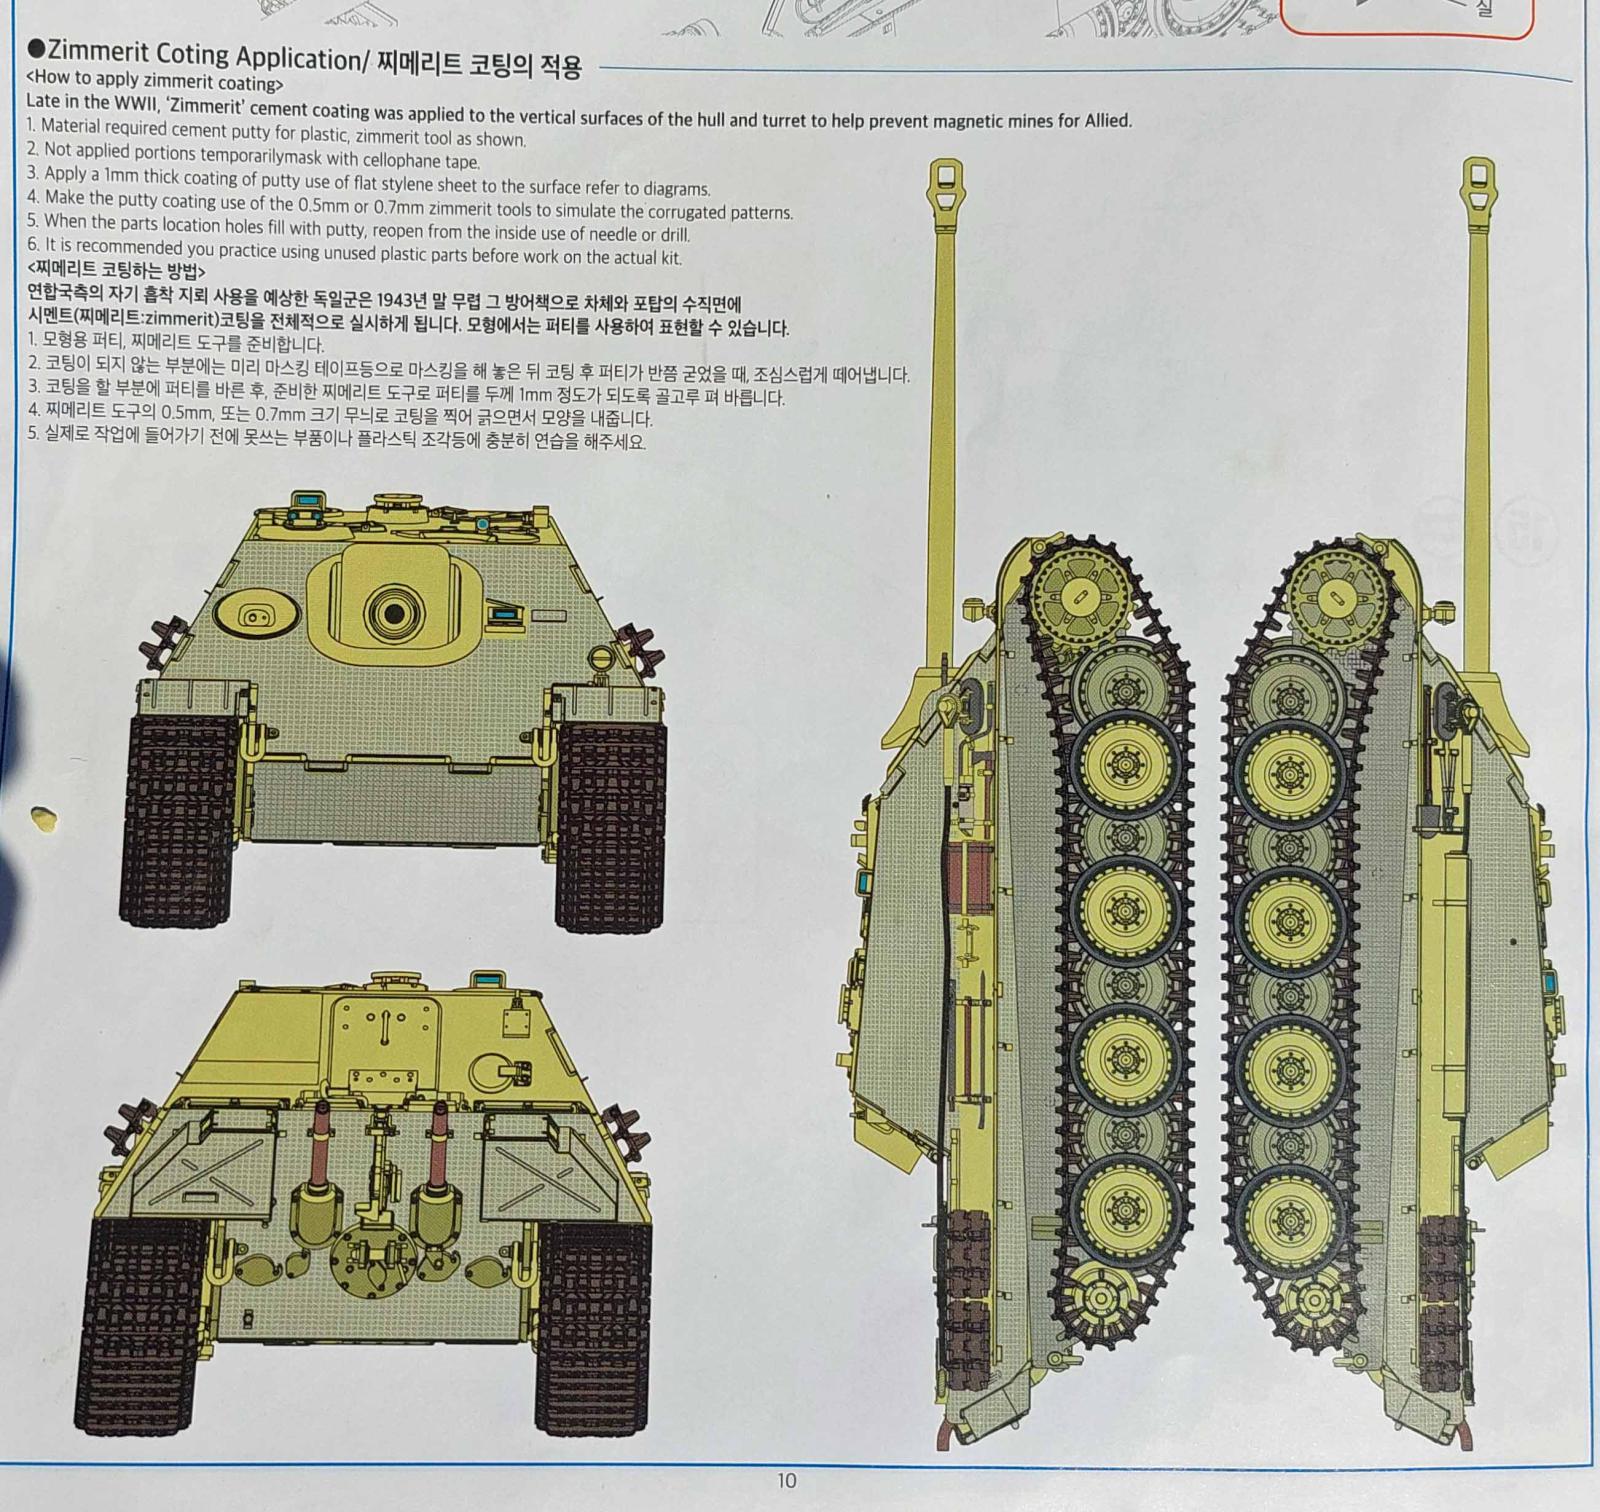
The top part of Manual 2, page two is assembly and attachment of the tow cables. The lower part of page two is instructions for applying zimmerit and a four view image of zimmerit coverage. Pages three through seven are four view images of the paint schemes and decaling for each of the four vehicles that can be modeled. The last page of Manual 2 is a parts map.
Things to Consider Before Starting
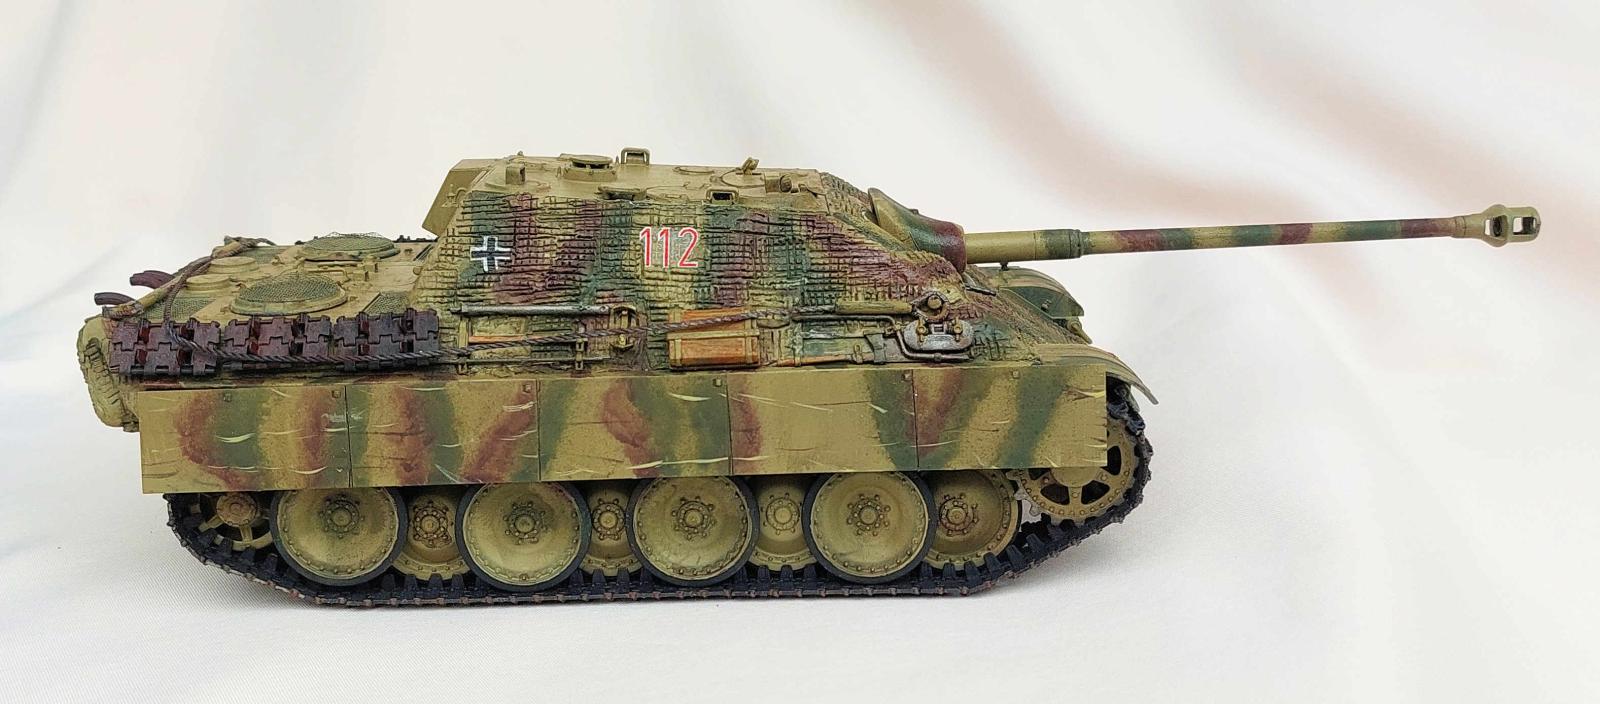
The kit comes with four markings options. Two from Normandy in the summer of 1944, one from September 1944 in Germany, and one in Belgium also from September 1944. The biggest visible difference is the main gun and exhausts. The two Normandy versions share the same extra pipe exhaust, but one has the early “heavy” muzzle break while the other has the later “light” muzzle break. The September versions again share the later double pipe exhaust, while the Germany vehicle has the “heavy” muzzle break and the Belgium one the “light” muzzle break. Optional parts are clearly called out in the instructions. In addition the decal sheet supplies three each of the numerals 1, 2, 3, and 4. So one has the option to pretty much model any G1 numbered vehicle as long as the numbers were red with white borders.
The hatches can be modeled open or closed, including the large rear door. Unfortunately, there is no interior detail provided, so the open hatches will at best serve as a starting point for super-detailing. While Jagdpanthers almost universally sported an anti-magnetic layer of zimmerit, you will need to add your own, if desired – the exterior surfaces come smooth in the box.
Construction
I start all my builds by scrubbing the sprues with an old toothbrush in warm water and dish soap (Dawn) to remove any residual mold release residue. Another thing to watch for is that many sprue attachment points are along the edges of the parts, so make sure that corners remain clean and square when removing mold seams.
Lower Hull, Wheels, and Tracks.
Steps 1 through 4 cover construction of the lower hull “tub,” running gear, road and idler wheels, drive sprockets. Step 5 is assembly of the link-and-length tracks. All these steps are easy and straight forward. Note that in steps 2 through 5 parts are called out as a number and a second number in parenthesis (e.g., A11(D38)). The number in the parenthesis is the part number for the opposite side of the vehicle. So pay attention because it is not always a 1-to-1 match (as the above example points out).
To make painting easier I built the tracks as an upper and lower run so they could be removed after they dried. I also did not cement any of the road wheels, idlers, or drive sprockets so they too could be removed and the rubber road wheel tires could be painted separately. In Step 5 pay particular attention to the three notes as each side is not the same (there are differences in the number and placement of tracks for each side).
Step 6 finishes out the lower hull with assembly and attachment of the rear plate. Again note the option call-outs for the exhaust based on the vehicle you are modeling.
Upper Hull
Steps 7 through 13 cover construction of the upper hull. Again building is easy and straight forward.
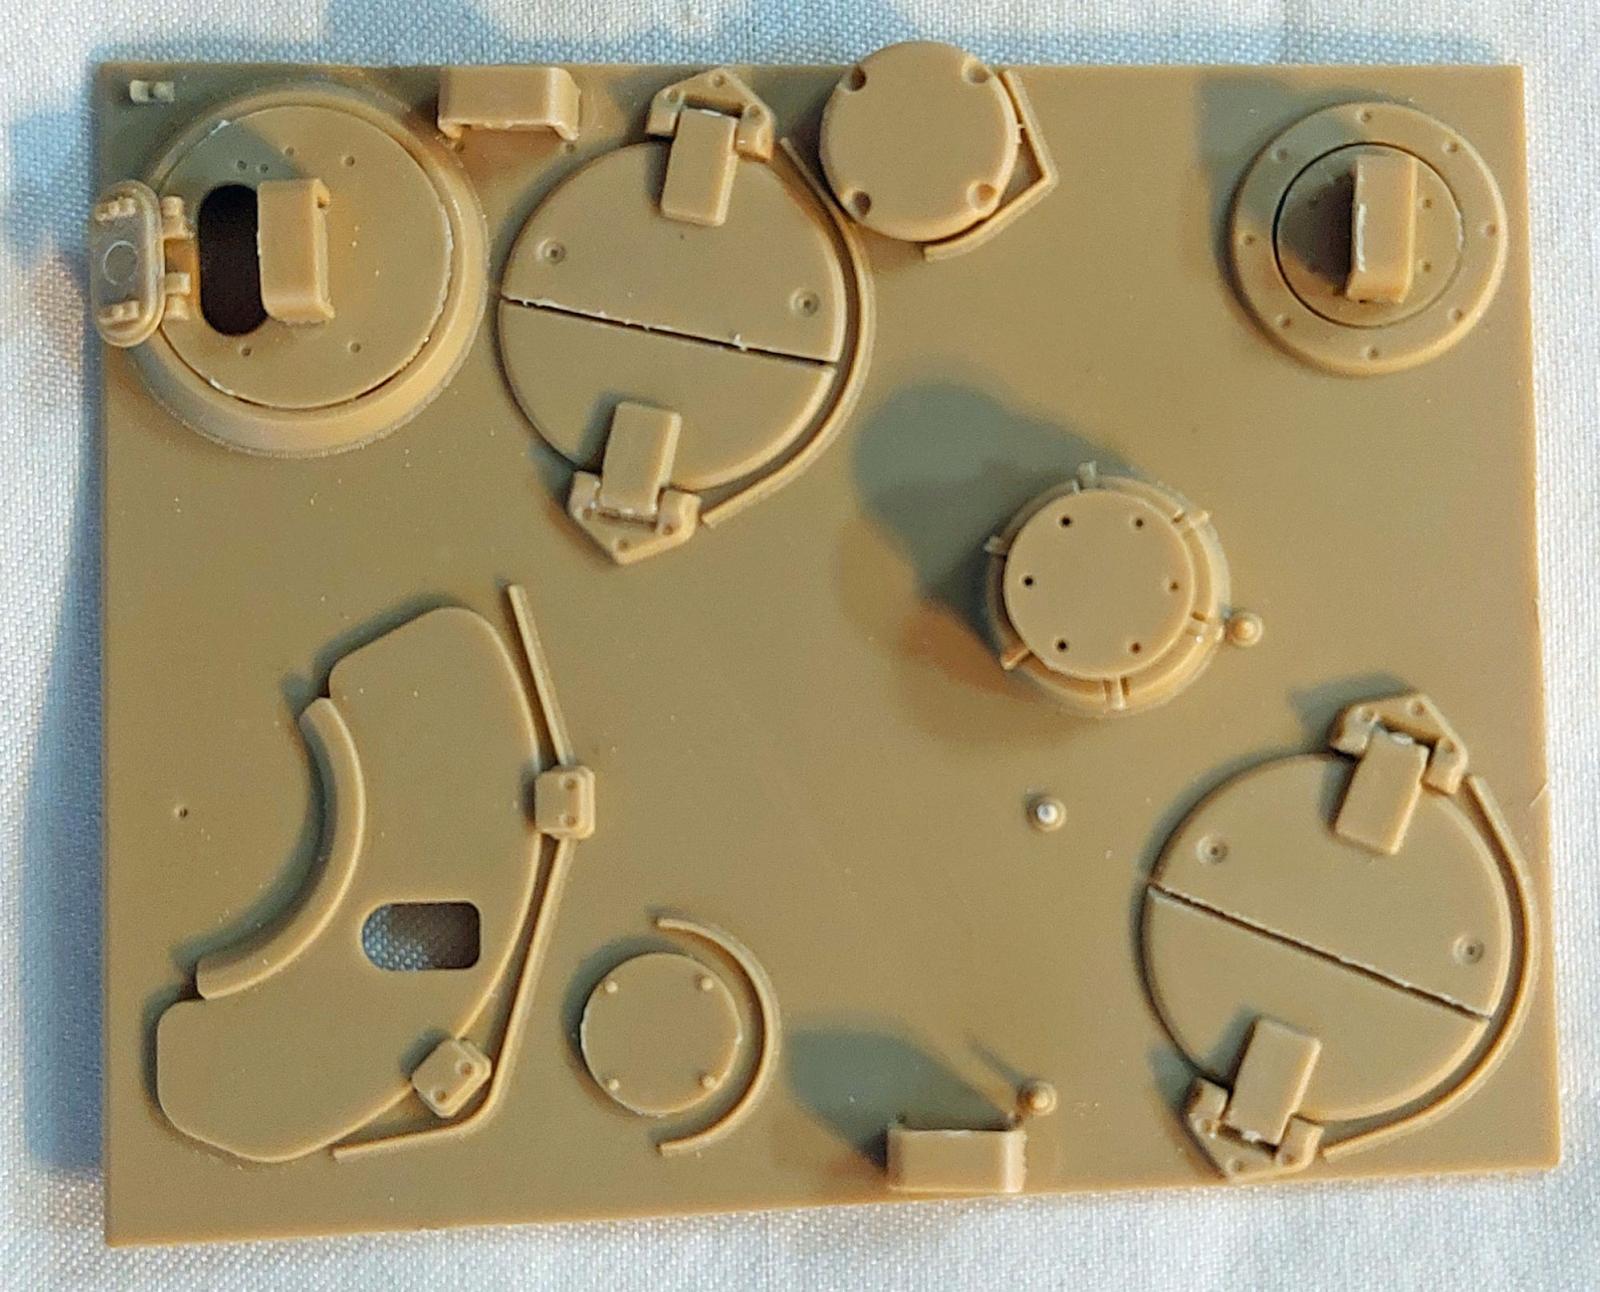
The instructions give the builder the option to have the hatches open or closed. But with an empty interior I built them closed.
Steps 8 through 12 cover the attachment of the exterior parts for the right (Steps 8 and 9) and left (Steps 10 through 12) upper hull sides. Steps 8 and 9 also include engine deck detail.
The only vehicle-specific options to be aware of are in Step 8, where the left side of the upper superstructure rear receives either a storage box (vehicle options 1, 2 and 3), or a radio antenna mount (option 4). Other optional parts are photo-etch replacements for handles, driver’s visor, and gun cleaning tube mounts.
Pay attention in Step 13 as there are two main gun options depending on which decal version you are building. Just as an aside I really like the mechanism that Academy supplied for movement of the main gun. It is a double universal joint that allows the gun to move up and down, as well as side to side.
The first two pages of Manual 2 cover completion of the model. Step 14 joins the upper and lower hulls, while step 15 attaches the front fenders and side skirts. The top and bottom edges of the side skirts are beveled so, when attached, they have a scale thickness appearance. A nice touch. To further enhance the side skirts I also used a razor saw to deepen the join lines between the skirt pieces. It’s not a big issue but in doing this on the top and bottom of the skirts I noticed that outside skirt joints don’t match the inside joints.
Step 16 is the final assembly step, and consists of construction and attachment of the tow cables. String is provided for the tow cables. The plastic ends have a nice long, deep notch into which one can super glue the string.
Painting and Finish
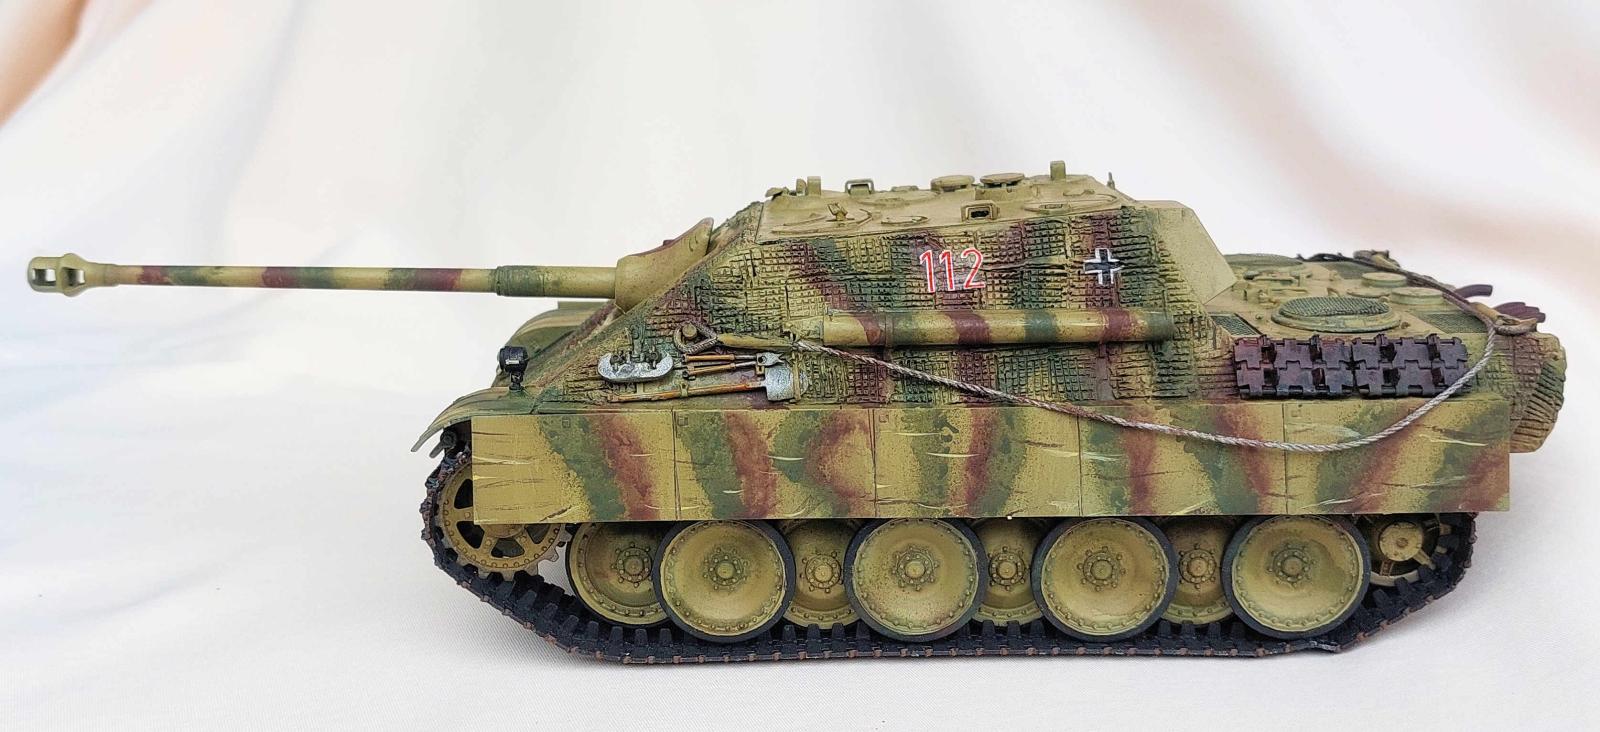
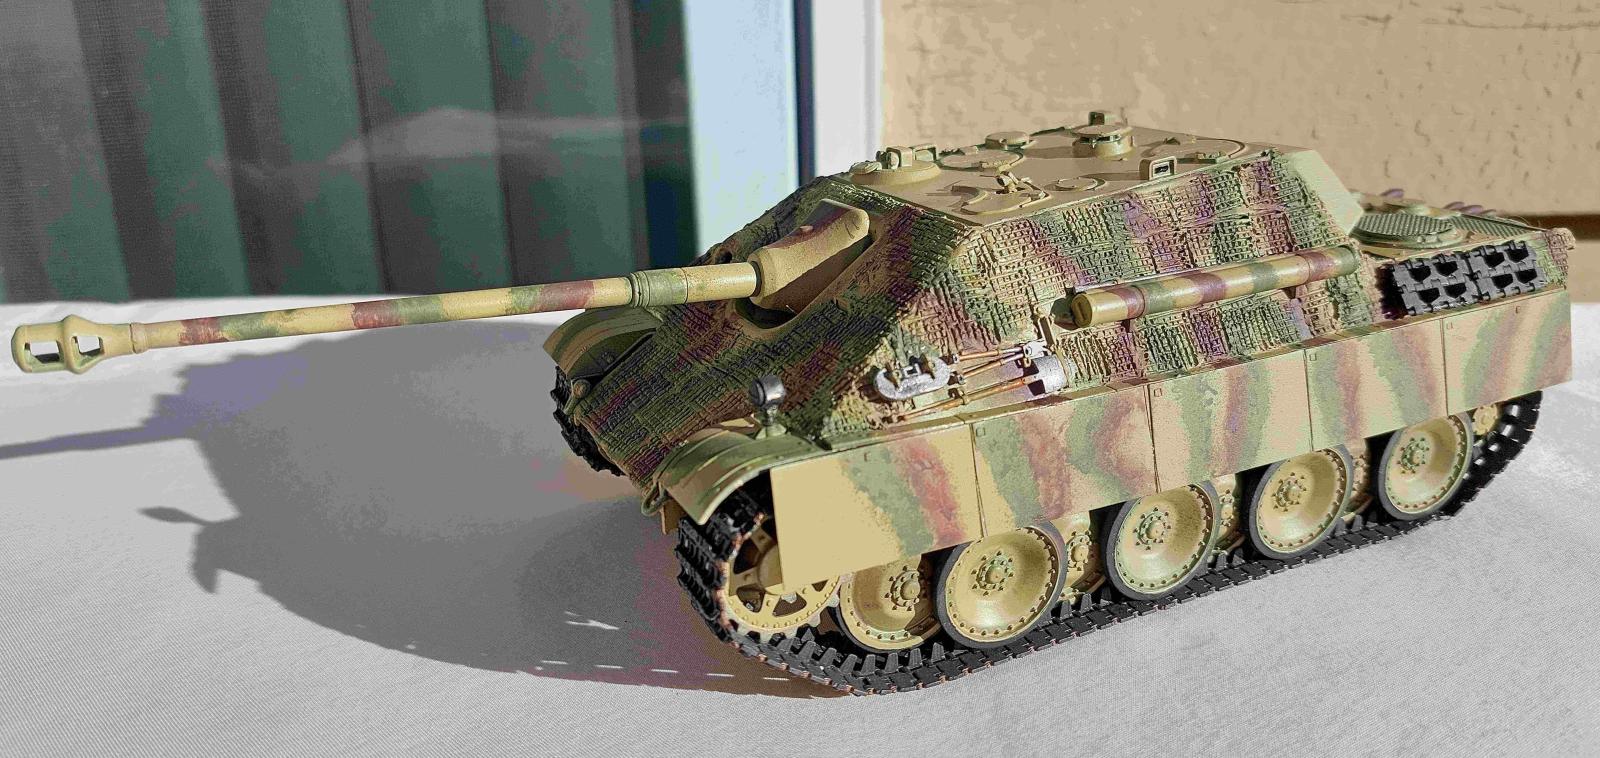
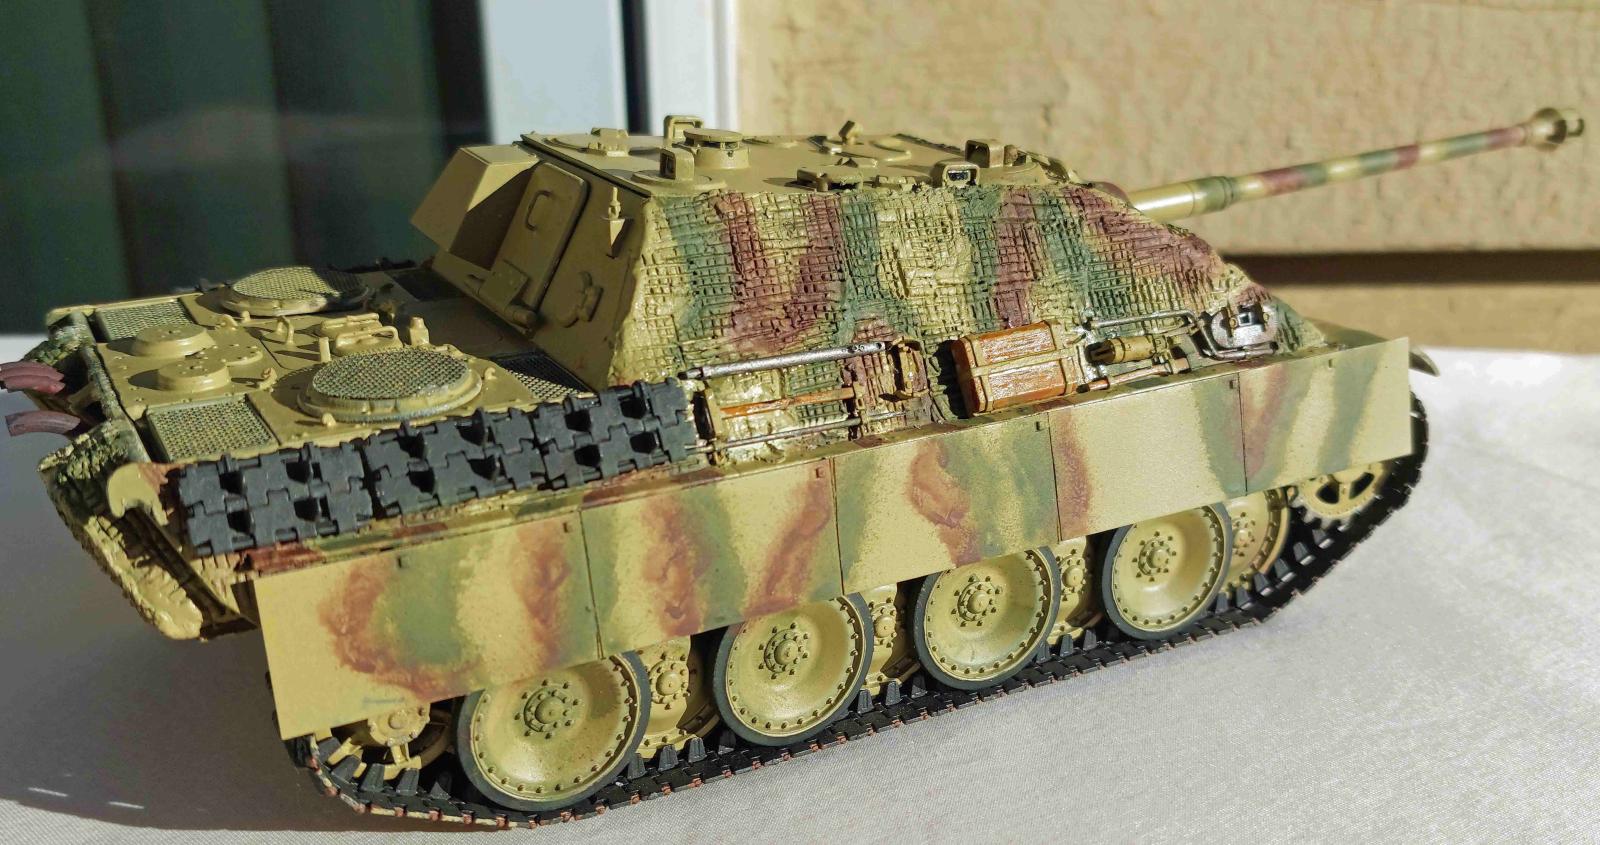
The camouflage for all four vehicles uses the same three-color scheme of RAL7026 Dark Yellow, RAL6003 Dark Green, and RAL8017 Red Brown. The only difference is the pattern in which the three colors are applied. I chose to model vehicle 112 of 1./s. Pz.Jg.Abt. 654 in Germany in September of 1944. The colors are applied in moderate sized vertical squiggly bands. I used an online paint conversion chart to find which of the paints I owned matched with the paints called out.
(Note: I thin all acrylic paints 50/50 with Tamiya Acrylic Thinner. I mix the paint in the color cup with a round toothpick stuck in the end to prevent the paint mix from pouring out. I fill and empty a disposable pipette until mixed. Then attach the color cup on my Grex Tritium TG3 airbrush and paint with the airbrush within an inch or two of the model at about 10 lbs. pressure.)
Zimmerit Coating
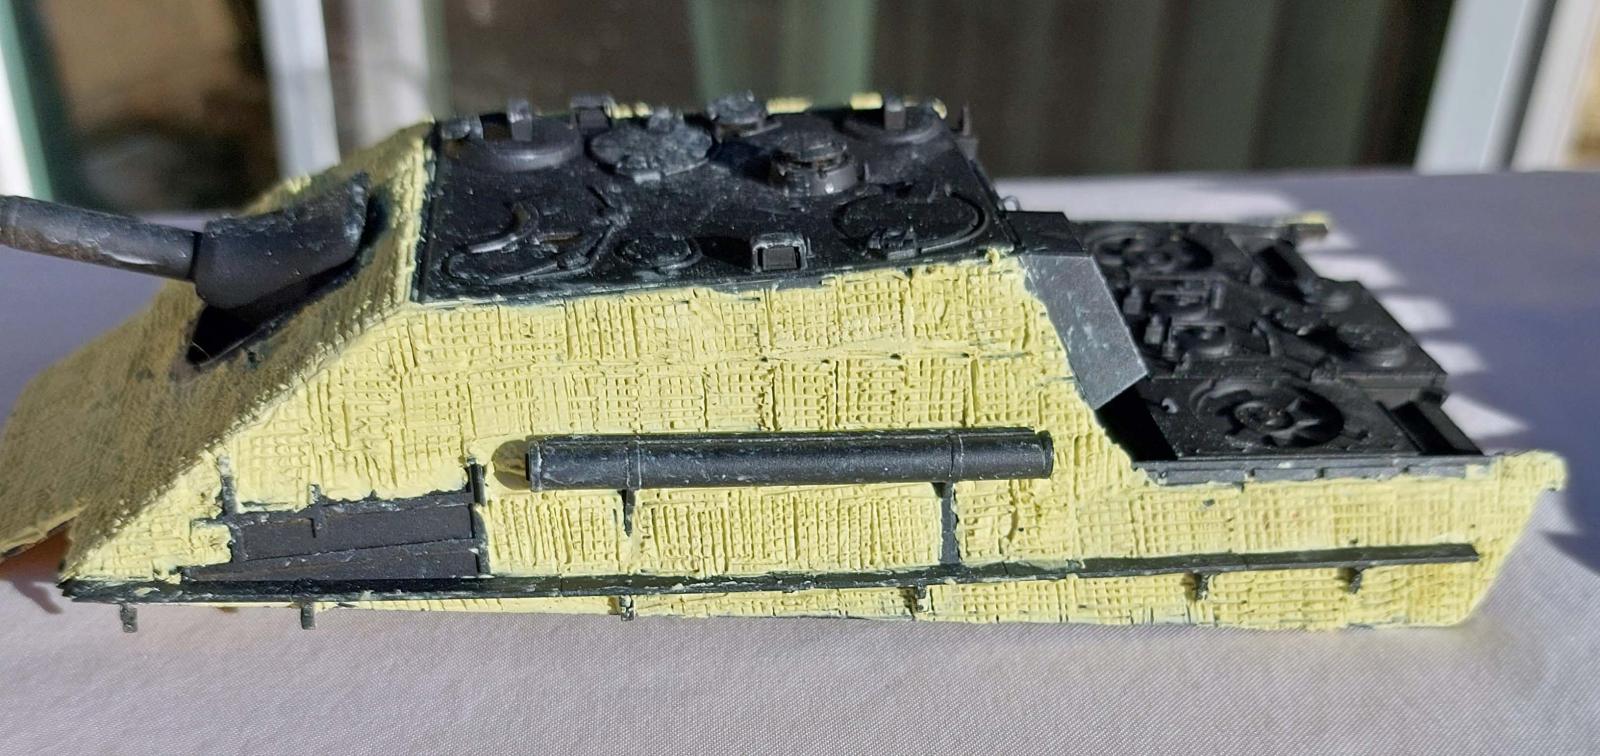
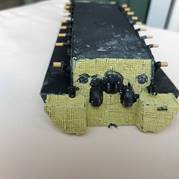
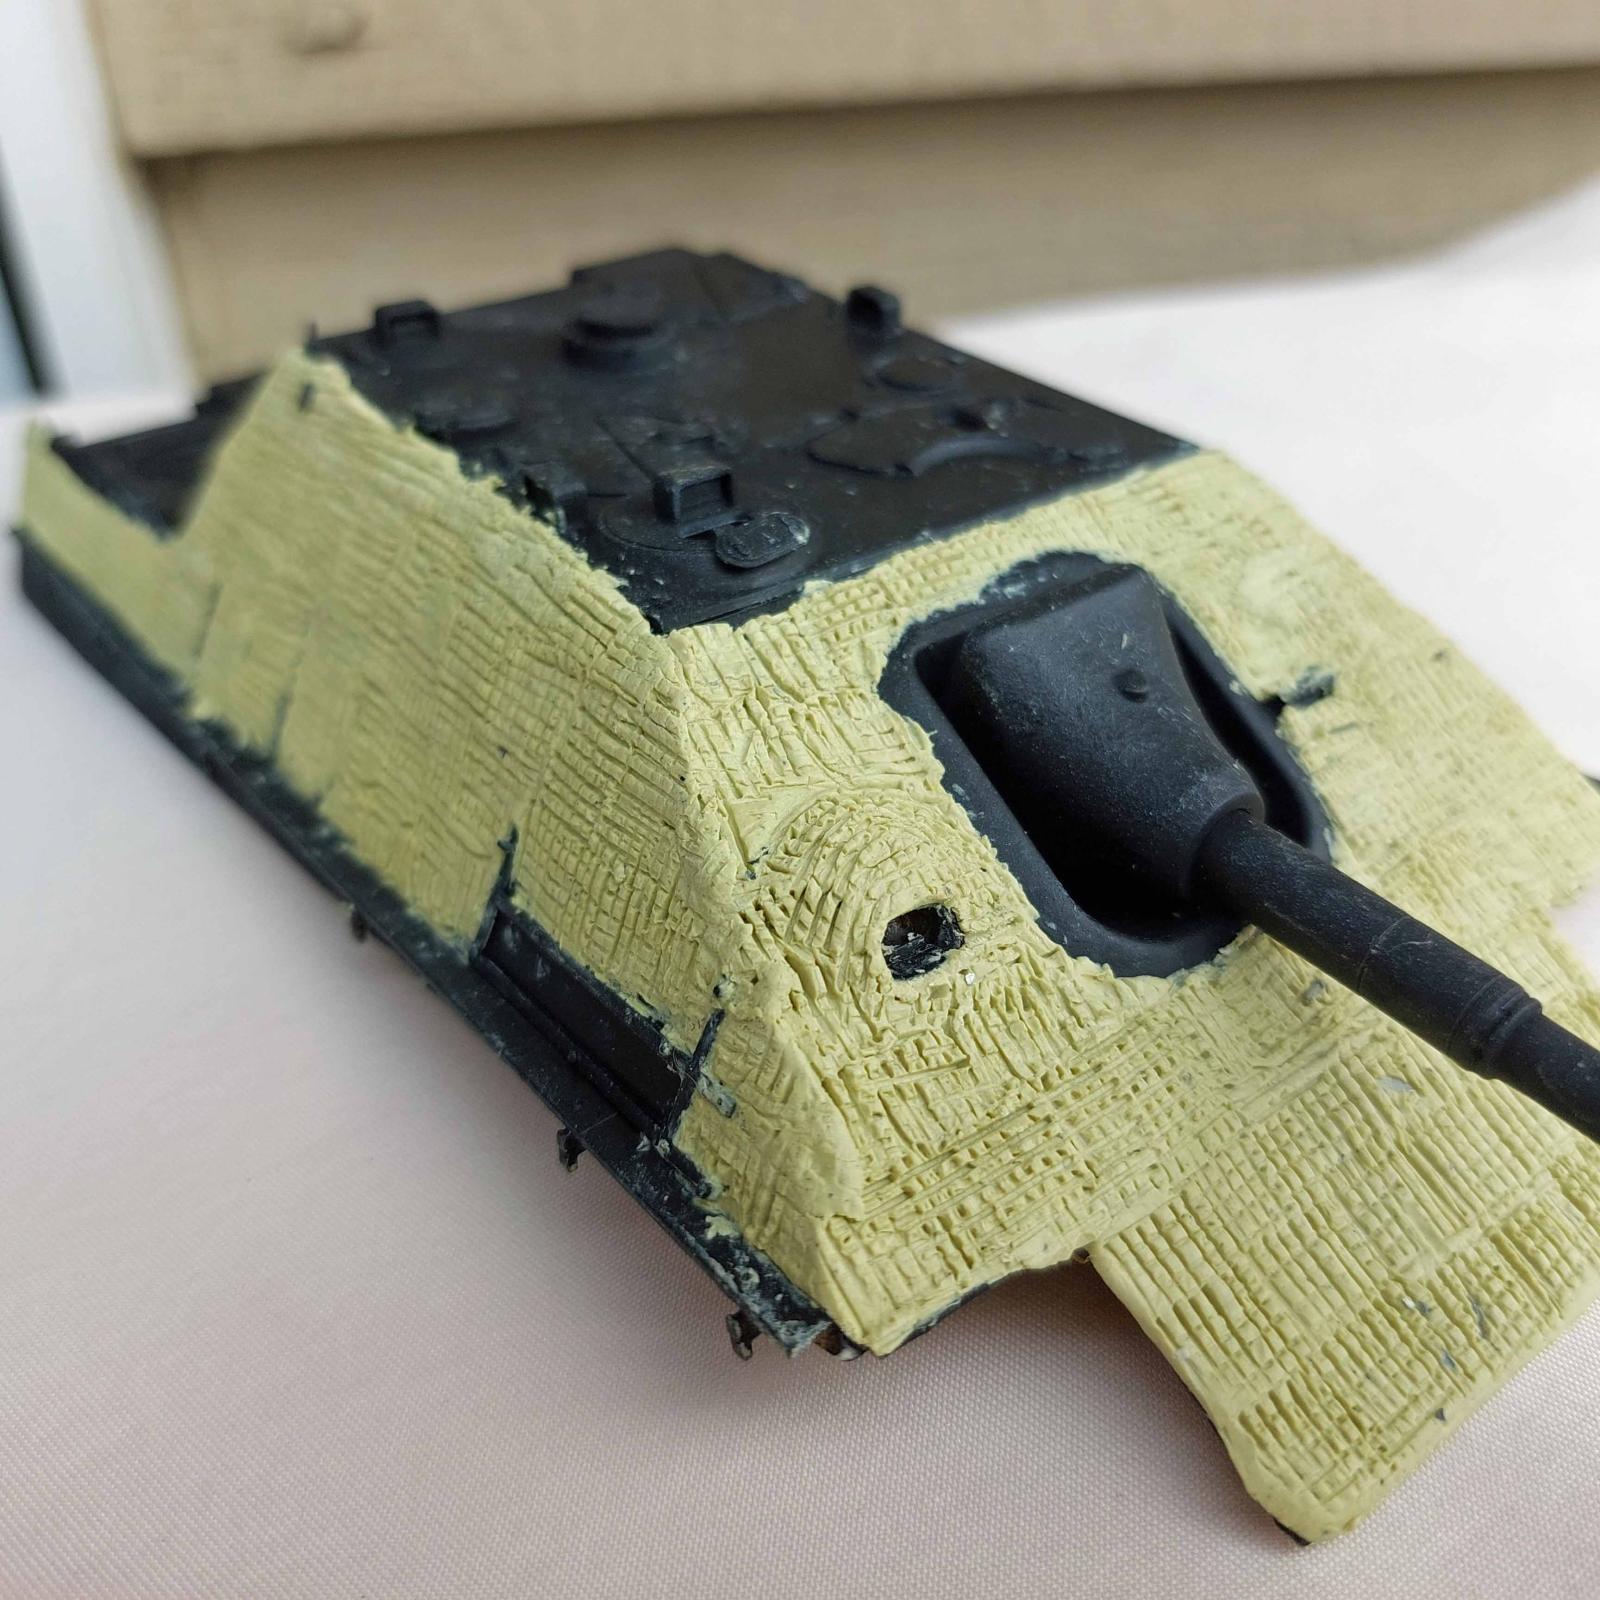
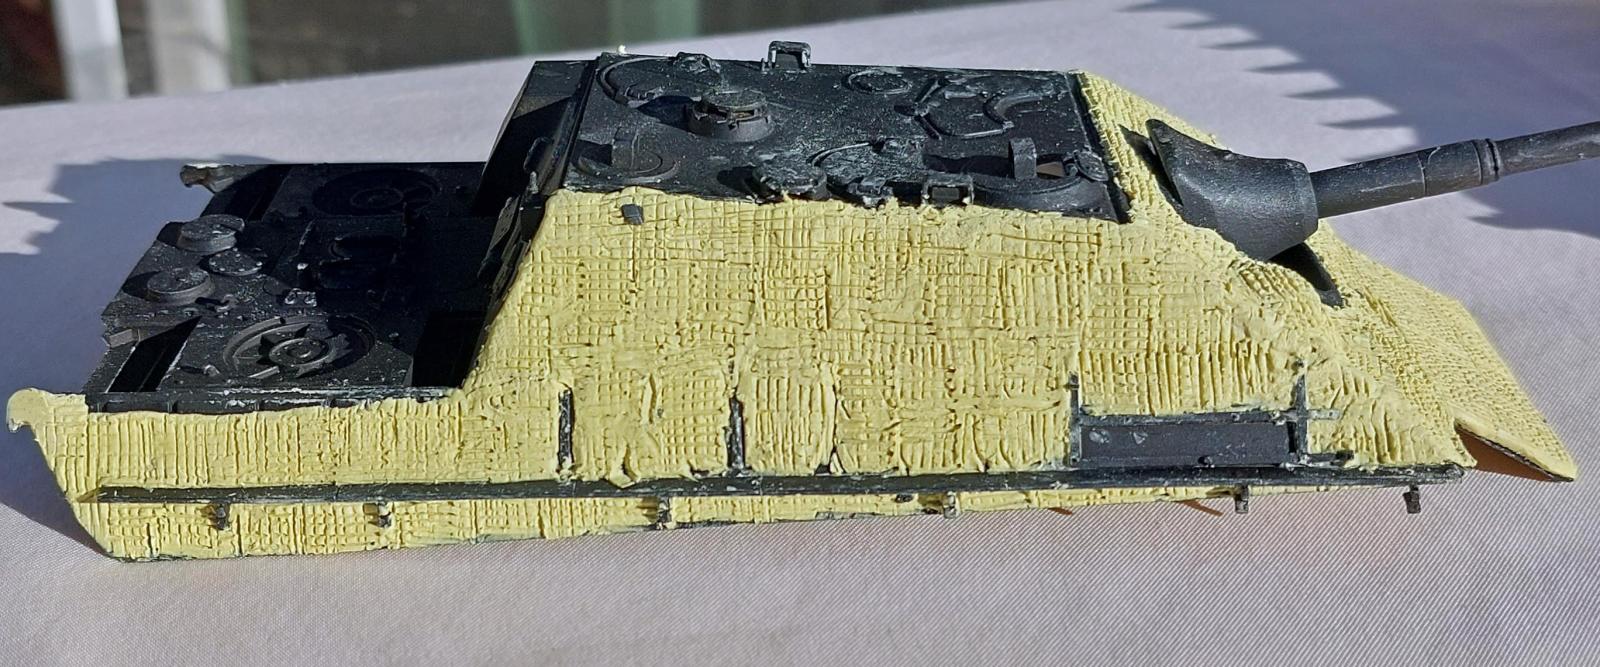
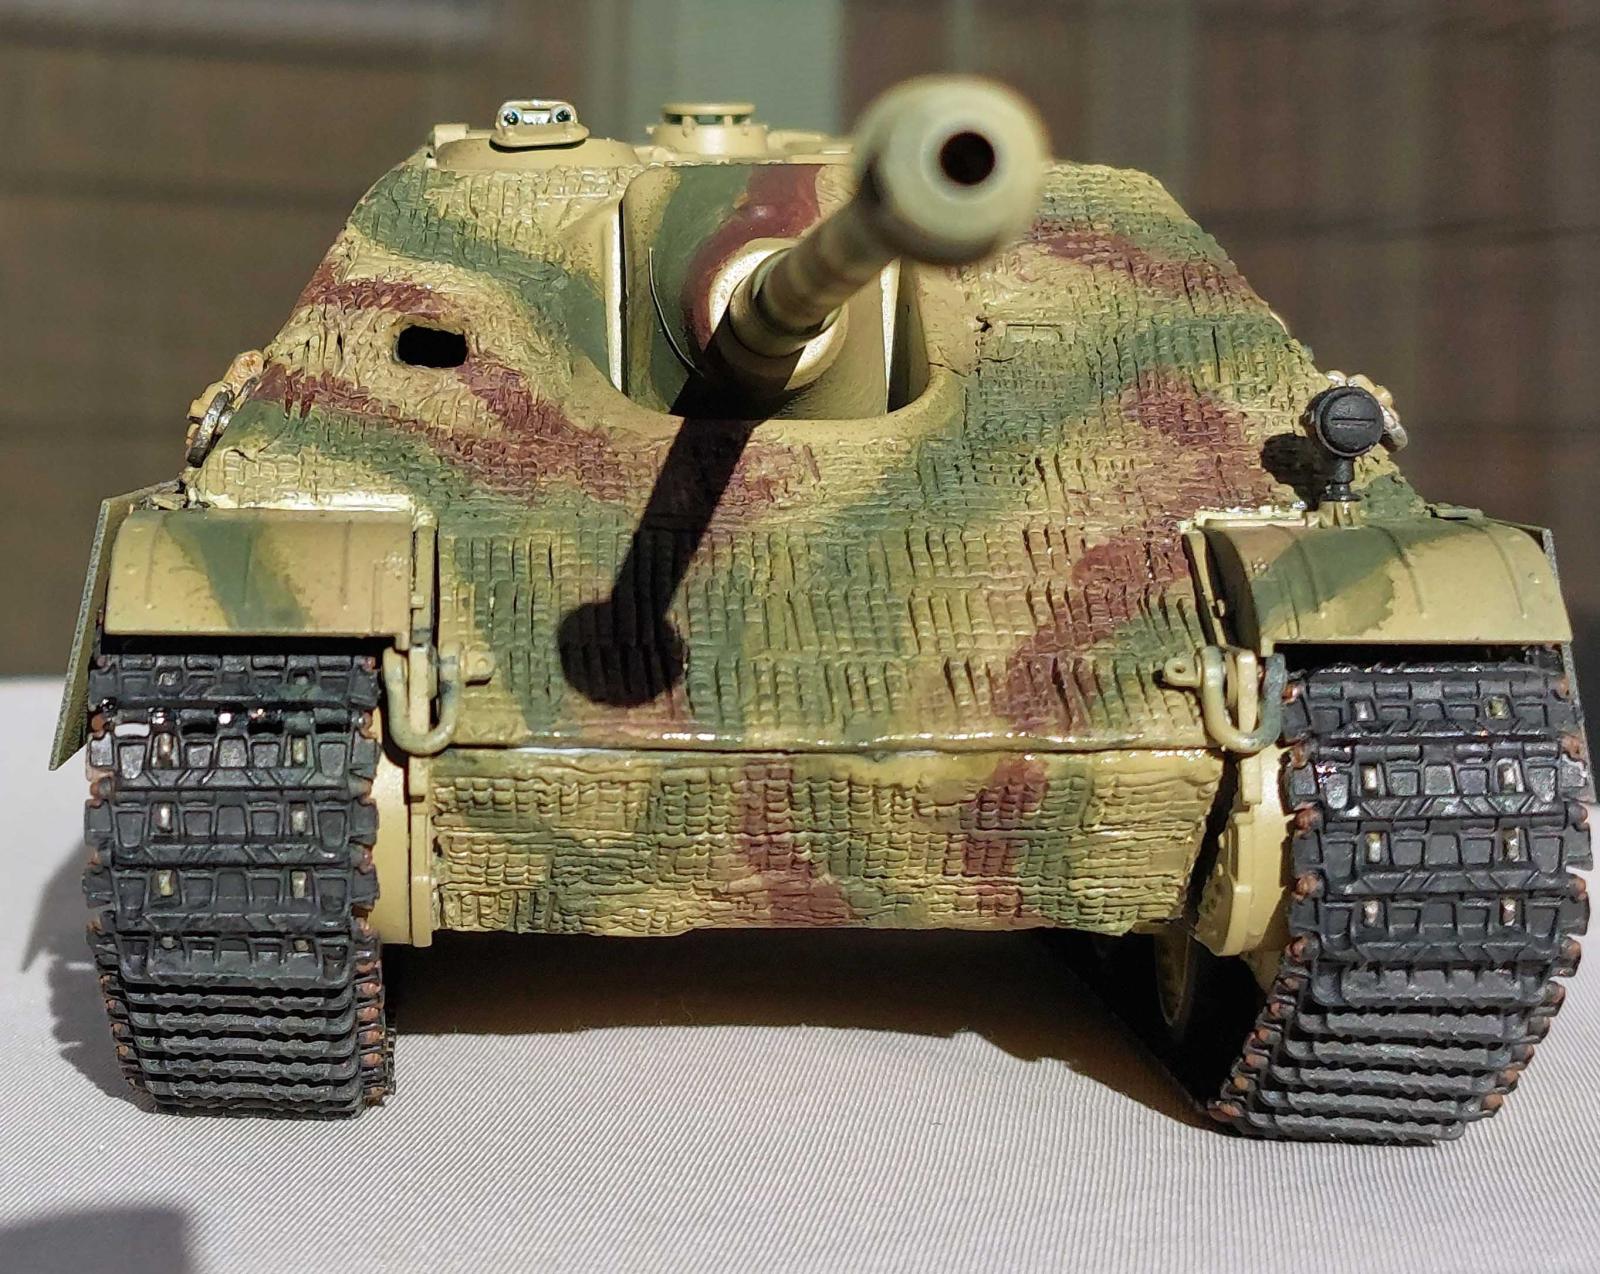
As noted in the Summary, all Jagdpanthers produced came with factory applied zimmerit antimagnetic paste. Unfortunately, this model is molded with smooth sides. So, if desired, you can add your own zimmerit. Page two of Manual 2 provides very good instructions on how to apply zimmerit with plastic model putty, as well as a four view drawing of where it should be applied. One thing I noticed in the four view drawings was that they show no zimmerit around the machine gun mantlet, or in a swath along the upper hull the width of the external tool racks. To me having an uncovered swath at about shoulder height seemed like a bad idea. And, while reviewing online period photos of Jagdpanthers it was clear that this area was indeed covered in zimmerit. The other application I questioned was zimmerit on the lower hull above the road wheels. It was not clear in any of the period photos I found whether this area had zimmerit or not. I didn’t bother because this part would be hidden behind the side skirts.
I used Milliput Standard two-part epoxy putty for my zimmerit paste. I made a pattern out of 0.030 sheet styrene alternating long pieces and shorter spacers. By a happy accident this little tool was roughly square in shape, so all I had to do was rotate it 90-degrees to get the “waffle” pattern I was after. This was my first attempt at adding zimmerit this way. And while it is not perfect, I’m not unhappy with the results. I found the hardest part of this method was getting the putty layer thin enough so that external detail would still stand proud of the zimmerit. That said, were I to build this kit again, I would purchase one of the numerous aftermarket zimmerit decals/PE sets. Much less messy and much easier.
My main take-away from this effort is to make sure that ALL external parts that you want on the finished model are FIRMLY attached BEFORE applying any putty.
Primer and Base Coat
The assembled tank, road, idler and drive wheels, tracks and tools were all primed with Krylon ColorMaxx Flat Black Primer. This product sprays on “fire-hose thick” but dries down to a tight coat that shows all the detail (and any flaws). Let the primer coats dry and de-gas at least overnight (though a full 24-hours is better).
After the primer coat dried, the superstructure, road and idler wheels, and drive sprockets were sprayed with Tamiya TS-3, Dark Yellow using a spray can. The front fenders and side skirts were yet to be attached so they too were sprayed Tamiya Dark Yellow.
Camouflage Coats
The camouflage pattern was applied using Mission Model Paints thinned 60% thinner/ 40% paint. The thinner included 10% polyurethane additive. In addition, I added about 5% Tamiya acrylic paint retarder to this mix. Mission Model MMP-0XX, Olivegrun served as the dark green, while MMP-012, RotBraun RAL2017 was used for the red brown. Both paints were applied with a Grex Tritium TG3 airbrush at about 10 psi. (Note: Best to work from light to dark colors.)
The interior of the rear hatch and some visible parts of the commander and gunners periscopes were painted Mission Models MMP-082, Eifenbein Interior White.
The tracks were painted with Tamiya XF-84, Dark Iron, with the connector pins and other areas picked out with Tamiya XF-9, Hull Red to represent old rust. This color was also used for the exhaust pipes. Other details were brushed painted before being attached to the model using Testors Model Master enamel Steel, Tamiya, XF-85 Rubber Black for the rubber portion of the road wheels, and Tamiya X-10, Gun Metal for the hull machine gun barrel. Periscopes lenses were painted Tamiya X-18 Semi-Gloss Black before having a touch of Mission Models MMA-006 Gloss Clear Coat added to simulate glass. Finally Tamiya XF-60, Dark Yellow was used for touch ups and to paint small details such as tool clamps.
Once dry, I applied a coat of Humbrol Gloss Clear Lacquer from a spray can in preparation for decaling.
Decals
I used the Red and Blue MicroSol/MicroSet products to apply the decals without any problems. Once dry, I gave the entire vehicle a good coat of Model Master Gloss Flat Lacquer to seal the decals and prepare the surfaces for weathering. One nice option on the decal sheet, beyond the four vehicles shown, is the inclusion of three each of the numbers 1 thru 4 in red. This gives the modeler the option of creating most any Jagdpanther.
Conclusion
I recommend this kit for any modeler with a few kits under their belt. The build was easy and straight forward and went quite smoothly. One needs to watch for parts that are specific to the vehicle version they wish to model, but these are clearly called out in the instructions. The biggest single issue I had was the application of the zimmerit. As noted above, were I to build this kit again I would avoid the trouble of making my own zimmerit and use one of the available aftermarket decal or PE sets.
I would like to thank Academy for providing this kit for review, and IPMS/USA for giving me the opportunity to build it.


Comments
Add new comment
This site is protected by reCAPTCHA and the Google Privacy Policy and Terms of Service apply.
Similar Reviews