
German Panzerkampfwagen 38(t) Ausf.E/F
During the early 1930’s, the nation of Czechoslovakia was a leading European arms manufacturer, whose armaments industry was dominated by the giant Skoda conglomerate. In 1933-34, Skoda produced what became known as the LT vz.35 light tank, and this was accepted into the Czech Army, becoming its main tank. However, the tank suffered from numerous flaws, and was much disliked by its crews. Enter the firm of CKD, a conglomeration of various engineering firms, one of whose acquisitions was the Praga Works, makers of trucks/passenger vehicles/tractors. Praga decided to go into the tank building business, selling its products both to the Czech Army, and a number of export markets. With the poor experience with the LT vs.35 in their minds, as well as the need for rearmament due to the rise of Nazi Germany on its border, the Czech military looked around for a new tank design. Praga offered up its TNH design, which proved very reliable and certainly better than anything Skoda had to offer. After exhaustive trials, the Czech military accepted the Praga design, placing orders for 150 vehicles in July 1938 for the new tank, designated LT vz.38.
However, none of the tanks had been delivered to the Czech Army prior to the German occupation of Czechoslovakia in March 1939. The Germans, on examining the LT vz.38, realized it was vastly superior to their own Panzer I and Panzer II tanks, and at least equal to the Panzer III then in service, and set about increasing the production rate of the Czech tank, renamed Panzer 38(t) (the “t” because Czechoslovakia in German is tschechoslowakei). When German forces launched Operation “Fall Weiss”, the invasion of Poland in September 1939, two of the six armored divisions involved utilized Czech tanks, including 59 Panzer 38(t). Two of the ten Panzer Divisions utilized for Operation “Fall Gelb”, the invasion of France in May 1940, the 7th and 8th Panzer Divisions, utilized Panzer 38(t), and this tank continued in operation with front line German units during Operation “Barbarossa” in June 1941, making up fully one third of German tank strength, just over 670 vehicles. Clearly then, a major “German” tank!
The Panzer 38(t) has been well served in the larger 1/35th scale, with Italeri producing a kit way back in the 1970’s. Tristar of Hong Kong issued a couple of variants to a very high standard starting in 2006, followed by equally nice variants by Dragon Models a few years later. In 1/48th scale the one man firm of Kengi produced a very nice resin conversion for Tamiya’s 1/48th scale Marder III series of kits, but now Tamiya has issued their own Panzer 38(t) in 1/48th scale, and a gem of a kit it is.
The new Tamiya kit scales out very nicely according to the drawings in Panzer Tracts #18 (see bibliography at the end of this article). The model consists of four sprues of plastic parts, together with two metal “weights” and some of Tamiya’s traditional poly caps. The parts are well detailed, and with one exception there are no visible ejection pin marks to be seen on areas that will be visible once the model is completed. The exception is on the track parts, which have tiny marks present, though due to the way the Panzer 38(t) tracks are designed, these ejection pin marks are extremely difficult to see on the completed model. No photo etched parts are included with the model.
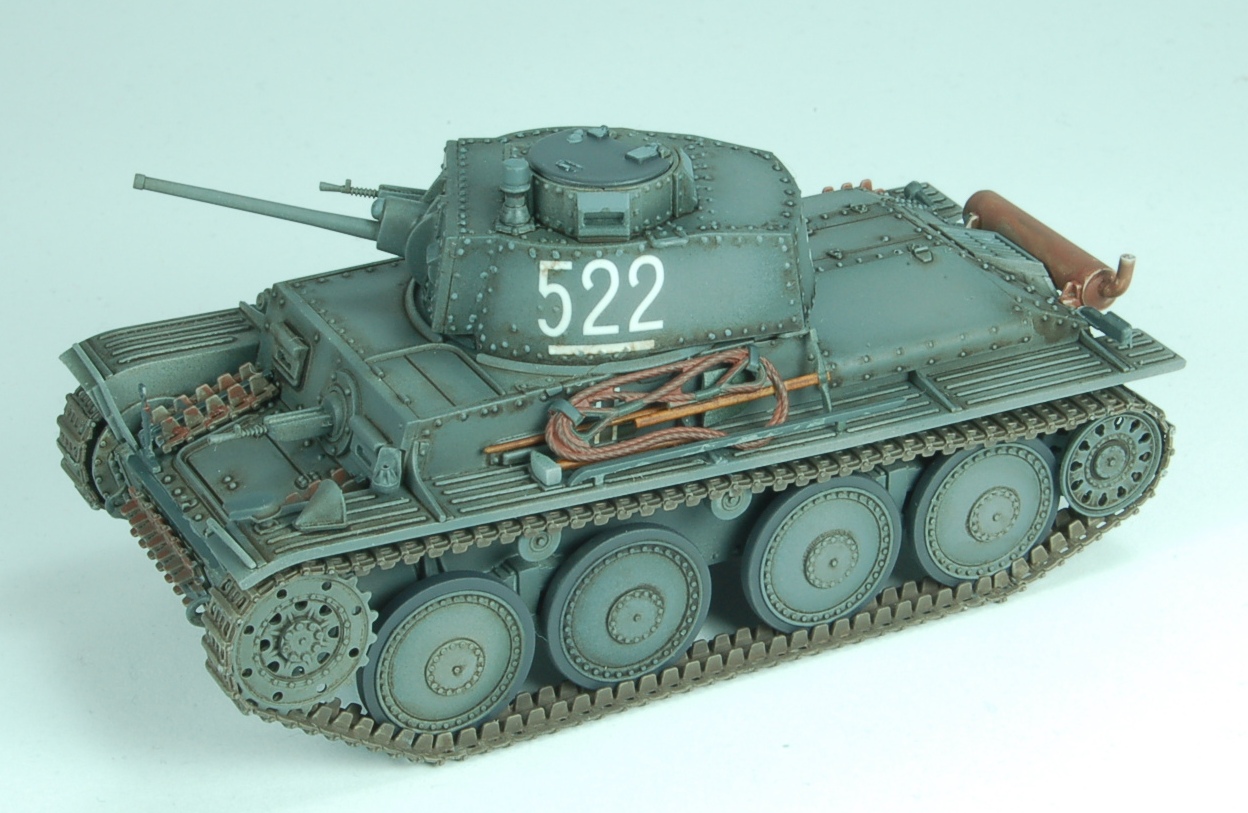
For the most part construction of the plastic parts is very straight forward, and the modeler is treated to yet another example of Tamiya’s world famous reputation for great engineering, making for excellent fit of parts. Construction starts off with a five part lower hull, front, back and two sides, plus belly pan. Tamiya then provides two metal “weights” for the modeler to attach to the inside of the hull, something that seems to be a feature of the firm’s 1/48th military vehicle range these days. Gone thankfully are the cast metal hulls of the first kits in the series, which were a bear to alter if this proved necessary. Attached to the lower hull are 8 single part main road wheels, which need carefully lining up as the glue dries. The idler wheels and drive sprockets are each two part, the latter having a poly cap inserted between the two parts. Again, make sure the idler wheels are lined up correctly as the glue sets. The drive sprockets with their poly caps align very securely without any issues. Once everything was firmly attached, I painted these parts with Mr Surfacer 1200 gray primer, followed by Tamiya’s XF-63 Panzer Gray. I added some white to the base cote, and did some “panel shading” on the parts. After waiting 24 hours, I hand painted the rubber rim areas of the main road wheels using Vallejo acrylic Panzer Aces 306 “Dark Rubber”.
While the lower hull painted parts were drying, I turned to the next step in the construction instructions, the “link and length” tracks. These were removed from their sprues, cleaned up, and then painted with Mr Surfacer primer. This was left to dry for a couple of days, and then the tracks were hand painted with Vallejo 304 “Track Color” from their Panzer Aces range of acrylic paints. These to me are the best hand brushing paints on the market. Once dry (48 hours) I then scraped the paint off the track parts where I would apply the glue, and ever so carefully attached the tracks to the painted road wheels, drive sprockets and idler wheels. Tamiya lists a specific order that the track parts should be glued in place, and I highly recommend that the modeler follows this order exactly. With a little adjusting here and there, the tracks fit very well indeed.
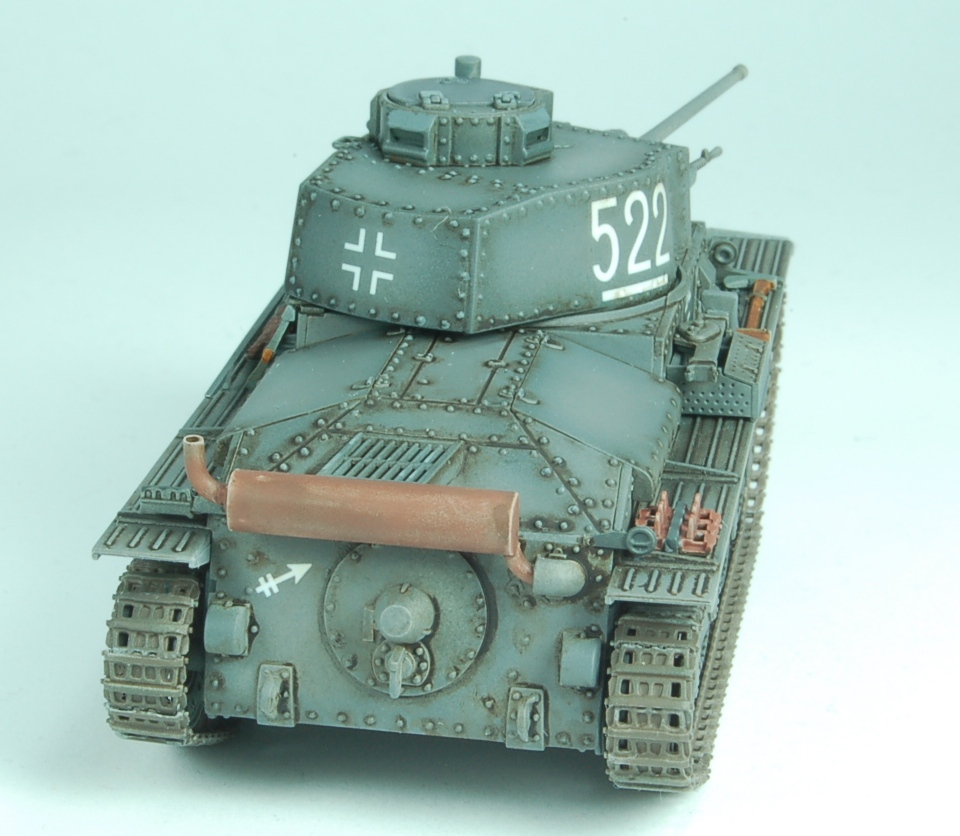
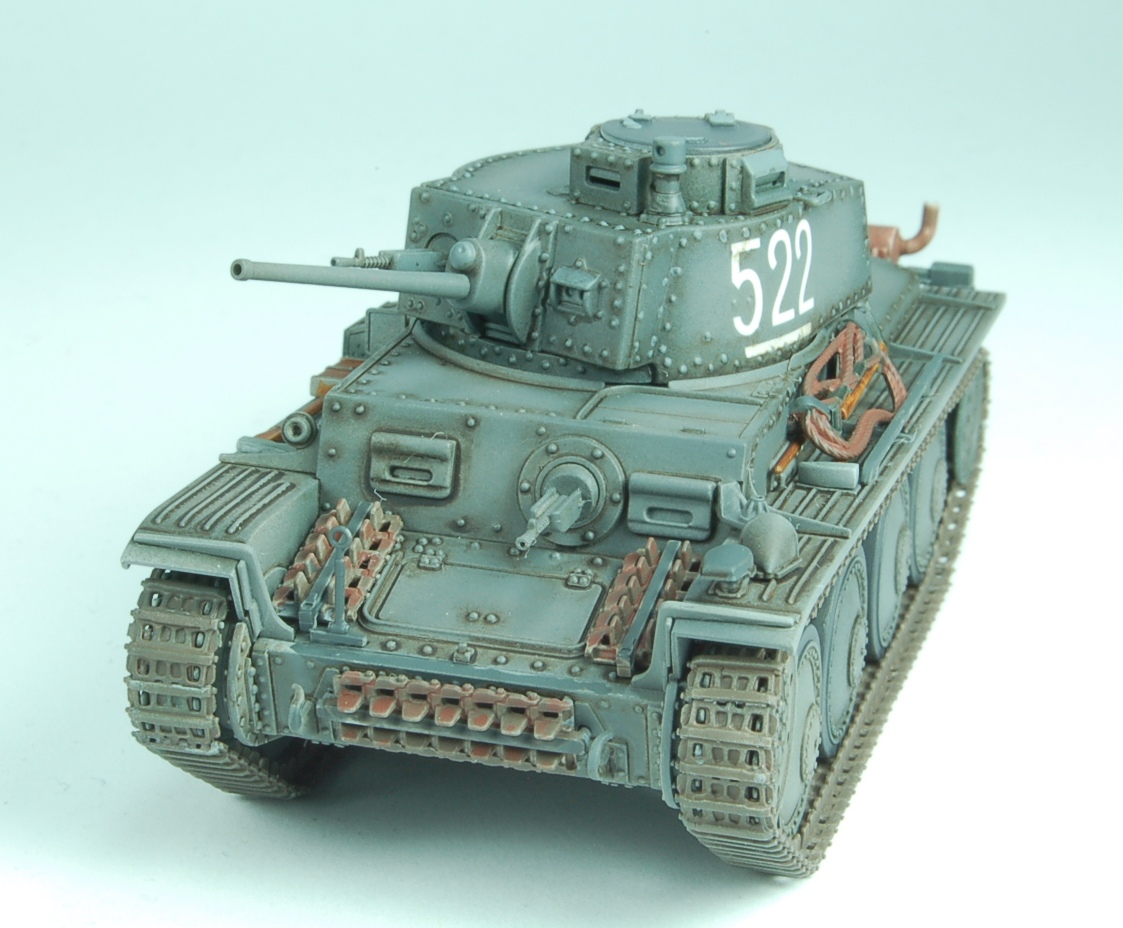
Following completion of the lower hull comes construction of the upper hull parts, Section 5 in the instructions. Make sure you follow the correct order of parts attachment, specifically part B1. The model has separate parts for the various tools such as a shovel, large hammer, axe, a two part jack etc. However the wire cutters are molded in place on the main upper hull part, B17. I left all these tool parts off the model so as to be able to paint them separately at a later time. In Section 6, I left off the smoke shell case, parts H36/37/38, as my research indicated these were used on the later Panzer 38(t) Ausf. F, and I wanted mine to be the earlier Ausf. E (the kit says the model can be built as either an E or an F, but doesn’t tell the modeler which parts differentiate one variant from another??). Make sure you drill out the barrel of the front hull machine gun. I then attached the towing hooks, Section 6. Once all the glue had set, I sprayed an application of primer followed by Tamiya Panzer Gray to the completed main upper hull. Then came a light coat of Tamiya X-22 Clear Gloss, because the modeler, per Tamiya’s instructions, needs to apply decals to the upper hull sides (German crosses) before other parts can be glued in place.
I did not attach the following parts to the main upper hull assembly prior to the above listed painting sequence: all the separate on-vehicle tools, per my earlier statement. Parts H4 & H5, fender brackets and A6/A7, tracks and mounting brackets and part A12, Nortek light, all in Section 7. These were all cleaned up, primed, and then painted separately. Once I had applied all the decals to the model, and the upper hull was attached to the lower hull, then I applied these parts utilizing white glue as my method of adhesion. This included the two part engine muffler, Section 8, Parts H55/56, which was hand painted using Vallejo “Rust”, from their “Model Air” range. Since the parts weren’t under stress, they adhered just fine with the white glue, and the glue didn’t mar the paint work already completed.
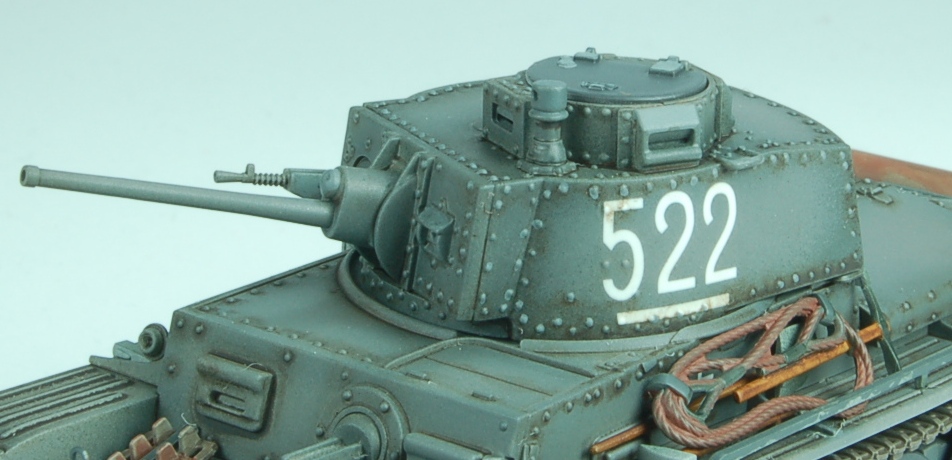
Section 10 through 14 covers the construction of the tank’s turret, which consists of a front face plate that incorporates a positionable main gun, and turret machine gun. Using a pin vice and small drill bit, I drilled out the machine gun, as I did for the front hull machine gun. The turret parts are well detailed, with a plethora of rivet detail. The turret cupola hatch can be positioned open or closed, allowing the modeler to incorporate the four part half figure tank commander if the hatch is left open. The detail on the figure is adequate for this scale, and assembles nicely. Once the turret was assembled, minus the positionable cupola hatch, I painted it Tamiya Panzer Gray, again with some panel shading. Decals were applied then to the model over a coat of Tamiya X-22 Clear Gloss, which was airbrushed over all the painted model sub assemblies. Gunze Sangyo’s two part decal setting system was utilized to get the decals to adhere nicely. The decals are standard Tamiya, a tad on the thick side, but perfectly serviceable. Once allowed to dry for 48 hours, a sealer cote of Tamiya X-22 Clear Gloss was applied. This too was given a 48 hour drying period, whereupon I applied a couple of pin washes to accentuate all the raised rivet etc detail using oil paints of the appropriate color plus odorless mineral spirits. I then cleaned up any messy areas of the pin wash application with some Q-tips and mineral spirits, and set all the sub assemblies aside to dry (72 hours). I sealed the model with an application of Alclad Matt Clear.
Regarding the vehicle marking schemes, Tamiya provides the modeler with two options, both overall Panzer Gray. Option A: listed as 22nd Panzer Division, Eastern Front, 1942. Option B: listed as “unit unknown,”, Eastern Front 1942. Neither is called out as either a Panzer 38(t) Ausf. E or an Ausf. F, but the color and marking drawings on the instruction sheet both show the smoke shell unit on the rear of the vehicle, so can one assume they are both Ausf. F vehicles? Given the scarcity of aftermarket decals for 1/48th military vehicles, it would have been nice if Tamiya had provided the modeler with a few more options?
Overall then, Tamiya provides the modeler with a very nice rendition of the Panzer 38(t) Ausf.E/F utilizing the parts in this kit. The detail is good, and assembly is pretty straight forward, though careful study of the track installation will be very important if the modeler is to avoid any construction “surprises”. If you are at all interested in 1/48th scale military vehicles, this kit is will make a very worthy addition to your collection. I would like to thank TamiyaUSA for providing IPMS/USA with the opportunity to present this build review to their members.
Bibliography
- PzKpfw 38(t) in Action, Squadron Signal Publications, Armor No. 19
- Panzer 38(t)/Swiss LTL-H, Squadron Signal Publications, Walk Around No. 13
- Panzers 35(t) and 38(t) and their Variants 1920-1945, Walter J. Spielberger, Schiffer Publishing
- Panzerkampfwagen 38 (t) Ausf.A to G and S Production, Modification, and Operational History from 1939 to 1942, Thomas L. Jentz & Hilary Doyle, Panzer-Tracts 18


Comments
Add new comment
This site is protected by reCAPTCHA and the Google Privacy Policy and Terms of Service apply.
Similar Reviews