
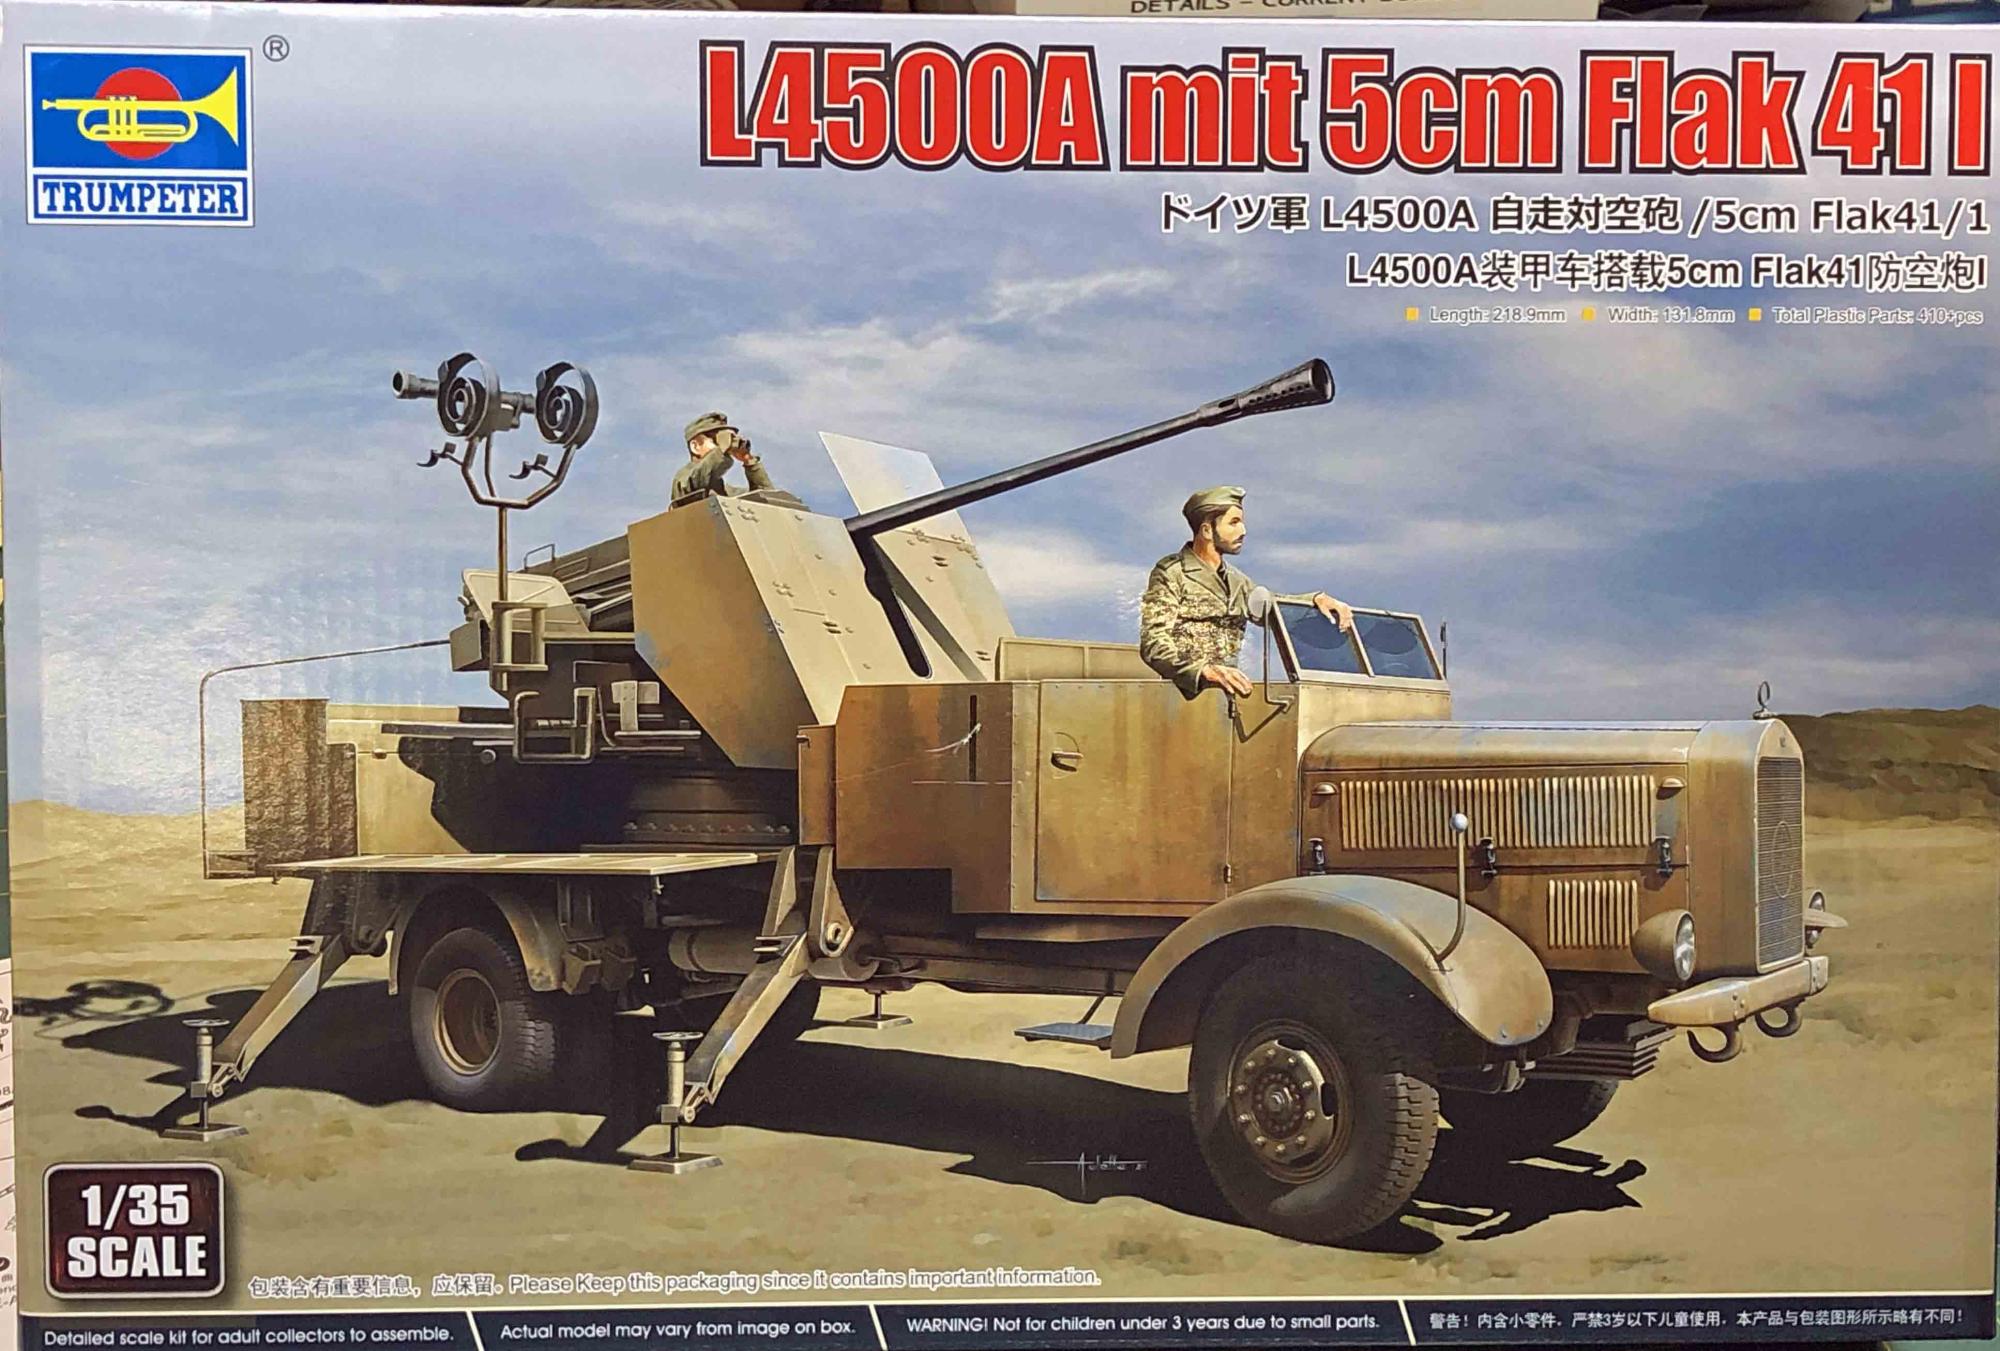
German L4500A (with) 5cm Flak 411
Trumpeter has recently released several WWII German, truck-mounted Flak platforms based on the Mercedes Benz L4500A, including the subject of this review. As with previous releases, Trumpeter continues to stick to its roots in providing interesting and often one-of-a-kind subjects for a competitive price.
The L4500 was a heavy-duty truck built by Daimler-Benz from 1939–44 in the Mercedes-Benz plant at Gaggenau, and from 1944–45 by Saurer. The long-bed vehicle was built as both a rear-wheel-drive truck (L4500S) and as an all-wheel-drive truck (L4500A). The German Wehrmacht used the L4500 with armored cabins as Flak trucks during World War II. Due to the lack of production material, the cabin was replaced with the simplified standardized Wehrmacht cabin and the mud wings with simplified wings in 1943. The L4500 chassis was also modified as a halftrack for use on the Eastern Front.
The Kit
Inside the sturdy, top-over box you will find that all parts are bagged, with the decals slipped inside the instruction booklet. The plastic is soft but not too soft, and the detail is crisp and the molding is flash-free. The number of attachment points and nodes, while many, are located in areas that are either not visible or easily addressed.
The contents of the box include:
- 13 sprues of parts molded in light-grey plastic, including a single-part gun shield
- 1 slide-molded, single part for the truck cab
- 1 sprue of clear plastic for the glass parts (lights, two-part windshield, etc.)
- 7 vinyl tires (6 plus a spare)
- 1 small decal sheet
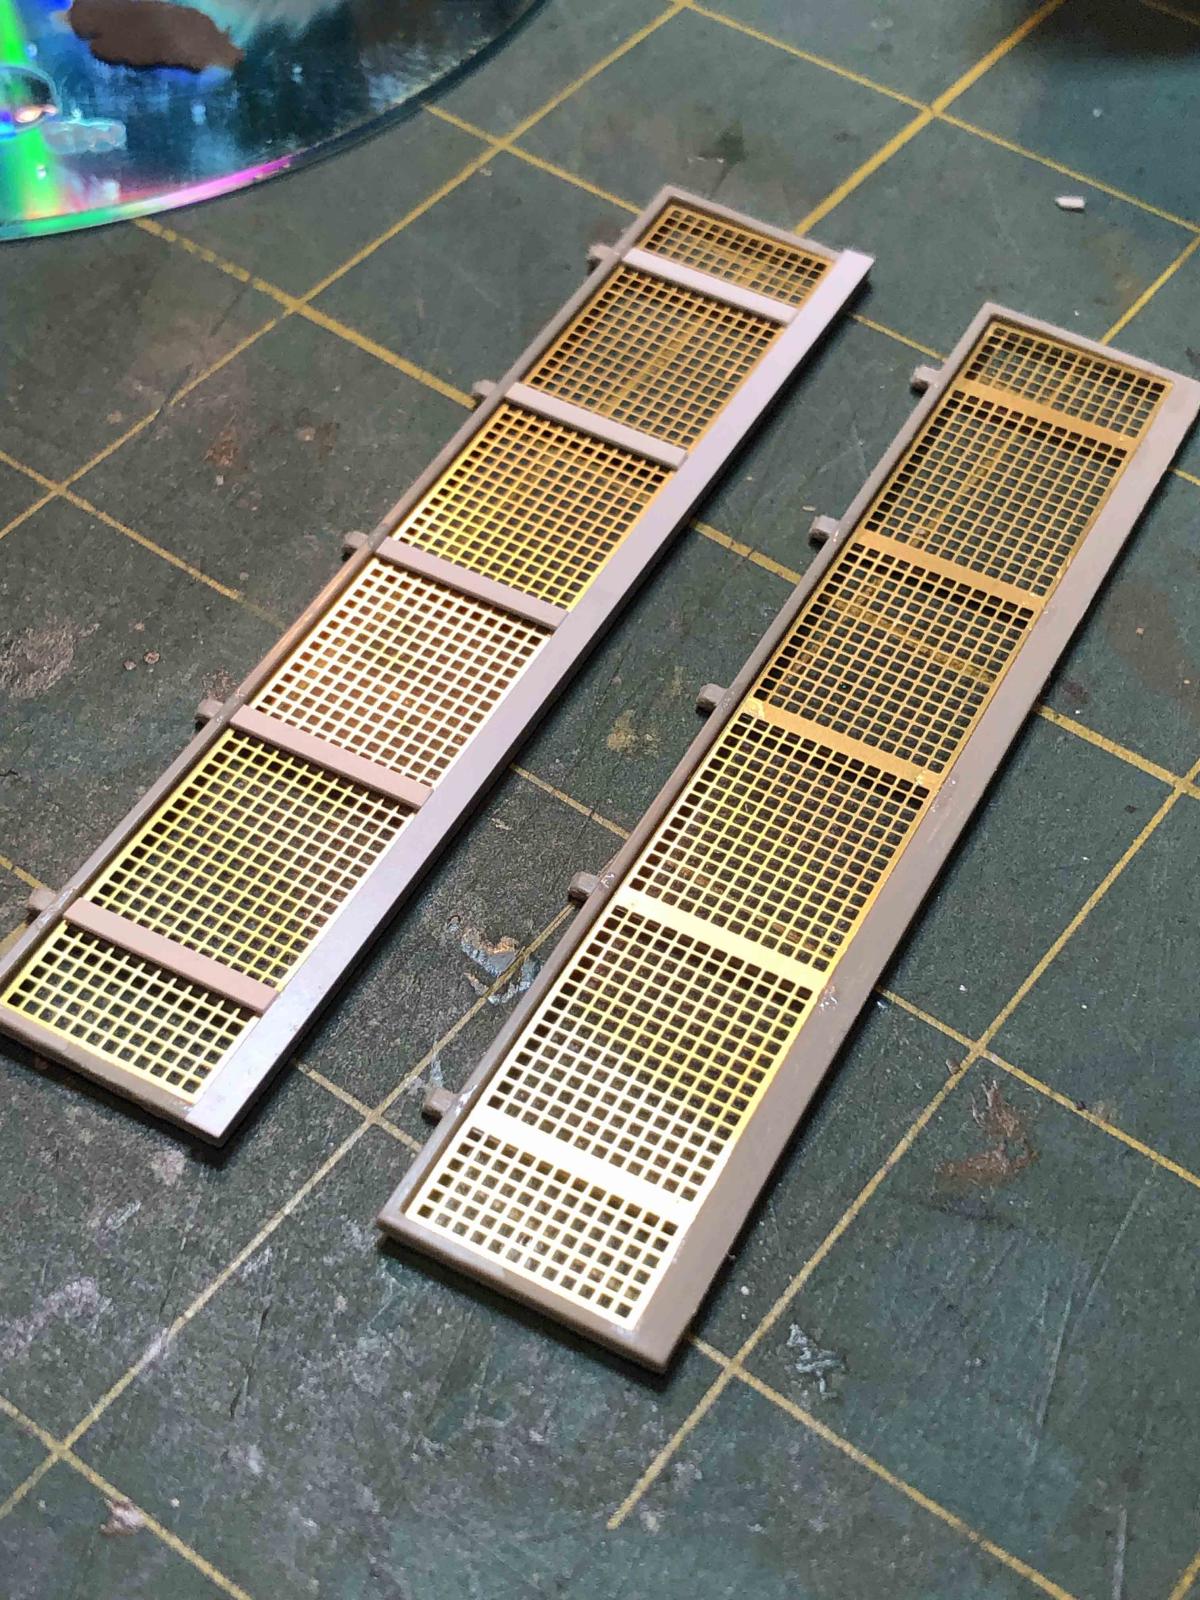
- 3 photo-etch sheets, including one for the mesh on the side panels
- 1 20-page, black and while instruction booklet that includes a parts map. All text is translated into English.
- 1 separate, full-color sheet showing two, multi-view paint schemes and decal placement instructions.
The Instructions
The instruction booklet is printed in black and white, on standard white paper. It starts off with a one-page parts map with a list if unused parts at the bottom. The rest of the booklet breaks assembly into 33 steps, ending with the completed gun assembly being placed on the completed truck. A separate, full-color glossy page contains instructions for painting and decal placement, with call-outs for Tamiya, Mr Hobby H-series, Acrysion, Vallejo, Humbrol, and Model Master paints. Images are rendered from several angles so you are rarely forced to guess about how things go on ‘the other side’.
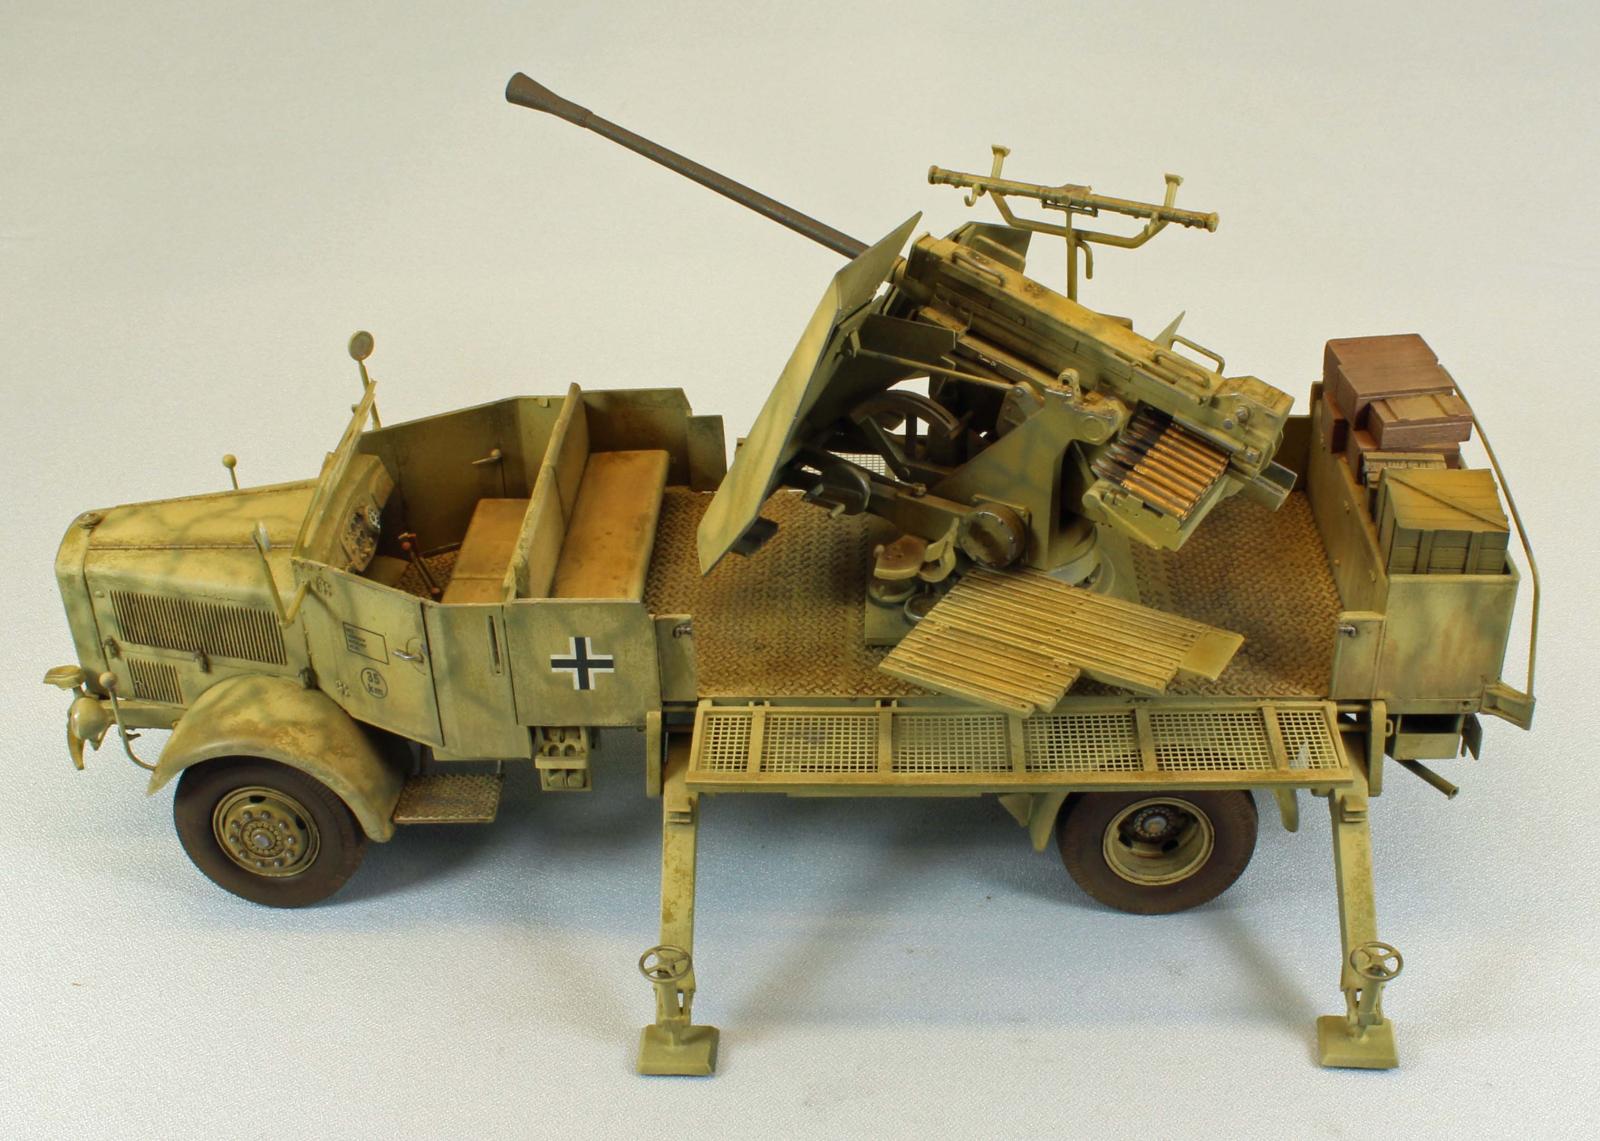
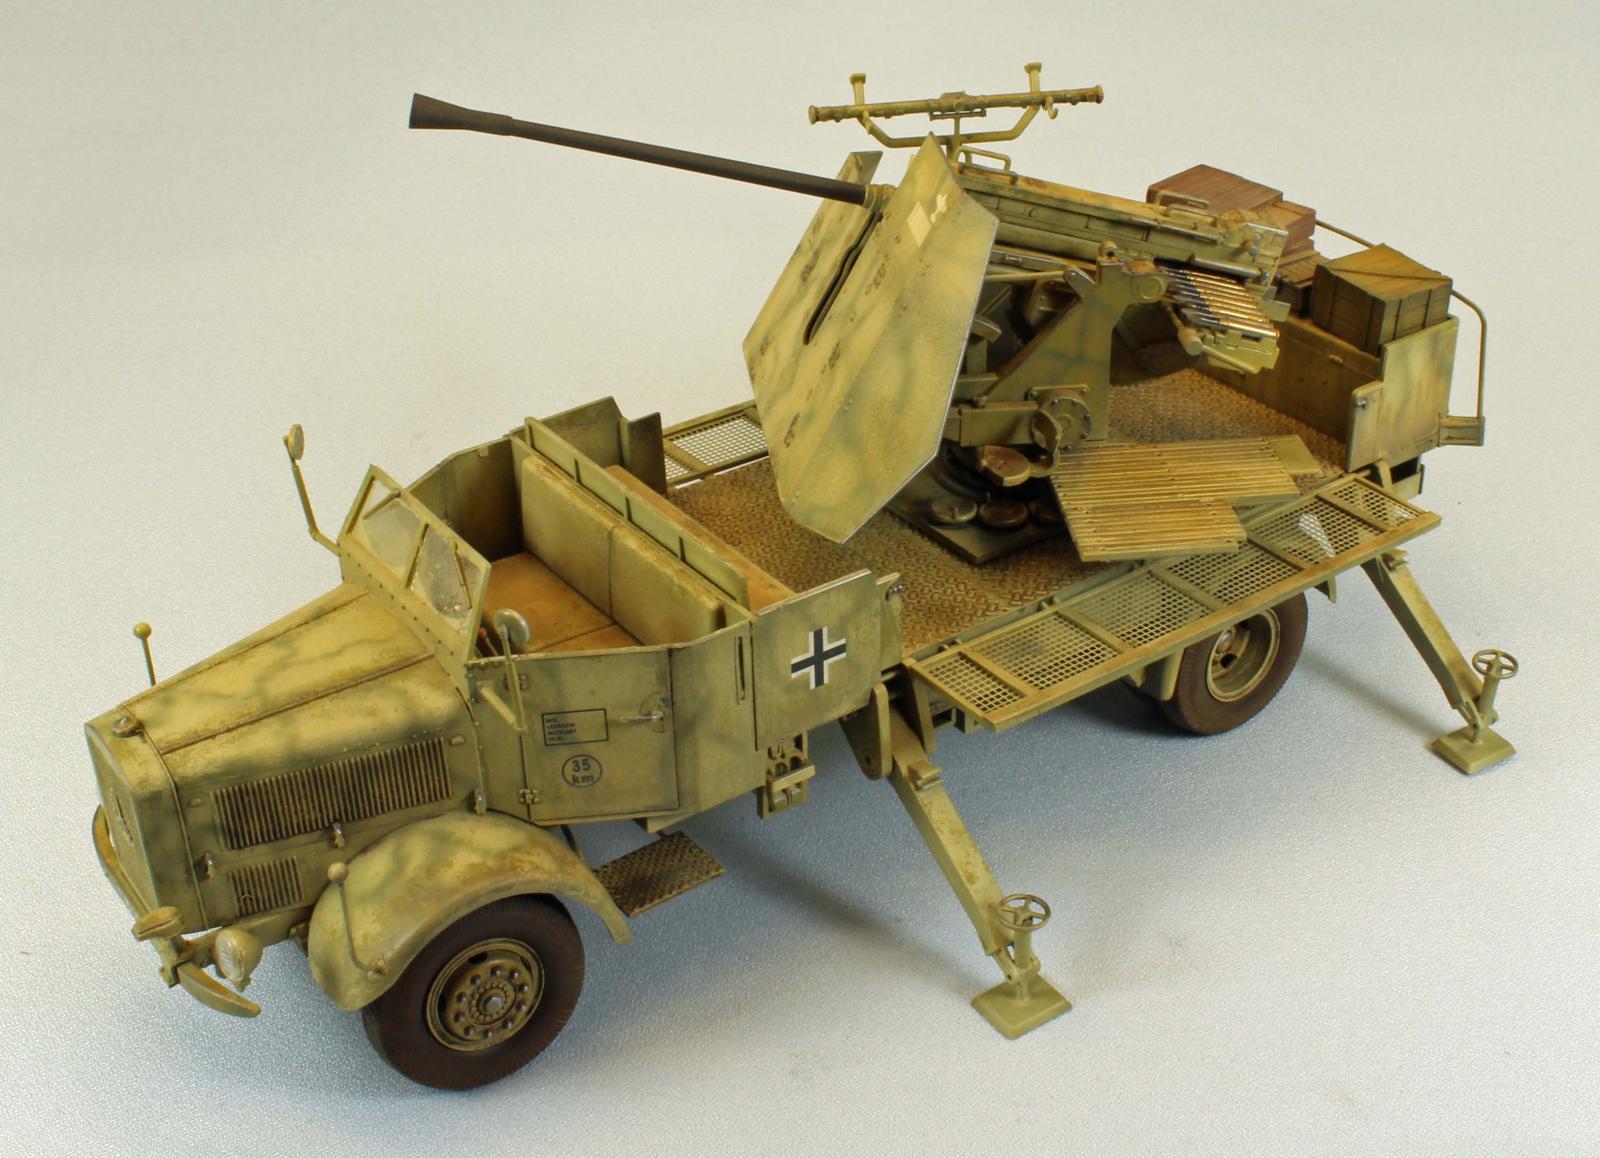
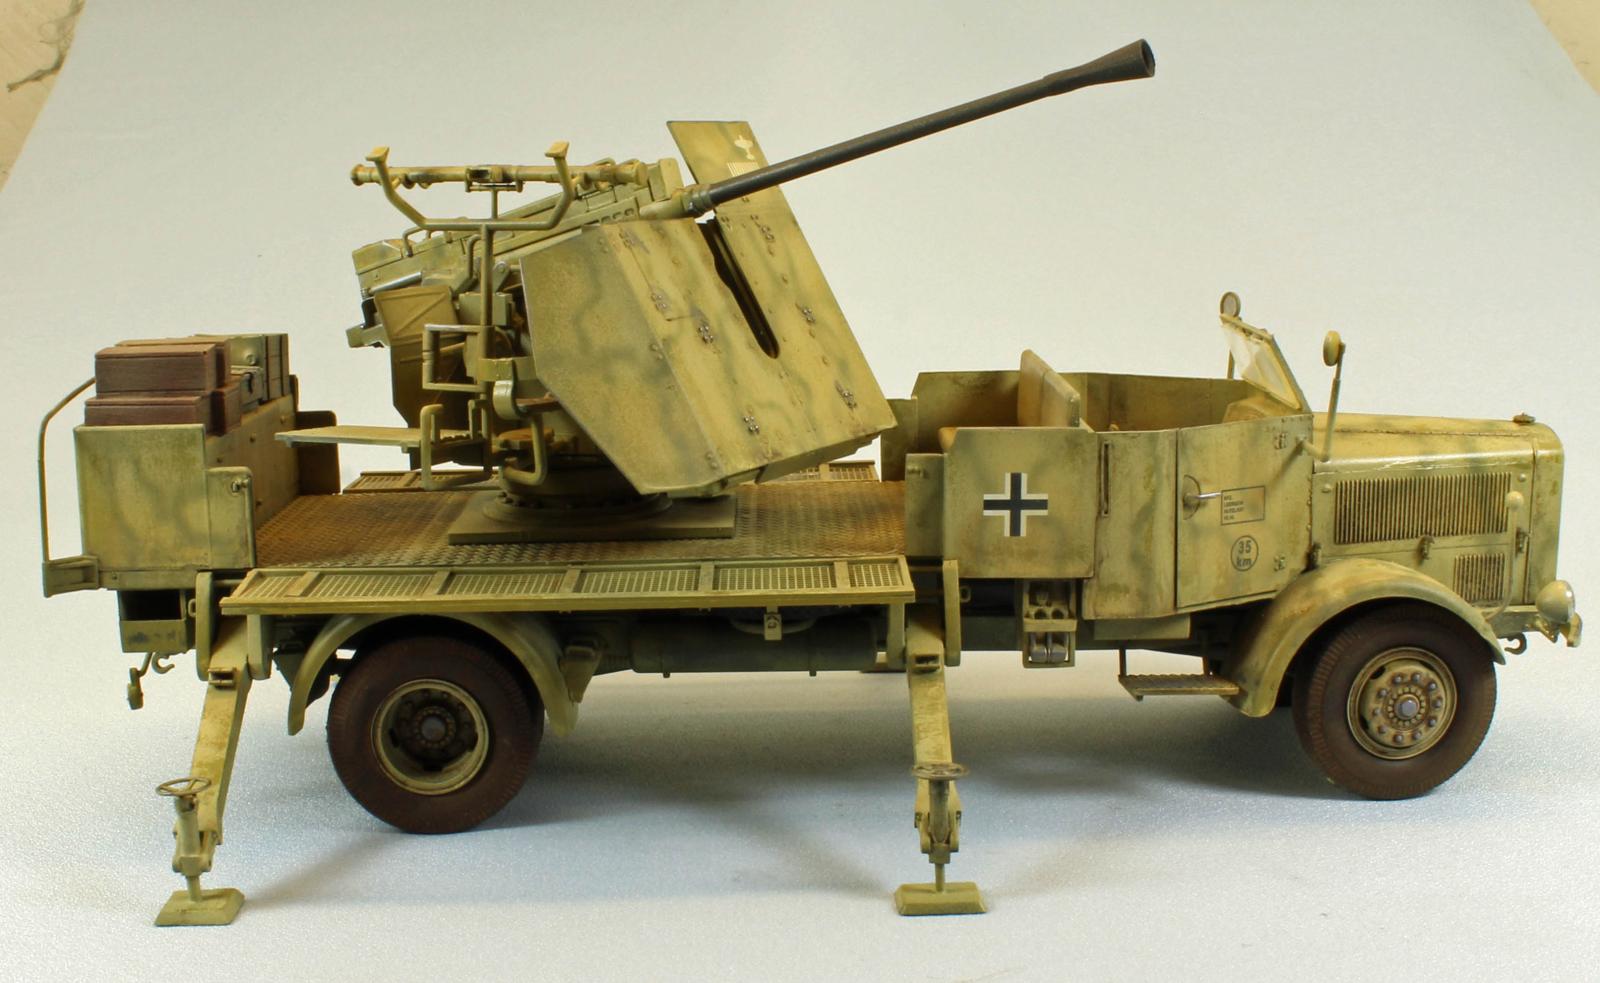
Two finishing options are provided showing overall German Grey and German Yellow schemes.
Things to Consider Before You Start
The two rear deck panels of the truck bed can be modeled up or down, along with the four prominent stabilization legs, and the engine compartment can be assembled open or buttoned up. The inside of the engine hood, however, is not detailed, and the clearance of the gun assembly when deployed interferes with both rear-bed panels. Consequently, I decided to model my L4500 with the engine compartment closed and both panels in the ‘down’ position.
The complex gun assembly is built separately and dropped into place in the very last step, making things easier. Otherwise, that’s it. This build, like many of my Trumpeter kits, was about as problem free as they get.
The Build
Assembly is broken into several main steps, each detailed below.
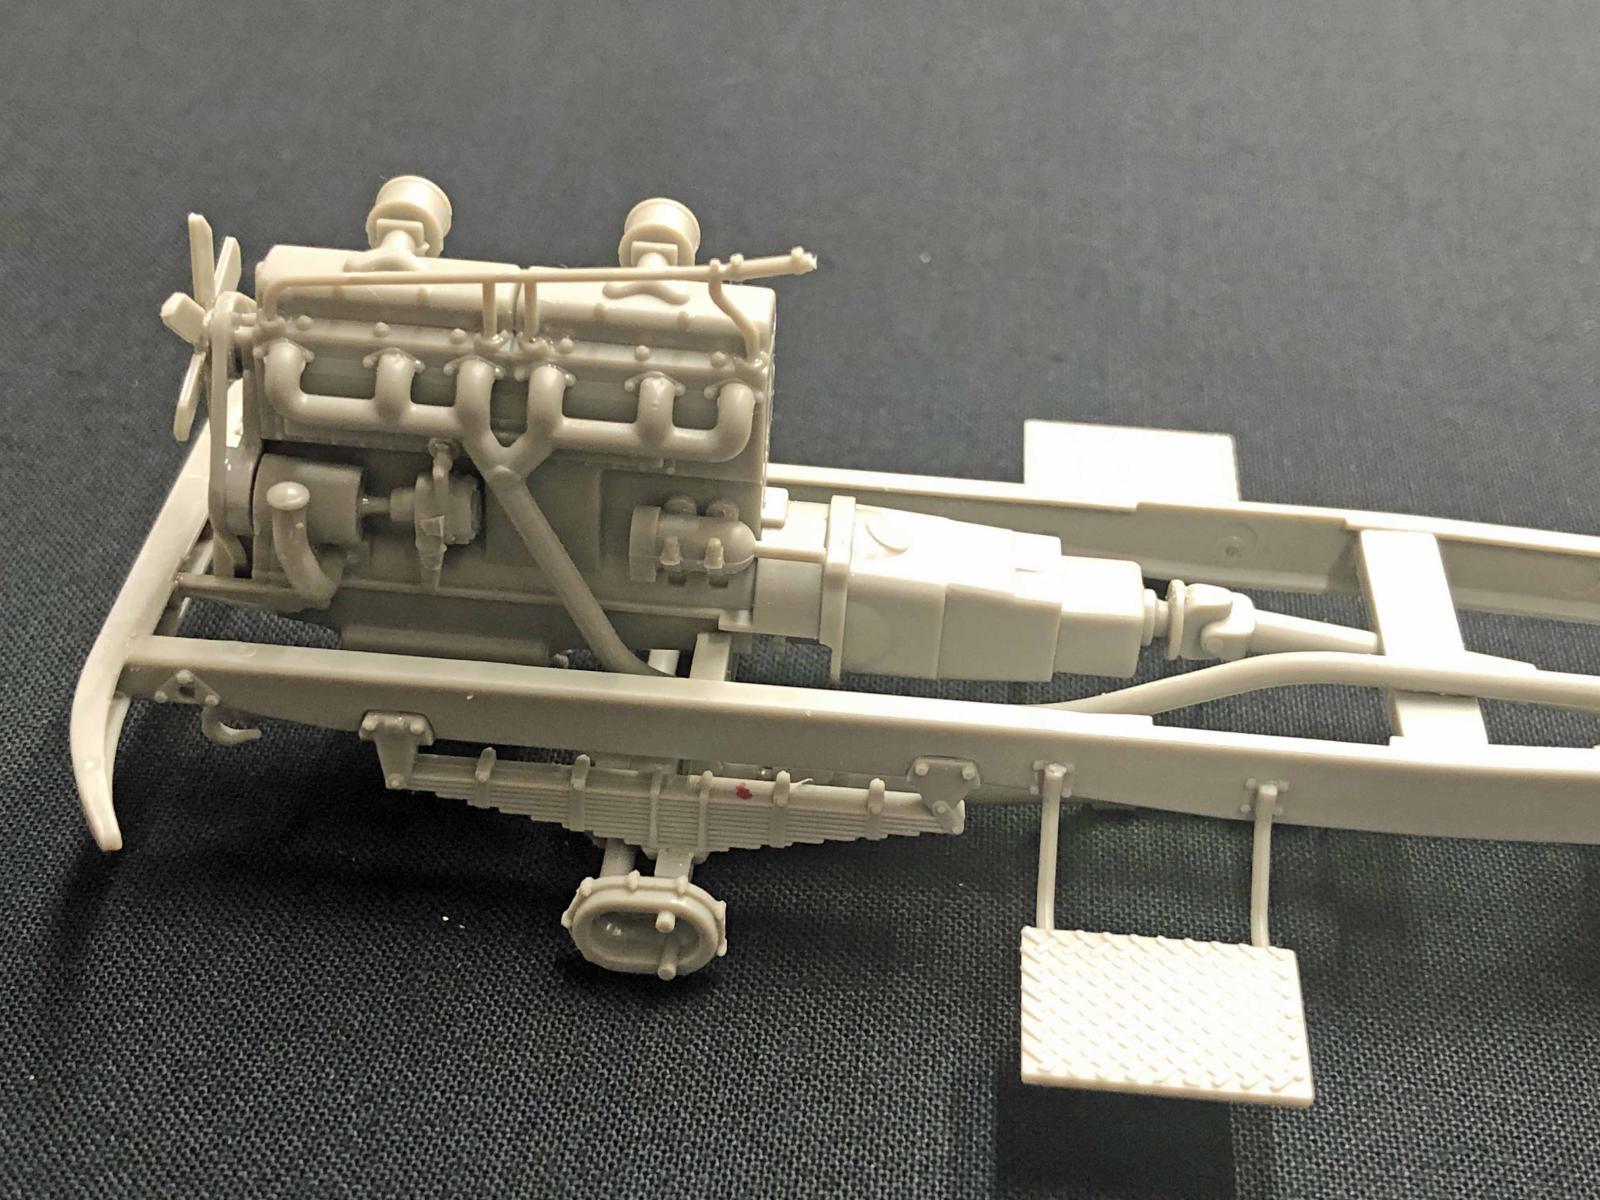
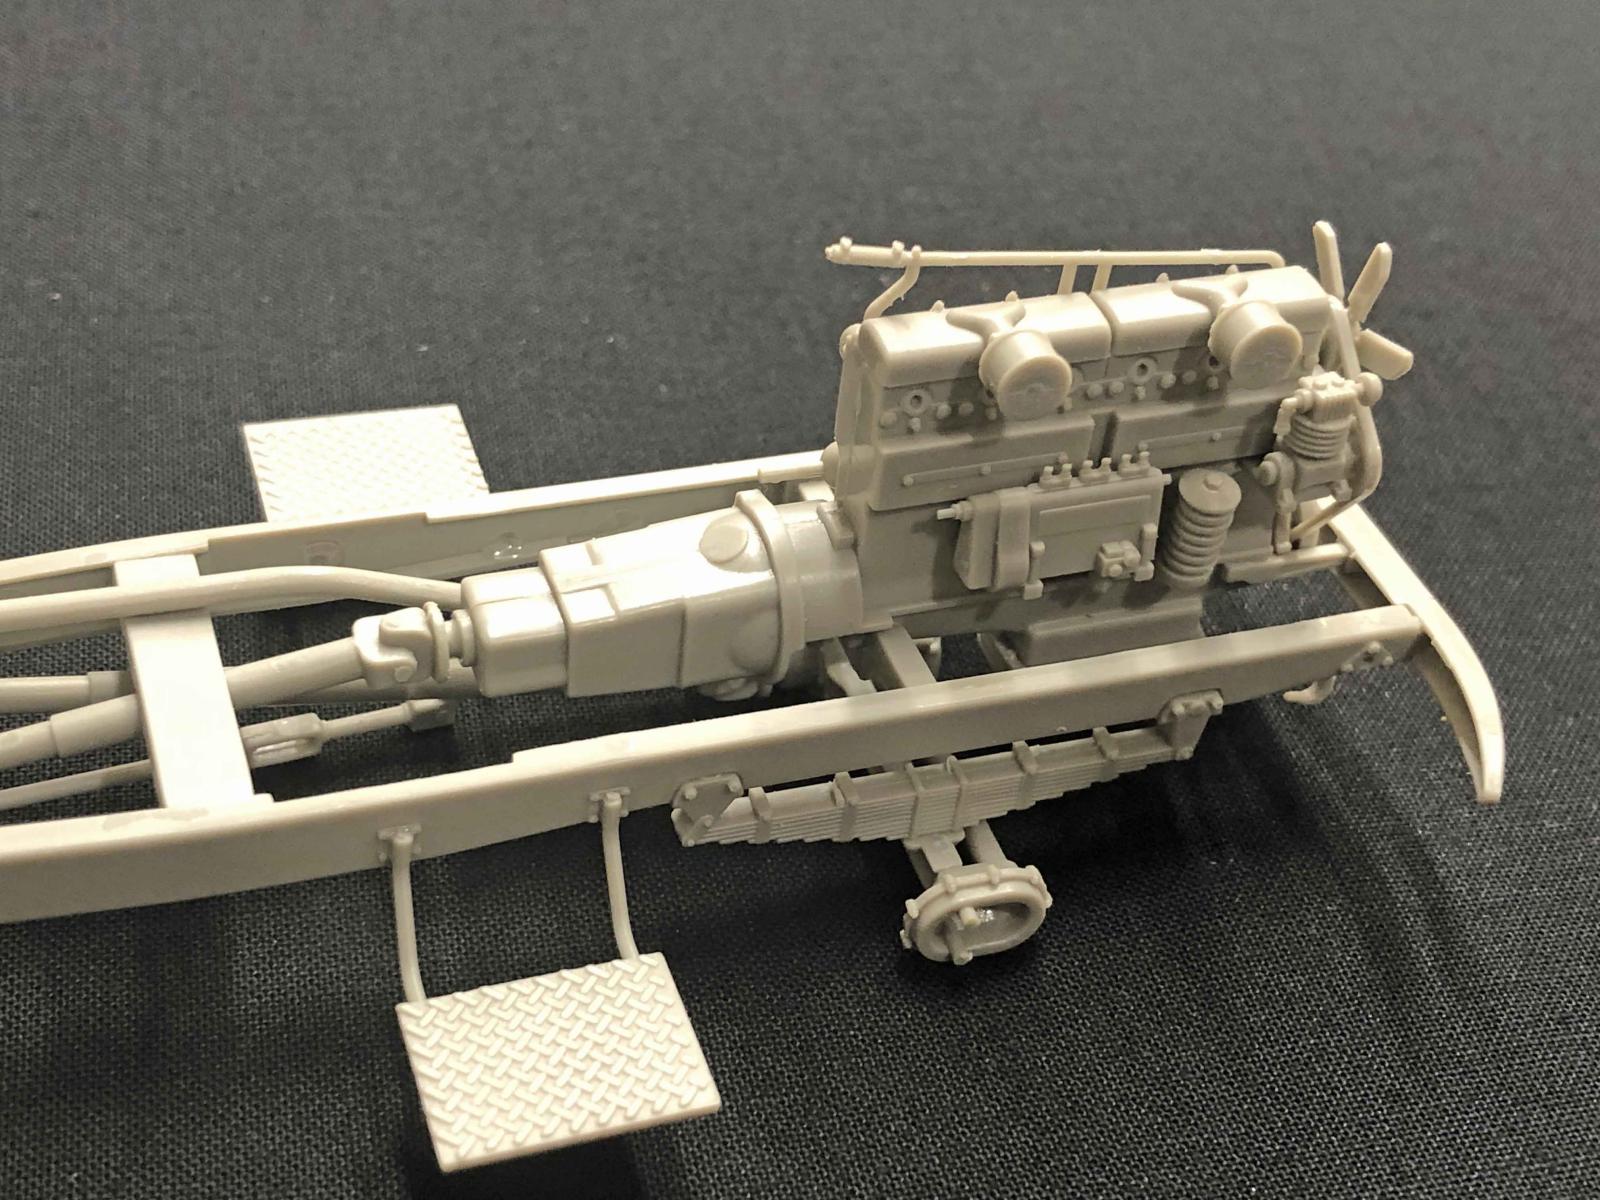
Engine Compartment and Hood
The engine detail is excellent and the parts fit well. Unfortunately, even though the narrow engine side-panel can be left open with a little scratch-building, the panels are way too thick and do not have any interior detail. The amount of work to remedy this was too much for a review build, so sadly I had to cover up that beautiful engine once I reached that part of the build, in Step 7.
Frame, Undercarriage, and Drivers Compartment
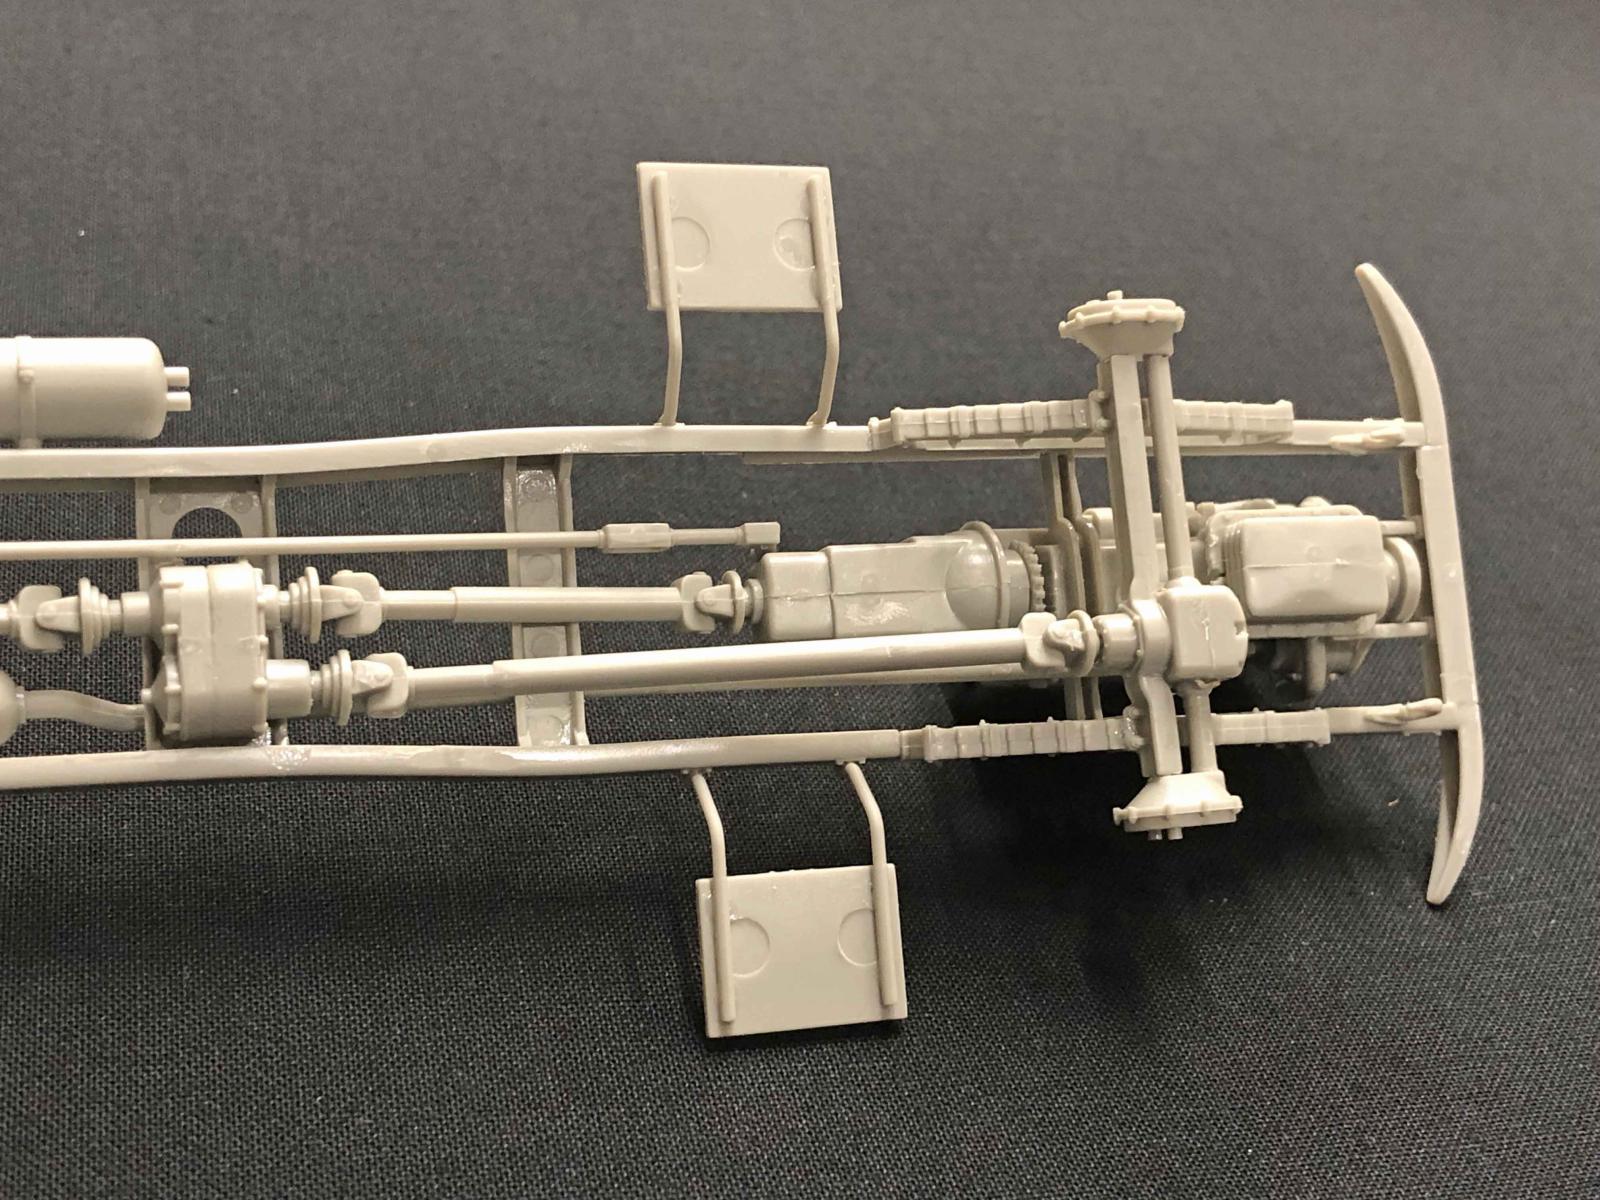
The undercarriage of Trumpeter’s L4500A consists of twin, single-frame members across which a myriad of items, including the engine, hold everything together. While this design can be fraught with problems, the engineering here is excellent – everything fits and produces a solid base for the rest of the build. I suggest that you clean all the parts for Steps 2 and 3 up front, and then assemble everything using glue that will give you time to adjust things as necessary, like the two long exhaust sections which wind their way above and below the various cross-members.
The leaf springs and axles only fit one way and come together quickly. While I added the photo-etch parts to each side, it can’t be seen on the completed truck without turning it upside done and looking for it.
The driver’s compartment is wide-open and totally accessible after assembly, so I was able to build it out completely (except for the ‘glass’ windshield) and paint the interior parts by hand after airbrushing the rest of the vehicle. While the steering wheel post (Part C14) probably attaches somewhere, I snipped off everything forward of the firewall once it was dry to ease assembly. The missing piece cannot be seen once the hood is in place. The hood, by the way, comes together easily and, along with the two fenders, fits surprisingly well to the cabin and frame.
Wheels
While the loose-fitting tires can be added at the end of assembly (even the rear ‘dualies’), the wheels themselves should be attached according to the instructions – they end up supporting everything that comes after, in place. While I would have preferred wheel/chassis connection points that were more solid, Trumpeter chose to allow the front axle to be freely moved. As a result, the bits that connect the wheels to the axles are fragile and, if they break (like mine did for one wheel, much later), it is a real chore to re-attach them (I first applied slow-drying glue to goose things into place, then gobs of thick super glue, then a big gob of epoxy, over three days, to get the job done.
The vinyl tires won’t take paint very well, but they will hold pigment, so attaching them at the end makes everything easier and less of a mess.
Note: When attaching the rims, make sure to set the model aside, weighted, so that everything sits evenly while it dries.
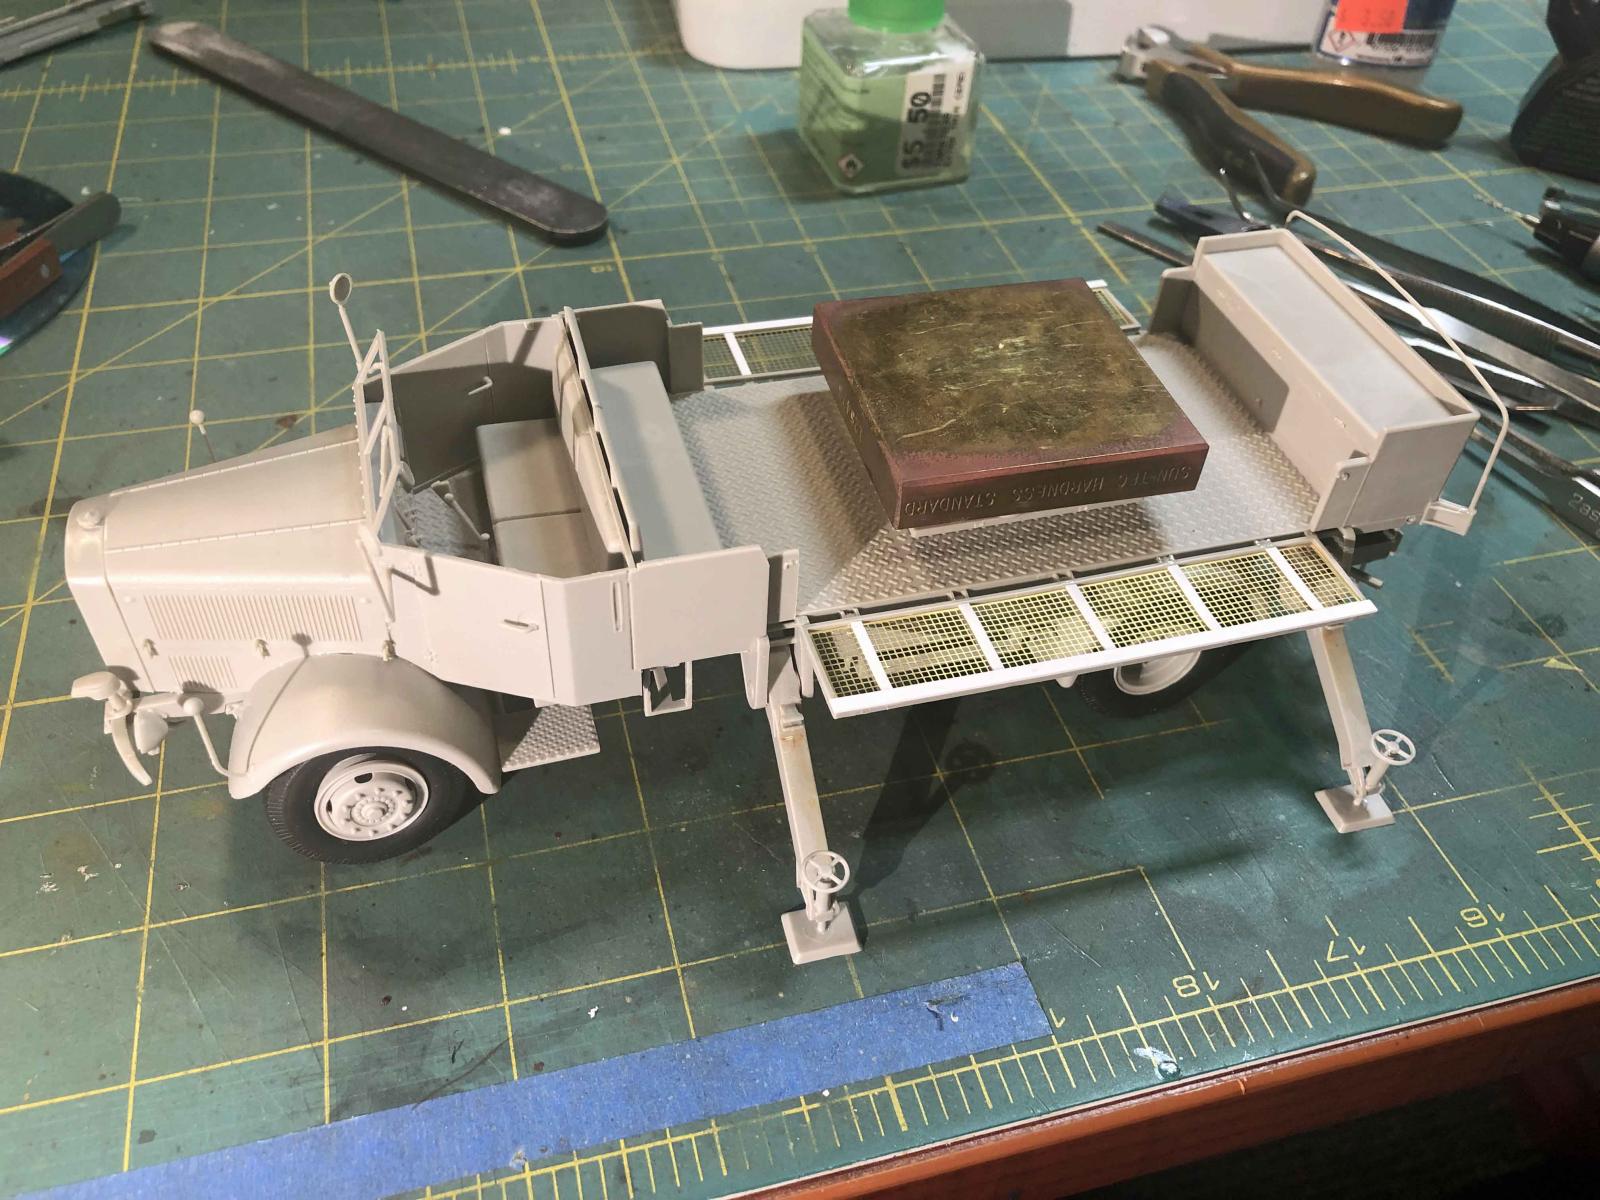
Truck Bed and Drop Panels
The sturdy, double-layer truck bed is nicely detailed with diamond-pattern surfaces on the top side. Note that there are several holes that must be opened up so that the spare tire and various storage boxes can be attached from below.
The two drop panels, one on each side if the truck, have five attachment points that slip between pairs of studs that are glued to the truck bed. Each stud has a hole that accepts tiny posts in the sides of the panel attachments. I guess you are supposed to align these posts with their respective holes while the glue dries on the studs on each side (see Step 16). Nope. It is much easier to glue the pairs of studs to the truck bed and let them cure overnight. Then remove the tiny posts on each of the panel attachment points so the entire panel can simply be pushed into place when the time comes.
The drop panels themselves are nicely detailed, but only on one side, as is the PE wire mesh that slips into each panel. Furthermore, the unfinished sides show several ejection pin marks (fortunately, these are the kind that stand proud of the surface and can be easily sanded flush).
Since the gun traverse (in combat mode) interferes with the panels when they are up (closed), I left both panels down and open, exposing the unfinished sides. Any thought of simply flipping the panels over to display the detail is a non-starter; their design causes this configuration to interfere with several parts of the truck bed and the panels end up (not) sitting horizontally. I ended up adding some detail to the unfinished sides using strips of Evergreen plastic. Not a perfect solution, but definitely an improvement.
The main gun turntable and various storage compartments fit very well on both upper and lower surfaces of the truck bed. The racks for the spare tire and dual water cans are nicely rendered – the cans themselves can be finished before inserting them into their racks – nice.
Steps 23-25 involve creating six separate wheel chocks that attach to the fenders. Something went sideways during assembly and I could not get a good fit with any of the 12 parts. I suggest that you go slow, and build/attach one block at a time - all parts are not the same.
The completed truck bed structure fits nicely down on to the chassis – bravo Trumpeter, for getting this part right when so many others come up short. I pushed the bed down onto its connection points and touched a few spots with glue. Done.
Stabilization Assemblies
The four, articulated stabilization arms can be assembled up/stored (for transport mode) or down/deployed (for combat mode). When deployed, the parts that extend to the ground swivel so that each of the four legs can form a firm base on both flat and uneven ground. Trumpeter gives the angle to which these extensions should be set at for a flat surface but, lacking a decent set of tools, I had to temporarily slip on four of the tires, attach the arms, glue everything, and then, when dry, slip the tires back off. Doing so allowed me to paint and weather the four arms along with the rest of the truck body.
Gun Assembly
The last four pages of instructions are dedicated to bringing the main gun assembly together. Since the 12 rounds of 50mm ammunition lay across a tray that fits (under) the main barrel section, I assembled and painted those two items separately from everything else. At the bottom of Page 17 there are two fiddly assembles (labeled <<R-R>> and <<L-L>>) that have to be specifically shaped to fit into where they go on each side of the gun. Thankfully, Trumpeter provides a scale image of each assembly as a go-by, which works perfectly – nice. While there are a lot of small parts over the next few steps, everything fit as expected – going slowly here will pay off.
The main gun shield is a single piece of very thin plastic to which other parts, including two photo-etch support ‘blades’ are attached. The choice to make the shield out of plastic here is the right one – things stay in place during assembly, and attaching the shields to the main gun housing is a breeze. Even two additional PE plates (A3 and A4) are firmly set into place without any fuss. Trumpeter should be commended here for some fine design and engineering.
The only hiccup (for me) were the two ribbons of PE that are coiled and glued in place on top of what looks like a range-finder (Part TA-19). While I am sure it is accurate, and the coiled PE is probably the right medium for it, I thought it looked ‘wrong’, and distracts from the rest of the model. I left the two coils off.
As a last detail, I added several crates and such from my spare parts box.
And that’s it! Once the gun assembly is dropped into place in the last step, the L4500 is ready for paint.
Painting, Decals and Finish
I decided to paint my L4500A using a standard German Yellow scheme, with a disruptive ‘squiggle’ pattern to liven things up a little. I used paint and finishes from a variety of manufacturers, listed below.
Before painting, I made a sticky board for the separate ammunition rounds, the spare wheel and Jerry Cans. I also painted the main weapon separately since it would be placed over the ammunition rack. I left the 7 nylon tires off so they could be treated with pigment separately before carefully pushing them on after assembly. I treated the tires by dropping them into a plastic baggie holding ‘a few shakes’ of Mig pigments (European Dust, Dark Mud and Dry Mud). After giving the bag a good shake, I put on a pair of surgical gloves and brushed off the excess pigment into a capture tray using a short-haired paint brush. The latex-free gloves allowed me to rub a nice dull sheen into the sides of the tires (and keep the mess to a minimum).
- Primer: Alclad II ALC302 Gray Primer & Microfiller (Lacquer) – Overall
- Pre-shade: Alclad II ALC309 Black Primer & Microfiller (Lacquer) – Panel lines and recesses only.
- Camouflage: Heavily thinned Tamiya XF-60 Dark Yellow – Overall
- Protective Chipping Coats – Alclad II Klear Kote Gloss followed by rattlecan hairspray.
- Post-Shade: Heavily thinned 1:2 Mix XF-60 Dark Yellow and XF-1 Flat White – open areas only. I stumped this with a brush and water.
- Camouflage: Heavily thinned Tamiya XF-22 RLM Grey ‘squiggle’ pattern.
- Filters: Old Holland Warm Sepia (Oil) mixed with Mona Lisa Thinner (overall)
Weathering (glossy surface)
Mr. Hobby Mr. Weathering Color Enamels - Stain Brown – all surface detail, stumped with Mr. Hobby thinner.
Pin Wash using Mig Dark Wash heavily thinned with Mona Lisa
Weathering (flat surface)
Overall ‘bling’ using Uschi Chrome Powder.
Overall application of dry pigments to areas that needed a little toning, using MIG Russian Earth to darken areas, and European Dust as a mid-level dirt-color dusting.
The decals went on without any issues using red and blue MicroSol/MicroSet products. I added the two German Balkenkreuze decals from my spares box – images online do not show these but I thought the truck looked sparse without them.
Conclusion
Trumpeter should be commended for designing this rather complex vehicle in such a way as to allow some of the trickier parts (gun assembly, glass panels, tires, water cans, steering wheel, and ammunition) to be added after the rest of the vehicle is assembled and painted – there is no need to mask anything.
One nit to pick; in Step 27 there are no less than eight parts that must be teased into place in 3 dimensions until they are dry. I would have preferred connection points that were engineered in such a way as to have these parts ‘chunk’ solidly into place.
Near the end of assembly, once the four stabilizing arms are in place, handling the model is something akin to handling a porcupine. There are a lot of delicate parts to break off. For that reason, and for the preponderance of very small parts, I would recommend this for modelers that have experience with kits of this complexity. Problem-solving is also a helpful skill to have.
This is an unusual vehicle and will no doubt attract a lot of attention on showroom tables.
I would like to thank Trumpeter and Stevens International for providing this kit for review, and to IPMS USA for giving me the opportunity to build it.


Reviewer Bio
Eric Christianson

Eric Christianson is a father to two boys (Reed and Dean), the President of the Seattle Chapter of IPMS, and a long-time Little League umpire. He is also a devoted husband and companion to a wonderful woman named Jackie who enthusiastically supports his passions. Recently retired as a programmer, his home office has been scratch-built into ‘a perfect model room’. Modeling since he was a boy, Eric mostly builds armor these days, but still dabbles in 1/32nd aircraft and other types of models from time to time. He also enjoys presenting seminars on weathering and technique at local shows. Many of Eric’s kit reviews can be found on the IPMS USA website.
Comments
This kit
Thanks for the build review , I'm thinking about getting the flak 38 version . Very helpful. M
Add new comment
This site is protected by reCAPTCHA and the Google Privacy Policy and Terms of Service apply.
Similar Reviews